Search the Community
Showing results for tags 'esxi'.
-
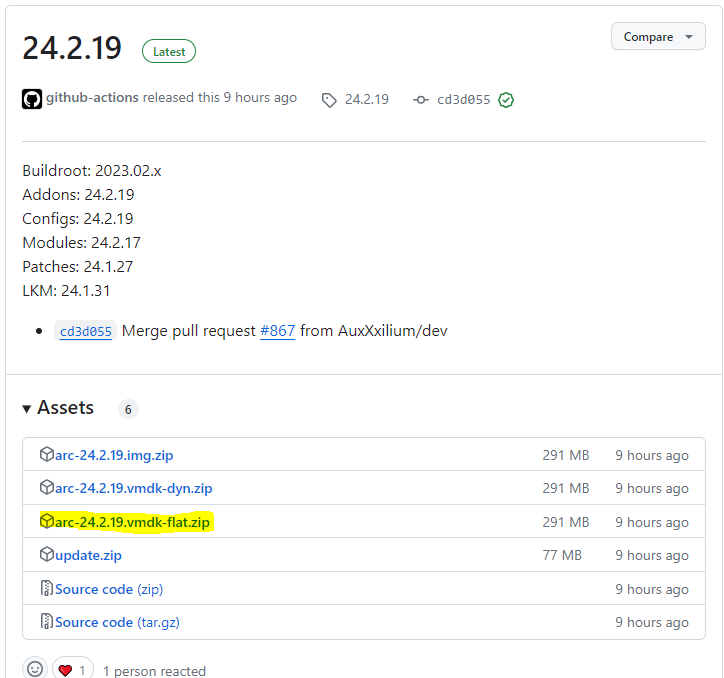
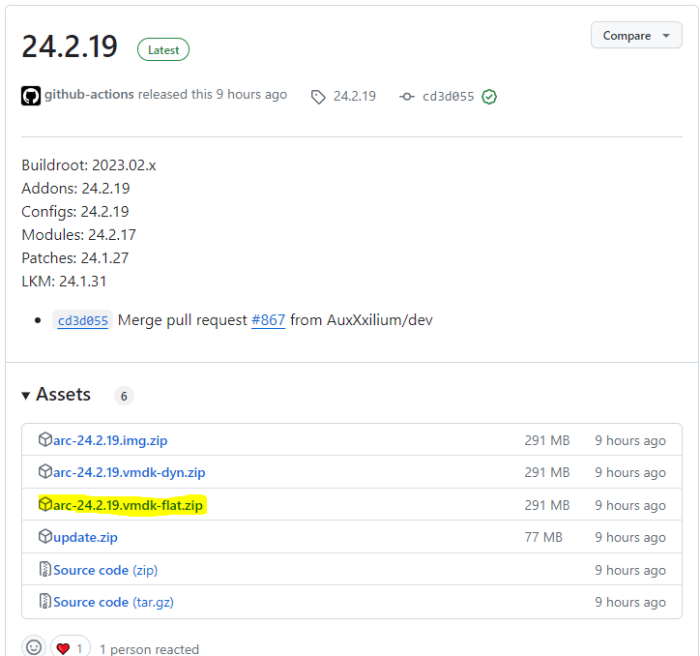
[EDIT du 20/02/2024] : Prise en compte retour sur le fichier flat et mode UEFI [EDIT du 01/12/203] : Mise à jour pour loader ARC [EDIT du 01/10/203] : Mise à jour pour DSM 7.2.1 [EDIT du 22/04/2020] : Mise à jour pour DSM 6.2.3-25426 [EDIT du 26/05/2020] : Ajout procédure de changement d'adresse mac et SN Je mets à jour ce tuto avec le loader ARC réputé beaucoup plus simple et plus réactif en terme de développement. Pour simplifier les captures d'écran je vais vous les présenter à l'aide de VMWare Workstation Player, mais la procédure est équivalente pour ESXi. 1. Pour commencer, télécharger le loader ARC fichier nommé arc-YY.MM.DD.vmdk-flat.zip et décompresser le zip pour extraire les 2 fichiers arc-*.vmdk dans le futur répertoire de la VM : 2. Dans VMWare, créer une VM de type Linux Version : Other Linux 4.x kernel 64-bit avec comme disque dur SATA le fichier arc-flat.vmdk fraichement créé au port SATA 0:0. ==>Pensez à supprimer les trucs qui ne servent à rien comme la carte son, l'imprimante et le lecteur DVD. 3. Une fois la VM créée, éditer la directement en ajoutant autant de disques SATA pour les données qu'on souhaite, au(x) port(s) SATA 0:1(n+1). 4. Seulement pour ESXi (ie. pas VMWare Player) : Se rendre dans les options VM et décocher "Activer le démarrage sécurisé UEFI" dans les options de démarrage. 5. Démarrer la VM. Elle devrait lancer le loader automatiquement. 6. Suivre la configuration classique du loader ARC pour builder le loader (même pas besoin de saisir d'adresse mac et de SN si vous n'avez pas besoin des services Syno) comme indiqué dans le tuto principal à partir du point 3. 7. Une fois DSM installé et configuré, vous pouvez télécharger ici les outils VMWare et les installer directement depuis le gestionnaire de paquets. Cela vous offrira une meilleure prise en charge de l'arrêt et du démarrage de la VM depuis ESXi.
-
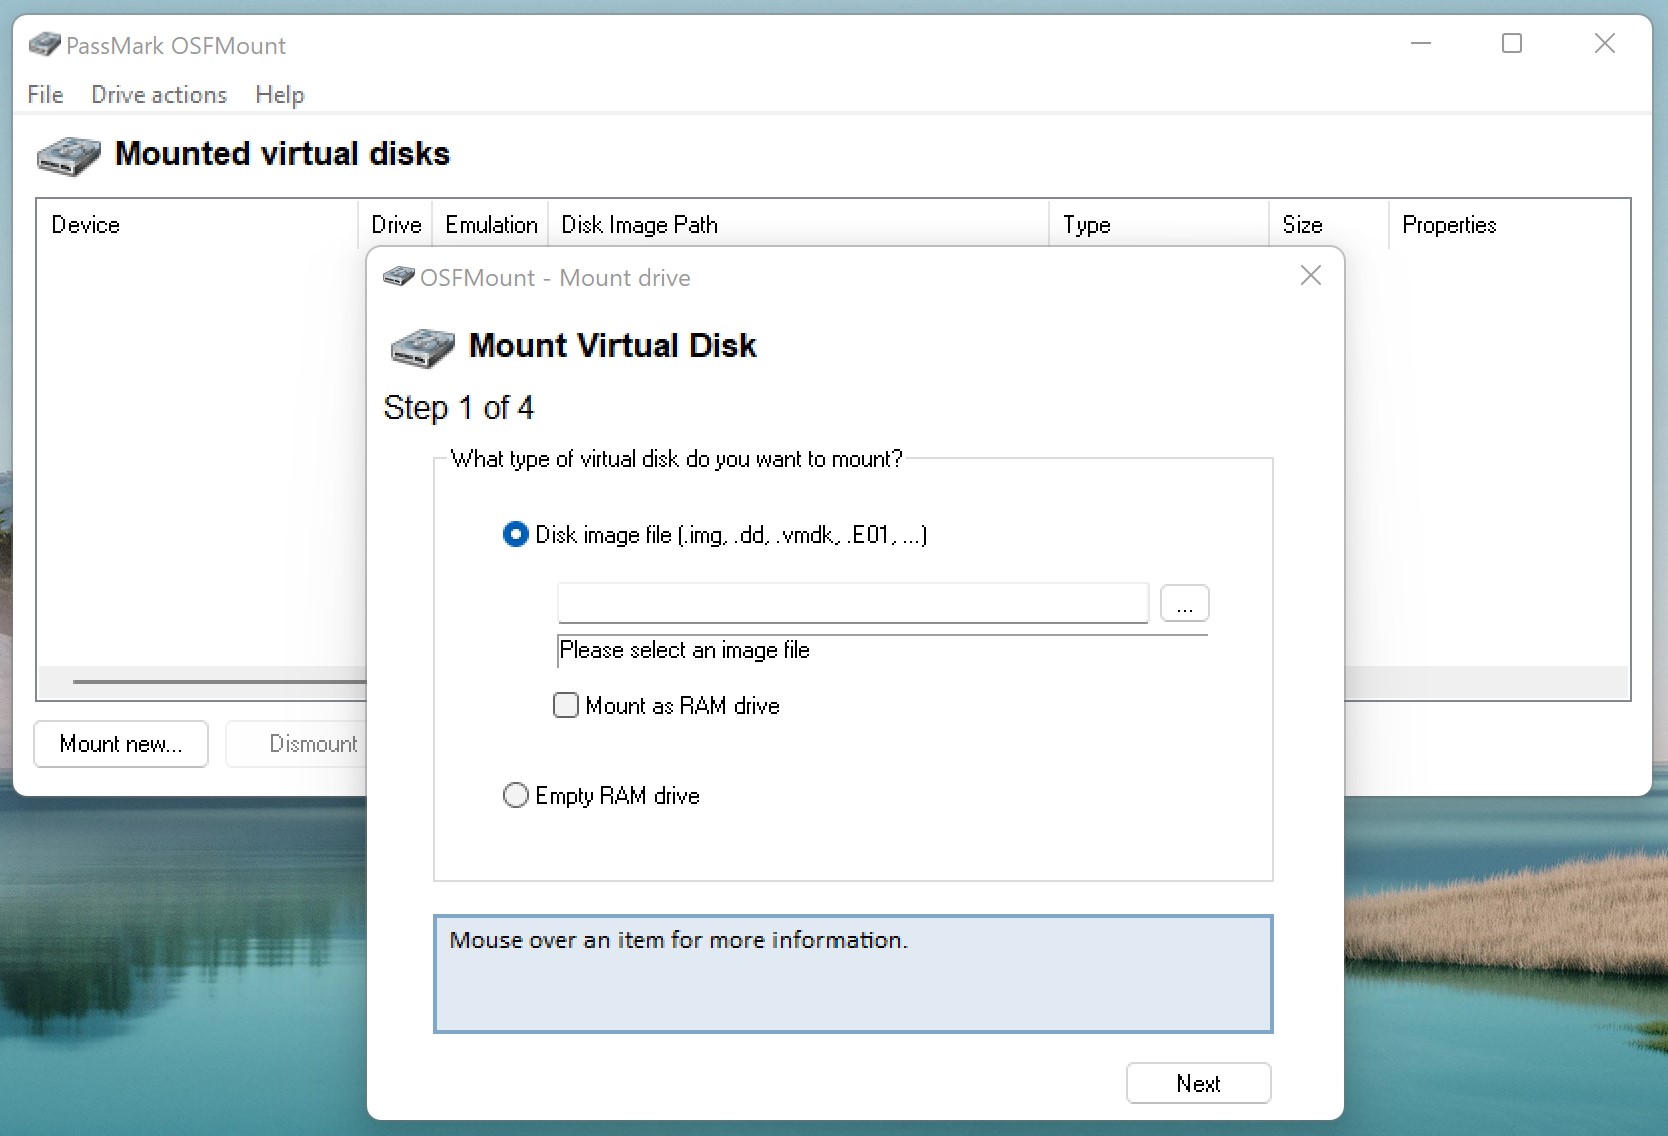
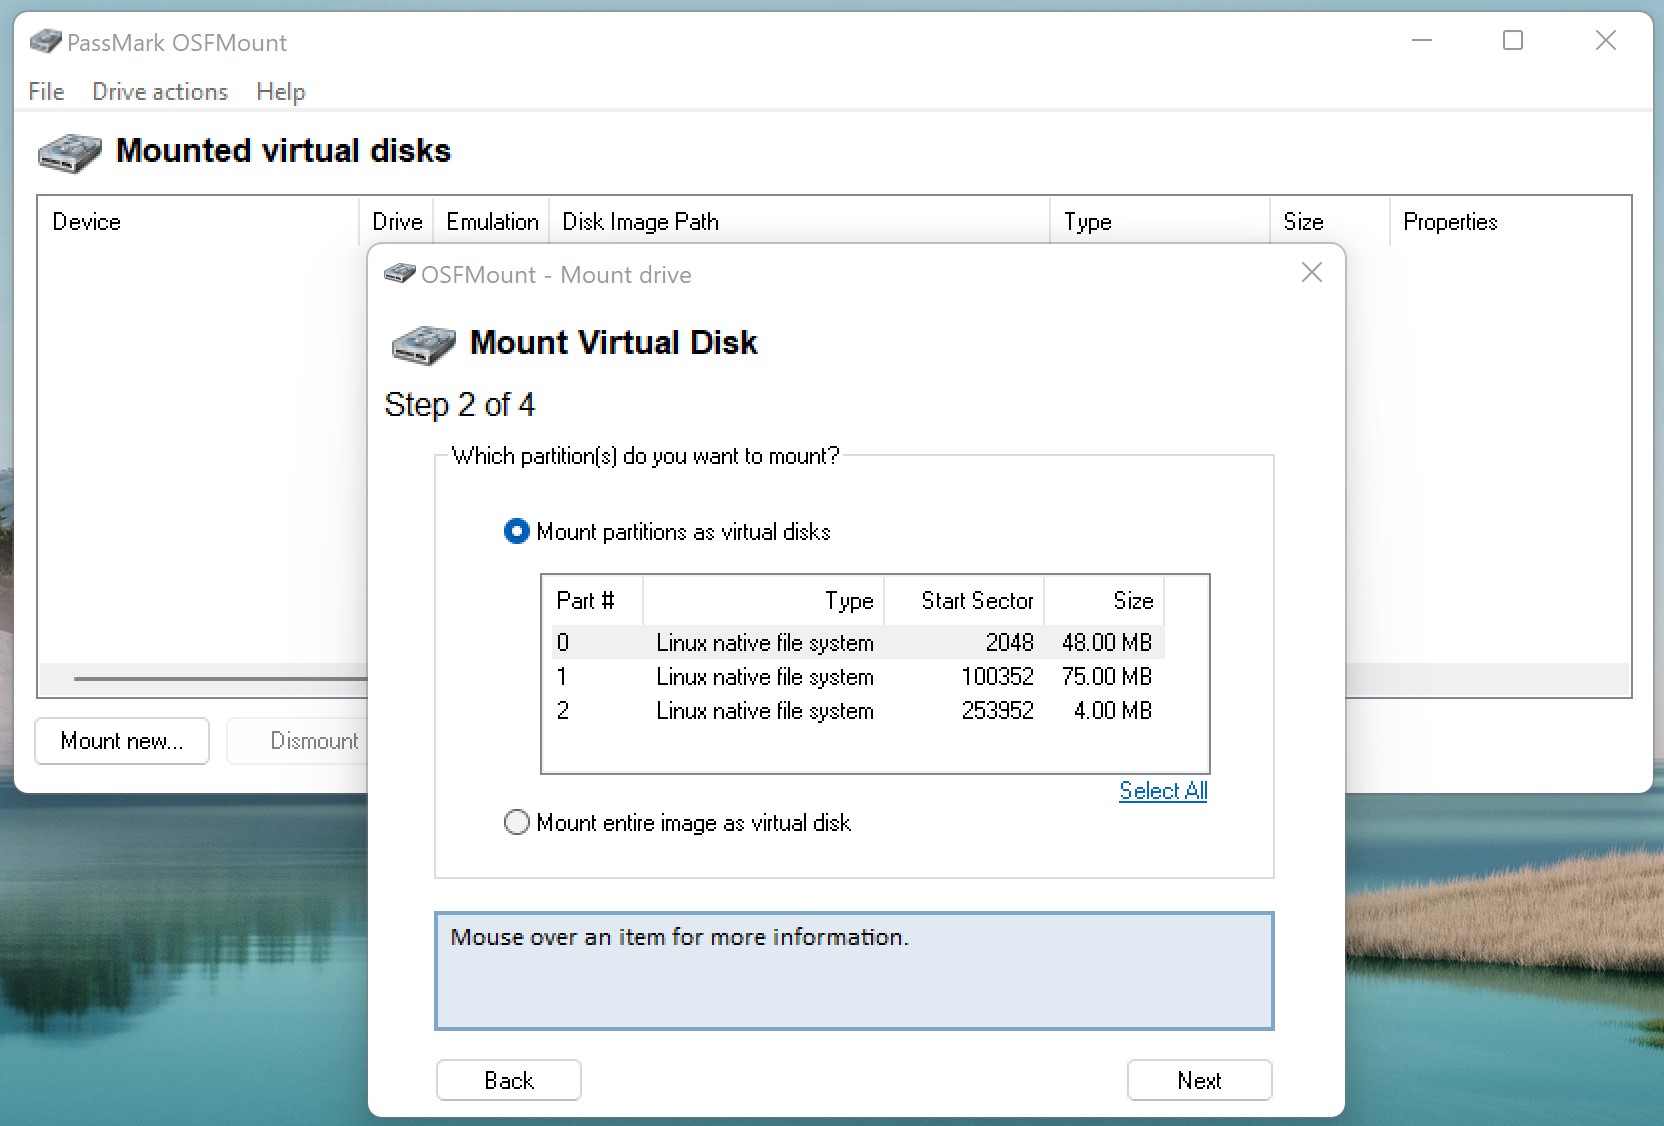
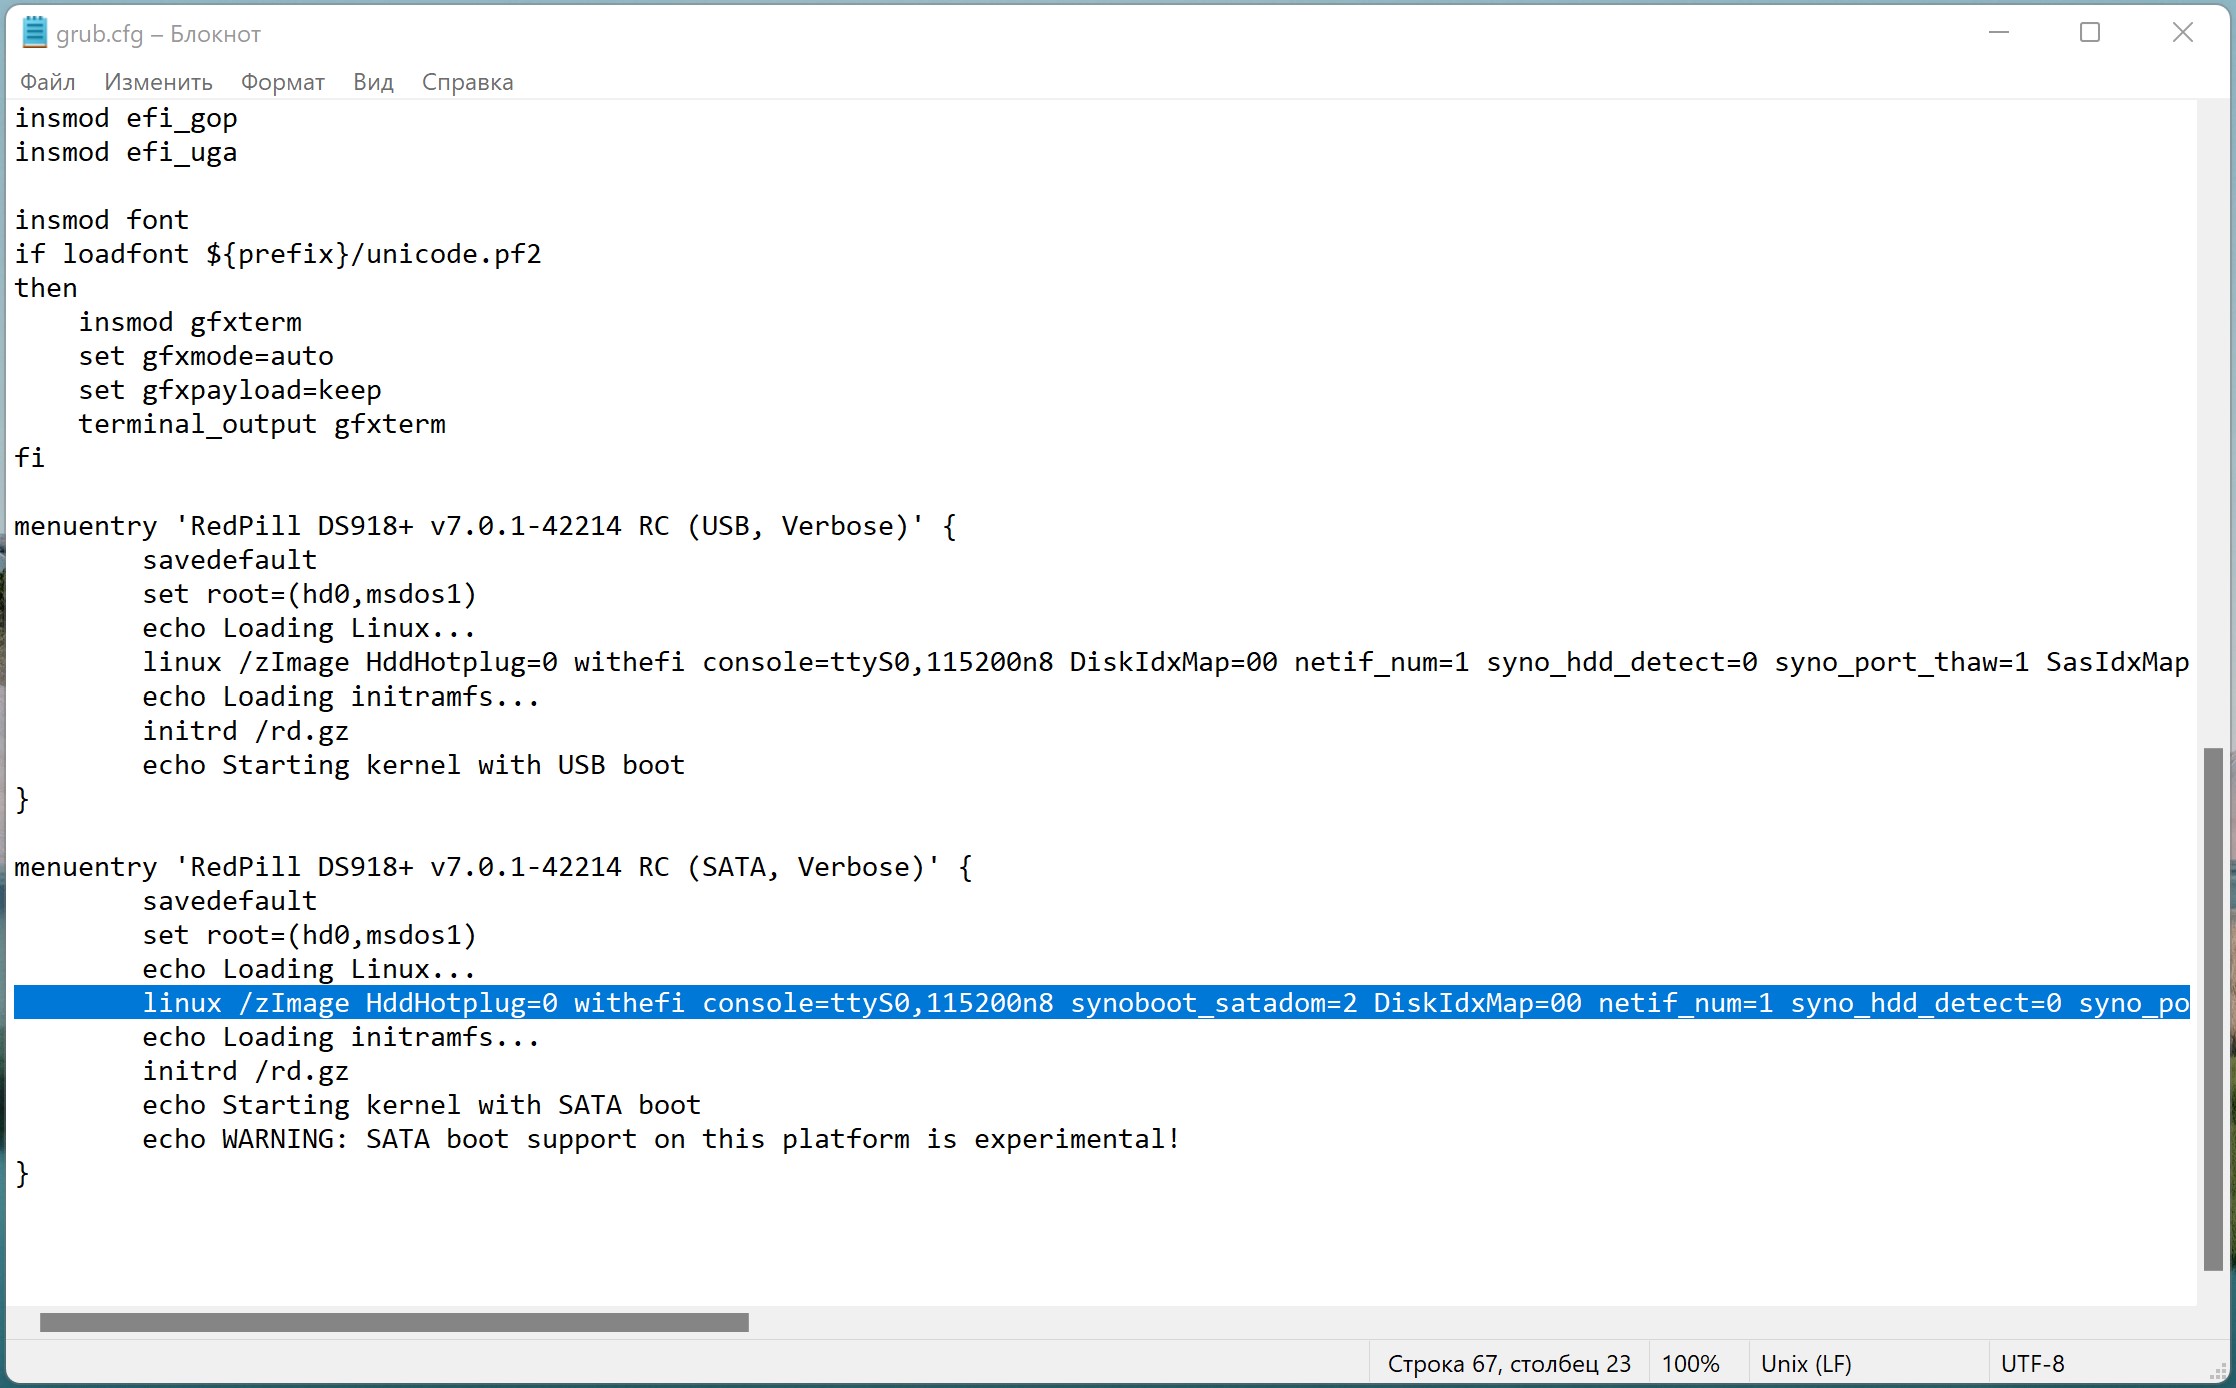
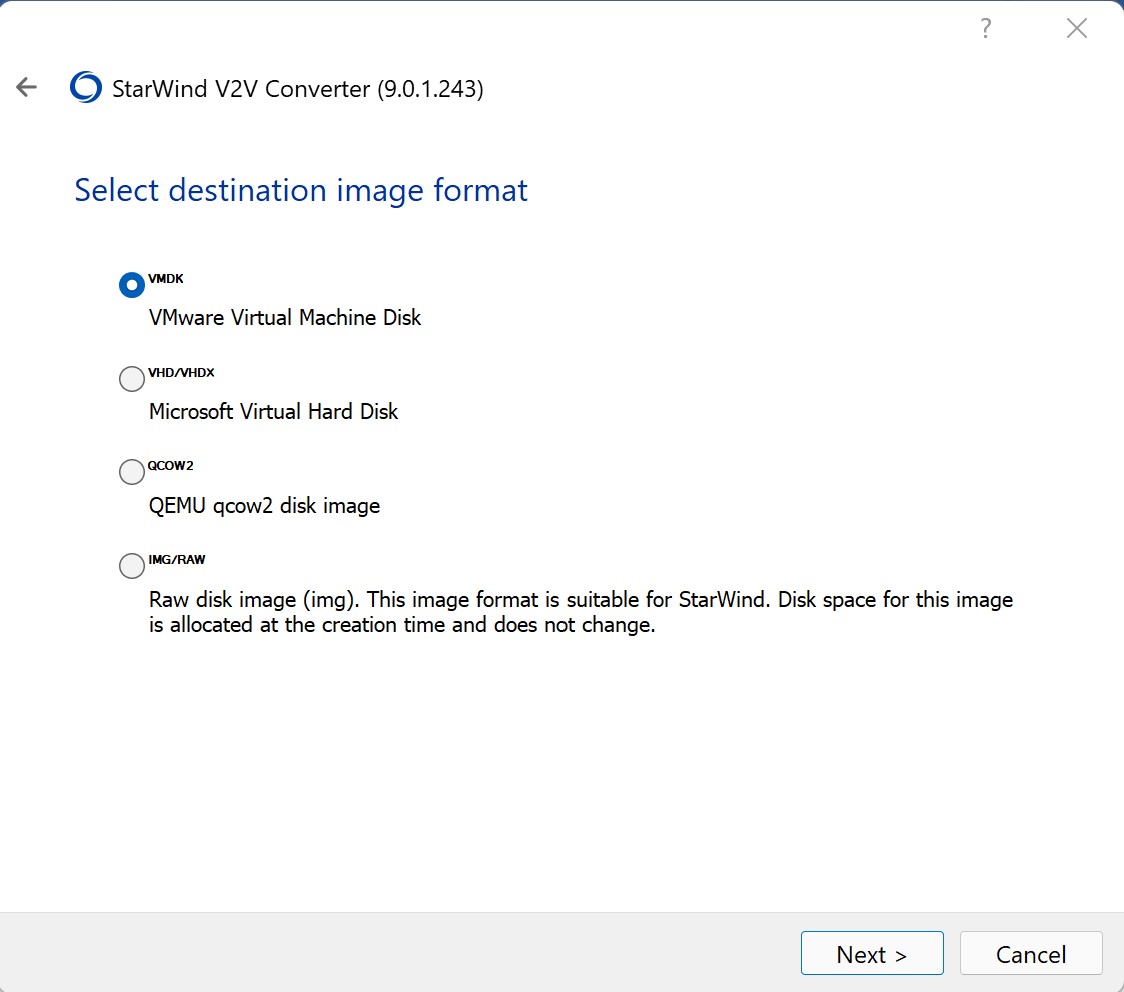
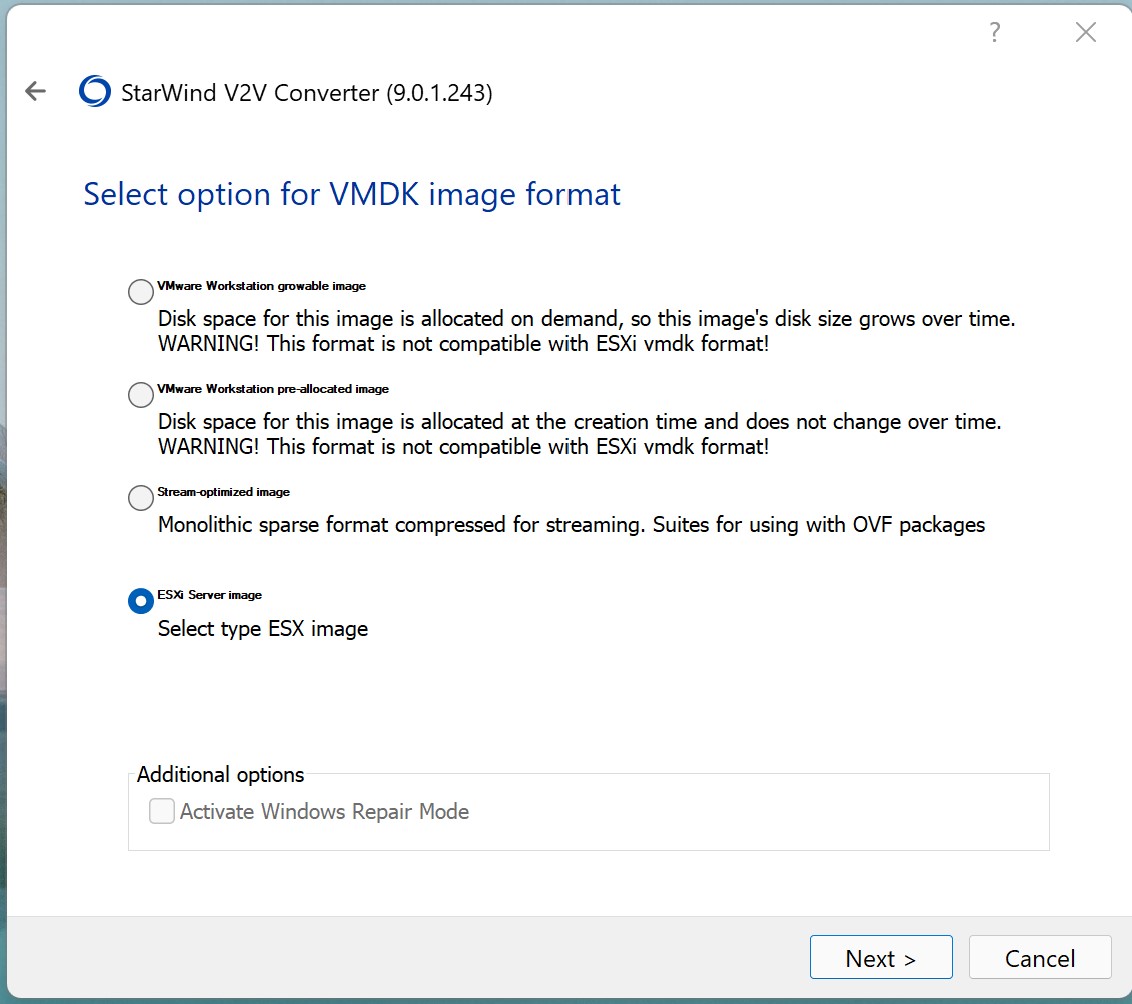
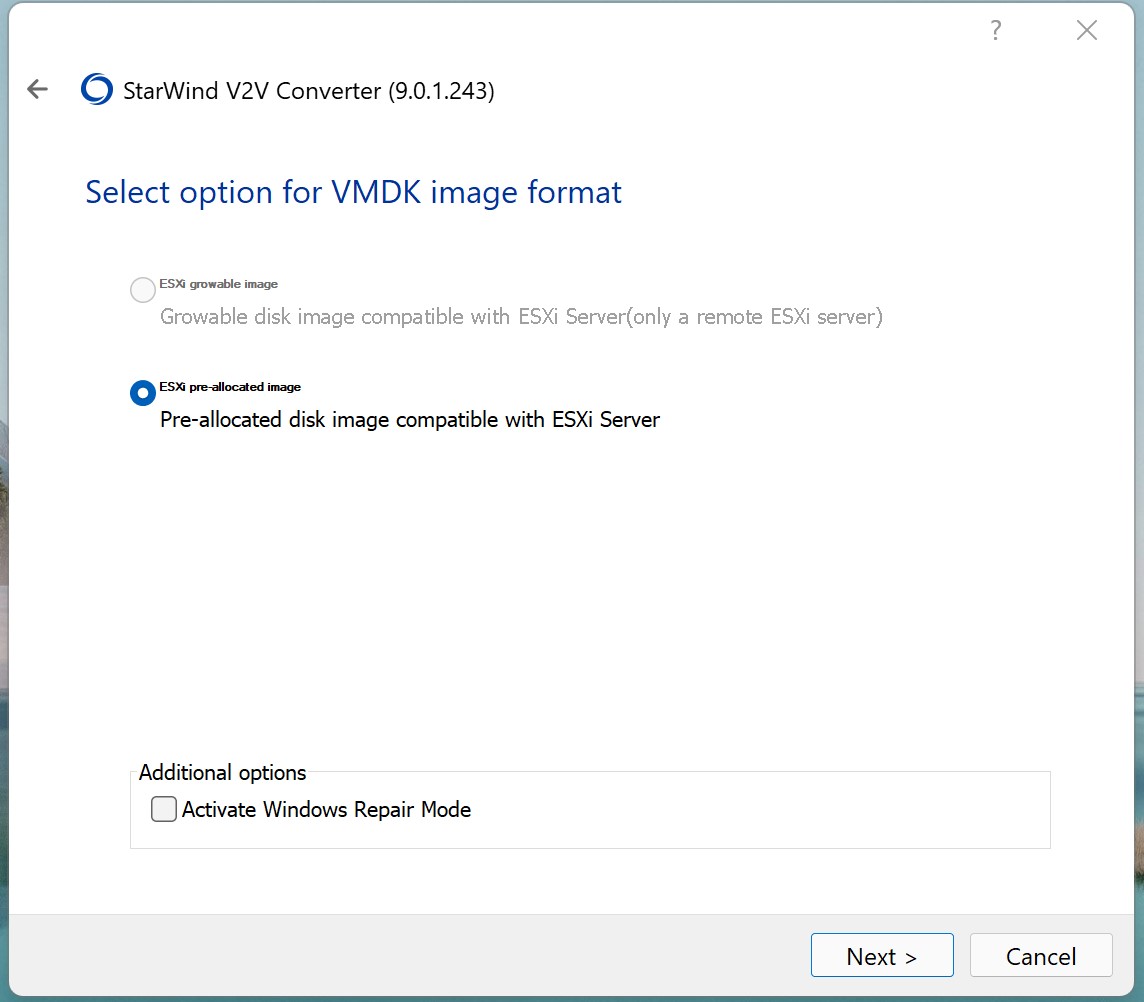
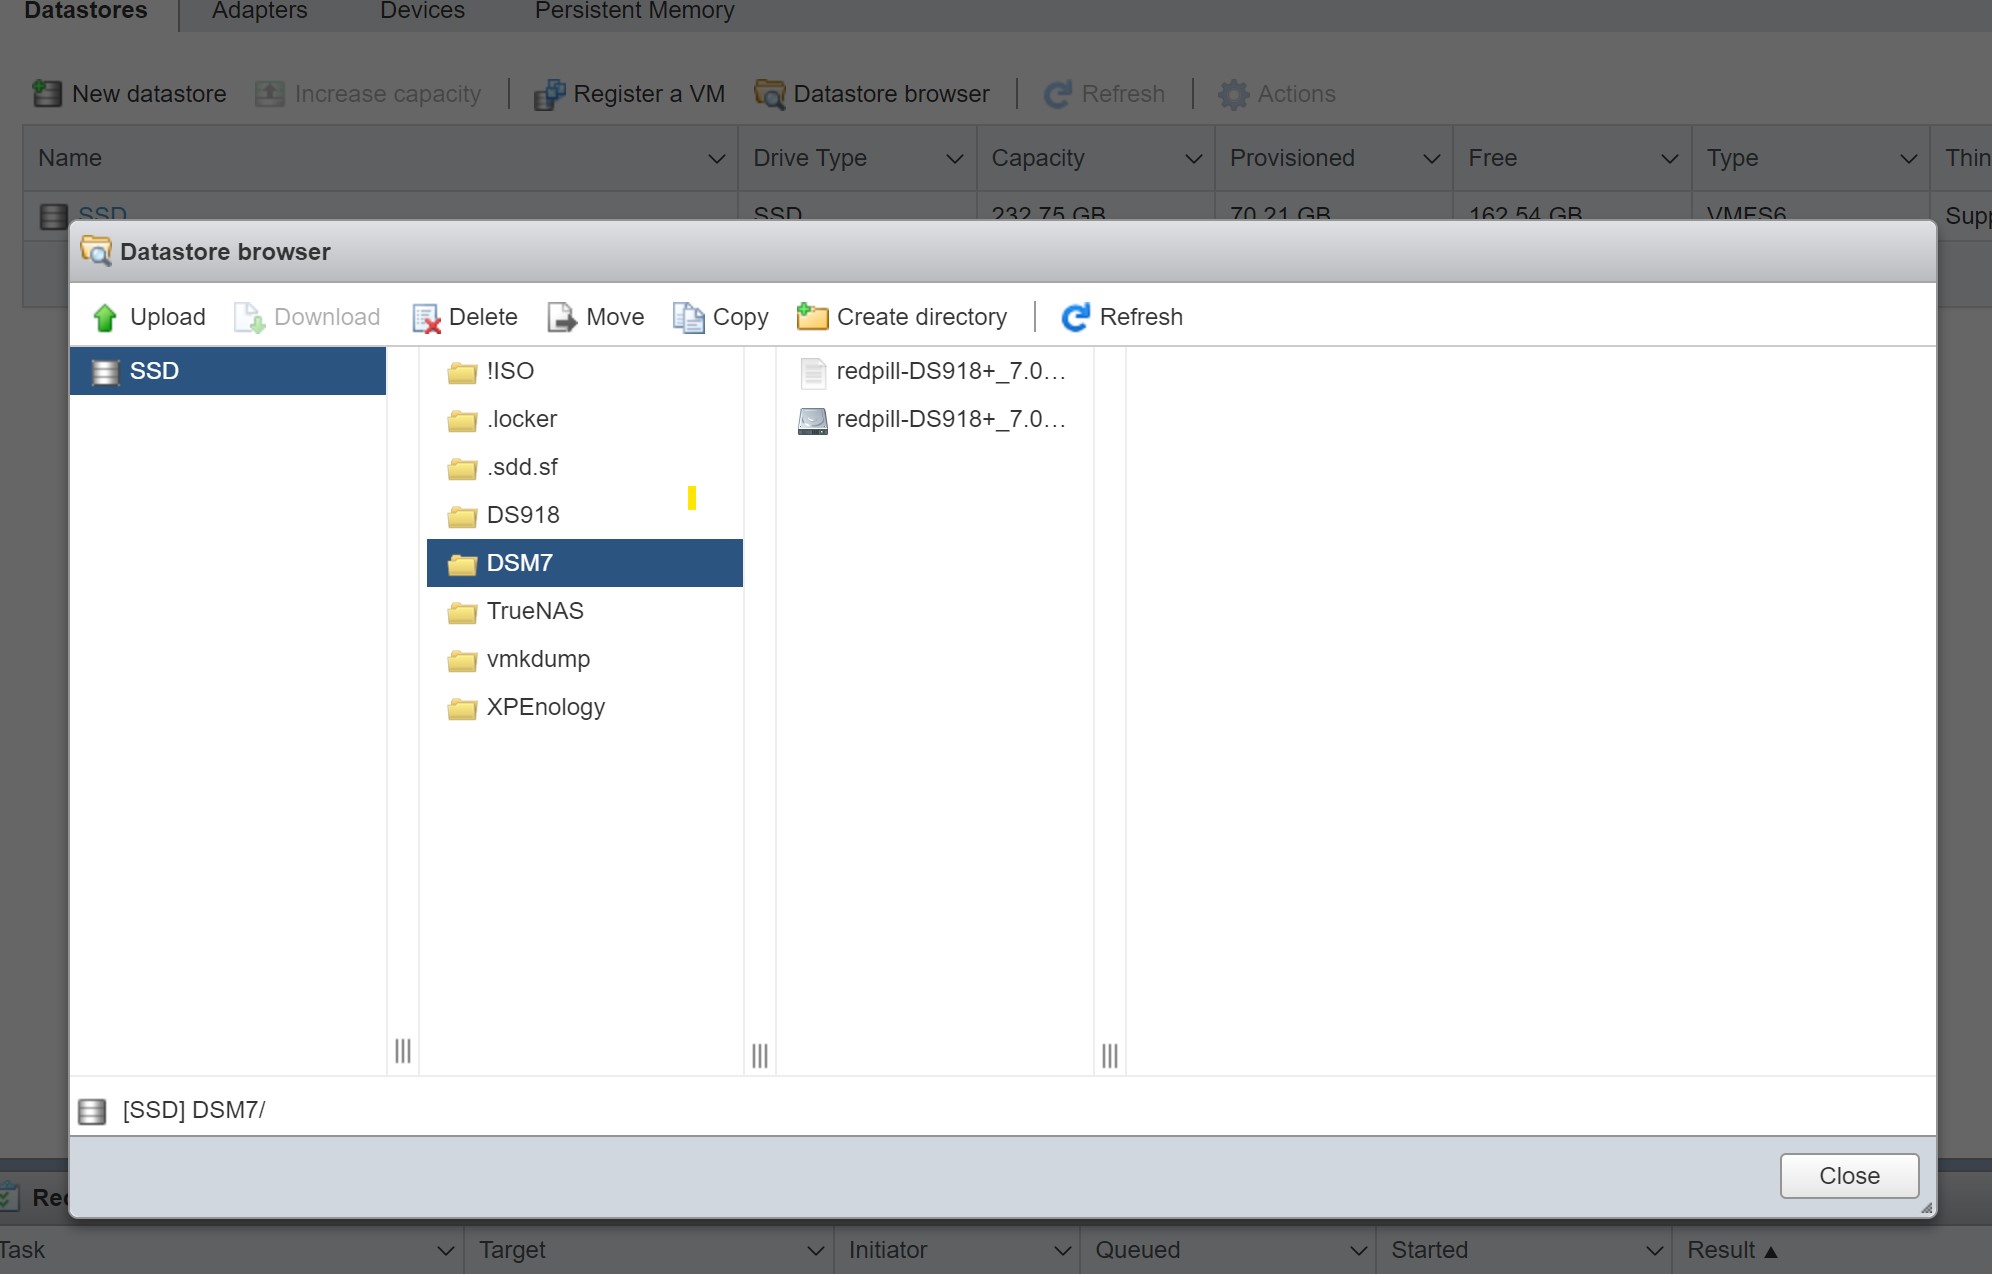
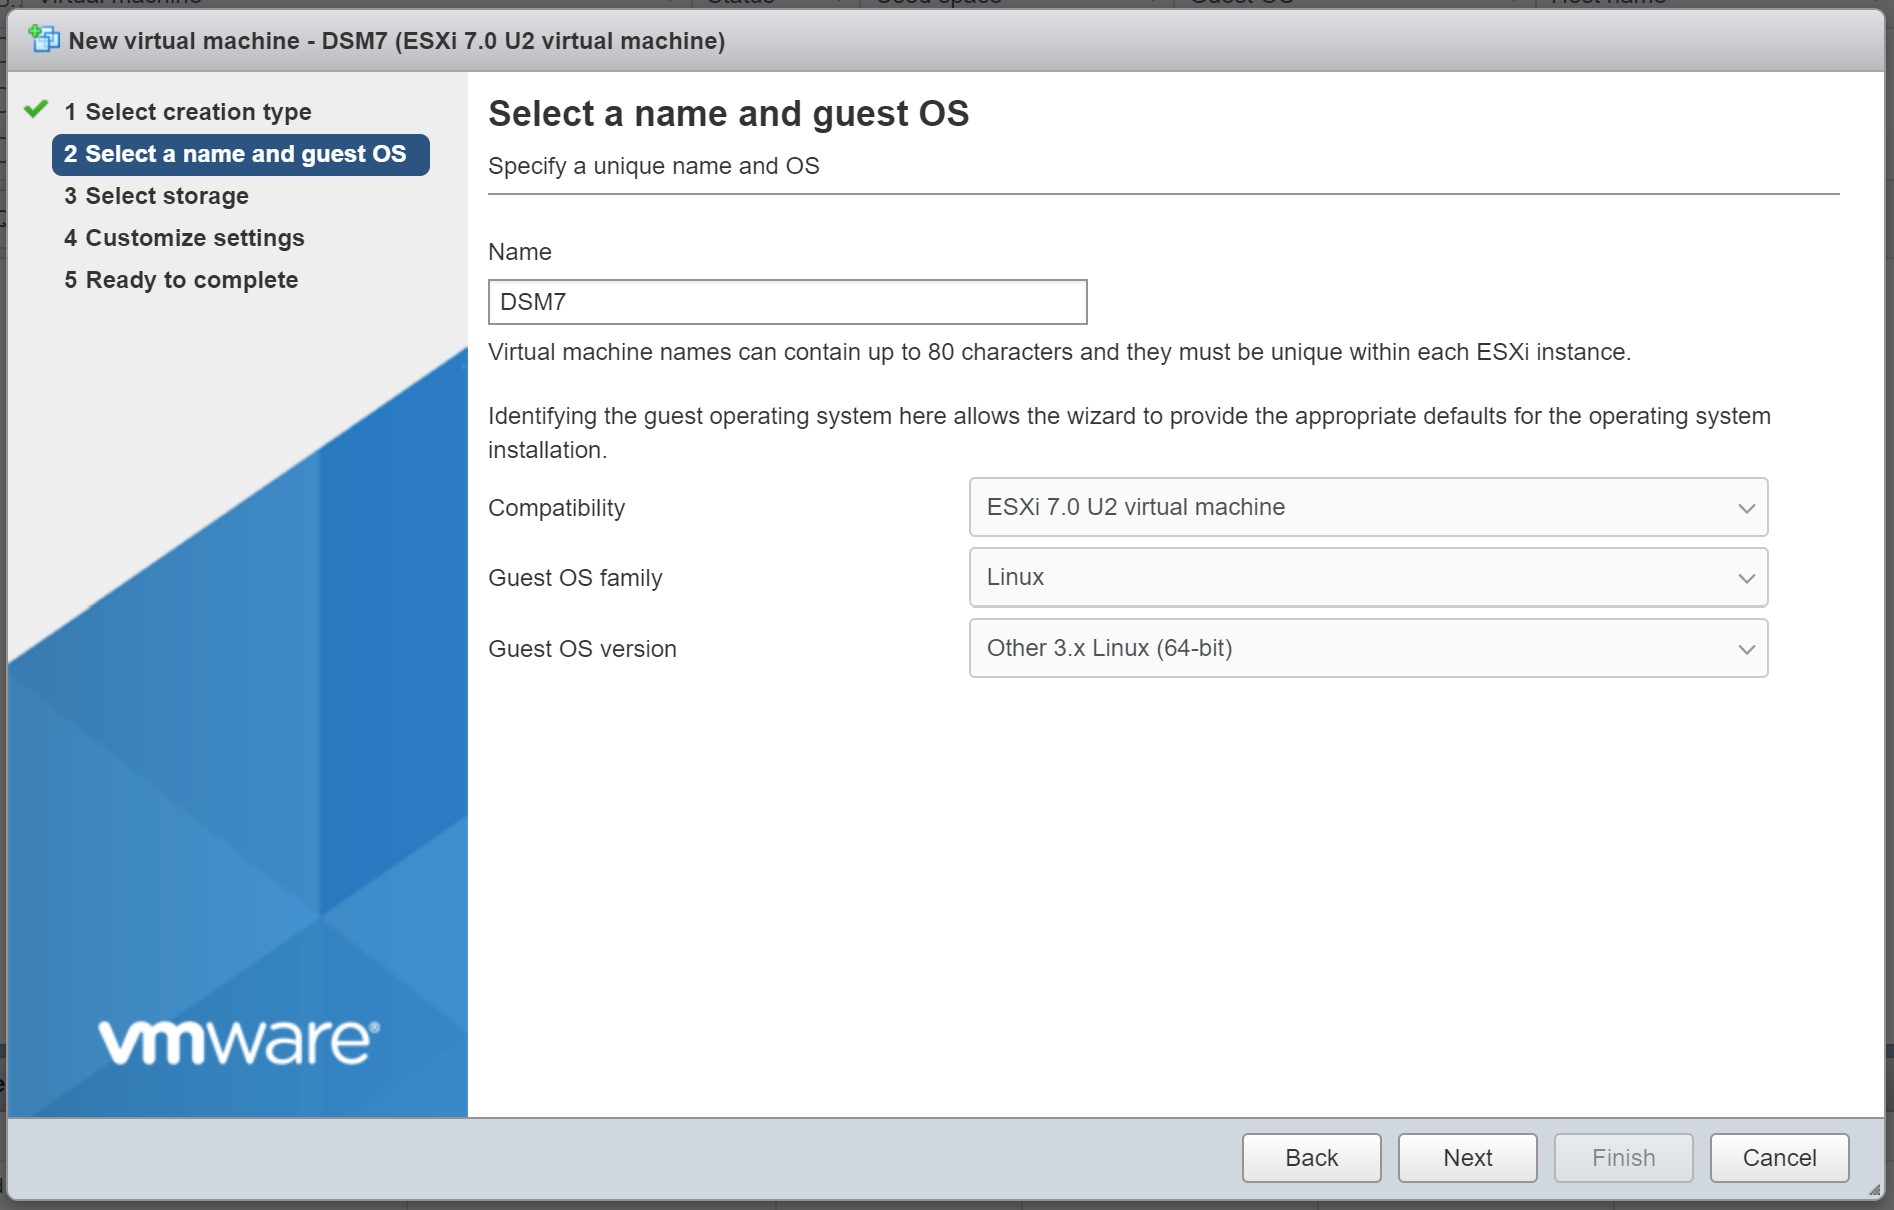
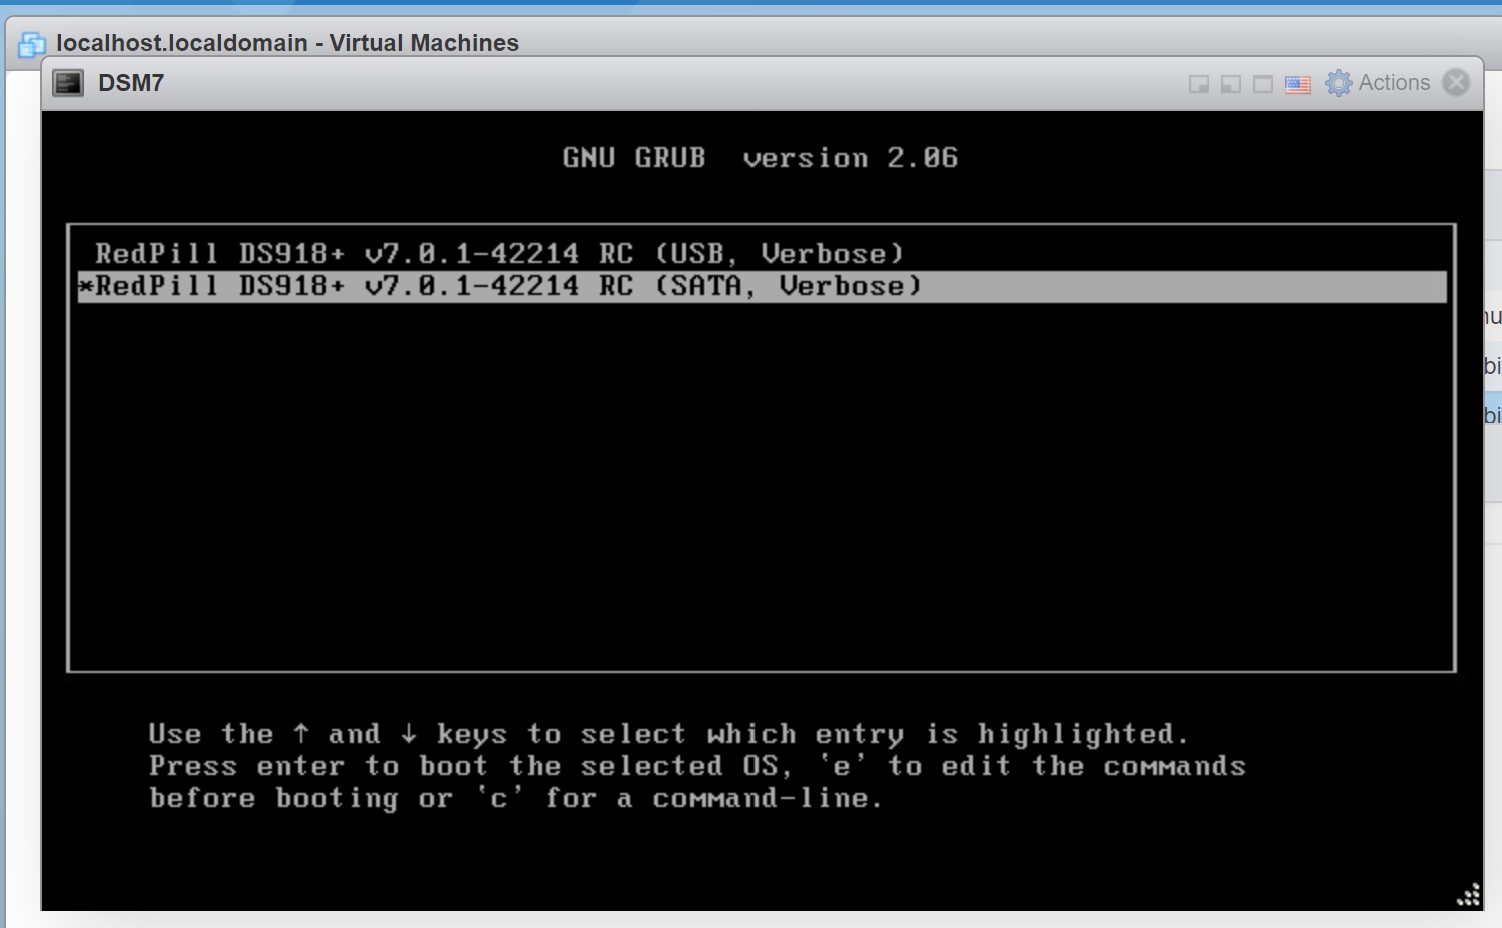
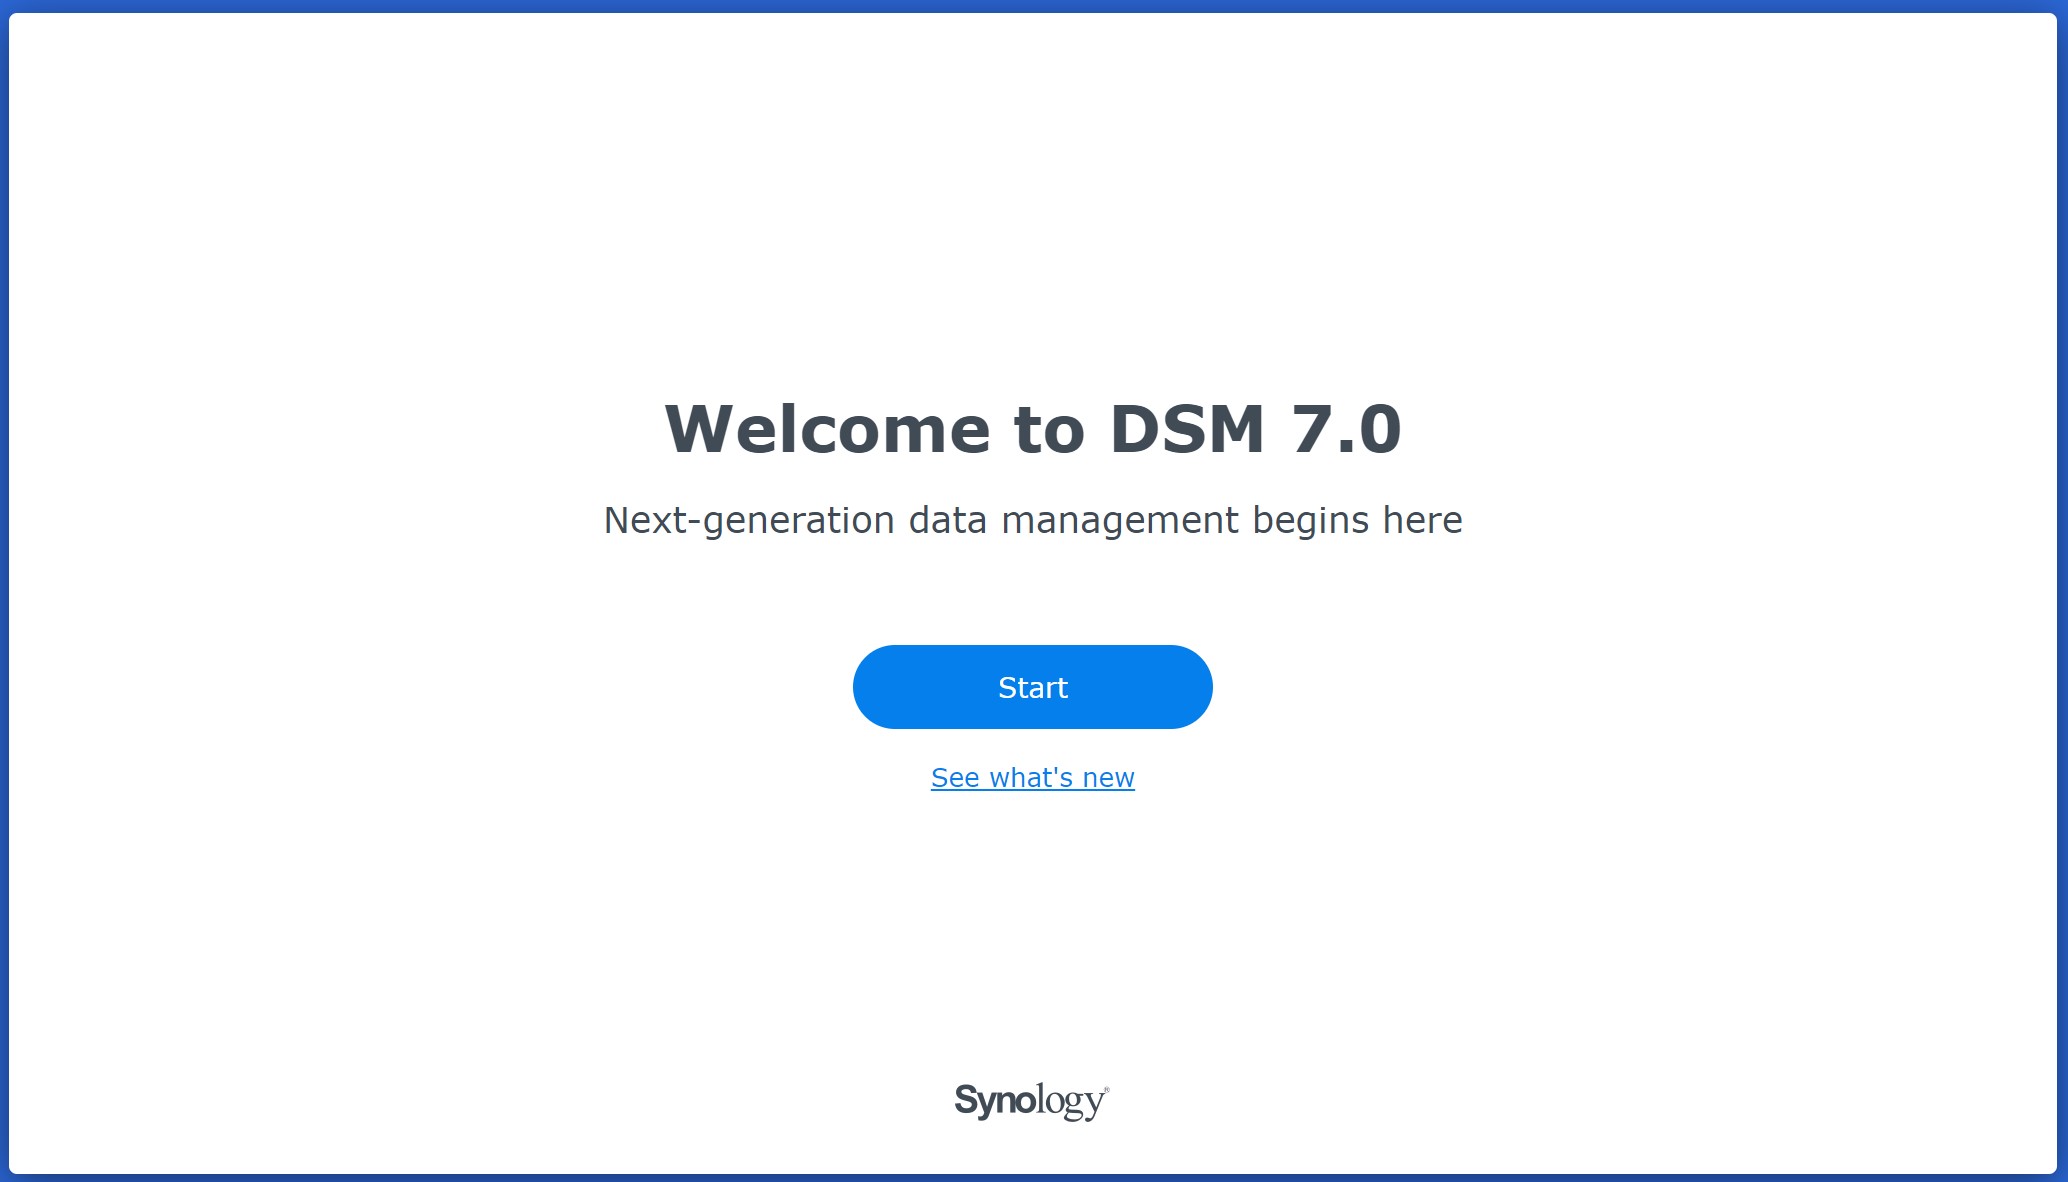
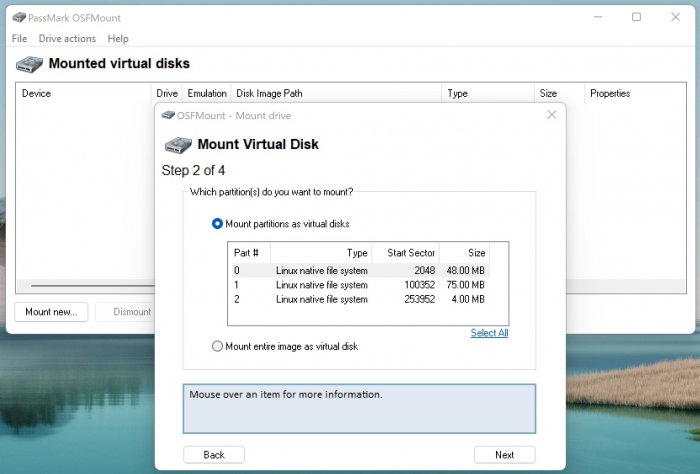
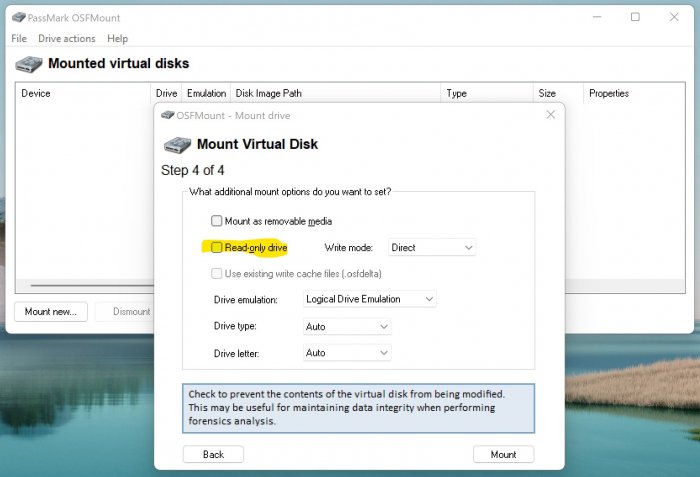
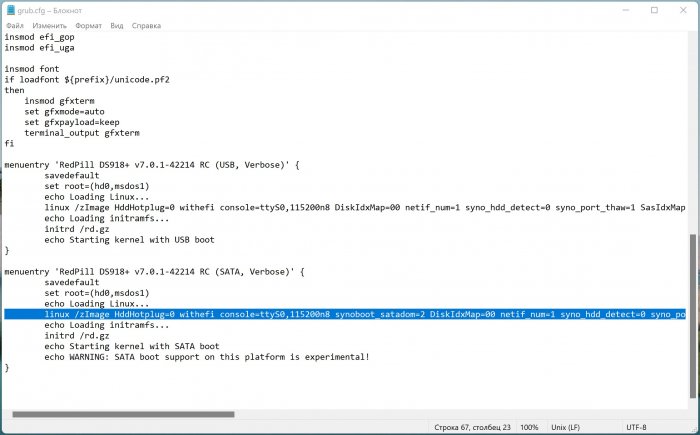
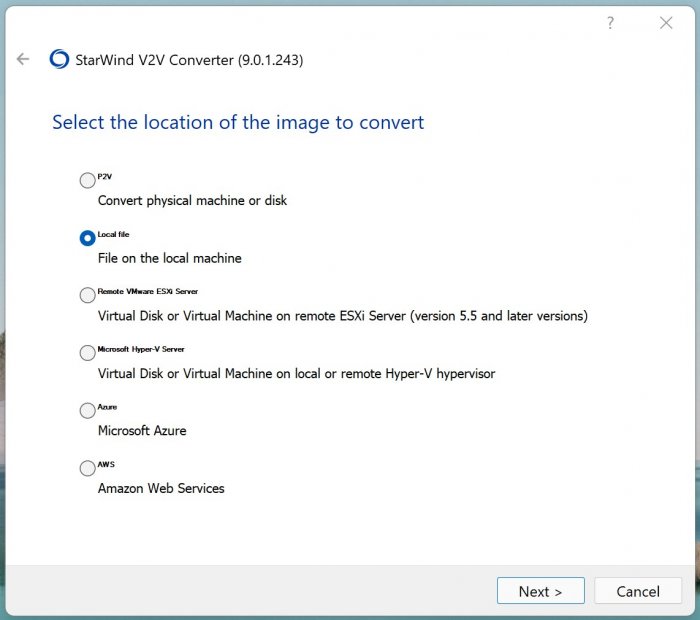
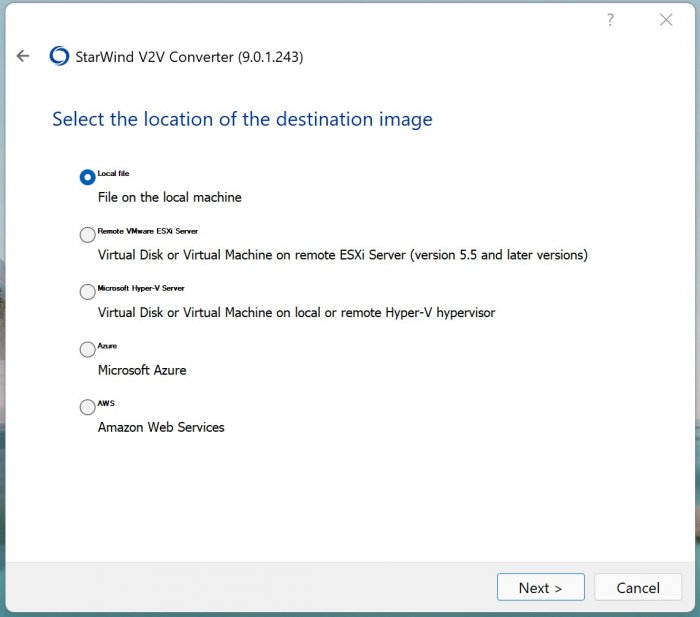
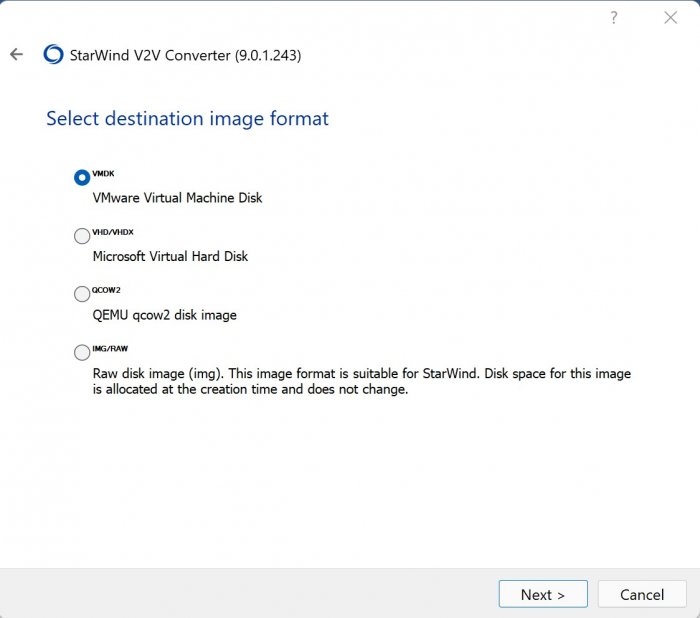
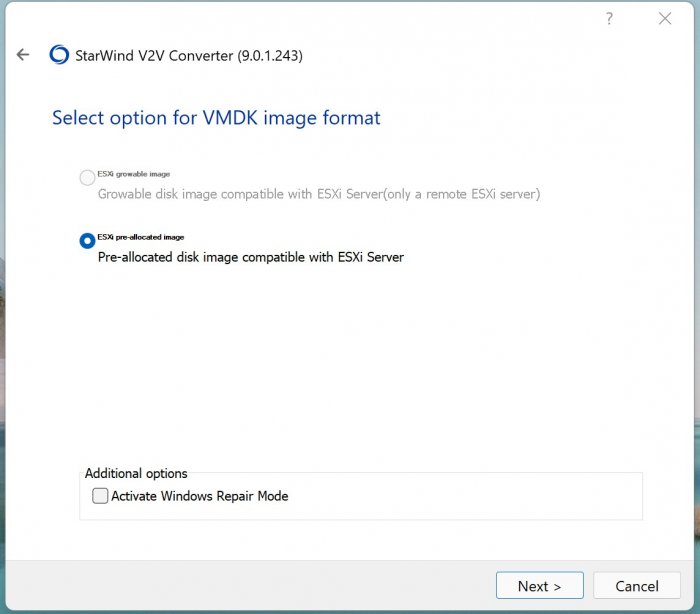
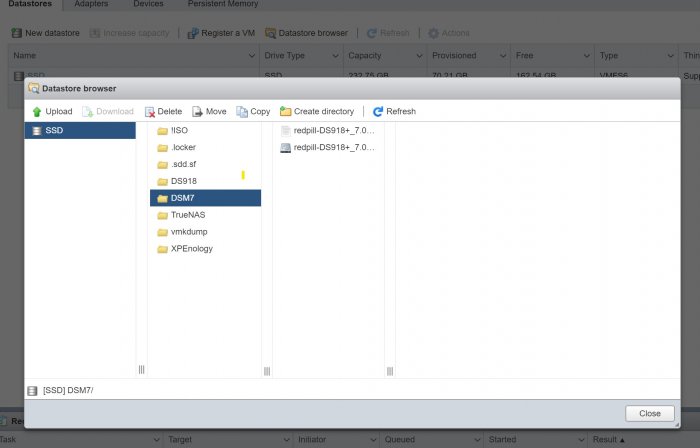
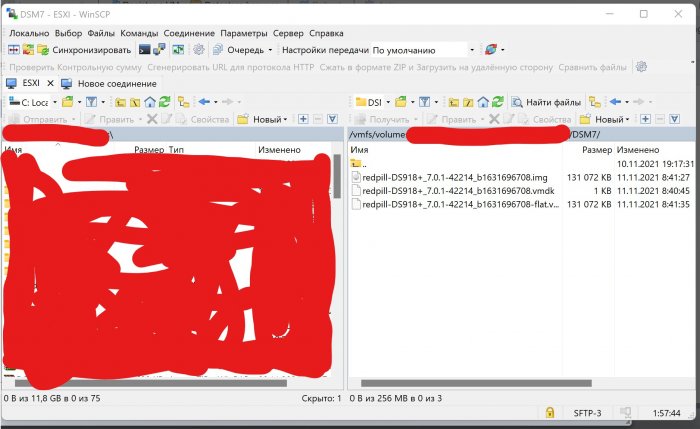
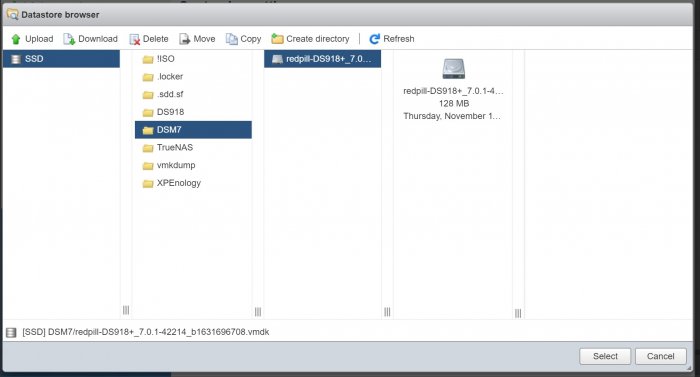
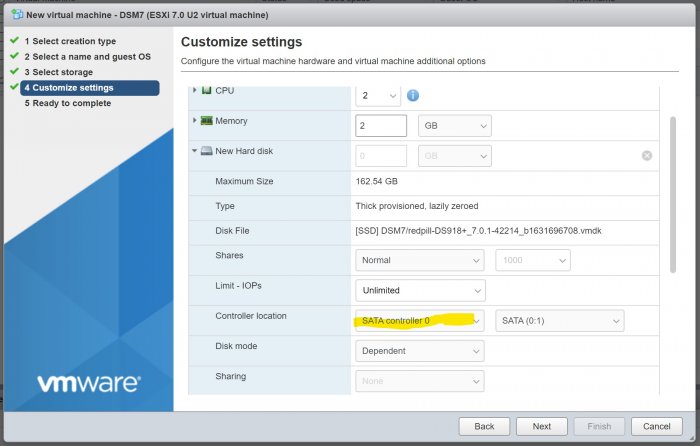
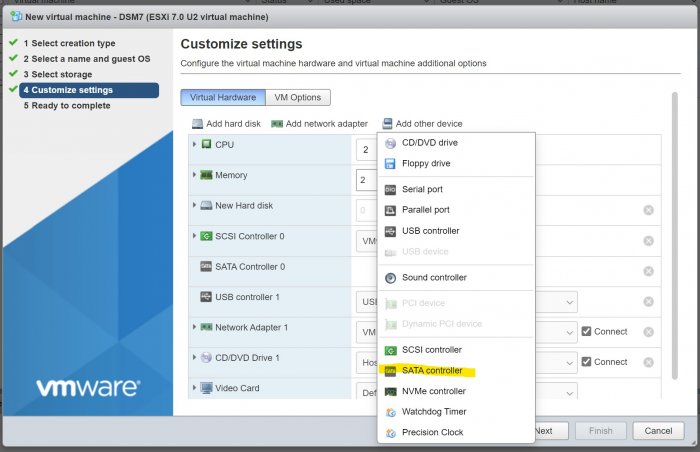
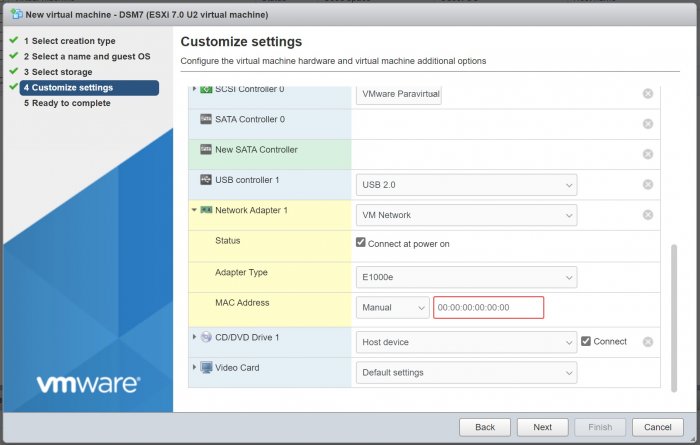
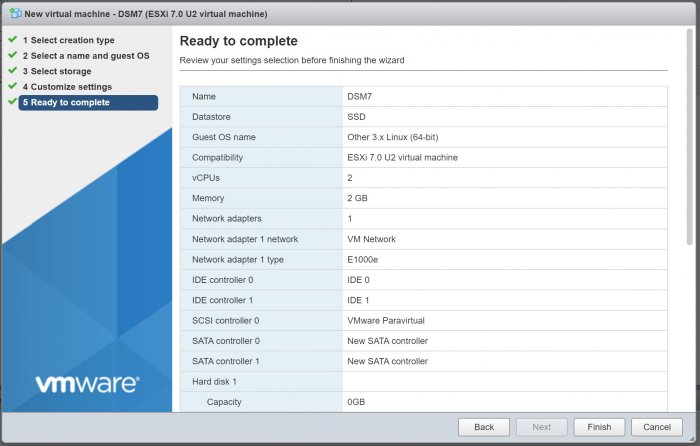
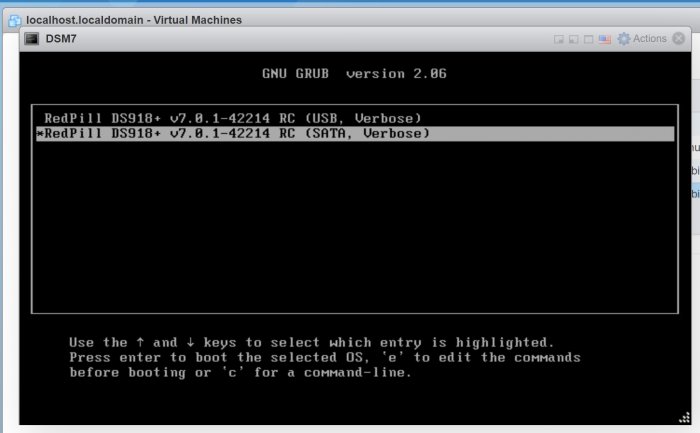
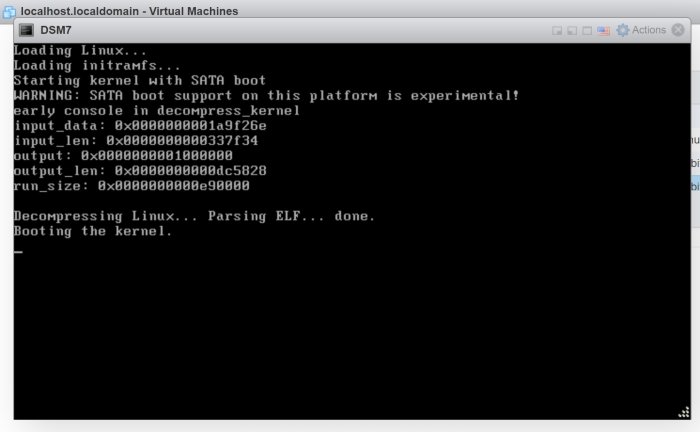
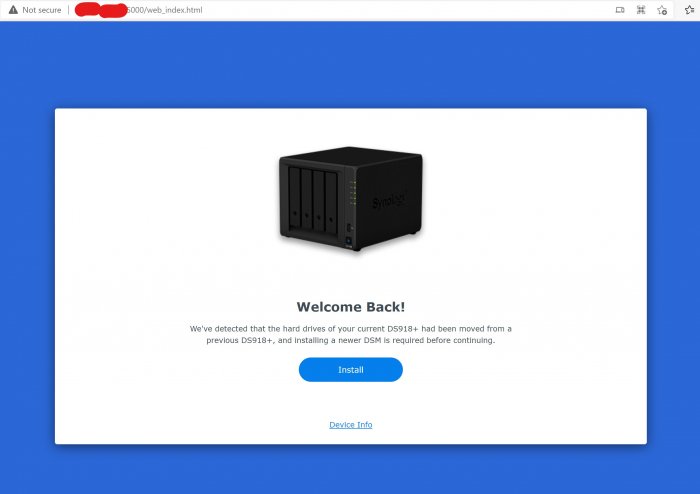
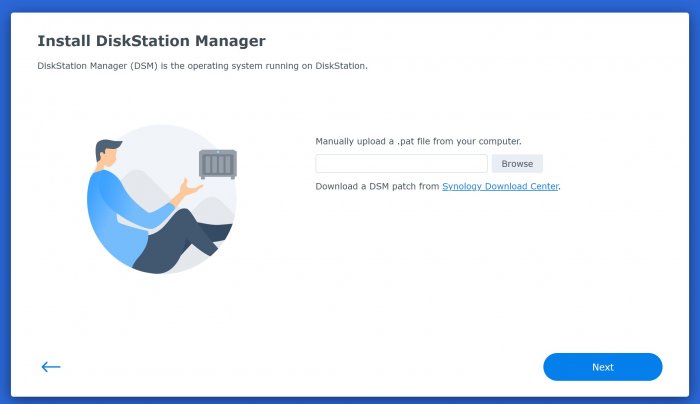
Здравствуйте, недавно я установил ESXI и пробовал устанавливать различные версии XPEnology. Есть много информации по установке DSM6, однако про DSM7 информации существенно меньше, а пошаговой инструкции по установке на ESXI я вообще не нашёл. После прочтения этой темы решил сделать инструкцию по установке DSM7 на ESXI, в первую очередь для себя, чтобы потом не забыть Для редактирования ISO образа и его конвертации понадобятся программы OSFMount и StarWind V2V Converter соответственно. Образ redpill-DS918+_7.0.1-42214 загружаем здесь. Открываем образ redpill-DS918+_7.0.1-42214_b1631696708.img в OSFMount. Выбираем 0 раздел. Снимаем галочку только для чтения. Заходим на смонтированный диск и открываем файл grub.cfg, расположенный по пути \boot\grub. В данном файле меняем mac1=D050997C770C на мак адрес своей сетевой карты. Мак адрес сетевой карты можно посмотреть в сетевых настройках ESXI. Мак адрес прописывается без символов двоеточия. Также в файле grub.cfg прописан серийный номер устройства sn=1230NZN018654, нужно ли его менять не знаю, я сменил серийник воспользовавшись генератором Xpenology_Tool_V142. Как мне известно подбор валидных мака и серийника требуется только для работы QuickConnect, мне он не нужен, поэтому не морочился. В файле grub.cfg мак адрес и серийный номер прописан дважды, в блоках RedPill DS918+ v7.0.1-42214 RC (USB, Verbose) и (SATA, Verbose), я исправил в двух местах, хотя по идеи требуется только в SATA. Сохраняем изменения и размонтируем образ. Далее правленный образ открываем в программе StarWind V2V Converter, выбираем место назначения свой компьютер, формат VMware Virtual Machine Disk, тип ESX image, вариант Pre-allocated disk image, затем завершаем конвертацию и получаем два файла redpill-DS918+_7.0.1-42214_b1631696708.vmdk и redpill-DS918+_7.0.1-42214_b1631696708-flat.vmdk Два вышеуказанных файла вместе с правленным образом redpill-DS918+_7.0.1-42214_b1631696708.img копируем в созданную папку на DataStore. При копировании через интерфейс ESXI видно только два файла, хотя по факту их три, если зайти на DataStore через WinSCP. Далее создаём новую виртуальную машину. Придумываем ей название, выбираем операционную систему Other 3.х Linux (64-bit). Пробовал версии 4.х и 5.х, но на них система не запустилась. Далее выбираем место установки, в моём случае это SSD диск. Настройки виртуальной машины следующие: 1. CPU – 2 2. Память – 2гб 3. Удаляем созданный по умолчанию жесткий диск 1 на 16 гб. 4. Добавляем существующий жесткий диск и выбираем на Datastore ранее скопированный файл redpill-DS918+_7.0.1-42214_b1631696708.vmdk, в настройках которого выбираем SATA контроллер 0. 5. Добавляем еще один SATA контроллер 6. Добавляем новый стандартный жесткий диск, в настройках которого выбираем SATA контроллер 1. Объем жесткого можно оставить по умолчанию, у меня это 16гб, если нужно больше, делаем больше. Имеется ещё другой вариант - вместо стандартного диска добавить RDM диск, в настройках которого также выбрать SATA контроллер 1. Как подключить локальный SATA-диск в качестве хранилища RDM для виртуальных машин читать здесь. 7. В настройках сетевой карты в качестве адаптера выбираем E1000e, вручную вбиваем мак адрес своей сетевой карты, которую ранее прописывали в grub.cfg, только в этот раз разделяем каждые два символа двоеточием. 8. Завершаем создание виртуальной машины. Далее запускаем созданную виртуальную машину. В появившемся меню выбираем RedPill DS918+ v7.0.1-42214 RC (SATA, Verbose). Если всё правильно сделать, то система запустится. Через приложение Synology Assistant находим запущенную DSM и открываем. Можно также искать, вбив в браузере http://find.synology.com/ , но через приложение находит лучше. Затем устанавливаем систему, вручную выбрав DSM_DS918+_42214.pat Данный релиз почему-то удален на официальном сайте, поиски в интернете мне ничего не дали, однако мир не без добрых людей, спасибо формучанину stefauresi, который поделился данной версией DSM, качаем здесь. Попытки установки версий DSM_DS918+_41890 и DSM_DS918+_42218, к успеху не привели. Всем добра!


-
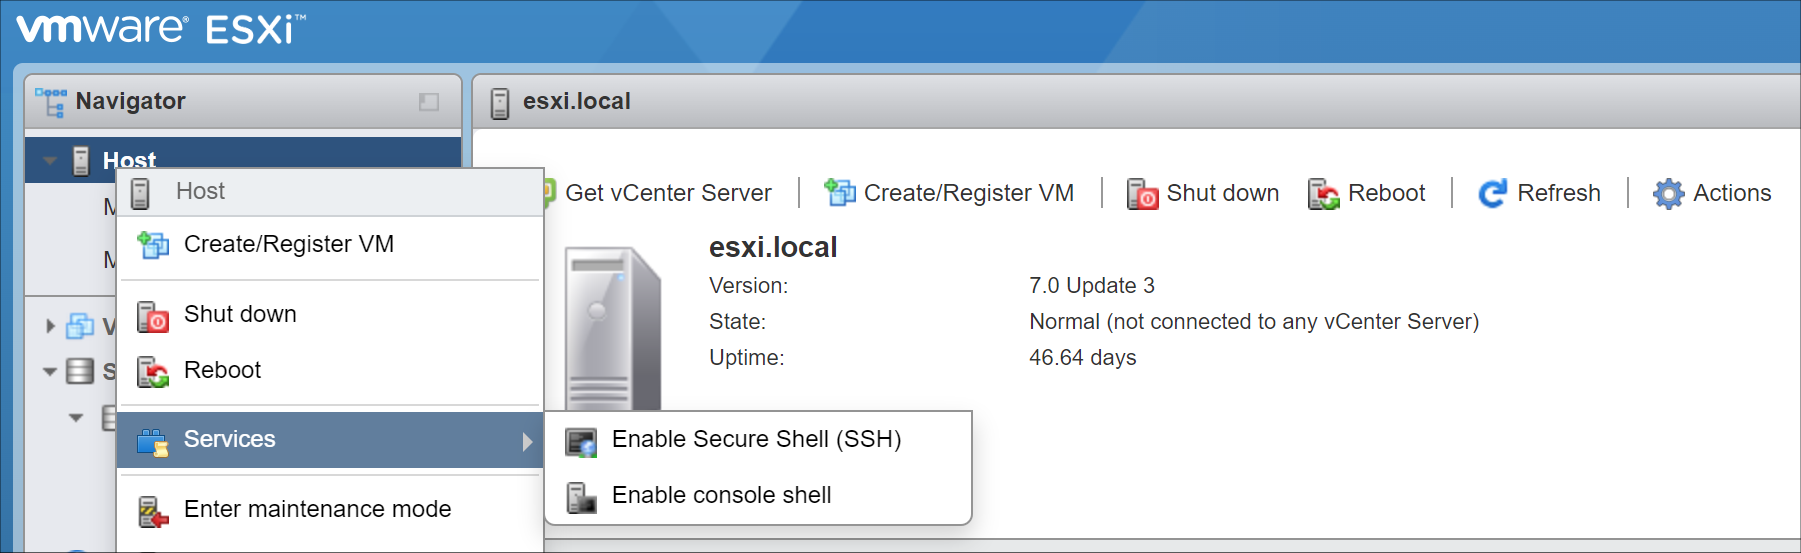
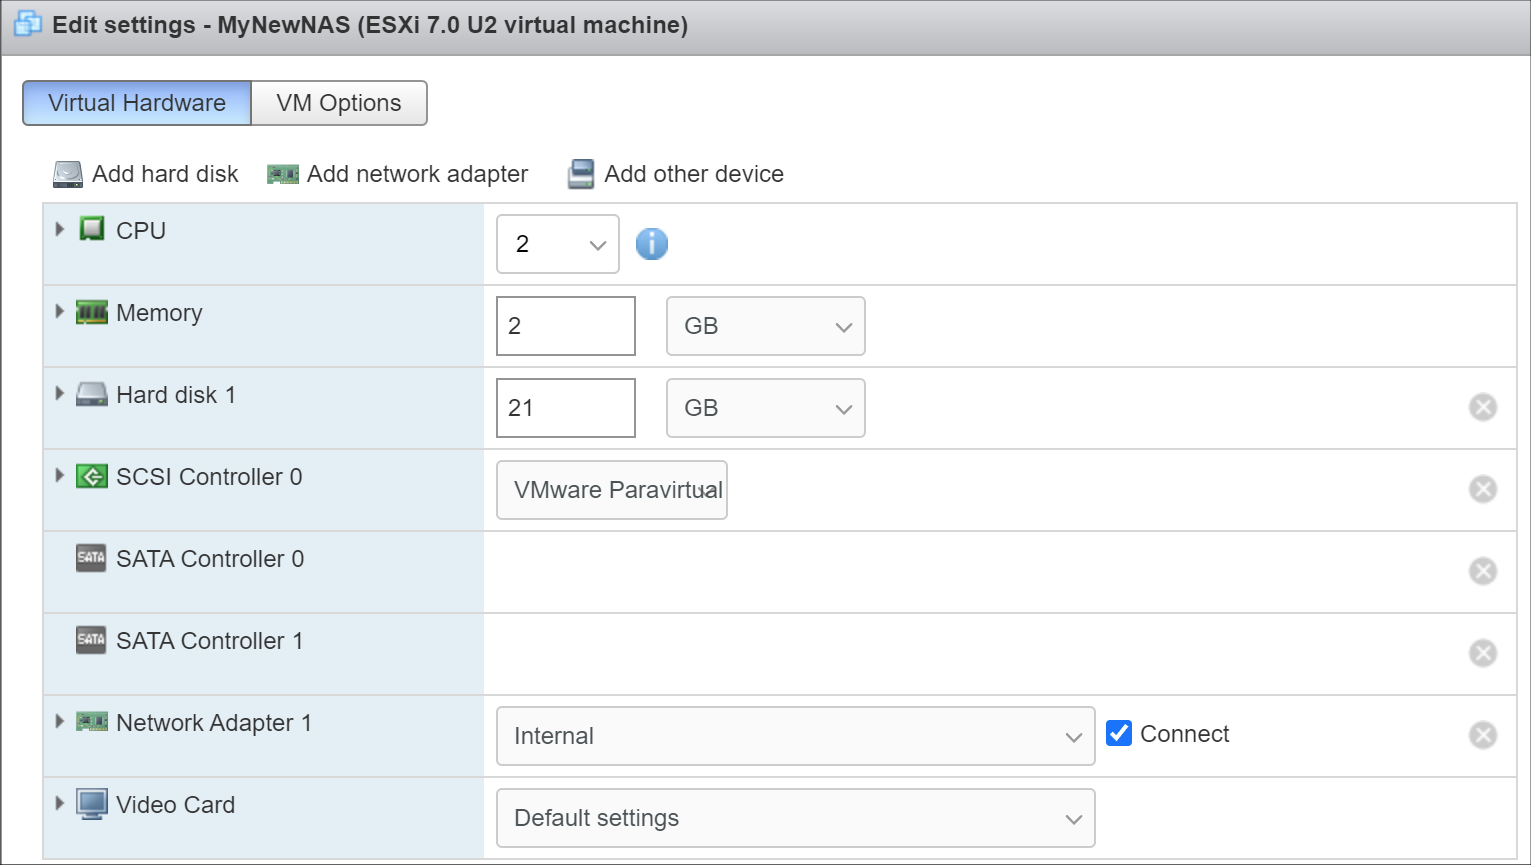
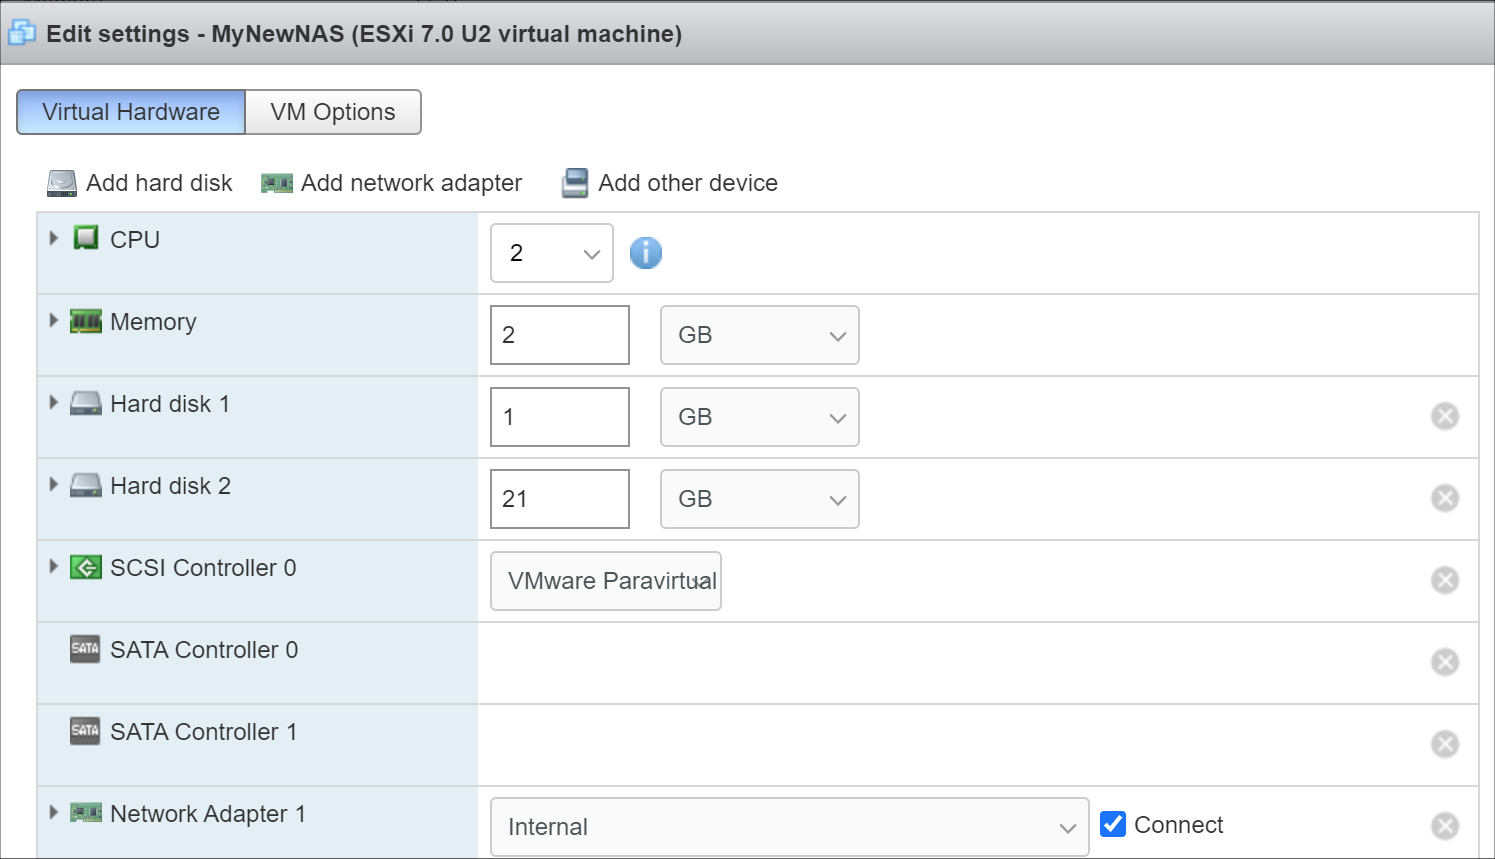
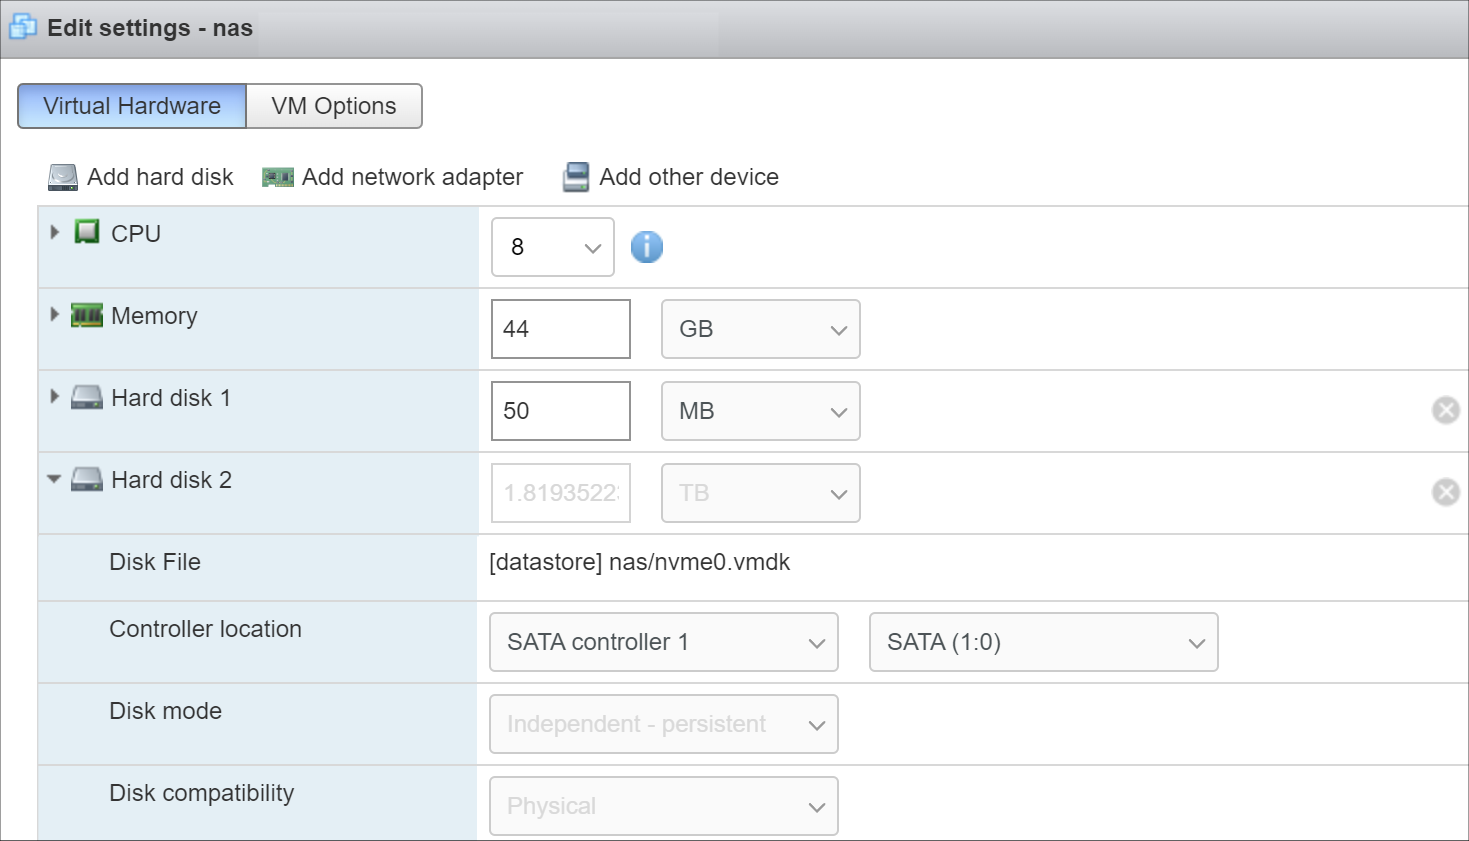
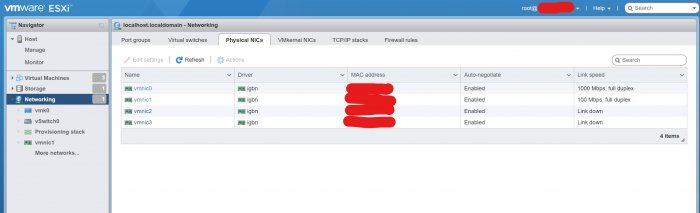
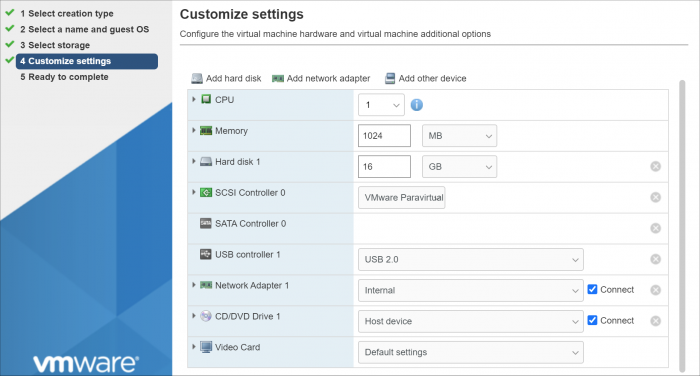
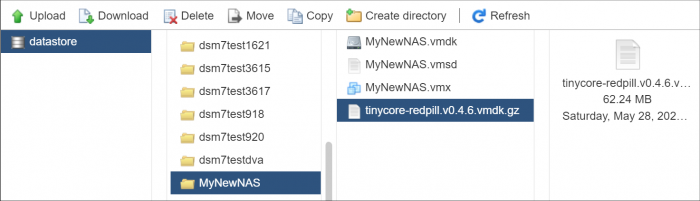
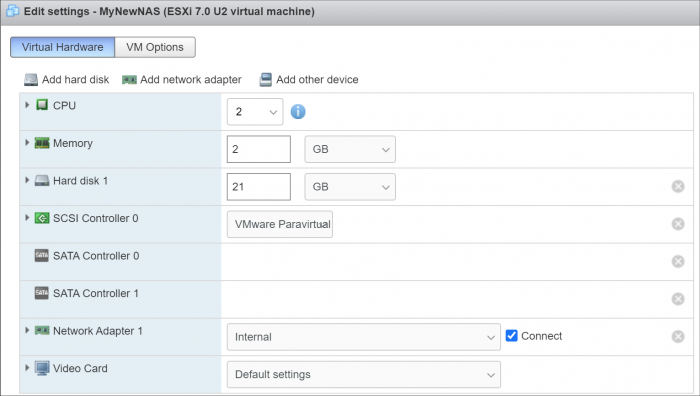
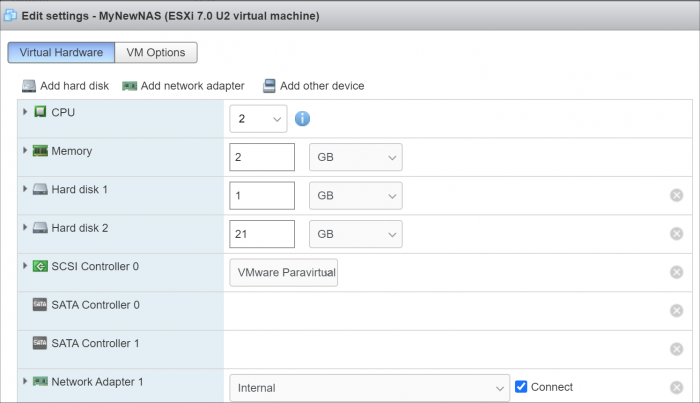
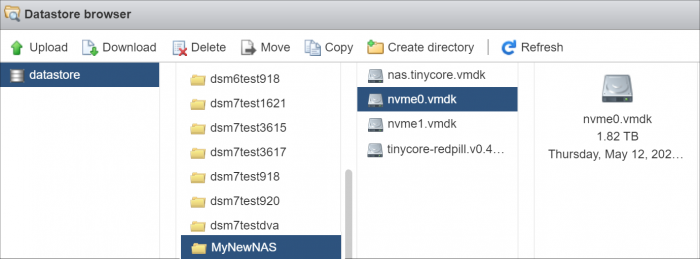
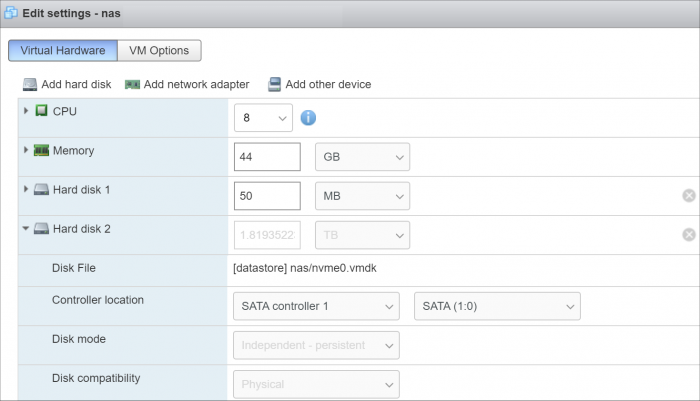
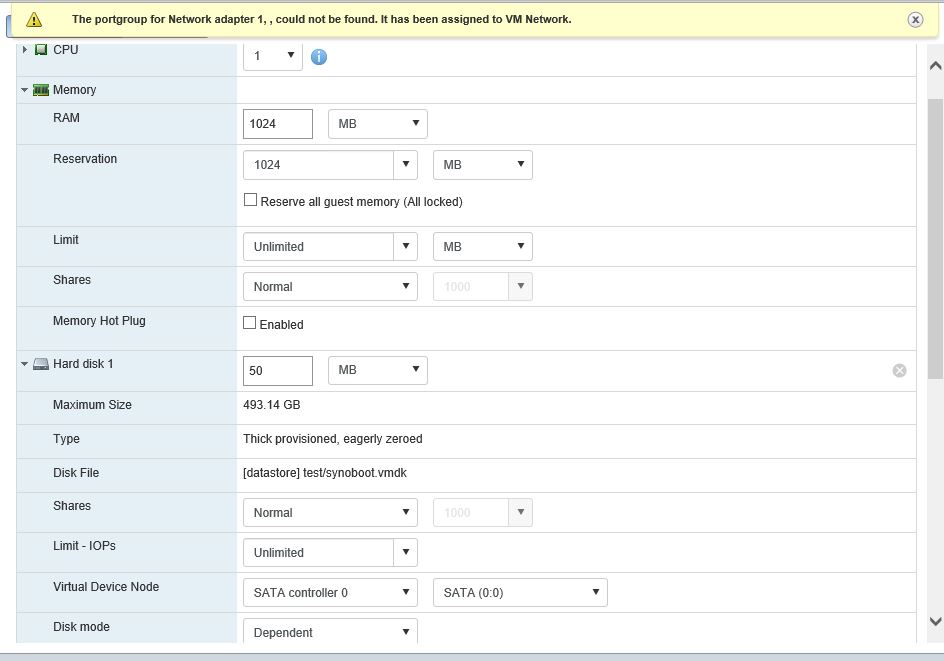
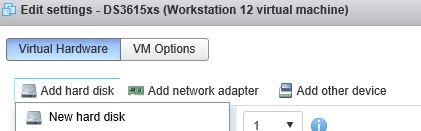
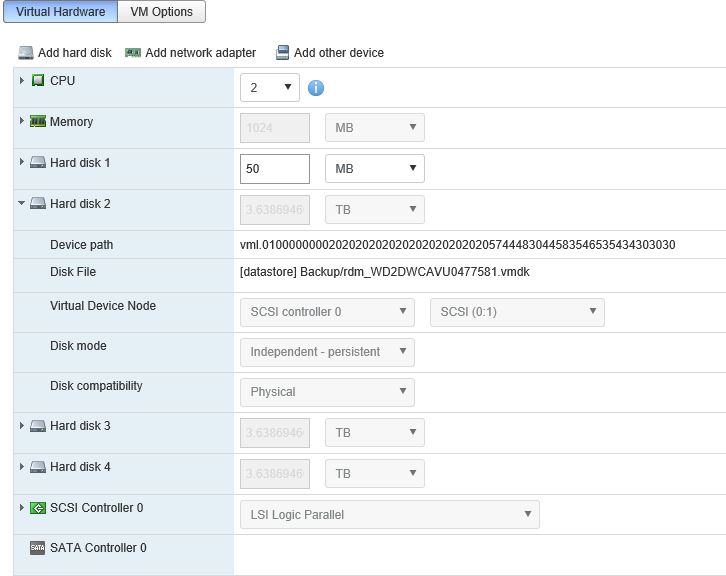
 Introduction This tutorial is a supplement to the main TCRP installation tutorial located here: https://xpenology.com/forum/topic/62221-tutorial-installmigrate-to-dsm-7x-with-tinycore-redpill-tcrp-loader/ You should be familiar with all the concepts and procedures in that tutorial, and general knowledge of VMware ESXi installation and virtual machine management. The focus here is on differences between installing on baremetal (with DSM as the only OS on the NAS), and as a virtual machine using VMware ESXi as the hypervisor. However, much of the conceptual information applies to other hypervisors. Some reasons to install DSM using a hypervisor: virtualize unsupported network card virtualize NVMe or other storage and present to DSM as SATA run other VMs in parallel on the same hardware (as an alternative to Synology VMM) share storage or network cards with other non-XPEnology VMs testing and rollback of updates About VMware ESXi ESXi (currently branded as the "VMware vSphere Hypervisor") is a stand-alone hypervisor that is part of the VMware enterprise computing platform. ESXi's strength includes robust testing and support, good compatibility with modern hardware platforms, and very flexible control over the hypervisor configuration. The core hypervisor is free to use, all that is needed is to sign up to receive a lifetime free license key. Key limitations of the free license are 8 vCPU's (8 threads, same as DS918+) and no serial port virtualization. To use the serial console, a physical connection is needed from the motherboard to your personal computer, or if the motherboard has IPMI features, intercepting the physical serial data with the IPMI remote access tools works as well. There is also a trial ESXi license that offers 256 vCPUs and serial port virtualization. ESXi and DSM Platform/Architecture All currently supported DSM platforms can run as virtual machines. As of this writing, the Device Tree platforms (DS920+ and DS1621+) are not supported by the TCRP device tree patcher when ESXi virtual SATA controllers are used. The problem is understood but currently the only way to make these platforms work is to manually patch the DTS. Transcoding platforms are supported with a compatible CPU, but actual transcoding requires a passthrough configuration of the VGA display adapter, which is somewhat complicated to set up, and beyond the scope of a basic tutorial. As DSM is run as a workload inside ESXi, there is an overhead tax, so the minimum requirements are somewhat higher: x86-64 CPU with two cores or more Hardware virtualization features enabled in the BIOS (Intel VT-x or AMD RVI) 4GB of RAM or more Dedicated 138GB or larger boot and storage device for ESXi system files, run-time files and datastore containing VM configuration files and virtual disks Block storage/controllers on ESXi's compatibility list OR compatible with DSM for passthrough Storage for use with DSM (either as backing storage for virtual disks, or passthrough devices) Creating a DSM Virtual Machine, Part 1 When we create a virtual machine we are defining its hardware characteristics. This machine must be compatible with DSM. For the purposes of the tutorial, we'll create a simple DSM VM with a 21GB virtual SATA drive. First the hardware profile must be selected. The recommended options are illustrated below. Other 3.x Linux (64-bit) is best even when installing a DSM platform with 4.x kernel. The selection here doesn't actually have anything to do with the OS being installed - it's just defining the behavior of the emulated hardware. Here's the initial complement of hardware created with Other 3.x Linux (64-bit): The pre-configured Network Adapter is VMware 10Gbe virtual vmxnet3 and is directly supported by TCRP. However, some changes need to be made to the virtual machine: Change the CPU vCore count to 2 or more Change the memory amount to 2048 or more Change the virtual hard disk size to 21GB or larger (see minimum spec here) If desired, open the drop-down menu and change the virtual disk type to Thin if the VM is only for testing Delete the USB controller Delete the CD/DVD Drive Add a second SATA controller - this will initially be called "New SATA Controller" Save the virtual machine. This creates a virtual machine folder on the datastore, and provisions the VM configuration file and virtual disk in that folder. It is not ready for use yet; some additional preparatory steps need to be completed. Preparing the TCRP Image ESXi VMs cannot boot virtualized USB flash drive images. A passthrough physical USB can be used, but is not recommended. Instead, a special version of the loader is used as a bootable virtual SATA drive. When the TCRP loader boots in this manner, it is called SATABOOT. Download the tinycore-redpill 7.x loader and save it to your personal computer. Then, open it with a zip manager to show the boot images: tinycore-redpill.vX.X.X.img.gz (for BIOS/CSM/Legacy boot from USB flash drive) tinycore-redpill-uefi.vX.X.X.img.gz (for UEFI/EFI boot from USB flash drive) tinycore-redpill.vX.X.X.vmdk.gz (for virtual machine SATABOOT from disk image) Save the vmdk gzip file to your personal computer. Then, upload it to the new virtual machine folder contained in the datastore: For the next step, ESXi console access is required. From the web GUI, enable both SSH and the console shell. SSH into the ESXi host and navigate to the new VM's folder: [root@esxi:] cd /vmfs/volumes [root@esxi:] cd <datastore> [root@esxi:] cd MyNewNAS [root@esxi:] ls -la total 65664 drwxr-xr-x 1 root root 73728 May 28 09:02 . drwxr-xr-t 1 root root 81920 May 28 08:58 .. -rw------- 1 root root 22548578304 May 28 08:58 MyNewNAS-flat.vmdk -rw------- 1 root root 474 May 28 08:58 MyNewNAS.vmdk -rw-r--r-- 1 root root 0 May 28 08:58 MyNewNAS.vmsd -rwxr-xr-x 1 root root 1941 May 28 08:58 MyNewNAS.vmx -rw-r--r-- 1 root root 65260813 May 28 09:02 tinycore-redpill.v0.4.6.vmdk.gz The TCRP SATABOOT image is provided compressed and in VMware Workstation format. These commands prepare it for use with ESXi: [root@esxi:] gunzip tinycore-redpill.v0.4.6.vmdk.gz [root@esxi:] vmkfstools -i tinycore-redpill.v0.4.6.vmdk MyNewNAS-TCRP.vmdk Destination disk format: VMFS zeroedthick Cloning disk 'tinycore-redpill.v0.4.6.vmdk'... Clone: 100% done. Creating a DSM Virtual Machine, Part 2 From the GUI console, select the DSM virtual machine and Edit. This is what things look like now: Now the SATABOOT loader must be added to the virtual machine. Select Add hard disk (existing hard disk) and choose the TCRP vmdk created in the previous step It will be displayed as "New hard disk" - expand the dropdown Change the controller to SATA Controller 0 The disk address should be SATA0:0 Save the changes to the VM The default for the Other 3.x Linux (64-bit) hardware profile is to create a SCSI virtual controller and attach all new virtual disks to it. DSM works better with the virtual SATA controller, so we need to move the DSM virtual data disk to it. Edit the virtual machine Expand the dropdown for Hard disk 1 (note that it is 21GB or whatever size we selected) Change the controller to SATA Controller 1 The disk address should be SATA1:0 Save the changes to the VM VMWare has an odd behavior in that it renumbers all the hard disks based on the last edit. This is cosmetic, and only affects the VM configuration screen. It does not change the disk addressing order in any way. The VM edit window now looks like this: Now that no disks are attached to the SCSI controller, we can (and should) delete it. The final configuration of controllers and disks is: SATA Controller 0: SATABOOT (SATA0:0) SATA Controller 1: DSM Data DIsk (SATA1:0) Any additional virtual DSM data disks should be added to SATA1 (i.e. SATA1:1, SATA1:2, etc). SATA0 should be reserved only for SATABOOT. The VM is now ready for the TinyCore boot (main tutorial, Step 3). System-Specific Parameters and SATABOOT ESXi requires minor adjustments to the basic tutorial configuration steps: The USB flash drive VID/PID configuration step (./rploader.sh identifyusb) is invalid and can be skipped when using SATABOOT. When using a virtual network adapter (such as VMXNET 3), its MAC address and the loader's MAC address setting must match. When a virtual machine is booted for the first time, a random address is assigned to each virtual adapter. Unless your primary network interface is a passthrough device, the serialgen configuration step requires the realmac argument to match the virtual NIC's random address to TCRP. Example: ./rploader.sh serialgen DS3622xs+ realmac The Drive Slot Mapping configuration step is the same, but the outcome is different when SATABOOT is in use. ./rploader.sh satamap will enforce the prohibition on data disks attached to SATA0 and warn if this configuration exists. SataPortMap and DiskIdxMap are configured to remove a blank slot between the SATA0 and SATA1 controllers. SCSI/SAS controllers or HBAs (either passthrough or virtual) ignore satamap functionality. When SATABOOT is also in use, there is an unavoidable blank slot between the last SATA controller and the first SCSI/SAS controller or HBA. Boot DSM with GRUB When the GRUB Menu is displayed: if necessary, use the arrow keys to ensure that SATA is selected and press ENTER. Advanced Configuration Examples: Passthrough and Raw Device Mapping (RDM)
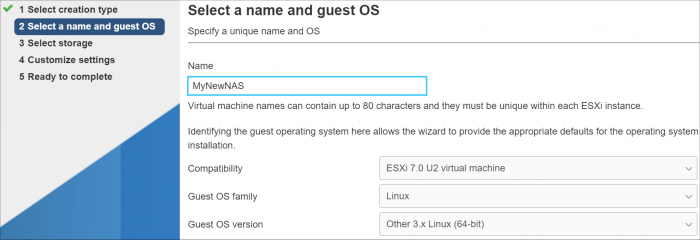


- 89 replies
-
- 11
-

-

-
- virtualization
- tcrp
- (and 2 more)
-
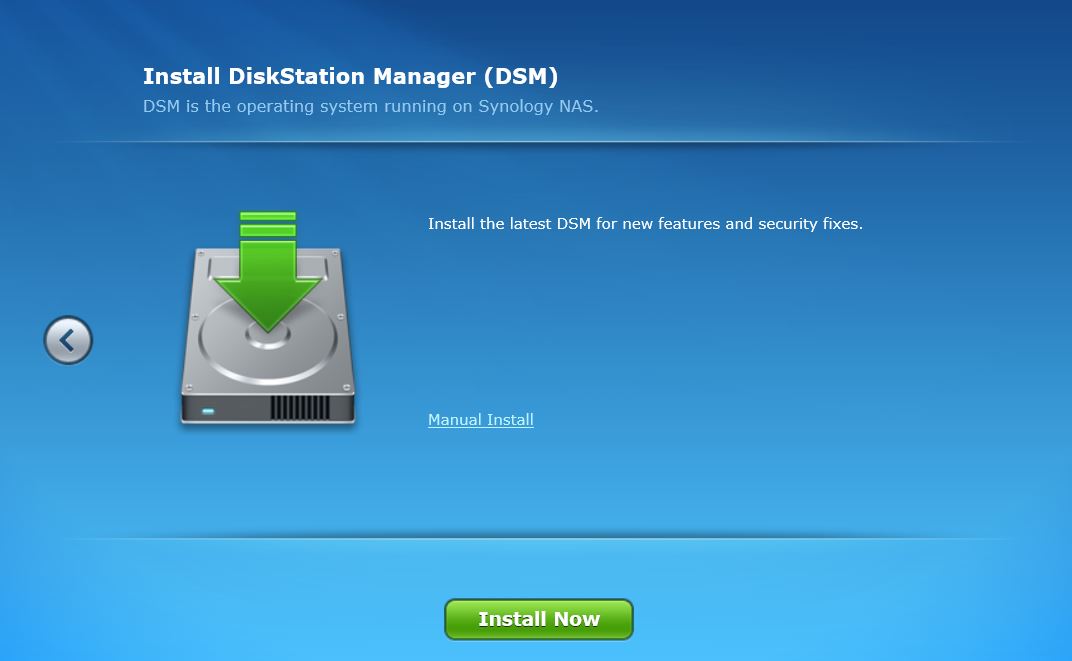
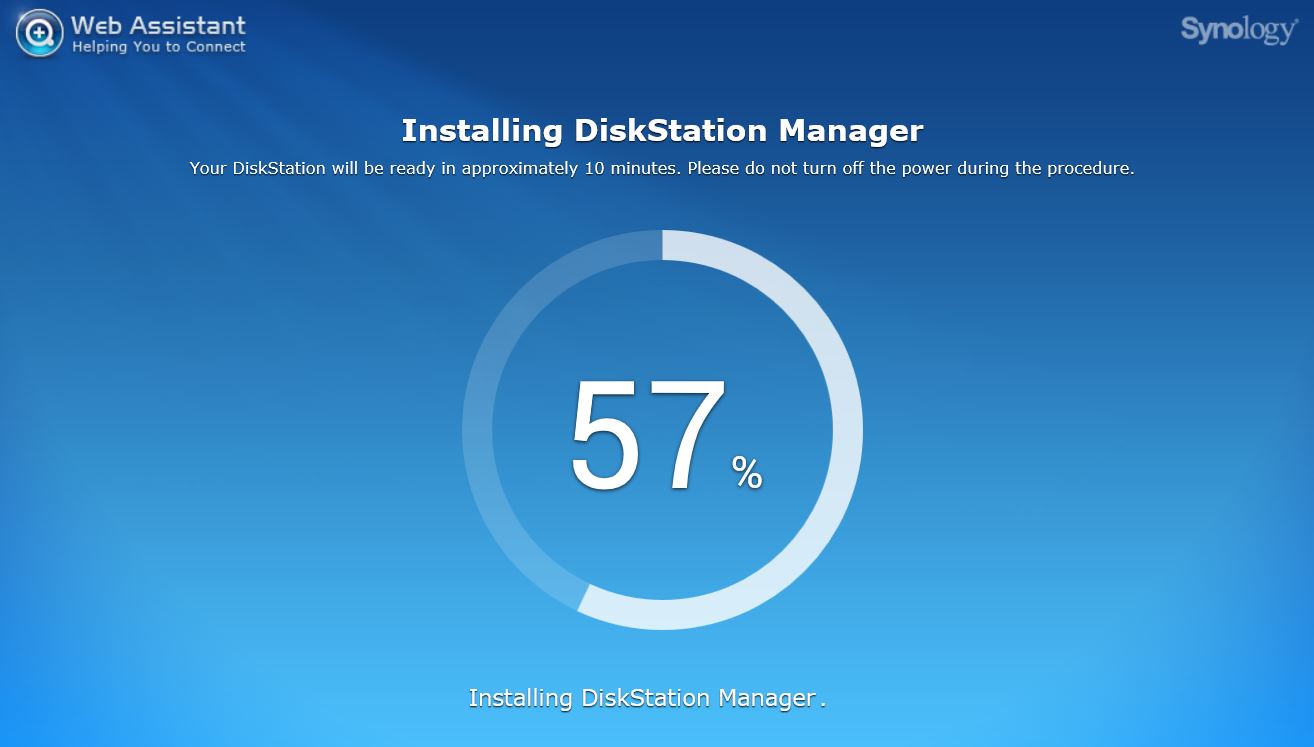
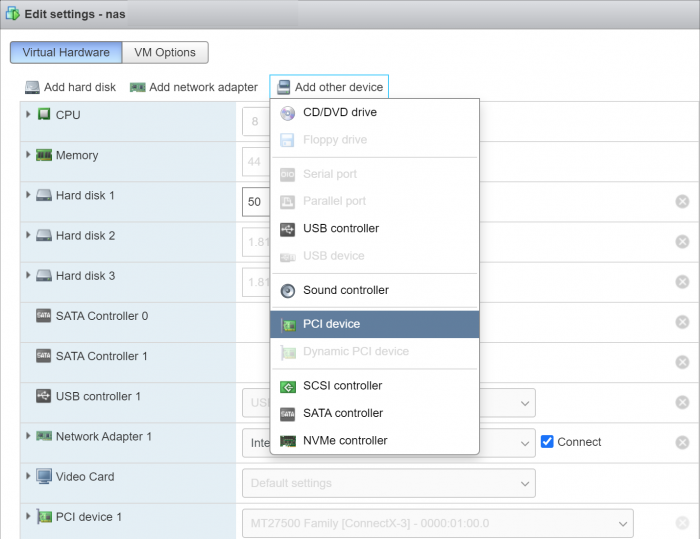
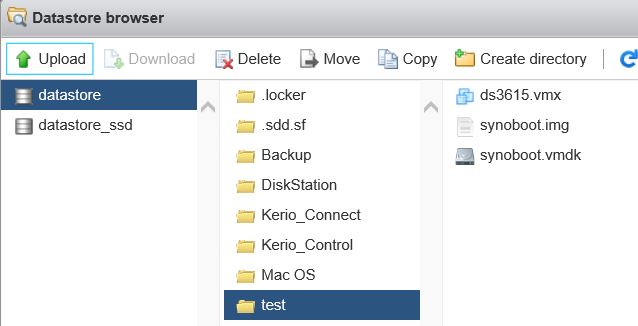
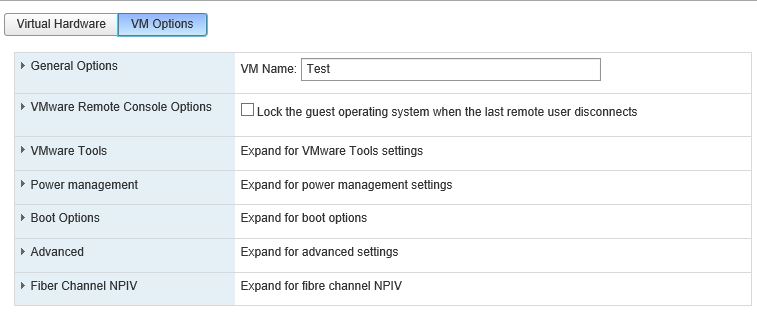
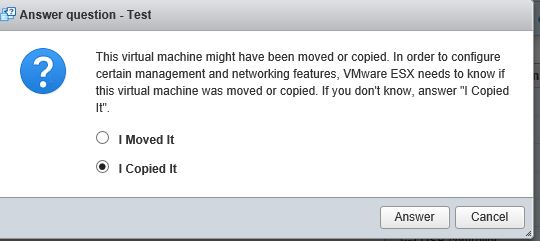
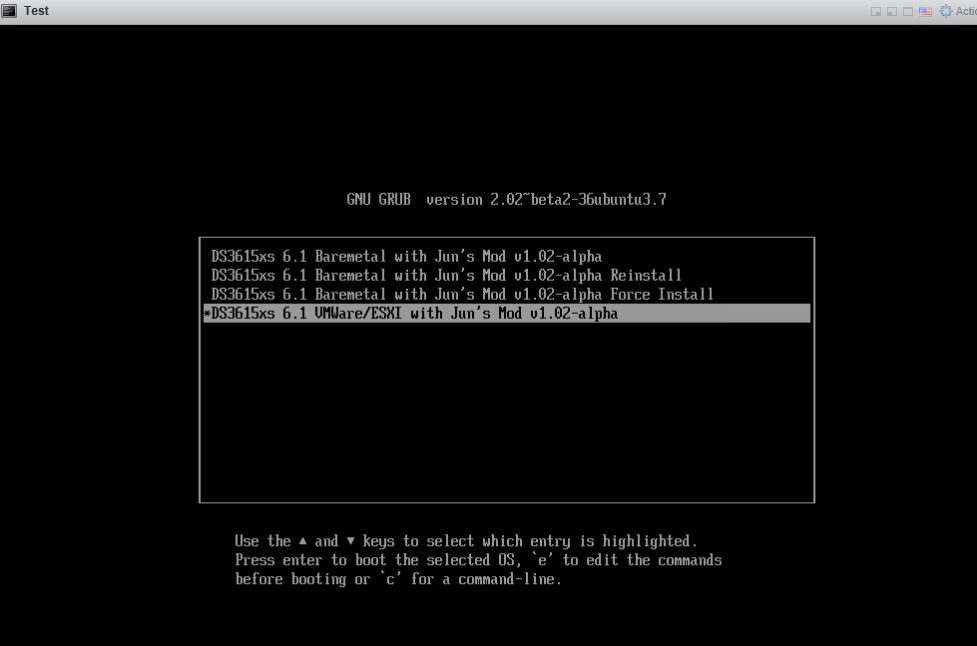
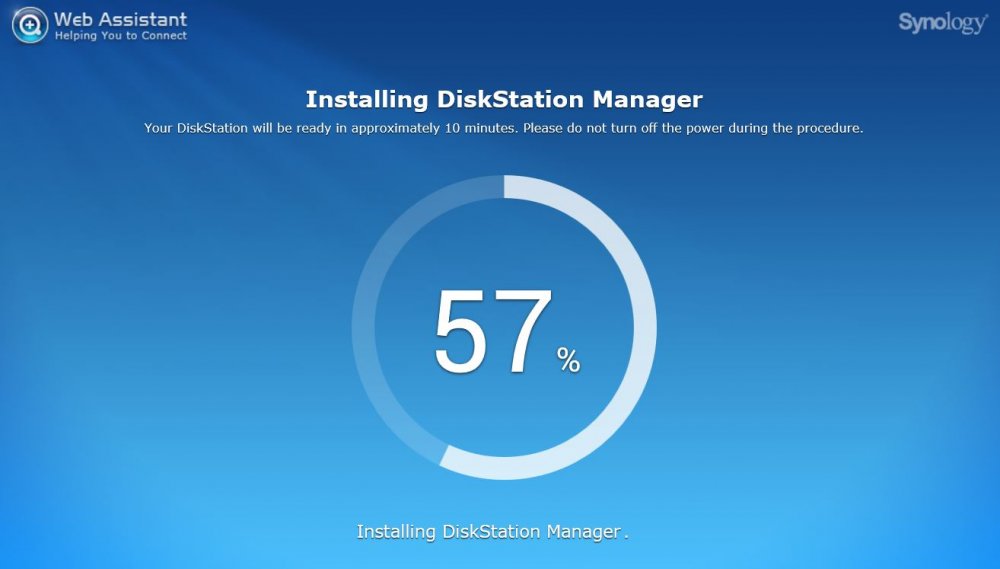
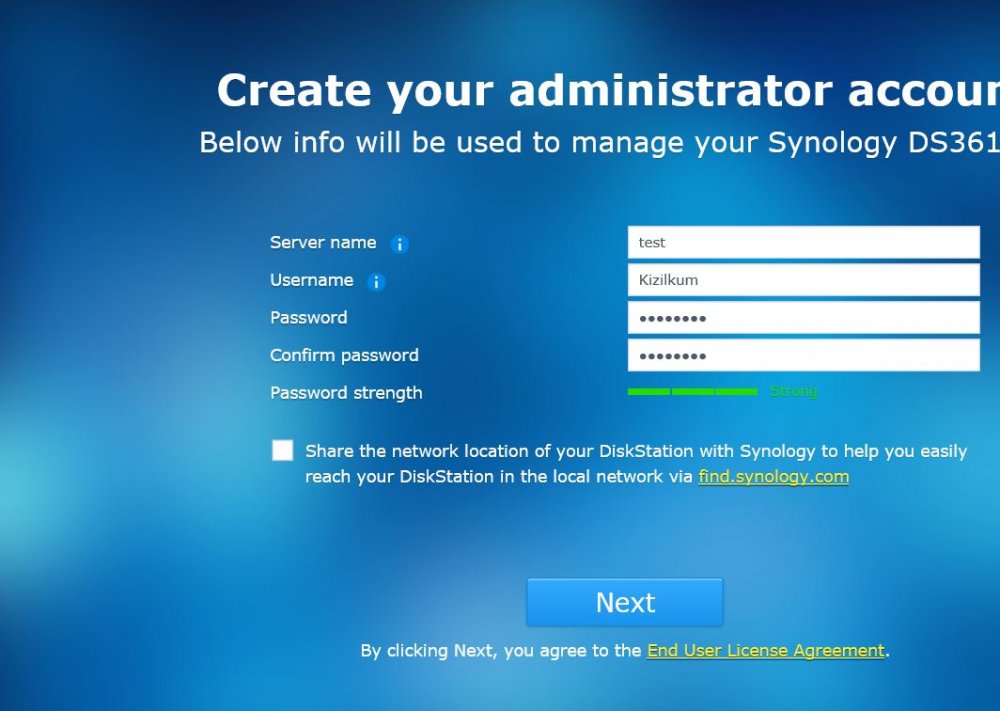
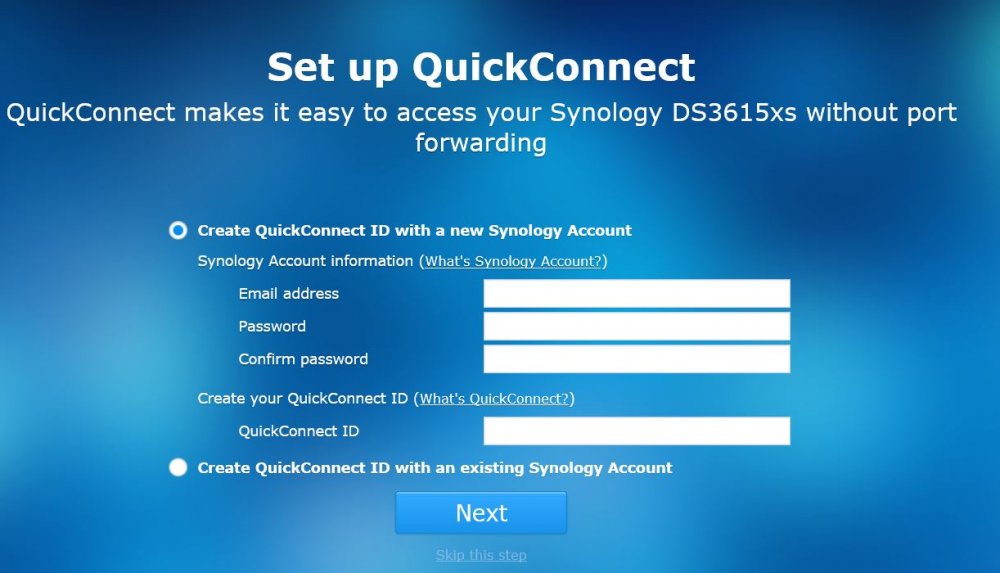
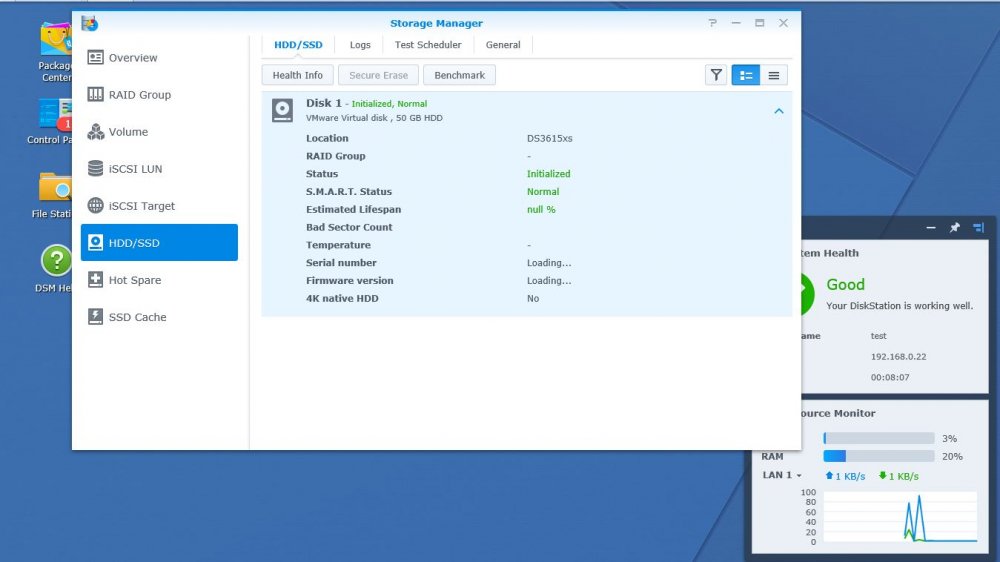
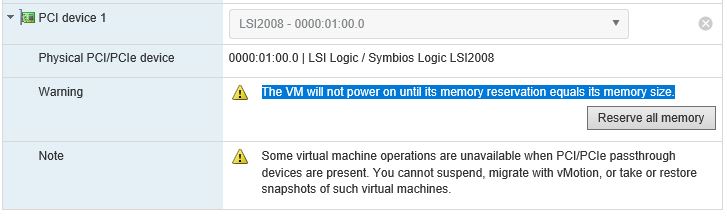
Как оказалось, у новичков возникают сложности с инсталляцией Хренологии на ESXI. поэтому решил написать краткий мануал, призванный облегчить жизнь. дополнения и уточнения приветствуются. 1. подключаемся к ESXI и создаем на датасторе директорию 2. далее в созданную директорию копируем 3 файла вот от сюда 3. после окончания копирования регистрируем нашу машину в ESXI указав на наш .vmx файл собственно доходим до финиша и жмем его все! машина установлена. но ее необходимо настроить перед запуском. 4. в настройках рекомендую задать необходимые параметры процессора и памяти, и обязательно указать размер резервируемой памяти. при недостаточном объеме зарезервированной памяти машина может не запуститься. далее необходимо создать виртуальный жесткий диск и указать его объем. после чего можно перейти на вкладку VM Options и поменять название машины на то которое нравится вам в принципе наша машина уже работоспособна. это простейший способ создания виртуальной машины. Лично я поступил немного иначе: можно или пробросить целиком дисковый контроллер в вашу виртуальную машину и подключить диски к контроллеру поставив крыжик и нажав на Toggle Passthrough после перезагрузки добавив в настройках новый PCI девайс. если у вас нет возможности пробросить целиком контроллер, можно подключить целиком физические диски, не пробрасывая весь контроллер называется это pRDM, как это делается подробно расписано здесь. данный способ хорош еще и тем, что диски целиком можно выдернуть и вставить в физическую машину, без лишних плясок с бубном, если вдруг ваши планы изменятся, а данные скопировать не куда. 5. запускаем машину. при первом запуске говорим: "я скопировал это" после чего стараемся успеть выбрать правильную загрузку далее выжидаем пару минут и начинаем искать свою машину в сети или через сервис http://find.synology.com, если вдруг сервис машину не найдет, то не паникуем и ищем через Синолоджи Ассистента. далее подключаемся к найденной машине и устанавливаем ОС просто нажав на Install Now и спокойно наблюдаем за процессом вводим свои данные, и желательно отключаем крыжик на следующем окне в самом низу говорим "пропустить данный шаг" вот и все, заходим в панель управления и в диспечере хранения радостно видим свои диски. ну и думаем как рачительно распорядиться этим богатством ну и в конце рекомендую установить vm-tools вопросов ввода серийного номера и МАК адреса касаться не стал, все это многократно расписано на форуме можете кидаться тапками, спасибами, кому что нравится.


-
Пришлось создать тему, в которой смогу возможно получить ответы по существующей думаю не только у меня, острой проблеме, а именно - 1. Перенести виртуальную машину с Synology на ESXI; 2. Какие есть варианты переноса; 3. Кто и как уже это делал; Я пробовал и через Архивацию диска через винду, и через восстановление ее - не помогает, после приветствия винды, постоянный ребут! Причина - создал удаленный комп на 1С, жена поработала и понравилось, теперь нужно его перенести на сервак, с другими компами, так чтобы не на моем NASe...
-
 Hi guys, For some of you who wish to expand btrfs Syno volume after disk space increased. Before: df -Th btrfs fi show mdadm --detail /dev/md2 SSH commands: syno_poweroff_task -d mdadm --stop /dev/md2 parted /dev/sda resizepart 3 100% mdadm --assemble --update=devicesize /dev/md2 /dev/sda3 mdadm --grow /dev/md2 --size=max reboot btrfs filesystem resize max /dev/md2 After: df -Th btrfs fi show mdadm --detail /dev/md2 Voila Kall
 -
 hello, i cannot install on my esxi an DS920+ or DS3622xs+ with DSM 7.1 (it's okay with 7.01) after rploader build the VM boot but NAS not detect HDD an idea ? Thanks
 -
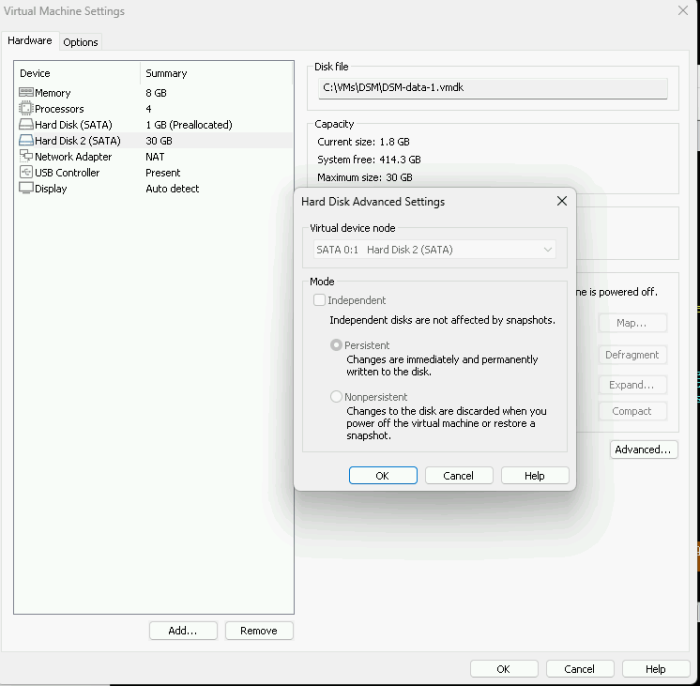
 I must be missing something, but I can't figure out what it is. I'm trying the following on my ESXi 6.7 system which has been running a JUN DSM6 for several years: I created the VM, with the latest VMDK (0.8.0.0). It boots fine, update/fullupgrade work fine, I believe the version is now 0.8.0.3 or something like that. For the build I've run the following commands: ./rploader.sh serialgen DS3622xs+ realmac ./rploader.sh satamap (where I specify 9 disks, to allow 1 vmdk for volume1 and bringing over my 8 RDM devices for volume2, which I will not do until after testing) ./rploader.sh build broadwellnk-7.1.0-42661 The build seems to go fine and does not display any errors, however when I reboot the VM I still only have TinyCore at the GRUB screen. I don't have any entries for RedPill. Anyone have any ideas?
 -
I recently had a volume crash since I didn't configure my UPS to shutdown the server during a power outage. I have a Cyberpower CP1500AVRLCD UPS (one USB output and one Serial output) and use an HP Microserver gen 8 running ESXi-7.0U3-18644231-standard (booting from SD card) using an SSD for the datastore, and the 4 HDD slots on raid 5 and DSM 6.2.2-24922 Update 3. I've just connected the UPS to the Server via usb, and have configured the USB port on the XPE VM as a passthrough, and configured DSM to shutdown after 10 seconds of power outage. So I guess my XPE is protected, but I have the following questions: 1. Is there better way to do this where everything shutdown? 2. I intend on creating a new server for backup, can I configure with just one USB cable for everything to shutdown (via software?) If so how? Thanks!
-
Hi All, So i have built myself a new setup and having issues with Synology VMM. So what i would like to know is there any point for me to Re-Do my setup on Proxmox or ESXI. I have the Hardware and I can move my data to build a new RAID 5 Setup etc.... If this is an good Idea how will i go about it and what is the Recommendations. Thanks in advanced.
-
 Video tutorial on how to get XPEnology to run on an HP Microserver Gen8 via ESXi 6.7, and install DSM 6.2 on SSD drive on ODD port, and pass drivebays to VM with RDM (Raw Data Mapping) MANY Thanx go to the great tutorial already posted here by @luchuma [ Tutorial: Install/DSM 6.2 on ESXi 6.7 ] I just always prefer to watch a video
- 112 replies
-
- 5
-
-
-
- hp microserver gen8
- gen8
- (and 2 more)
-
A little help for everyone who struggles a little bit with enabling the serial console in ESXi. This manual works 1:1: https://www.juniper.net/documentation/en_US/vmx15.1f4/topics/task/configuration/vmx-vm-connecting-vmware.html in short: # at ESXi: open Firewall for serial Console # at VM: add Serial Port 1 - Use Network - Connect at Power - Direction: Server - Port URI: telnet://:8601 In PuTTY the connection will be made as: Type: Telnet Hostname: IP-of-your-ESXi-Host Port: The-port-you-entered-in-the-config-of-the-VM (e.g. 8601) With this you have at every time contact to the Xpenology-VM-Console even a driver wont be load with a upgrade (like in Loader 1.02a).
- 13 replies
-
- 4
-
-
-
- vm
- serial port
- (and 1 more)
-
Hi, habe eine xpenology 1.04b unter ESXi 7 am laufen. Besteht die Möglichkeit einen USB Stick zur Datenübertragung an xpenology anzuschließen? Habe den Stick angesteckt und wie die USV im ESX zugeordnet. Der Stick wird aber im DSM nicht angezeigt meine USV die am anderen Port steckt aber schon. Hab ich was übersehen? Danke, Gruß Jürgen
-
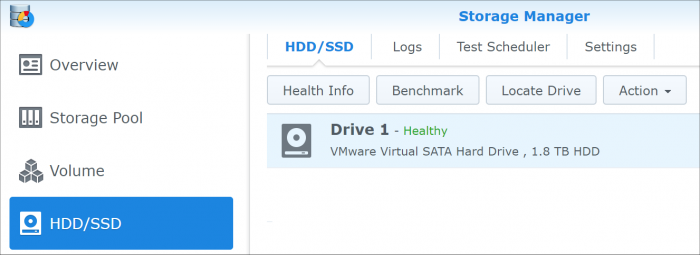
USE NVMe AS VIRTUAL DISK / HOW TO LIMIT DSM TO SPECIFIC DRIVES NOTE: if you just want to use NVMe drives as cache and can't get them to work on DSM 6.2.x, go here. Just thought to share some of the performance I'm seeing after converting from baremetal to ESXi in order to use NVMe SSDs. My hardware: SuperMicro X11SSH-F with E3-1230V6, 32GB RAM, Mellanox 10GBe, 8-bay hotplug chassis, with 2x WD Red 2TB (sda/sdb) in RAID1 as /volume1 and 6x WD Red 4TB (sdc-sdh) in RAID10 as /volume2 I run a lot of Docker apps installed on /volume1. This worked the 2TB Reds (which are not very fast) pretty hard, so I thought to replace them with SSD. I ambitiously acquired NVMe drives (Intel P3500 2TB) to try and get those to work in DSM. I tried many tactics to get them running in the baremetal configuration. But ultimately, the only way was to virtualize them and present them as SCSI devices. After converting to ESXi, /volume1 is on a pair of vmdk's (one on each NVMe drive) in the same RAID1 configuration. This was much faster, but I noted that Docker causes a lot of OS system writes which spanned all the drives (since Synology replicates the system and swap partitions across all devices). I was able to isolate DSM I/O to the NVMe drives by disabling the system partition (the example below excludes disks 3 and 4 from a 4-drive RAID): root@dsm62x:~# mdadm /dev/md0 -f /dev/sdc1 /dev/sdd1 mdadm: set /dev/sdc1 faulty in /dev/md0 mdadm: set /dev/sdd1 faulty in /dev/md0 root@dsm62x:~# mdadm --manage /dev/md0 --remove faulty mdadm: hot removed 8:49 from /dev/md0 mdadm: hot removed 8:33 from /dev/md0 root@dsm62x:~# mdadm --grow /dev/md0 --raid-devices=2 raid_disks for /dev/md0 set to 2 root@dsm62x:~# cat /proc/mdstat Personalities : [linear] [raid0] [raid1] [raid10] [raid6] [raid5] [raid4] md2 : active raid5 sdc3[5] sda3[0] sdd3[4] sdb3[2] 23427613632 blocks super 1.2 level 5, 64k chunk, algorithm 2 [4/4] [UUUU] md1 : active raid1 sdc2[1] sda2[0] sdb2[3] sdd2[2] 2097088 blocks [16/4] [UUUU____________] md0 : active raid1 sda1[0] sdb1[1] 2490176 blocks [2/2] [UU] unused devices: <none> root@dsm62x:~# mdadm --add /dev/md0 /dev/sdc1 /dev/sdd1 mdadm: added /dev/sdc1 mdadm: added /dev/sdd1 root@dsm62x:~# cat /proc/mdstat Personalities : [linear] [raid0] [raid1] [raid10] [raid6] [raid5] [raid4] md2 : active raid5 sdc3[5] sda3[0] sdd3[4] sdb3[2] 23427613632 blocks super 1.2 level 5, 64k chunk, algorithm 2 [4/4] [UUUU] md1 : active raid1 sdc2[1] sda2[0] sdb2[3] sdd2[2] 2097088 blocks [16/4] [UUUU____________] md0 : active raid1 sdd1[2](S) sdc1[3](S) sda1[0] sdb1[1] 2490176 blocks [2/2] [UU] root@dsm62x:~# If you want to disable the swap partition I/O in the same way, substitute /dev/md1 and its members sd(x)2 with the procedure above (NOTE: swap partition management not verified with DSM 6.1.x but it should work). After this, no Docker or DSM system I/O ever touches a spinning disk. Results: The DSM VM now boots in about 15 seconds. Docker used to take a minute or more to start and launch all the containers, now about 5 seconds. Copying to/from the NVMe volume maxes out the 10GBe interface (1 gigaBYTE per second) and it cannot fill the DSM system cache; the NVMe disks can sustain the write rate indefinitely. This is some serious performance, and a system configuration only possible because of XPEnology! Just as a matter of pointing out what is possible with Jun's boot loader, I was able to move the DSM directly from baremetal to ESXi, without reinstalling, by passthru of the SATA controller and the 10GBe NIC to the VM. I also was able to switch back and forth between USB boot using the baremetal bootloader menu option and ESXi boot image using the ESXi bootloader menu option. Without the correct VM settings, this will result in hangs, crashes and corruption, but it can be done. I did have to shrink /volume1 to convert it to the NVMe drives (because some space was lost by virtualizing them), but ultimately was able to retain all aspects of the system configuration and many months of btrfs snapshots converting from baremetal to ESXi. For those who are contemplating such a conversion, it helps to have a mirror copy to fall back on, because it took many iterations to learn the ideal ESXi configuration.
-
 Hello, I am looking to build a Xpenology but am hesitating on installing on bare metal or VMware ESXI 6.7 to replace my DS916+. I would like to use at all time as a NAS as a massively used file server where Moments will be running and casually use VMs (Win10, WinServer & Ubuntu). I know we can use VMs on Synology. That is why I am hesitating. My specs: Intel Xeon E5-2630LV3 (8cores 16threads) Fujitsu 32GB DDR4 ECC 2400mhz Kllisre X99 LGA2011-3 motherboard from Aliexpress 2x WD Red 8TBs (Dedicated for the storage) 2x WD Red 6TBs (Dedicated for the storage) 2x Samsung NVME 256GB SSD PM981 (for the cache) 1x Toshiba Sata 256gb SSD (for the VMware ESXI installation) 1x 2.5 GBE Network interface 1x 1GBE Network interface 1x APC Back up UPS My aim is to have the less problem as possible while the best stability, security, and performance as possible. Requirements: Have at least 18TB with, for example, SHR Have redundancy SSD Cache (NVME maybe?) PS: All my data will be backed up to my GSuite account with HyperBackup. Many thanks for your precious advice!
 -
(извините много букв, прошу разъяснить про виртуальные машины новичку) я изначально использовал xpenology на голом железе в hp microserver gen8 (стоковый celeron 4+8 Гб ram). пара первых рейдов с ext4 организованных самой xpenlogy были, ssd-кэш для чтения пробовал делать. c btrfs экспериментов не проводил. в целом всё выглядело вполне надёжно: загрузчик на sd-карточке, с неё грузился, в случае чего, карточка менялась, на неё залилвался такой же загрузчик. сама xpenology получалась какбы размазана по всем hdd, то есть если какой-то выходил из строя, то даже установленные пакеты не переставали функционировать после устранения неполадки. недавно был заменён процессор на xeon 1270v2. с установкой нового процессора решил расширить горизонты своих познаний и перейти на esxi. для этого у hp есть даже спец образ. его прекрасно установил на sd-карточку, с которой система загружается. не то чтобы сразу, но всё что хотелось реализовать получилось: крутится xpenology, рядом пара debian'ов. с rdm и прочими толстыми виртуальными дисками кое-как разобрался. в производительности hdd немного сомневаюсь, но для текущих нужд пока это не критично. usb 3.0 не работает - вот это засада, но пользуюсь им не часто, поэтому пока не обращаю внимание на это (хотя когда надо, хочется, конечно, чтобы "оно" побыстрее копировалось). так вот вопрос: я понимаю, общественность утверждает что esxi в отличие от proxmox больше заточена под установку на sd-карточки. но всё же, сдохнет карточка, ну не через месяц, но через полгода точно. и что меня ждёт? как-то можно снимать образы с этой карточки, чтобы в случае чего восстановить всё "как было"? тут конечно кто-то скажет, что можно нагородить рейд для esxi, но в моём случае это слишком расточительно. и я размышляю дальше. есть ведь virtual machine manager. который synology, позиционируют как гипервизор. судя по всему там имеют место проблемы с динамическим распределением ресурсов оперативной памяти. но если прикинуть, так, на вскидку, если завести это дело на raid1 с btrfs на текущем железе (3,5 ггц 4 ядра, 8 потоков, 12 гб озу) и крутить там 3-4 виртуальных машины на линуксе для домашних экспериментов, хватит ведь ресурсов (им ведь будет выдаваться отдельные ip роутером? свобод докера, кажется, мне не хватает)? в целом я конечно склоняюсь к xpenology на чистом железе, но сомневаюсь из-за поверхностных знаний. спасибо за внимание.
-
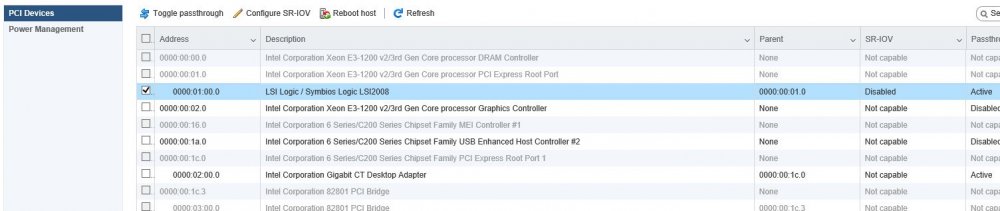
Hello Guys, I've recently installed DS918+ on ESXi 6.7, but i have problems with passthrough. I have Asrock J3455-ITX board which have builed in second sata controller (Asmedia). For storage I'm using two 8TB WD drives that were took out of MyBook external drives. I set Asmedia controller to be passthrough to VM with DSM, but once I create Volume on RAID1 pool, I start getting write errors on drives. I tried also external PCIE-X sata controller on Marvell chipset and got the same issue. Errors starts to appear once I'm writing to drives. Issue does not appear once drives are RDMs. Below is a screenshot for reference. Some text is in Polish, but you get the idea Did some one of you has some simmilar issues of know what can be the reason of this
-
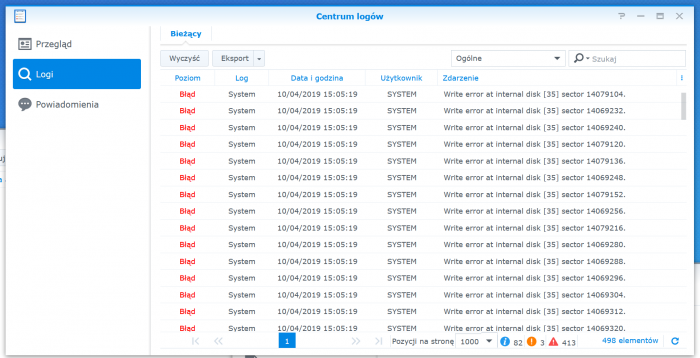
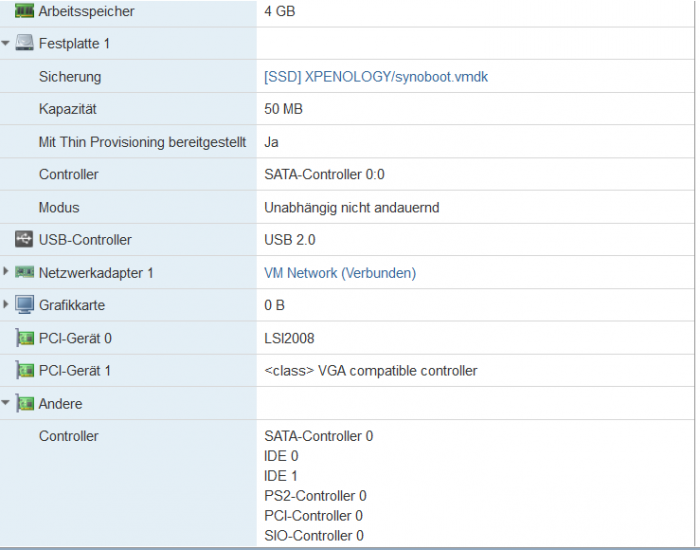
Hallo zusammen, Vorab mein Setup : Intel H370 Plattform mit Pentium G5400 Aktueller DS918+ Loader auf ESXI installiert Synoboot.vmdx auf Satacontroller 0:0 Datenfestplatten sind per PCI Passtrough an einen LSI 2008 Controller angeschlossen Ich habe gerade mein XPEnology System in Betrieb genommen und wollte mich nun ans finetuning machen. Dazu gehörte auch direkt im Standard Zustand ohne irgendwelche Pakete zu versuchen dieses lästige Festplatten Ruhezustandsthema hinzubekommen. Dabei entdekte ich folgenden LOG Spam, der das natürlich verhindert und auch sonst durch laufende Schreibvorgänge den Stromverbrauch, und Lautstärke in die Höhe treibt (aus scemd.log): 2019-09-12T17:19:20+02:00 NAS19 scemd: SmartDataRead(102) open device /dev/sdak fail 2019-09-12T17:19:20+02:00 NAS19 scemd: disk/disk_temperature_get.c:104 read value /dev/sdak fail 2019-09-12T17:19:20+02:00 NAS19 scemd: disk_temperature_update.c:63 Temperature Update Fail 2019-09-12T17:19:26+02:00 NAS19 scemd: SmartDataRead(102) open device /dev/sdak fail 2019-09-12T17:19:26+02:00 NAS19 scemd: disk/disk_temperature_get.c:104 read value /dev/sdak fail 2019-09-12T17:19:26+02:00 NAS19 scemd: disk_temperature_update.c:63 Temperature Update Fail Das insterresante ist : ich kann mir kein Reim drauf machen was /dev/sdak sein soll. Wie die smartctl --scan ausgabe mir anzeigt sind die Datenplatten sde,sdf und sdg. Per Ausschlussverfahren muss es also die Synoboot.vmdk sein, welche mir ja auch im Speichermanager angezeigt wird. Ich habe schon Ein wenig probiert mit dem Sata Port Mapping etc. in der Synoboot.img etwas zu erreichen aber das wirkte alles wie zufällig auswürfeln, es kam nie das heraus was herauskommen sollte. Im Anhang ein Screenshot des Speichermanagers und der ESXI Konfiguration. Weiß jemand wie ich die Synoboot.vmdk "los werde" damit dieser Fehler verschwindet? EDIT 1 : Ich habe einmal unter /dev/ nachgesehen und festgestellt, das es gar keine device file sdak gibt. Die Synoboot.vmdk als Ursache würde ich damit nicht mehr definitiv festmachen sondern Probleme beim Sata Port Mapping in der grub.cfg . Welche Einstellungen sollten dort getroffen werden für : Sata Controller 0 mit Synoboot.vmdk auf Sata 0:0 + PCI Passtrough HBA? Vielen Dank!
-
Hi all ! First of all, thank you developers for the wonderful work on Xpenology project ! Does anyone know why the SATA disks show up as SCSI in DSM virtualized ? This will generate errors in the interface when I check the Health of the disks. I am running DSM 6.2.2, Jun 1.04b, DS918+, in Esxi 6.7 on Asrock J4105-ITX board. I have 3 disks in my VM: 1. the synoboot image (/dev/hda) 2. a virtual disk on SATA1:0 3. a Hitachi hdd on a SATA controller, using PCI Passthrough. synodisk --enum ************ Disk Info *************** >> Disk id: 1 >> Slot id: -1 >> Disk path: /dev/sda >> Disk model: Virtual SATA Hard Drive >> Total capacity: 0.05 GB >> Tempeture: -1 C ************ Disk Info *************** >> Disk id: 2 >> Slot id: -1 >> Disk path: /dev/sdb >> Disk model: Virtual SATA Hard Drive >> Total capacity: 16.00 GB >> Tempeture: -1 C ************ Disk Info *************** >> Disk id: 4 >> Slot id: -1 >> Disk path: /dev/sdd >> Disk model: HTS545050B9A300 >> Total capacity: 465.76 GB >> Tempeture: 29 C smartctl --scan /dev/hda -d ata # /dev/hda, ATA device /dev/sdb -d scsi # /dev/sdb, SCSI device /dev/sdd -d scsi # /dev/sdd, SCSI device As you can see the HDD is seen as SCSI. udevadm info --query=property --name /dev/sdd DEVNAME=/dev/sdd DEVPATH=/devices/pci0000:00/0000:00:17.0/0000:13:00.0/ata4/host3/target3:0:0/3:0:0:0/block/sdd DEVTYPE=disk ID_PART_TABLE_TYPE=gpt MAJOR=8 MINOR=48 PHYSDEVBUS=scsi PHYSDEVDRIVER=sd PHYSDEVPATH=/devices/pci0000:00/0000:00:17.0/0000:13:00.0/ata4/host3/target3:0:0/3:0:0:0 SUBSYSTEM=block SYNO_DEV_DISKPORTTYPE=SATA SYNO_INFO_PLATFORM_NAME=apollolake SYNO_KERNEL_VERSION=4.4 USEC_INITIALIZED=779574 So all disks, even though are on SATA controllers show up as SCSI and smartctl fails for them. If I try to get SMART info, I get an error: smartctl -a /dev/sdd SMART support is: Unavailable - device lacks SMART capability. But if I add -d ata, it works. SMART support is: Available - device has SMART capability. Anyone can shed some light how to make the disk be seen as SATA instead of SCSI? Thank you !
-
Hey guys, I hope anybody can help me, because I've already tried nearly everything. I'm running XPEnology 6.1 Update 4 with Juns Loader 1.02b on a ESXi 6.0 VM. The ESXi Host is a HP Microserver Gen8 and i'm already using the hpvsa-5.5.0-88OEM driver. I've created 3 basic volumes, all on a seperate disk. If i move a file from one disk to another on the DSM interface, the transmission is really quick (more then 100mb/s). If I write a file on one of the shares from a Windows-VM on the same ESXi-Host, it is also quick (about 70mb/s). But if read a file on the SMB share, it starts at 6-7mb/s and gets a bit faster, but not more than 20mb/s. I have created a new XPE-VM, changed the network-card of the VM, gave the VMs more RAM, but nothing helped. Does anyone have an idea, why it is working perfect in one direction but so bad in the other?! I've found some threads, where the people wrote, that it works nicely on a baremetal installation. But i really need the Windows-vm on that machine and I also like ESXi very much.
-
I am new with ESXi server and virtual machine. With some tutorial I make my hardware works: now I have ESXi 6.7 load from a internal USB Stick (4Gb) I create a datastore on external USB Stick (32Gb) where I installa a VM with XPEnology I use the internal SATA HDD like phisycal drive on VM (map with vmkfstools -z on a local vmdk ) All works with DSM 6.2.2 that was my goal BUT my problem is that i HAVE to use also two NTFS HDD connected on external USB3 to share with XPEnology ... NOW in point 2. (to use a datastore on external USB) I use also command "chkconfig usbarbitrator off" and I think this is WHY I can't set the external NTFS HDD on virtual machine! if I set "chkconfig usbarbitrator on" after reboot, i can't see the datastore on external USB... so ESXi not find VM... what is the correct method to use a datastore on USB AND USB passthrough for my USB NTFS HDD? The perfect solution (for me) was to use the free USB space on the internal USB stick Is there a way to use the same USB STICK for boot ESXi and create a datastore for VM in the free space ? I not find a tutorial to make this... but only to use a entire USB stick, so I have to use two USB stick: one for boot and one for datastore Thanks
-
I own a DS1813+ but it has become slow, so I decided to build a new XPEnology Nas to replace it but I am running into a problem with Moments Face and Subject recognition. Hardware is: Motherboard: Supermicro X10SRM-F CPU: Xeon(R) CPU E5-2667 v4 @ 3.20GHz Memory: 64GB RAM Hypervisor: VMware ESXi 6.7.0 Update 2 (Build 13006603) I've tried all 3 current loaders: DSM_DS3617xs_23739 DSM_DS3615xs_23739 DSM_DS918+_23739 I am able to install all 3 loaders without issue but Moments facial and subject recognition does not work on any Moments log file contents: 2019-05-31T07:06:45-05:00 CloudE synophoto-task-center: /source/synophoto/src/daemon/task-center/plugin-monitor/sended_task_queue.cpp:96 Delete task user_id 1, unit_id 69, type 6 2019-05-31T07:06:45-05:00 CloudE synophoto-task-center: /source/synophoto/src/daemon/task-center/plugin-monitor/sended_task_queue.cpp:96 Delete task user_id 1, unit_id 70, type 6 2019-05-31T07:06:45-05:00 CloudE synophoto-task-center: /source/synophoto/src/lib/io/channel.cpp:81 channel[/run/synophoto/concept.socket] construct failed: connect: Connection refused 2019-05-31T07:06:45-05:00 CloudE synophoto-task-center: /source/synophoto/src/daemon/task-center/plugin-monitor/sended_task_queue.cpp:96 Delete task user_id 1, unit_id 71, type 6 2019-05-31T07:06:45-05:00 CloudE synophoto-task-center: /source/synophoto/src/daemon/task-center/plugin-monitor/sended_task_queue.cpp:96 Delete task user_id 1, unit_id 72, type 6 2019-05-31T07:06:45-05:00 CloudE synophoto-concept: /source/synophoto-plugin-detection/src/detection/plugin.cpp:21 detection plugin init 2019-05-31T07:06:53-05:00 CloudE synophoto-task-center: /source/synophoto/src/daemon/task-center/plugin-monitor/sended_task_queue_base.cpp:61 Plugin wake up pkg-SynologyMoments-concept, retry 1 2019-05-31T07:06:53-05:00 CloudE synophoto-concept: /source/synophoto-plugin-detection/src/detection/plugin.cpp:21 detection plugin init 2019-05-31T07:07:00-05:00 CloudE synophoto-task-center: /source/synophoto/src/daemon/task-center/plugin-monitor/sended_task_queue_base.cpp:61 Plugin wake up pkg-SynologyMoments-concept, retry 2 2019-05-31T07:07:00-05:00 CloudE synophoto-concept: /source/synophoto-plugin-detection/src/detection/plugin.cpp:21 detection plugin init 2019-05-31T07:07:08-05:00 CloudE synophoto-task-center: /source/synophoto/src/daemon/task-center/plugin-monitor/sended_task_queue_base.cpp:61 Plugin wake up pkg-SynologyMoments-concept, retry 3 2019-05-31T07:07:08-05:00 CloudE synophoto-concept: /source/synophoto-plugin-detection/src/detection/plugin.cpp:21 detection plugin init 2019-05-31T07:07:13-05:00 CloudE synophoto-task-center: /source/synophoto/src/daemon/task-center/plugin-monitor/sended_task_queue.cpp:93 Plugin wake up pkg-SynologyMoments-concept, clean task 2019-05-31T07:07:13-05:00 CloudE synophoto-task-center: /source/synophoto/src/daemon/task-center/plugin-monitor/sended_task_queue.cpp:96 Delete task user_id 1, unit_id 73, type 6 2019-05-31T07:07:13-05:00 CloudE synophoto-task-center: /source/synophoto/src/daemon/task-center/plugin-monitor/sended_task_queue.cpp:96 Delete task user_id 1, unit_id 74, type 6 2019-05-31T07:07:13-05:00 CloudE synophoto-task-center: /source/synophoto/src/daemon/task-center/plugin-monitor/sended_task_queue.cpp:96 Delete task user_id 1, unit_id 75, type 6 2019-05-31T07:07:13-05:00 CloudE synophoto-task-center: /source/synophoto/src/daemon/task-center/plugin-monitor/sended_task_queue.cpp:96 Delete task user_id 1, unit_id 76, type 6 2019-05-31T07:07:13-05:00 CloudE synophoto-task-center: /source/synophoto/src/daemon/task-center/plugin-monitor/sended_task_queue.cpp:96 Delete task user_id 1, unit_id 77, type 6 2019-05-31T07:11:27-05:00 CloudE synoscgi_SYNO.Photo.Index_2_reindex[23699]: /source/synophoto/src/webapi/lib/index/index.cpp:58 User disciple(1026) trigger reindex: all [/var/services/homes/disciple/Drive/] 2019-05-31T07:15:17-05:00 CloudE synoscgi_SYNO.Photo.Setting.User_2_set[25384]: /source/synophoto/src/webapi/module/Photo/Setting/user_setting.cpp:299 User disciple(1026) enable GeoCoding 2019-05-31T07:15:17-05:00 CloudE synoscgi_SYNO.Photo.Setting.User_2_set[25384]: /source/synophoto/src/webapi/module/Photo/Setting/user_setting.cpp:304 User disciple(1026) enable FaceExtraction 2019-05-31T07:15:17-05:00 CloudE synoscgi_SYNO.Photo.Setting.User_2_set[25384]: /source/synophoto/src/webapi/module/Photo/Setting/user_setting.cpp:309 User disciple(1026) enable ConceptDetection 2019-05-31T07:15:17-05:00 CloudE synoscgi_SYNO.Photo.Setting.User_2_set[25384]: /source/synophoto/src/webapi/module/Photo/Setting/user_setting.cpp:319 User disciple(1026) enable Assessment 2019-05-31T07:15:17-05:00 CloudE synophoto-bin-update-similar: /source/synophoto/src/bin/utils/update.cpp:33 [Moments Binary] >> disciple(id: 1, uid: 1026) 2019-05-31T07:15:17-05:00 CloudE synophoto-bin-update-similar: /source/synophoto/src/bin/utils/update.cpp:33 [Moments Binary] Update 2019-05-31T07:15:17-05:00 CloudE synophoto-bin-update-similar: /source/synophoto/src/bin/utils/update.cpp:33 [Moments Binary] << disciple(id: 1, uid: 1026) 2019-05-31T09:48:08-05:00 CloudE synoscgi_SYNO.Photo.Index_2_reindex[1198]: /source/synophoto/src/webapi/lib/index/index.cpp:58 User disciple(1026) trigger reindex: all [/var/services/homes/disciple/Drive/] The VM running XPENology is configured: 2 vCPUs (also tried 4) 16GB RAM SATA 0:0 - synoboot.vmdk SATA 1:0 - vmname.vmdk (64 GB) SATA 1:1 RDM SATA 1:2 RDM SATA 1:3 RDM My question is simple, can anyone confirm that Moments Facial and Subject recognition works on DSM running in a VM? If it does, can you let me know what combination you are using: Loader version, DSM version, ESXi version, VM config Thanks.
-
Привет всем. DS3617, Loader 1.03, установка на ESXi, при установке всё идет нормально и по плану, а вот после установки и перезагрузки XPEnology не видит scsi контроллер и подключенные диски. конфиг следующий: контроллер LSI logical parallel Диски прокинуты через vmkfstools -z ...И ещё при равных условиях DS918+ loader 1.04b грузится и работает нормально... если дело в дровах то может есть у кого exrta.lzma для 3617 с поддержкой scsi или подскажите в чем проблема.
-
Hi Guys, Im having issues with my vitrualized XPE. I am running it on a dell R710 with a H200 HBA(IT-mode). The issue is that when I pass through the PCI-E HBA 4 all drives get recognized but Synology is reporting that 4 of them are 0 Bytes HDD. Ex. Esxi VM-settings: Version: DSM 6.2.1-23824 Update 4 Do any of you guys know what the cause of the issue can be ? In ESXI all drives are recognized. Kind regards, Mat.
-
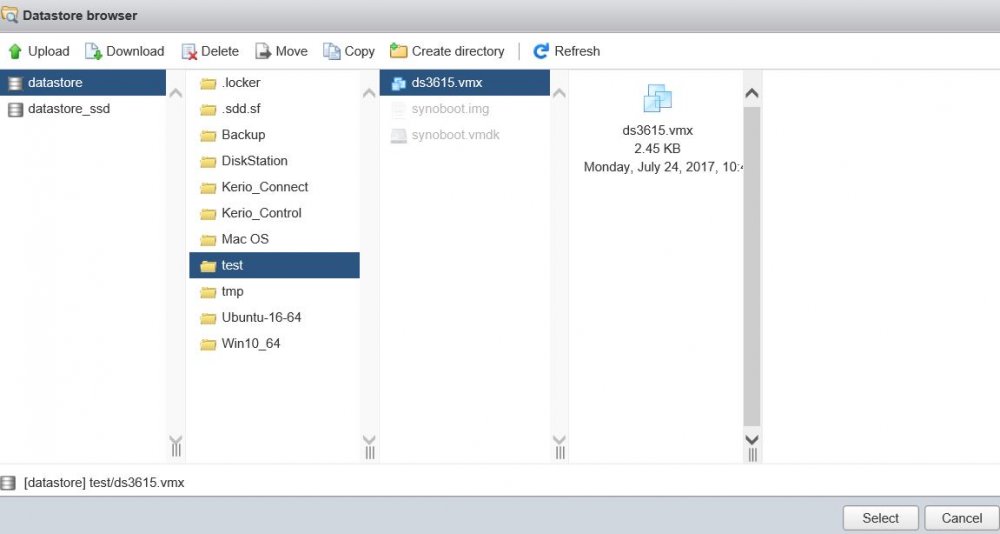
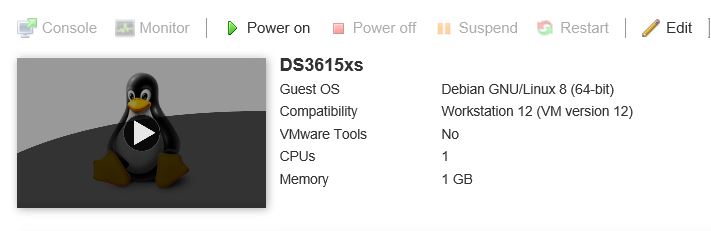
 Hallo zusammen, hier ist eine Anleitung zum Update des Boot Loaders auf Jun's Bootloader V 1.02b.Basiert auf Synology DS3615xs und VMware ESXi v6.5. Upgrade des Jun's Bootloaders von V1.01 auf V.1.02b, damit man DSM 6.1.x (i.d.F. 6.1.5-15254 Update 1) installieren kann. 1. Vorher DSM ausschalten und die betroffene VM mit DSM bzw. Xpenology vom ESXi-Datastore auf lokale Festplatte sichern. Im Falle eines Problem ist somit für Backup vorgesorgt 2. In der gesicherten VM-Ordner befindet sich ein synoboot.img. Diese Datei entpacken und in der "grub.cfg" -Datei (synoboot\boot\grub\grub.cfg) nachschauen, welche Einstellungen aktuell hinterlegt sind. Dieser Textbereich ist relevant: set vid=0x058f set pid=0x6387 set sn=B3Lxxxxx (Eure SN-Nummer!) set mac1=011xxxxxxx (Eure MAC-Adresse!) set rootdev=/dev/md0 set netif_num=1 set extra_args_3615='' 3. Die aktuelle Jun's Bootloader (synoboot.img) in der aktuellen Version (derzeit V.1.02b) für DS3615xs hierüber herunterladen. 4. Die heruntergeladene synoboot.img mit der OSF-Mount Software mounten. Dabei beachten, dass beim Mounten die Optionen " Mount All Volumes" angehackt und "Read Only drive" nicht ausgewählt ist 5. Danach im Windows-Explorer in das gemountete Laufwerk navigieren. In der "grub.cfg" der gemounteten synoboot.img-Datei (\boot\grub\grub.cfg) die Informationen(MAC-Adresse, SN-Nummer usw.) von der alten "grub.cfg" -Datei übernehmen bzw. überschreiben und die Änderungen speichern. Danach die zuvor gemountete Datei wieder über OSF-Mount dismounten (Dismount All & Exit) 6. Die Alte "synoboot.iso" Datei auf dem VMware-ESXi Datastore löschen und durch die aktuelle synoboot.img ersetzen (hochladen) 7. Danach die VM mit DSM bzw. Xpenology auf dem ESXi wieder starten. Wichtig: Über die VMware Konsole unmittelbar nach dem Start mit der Tastatur "Jun's Bootloader for ESXi" auswählen und mit ENTER bestätigen 8. Im Web-Browser "find.synology.com" und mit ENTER bestätigen. Synology Web Assistant sucht jetzt nach der DSM und zeigt den Status als "migrierbar" an. Dort auf "Verbinden" klicken und auf die DSM verbinden. Dort steht jetzt: "Wir haben festgestellt, dass die Festplatten Ihres aktuellen DS3615xs aus einem vorhergehenden DS3615xs entnommen wurden. Bevor Sie fortfahren, müssen Sie einen neueren DSM installieren." 9. Nun kann man die .pat-Datei (DSM-Firmware) hinzufügen und manuell installieren lassen aber oder automatisch die neueste DSM Version vom Synology-Server (online) installieren lassen. Ich empfehle euch die manuelle Installation, da es keine Garantien gibt ob die aktuellste DSM-Version vom Synology-Server (online) mit eurem Xpenology Boot Looder funktiert. Ich habe meine (diese) Installation mit der DSM Version "6.1.5-15254 Update 1" erfolgreich hingekriegt. Hier könnt ihr diese Version herunterladen: DSM_DS3615xs_15254.pat 10. Nun auf "Installieren" anklicken und danach "Migration: Meine Dateien und die meisten Einstellungen behalten" auswählen. Auf "Weiter" und "Jetzt installieren" anklicken 11. DSM wird nun auf dem neuen Jun's Boot Loader installiert (dauert ca. 10 Minuten) 12. Nach der Installation im DSM anmelden und die durch den DHCP-zugewiesenen IP nach Wunsch wieder anpassen bzw. ändern Fertig.