Search the Community
Showing results for tags 'vmware'.
Found 25 results
-
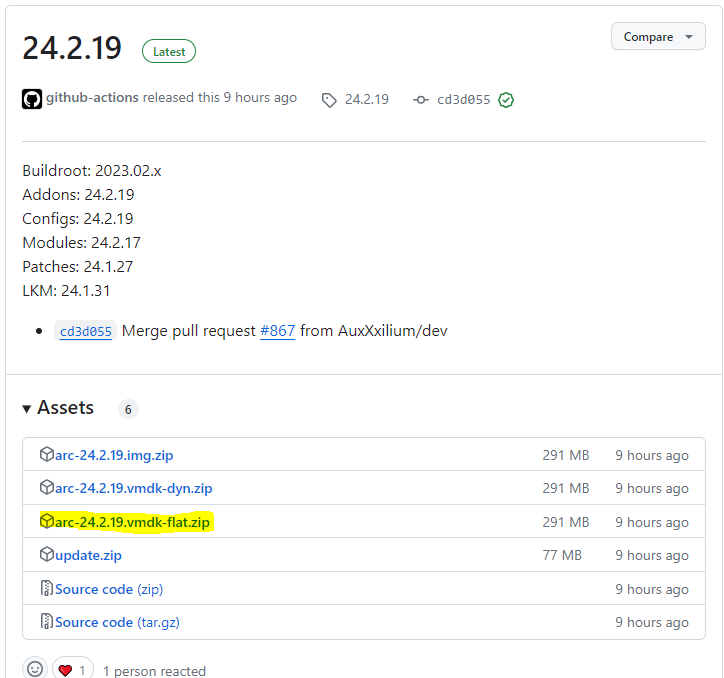
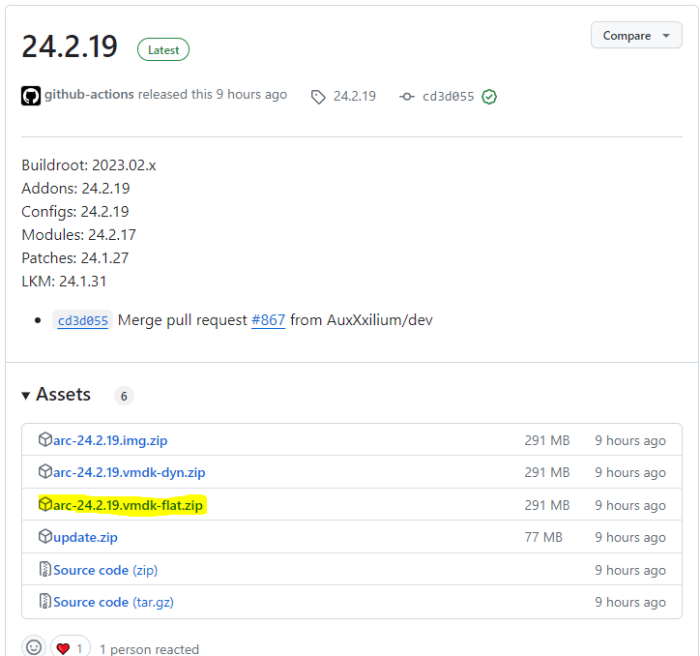
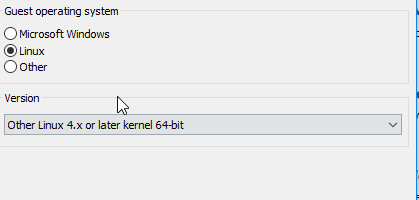
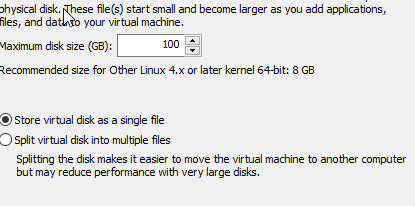
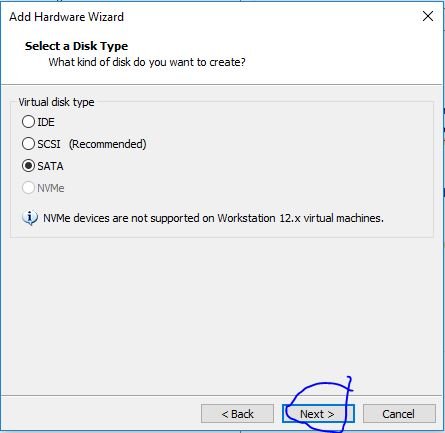
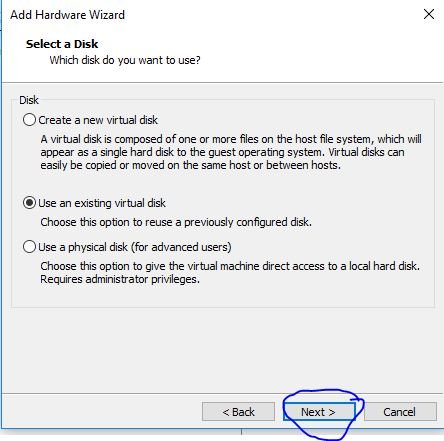
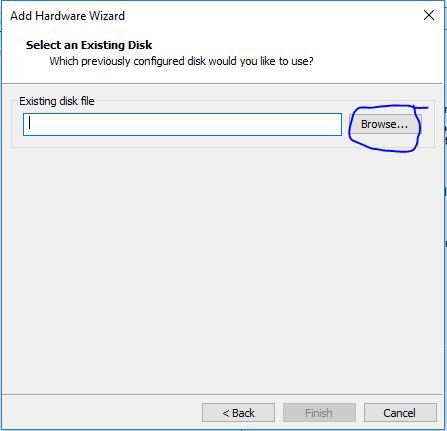
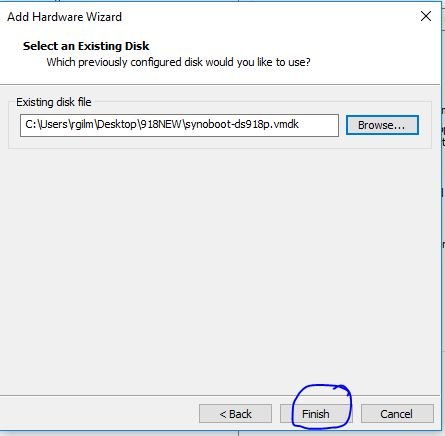
[EDIT du 20/02/2024] : Prise en compte retour sur le fichier flat et mode UEFI [EDIT du 01/12/203] : Mise à jour pour loader ARC [EDIT du 01/10/203] : Mise à jour pour DSM 7.2.1 [EDIT du 22/04/2020] : Mise à jour pour DSM 6.2.3-25426 [EDIT du 26/05/2020] : Ajout procédure de changement d'adresse mac et SN Je mets à jour ce tuto avec le loader ARC réputé beaucoup plus simple et plus réactif en terme de développement. Pour simplifier les captures d'écran je vais vous les présenter à l'aide de VMWare Workstation Player, mais la procédure est équivalente pour ESXi. 1. Pour commencer, télécharger le loader ARC fichier nommé arc-YY.MM.DD.vmdk-flat.zip et décompresser le zip pour extraire les 2 fichiers arc-*.vmdk dans le futur répertoire de la VM : 2. Dans VMWare, créer une VM de type Linux Version : Other Linux 4.x kernel 64-bit avec comme disque dur SATA le fichier arc-flat.vmdk fraichement créé au port SATA 0:0. ==>Pensez à supprimer les trucs qui ne servent à rien comme la carte son, l'imprimante et le lecteur DVD. 3. Une fois la VM créée, éditer la directement en ajoutant autant de disques SATA pour les données qu'on souhaite, au(x) port(s) SATA 0:1(n+1). 4. Seulement pour ESXi (ie. pas VMWare Player) : Se rendre dans les options VM et décocher "Activer le démarrage sécurisé UEFI" dans les options de démarrage. 5. Démarrer la VM. Elle devrait lancer le loader automatiquement. 6. Suivre la configuration classique du loader ARC pour builder le loader (même pas besoin de saisir d'adresse mac et de SN si vous n'avez pas besoin des services Syno) comme indiqué dans le tuto principal à partir du point 3. 7. Une fois DSM installé et configuré, vous pouvez télécharger ici les outils VMWare et les installer directement depuis le gestionnaire de paquets. Cela vous offrira une meilleure prise en charge de l'arrêt et du démarrage de la VM depuis ESXi.
-
 Hello all, I have a HP Microserver Gen10 with 16GB of RAM and 4 disk WD red 3TB (drives are in passthrough). I'd like to go back from virtual machine to bare-metal due to performance issue. What steps should i do considering that i've updated to DSM7.2-64570 - DS3622xs? i have only to create the usb boot or i have to perform any other step? Any other consideration? Thank you in advance!
-
What are the multiple approaches to VMware backup, and what is the best VMware services they could offer for a digital business?
-
Bonjour à tous, Voulant essayer la version 6 oui, je suis toujours en 5.2 Le passage d’une version à l’autre me donne des sueurs ! Bref, j’ai voulu voir à quoi ressemblait DSM 6. J’ai donc créé une VM avec VMware Workstation. J’ai récupéré dans ce fil https://xpenology.com/forum/topic/9788-config-toute-prete-pour-esxi-ça-serai-le-pied/ Le fichier « synoboot » de Nicoueron et le fichier .pat « DSM_DS3615xs_15217.pat » sur le site de synology Ensuite j’ai mis le vmdk synoboot en Sata et j’ai ajouté un vmdk en Scsi. Au lancement de la VM J’ai ceci : je lance donc « Synology Assistant » qui trouve le nouveau DiskStation en mode DHCP et Non installé. Jusque là tout va bien. Ensuite je me connecte dessus avec un browser et lance la configuration. Apres avoir in traduis le chemin du fichier pat. J’ai une erreur (35) ! Quelqu’un à une idée ? Merci pour votre aide. Bon week-end
-
i am successfully up and running with juns 1.03 and DSM 6.2.3-25426, hardware is currently a ryzen 3700x x570apro motherboard but is soon changing as it is going to its own dedicated intel hardware, i also own a ds918+ (but not powerful enough so going to a 10th gen i5) i can't seem to install vmware tools AT ALL and pass thru a shared folder from the windows host to the guesto2 (the dsm) anybody offer any help or has a pre-setup vmware clone they could share with vmware tools on so i can mount the windows host o2 share? thankyou very much!
-
 Hello, I am looking to build a Xpenology but am hesitating on installing on bare metal or VMware ESXI 6.7 to replace my DS916+. I would like to use at all time as a NAS as a massively used file server where Moments will be running and casually use VMs (Win10, WinServer & Ubuntu). I know we can use VMs on Synology. That is why I am hesitating. My specs: Intel Xeon E5-2630LV3 (8cores 16threads) Fujitsu 32GB DDR4 ECC 2400mhz Kllisre X99 LGA2011-3 motherboard from Aliexpress 2x WD Red 8TBs (Dedicated for the storage) 2x WD Red 6TBs (Dedicated for the storage) 2x Samsung NVME 256GB SSD PM981 (for the cache) 1x Toshiba Sata 256gb SSD (for the VMware ESXI installation) 1x 2.5 GBE Network interface 1x 1GBE Network interface 1x APC Back up UPS My aim is to have the less problem as possible while the best stability, security, and performance as possible. Requirements: Have at least 18TB with, for example, SHR Have redundancy SSD Cache (NVME maybe?) PS: All my data will be backed up to my GSuite account with HyperBackup. Many thanks for your precious advice!
 -

Tutorial: DSM 6.2 on VMWare Workstation Player 15
WhileDekker posted a topic in Tutorials and Guides
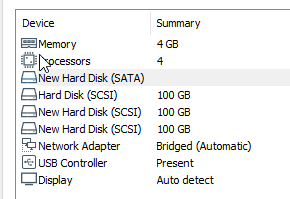
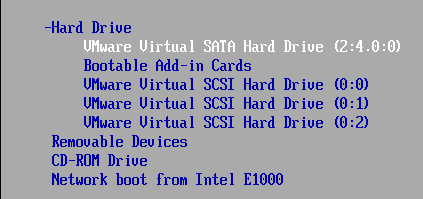
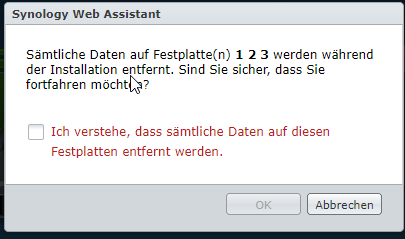
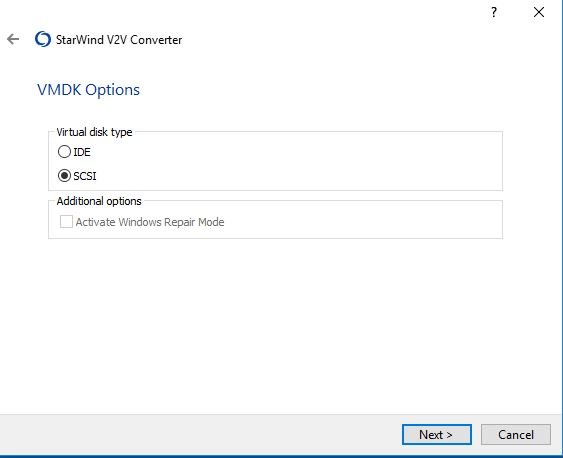
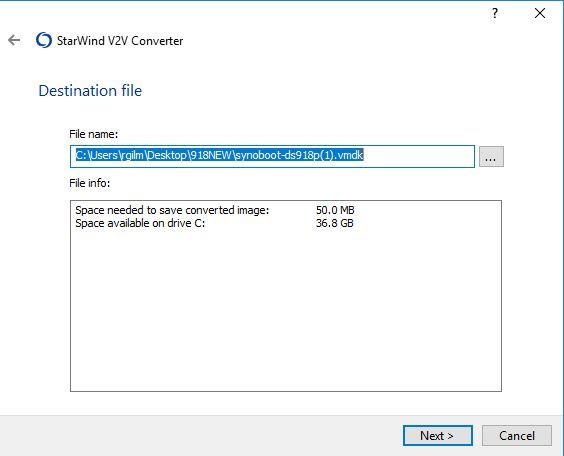
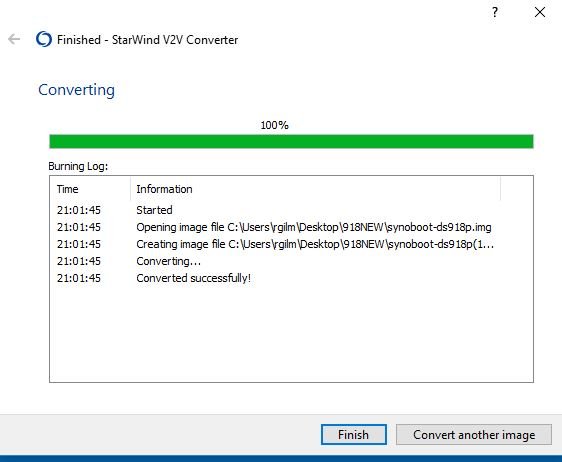
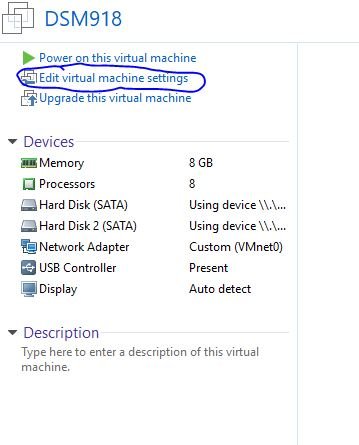
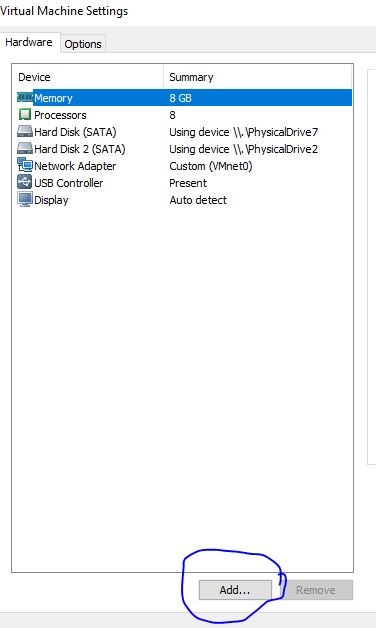
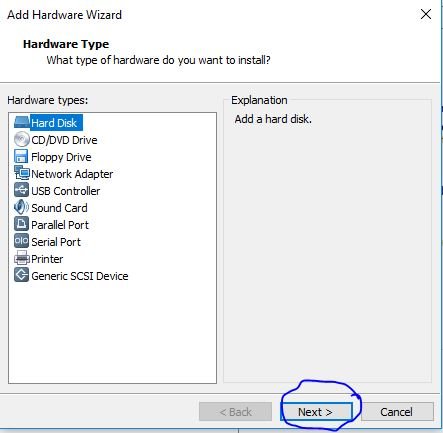
Hi this is how I managed to get DSM 6.2 running on the free VMWare Workstation Player 15. I know there are other tutorials for VMWare Workstation Pro and the procedure is quite similar. Following on of these tutorials (https://xpenology.com/forum/topic/13006-tutorial-vmware-workstation-dsm-62-install-esxi-compatible) brought me very close to my goal but still I had to do some try and error, therefore I am sharing my piece of the cake here. Please note: This is how I made it work, dont blame me if this is not working for you. 1. Loader Download Jun's Loader v1.03b DS3617xs Synoboot_3617.zip | 19.5 MB | MD5 = 94d18efbc349da2bd45d6e57adabc54f 2. Convert Loader img to vmdk with Starwind V2V Image Converter (free) 3. Run the "new vm wizzard" on VMWare Workstation Player The wizzard always creates a data hd, you can use this as your first data hd or delete it later. Finish the wizard Now edit the virtual machine settings This is what I do usually - Change cpu and ram to 4/4 - remove cd, soundcard, printer - change LAN to bridged - add x more scsi hds (same settings as when using the wizard) Copy the two vmdk files from the conversion above and add as a SATA hd (select the 1k file) and select keep existing format This is how my setup looks after that Power up the vm and you will realize it doesnt boot – change bios boot order and after saving select VMWare while booting (you need to be real quick this is only showing for some secs). Find your ds via find.synology.com and run installation as usual (I downloaded latest 6.2. using the link on xpenology to be sure to use a supported version). When the HD erase notification appears it should show you all your data hds you added – I added 1 boot hd and 3 data hds so 3 hds should be shown. Takeaways: - I was using an old version of Starwind V2V converter, this converted the image but apparently sth was different and it didnt really boot up correctly (no LAN). - When configuring the synoboot as scsi I was not able to connect to my nas (didnt get an IP from DHCP) - I had to select VMWare/ESXi on boot otherwise no data hd was shown during installation and dsm installation failed - I tried the same with DS918+, but this got me into a installation loop - Tested upgrade to 6.2.1. after that ds was broken – I guess the loader is not ready for it yet – so make sure auto update is disabled Again, this is just my thoughts and how I managed it. Maybe things in this are wrong or understood wrong by me - but at least this is how I managed to get it running. Cheers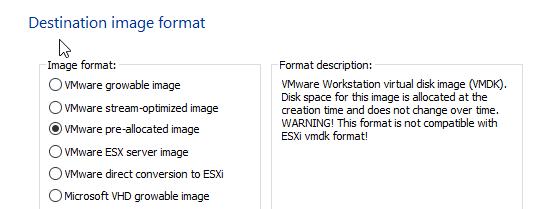


- 14 replies
-
- 1
-

-
- workstation player
- vmware
- (and 3 more)
-
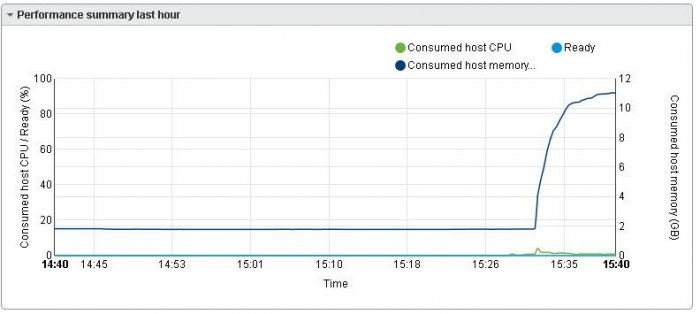
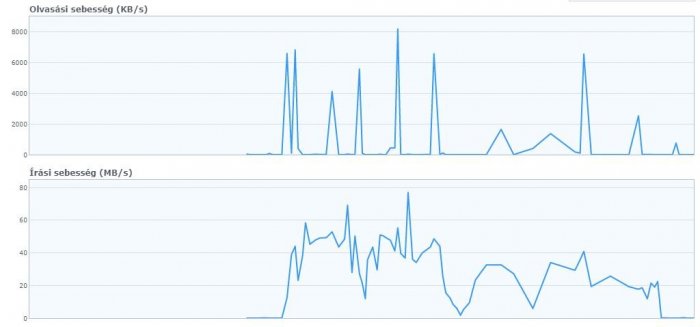
Hi, I have a DSM6.2 VM. It has a vmdk disk from the local Sata HDD on a Xeon server. I have assigned 16 cpu and 12 gb ram to it. When there is any disc operation (copy locally or on network) it consumes all memory like this: And the copy itself is also slow: My idea was to disable the memory compression feature but it did not helped. Do you have any idea what could be the problem? Thanks.
-
I got DS3615xs installed on Workstation with ESXi 6.5 HW compatability, and got it working so that I could set up a RAID, after I set up file sharing etc. I could not connect to the NAS outside of the VM host, so I shut it down within the Synology OS so I could change network settings in the VM while it's not running. When I booted it back up again I couldn't connect to it from anywhere, so I shut it down from VMware and changed the network settings back again. VMware says that it's booted and all good, but I can't connect to it and one of my 4 discs are running at 100% usage but barely any data is being written or read from it. Anyone that can tell me if there is hope of saving it?
-
I own a DS1813+ but it has become slow, so I decided to build a new XPEnology Nas to replace it but I am running into a problem with Moments Face and Subject recognition. Hardware is: Motherboard: Supermicro X10SRM-F CPU: Xeon(R) CPU E5-2667 v4 @ 3.20GHz Memory: 64GB RAM Hypervisor: VMware ESXi 6.7.0 Update 2 (Build 13006603) I've tried all 3 current loaders: DSM_DS3617xs_23739 DSM_DS3615xs_23739 DSM_DS918+_23739 I am able to install all 3 loaders without issue but Moments facial and subject recognition does not work on any Moments log file contents: 2019-05-31T07:06:45-05:00 CloudE synophoto-task-center: /source/synophoto/src/daemon/task-center/plugin-monitor/sended_task_queue.cpp:96 Delete task user_id 1, unit_id 69, type 6 2019-05-31T07:06:45-05:00 CloudE synophoto-task-center: /source/synophoto/src/daemon/task-center/plugin-monitor/sended_task_queue.cpp:96 Delete task user_id 1, unit_id 70, type 6 2019-05-31T07:06:45-05:00 CloudE synophoto-task-center: /source/synophoto/src/lib/io/channel.cpp:81 channel[/run/synophoto/concept.socket] construct failed: connect: Connection refused 2019-05-31T07:06:45-05:00 CloudE synophoto-task-center: /source/synophoto/src/daemon/task-center/plugin-monitor/sended_task_queue.cpp:96 Delete task user_id 1, unit_id 71, type 6 2019-05-31T07:06:45-05:00 CloudE synophoto-task-center: /source/synophoto/src/daemon/task-center/plugin-monitor/sended_task_queue.cpp:96 Delete task user_id 1, unit_id 72, type 6 2019-05-31T07:06:45-05:00 CloudE synophoto-concept: /source/synophoto-plugin-detection/src/detection/plugin.cpp:21 detection plugin init 2019-05-31T07:06:53-05:00 CloudE synophoto-task-center: /source/synophoto/src/daemon/task-center/plugin-monitor/sended_task_queue_base.cpp:61 Plugin wake up pkg-SynologyMoments-concept, retry 1 2019-05-31T07:06:53-05:00 CloudE synophoto-concept: /source/synophoto-plugin-detection/src/detection/plugin.cpp:21 detection plugin init 2019-05-31T07:07:00-05:00 CloudE synophoto-task-center: /source/synophoto/src/daemon/task-center/plugin-monitor/sended_task_queue_base.cpp:61 Plugin wake up pkg-SynologyMoments-concept, retry 2 2019-05-31T07:07:00-05:00 CloudE synophoto-concept: /source/synophoto-plugin-detection/src/detection/plugin.cpp:21 detection plugin init 2019-05-31T07:07:08-05:00 CloudE synophoto-task-center: /source/synophoto/src/daemon/task-center/plugin-monitor/sended_task_queue_base.cpp:61 Plugin wake up pkg-SynologyMoments-concept, retry 3 2019-05-31T07:07:08-05:00 CloudE synophoto-concept: /source/synophoto-plugin-detection/src/detection/plugin.cpp:21 detection plugin init 2019-05-31T07:07:13-05:00 CloudE synophoto-task-center: /source/synophoto/src/daemon/task-center/plugin-monitor/sended_task_queue.cpp:93 Plugin wake up pkg-SynologyMoments-concept, clean task 2019-05-31T07:07:13-05:00 CloudE synophoto-task-center: /source/synophoto/src/daemon/task-center/plugin-monitor/sended_task_queue.cpp:96 Delete task user_id 1, unit_id 73, type 6 2019-05-31T07:07:13-05:00 CloudE synophoto-task-center: /source/synophoto/src/daemon/task-center/plugin-monitor/sended_task_queue.cpp:96 Delete task user_id 1, unit_id 74, type 6 2019-05-31T07:07:13-05:00 CloudE synophoto-task-center: /source/synophoto/src/daemon/task-center/plugin-monitor/sended_task_queue.cpp:96 Delete task user_id 1, unit_id 75, type 6 2019-05-31T07:07:13-05:00 CloudE synophoto-task-center: /source/synophoto/src/daemon/task-center/plugin-monitor/sended_task_queue.cpp:96 Delete task user_id 1, unit_id 76, type 6 2019-05-31T07:07:13-05:00 CloudE synophoto-task-center: /source/synophoto/src/daemon/task-center/plugin-monitor/sended_task_queue.cpp:96 Delete task user_id 1, unit_id 77, type 6 2019-05-31T07:11:27-05:00 CloudE synoscgi_SYNO.Photo.Index_2_reindex[23699]: /source/synophoto/src/webapi/lib/index/index.cpp:58 User disciple(1026) trigger reindex: all [/var/services/homes/disciple/Drive/] 2019-05-31T07:15:17-05:00 CloudE synoscgi_SYNO.Photo.Setting.User_2_set[25384]: /source/synophoto/src/webapi/module/Photo/Setting/user_setting.cpp:299 User disciple(1026) enable GeoCoding 2019-05-31T07:15:17-05:00 CloudE synoscgi_SYNO.Photo.Setting.User_2_set[25384]: /source/synophoto/src/webapi/module/Photo/Setting/user_setting.cpp:304 User disciple(1026) enable FaceExtraction 2019-05-31T07:15:17-05:00 CloudE synoscgi_SYNO.Photo.Setting.User_2_set[25384]: /source/synophoto/src/webapi/module/Photo/Setting/user_setting.cpp:309 User disciple(1026) enable ConceptDetection 2019-05-31T07:15:17-05:00 CloudE synoscgi_SYNO.Photo.Setting.User_2_set[25384]: /source/synophoto/src/webapi/module/Photo/Setting/user_setting.cpp:319 User disciple(1026) enable Assessment 2019-05-31T07:15:17-05:00 CloudE synophoto-bin-update-similar: /source/synophoto/src/bin/utils/update.cpp:33 [Moments Binary] >> disciple(id: 1, uid: 1026) 2019-05-31T07:15:17-05:00 CloudE synophoto-bin-update-similar: /source/synophoto/src/bin/utils/update.cpp:33 [Moments Binary] Update 2019-05-31T07:15:17-05:00 CloudE synophoto-bin-update-similar: /source/synophoto/src/bin/utils/update.cpp:33 [Moments Binary] << disciple(id: 1, uid: 1026) 2019-05-31T09:48:08-05:00 CloudE synoscgi_SYNO.Photo.Index_2_reindex[1198]: /source/synophoto/src/webapi/lib/index/index.cpp:58 User disciple(1026) trigger reindex: all [/var/services/homes/disciple/Drive/] The VM running XPENology is configured: 2 vCPUs (also tried 4) 16GB RAM SATA 0:0 - synoboot.vmdk SATA 1:0 - vmname.vmdk (64 GB) SATA 1:1 RDM SATA 1:2 RDM SATA 1:3 RDM My question is simple, can anyone confirm that Moments Facial and Subject recognition works on DSM running in a VM? If it does, can you let me know what combination you are using: Loader version, DSM version, ESXi version, VM config Thanks.
-
I'm thinking about upgrading my hardware and moving from VMware to Proxmox. It'll be a good exercise which I'll probably am going to regret when I'm half way the upgrade I'm looking for some help in the migration steps; Current setup: Hardware: i3 6100 8Gb 250Gb SSD + 4x3TB + 3x5TB+2x8TB VMWare ESXi 6.7.0 XpenologyA: Jun's Loader v1.04b - DS918 RDM 4x3TB - Photos, backups and document storage (The important stuff) XpenologyB: Jun's Loader v1.04b - DS918 RDM 3x5TB + 2x8TB - Home media server (The not so important stuff) XpenologyC: Jun's Loader v1.04b - DS918 No disks, upgrade/test purposes. I'd like to move to a Ryzen 7 1700 with the Asus Prime X370-PRO with 16Gb running ProxMox Installing Proxmox and Xpenology should not be a big problem. However, how am I going to migrate my data to the new installation without having to buy a sh*tload of drives? I know DSM allows you to migrate a set drives from one server to another. But, how does this work/apply (if at all) when you have a virtualized instance RDM and you want to change from VMWare to Proxmox?
-
 Hallo zusammen, hier ist eine Anleitung zum Update des Boot Loaders auf Jun's Bootloader V 1.02b.Basiert auf Synology DS3615xs und VMware ESXi v6.5. Upgrade des Jun's Bootloaders von V1.01 auf V.1.02b, damit man DSM 6.1.x (i.d.F. 6.1.5-15254 Update 1) installieren kann. 1. Vorher DSM ausschalten und die betroffene VM mit DSM bzw. Xpenology vom ESXi-Datastore auf lokale Festplatte sichern. Im Falle eines Problem ist somit für Backup vorgesorgt 2. In der gesicherten VM-Ordner befindet sich ein synoboot.img. Diese Datei entpacken und in der "grub.cfg" -Datei (synoboot\boot\grub\grub.cfg) nachschauen, welche Einstellungen aktuell hinterlegt sind. Dieser Textbereich ist relevant: set vid=0x058f set pid=0x6387 set sn=B3Lxxxxx (Eure SN-Nummer!) set mac1=011xxxxxxx (Eure MAC-Adresse!) set rootdev=/dev/md0 set netif_num=1 set extra_args_3615='' 3. Die aktuelle Jun's Bootloader (synoboot.img) in der aktuellen Version (derzeit V.1.02b) für DS3615xs hierüber herunterladen. 4. Die heruntergeladene synoboot.img mit der OSF-Mount Software mounten. Dabei beachten, dass beim Mounten die Optionen " Mount All Volumes" angehackt und "Read Only drive" nicht ausgewählt ist 5. Danach im Windows-Explorer in das gemountete Laufwerk navigieren. In der "grub.cfg" der gemounteten synoboot.img-Datei (\boot\grub\grub.cfg) die Informationen(MAC-Adresse, SN-Nummer usw.) von der alten "grub.cfg" -Datei übernehmen bzw. überschreiben und die Änderungen speichern. Danach die zuvor gemountete Datei wieder über OSF-Mount dismounten (Dismount All & Exit) 6. Die Alte "synoboot.iso" Datei auf dem VMware-ESXi Datastore löschen und durch die aktuelle synoboot.img ersetzen (hochladen) 7. Danach die VM mit DSM bzw. Xpenology auf dem ESXi wieder starten. Wichtig: Über die VMware Konsole unmittelbar nach dem Start mit der Tastatur "Jun's Bootloader for ESXi" auswählen und mit ENTER bestätigen 8. Im Web-Browser "find.synology.com" und mit ENTER bestätigen. Synology Web Assistant sucht jetzt nach der DSM und zeigt den Status als "migrierbar" an. Dort auf "Verbinden" klicken und auf die DSM verbinden. Dort steht jetzt: "Wir haben festgestellt, dass die Festplatten Ihres aktuellen DS3615xs aus einem vorhergehenden DS3615xs entnommen wurden. Bevor Sie fortfahren, müssen Sie einen neueren DSM installieren." 9. Nun kann man die .pat-Datei (DSM-Firmware) hinzufügen und manuell installieren lassen aber oder automatisch die neueste DSM Version vom Synology-Server (online) installieren lassen. Ich empfehle euch die manuelle Installation, da es keine Garantien gibt ob die aktuellste DSM-Version vom Synology-Server (online) mit eurem Xpenology Boot Looder funktiert. Ich habe meine (diese) Installation mit der DSM Version "6.1.5-15254 Update 1" erfolgreich hingekriegt. Hier könnt ihr diese Version herunterladen: DSM_DS3615xs_15254.pat 10. Nun auf "Installieren" anklicken und danach "Migration: Meine Dateien und die meisten Einstellungen behalten" auswählen. Auf "Weiter" und "Jetzt installieren" anklicken 11. DSM wird nun auf dem neuen Jun's Boot Loader installiert (dauert ca. 10 Minuten) 12. Nach der Installation im DSM anmelden und die durch den DHCP-zugewiesenen IP nach Wunsch wieder anpassen bzw. ändern Fertig.
 -
I followed the tutorial for Jun's DS3617. After first boot I can find the diskstation manager. I install the DSM using automatically option. After that I can not find the diskstation manager anymore. No matter how many times I reboot the VM. The host machine is Dell xps desktop with i5 running windows 10. Do I need to download DSM image and install manually?
-
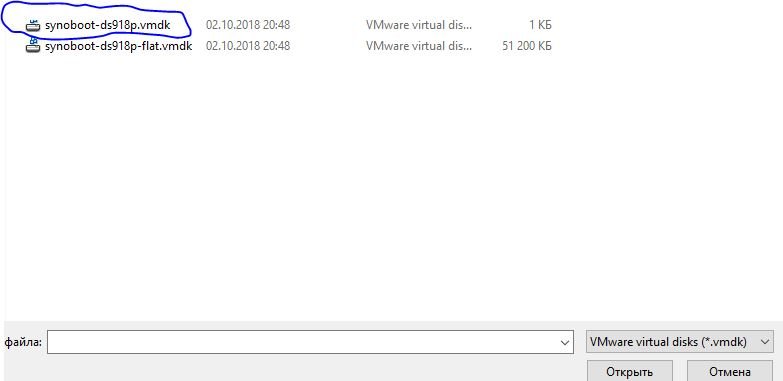
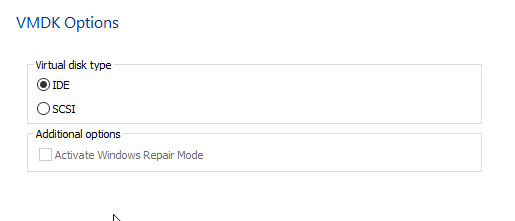
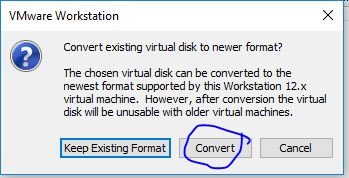
 Всем привет. Потребовалось конвертировать IMG файл загрузчика в формат VMware для Workstation 14, в которой поднят NAS. 1. Отсюда качаем и устанавливаем конвертер https://www.starwindsoftware.com/tmplink/starwindconverter.exe 2. Открываем и выбираем IMG, у меня был от 918+. Его я изначально подготовил (серийник, mac adress, VID, PID прописал взял с флешки, где образ ставил уже. Надо это или нет ХЗ, у меня было уже в IMG образе). 3. Выбираем пункт Local file, далее 4. Выбираем пункт VMware pre-allocated image, далее 5. Выбираем SCSI, далее 6. finish 7. В папке, где лежал IMG файл создалось два VMDK файла, 1КБ и 51200КБ. Сам IMG файл нам уже не нужен. 8. Открываем VMware, у меня 14 версия, а виртуальная станция на 12. 9. Нажимаем добавить диск и выбираем добавить диск с типом SATA 10. Далее выбираем existing virtual disk 11. Далее выбираем файл VMDK весом 1КБ 12. В пункте где спросил конвертировать или нет я выбрал convert (у когото может этот пукт вообще не выйдет, зависит от версии Workstation и версии виртуальной машины) 13. Все. Запускаем станцию и радуемся.


-
Hi all, i've setup my XPEnology on HP Microserver Gen8 which is running ESXi 6.5 u2. I provisioned my data drive at 1.5 TB, but now i'm running out of diskspace. Can i extend this disk to 2 TB (using 2 * 3TB disk in ESXi) easily in DSM? Or is the best way to create a second disk (0.5 TB) and add this disk to XPEnonlgy (DSM)? thanks in advance for the answers! MAdD
-
Hy Leute, da es sich hier um meinen ersten Post handelt, bitte ich euch darum, nicht so hart zu mir zu sein, falls ich das falsche Unterforum gewählt habe. Ich bin aktuell dabei eine "Eier legenden Woll-Milch-Sau" als Homeserver mit folgender Hardware und Software zu bauen: MSI B250M Mortar -> Intel Pentium G4560 -> 2x 8GB DDR4 RAM -> 1x 500GB Samsung 850 Evo SSD (ESXi local Datastore) -> 1x 16GB SanDisk UltraFit (ESXi Boot-Stick) Intel Quad-Gigabit Netzwerkkarte Crossflashed Fujitsu DS2607-A21 = LSI 9211-8i im IT-Mode -> 2x WD Red 4TB -> 1x HGST Deskstar NAS 4TB -> 2x 1TB Seagate Barracuda VMware ESXi 6.5 U1 free ist installiert und der Controller per Passthorugh an die XPenology-VM durchgereicht. Die Platten werden soweit richtig in XPenology erkannt, aber es erscheint beim Klick auf "Integritätsstatus anzeigen" die Meldung "Nicht verfügbar". Demnach kann ich mir die Rohdaten der SMART-Werte nicht sehen. Die Temperaturen werden im Detail-Modus der HDD/SSD-Übersicht anscheinend richtig angezeigt und bei SMART-Status wird auch "normal" angezeigt. Außerdem wollte ich mal nach euren Erfahrungen im Bezug auf die iSCSI-Performance fragen: Ist diese brauchbar um die beiden Seagate HDDs (RAID1) als Datastore für WSUS/Backups/... an einen Intel NUC mit ESXi/Windows Server 2016 zu betreiben? Danke im Voraus für alle Antworten! Gruß, - Tom.
-
Hello, i have got a pretty big question, as there is already a Version of Juns mod for ESX did sombody have an image wich wors with Hyper-V and the new Synology 6.x.x OS versions ? I got the Image ro boot but it doesnt get any farther than Booting the Kernel, changing up the network adapters between new and old wont do the trick either.... maybe somebody knows more ^^ at least : Thanks for having me on this Forum !
-
Bonjour, j'ai un souci lors l’installation d'une deuxième VM DSM 6 sous ESX 6.5. J'ai une première VM ds3615xs créée à partir de ce lien, le problème c'est que je souhaiterais créer une deuxième VM dsm lors de l’installation la deuxième VM chope la même adresse ip que la première. J'ai une réservation dans le DHCP de ma livebox 4 pour la première VM. Cela vient du fait que l'adresse MAC est la même sur les deux VM vu qu'elle est intégrée dans le fichier .vmx. J'ai donc essayé de créer une VM manuellement mais rien a faire mes deux VM ont toujours la même IP Quelqu'un aurait une idée d'où cela pourrait venir? mog
-
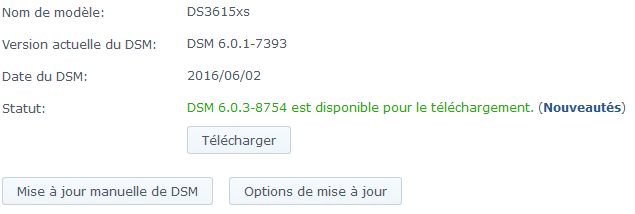
Bonjour à toutes et à tous, J'utilise un syno avec vmware 12 depuis quelques mois. Il fonctionne très bien mais je ne parviens pas à le mettre à jour. Quand je lance la MAJ auto j'obtiens le message suivant : Ma version actuelle est la suivante : J'ai bien essayé de me rendre sur le repo suivant : https://mega.nz/#F!BtFQ2DgC!JgomNP3X8V9EuwxL4TXbng!5kcjyJ7R Mais je n'obtiens qu'un zip avec un fichier img que je ne parviens pas à convertir en ISO (avec plusieurs utilitaires windows ou ccd2iso sur une Debian) De plus le fichier .vmdk que j'obtiens est de 1 KB. (remarque : le zip s'appelle 3617 mais les fichier 3615 Quand j'ai installé mon syno actuel j'avais ceci comme base : Pour info je suis parti du site suivant qui n'a pas de communauté (ou presque) : https://www.xpenology-fr.net/news/synology-dsm-6-sur-vmware/ Soit un VMDK de 1.24 GB J'ai bien essayé de l'installer sur une VM de test mais l'update plante tout à fait pareil Je ne suis pas contre le fait de passer sur un syno 3617 bien que rester sur un 3615 m'éviterait de backuper près de 2 To de données. Est-ce qu'une âme charitable voudrait bien m'éclairer et m'aider à me dépêtrer de cette situation s'il vous plaît ? Merci d'avance pour votre aide !! Bien cordialement, Virtua


-
Bonjour, je suis dans un environnement vmware esxi 6.5 je me pose la question suivante: si je mets une vm 3615xs, est-ce que si je lui affecte 4 vCPU les 4 seront utilisés? ou suis-je obligé de passer par la vm 3617xs étant donné que le 3617xs est un model avec un proc 4 cœurs contrairement au 3615xs qui est model avec un proc 2 cœurs. mog
-
Hi, Is it possible to convert my Hyper-V DSM 5.2 to VMWare so I can update to DSM 6.x? I really need some features from this DSM, but I don't want to lose my stuff. I can't get docker to work on my DSM and Lets Encrypt certificates are a welcome bonus. Regards
-
I use VMWare Workstation 12 on Windows 10, I can see network interface is 1Gbps in DSM which installed in VM. But it's very slow copy file between host machine and DSM, about 20MB/s~30MB/s, I use bridge network. Any one have this issue? Thanks.
-
Hi all, I have DSM 6.0.2-8451 update 11, model DS3615xs with Juns loader 1.01 on HP ProLiant 160 Gen9 (VMware esxi 6.5) and I have problem with samba. When I want to open office documents larger (cca than 1MB) samba seys: "smb2 sendfile send_data: sendfile failed for file <whatever> (Connection reset by peer). Terminating" This is done on all computers (10pcs with win10 and office2016) that are connected to the DSM. Do not know where the problem might be? Thanks a lot, Martin.
-
Bonjour, je voudrais savoir comment faire pour créer une sur vmware en partant du loader en .img ? soit avec ce loader ou bien celui ci D'avance merci
-
Bonjour, Je suis actuellement en pleine migration de serveur. J'était sur un ESXi en 5.5. J'avais un DSM 5.x. Aujourd'hui je passe sur un ESXi 6.5, cependant j'aimerais profiter de cette migration pour passer sur du DSM 6.x. J'ai essayé pas mal de choses que j'ai vu sur le net, ici et ailleurs. Rien n'abouti, VM qui de démarre pas et j'en passe. J'aimerais repartir de 0 en suivant vos conseil, vos lien de qualité. Merci d'avance pour votre aide.