Search the Community
Showing results for tags 'dsm 6.1'.
Found 13 results
-
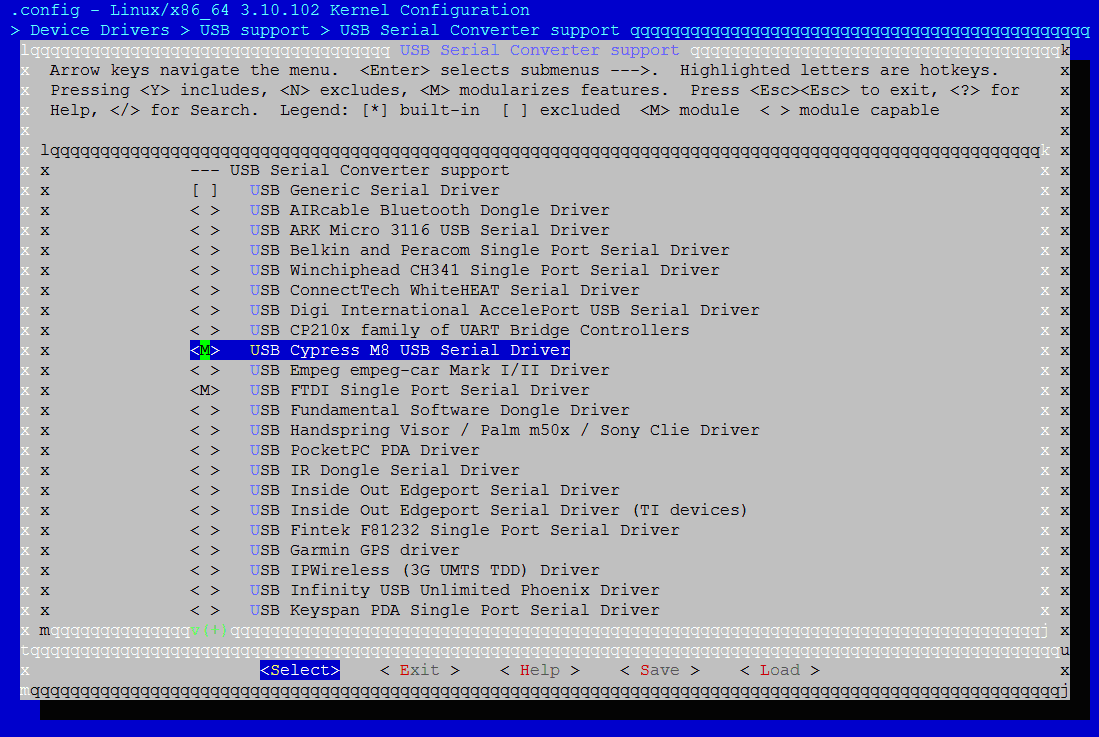
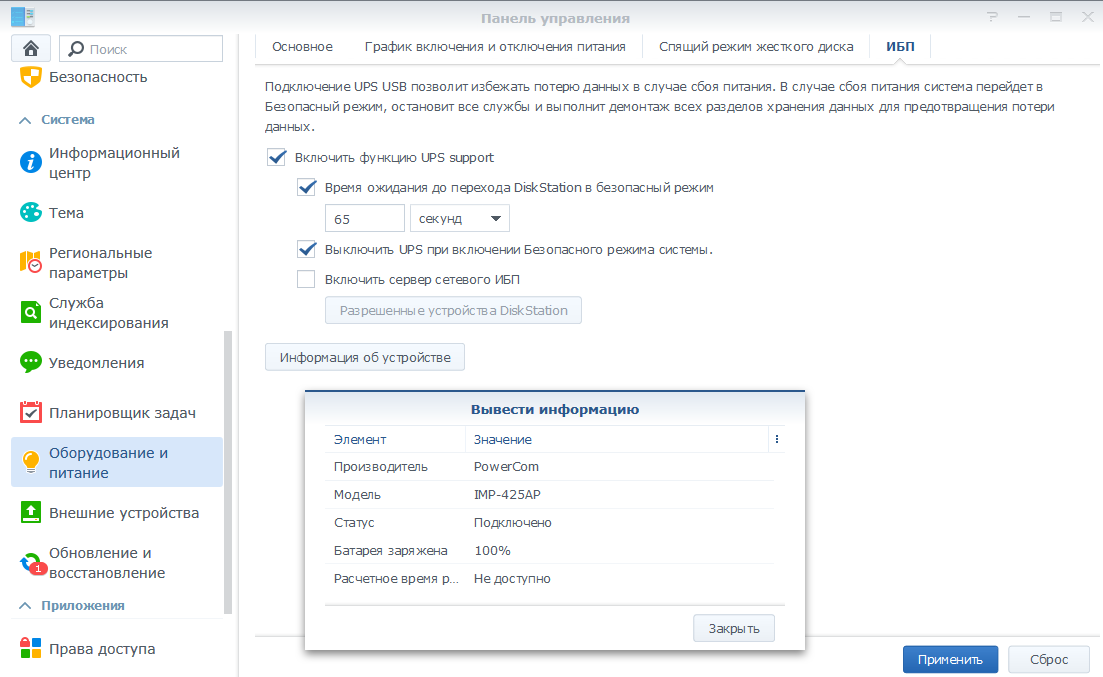
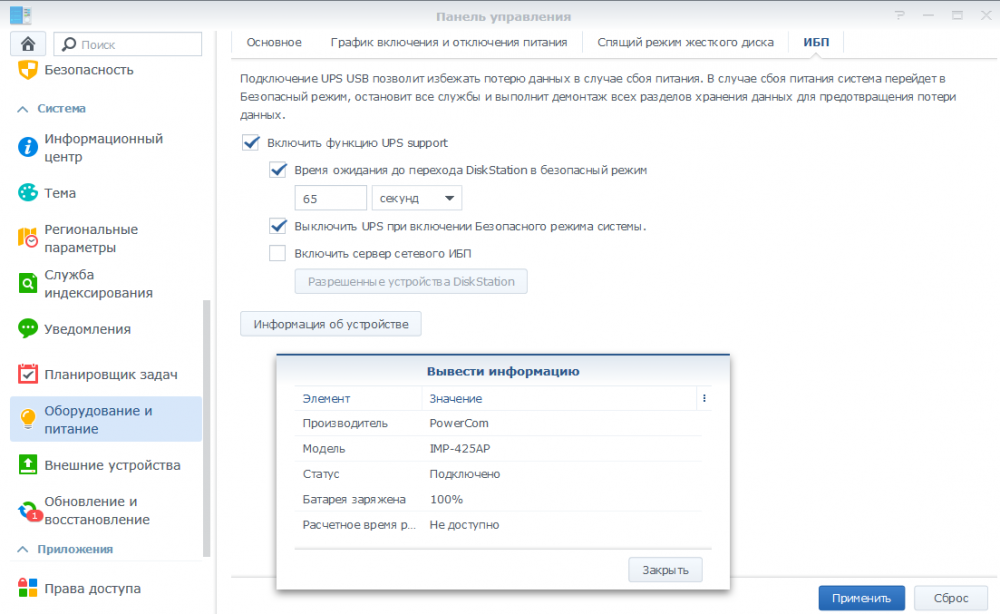
 Есть у меня старенький UPS Powercom IMP-425AP. Давно хотел его подключить к Synology, но дело осложнялось тем, что он является устройством типа USB to Serial, и официально не поддерживается. В интернете гуглится статья на эту тему, по адресу: https://forum.synology.com/enu/viewtopic.php?f=39&t=17658 Но статья давно устарела, т.к. там идёт речь о DSM 3.0-1337 Сразу предупреждаю, я не очень "грамотный" пользователь *nux систем, но, собрав по крупицам некоторую информацию, я всё же смог подключить свой UPS Powercom IMP-425AP к DSM 6.1-15047 Может, я где-то допустил ошибки, но и итоге всё работает. Надеюсь мой опыт будет кому-то полезен. И так, наш UPS в системе определяется как: Bus 002 Device 004: ID 0d9f:0002 Powercom Co., Ltd Black Knight PRO / WOW Uninterruptible Power Supply (Cypress HID->COM RS232) (С таким ID 0d9f:0002 есть целая серия старых IMP-*25AP) Для DSM 6.1-15047 я использую загрузчик Jun's Loader v1.02b Вначале мы воспользуемся советами, описанными в этой статье: https://xpenology.com/forum/topic/7187-how-to-build-and-inject-missing-drivers-in-jun-loader-102a/ Качаем исходный код ядра: https://sourceforge.net/projects/dsgpl/files/Synology%20NAS%20GPL%20Source/15047branch/bromolow-source/linux-3.10.x.txz/download Synology 3615xs построен на архитектуре bromolow, нам нужна версия 15047 (я использую эту версию, т.к. в ней работает нужный мне VirtualBox) Устанавливаем плагин debian-chroot ( https://synocommunity.com/package/debian-chroot ) из раздела сообщества. Запускаем chroot: /var/packages/debian-chroot/scripts/start-stop-status chroot Ставим пакеты apt-get update apt-get upgrade apt-get install locales dpkg-reconfigure locales dpkg-reconfigure tzdata apt-get install mc make gcc build-essential kernel-wedge libncurses5 libncurses5-dev libelf-dev binutils-dev kexec-tools makedumpfile fakeroot linux-kernel* lzma Создаём рабочий каталог «/volume1/@appstore/debian-chroot/var/chroottarget/test/» Распаковываем в каталог /volume1/@appstore/debian-chroot/var/chroottarget/test/ исходники ядра linux-3.10.x.txz Заходим в каталог linux-3.10.x и запускаем cp synoconfigs/bromolow .config Делаем резервную копию конфигурации make ARCH="x86_64" oldconfig Настраиваем конфигурацию make ARCH="x86_64" menuconfig Выбираем «М» напротив драйвера Device Drivers/USB support/USB Serial Converter support/USB Cypress M8 USB Serial Driver Сохраняем конфигурацию и компилируем модули make ARCH="x86_64" modules Копируем скомпилированные модули cypress_m8.ko, usbcore.ko, usbserial.ko в рабочий каталог synology /lib/modules/ Не забываем проверять/выставлять права файлам: chmod 644 Дальше переходим к работе с пакетом NUT. Это нужно, чтобы скомпилировать модуль powercom Информацию по исправлению драйвера я нашёл тут: http://forum.pcm.ru/viewtopic.php?f=3&t=2627 Качаем исходники NUT 2.4.1 http://pkgs.fedoraproject.org/repo/extras/nut/nut-2.4.1.tar.gz/609ebaf2123fc7171d25a6c742dd7d66/nut-2.4.1.tar.gz Распаковываем их в каталог /volume1/@appstore/debian-chroot/var/chroottarget/test/ В каталоге /volume1/@appstore/debian-chroot/var/chroottarget/test/nut-2.4.1 создаём файл патча «patch-nut» с содержимым: --- drivers/powercom.c 2009-02-17 12:20:48.000000000 +0300 +++ drivers/powercom.c 2010-03-02 15:48:25.354735038 +0300 @@ -852,21 +852,30 @@ /* setup flow control */ types[type].flowControl.setup_flow_control(); - if (!strncmp(types[type].name, "BNT",3) || !strcmp(types[type].name, "KIN") || !strcmp(types[type].name, "IMP")){ + if (getval("type") == NULL){ if (!ups_getinfo()) return; if (raw_data[UPSVERSION]==0xFF){ types[type].name="IMP"; - model=IMPmodels[raw_data[MODELNUMBER]/16]; } if (raw_data[MODELNAME]==0x42){ if (!strcmp(types[type].name, "BNT-other")) types[type].name="BNT-other"; else types[type].name="BNT"; - model=BNTmodels[raw_data[MODELNUMBER]/16]; } if (raw_data[MODELNAME]==0x4B){ types[type].name="KIN"; + } + } + if (!strncmp(types[type].name, "BNT",3) || !strcmp(types[type].name, "KIN") || !strcmp(types[type].name, "IMP")){ + if (!ups_getinfo()) return; + if (!strcmp(types[type].name, "IMP")){ + model=IMPmodels[raw_data[MODELNUMBER]/16]; + } + if (!strncmp(types[type].name, "BNT",3)){ + model=BNTmodels[raw_data[MODELNUMBER]/16]; + } + if (!strcmp(types[type].name, "KIN")){ model=KINmodels[raw_data[MODELNUMBER]/16]; } linevoltage=voltages[raw_data[MODELNUMBER]%16]; Применяем патч: patch -p0 -l <patch-nut В драйвере powercom по умолчанию включена самопроверка батарей при каждом старте драйвера. Настройки или возможности отключения этой проверки – нет. Метод устранения этой особенности я подсмотрел здесь: http://forum.lissyara.su/viewtopic.php?t=17735&start=25 Если Вам это не актуально, можете данный шаг пропустить. В файле: /volume1/@appstore/debian-chroot/var/chroottarget/test/nut-2.4.1/drivers/powercom.c находим строчки: ... upsdebugx(1,"Detected: %s , %dV",modelname,linevoltage); if (ser_send_char (upsfd, BATTERY_TEST) != 1) { upslogx(LOG_NOTICE, "writing error"); dstate_datastale(); return; } ... и комментируем лишнее: ... upsdebugx(1,"Detected: %s , %dV",modelname,linevoltage); /*if (ser_send_char (upsfd, BATTERY_TEST) != 1) { upslogx(LOG_NOTICE, "writing error"); dstate_datastale(); return; }*/ ... Компилируем NUT (пути для конфигов и т.д. выставляем такие же, как у synology): ./configure --with-user=root --with-group=root --prefix=/usr/syno/etc/ups --sysconfdir=/usr/syno/etc/ups --datadir=/usr/syno/share make Копируем скомпилированный файл powercom из каталога /volume1/@appstore/debian-chroot/var/chroottarget/test/nut-2.4.1/drivers/ в рабочий каталог synology /bin Не забываем проверять/выставлять права файлам: chmod 644 Теперь нужно добавить скомпилированные драйвера, в загрузчик Jun's Loader v1.02b. Используем osfmount (под windows), чтобы извлечь «extra.lzma» (сжатый файл cpio) из synoboot.img (находится «extra.lzma» на втором разделе FAT). Osfmount часто используют для редактирования файла grub.cfg в synoboot.img. («extra.lzma» - содержит дополнительные драйвера *.ko, которые стартуют при загрузке) Скопируем «extra.lzma» в /volume1/@appstore/debian-chroot/var/chroottarget/test/extra-drv Для распаковки «extra.lzma» выполним команду: lzma -d extra.lzma Далее, извлекаем файлы из «extra»: cpio -idv <extra После чего файл «extra.lzma» можно удалить. В распакованный каталог …/usr/lib/modules/ копируем скомпилированные модули cypress_m8.ko, usbcore.ko, usbserial.ko, а в /etc редактируем файл rc.modules В конце списка EXTRA_MODULES добавляем свои три драйвера, без *.ko rc.modules выглядит примерно так: EXTRA_MODULES="mii mdio libphy atl1 atl1e atl1c alx uio ipg jme skge sky2 ptp_pch pch_gbe qla3xxx qlcnic qlge netxen_nic sfc e1000 pcnet32 vmxnet3 bnx2 libcrc32c bnx2x cnic e1000e igb ixgbe r8101 r8168 r8169 tg3 usbnet ax88179_178a button evdev ohci-hcd cypress_m8 usbcore usbserial" DISK_MODULES="BusLogic vmw_pvscsi megaraid_mm megaraid_mbox megaraid scsi_transport_spi mptbase mptscsih mptspi mptsas mptctl ata_piix megaraid_sas mpt2sas mpt3sas" EXTRA_FIRMWARES="bnx2/bnx2-rv2p-09ax-6.0.17.fw bnx2/bnx2-rv2p-09-6.0.17.fw bnx2/bnx2-rv2p-06-6.0.15.fw tigon/tg3_tso5.bin tigon/tg3_tso.bin tigon/tg3.bin" Дальше, внутри каталога, /volume1/@appstore/debian-chroot/var/chroottarget/test/extra-drv, создаём новый файл cpio, и сжимаем его lzma. Полученный, новый «extra.lzma» записывается в каталог уровнем выше. Выполняем команду: (find . -name modprobe && find . \! -name modprobe) | cpio --owner root:root -oH newc | lzma -8 > ../extra.lzma Полученный файл «extra.lzma», при помощи osfmount, записываем обратно в образ synoboot.img. Теперь произведём настройку DSM 6.1 Выполняем: insmod /lib/modules/cypress_m8.ko mknod /dev/ttyUSB0 c 188 0 chmod 644 /dev/ttyUSB0 Настраиваем скорость порта: stty -F /dev/ttyUSB0 speed 1200 cs8 raw (Дальнейшая настройка подсмотрена тут: https://xpenology.com/forum/topic/4413-dsm-52-5592-update-4-amp-serial-apc-ups/#comment-38621) Редактируем файл: /etc/rc Добавляем в KERNEL_MODULES драйвера «usblp cypress_m8 usbserial»: if [ $KERNEL_VCODE -ge $(KernelVersionCode "4.4") ]; then KERNEL_MODULES="usblp cypress_m8 usbserial llc p8022 psnap usbcore quota_tree quota_v2 crc-ccitt crc-itu-t zlib_inflate dm-bufio dm-snapshot" else KERNEL_MODULES="usblp cypress_m8 usbserial llc p8022 psnap usbcore quota_tree quota_v2 crc-ccitt crc-itu-t zlib_inflate dm-snapshot" fi В конце файла, перед exit 0 добавляем строку запуска службы UPS: /usr/syno/etc/rc.sysv/ups-usb.sh start В файле /usr/syno/etc/rc.sysv/ups-usb.sh правим строку StartAllDrv() { local DRV_LIST="usbhid-ups blazer_usb bcmxcp_usb richcomm_usb tripplite_usb" на StartAllDrv() { local DRV_LIST="powercom usbhid-ups blazer_usb bcmxcp_usb richcomm_usb tripplite_usb" Редактируем файл /usr/syno/etc/ups/ups.conf [ups] driver = powercom port = /dev/ttyUSB0 type = IMP Загружаем файл https://github.com/networkupstools/nut/raw/master/data/cmdvartab и копируем его в каталог /usr/syno/share/ На этом всё. После перезагрузки, UPS должен автоматически появиться в GUI: P.S. Посмотреть более подробный статус UPS можно командой: upsc ups admin@serv01:~$ upsc ups battery.charge: 100.0 driver.name: powercom driver.parameter.pollinterval: 5 driver.parameter.port: /dev/ttyUSB0 driver.parameter.type: IMP driver.version: 2.4.1 driver.version.internal: 0.12 input.frequency: 50.00 input.voltage: 226.0 input.voltage.nominal: 220 output.frequency: 50.00 output.voltage: 226.0 ups.load: 12.0 ups.mfr: PowerCom ups.model: IMP-425AP ups.model.type: IMP ups.serial: Unknown ups.status: OL
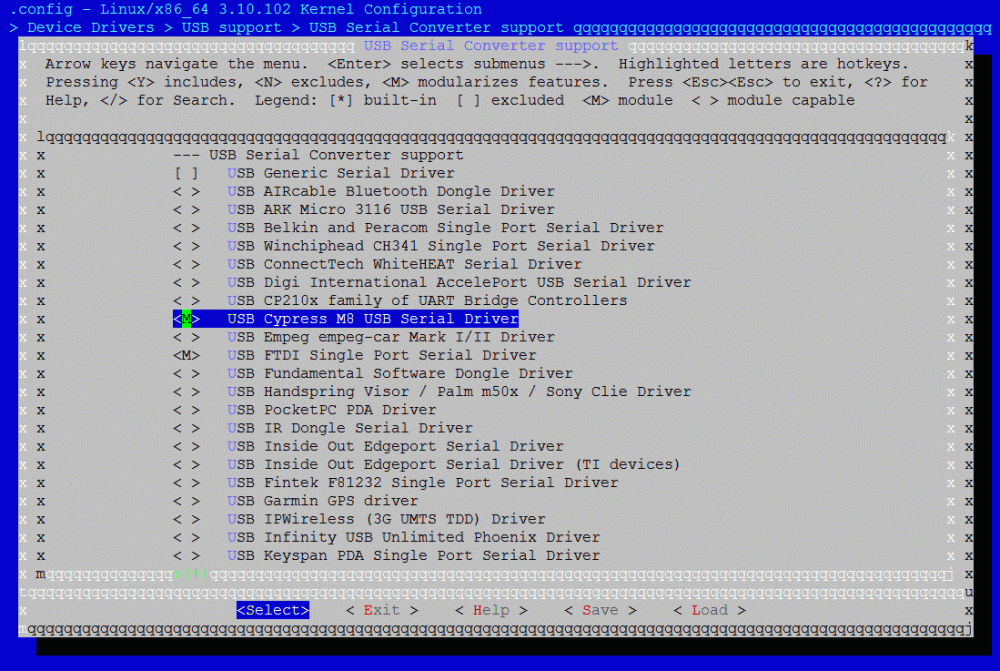
-
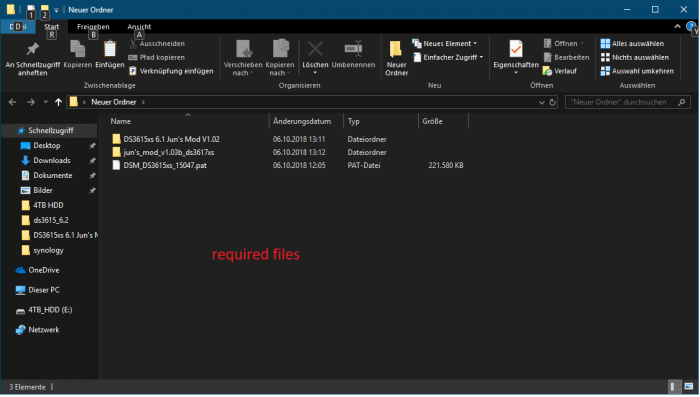
Good day I have successfully installed the DSM 6.2 on VmWare 14 Pro. For this I have only the official DSM 6.1 installed. For this let the bios on legacy and HDD Type not on Scsi but on Sata. And put the Lan attitude on bridged. simply insert the 6.1.vdmk as sata in the first place then add ne hdd eg 500gb. And in the options menu of Junloader Baremetal select. Now download and install DSM_DS3615xs_15047.pat through the Synology archive. If the DSM is ready set up you can download the update to 6.2 under Control Panel and INSTALL. When the DSM restarts it will not be found in LAN. Now the Jun Loader 1.03b (synoboot.img) must be downloaded and overwritten into the file Synoboot.img in the folder where the synoboot.vdmk (6.1) lies. then start the VM and read as Baremetal read. now the dsm should also be found in lan. now amelden and dsm 6.2 should be installed. and be usable. the metode before the dsm 6.1 installation directly with the 1.03b (dsm6.2) to install the dsm 6.2 fail me to find in the lan. Hope it is understandable for you so far. Sincerely, Marcel

-
 Hello everyone, I recently followed the tutorial step by step as it was writing and after rebooting i stumble with the message "Insert Media and Select Boot Device". My box spec's are as follow: MAIN BOARD ASROCK H61M-VG3\ Intel(R) Pentium(R) CPU G2020 @ 2.90GHz, 2900 Mhz, 2 Core(s), 2 Logical Processor(s) Physical Memory (RAM) 8.00 GB Intel(R) 6 Series/C200 Series Chipset Family Intel(R) Desktop/Workstation/Server Express Chipset SATA AHCI Controller Realtek PCIe GBE Family Controller Installation and all went fine!! Any help would be greatly appreciated. )
 -
 Firstly, I started using XPEnology like a month ago, after retiring my Synology 218 and 418 from service. I want bare metal setup that offers flexibility and of course the 'fun' building a NAS from scratch but with familiar UI. My setup as above, HP Pro 3330 MT with i3 3.3ghz CPU, 8gb RAM and Realtek NIC. I loaded 1.02a with 6.1-15047 successfully, without hiccups. Its is looking good for 2 weeks now. I'm happy. BUT, the happiness doesn't last not because my XPE failed, its good and stable now, but I want to explore more to see what else can I do with the flexibility of building baremetal NAS. But, I won't push too much. My priority now is to try running later DSM coz 15047 is already years old and Synology has updated far ahead, and most importantly security updates. So, with my above HP pc, which boot loader and DSM update is compatible? I'm not really good with command lines, etc etc... but yup, not that noob too. So please offer me some ideas or suggestions. Let me know what else in terms of hardware I'd need to provide or share, I will post. Thanks all!
 -
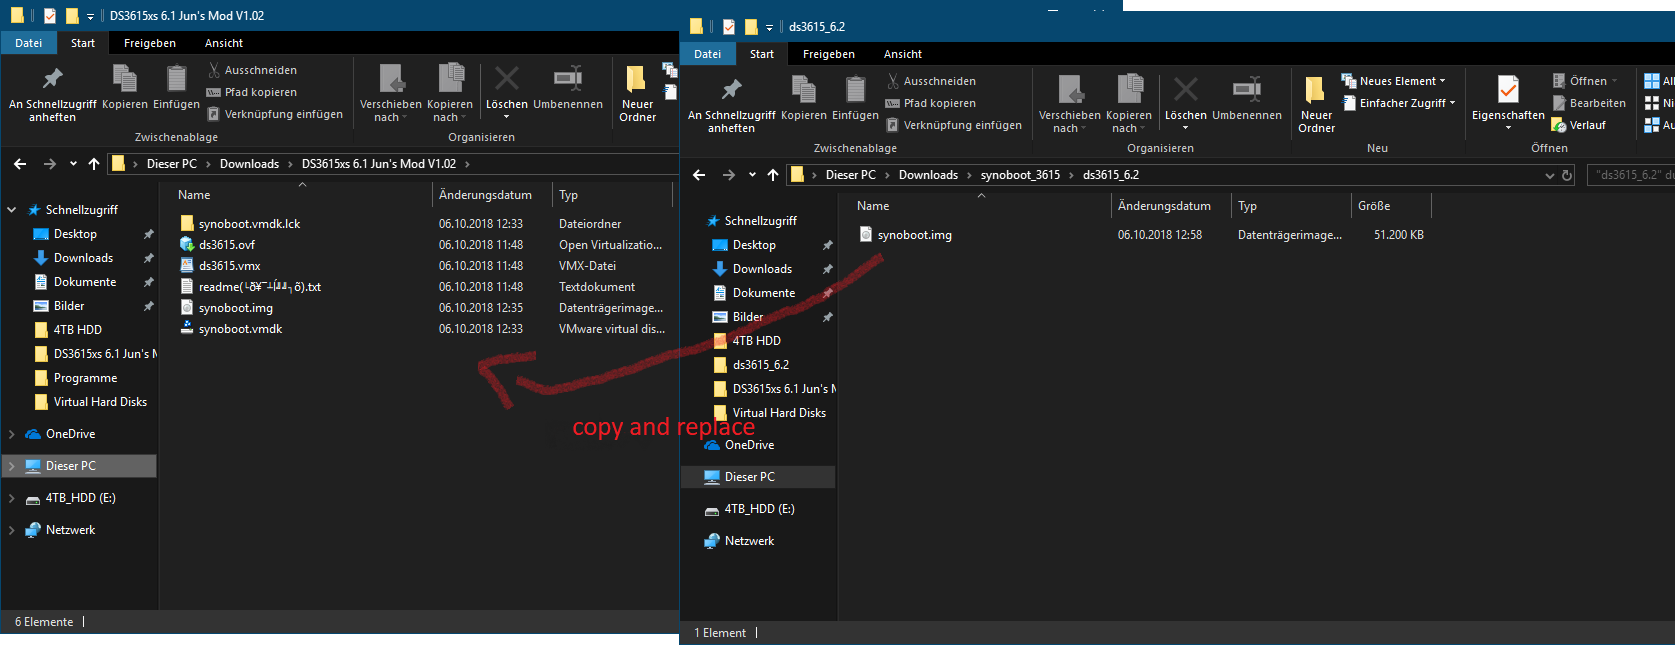
 Hallo zusammen, hier ist eine Anleitung zum Update des Boot Loaders auf Jun's Bootloader V 1.02b.Basiert auf Synology DS3615xs und VMware ESXi v6.5. Upgrade des Jun's Bootloaders von V1.01 auf V.1.02b, damit man DSM 6.1.x (i.d.F. 6.1.5-15254 Update 1) installieren kann. 1. Vorher DSM ausschalten und die betroffene VM mit DSM bzw. Xpenology vom ESXi-Datastore auf lokale Festplatte sichern. Im Falle eines Problem ist somit für Backup vorgesorgt 2. In der gesicherten VM-Ordner befindet sich ein synoboot.img. Diese Datei entpacken und in der "grub.cfg" -Datei (synoboot\boot\grub\grub.cfg) nachschauen, welche Einstellungen aktuell hinterlegt sind. Dieser Textbereich ist relevant: set vid=0x058f set pid=0x6387 set sn=B3Lxxxxx (Eure SN-Nummer!) set mac1=011xxxxxxx (Eure MAC-Adresse!) set rootdev=/dev/md0 set netif_num=1 set extra_args_3615='' 3. Die aktuelle Jun's Bootloader (synoboot.img) in der aktuellen Version (derzeit V.1.02b) für DS3615xs hierüber herunterladen. 4. Die heruntergeladene synoboot.img mit der OSF-Mount Software mounten. Dabei beachten, dass beim Mounten die Optionen " Mount All Volumes" angehackt und "Read Only drive" nicht ausgewählt ist 5. Danach im Windows-Explorer in das gemountete Laufwerk navigieren. In der "grub.cfg" der gemounteten synoboot.img-Datei (\boot\grub\grub.cfg) die Informationen(MAC-Adresse, SN-Nummer usw.) von der alten "grub.cfg" -Datei übernehmen bzw. überschreiben und die Änderungen speichern. Danach die zuvor gemountete Datei wieder über OSF-Mount dismounten (Dismount All & Exit) 6. Die Alte "synoboot.iso" Datei auf dem VMware-ESXi Datastore löschen und durch die aktuelle synoboot.img ersetzen (hochladen) 7. Danach die VM mit DSM bzw. Xpenology auf dem ESXi wieder starten. Wichtig: Über die VMware Konsole unmittelbar nach dem Start mit der Tastatur "Jun's Bootloader for ESXi" auswählen und mit ENTER bestätigen 8. Im Web-Browser "find.synology.com" und mit ENTER bestätigen. Synology Web Assistant sucht jetzt nach der DSM und zeigt den Status als "migrierbar" an. Dort auf "Verbinden" klicken und auf die DSM verbinden. Dort steht jetzt: "Wir haben festgestellt, dass die Festplatten Ihres aktuellen DS3615xs aus einem vorhergehenden DS3615xs entnommen wurden. Bevor Sie fortfahren, müssen Sie einen neueren DSM installieren." 9. Nun kann man die .pat-Datei (DSM-Firmware) hinzufügen und manuell installieren lassen aber oder automatisch die neueste DSM Version vom Synology-Server (online) installieren lassen. Ich empfehle euch die manuelle Installation, da es keine Garantien gibt ob die aktuellste DSM-Version vom Synology-Server (online) mit eurem Xpenology Boot Looder funktiert. Ich habe meine (diese) Installation mit der DSM Version "6.1.5-15254 Update 1" erfolgreich hingekriegt. Hier könnt ihr diese Version herunterladen: DSM_DS3615xs_15254.pat 10. Nun auf "Installieren" anklicken und danach "Migration: Meine Dateien und die meisten Einstellungen behalten" auswählen. Auf "Weiter" und "Jetzt installieren" anklicken 11. DSM wird nun auf dem neuen Jun's Boot Loader installiert (dauert ca. 10 Minuten) 12. Nach der Installation im DSM anmelden und die durch den DHCP-zugewiesenen IP nach Wunsch wieder anpassen bzw. ändern Fertig.
 -
I've an HP G7 N54L running 1.02b bootloader and DSM 6.1.7-15284 Update 2 (DS3615xs) using the onboard NIC. I've since purchased an Intel 82575-T2 PCIe 1Gb dual port adapter which I'd like to add (and disable the onboard NIC). I am planning to 1. Insert new NIC card and using the BIOS (a) disable the onboard NIC and (b) confirm the MAC(s) of the new NIC ports 2. Must I now edit grub.cfg to reflect I've now got two ports with updated MACs *before* I reboot [should I use force mode] ? Have I missed anything else ? Thanks in advance Paul PS. I did try first posing this question by posting to an existing thread but didn't get any input. Thanks for reading !
-

Adding new NIC intel 82575 post-installation of DSM 6.1
MitchBook posted a topic in Hardware Modding
Hi everyone, it's my first post, very excited about joining the community. First of all, congratulations for the huge work done. But I have a question: about 2 weeks ago i configured a brand new NAS with the jun's loader. Today I bought a 2port nic card with Intel 82575 chipset to create a LAG on my 4-lan-port sophos firewall. When I receive the card what will be the best way to find the new MAC addresses and edit the grub.cfg file? Boot Ubuntu from an usb stick and modify grub.cfg from there? Do boot from ubuntu (in case with no usb loader key and no disk) but modify grub.cfg from the grub command line? If I proceed with command-line modification by specifying mac2 and mac3, other configurations remain untouched, right? How do I set the netif_num value considering that the two additional ports will be in LAG? Remain =1? Thank you so much for all and apologize for my bad English, a mix of personal knowledge and google translate (i'm italian) -
 Hi Guys, I've been having issues when trying to Create disk group on my Microserver M54L, using Xpenology Xpenoboot 6.1. I have tried all the RAID options and no luck. Tried formatting the disk on a PC and still no luck too. Can you help me please.
 -
Hi, I started my DSM VM (ESXI 6.1) with a esxi small disk2 (16G), so that I can easily export an OVF. Then I increased ESXI VMs disk2 to 2 tB. THe problem is that DSM volume doesnt increase . Is the volume not a dynamic one? Have I to install DSM only when the large disk size have been selected? Thank you Phil
-
Hi everybody sorry for my english as requested by IG-88 i m posting my problem with jun's loader 1.02b and the extra lzma 4.5 my hardware for my nas is a proliant ML150 g5 with a hp NC105i gigabit ethernet (its a tg3.ko module). Follow the tutorial with vid/pid, sn and mac on usb drive 1 - boot the usb drive launch syno assistant my nas is recognize and install the 15217 pat file on drive (crucial ssd 128 Go for testing) 2 - reboot automatically and then no dsm in syno assistant !!?!!?? 3- recreate the usb drive but same thing By the way dsm 5.2.5967 is a flawless installation with no problems Please any idea ???
-
Hi all, I have a Dell T20 with a barebone installation of DMS 6. I was wondering if someone have been able to hibernate/wake a xpenology machine with the last (DSM or DSM 6.1) version avaible. I was able to do it with 5.2 but no luck with the last one. The reason behind the question is that I want to optimize energy comsumption of my home server! Thank you in advance!
-
Hi to everyone. Since I upgraded DSM from 5.2 to 6.1.3 (update 6), changing themes doesn't works: when I apply the new theme, it is applyed only to the access (login) page, not to all the web interface. How can I fix it? Thanks to everybody
-
Hi, im running DSM 6.0.2-8451 (DS3615xs) on my HP Proliant microserver Gen 8 . I would like to update to DSM 6.1 if posible, but im unable to find anie tutorial for that...