Leaderboard


Popular Content
Showing content with the highest reputation since 03/27/2024 in all areas
-
as my 7.1 long term informations where older i looked it up, looks like there is a catch to that (at least now) only older units (presumably kernel 3.10, mostly 2015 units and older) will get one more year up to 6/2025, namely the ds3615xs, the other commonly used types like 3617 or 3622 will loose update support 6/2024 and will have to be updated to 7.2 (if security updates are important) https://kb.synology.com/en-global/WP/Synology_Security_White_Paper/3 looks like i will have to upgrade my dva1622 in the next 3 month to 7.2 there was also a "Synology E10G18-T1" with that performance problem so it might stretch to more nic's or its something different but if exchanging the driver on the already running system clears the speed problem then it would be clearly that issue edit: i looked up the syno nic, its a "newer" model, not tehuti bsed, its marvell aquantia (aka AQtion Aquantia AQC) and the driver module to look for is "atlantic.ko", sadly "modinfo" is not part of dsm but you would see driver realted information when the driver is loaded ( dmesg |grep atlantic) also a sign of a original driver would be if its signed by synology, you could check this by looking in raw/hex at the end of the driver "xxd /lib/modules/8021q.ko" for one that usually is still original and "xxd /lib/modules/atlantic.ko" you will see "Module signature appended" at the very end of the driver when its a driver provided by synology forgot to mention it but my test system was using arc loader, as most loaders have there own driver set its worth checking the driver version and comparing to the original driver from synology (if there is one), in some cases it might not work using synology's drivers as there might not cover other oem versions of nic's, seen that with ixgbe drivers on 6.2 (but also tehuti and other intel drivers and realtek 2.5G nic driver) so it might not work to "downgrade" the driver to syno's original in some cases, that might result in a non working nic, it might find the device but if the phy chip is not supported the it will not show any connection or the driver might not load at all so in case of experiments like that its handy to keep a 2nd nic inside that can be used if the 10G nic fails to work after changing the driver2 points
-
yes it is2 points
-
Due to many further questions/problems here in the thread, I would like to expand the topic to all models of the Synology "+" series and all questions about internal flash memory regarding hardware replacement, image repair, elsewhere with a new topic. Synology model upgrades are also possible here: As already mentioned, the thread owner also has the opportunity to close this topic here. From my side, thank you @wool very much for the information about the pin-out and the ideas that came from it.2 points
-
Ага) И тебе привет)2 points
-
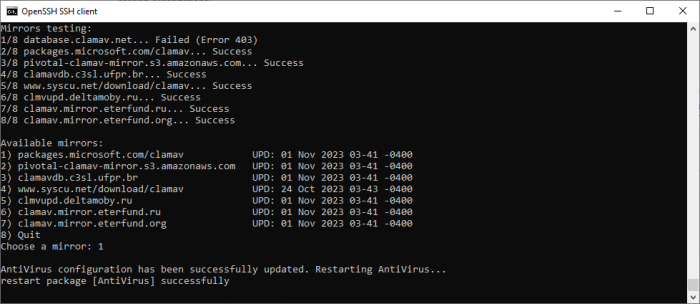
Greetings to all. Perhaps someone like me has encountered (especially in the RU segment) the problem of accessing antivirus database updates. I'm tired of looking for a mirror after each update, finding and making changes to the configuration file. To automate routine actions, I developed a script for changing the update mirror: https://github.com/wirgen/syno-clamav-mirrors The order of the script: checking the availability of the list of preinstalled mirrors; displaying information about the database version; updating the configuration file; restarting the antivirus package. I hope someone will find it interesting and useful.
 2 points
 -
Истина ...... ))) Не единожды сталкивался с поделками от MSI и почти всегда проблемы на ровном месте, там, где другие Бренды и не пикнут. Ну и если посмотреть по форуму, связка MSI + Realtek, почему то наиболее проблемная2 points
-
Да. Когда первый диск воткнёте в xpenology, создайте на нём пул SHR. После переноса данных со второго диска удалите на нём все разделы (не всегда это требуется, но хуже не будет), подключите его к xpenology и добавьте в тот же пул, он в фоновом режиме превратит его в защищённый от сбоев RAID - может несколько дней длиться, но пользоваться сервером в это время можно.2 points
-
Perhaps that's why?
 2 points
 -
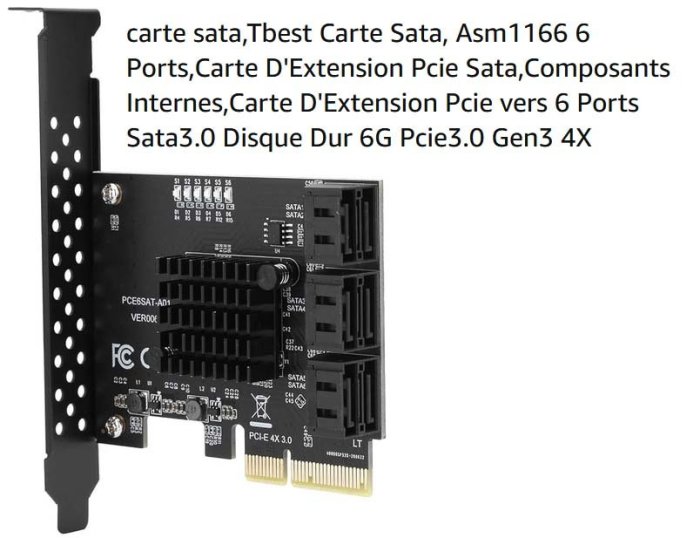
J'ai ajouté une carte ASMedia ASM1166 avec 6 prises Sata (standard) acheté sur Amazon la carte a été reconnue sans aucun souci. ma config : - i7 4770 ASUS Z97 PRO - GTX 1650 - 10Gtek® Carte Réseau 10GbE PCIE pour Intel X540-T2 - X540 Chip, Dual RJ45 Ports - Tbest Carte Sata, Asm1166 6 Ports Loader ARC DSM 7.2 DVA3221 la migration de ma configuration est terminé. merci à tous de votre aide.
 2 points
 -
Исходя из выше сказанного, то наверное это лучший выход. И обратите внимание на самосбор, нежели на продукт от Сино. Он будет в разы лучше и дешевле. Тем более, что вы уже на форуме по этой теме )))2 points
-
The Intel 10G ixgbe modules of DS3617xs(broadwell) and DS3622xs+(broadwellnk) operate somewhat specially. Both models must use the vanilla ixgbe that was originally built into the original model. I don't know if the TCRP of pocopico you used has adjustments for this vanilla module. rr and my mshell have this vanilla ixgbe adjustment. ixgbe compiled separately from redpill should only be used on other than these two platforms broadwell / broadwellnk. These two files are vanilla module files that are imported directly from the original module in Synology. The module pack is managed by overwriting this file on top of the ixgbe compiled by redpill. https://github.com/PeterSuh-Q3/arpl-modules/blob/main/vanilla/broadwell-4.4.302/ixgbe.ko https://github.com/PeterSuh-Q3/arpl-modules/blob/main/vanilla/broadwellnk-4.4.302/ixgbe.ko I hope you try it with rr or mshell.1 point
-
Подтверждаю. Обновление прошло без проблем в штатном режиме.1 point
-
https://web.archive.org/web/20210412133958/https://global.download.synology.com/download/DSM/release/6.1.7/15284/DSM_VirtualDSM_15284.pat1 point
-
There's an internet archive for this sort of thing https://web.archive.org/web/20210305152847/https://archive.synology.com/download/Os/DSM1 point
-
Я обновился на старом загрузчике Arc 23.11.15 . Проблем нет1 point
-
Hi DSfuchs. I managed to download the DOM. Can you give me an email address to send you the link to the DOM image file? Thanks!1 point
-
зависит от версии ESXi. хотя на рутрекере (через впн) всё есть (обычно достаточно SN указать)1 point
-
в ссылку добавились лишние символы - вот так правильно: https://www.programmersought.com/article/53224542504/ Сделали всё верно, я забыл ещё: если что-то пробрасываем в виртуалку, то надо вот этот крыжик ещё включить:
 1 point
 -
А не в Модулях ?1 point
-
Is there no one moderating these forums anymore ? I posted a new topic for Version: 7.2.1-69057 Update 5 3 days ago and it is still waiting approval !1 point
-
Предполагаю что диск который вы заменили нормальный. А диски отключаются по питанию одни и те же или разные? Тут 2 варианта или питалово или плохой сата коннект. Если диск нормальный и отваливаются одни и те же диски то вероятность больше в том что плохие сата коннекты. Если разные диски то надо смотреть в сторону бп. Еще может быть контроллер. Но это уже после проверки первых двух причин.1 point
-
Просто не гонитесь за самым новым железом. Для домашних/бытовых нужд вполне подойдут решения на процессорах Intel 8-9 поколений, и риск несовместимости на них будет минимальный. Смотрите здесь же на форуме проверенные конфигурации. Если вы не планируете чем-то особо тяжёлым нагружать, то избыточные мощности процессора и памяти вам скорее всего не пригодятся. А если планируете запускать, например, несколько дополнительных виртуальных машин, то лучше смотрите на конфигурацию: ESXi + виртуальная DSM (для ESXi - свои требования по совместимому железу, зато они порой позволяют ограничения DSM снять). [Add]: M.2 и на таких платах есть, или можно дополнительно поставить адаптер в PCIe разъём.1 point
-
Да завсегда на здоровье ....))) Но думаю проблема не в этом. Если есть какая-нибудь сторонняя сетевая карта на чипе Intel (не карта Intel, а чипсет от Intel), попробуйте и её. Ну и удачи вам )))1 point
-
У вас должен быть выпущен сервер в интернет. - какой роутер? (вендор) - какой тип подключения в тырнет? pppoe, l2tp, без инкапсуляции или какой то вариант ddns. результатом должен стать проброс портов с роутера на внешний сетевой интерфейс Synology Drive Server - 6690 TCP https://bafista.ru/kak-na-keenetic-probrosit-porty-dlya-synology/ как пример. в результате нужно будет на клиенте настроить 2 подключения - 1 работать в офисе, второе в любом другом месте. аналогично и на телефоне - на каждый сервис у меня 2 подключения.1 point
-
Да есть конечно...... Тот же ARC по ссылке выше. Очень простой и хороший загрузчик. Вы только определите что вам от Хрени надо (или как использовал), что бы выбрать модель DS. Вот вам видео, посмотрите. Там достаточно подробно описан процесс установки https://bafista.ru/ustanovka-xpenology-na-realnoe-zhelezo/1 point
-
Glad you were able to find working links for DSM 6.2.3 instead. On the off chance that you or anyone else may need the downloads in this thread for DSM 6.2.2, here are fresh download links: 0.8_syno ds918+ - extra.lzma/extra2.lzma for loader 1.04b_mod ds918+ DSM 6.2.2 v0.8_syno https://gofile.io/d/Otg1w4 SHA256: 21B0CCC8BE24A71311D3CC6D7241D8D8887BE367C800AC97CE2CCB84B48D869A https://dailyuploads.net/75vcrg61rsn2 https://usersdrive.com/qhwiez556u7k.html https://www.zippyshare.day/QkM1RuCZ4WGjJ91/file 0.8_std ds918+ - extra.lzma/extra2.lzma for loader 1.04b_mod ds918+ DSM 6.2.2 v0.8_std https://gofile.io/d/rlPLhM SHA256: F611BCA5457A74AE65ABC4596F1D0E6B36A2749B16A827087D97C1CAF3FEA89A https://dailyuploads.net/l1v9vaob0k4o https://usersdrive.com/xyepa6sa4trc.html https://www.zippyshare.day/NB0AjRJhSL9nRGT/file 0.8_recovery ds918+ - extra.lzma/extra2.lzma for loader 1.04b_mod ds918+ DSM 6.2.2 v0.8_recovery https://gofile.io/d/dBMD5e SHA256: 5236CC6235FB7B5BB303460FC0281730EEA64852D210DA636E472299C07DE5E5 https://dailyuploads.net/t4grkc3s2hfs https://usersdrive.com/f28dhpmbjlkf.html https://www.zippyshare.day/QxWHH3jJ0Q6BvzK/file DS3615: extra.lzma for loader 1.03b_mod ds3615 DSM 6.2.2 v0.5_test https://gofile.io/d/Q8V9iR SHA256: BAA019C55B0D4366864DE67E29D45A2F624877726552DA2AD64E4057143DBAF0 https://dailyuploads.net/c8y9jyunl0wg https://usersdrive.com/nn6ja92hy8a2.html https://www.zippyshare.day/U9uxXCwpnXwrSlk/file DS3617: extra.lzma for loader 1.03b_mod ds3617 DSM 6.2.2 v0.5_test https://gofile.io/d/44u6er SHA256: 4A2922F5181B3DB604262236CE70BA7B1927A829B9C67F53B613F40C85DA9209 https://dailyuploads.net/fje0te8ywo9a https://usersdrive.com/wjsojq787h5w.html https://www.zippyshare.day/z4Lf0av9njH5dLx/file1 point
-
https://github.com/AuxXxilium/AuxXxilium/wiki https://auxxxilium.tech/redpill/ and he also has a lot of stuff on youtube https://www.youtube.com/@AuxXxiliumTech1 point
-
Для начала возьмите свежую версию Arc Loader (23.9.1b - это уже более полугода назад)1 point
-
Заказал 12/04 планируемая доставка.1 point
-
Из бесплатных, с хорошей поддержкой, фаерволов нового поколения обратите внимание на Sophos FW home. Потребуется мини ПК (или старый ПК) с двумя, лучше тремя сетевыми картами, 2-4 ядра проц, до 6ГБ памяти и небольшой диск (лучше SSD). Настройки Level7 фильтрации просто выбираются из меню и можно создавать свои. Есть много информации по настройкам, но в основном на англ. PFSense/OPNSense с добавочными модулями тоже неплохо, но требуют намного больше знаний и усилий. А я использовал ваш ответ как пример важности бэкапа. В каждой шутке есть доля .... шутки!1 point
-
Возможно, но я пытался.1 point
-
We have corrected the problematic parts. Could you please build the mshell loader again and test it? https://github.com/PeterSuh-Q3/tcrp-addons/commit/fbf44a900509e58b09401718daf19077d1f720ed1 point
-
Еще кабель SATA замените.1 point
-
На флешке только загрузчик. ОС на всех жестких дисках. Проверьте логи на предмет ошибок на жестких дисках. Может и не быть битых секторов, но ошибки подключения или задержки чтения могут показать. Что-то вроде "I/O error occurred to Drive 1 on NAS-Name" или похожее.1 point
-
Hello, yes if the motherboard has 2 slots for RAM, then 3GB is also great. I was under the assumption that only RackStations had this. With my RS812+ it was just a matter of finding the right combination of memory module manufacturers. 2x original Synology didn't work. And yes, with #35 it is very easy to change the model in 10 minutes, including a restart and without screwdriver.1 point
-
Сейчас тестирую конфигурацию с таким же процессором i5-12400 и мамкой ASRock Z690M-ITX/ax. Сетевая карта тоже RTL8125BG. Загружается без проблем, DSM установилась 7.2.1. Есть другая проблема - с raid контроллером LSI. Пришлось отказаться от его использования.1 point
-
Есть такая проблема.. сам столкнулся. С нуля ставите или миграция? Это с процессором проблема.. слишком новый ))) Как только есть обращения к ДСМ через вэб, сразу перезагрузка.1 point
-
Ну тогда, если диски одного размера, то следуйте совету @dj_nsk выше, а если разного размера, то все тоже самое, но первым переносите меньший диск, а потом добавляйте с SHR массив больший.1 point
-
Вот было такое.1 point
-
вот тут комрад из США вроде как добился успеха через ssh если я правильно понял, но без опыты работы с линуксом тут сложно что-то понять. Может кто-то изх опытных сделает русскоязычный гайд по этой теме?1 point
-
И вам вечера доброго Возможно, проблема в сетевой карте Realtek RTL8125G. В Модулях есть драйвера на RTL8125, попробуйте их установить. А вообще, если поискать по форуму, по карте имеются проблемы1 point
-
Добрый день, боюсь не получится, т.к. проц более нового ничего не поддерживает1 point
-
Вспомнил. При каком-то из обновлений винда отключала smb 1 и из-за етого крашилась сеть. Нужно было зайти в компоненты и включить.1 point
-
You can use of of the loaders such as TCRP, ARPL or Peter Suh's M-Shell that is based on TCRP: https://xpenology.com/forum/topic/61839-tinycore-redpill-loader-build-support-tool-m-shell/ is the one I use. They all now allow you to build within a web interface that makes the process pretty simple with support for many newer models. The DS3615xs has lost support since it is one of the oldest models, so the DS3622xs+ would be a great upgrade for you. But if you do not have 12 disks in your system, for cosmetic reasons only, you can choose one of the models that hold 2.4 disks. The steps I would use is, get a new thumb drive and a spare hard drive that you can test builds with. Download the PAT file for the model you want to use, you will need it later. Remove you data disks from the system and put them in a safe place until the build is done. I would keep the disks in order for simplicity. Build say the DS920+ and see how you like it. If you are satisfied, power down the system, remove the test disk and install your data disks. Once booted, you will get a prompt to migrate. At this point you will get a prompt to re-install the OS. Choose manual and select the file you downloaded. Enjoy your new NAS.1 point
-
change DS923+ (AMD platform) --> DS920+ DVA1622 - not for iGPU To use the iGPU in the i9-9900T, you will need the i915 patch (for example, it is available as an addon in the Arc loader)1 point
-
Ситуация следующая. Промудохался в поисках решения, результата ноль. Непонятные логины и дубли оставались в системе. Сброс системы на начальные, помог исправить ситуацию. Выводы следующие. На данных винтах производилась не однократная миграция с системы на систему, а так же восстановление настроек онлайн из бэкапов от других систем. Выводы: Не восстанавливать настройки из резервных копий, если вы к примеру перешли с DS918+ на DS920+, при миграции будьте готовы к тому, что все настройки системы придётся делать с нуля. Всем бобра!1 point
-
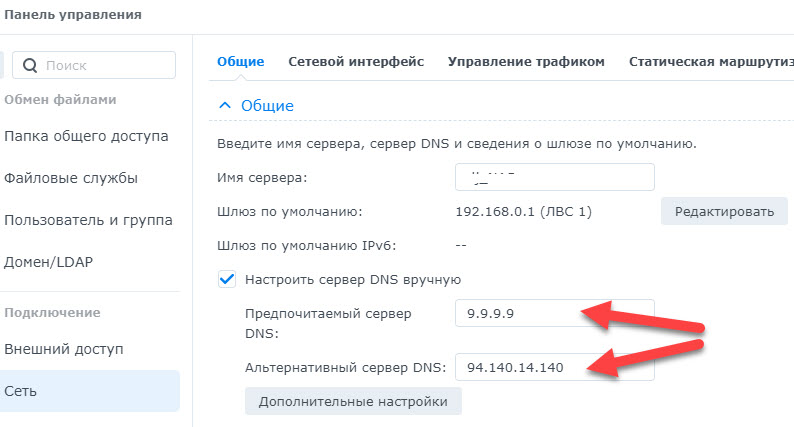
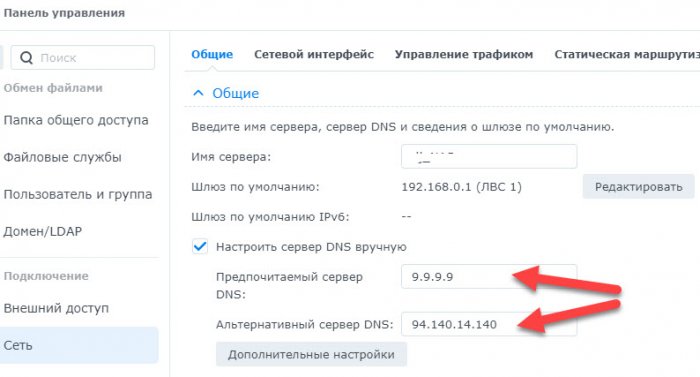
Всё, на сегодня проблема решена полностью - VPN и правки hosts не нужны вовсе. Цитата с одного дружественного сайта: No need for VPN to bypass the block anymore. Simply use AdGuard public DNS: 94.140.14.140, 94.140.14.141, or Quad9 public DNS: 9.9.9.9, 149.112.112.112 Всё, что нужно настроить для нормальной работы плагина - настроить сервер DNS вручную (у казать 1-2 ip-адреса из четырёх, перечисленных выше), например:
 1 point
 -
Перед тем как что-то менять в своей работающей системе, настоятельно рекомендуется сделать резервные копии своих особо ценных данных, чтобы потом не жалеть об их безвозвратной потере. Все, что вы творите - это ваш страх и риск, никто не побуждает вас это делать. Самый простой и надежный способ безопасно попробовать - выключить хрень, отключить все диски и загрузочную флешку от действующей системы, взять чистый диск и другую флешку и попробовать установить новую версию загрузчика и системы, если прокатило, то делать уже на действующей системе. 1. Как установить (подготовительные работы описаны для компа с Windows): а) скачать образ загрузчика 1.04b (исходная тема тут), создать каталог в корне диска без символов на кириллице, например, c:/918/ и поместить туда образ загрузчика б) определить VID/PID флешки или картридера в который она вставлена (Панель управления - Диспетчер устройств - Контроллеры USB - Ваша флешка/ридер - Свойства - Сведения - ИД оборудования, нужно для того, чтобы система DSM опознала этот диск и не пыталась устанавливать себя на него, если неправильно определите и пропишите эти параметры, то система будет вылетать по ошибке 13 при установке в) скачать, установить и запустить программу OSFmount, смонтировать Partition 0 (15 Mb) из файла загрузчика, перед монтированием убрать галку Read-only drive г) скачать, установить и запустить программу Akelpad, открыть файл grub/grub.cfg на ранее смонтированном диске, правим, сохраняем: set vid=0xA234 #VID флешки/ридера set pid=0xB678 #PID флешки/ридера set sn=1780PDN123456 #sn set mac1=001132123456 #mac первой сетевой карты set mac1=001132123457 #mac второй сетевой карты, второй и последующий отличаются от первого на +1 в последнем разряде в шестнадцатеричной системе ... set netif_num=2 #количество сетевых карт ... set sata_args='SataPortMap=6' #контроллер sata, значения: 6 - 1 контроллер на 6 портов; 22 - 2 контроллера по 2 порта; 42 - 2 контроллера, первый на 4 порта, второй на 2 и т.п. Где брать sn и mac - ваша головная боль, гугл в помощь, система установится и будет работать с теми, которые изначально прописаны в загрузчике, но с ограничением функционирования некоторых сервисов и модулей, таких как: QC, пуш уведомления, активация кодеков для транскодинга, установка лицензий syno... Но для большинства и без них будет достаточно. На форуме писали, что прокатывало с sn и mac от других реальных моделей syno, но так не пробовал, поэтому утверждать не буду, кто хочет - дерзайте. д) размонтировать диск в OSFmount е) скачать, установить и запустить программу Rufus и записать ранее подготовленный образ на флешку з) вставить флешку в машину, на которой планируете запустить хрень, подключить диски, включить питание ж) отключить брандмауэр в антивирусе, в браузере набрать http://find.synology.com или установить Synology Assistant с сайта syno и найти вновь установленную хрень в вашей сети и) установить DSM установить хрень следуя инструкциям программы установки и приступить к настройке (как это делать здесь не описываю, ибо все ответы есть в базе знаний syno) Для ленивых есть утилита, где собраны основные проги для Windows x64 2. Если хрень не обнаружилась в сети, то скорее всего в загрузчике нет драйверов для ваших сетевых карт и/или для sata контроллеров. a) запустить программу OSFmount, смонтировать Partition 1 (30 Mb) из файла загрузчика, перед монтированием убрать галку Read-only drive б) скачать extra.lzma из этой темы и перезаписать в смонтированном диске в) размонтировать диск и перезаписать образ с добавленными драйверами на флешку г) попробовать запустить и найти хрень в сети, если не получилось, то увы и ах, либо просить, чтобы добавили дрова для ваших устройств в этой теме или самому их добавлять - теория тут 3. Транскодинг (нужны sn и mac от реальной железки) С наибольшей степени вероятности запустиnся на процессорах Intel начиная с 4го поколения (Haswell), но есть нюансы с моделями материнских плат и биосами. Проверяем следующим образом: hardware (hw) транскодинг - в корне системы должен быть каталог /dev/dri с тремя подкаталогами внутри, если его нет, но нет и hw транскодинга, чтобы проверить - ищем каталог в терминале/ssh командой cd /dev/dri. software (sw) транскодинг - должны подняться соответствующие кодеки, проверить можно командой в терминале/ssh cat /usr/syno/etc/codec/activation.conf Если результат такой, то он есть: {"success":true,"activated_codec":["hevc_dec","h264_dec","h264_enc","mpeg4part2_dec","ac3_dec","vc1_dec","vc1_enc","aac_dec","aac_enc","mpeg4part2_enc"],"token":"абракадабра"} Если ничего похожего нет, то нет и транскодинга. P.S. Просьба к админам прибить тему в шапке и дать мне доступ на редактирование первого поста этой темы, буду добавлять по мере поступления вопросов, ибо задолбали оленеводы, которые задают вопросы по установке, во всех подряд темах.1 point
-
NOTE OF CAUTION It is strongly advised to never apply an update on a 'production' box as soon as the update is made available. ALWAYS test the update on a test machine first and make sure all features are working as expected. Also, I recommend you to wait several days after the update is available to apply the update on a 'production' box. Reason is that Synology sometimes makes updates available and then suddenly withdraws them for no apparent reason. This could mean that the update has some issues and needs to be withdrawn from the public.1 point