Search the Community
Showing results for tags 'dsm 6.2'.
-
Just a quick guide from my installation of DSM 6.2.1 Update4, before I forget it. The process was much easier than I expected, thanks to all the contributions and sharing in this forum. *** This guide required MODDED BIOS and a HP NC360T NIC *** Hardware Setup Flash kamzata's modded bios, use attached file to burn an USB drive with the modded bios, boot the server from it and let it completes the bios flashing Install the HP NC360T NIC, I bought a used one in Taobao for 14 bucks Load "Optimal Defaults" from BIOS, then In Advance page, disable C1E Support In Chipset page, disable the onboard NIC Atheros AR8132M NIC DSM Installation Download Jun's Loader v1.03b DS3615xs (Synoboot_3615.zip | 17.3 MB | MD5 = e145097bbff03c767cc59b00e60c4ded) Download PAT file DS31615xs DSM 6.2.1-23824 Update4 (263MB) Prepare the USB boot drive, I followed Polanskiman's tutorial to write the generated SN, USB vid and pid in to grub.cfg boot image then burned it to my USB drive (below steps also come from Polanskiman's tutorial, really recommended to read it through) Boot the USB drive, select the 1st option (or just let it timeout in a sec), wait for 10mins then run Synology Assistant, your Microserver should be found as a "Not Installed" DSM Right click on the found DSM and select install, browse to the download PAT file above. Installation will take some time (10mins for my 8TB drives) Post Installation Enable SSH login Update packages Add SynoCommunity package sources - http://packages.synocommunity.com/ Packages Log Center Storage Analyzer Photo Station Audio Station Surveillance Station Transmission WIP Using Webcam as an IPcam with Surveillance Station Kamzata Modded BIOS - run HPQUSB.rar
- 38 replies
-
- 4
-

-

-
- hp
- microserver
-
(and 3 more)
Tagged with:
-
Установка и настройка DSM на основе версии 6.2.3 Ну вот, муки поиска позади и вы пришли к эпохальному решению создать сервер на основе Хрени.....)))) Надеюсь, что подошли к этому шагу с долей познаний и оценили свои возможности. Данный мануал является общим, без акцента на частные настройки и особенности применяемого вами железа, такие как настройки БИОС_а и хардово-софтовые нюансы вашего железа. Процедура описана на основе последней возможной (на данный момент) для установки версии DSM. Но она применима и на ранние версии DSM 6 . Более древние уже не помню ))) Итак начнём....... Берём флешку. Определяем vid pid. Редактируем grub.cfg. Записываем загрузчик 1.03b для 3615 - 3617 или 1.04b для 918+ Загрузчики: https://mega.nz/#F!yQpw0YTI!DQqIzUCG2RbBtQ6YieScWg!7AoyySoS Файлы DSM 6.2.3-25426: https://archive.synology.com/download/Os/DSM/6.2.3-25426 Обновление только вручную, предварительно скачав файлы !!!! Не обновляться до версии 6.2.4 Нежно "втыкиваем" наш загрузчик в USB и запускаем процесс установки. Можно подключить монитор и что то там увидеть, но я уже давно делаю это "вслепую". По умолчанию запускается Установка. И если всё же подключили монитор, то он вас обрадует этой надписью:"Happy Hacking" - Счастливый взлом. То есть всё хорошо ))) Далее, запускаем Synology Assistant или идём на find.synology.com для поиска своего сервера. Я пользуюсь Synology Assistant_ом, потому и описание будет с ним. Во избежании недопонимания и подобных трудностей бытия, уточняю..... Поиск сервера посредством Synology Assistant или на find.synology.com, осуществляется с ДРУГОГО Компа. С ДРУГОГО, а не с того, на который ставили Сервер. Synology Assistant - почитать: https://www.synology.com/ru-ru/knowledgebase/DSM/help/Assistant/assistant Synology Assistant - скачать: https://archive.synology.com/download/Utility/Assistant/6.2-24922 Нашли свой сервер, вошли по ip и запускаете дальнейшую установку Установка вручную и только так. Находим ранее скачанный файл DSM и подсовываем его. Ну а далее всё интуитивно понятно Создаём учётную запись Предложение по созданию Synology QuickConnect_а отметаем, так как для его работы необходима Реальная Валидная пара. Эту функцию стоит запустить сразу, а то потом она будет вылезать постоянно. Тоже самое, запустить и забыть. Вся безопасность в наших руках ))) Не успели запустить, а уже устарело .... ))) Идём в Центр пакетов и обновляемся. Идём в Панель управления Видим свою версию DSM и предложение обновиться до 6.2.4. Ни в коем случае не обновляемся. Загрузчика, на момент написания мануала, на эту версии НЕТ. Полезная функция Резервирования настроек. Резервируйте их при каждой манипуляции с обновлениями. Потом восстановить настройки будет проще. Нам необходима Папка общего доступа. Туда мы будем складывать файлы И тут нас посылает система к созданию Раздела. Без него никак. Опять таки, всё интуитивно понятно и просто идёте предложенным путём. Но внимательно читаем Создаём Пул хранения. Руководствуемся предложениями Мастера создания Выбираем необходимое или же идём по пути умолчания. Выбираем диск. Он у меня один, если у вас несколько, можно создать сразу RAID-массив. Просто перетягиваем его слева на право Пул готов, пошла проверка. Теперь необходимо создать Том Процесс проверки запущен, но он не мешает дальнейшим настройкам Создаём раздел Выбор файловой системы на ваше усмотрение. Гуглим и читаем мануалы. Я использую Btrfs Процесс проверки диска. Уже ближе к концу Ну вот мы уже имеем Раздел. В Диспетчере хранения имеются инструменты контроля за дисками Информация о состоянии. Смарт. Тесты Возвращаемся в Файл Стейшен, создаём Папки общего доступа. Выбор значений за вами. Редактирование разрешений за вами. Читайте внимательно. Советую, после первичных настроек, запустить эту утилиту . Она поможет настроить интернет на сервере. Очень полезная утилита Так же советую использовать Довланд Стейшен в качестве качалки торрентов. Простая и достаточно эффективная утилита. Сам её использую Нюанс настройки.... По умолчанию, почему то прописано ограничение на отдачу. Значение "20" заменить на значение"0" После настроек, советую открыть так называемый ROOT доступ: https://www.synology.com/ru-ru/knowledgebase/DSM/tutorial/General_Setup/How_to_login_to_DSM_with_root_permission_via_SSH_Telnet Ну вот вроде и всё.... Основные аспекты первоначальной настройки я охватил, остальное изучите в процессе эксплуатации.
-
Video tutorial on how to get XPEnology to run on an HP Microserver Gen8 via ESXi 6.7, and install DSM 6.2 on SSD drive on ODD port, and pass drivebays to VM with RDM (Raw Data Mapping) MANY Thanx go to the great tutorial already posted here by @luchuma [ Tutorial: Install/DSM 6.2 on ESXi 6.7 ] I just always prefer to watch a video
- 112 replies
-
- 5
-

-

-
- hp microserver gen8
- gen8
-
(and 2 more)
Tagged with:
-
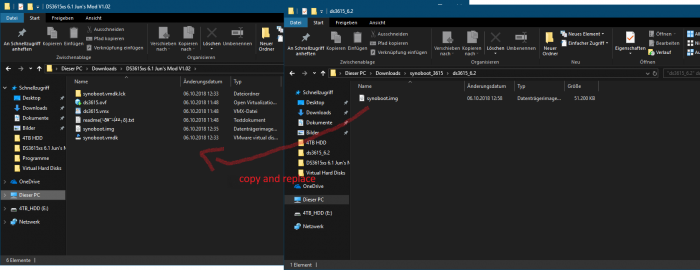
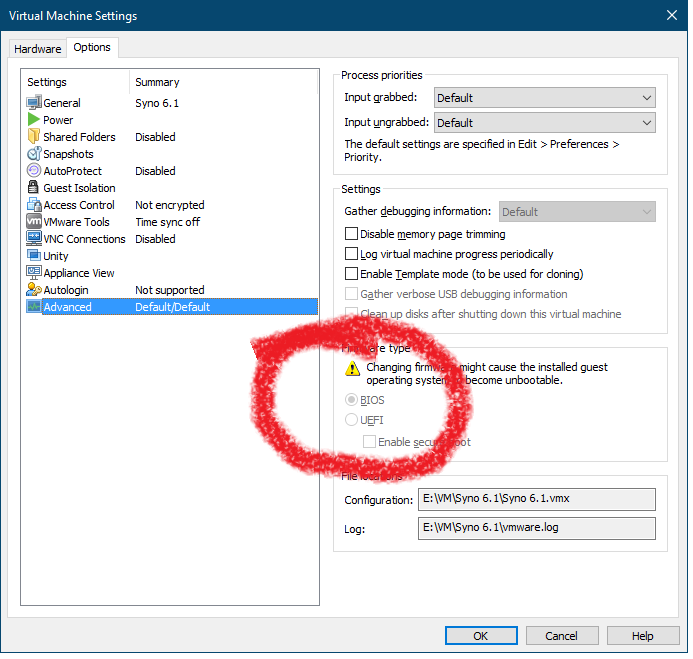
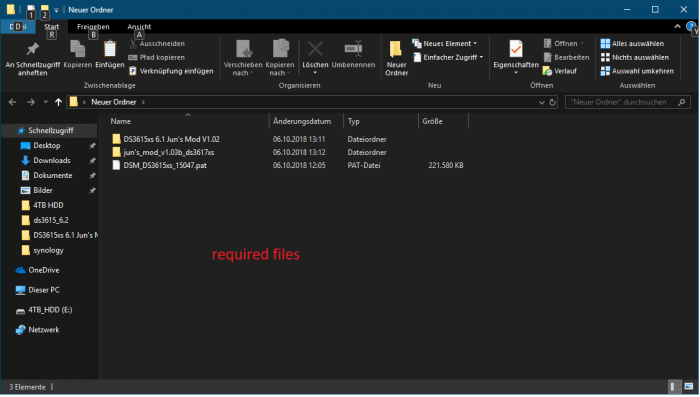
Good day I have successfully installed the DSM 6.2 on VmWare 14 Pro. For this I have only the official DSM 6.1 installed. For this let the bios on legacy and HDD Type not on Scsi but on Sata. And put the Lan attitude on bridged. simply insert the 6.1.vdmk as sata in the first place then add ne hdd eg 500gb. And in the options menu of Junloader Baremetal select. Now download and install DSM_DS3615xs_15047.pat through the Synology archive. If the DSM is ready set up you can download the update to 6.2 under Control Panel and INSTALL. When the DSM restarts it will not be found in LAN. Now the Jun Loader 1.03b (synoboot.img) must be downloaded and overwritten into the file Synoboot.img in the folder where the synoboot.vdmk (6.1) lies. then start the VM and read as Baremetal read. now the dsm should also be found in lan. now amelden and dsm 6.2 should be installed. and be usable. the metode before the dsm 6.1 installation directly with the 1.03b (dsm6.2) to install the dsm 6.2 fail me to find in the lan. Hope it is understandable for you so far. Sincerely, Marcel
-
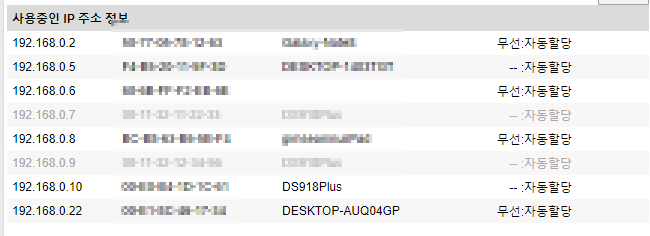
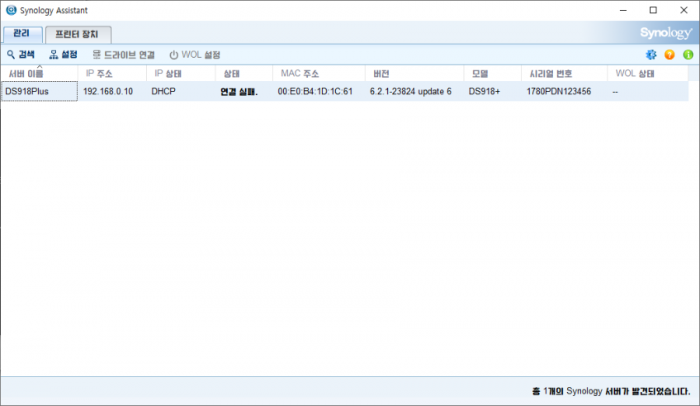
Hello. I'm the user which use xpenology with jun's loader. I've already bought chinese NAS which already installed DSM 6.2.2 (https://item.taobao.com/item.htm?id=590912056020). When I had used this(on a month ago), I can't find my NAS in Web/Client Assistant, but can connect my NAS by manually typing internal IP. Yesterday, I was change my internet environment and my router, and NAS cannot find my Assistant. Router still recognize NAS' IP, but I cannot connect NAS using Assistant, either internal IP I've also trying to re-install on my NAS, but it also has same problem when using Jun's loader 1.04b(with changing grub with my pid/vid/mac) When I ping my NAS server, it says "Request timed out". When I trying to search my NAS on and on, synology assistant find my server sometime(trying to 20~30 times), but it says their status as "connection failed" and still not work. I already turn off client's firewall setting, and my LAN controller is Intel I221.
-
Hello, I am very interested in the new DSM 6.2 loader by Jun. I read the posts in the Developer section but i must admit that i am not a great linux specialist. So i am not undestanding erverything. Just a simple question: Is it possible to run DSM 6.2 with Jun's new 1.03a2 loader , baremetal, on a DELL PowerEdge T30 with an Intel Xeon E3-1225 v5, 4x 3.30GHz? LAN is an Intel i219. Thank you for your suggestions. Greetings, Sonnyboy
-
https://www.synology.com/en-global/releaseNote/DS918+ ⚠️ Note the update of NVMe code. ⚠️ Anyone who has used the NVMe patch should consider removing cache prior to applying this update.
-
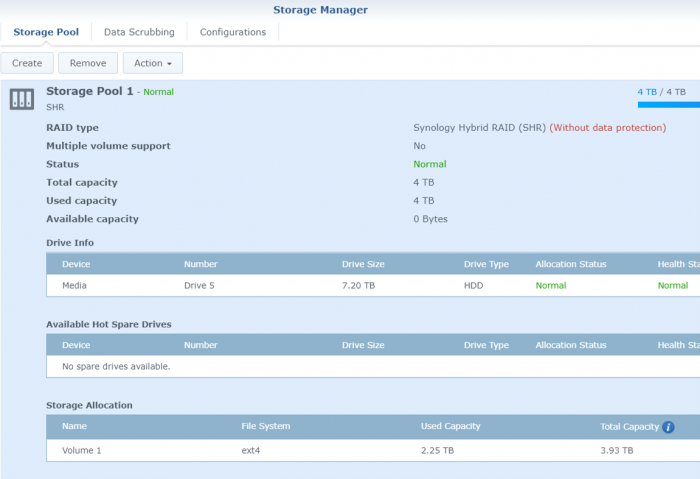
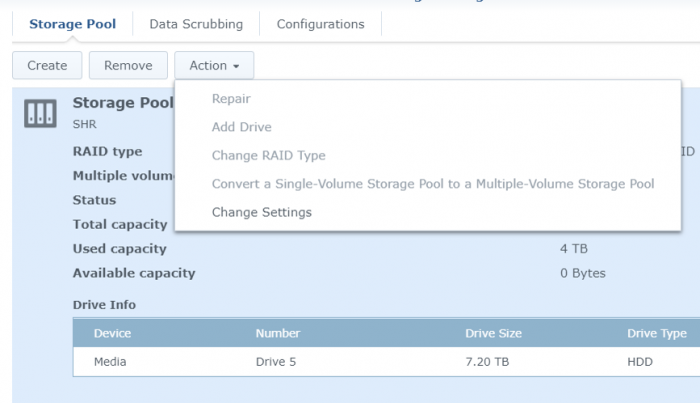
So when installing DSM on my gen10 microserver in ESXi i gave 4TB initially to an 8TB (7.27TB formatted) to the volume thinking I could expand it later. However, I can't seem to expand the volume. It sees it as a 4TB volume in a 7.27TB drive but when I click Create, the Storage Manager doesnt see the Drive 5 where the 4TB is, only Drive 1 where the Synology OS is. How do I expand the storage so that DSM 6.2 sees the whole drive?
- 2 replies
-
- volume
- storage manager
-
(and 3 more)
Tagged with:
-
This is a MAJOR update of DSM. DO NOT UPDATE TO DSM 6.2 with Jun's loader 1.02b or earlier. Your box will be bricked. Use loader 1.03b instead. You have been warned. https://www.synology.com/en-global/releaseNote/DS3615xs
-
-
Hi guys, I’m new at xpenology and I would need to install a DSM on a google cloud platform instance. is this feasible? is anyone interested in helping me getting that up and running please? Cheers Stanley Brusse
-
Hi, I just setup HP Microserver N54L running on DSM 6.1.3-15152 and System update shows/suggest to update it to 6.2.1-23824? Can I please know whether it is safe to click & update? Current SETUP: Current - DS3615xs - DSM 6.1.3-15152 16G RAM Regards, Mathew
-
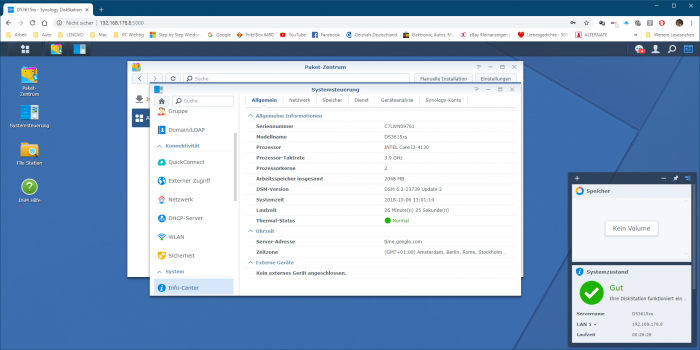
after changing my router i am not able to acces php myadmin nomore, my setup 1780PDN123456 DS918+ INTEL Celeron J3455 3.3 GHz 4 4096 MB DSM 6.2-23739 2019-01-27 20:46:47 3 day(s) 23 hour(s) 8 minute(s) 22 second(s) time.google.com (GMT+01:00) Amsterdam, Berlin, Rome, Stockholm, Vienna Flash Drive - Alcor Micro Corp. any help is very welcome
- 1 reply
-
- php
- phpmyadmin
-
(and 4 more)
Tagged with:
-
Hi, I was using DSM 6.1.7-15284 Update 2 with loader 1.02b on VMware ESXi 6.5 with PCI Passthrough. Recently, I updated DSM to 6.2.1 23824 but after reboot, my NAS did not come up. Then I pulled out all the Data Drives and restored the system to the last snapshot. Now I can access the DSM GUI (with DSM 6.1.7-15284 Update 2) without my Data Hard Drives, But when I insert the Hard Disks and reboot it lost its static IP and take IP from DHCP and show the status as "Recoverable" I tried to click on "Recovery" but after a reboot Synology Assistant could not detect it. I again restored it to the last snapshot with DSM 6.1.7 - 15284 Update 2 and this time I tried to manually upgrade it to DSM 6.2.1 23739 and after reboot, it again not able to detect on the network. Is there any chance to restore my data? Please help!! Regd.
- 2 replies
-
- recoverable
- dsm 6.2
-
(and 4 more)
Tagged with:
-


