Search the Community
Showing results for tags 'dsm'.
-
DSM: 6.1.6-15266 - Результат обновления: УСПЕШНЫЙ - версия DSM до обновления: DSM 6.1.5-15254 U1 - версия и модель загрузчика: Jun's Loader v1.02b - DS916 + - железо: Gigabyte N3150N-D3V - дополнительные комментарии: требуется перезагрузка!
-
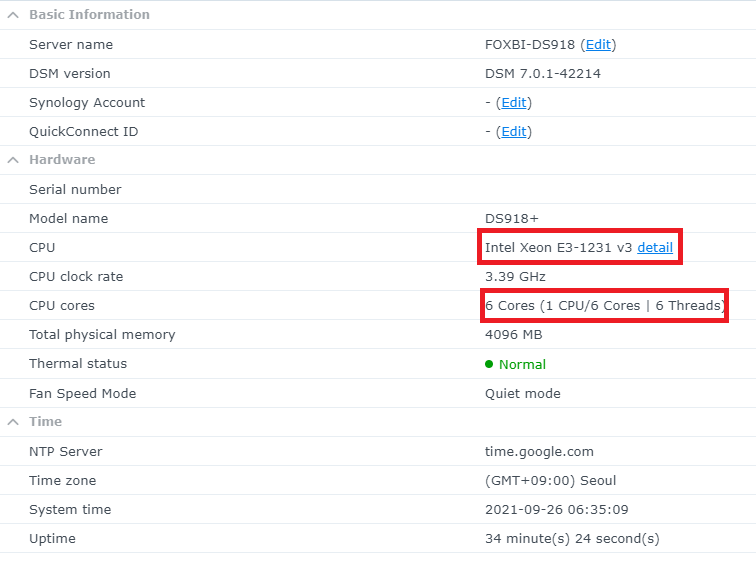
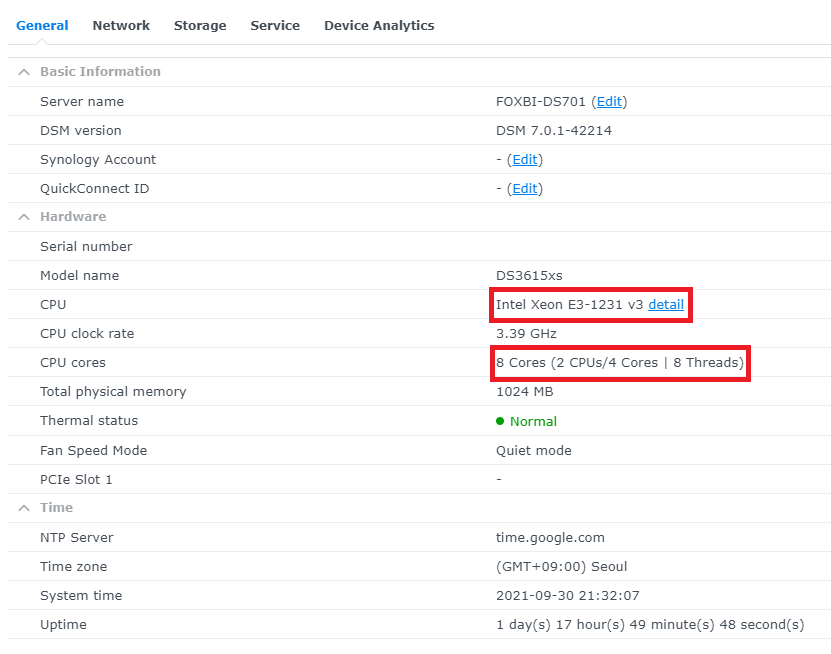
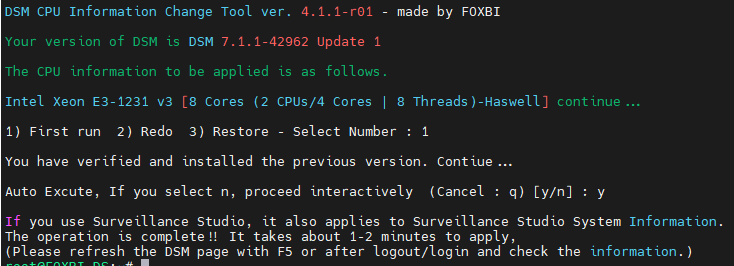
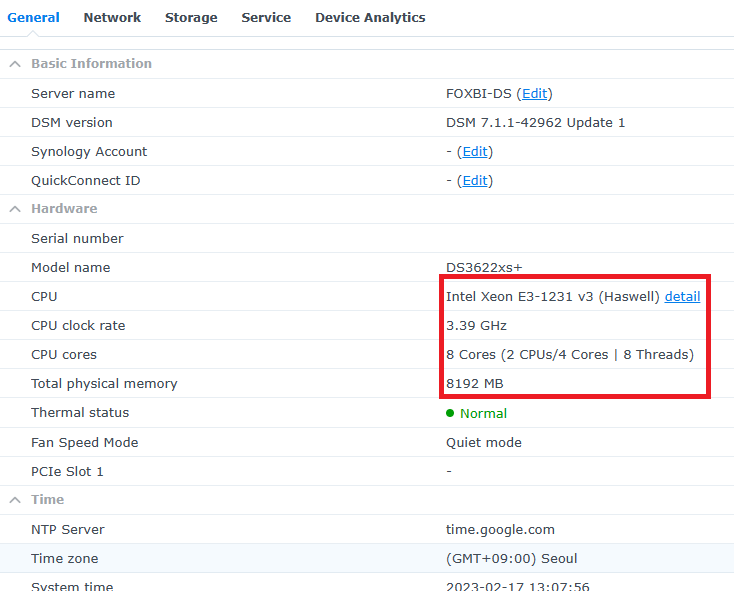
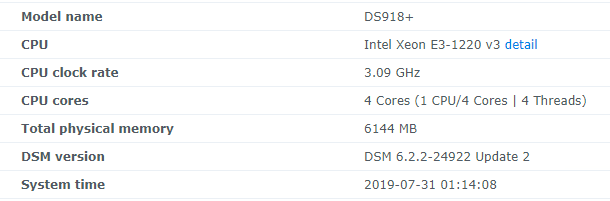
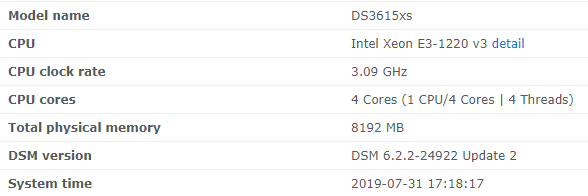
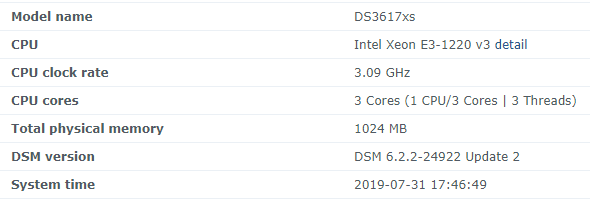
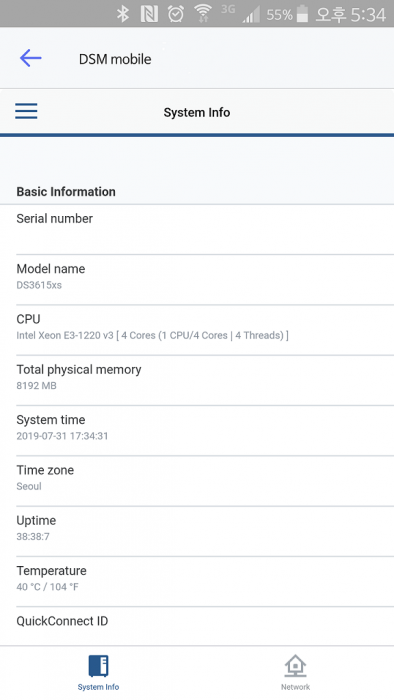
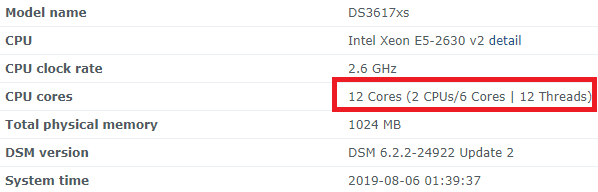
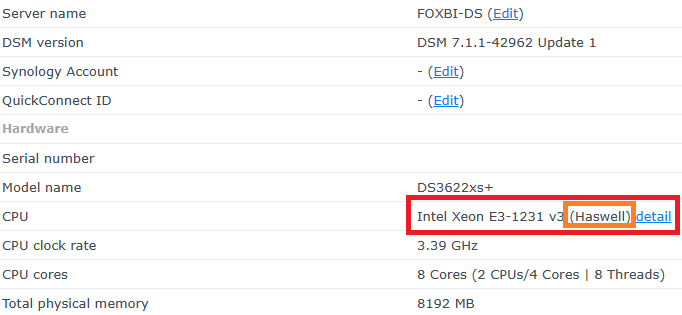
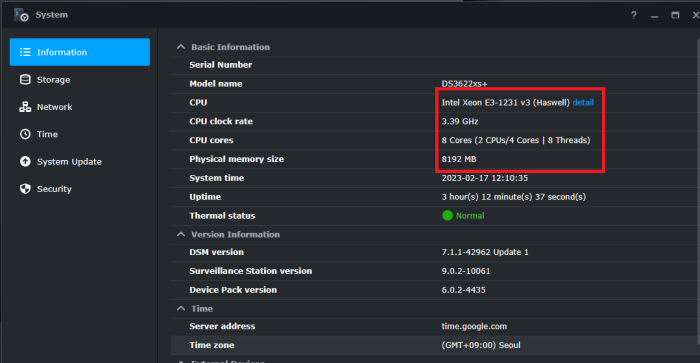
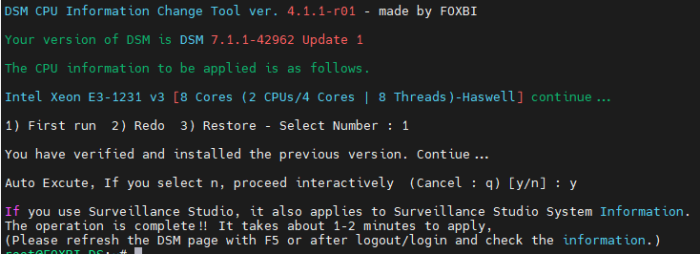
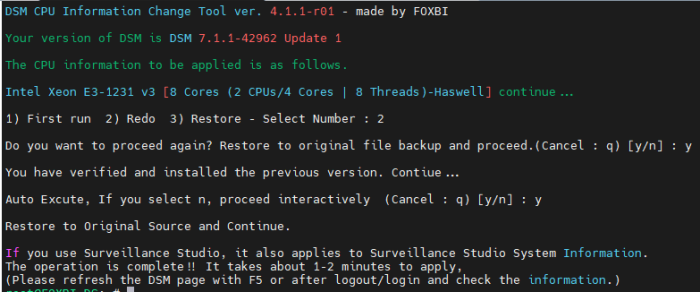
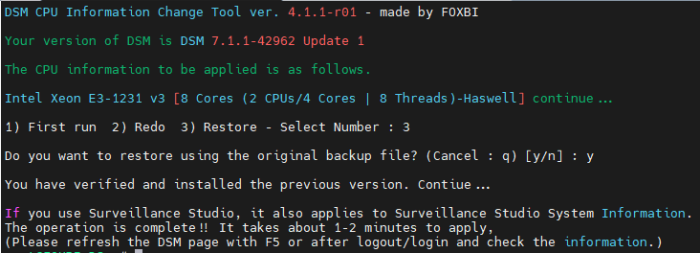
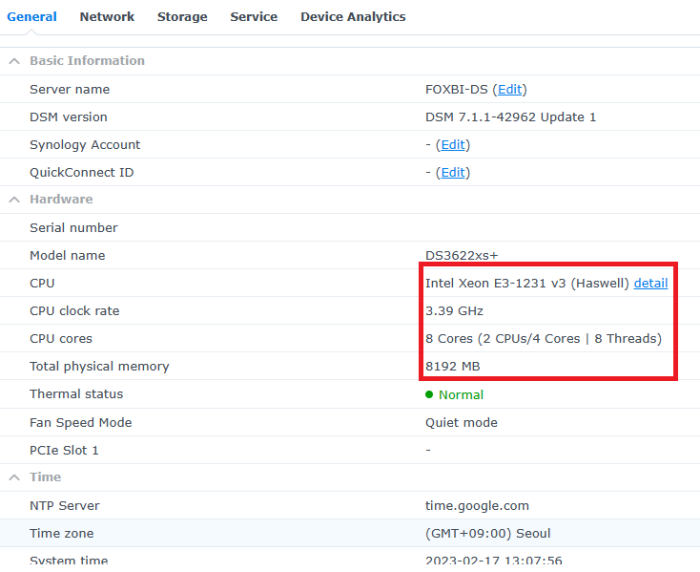
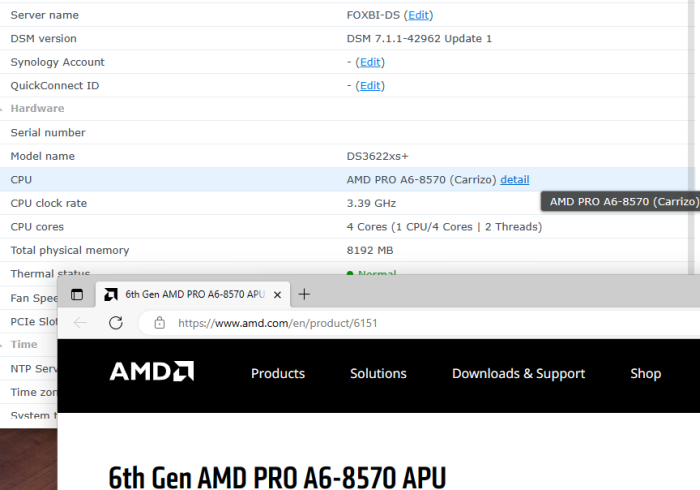
Hello! I am xpenology user. And I am an IT engineer who creates shell scripts as hobbies. Please understand that it is written by a google translate site. because i’m korean who is not fluent in English. I created a tool to change cpu information for Xpenology’s users. Modify the actual cpu name and cores of your pc or server. Howto Run ============================================================= 1. Download attached file on your PC (ch_cpuinfo.tar) (ch_cpuinfo_en.tar) / (ch_cpuinfo_kr.tar is file for korean) 2. Upload file to your DSM location (by filestation, sftp, webdav etc....) 3. Connect to ssh by admin account. (dsm > control panel > terminal & snmp > terminal > enable ssh check) 4. Switch user to root: sudo su - (input admin password) 5. Change directory to where ch_cpuinfo.tar file is located: cd /volume1/temp 5-1. in another way, Download ch_cpuinfo.tar with wget wget https://github.com/FOXBI/ch_cpuinfo/releases/download/ch_cpuinfo/ch_cpuinfo.tar 6. Decompress file & check file: tar xvf ch_cpuinfo.tar ls -lrt (check root’s run auth) 7. Run to Binary file ./ch_cpuinfo or ./ch_cpuinfo.sh (If you use busybox in DSM 5.x, you can use it as a source file) 8. When you execute it, proceed according to the description that is output. 9. Check your DSM’s CPU name, CPU cores at “information center” made a video of the how to run ch_cpuinfo. Extra Action If you want to use ch_cpuinfo in your language Modify and use the LANG.txt file in the same path as ch_cpuinfo. It is possible to use after changing the English content of each variable after translation and changing the value of CUSTLANG in line 8 to Y. Sample image(by Google trans) ==================================================== Addtional, Adjust binary to excute file made by shc(http://www.datsi.fi.upm.es/~frosal) The tool does not inclue worms, bad code. If you want to edit the CPU information yourself manually, please refer to the contents below. ——————————————————————————————————————————————————————————————— Location : /usr/syno/synoman/webman/modules/AdminCenter Source : admin_center.js / admin_center.js.gz(above 6.2) Add Before -> if(Ext.isDefined(h.cpu_vendor)&&Ext.isDefined(h.cpu_family)&&Ext.isDefined(h.cpu_series)){ o.push([_T("status","cpu_model_name"),String.format("{0} {1} {2}",h.cpu_vendor,h.cpu_family,h.cpu_series)])} if(Ext.isDefined(h.cpu_cores)){o.push([_T("status","cpu_cores"),h.cpu_cores])} Add contents: h.cpu_vendor="Intel";h.cpu_family="Xeon";h.cpu_series="E3-1220 V3";h.cpu_cores="4 Cores (1 CPU/4 Cores | 4 Threads)"; h.cpu_detail="<a href='https://ark.intel.com/content/www/us/en/ark/search.html?_charset_=UTF-8&q=E3-1220 V3' target=_blank>detail</a>" Change contens: String.format("{0} {1} {2}",h.cpu_vendor,h.cpu_family,h.cpu_series) to String.format("{0} {1} {2} {3}",h.cpu_vendor,h.cpu_family,h.cpu_series,h.cpu_detail) ——————————————————————————————————————————————————————————————— Finally, All descriptions are based on version 6.2, and the actual executable file supports 5.x, 6.x and 7.x Publish the source through github(https://github.com/FOXBI/ch_cpuinfo). For versions DSM 6.x and later, you can use the binary as before. If you use busybox in DSM 5.x, you can use it as a source file(ch_cpuinfo.sh). Please contact me by comment or bug report, i’ll respond to you as much as possible within my ability. Test & Made Environment ———————————————————————————————————— Base Server : HP ML310e v2 gen8 + VMware ESXi 6.0 + RDM DSM : DSM 6.2.3-25426 Update 3 (DS3615xs) Base Server : HP ML310e v2 gen8 + VMware ESXi 6.0 DSM : DSM 7.0.1-42214 (DS3615xs) Base Server : HP ML310e v2 gen8 + VMware ESXi 6.0 DSM : DSM 7.0.1-42214 (DS918+) Base Server : HP ML310e v2 gen8 + VMware ESXi 6.0 DSM : DSM 6.2.4-25556 (DS3615xs) Base Server : Intel E5-2630 v2 + VMware ESXi 6.7u2 DSM : 6.2.2-24922 Update 2 (DS3617xs) ———————————————————————————————————— Change Log Update new version (ch_cpuinfo ver 4.2.0-r01) 2023.02.18 - Application of AMD's CPU information collection function improvement - xpenlib(cpu_info.sh) refered https://github.com/FOXBI/xpenlib/blob/main/cpu_info.sh Update new version (ch_cpuinfo ver 4.2.1-r01) 2023.03.05 - Fixed error when users of previous version perform redo with version 4.2.0-r01 (Thanks for the @Mentat report.) I am sorry for not being able to actively respond to your inquiries due to busy life. Thank you!! Have a nice day!! Cheer up!! We can do it!! Reduce activity & Stay home & Wear a Mask!! Let's overcome COVID-19 !! Let's pray and support together for the two countries where the earthquake caused great damage and many deaths and missing people. ============================================= Download links: ch_cpuinfo ver 4.2.0-r01 - new version update -> ch_cpuinfo ver 4.2.1-r01 - new version update -> ch_cpuinfo.tar Reference images # 1.04b + DS918+ # 1.03b + DS3615xs # 1.03b + DS3617xs # Normal output is possible even when using more than 8core. # Support DSM 7.x


- 395 replies
-
- 54
-

-

-
Hello everyone, I have install DSM on my Qnap TS559 pro+, all work without problem except the hibernation. I have the problem with 6.2.3 and I have downgrade to 6.2.2 but same problem. Anyone know how can I resolve the problem ?
-
 Dear all, I am trying top Install Xpenology on a spare desk computer that i have. I out in a sigle disk with 6TB capacity. I burned the image via Rufus on a USB Stick. The Stick boot correctly and the dsm installation start, but It stops at 95%. If i refresh the Page, the installation progress Starts again from 56% and stops 95%. There Is something that i can check to understand where and how i have made something wrong? Thanks in Advance for all the reply that i Will receive. 👋👋
 -
Dear all, I am trying top Install Xpenology on a spare desk computer that i have. I out in a sigle disk with 6TB capacity. I burned the image via Rufus on a USB Stick. The Stick boot correctly and the dsm installation start, but It stops at 95%. If i refresh the Page, the installation progress Starts again from 56% and stops 95%. There Is something that i can check to understand where and how i have made something wrong? Thanks in Advance for all the reply that i Will receive. 👋👋
-
 Please help me, I want to use ABB but i can't activate trough the os, the web interface, the offline activation and the special url. everytime it shows an error. please help me with this
 -
Bonjour. Comment en peux faire installer un DSM 7.1 ARPL sur serveur VPS en KVM ? .un grand merci
-
Ce tuto est une mise à jour du tuto que j'ai déjà fait l'année dernière. Le tuto ci-dessous permet d'installer/migrer DSM 5.2 à DSM 6.1.7 directement sans devoir à passer par DSM 6.0.2. Si pour une raison ou une autre vous voulez migrer à DSM 6.0.2 d'abord ou alors tout simplement vous ne voulait pas migrer à DSM 6.1.7 mais souhaiter migrer à DSM 6.0.2 uniquement alors utilisez le lien ci dessus. Pour mettre à jour DSM 6.0.2 à DSM 6.1.7 voir ici. Comme la plupart de vous doivent déjà le savoir Jun a réussi un exploit en créant un loader permettant l'installation de DSM 6 sur du matériel non Synology. Voici le fil de la discussion pour ceux que ça intéressent: https://xpenology.com/forum/topic/6253-dsm-6xx-loader/. Il va vous falloir quelques outils. Je pars du principe que vous êtes sous Windows 10, 8, 7, Vista ou XP. Si vous êtes sur un MAC OS et que vous comprenez l'anglais réfèrerez vous au post que j'ai fait sur comment écrire et monter l'image sur une clef USB. Vous pouvez ensuite revenir sur ce tuto après avoir effectué les manips nécessaires sur MAC OS. Si vous avez des doutes n'hésitez pas à laisser un commentaire. Si vous êtes à DSM 5.1 ou sur une version antérieur, il faut tout d'abord mettre à jour DSM à la version 5.2. Si vous faites une installation fraîche de DSM 6.1 alors vous êtes bon pour la suite. Simplement omettez toute référence à DSM 5.2 Voici ce dont vous avez besoin: - Win32 Disk Imager. Application permettant de rendre une clef USB bootable. - Une clef USB que l'on utilisera pour y mettre le loader. 4GB suffiront largement. Je conseille une clef de marque (Kingston, SandDisk ou autre). Cela évitera les problèmes dans le future. - Comment connaitre le VID et PID de votre clef usb >>> voir ici - Un éditeur de texte avancé. Notepad++ fera l'affaire. L'éditeur de text Notepad inclu avec Windows est déconseillé. - DSM 6.1.7. Télécharger un des fichiers relatifs à un des 3 modèles suivant: DS3615sx ou DS3617sx ou DS916+. Télécharger uniquement le fichier avec l'extension ".pat" et non celui avec l'extension ".pat.md5". Les fichiers PAT viennent directement des serveurs de Synology, donc sans aucune altération. - Le loader (miroir) officiel v1.02b de Jun. Ce loader est hybrid c'est à dire qu'il marche en EFI ou BIOS donc il devrait marcher sur une majorité de machines capable de lire du GTP. Pour les machines plus vielles qui ne peuvent lire que du MBR ce loader ne marchera pas. Utilisez alors l'image du loader v1.02b faites par @Genesys construite à partir du loader de Jun mais faite avec une table de partitionnement de type MBR. Note: Le loader v1.02b de Jun est compatible avec les CPU Intel. Pour les CPU AMD cela n'est pas entièrement le cas mais plusieurs personnes ont mentionnée qu'il était possible d'utiliser ce loader. Il serait d'après eux nécessaire de désactiver la fonction C1E dans le BIOS (applicable aux machines HP comme le N40L ou N54L par exemple). Si vous avez un autre model/marque de machine AMD ne me demandez pas, je ne sais pas. Il faudra que vous regardiez dans le bios et fassiez des tests vous même. Partagez voter expérience ca en aidera surement d'autres. - Le ramdisk personnalisé extra.lzma. Ce ramdisk est optionnel et ne doit être utiliser que si le ramdisk par défaut inclus dans le loader ne permet pas la détection du matériel. Je le fourni pour ceux qui pourraient avoir des problèmes de détection réseau ou de contrôleurs de disques non reconnus. Ce ramdisk personnalisé contient des modules (drivers) additionnels qui ont été compilé par @IG-88 avec le code source de DSM 6.1.3. Je ne garantie pas qu'ils marchent tous. Vous devrez remplacer (ou renommer, au cas ou!) le ramdisk par défaut extra.lzma par celui ci. Si vous avez des questions spécifiquement liées au ramdisk de IG-88 merci de les poster directement dans le fil de discussion de IG-88, pas ici. - Faites attention à branchez vos HDD successivement en commençant par le premier port SATA normalement décrit comme SATA0 sur les cartes mères. Vérifiez avec le fabriquant de votre carte mère. Si vous faites une migration à partir de DSM 5.2 alors laissez tel quel. - OSFMount. Application permettant de modifier le fichier grub.cfg directement sur l'image. Ceci n'est pas strictement nécessaire car Jun a rendu possible la configuration du VID/PID, S/N et MAC directement à partir du Menu Boot Grub. Si vous préférez utiliser la nouvelle méthode il suffit d'omettre le Point 4, lisez plutôt la Note 4 et reprenez le tuto à partir du Point 5. SVP LISEZ TOUT LE TUTO AVANT DE FAIRE N'IMPORTE QUOI L'utilisation de ce loader relève de votre entière responsabilité. Ne me tenez pas responsable si vous perdez vos données ou que votre NAS part en fumée. Sachez aussi que ce loader contient moins de drivers que sous DSM 5.2 donc si il est primordiale pour vous d'avoir une machine opérationnelle h24 je vous conseille de lire en bas du tuto les drivers disponibles. Si votre module n'est pas inclus alors il vous faudra les compiler vous même ou utiliser le ramdisk personnalisé qui se trouve ci-dessus. Ne me demandez pas de compiler des modules à votre place, je ne le ferais pas. NE METTEZ PAS A JOUR DSM AU DELA DE LA VERSION 6.1.7 AVEC LE LOADER v1.02b. EN D'AUTRES TERMES NE METTEZ PAS A JOUR DSM A LA VERSION 6.2 A bon entendeur. Maintenant que vous avez tout ce qu'il vous faut, passons aux choses sérieuses: 1 - Faites un backup de vos données et de votre configuration avant toute chose. Cela évitera la pleurniche plus tard. Imprimez ce tuto si nécessaire. 2 - Eteignez votre NAS. Déconnectez votre clef USB avec votre loader 5.2. Je conseille que vous mettiez de coté la clef USB que vous utilisez actuellement avec DSM 5.2 et prenez une nouvelle clef USB pour DSM 6.1. Cela évitera de la refaire si l'upgrade ne marche pas pour vous et que vous avez besoin de revenir à DSM 5.2. 3 - Allez à votre PC, branchez votre clef USB et lancez votre application de choix permettant de voir le VID et PID de votre clef USB. Notez ça quelque part car vous en aurez besoin sous peu. 4 - Maintenant lancez OSFMount. Sélectionnez "Mount New", puis choisissez votre loader (fichier au format .img) dans "Image File". Une autre fenêtre s'ouvre. Sélectionnez la partition 0 (celle de 15 MB). Cliquez Ok. Sur la fenêtre principale décochez la case "Read only drive". Cliquez Ok. La partition de l'image devrait maintenant être montée dans votre explorateur de fichiers. Vous pouvez maintenant aller au dossier /grub et remplacer (ou renommé) le ramdisk par défaut extra.lzma par celui que j'ai fourni un peu plus haut. Maintenant revenez en arrière et aller dans le dossier /grub et éditer le fichier grub.cfg avec votre éditeur de texte avancé. Si vous avez besoin de remplacer le ramdisk par défaut par le ramdisk extra.lzma personnalisé il vous faudra alors aussi monter la partition 1 (celle de 30MB) avec OSFMount. Le contenue du fichier grub.cfg est le suivant: Je ne mets uniquement ici que la portion du code qui nous intéresse dans le cadre de ce tuto: [...] set extra_initrd="extra.lzma" set info="info.txt" set vid=0x058f set pid=0x6387 set sn=C7LWN09761 set mac1=0011322CA785 set rootdev=/dev/md0 set netif_num=1 set extra_args_3615='' set common_args_3615='syno_hdd_powerup_seq=0 HddHotplug=0 syno_hw_version=DS3615xs vender_format_version=2 console=ttyS0,115200n8 withefi elevator=elevator quiet' set sata_args='sata_uid=1 sata_pcislot=5 synoboot_satadom=1 DiskIdxMap=0C SataPortMap=1 SasIdxMap=0' set default='0' set timeout='1' set fallback='1' [...] Les données à modifier sont les suivantes: vid=0x090C par vid=0x[le vid de votre clef usb] pid=0x1000 par pid=0x[le pid de votre clef usb] sn=C7LWN09761 par sn=générez votre sn ici avec le modèle DS3615xs ou DS3617xs ou DS916+ (cela va dépendre que quel loader vous avez choisi) mac1=0011322CA785 par mac1=[l'adresse MAC du port réseau #1]. Vous pouvez rajouter set mac2=[l'adresse MAC du port réseau #2] si vous avez un 2ième port réseau et ainsi de suite jusqu'à mac4 mais ceci n'est pas nécessaire. Conseil: changez timeout='1' par timeout='4' - Cela rallonge la durée d'affichage du Menu Boot Grub lorsqu'il apparaitra à l'écran. Une fois finie l'édition du fichier grub.cfg, sauvegardez les changements et fermez l'éditeur de texte. Sur OSFMount cliquez sur "Dismount all & Exit". Vous êtes maintenant fin prêt à écrire l'image sur votre clef USB. 5 - Utilisez Win32 Disk Imager pour rendre votre clef USB bootable avec l'image que vous venez d'éditer. 6 - Ejectez votre clef USB chaude et brulante proprement. Branchez la sur votre NAS (évitez les ports USB 3.0). Démarrez la machine et accédez immédiatement à votre BIOS afin de le reconfigurer pour que le boot se fasse à partir de la nouvelle clef usb. Faites les changements nécessaires pour redémarrer en UEFI ou en legacy bios, c'est à vous de choisir. Aussi, dans le BIOS, les HDD doivent être configurés en AHCI et non pas en IDE. Finalement et si possible, activez dans le BIOS le port série si il ne l'est déjà pas. Toutes les cartes mère n'ont pas forcément de port série. Si c'est le cas pour vous alors ce n'est pas bien grave, le loader se chargera du problème. Sauvegarder les changements fait au BIOS et redémarrez. 7 - Une fois redémarré, si vous avez un écran connecté au NAS vous verrez le Menu Boot Grub suivant: CONSEIL: avant même que le Menu Boot Grub n'apparaisse cliquez de façon répétée les touches haut ou bas. Cela aura comme effet d'arrêter le compte à rebours et vous donnera le temps de choisir la ligne que vous voulez. Vous verrez l'écran suivant après avoir fait entrer: Si vous avez démarrer la clef USB en mode EFI vous ne verrez normalement pas les 3 dernières lignes. Rien de grave. 8 - Retournez à votre PC et lancez de préférence Synology Assistant ou alors allez à http://find.synology.com. Normalement si vous avez bien tout suivi votre NAS devrait être détectée sur votre réseau local au bout d'une minute environ (j'ai testé avec un machine virtuelle et ça a prit ~55 secondes). Il suffit ensuite de suivre les indications pour soit faire une installation fraîche soit faire la migration de DSM 5.2 à DSM 6.1. A un moment donné DSM vous demandera le fichier PAT (DSM_DS3615xs_15217.pat ou DSM_DS3617xs_15217.pat ou DSM_DS916+_15217.pat) que vous avez normalement déjà téléchargé. 9 - Une fois finie la MAJ ou l'installation fraîche, accédez à votre NAS comme d'habitude. Il vous faudra surement mettre à jour plusieurs applications. Vous pouvez ensuite mettre à jour DSM 6.1.7 jusqu'à DSM 6.1.7 (critical update 3). Il est possible que vous soyez obligé de faire un reboot forcé. Certaines personnes ont dû refaire la clef usb aussi. Désactivez la mise à jour automatique dans DSM. Si besoin est, voici ou télécharger les fichiers individuels (DSM et updates): https://xpenology.com/forum/topic/7294-links-to-dsm-and-critical-updates/ 10 - Voila c'est fini. Si vous avez des questions cherchez le forum/Google d'abord. Si vous êtes toujours bloqué alors posez votre question en donnant les spécifications de votre matériel (model carte mère, contrôleur LAN, contrôleur disk etc) faute de quoi votre post sera supprimé ou sciemment ignoré. -------------- Note 1: Si après avoir suivi le tuto votre NAS n'est pas accessible via http://find.synology.com ou Synology Assistant la raison la plus probable c'est que les drivers de votre carte réseau n'ont pas été inclus dans le loader. Faites un effort et utilisez Google pour savoir quel module votre carte réseau et/ou votre contrôleur de disque utilisent sous linux suite à quoi vérifiez que ces modules soient inclus dans le ramdisk personnalisé. Si vous le voyez alors utilisez le ramdisk personnalisé. Si rien ne marche alors poser votre question. Note 2: Une fois passé à DSM 6.1 sachez que vous n'aurez plus accès au NAS via ssh avec le compte root. Vous pouvez ceci dit y accéder avec votre compte administrateur puis élever les droits en utilisant sudo -i Ceci est tout à fait normal. C'est Synology qui a voulu sécuriser l'accès à DSM. Note 3: Vérifiez bien le VID/PID de votre clef USB avant d'entamer la MAJ. Si lors de la migration vous obtenez l'erreur suivante: "Failed to install the file. The file is probably corrupted. (13)" (ou l'équivalent en français) c'est que le VID/PID ne correspond pas à votre clef USB. Si vous avez toujours des problèmes après avoir bien vérifié le VID/PID alors essayez une autre clef usb. Note 4: Les changements effectués sur le fichier grub.cg peuvent aussi être fait directement à partir du Menu Boot Grub donc en principe il est tout à fait possible d'ignorer le Point 4 et écrire l'image synoboot.img sur votre clef USB sans rien modifier (il suffit de continuer à lire à partir du Point 6). Pour faire les modifications il faut appuyer sur la lettre 'C' lorsque vous voyez le Menu Boot Grub apparaitre. Il faut être vif car vous n'avez qu'une seconde avant que le menu disparaisse. Apres avoir appuyé sur la lettre C vous vous retrouverez dans une invite de commande grub. Pour changer le VID vous devez écrire comme suit: vid 0xLES 4 CHIFFRES VID DE VOTRE CLEF USB Faites la même chose pour pid, sn et mac1. Appuyez sur entrer à chaque commande. Les commandes sont les suivantes: pid 0xLES 4 CHIFFRES PID DE VOTRE CLEF USB sn LE NUMERO DE SERIE DE VOTRE NAS mac1 L'ADRESSE MAC1 DE VOTRE NAS Si vous avez plusieurs cartes réseau vous pouvez les rajouter de la meme manière: Le maximum c'est mac4. Voir ci dessous: mac2 L'ADRESSE MAC2 DE VOTRE NAS mac3 L'ADRESSE MAC3 DE VOTRE NAS mac4 L'ADRESSE MAC4 DE VOTRE NAS Si vous pensez avoir fait une erreur il suffit de refaire la commande. Lorsque vous avez fini appuyez sur Esc et sélectionnez la ligne du menu qui convient. Ci dessous un example a quoi ressemble l'invite de commande grub avec les commandes: Note 5: Si lors de l'installation vous recevez un message d'erreur de type "Nous avons détecté des erreurs sur les disques [numero des disques] et les ports sata ont également été désactivés, remplacer les disques et réessayer" alors il faut rajouter SataPortMap dans l'invite de commande Grub (ou dans le fichier grub.cfg). Appuyer sur la letter C lors du Menu Boot Grub et écrivez ceci: append SataPortMap=XX XX est le nombre de HDD présent. N'oubliez pas de mettre à jour ce paramètres si vous rajouter des HDD. Par ailleurs, si vous êtes amené à utiliser Reinstall, il ne faut pas oublier de sélectionner le mode normal (première ligne du menu grub) lors du reboot automatique après l’installation, sinon le loader sélectionnera à nouveau Reinstall et cela occasionnera des problèmes ultérieurement. @@@@@@@@ Précisions sur ce que veut dire SataPortMap= @@@@@@@@ @@@@@@@@@@@@@@@@@@@@@@@@@@@@@@@@@@@@@@@@@@@@ ############## Problèmes connus ##################### - Sur des machines à coeur unique et lent le "patcher" charge trop tard. - Certains drivers de cartes réseau plantent lorsque le MTU est au delà de 4096 (Jumbo frame). ############# Modules inclus dans le Loader de Jun par défaut ############# ############### Log des modifications du Tuto ###################


-
Hi everyone I am installing XPEnology on a decommissioned Datto Siris 3 NAS (replacing Datto OS and OMV). I am able to to every step fine, but when the first DSM boot is done, the device will not connect to my network. I have tried 7.1.0 images for DS3617xs (Broadwell, matches CPU generation) and the DS3622xs+ (Broadwellnk), and no go. TC detects both NICs and is able to get a DHCP address, and I can SSH to it just fine. I am doing the: update, upgrade, usbs, MAC (realmac), SATA, listmods, and build. After the build, the device can boot DSM but it will NOT connect to the network at all. Maybe I am using an incompatible version? The Datto Siris 3 I am using has the following specs: Intel Xeon D-1521 2.40 GHz 32GB Memory 120GB internal SSD, 2x 2TB Seagate drives 2x Intel Ethernet X552/X557-AT 10GBASE-T It is installing the ixgbe extension in the mod search. Thanks in advance!!
-

Gigabyte GA-N3150N-D3V - DSM 6.Х.Х
XerSonik posted a topic in Аппаратное обеспечение и совместимость
Навернулась мамка на амд (AsRosk QC5000-ITX/PH/), прикупил Gigabyte GA-N3150N-D3V Заменил мать, бут не трогал стоит 1.02b Обновился через веб морду с 6.1.2-15132 U1 до 6.1.4-15217 U1 Все ОК. Кто на данной мамке (Gigabyte GA-N3150N-D3V) заюзал 916+ Отпишитесь по результатам пожалуйста, планирую слезть с 3615xs на 916+ -
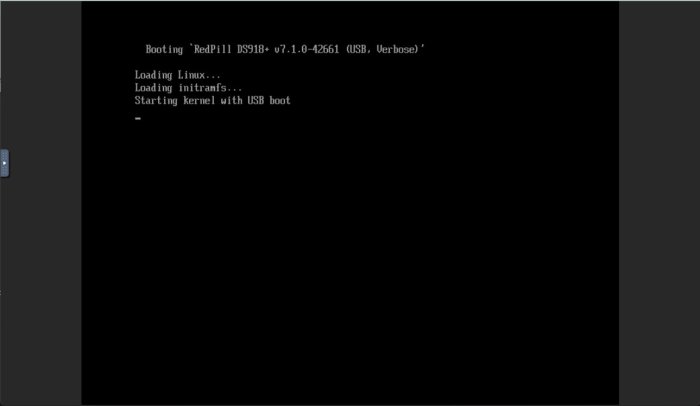
This tutorial is a supplement to the ESXi TCRP installation tutorial located here: https://xpenology.com/forum/topic/62547-tutorial-install-dsm-7x-with-tinycore-redpill-tcrp-loader-on-esxi/ Installing DSM 7.1.0.-42661 on UNRAID 6.10.3 I have been trying to install DSM 7.1 on my unraid server for the last night. After some problems and testing I have created this guide to install DSM 7.1 on UNRAID working perfectly. This is my vm config: STEP 1-Virtual machine creation: Download tiny core from https://github.com/pocopico/tinycore-redpill Select CentOS VM Template and apply correct options from the attached image. Select Q35-6.2 Select 3.0 (qemu XHCI) Load tiny red core as vdisk1 USB by selecting manually (you can create previously the name of the folder for the VM inside /domains and upload the tinycore img ) Create secondary disk 50G or whatever you want (this is your data storage for synology) as vdisk2 SATA Select Network model: e1000 Save. Uncheck "Start VM after creation" Edit again vdisk2 in the advanced xml template (top right corner) to controller='1' (if we don't do this tiny red core will not detect the disk properly when doing the satamap and will not install DSM correctly and will ask you to reinstall the *.pat infinitely) STEP 2-Start VM and connect via SSH Start VM and load tiny red core Once the OS is loaded, open the terminal and enter ifconfig to find out the ip of the machine Connect via ssh (with Putty) to the obtained IP address. user: tc password: P@ssw0rd STEP 3-Run the following commands: To update tiny red core with the latest data ./rploader.sh update now ./rploader.sh fullupgrade now To generate random mac and serial numbers (copy mac address generated to set on unraid vm template later) ./rploader.sh serialgen DS918+ (or whatever version you want, you can see all versions available with command info ./rploader.sh) To map the connected disks ./rploader.sh satamap now To record the vid/pid from usb ./rploader.sh identifyusb now To install NIC drivers (sometimes it loads the e1000e module instead of the e1000 and it doesn't work, adding this command will make sure that the e1000 module for the NIC is loaded correctly) For e1000 Network Card run: ./rploader.sh ext apollolake-7.1.0-42661 add https://raw.githubusercontent.com/pocopico/rp-ext/master/e1000/rpext-index.json NOTE: change version according your selection for CPU and DSM version For virtio-net Network Card run: ./rploader.sh ext apollolake-7.1.0-42661 add https://raw.githubusercontent.com/pocopico/rp-ext/master/v9fs/rpext-index.json NOTE: change version according your selection for CPU and DSM version To build the image ./rploader.sh build apollolake-7.1.0-42661 STEP 4-Download your .pat for your correct cpu architecture from official repo or mega download for this version apollolake , we will need it to install DSM later. https://global.download.synology.com/download/DSM/release/7.1/42661-1/DSM_DS918%2B_42661.pat - Offical repo STEP 5-Edit VM settings on advanced xml mode and install *.pat After doing all the above we shut down the machine. Edit the virtual machine on xml advanced mode (if we change mac address in normal editing mode you will lose controller="1" option set for vdisk2 we did previously so you will have to set it again everytime you change and/or save a setting from normal mode, try to edit always in xml advanced mode), look for MAC address and set the MAC generated by tiny red core. Save Start VM Select the first option USB and leave it a few minutes until we find it with synology assistant Open WebGui and install *.pat We now have DSM 7.1 working on unraid. There is other method with SATA boot but I have to test it better. Hope this guide help someone. Regards.
-
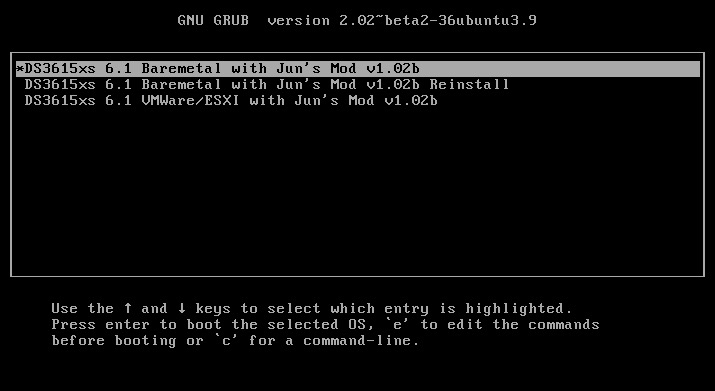
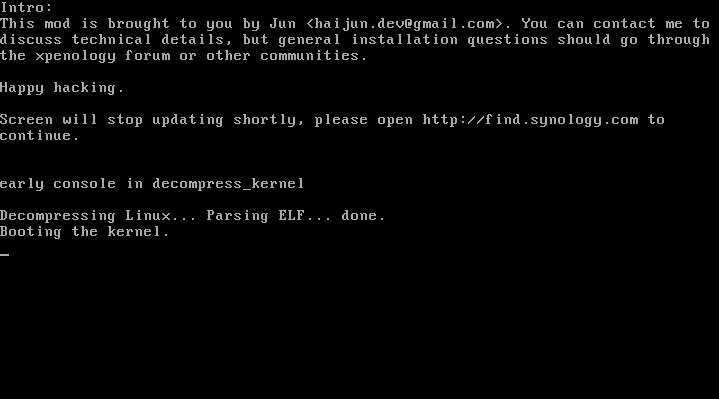
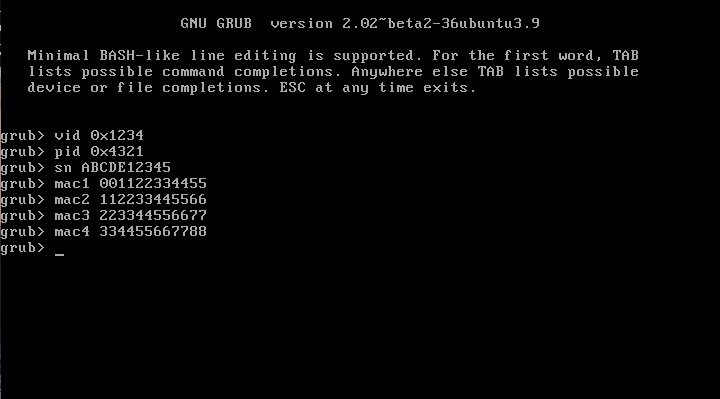
 This is an updated tutorial version from the one I made last year. It will enable you to migrate from DSM 5.2 to DSM 6.1.7 directly without the need to upgrade to DSM 6.0.2 first. If for some reason you want to upgrade to DSM 6.0.2 first or simply you do not want to upgrade to DSM 6.1.7 but only to DSM 6.0.2 then use the link above. To upgrade from DSM 6.0.2 to DSM 6.1.7 read here. As most of you know by now Jun was able to find a way to install DSM 6 on non Synology boxes. Here is the thread that I recommend reading. At least make an effort and read the OP: https://xpenology.com/forum/topic/6253-dsm-6xx-loader/ Below is what you need for the operation. I will assume you are doing all this under Windows 10, 8, 7 or XP. If you are on a MAC computer have a look at this post I made on how to burn the image to a USB drive and then mounting the USB drive for editing the content. The rest of the tutorial still applies. If you are currently using DSM 5.1 or below first update to DSM 5.2. If you are doing a fresh install of DSM 6.1 then carry on with the tutorial and omit references to DSM 5.2. - Win32 Disk Imager to make a bootable USB drive; - A 4GB (or any size really) USB drive (flash drive) to install the loader. Not that this is necessary but use preferably a brand name (Kingston, SanDisk...); - A way to read your USB drive VID/PID. Here is a how-to >>> VID and PID; - A good text editor: Notepad++ I really don't recommend using Windows's Notepad; - DSM 6.1.7 PAT file. Chose the one you need: DS3615sx or DS3617sx or DS916+. Download the ".pat" file not the ".pat.md5" - Jun's official v1.02b loader (mirror). This is a hybrid UEFI/BIOS loader so it should work in most machines which are capable or reading GUID partition table (GPT). For older machines that can only read MBR the above loader will simply not boot. If that is your case then use @Genesys's v1.02b loader rebuilt image which is MBR based. Note: Jun's loader supports Intel CPUs. For AMD CPUs Jun has stated that the loader needs some work but it has been reported by many users using HP machines that it actually works. The C1E function in the bios (in some HP machines) needs to be deactivated. I am unsure for other motherboards brands therefore if you have an AMD machine that is not an HP you might be out of luck. Try looking in the bios configuration and play around. - Custom extra.lzma ramdisk. This ramdisk is optional and should only be used if the default ramdisk included in the loader is not detecting your hardware. I am just providing it for those who are having issues with network detection or unrecognised HDD controllers. This custom ramdisk contains additional and updated modules & firmwares. Credits go to @IG-88 for compiling the modules against the latest DSM 6.1.3 source code. I do not warranty they all work but I think most do. If you chose to use this ramdisk, you will need to replace (or rename, so you can revert) the default extra.lzma ramdisk from Jun's loader with this one. If you a have question specific to the custom ramdisk please post it in the topic of IG-88, not here. - If you are doing a fresh install make sure your drives are plugged in direct succession starting from the 1st SATA port. Usually the first port is described as SATA0 on motherboards. Check with your MoBo manufacturer for exact nomenclature. - OSFMount to modify the grub.cfg file within the loader's image and if necessary to replace the extra.lzma ramdisk with the custom one. This is not strictly necessary as Jun has made it possible to configure what needs to be modified via the Grub Boot Menu. If you prefer using Jun's Grub Boot Menu configuration method, simply skip Point 4, read Note 4 instead and pick up at Point 5. PLEASE READ EVERYTHING PRIOR ATTEMPTING ANYTHING Use this loader at your own risk. I wont be held responsible for any loss of data or black smokes that may result in the use of this loader. Please note that this loader has a limited amount of modules (drivers) included. If it is fundamental for you to have a NAS operating as quick as possible I recommend you look at the included drivers very carefully at the bottom of this tutorial before attempting an upgrade. If they are not there you will have to compile your own modules/firmwares or use the custom ramdisk provided above. Don't ask me to compile modules for you. I wont do it. One last thing: DO NOT UPDATE DSM BEYOND VERSION 6.1.7 with loader v1.02b. IN OTHER WORDS DO NOT UPDATE TO DSM 6.2 You have been warned. Here we go: 1 - BACKUP your data and save your configuration prior any attempts to migrate from DMS 5.2 to DSM 6.1. I can't stress this enough. JUST DO IT, as Nike likes to say. Also, print this tutorial if you can. It will make your life easier. 2 - Turn off your NAS and unplug the USB drive you are currently using with DSM 5.2. I recommend you put this USB drive aside in case migration to DSM 6.1 doesn’t go as expected and you need to revert to DSM 5.2. It will just make your life easier. 3 - Now go to your workstation/PC, plug a new USB drive (or the old one if you really don’t have any spare USB drives). Use the link I provided earlier to check your USB drive VID/PID. Write down the info somewhere as we will need it later. 4 - Now launch OSFMount. Select Mount New, then select the image file you downloaded earlier (i.e. .img extension file) to open. Now select partition 0 (the one that is 15 MB). Click Ok. Then at the bottom of the window make sure to un-tick the "Read only drive". Click Ok. The partition should now be mounted in file explorer. At this point you can navigate to the /grub directory and edit the grub.cfg file. If you need to replace the extra.lzma ramdisk with the custom ramdisk provided above then you will also need to mount partition 1 (the one that is 30 MB). Below is what you will see in the grub.cfg file. I am only showing below the portion of the code that is relevant for the purpose of this tutorial [...] set extra_initrd="extra.lzma" set info="info.txt" set vid=0x058f set pid=0x6387 set sn=C7LWN09761 set mac1=0011322CA785 set rootdev=/dev/md0 set netif_num=1 set extra_args_3615='' set common_args_3615='syno_hdd_powerup_seq=0 HddHotplug=0 syno_hw_version=DS3615xs vender_format_version=2 console=ttyS0,115200n8 withefi elevator=elevator quiet' set sata_args='sata_uid=1 sata_pcislot=5 synoboot_satadom=1 DiskIdxMap=0C SataPortMap=1 SasIdxMap=0' set default='0' set timeout='1' set fallback='1' [...] You want to modify the following: Change vid=0x090C to vid=0x[your usb drive vid] Change pid=0x1000 to pid=0x[your usb drive pid] Change sn=C7LWN09761 to sn=generate your sn here with DS3615xs or DS 3617xs or DS916+ model (this will depend on which loader you chose) Change mac1=0011322CA785 to mac1=[your NIC MAC address #1]. You can also add set mac2=[your NIC MAC address #2] and so on until mac4 if you have multiple NICs. However, this is not necessary. Recommended: Change set timeout='1' to set timeout='4' - This will allow you more time to make a selection in the Grub Boot Menu when it appears on screen. Once you are done editing the grub.cfg file, save it and close your text editor. Now in OSFMount click on Dismount all & Exit. You are now ready to burn the image to your USB drive. 5 - Now use Win32 Disk Imager to burn the image file onto the USB drive. This will also make the USB drive bootable. 6 - Eject and unplug the USB drive from your workstation. Plug it in your NAS (avoid USB 3.0 ports. Use USB 2.0 port if available). Boot your NAS and before doing anything fancy, access your BIOS so to make your USB drive the 1st boot drive if it's not the case. The Jun official loader can boot in UEFI or in legacy BIOS, so you chose what suits you best. Also, make sure your HDDs are booting in AHCI mode and not in IDE. Finally, if disabled, also enable the serial port in BIOS. Some BIOS don't have this option so don't get too cranky on this if you can't find it. Save changes to the BIOS and REBOOT the NAS. 7 - Once rebooted, if you have a monitor connected to your NAS you will see the following Grub Boot Menu: ADVICE: even before you see the Grub Boot Menu press the up/down key. This will stop the countdown so you will be able to select the desired line. You won’t see much other than the following after you press enter: If you booted the USB drive in EFI mode then you will see the same text without the last 3 lines but that's ok. 8 - Now go back to your workstation, and launch Synology Assitant or go to http://find.synology.com. Within one minute or so you should normally be able to see your NAS on your local network (it took ~55 seconds on a test I did on a VM). Just follow the instructions and either chose "Install" if you wish to have a clean install or chose “Migration” if you are coming from DMS 5.2 and wish to update while retaining your data. You will be asked to provide the .PAT file you downloaded earlier (DSM_DS3615xs_15217.pat or DSM_DS3617xs_15217.pat or DSM_DS916+_15217.pat). 9 - When the migration is finished you will most probably have to update some of your packages. You can then proceed and update DSM 6.1.7 up to DSM 6.1.7 critical update 3. It is possible you might either need to hard reboot or re-image your usb drive. Make sure to deactivate auto-updates within DSM. Link to individual files (DSM and critical updates) can be found here: https://xpenology.com/forum/topic/7294-links-to-dsm-and-critical-updates/. DO NOT UPDATE TO DSM 6.2. The loader is not compatible. 10 - You are done. If you have questions, first search the forum and/or Google then leave a comment if nothing helps. Please provide your hardware specifications (motherboard model, LAN controller, driver controller etc). Failure to prove such information will lead to the post being deleted or not answered. -------------- Note 1: If after following the tutorial you can’t find your NAS through http://find.synology.com ou Synology Assistant it is highly possible that the drivers of your NIC are not included in the ramdisk of the loader. Make an effort and use Google to know what modules your NIC and HDD controller are using, then check if those modules are included in the custom extra.lzma ramdisk. If yes then use the custom ramdisk. Don't ask me to look for you. If nothing works then ask your question. Note 2: Synology increased security since the introduction of DSM 6. Root access through SSH is no longer possible out of the box. You can however use your admin account and elevate permissions with the following command if you need root permissions: sudo -i Note 3: Please check you have the right VID/PID prior proceeding. If you get the following error ”Failed to install the file. The file is probably corrupted. (13)" it most certainly means your VID and/or PID is/are wrong. If you still have the same error message after verifying the VID/PID then try another USB drive. Note 4: Configuration added to the grub.cfg file can also be done directly during the Grub Boot Menu, so technically you can skip Point 4 and burn the image on the USB drive without editing anything (read Point 5 onward first). If you wish to do the changes from the Grub Boot Menu directly you need to press the letter 'C' when you see the Boot Menu. You will literally only have one second, so be fast. Once you press 'C' you will be in a Grub command line environment. To change your VID enter the following: vid 0xYOUR 4 DIGITS USB DRIVE VID Do the same for pid, sn and mac1. Press enter at each command. The commands are: pid 0xYOUR 4 DIGITS USB DRIVE PID sn YOUR NAS SERIAL NUMBER mac1 YOUR NAS MAC1 ADDRESS If you have multiple NICs you can also issue mac2, mac3 and mac4 as commands. Maximum is mac4. See below: mac2 YOUR NAS MAC2 ADDRESS mac3 YOUR NAS MAC3 ADDRESS mac4 YOUR NAS MAC4 ADDRESS If you think you made a mistake in the numbers simply re-issue the command. When you are done press esc and select the appropriate menu entry. Below is an example (fake numbers) of how it looks under the Grub command line environment : Note 5: If you encounter the error "We've detected errors on your hard drives [drive number] and the SATA ports have also been disabled" during installation, then you have to fallback to adding SataPortMap to the grub environment. Press the letter 'C' at the Grub Boot Menu and then add the following: append SataPortMap=XX where XX is the number of drives. Don’t forget to update this parameter if you add additional drives to your machine. If you use Reinstall, don't forget to re-select the first line of the Boot Menu once the NAS has rebooted after the installation else the Loader will re-select Reinstall and you will be faced with some issues so please beware of this. @@@@@@@@ What does SataPortMap mean? @@@@@@@ @@@@@@@@@@@@@@@@@@@@@@@@@@@@@@@@@ ############## Know issues ##################### - When running on a slow single core machine, there is a race condition that causes the patcher to load too late. The most obvious sign is that console is not working properly. - Some ethernet drivers crash when set MTU above about 4096 (Jumbo frame). ############# Included default modules & firmwares in Jun's Loader ############# ############## Tutorial UPDATES ##################
- 630 replies
-
- 32
-
-
-

DSM upgrade from 5.2 to 6.1.7 OK - Issues with installed packages
cypher posted a question in General Questions
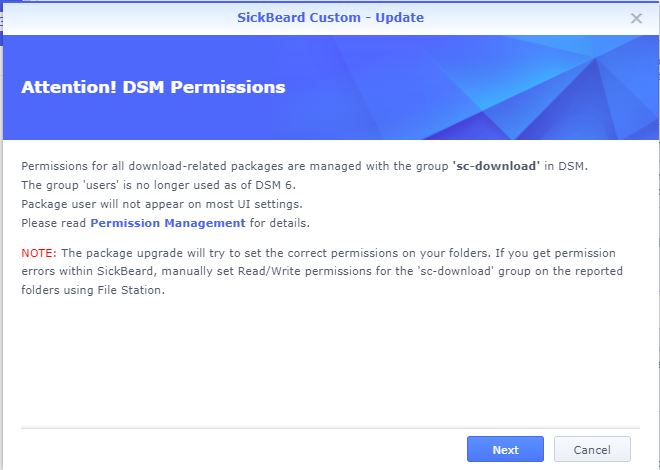
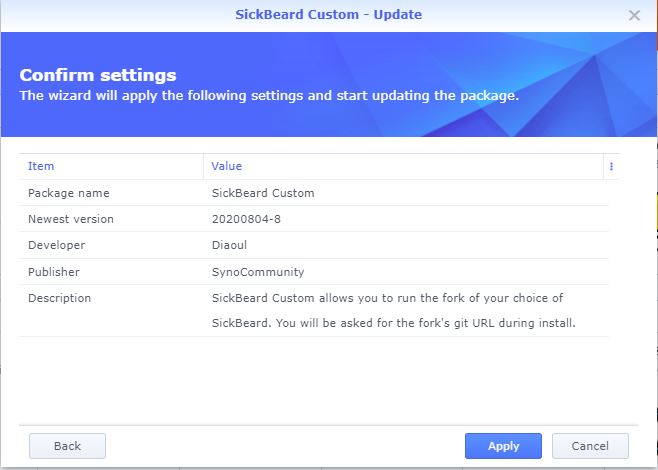
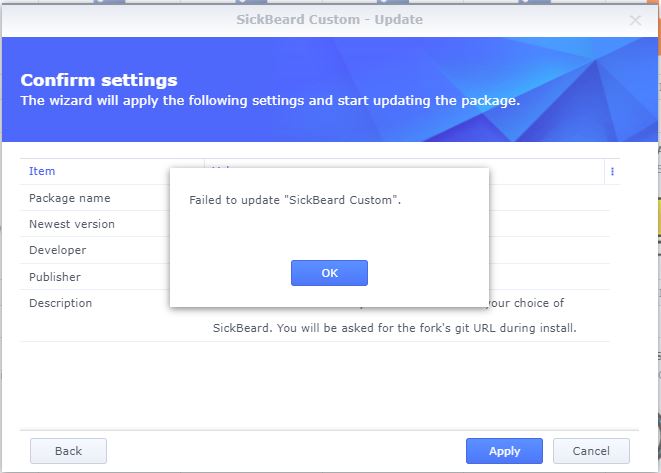
Hi All, Having read the guide - Tutorial: Install/Migrate DSM 5.2 to 6.1.x (Jun's loader) - Tutorials and Guides - XPEnology Community I decided to update my old DSM installation was on 5.2 and mainly used as a Plex server. I needed to update as my Roku update the Plex client and this needed a newer plex Server version which I couldn't install due to the DSM version I was on. Everything all worked OK with the upgrade and I'm now on DSM 6.1.7. I updated Plex and that is all working as expected (including on the Roku plex client). Sickbeard I need an updated version - I saw people make reference to this version - SiCKRAGE Synology DSM6 Repository but doesn't seem to allow me to save the spk file when I click on it, it loads the contents of the file rather than downloading. Having checked the here - How to install on a Synology via Packages - Guides and HowTo's - SiCKRAGE Forums and noted the pre-req for Pyhton 3.1 (so this is installed as well as 2.7.18-25), but that only mentions a Fresh install and not an upgrade to an existing instance. So I went to just update the package in Synology Package centre. My current Installed Version is 20180629-7 Newest Version is 20200804-8 Clicking on upgrade, I noted this made mention of a change to permissions and sc-download would be used instead. It also noted that "The package upgrade will try to set the correct permissions on your folders. If you get permission errors with transmission manually set Read/Write Permissions using File Station. clicking Next and then Apply It immediately comes back with a "Failed to update "Sickbeard Custom" I seem to recall that Sickrage split into 2 dev paths ?? My original install would have been from the synocommunity package prby 5 -6 years ago now. Anyone got any nuggets of information they can share please ?? or even a link to the package and I can try a manual installation. TRANSMISSION I then checked Transmission and Sickrage (both were showing as stopped), trying to run them it failed. I already had the synocommity package URL but it wasn't showing any packages, Checked this page "Invalid Location" error when trying to add SynoCommunity Repo - Nam Vu Personal Site (very useful) to get the link updated. Now I have options for upgrades for Pythion, Git, Transmission, Sickrage Installed the update from Transmission (now running 3.00-20. I noted this made mention of a change to permissions and sc-transmission would be used instead. It also noted that "The package upgrade will try to set the correct permissions on your folders. If you get permission errors with transmission manually set Read/Write Permissions using File Station. NP I though, all updated and upon starting Transmission, some of the previous partial downloads (ones in sub folders - MyTVshow epidode 6) were all reporting as No data found! Ensure your drives are connected or use "Set Location". To re-download, remove the torrent and re-add it. Any partial torrent that was just an individual file (example - myfile.mkv.part) seemed OK I even added a new torrent (complete series as this would be a folder) and when it started it looked OK, but then failed (same error message as above). I checked the settings.json to ensure the correct paths were still listed (they were) so incomplete downloads would go to /downloads/transmission/incomplete/ Checked File Station, for the permissions of an existing sub folder (MyTVshow epidode 6) and noticed the sc-transmission user was not listed. I added this user and restarted Transmission, but no difference. My Downloads folder structure is: /downloads/transmission/downloaded/ /downloads/transmission/incoming/ /downloads/transmission/incomplete/... I went about adding sc-transmission to the top level and replicating changes down giving it read/write access. Restarted Transmission again and now I have made it worse in that ever file reports back as No data found! Ensure your drives are connected or use "Set Location". To re-download, remove the torrent and re-add it. I was surprised at this as, as I thought adding Read / write to every sub folder for the sc-transmission user would resolve the issue. Checking an individual file (I've now resorted to putty, I can see the file permissions are all borked. The user rights are set to sc-transmission, however the group rights are still as the legacy account "transmission" drwxrwxrwx+ 2 sc-transmission transmission 4096 Oct 19 13:21 - Individual file drwxrwxrwx+ 3 sc-transmission transmission 4096 May 30 2018 - Sub Folder Rather than me making matters worse, but I think i'm going to have to run a chown -R sc-transmission:sc-transmission ./* from the /downloads folder Has anyone else been through the upgrade of Transmission client and had a successful result afterwards ?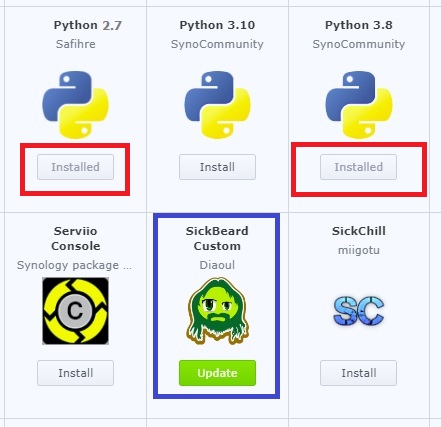
-
7.1.1-42962 Update 2 Что нового Когда пользователи выбирают Outlook в качестве поставщика службы системных уведомлений, им необходимо будет войти с помощью OAuth 2.0, который является более безопасным методом проверки подлинности. Ранее настроенные учетные записи Outlook будут перенесены на «Пользовательский SMTP-сервер». Мы настоятельно рекомендуем перенастроить параметры аутентификации, чтобы обеспечить безопасность вашей учетной записи Outlook. Исправленные проблемы Исправлена проблема, из-за которой проверка файловой системы на томах ext4 приводила к остановке работы параметров квот в DSM. Исправлена проблема, из-за которой после миграции жестких дисков пользователи не могли правильно смонтировать кэши SSD, которые не были перенесены на новое устройство. Исправлена проблема, из-за которой Universal Search не мог найти данные в общих папках на томах, созданных в DSM 7.1.1. Исправлена проблема, из-за которой пользователи не могли получить доступ к DSM с определенных устройств. Исправлена ошибка, из-за которой пользователи не могли получить доступ к DSM через службу Bonjour. Исправлена проблема, из-за которой сетевая карта E10G18-T1 не могла быть обнаружена на пассивном сервере при создании кластера Synology High Availability с RC18015xs+. Исправлена проблема, из-за которой модели с платформой ЦП AMD Ryzen V1000 не могли автоматически регулировать скорость вращения вентилятора после перезагрузки системы.
-
I created a tutorial for the French section so I thought, what the heck, let's do it for the English one as well. Here it goes. As most of you know by now Jun was able to find a way to install DSM 6 on non Synology boxes. Here is the thread that I recommend reading. At least make an effort and read the OP: https://xpenology.com/forum/topic/6253-dsm-6xx-loader/ Below is what you need for the operation. I will assume you are doing all this under Windows 10, 8, 7 or XP. If you are on a MAC computer have a look at this post I made on how to burn the image to a USB drive and then mounting the USB drive for editing the content. The rest of the tutorial still applies. If you are currently using DSM 5.1 or below first update to DSM 5.2. If you are doing a fresh install of DSM 6.0 then carry on with the tutorial and omit references to DSM 5.2. - Win32 Disk Imager to make a bootable USB drive; - A 4GB (or any size really) USB drive (flash drive) to install the loader. Not that this is necessary but use preferably a brand name (Kingston, SanDisk...); - A way to read your USB drive VID/PID. Here is a how-to >>> VID and PID; - A good text editor: Notepad++ I really don't recommend using Windows's Notepad; - DSM 6.0.2. The file comes straight from Synology servers; - Jun's official v1.01 loader (mirror). This is a hybrid UEFI/BIOS loader so it should work in most machines. Loader supports Intel and AMD CPUs; - Customized extra.lzma ramdisk. This ramdisk is optional and should only be used if the default ramdisk included in the loader is not detecting your hardware. I am just providing it for those who are having issues with network detection or unrecognised HDD controllers. This custom ramdisk contains additional modules (drivers) that were mostly taken from Quicknick's loader. I don't warranty they all work but I think most do. If you chose to use this ramdisk, you will need to replace (or rename, so you can revert) the default extra.lzma ramdisk from Jun's loader with this one. See change log at the end of the tutorial for additional modules. - Make sure your drives are plugged in direct succession starting from the 1st SATA port. Usually the first port is described as SATA0 on motherboards. Check with your MB manufacturer for exact nomenclature. - OSFMount to modify the grub.cfg file within the loader's image. This is not strictly necessary as Jun has made it possible to configure what needs to be modified via the Grub Boot Menu. I recommend you use OSFMount for now although it adds an extra step. If you prefer using Jun's new feature simply skip Point 5, read Note 4 instead and pick up at Point 6. PLEASE READ EVERYTHING PRIOR ATTEMPTING ANYTHING Use this loader at your own risk. I wont be held responsible for any loss of data or black smokes that may result in the use of this loader. Please note that this loader is based on DSM 6.0 Beta 2 branch 7274 and that a limited amount of drivers are included in the loader. If it is fundamental for you to have a NAS operating as quick as possible I recommend you look at the included drivers first at the bottom of this tutorial. If they are not there you will have to compile your own drivers. One last thing: DO NOT UPDATE DSM BEYOND VERSION 6.0.2 (6.0.3, 6.1, 6.1.X, 6.2) with loader v1.01. You have been warned. Here we go: 1 - BACKUP your data and save your configuration prior any attempts to migrate from DMS 5.2 to DSM 6.0.2. I can't stress this enough. JUST DO IT, as Nike likes to say. Also, print this tutorial if you can. It will make your life easier. 2 - Turn off your NAS and unplug the USB drive you are currently using with DSM 5.2. I recommend you put this USB drive aside in case migration to DSM 6.0.2 doesn’t go as expected and you need to revert to DSM 5.2. It will just make your life easier. 3 - Now go to your workstation/PC, plug a new USB drive (or the old one if you really don’t have any spare USB drives). Use the link I provided earlier to check your USB drive VID/PID. Write down the info somewhere as we will need it later. 4 - Unzip the loader you downloaded earlier. You will end up with a folder containing several files. Since we are installing on bare-metal you will only need the image file "synoboot.img". 5 - Now launch OSFMount. Select Mount New, then select the image file (i.e. synoboot.img) to open. Now select partition 0 (the one that is 30 MB). Click Ok. Then at the bottom of the window make sure to un-tick the "Read only drive". Click Ok. The EFI partition of the image file should now be mounted in file explorer. At this point you can navigate to the /image/DS3615xs directory and replace the extra.lzma ramdisk with the one provided above. When you are done come back to the root directory and go to the /grub directory and edit the grub.cfg file. Below is what you will see in the file. I am only showing below the portion of the code that is relevant for the purpose of this tutorial [...] set extra_initrd="extra.lzma" set info="info.txt" set vid=0x058f set pid=0x6387 set sn=C7LWN09761 set mac1=0011322CA785 set rootdev=/dev/md0 set netif_num=1 set extra_args_3615='' set common_args_3615='syno_hdd_powerup_seq=0 HddHotplug=0 syno_hw_version=DS3615xs vender_format_version=2 console=ttyS0,115200n8 withefi elevator=elevator quiet' set sata_args='sata_uid=1 sata_pcislot=5 synoboot_satadom=1 DiskIdxMap=0C SataPortMap=1 SasIdxMap=0' set default='0' set timeout='1' set fallback='1' [...] You want to modify the following: Change vid=0x090C to vid=0x[your usb drive vid] Change pid=0x1000 to pid=0x[your usb drive pid] Change sn=C7LWN09761 to sn=generate your sn here with DS3615xs model Change mac1=0011322CA785 to mac1=[your NIC MAC address]. You can also add set mac2=[your NIC MAC address #2] and so on until mac4 if you have multiple NICs. However, this is not necessary. Optional: Change set timeout='1' to set timeout='4' - This will allow you more time to make a selection in the Grub Boot Menu when it appears. Once you are done editing the grub.cfg file, save it and close your text editor. Now in OSFMount click on Dismount all & Exit. You are now ready to burn the image to your USB drive. 6 - Now use Win32 Disk Imager to burn the image file onto the USB drive. This will also make the USB drive bootable. 7 - Eject and unplug the USB drive from your workstation. Plug it in your NAS (avoid USB 3.0 ports. Use USB 2.0 port if available). Boot your NAS and before doing anything fancy, access your BIOS so to make your USB drive the 1st boot drive if it's not the case. The loader can boot in UEFI or in legacy BIOS, so you chose what suits you best. Also, make sure your HDDs are booting in AHCI mode and not in IDE, else it wont work. Finally, if disabled, also enable the serial port in BIOS. Some BIOS don't have this option so don't get too cranky on this if you can't find it. Save changes to the BIOS and REBOOT the NAS. 8 - Once rebooted, if you have a monitor connected to your NAS you will see the following Grub Boot Menu: If you are on an Intel based machine you can simply let it be and the loader will automatically start. However, if you are on a AMD based machine you will need to select the 4th line and then press enter. ADVICE: even before you see the Grub Boot Menu press the up/down key. This will stop the countdown so you will be able to select the desired line. You won’t see much other than the following after you press enter: If you booted the USB drive in EFI mode then you will see the same text without the last 3 lines but that's ok. 9 - Now go back to your workstation, and launch Synology Assitant or go to http://find.synology.com. Within one minute or so you should normally be able to see your NAS on the local network (it took 55 seconds on a test I did on a VM). Just follow the instructions and either chose "Install" if you wish to have a clean install or chose “Migration” if you are coming from DMS 5.2 and wish to update while retaining your data. You will be asked to provide the .PAT file you downloaded earlier (DSM_DS3615xs_8451.pat). 10 - When the migration is finished you will most probably have to update some of your packages. You can then proceed and update DSM 6.0 up to DSM 6.0.2-8451 update 11. It is possible you might either need to hard reboot or re-image your usb drive. DO NOT UPDATE DSM TO VERSIONS 6.0.3, 6.1, 6.1.x, 6.2, with loader v1.01. Make sure to deactivate auto-updates within DSM. 11 - You are done. If you have questions, first search the forum and/or Google then leave a comment if nothing helps. Please provide your hardware specifications (motherboard model, LAN controller, driver controller etc). Failure to prove such information will lead to the post being deleted. -------------- Note 1: If after following the tutorial you can’t find your NAS through http://find.synology.com ou Synology Assistant it is highly possible that the drivers of your NIC are not included in the ramdisk of the loader. Make an effort and use Google to know what modules your NIC and HDD controller are using, then check if those modules are included in the custom extra.lzma ramdisk. If yes then use the custom ramdisk. Don't ask me to look for you. If nothing works then ask your question. Note 2: Synology increased security in DSM 6. Root access through SSH is no longer available out of the box. You can however use your admin account and elevate permissions with the following command sudo -i Note 3: Please check you have the right VID/PID prior proceeding. If you get the following error ”Failed to install the file. The file is probably corrupted. (13)" it means your VID and/or PID is wrong. If you are 200% sure that your VID/PID is correct and you still get that error message then try to 'Force Install'. If that doesn't work then try another USB drive. Note 4: Changes made to the grub.cfg file can also be done directly during the Grub Boot Menu, so technically you can skip Point 5 and burn the image on the USB drive without editing anything (read Point 6 onward first). If you wish to do the changes from the Grub Boot Menu directly you need to press the letter 'C' when you see the Boot Menu. You will literally only have one second, so be fast. Once you press C you will be in a Grub command line environment. To change your VID enter the following: vid 0xYOUR 4 DIGITS USB DRIVE VID Do the same for pid, sn and mac1. Press enter at each command. The commands are: pid 0xYOUR 4 DIGITS USB DRIVE PID sn YOUR NAS SERIAL NUMBER mac1 YOUR NAS MAC1 ADDRESS If you have multiple NICs you can also issue mac2, mac3 and mac4 as commands. Maximum is mac4. See below: mac2 YOUR NAS MAC2 ADDRESS mac3 YOUR NAS MAC3 ADDRESS mac4 YOUR NAS MAC4 ADDRESS If you think you made a mistake in the numbers simply re-issue the command. When you are done press esc and select the appropriate menu entry. Below is an example of how it looks under the Grub command line environment: Note 5: If your encounter the error "We've detected errors on your hard drives [drive number] and the SATA ports have also been disabled" during installation, try the Force Install menu entry in the Grub Boot Menu. If this does not work then you have to fallback to adding SataPortMap to the grub environment. Press the letter 'C' at the Grub Boot Menu and then add the following: append SataPortMap=XX where XX is the number of drives. Don’t forget to update this parameter if you add additional drives to your machine. If you use Force Install, don't forget to re-select the first line of the Boot Menu once the NAS has rebooted after the installation else the Loader will re-select Force Install and you will be faced with some issues so please beware of this. @@@@@@@@ What does SataPortMap mean? @@@@@@@ @@@@@@@@@@@@@@@@@@@@@@@@@@@@@@@@@ ############## Know issues ##################### - When running on a slow single core machine, there is a race condition that causes the patcher to load too late. The most obvious sign is that console is not working properly. - Some ethernet drivers crash when set MTU above about 4096 (Jumbo frame). ############# Included default modules in Jun's Loader ############# ############# Additional modules in the custom extra.lzma ramdisk ############# ############## Tutorial UPDATES ##################
-
Ищу стабильную DSM... ну или может я не правильно думаю... может мне и железо не подходит... Железо такое: мать: ecs bat i j1800(Intel Celeron J1800), памяти 2гига + hdd 1tb. бп 350. Суть такая что при работе постоянно зависает..., при этом бывает что пингуется а бывает что нет, на любые соединения не реагирует(приходиться перезагружать кнопкой)... обычно при работе с переносом файлов... Железо все проверено не один раз, на винде и линуксе все прекрасно робило... Думал попробовать поставить 5.2 версию... у меня такая на нетбуке уже год стоит и ни разу не подвела, но хочется что то новое))) Может у кого какие мысли есть? Зарузчик делал "@Genesys's v1.02b loader" DSM 6.1.4-15217 Update 1 вот по этой инструкции >>>>
-
After fiddling with it for a day, and getting it to work, I thought it would be nice to share the knowledge, especially since "officially" only ESXi is supported, and ESXi is picky about supporting stuff... The main reason for me to move to a hypervisor was because Synology has not yet introduced NVMe support AT ALL. And even with a kernel driver, the Storage Manager will not see it as an SSD, as an HDD, or anything. Synology is silent about this, even though some have requested it on their forums (although they do not have a model with M.2 NVMe connector yet, they have some models with full sized x16 or x4 PCIe ports, which can be used with an adapter card for NVMe). So I decided to try with a hypervisor. On one hand it makes installation easier, upgrading also, and I don't need a display connected (since most hypervisors provide a VNC connection to the guest OS). On the other hand, I can install the measly 2-3GB hypervisor and all the tools on the NVMe SSD, and have the rest mounted as a VMDK (or any other virtual disk file). The rest of the hard drives would use passthrough of course. I fiddled around with multiple options. XenServer simply refused to boot in UEFI mode, ESXi does not support my network adapter, or my built-in SATA controller (B250 chipset), Microsoft's Hyper-V server has issues if you do not have a domain server on the network, also as soon as the display output goes off, the device drops network connection. It left me with Proxmox. Never used it, and during installation I had some issues with the bootloader (both on 4.4 release and 5.0 beta). Luckily there's a workaround, since it is based on Debian, one can use the Debian netinst image, create a very basic system, and install Proxmox on top. I won't bore you with the details, there are enough guides about installing it to make me think twice before I write an (n+1)th version. So let's begin! Requirements: A working install of Proxmox 5.0 - it can be 4.4 too, but I only tested this on 5.0. Follow the guide to create the bridged network interface! The loader you wish to use. I recommend Jun's Loader, specifically 1.02a2 at the time of the writing of this guide. Steps: 0. Edit the loader (if needed) to your liking - MAC address, serial number, etc. This is especially important if you have multiple XPE systems on the same network. 1. Create a new VM in Proxmox. 1.1 Set the name, and make sure to note down the VM ID (if it is your first VM, it should be 100). I'll be using {VM_ID} as a placeholder from now on. 1.2 OS type should be "Linux 4.x/3.x/2.6 Kernel". 1.3 Set the CD/DVD to "Do not use media" (we will remove the virtual disk drive any way later on). 1.4 For the HDD, you should create a new virtual disk with the format of your liking (qcow2, vmdk or raw), this will be the initial drive. I made sure that it uses nearly the whole storage of the OS drive it was installed on (in my case it was a 256GB NVMe SSD, which, after setup and partitioning, resulted in a 226GiB root drive, of which I had 211GB free, so I set the virtual disk's size to 200GB). You can set it to any kind of bus, EXCEPT VirtIO. With VirtIO I had performance issues, so I went with SCSI (it supports up to 12 devices any way, so it is better). This is for the virtual disk only, VirtIO works just fine with passthrough devices. So apart from the bus, size and format, you don't need to touch a thing. 1.5 For CPU, set kvm64 with as many cores as your host has (incl. virtual cores if you're on a HyperThreading supported CPU!). In my case with the Intel G4560 this is 4. 1.6 For RAM, you should leave some slack for the host OS, I went with 7.5GB from the 8GB I have. Ballooning is not required. 1.7 Networking. This is where many things can go wrong. The VirtIO paravirtualized network adapter should work, but to be safe I went with the Intel E1000. On the left select Bridged Mode, with the previously created bridge as the first choice. You can also enable Firewall if you do not trust Syno's own. Leave the rest of the settings as default. 1.8 On the Confirm page, confirm your settings and create the VM. 2. After the VM is created, first thing to do is to remove the virtual disk drive (IDE 2, if everything went right). Then comes the hard part. 3. You have to add each and every HDD to the config file that you want to use for passthrough. The command is simple: qm set {VM_ID} -[protocol][port] /dev/disk/by-id/[disk-id] The {VM_ID} part is obvious, but what about the rest? [protocol] is the connection protocol you want to use. This can be sata, ide, scsi or virtio. I'm using SATA here, but you can use anything (IDE is not IDEal for us). SATA supports up to 6 devices (port indexes 0-6), scsi supports up to 12 devices, and virtio does not have a limitation to my knowledge. [port] is the first unused port of said protocol. E.g. if you set the initial disk during setup to SATA0, and you want to use SATA further here, you have to start numbering from 1. [disk-id] is the unique identifier of your HDD. Go to /dev/disk/by-id/ and list the disks you see. For most SATA devices, you'll see entries like "ata-[MANUFACTURER]_[MODEL]_[sERIAL]". So let's say I have 4 disks, with the disk-id's ata-1, ata-2, ata-3, and ata-4 (yours will be a lot longer, but don't worry, you can use the bash autocomplete with the tab key). For this to work I execute the following commands: qm set 100 -sata1 /dev/disk/by-id/ata-1 qm set 100 -sata2 /dev/disk/by-id/ata-2 qm set 100 -sata3 /dev/disk/by-id/ata-3 qm set 100 -sata4 /dev/disk/by-id/ata-4 Of course later on you can add further HDDs to a VM config by using the same command, just keep in mind the limitations of the protocols. 4. Now comes the hard part, we'll have to add the bootloader image file to the config. The config file is located under /etc/pve/qemu-server/, and is named {VM_ID}.conf. Open it with nano. This config file defines everything about the VM. Disks to mount, which device to use for booting, RAM amount, CPU cores, name of the VM, et cetera. Don't touch anything else than the lines you see here! Copy the synoboot.img to somewhere on your server. If you want to be consistent with the Proxmox setup, copy it under /var/lib/vz/images/{VM_ID}/ - you'll need root for that. After that, come back to the conf file, and open it again. You'll enter a few things here, make sure you pay attention! Enter the following line into the conf file, and make sure you replace the parts in the path! args: -device 'piix3-usb-uhci,addr=0x18' -drive 'id=synoboot,file=/var/lib/vz/images/{VM_ID}/synoboot.img,if=none,format=raw' -device 'usb-storage,id=synoboot,drive=synoboot' Make sure to replace the path to the synoboot.img with your own! One more thing to edit here, the boot device. Find the line that begins with "boot: " and replace it so it looks like this: boot: synoboot Save the file, then start the VM. It should start up without an issue, and you'll be able to use find.synology.com to find your server and install it.
-
I have an issue HDD has crashed according to DSM i've managed to pull out the drive and read it but the main folder is encrypted i have the decryption key is there any way to use it outside DSM to decrypt it? thanks
-
Друзья, давно не заходил на форум Хрень предложила апдейт до DSM 6.2.4-25554 и я по глупости согласился Хрень пропала((( после перезагрузки не достучаться. Есть ли у кого инструкция по откату, ну если он возможен? Предыдущее обновление прошло на ура, а вот это закончилось кирпичом(( железо HP N40L
-
I successfully installed xpenology DSM for DS916+ on my computer. But there is strange behaviour. If I turn on the compueter, xpenology starts but after some while it shut down itself. If I use Synology assistant I can see "service starting" status. I have MB Asrock N3050M with 4 GB of RAM and 2x WD Black HDD each 4 TB. In grub.cfg I just changed MAC (I added the mac of my physical LAN) and PID/VID of boot flash disk. What can be wrong? Some bios settings?
-
Установка и настройка DSM на основе версии 6.2.3 Ну вот, муки поиска позади и вы пришли к эпохальному решению создать сервер на основе Хрени.....)))) Надеюсь, что подошли к этому шагу с долей познаний и оценили свои возможности. Данный мануал является общим, без акцента на частные настройки и особенности применяемого вами железа, такие как настройки БИОС_а и хардово-софтовые нюансы вашего железа. Процедура описана на основе последней возможной (на данный момент) для установки версии DSM. Но она применима и на ранние версии DSM 6 . Более древние уже не помню ))) Итак начнём....... Берём флешку. Определяем vid pid. Редактируем grub.cfg. Записываем загрузчик 1.03b для 3615 - 3617 или 1.04b для 918+ Загрузчики: https://mega.nz/#F!yQpw0YTI!DQqIzUCG2RbBtQ6YieScWg!7AoyySoS Файлы DSM 6.2.3-25426: https://archive.synology.com/download/Os/DSM/6.2.3-25426 Обновление только вручную, предварительно скачав файлы !!!! Не обновляться до версии 6.2.4 Нежно "втыкиваем" наш загрузчик в USB и запускаем процесс установки. Можно подключить монитор и что то там увидеть, но я уже давно делаю это "вслепую". По умолчанию запускается Установка. И если всё же подключили монитор, то он вас обрадует этой надписью:"Happy Hacking" - Счастливый взлом. То есть всё хорошо ))) Далее, запускаем Synology Assistant или идём на find.synology.com для поиска своего сервера. Я пользуюсь Synology Assistant_ом, потому и описание будет с ним. Во избежании недопонимания и подобных трудностей бытия, уточняю..... Поиск сервера посредством Synology Assistant или на find.synology.com, осуществляется с ДРУГОГО Компа. С ДРУГОГО, а не с того, на который ставили Сервер. Synology Assistant - почитать: https://www.synology.com/ru-ru/knowledgebase/DSM/help/Assistant/assistant Synology Assistant - скачать: https://archive.synology.com/download/Utility/Assistant/6.2-24922 Нашли свой сервер, вошли по ip и запускаете дальнейшую установку Установка вручную и только так. Находим ранее скачанный файл DSM и подсовываем его. Ну а далее всё интуитивно понятно Создаём учётную запись Предложение по созданию Synology QuickConnect_а отметаем, так как для его работы необходима Реальная Валидная пара. Эту функцию стоит запустить сразу, а то потом она будет вылезать постоянно. Тоже самое, запустить и забыть. Вся безопасность в наших руках ))) Не успели запустить, а уже устарело .... ))) Идём в Центр пакетов и обновляемся. Идём в Панель управления Видим свою версию DSM и предложение обновиться до 6.2.4. Ни в коем случае не обновляемся. Загрузчика, на момент написания мануала, на эту версии НЕТ. Полезная функция Резервирования настроек. Резервируйте их при каждой манипуляции с обновлениями. Потом восстановить настройки будет проще. Нам необходима Папка общего доступа. Туда мы будем складывать файлы И тут нас посылает система к созданию Раздела. Без него никак. Опять таки, всё интуитивно понятно и просто идёте предложенным путём. Но внимательно читаем Создаём Пул хранения. Руководствуемся предложениями Мастера создания Выбираем необходимое или же идём по пути умолчания. Выбираем диск. Он у меня один, если у вас несколько, можно создать сразу RAID-массив. Просто перетягиваем его слева на право Пул готов, пошла проверка. Теперь необходимо создать Том Процесс проверки запущен, но он не мешает дальнейшим настройкам Создаём раздел Выбор файловой системы на ваше усмотрение. Гуглим и читаем мануалы. Я использую Btrfs Процесс проверки диска. Уже ближе к концу Ну вот мы уже имеем Раздел. В Диспетчере хранения имеются инструменты контроля за дисками Информация о состоянии. Смарт. Тесты Возвращаемся в Файл Стейшен, создаём Папки общего доступа. Выбор значений за вами. Редактирование разрешений за вами. Читайте внимательно. Советую, после первичных настроек, запустить эту утилиту . Она поможет настроить интернет на сервере. Очень полезная утилита Так же советую использовать Довланд Стейшен в качестве качалки торрентов. Простая и достаточно эффективная утилита. Сам её использую Нюанс настройки.... По умолчанию, почему то прописано ограничение на отдачу. Значение "20" заменить на значение"0" После настроек, советую открыть так называемый ROOT доступ: https://www.synology.com/ru-ru/knowledgebase/DSM/tutorial/General_Setup/How_to_login_to_DSM_with_root_permission_via_SSH_Telnet Ну вот вроде и всё.... Основные аспекты первоначальной настройки я охватил, остальное изучите в процессе эксплуатации.
-
I have a system with a j5005 motherboard, in the past (about a half year ago) i installed DSM on this system, i changed to OpenMedaVault but now i want to go back to DSM. What system (DS918+ or 36...) is the best to use? Also what is the newest DSM version to use?
-
Hello, I have succesfully installed DSM 6.1.4 on a IoMega PX4-300D (Intel D525 Atom Dual Core CPU). Everything works perfectly, except the fact that the little monitor on the front stays unused with iomega logo. I've been searching for ways to get it to work and by looking around i've found this git: https://github.com/Wireheadbe/lenovoEMC-300d The guy managed to get the display working on a linux distro. I've tried to fiddle around and so far i git cloned the release and managed to install imagemagick through ipkg, but i'm unable to do the "make go" instruction as i cannot find build-essentials package. Anyone has an idea on how to build the folder ums8485md and/or ways to make this to work? Thanks in advance!
-
-
Всем доброго времени суток! Повторю вопрос 2х летней давности, кто-нибудь нашел способ установить Asterisk или FreeSwitch или Yate без докера ? Или может есть самосборные пакеты? Поделитесь плиз опытом