Search the Community
Showing results for tags 'tutorial'.
Found 12 results
-
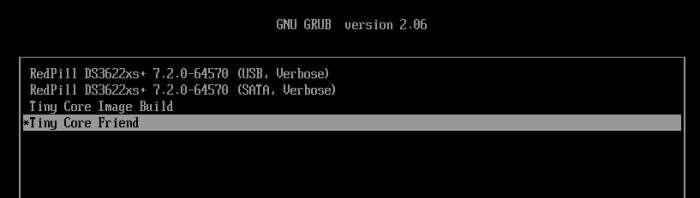
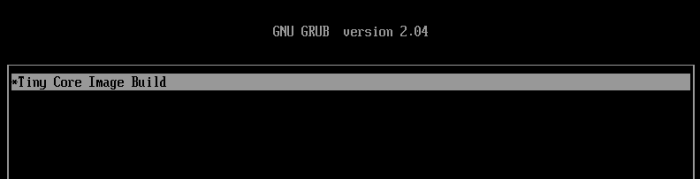
Install DSM 7.2 on FreeBSD using vm-bhyve and TinyCoreRedPill This guide is for installing DSM 7.2 on a Virtual Machine with a Virtual Disk using bhyve with TCRP Friend kernel. To make this guide I used the main TCRP Guide, the ESXi Guide and I got most of my conf file from this Bhyve Guide. I didn't explain much, just some vm-bhyve relevant info, more in depth explanations can be found in those guides. I used DSM 7.2.0-64570 and DS3622xs+ My CPU is Xeon so I used DS3622xs+ Download site for DSM 7.2 for DS3622xs+. Direct link to download DSM_DS3622xs+_64570.pat Link to Tiny Core RedPill Releases. I used the uefi img tinycore-redpill-uefi.v0.9.4.9.img.gz Step 1 - (Config file) After bhyve is installed use this "synology.conf" config file below. It goes in with the rest of the vm-bhyve config files poossibly at "/pool/vm/.templates" directory. synology.conf loader="uefi" cpu=8 cpu_sockets=1 cpu_cores=4 cpu_threads=2 memory=16G ahci_device_limit="1" disk0_type="ahci-hd" disk0_name="tinycore-redpill-uefi.v0.9.4.9.img" disk1_type="ahci-hd" disk1_name="disk0.img" disk1_opts="sectorsize=4096/4096" disk1_size="10T" debug="yes" network0_type="e1000" network0_switch="public" graphics="yes" xhci_mouse="yes" graphics_res="1600x900" Notes: Network type "virtio-net" driver did not work for version 7.1.1-42962 and I did not try it yet with friend, so I still used the e1000 driver instead. I also have not tried "virtio-blk" and "sparse-zvol" recently. Step 2 - (Create VM) Create a VM named "synology" using the template synology.conf sudo vm create -t synology synology This creates two empty files, or two disks in the /pool/vm/synology/ directory. disk0 named "tinycore-redpill-uefi.v0.9.4.9.img" - the boot disk. disk1 named "disk0" - data disk. I named the disk0 "tinycore-redpill-uefi.v0.9.4.9.img" because now the actual TCRP disk file needs to be copied to the VM directory to overwrite the empty disk with the same name. Deflate the img.gz file using "gzip -d tinycore-redpill-uefi.v0.9.4.9.img.gz" Copy the downloaded disk img file to the VM directory sudo cp /pool/vm/.iso/tinycore-redpill-uefi.v0.9.4.9.img /pool/vm/synology The config file uses UEFI bootloader and graphics so the VM will run on a VNC port. Step 3 - (Start VM) Start the VM sudo vm start synology This will start the VM and boot the TCRP disk since TCRP is in the first place, the disk0 place. The disk1 is just named "disk0" but it still comes at second place after the TCRP disk. Step 4 - (Booting TCRP) Boot will have one option. When TCRP boots get the IP info by running "ifconfig" ssh into it with user "tc" and password "P@ssw0rd". Step 5 - (Install DSM) Below is the commands needed to install DMS from the TCRP Loader Guide. Type "y" and hit enter to update the json file. One important point is to use "realmac" when running DSM in a VM as explained in the ESXi Guide . On "satamap" command type number "1" and hit enter. You can also just hit enter but if you hit enter without typing 1 it will say DSM install will fail but it does not fail. Probably because it's a VM. ./rploader.sh update ./rploader.sh fullupgrade ./rploader.sh serialgen DS3622xs+ realmac ./rploader.sh satamap ./rploader.sh build ds3622xsp-7.2.0-64570 exitcheck.sh reboot After reboot: When TCRP boots choose "Tiny Core Friend" option, hit enter to boot. That option will be selected by default. Then go to https://finds.synology.com/ and hit connect, or you can see the IP from Friend and add port :5000 to the IP. Click install. Select to manually upload the DSM pat file you downloaded earlier (DSM_DS3622xs+_64570.pat). Wait up to 10 minutes. DSM will install packages. After you create an account select not to auto update DSM but to install them manually. ------------------------------------------------------------------------------------------------------------------------------------------------------------------------- Notes and things I noticed: Without Friend using tcrp 0.9.4.2 I was able to install version 7.1.1-42962 by choosing the SATA option, but SATA option did not work for newer versions. I did actually install the latest version (7.2.0-64570) at first with SATA option but then after DSM is done it says "something went wrong" and it wants to rebuild, but then if I force shutdown the VM and start it again but with Friend option Synology continues to install the packages and installs. After DSM is installed SATA option also works as well as Friend option. While back I tried to manually update from version 42661 but it failed, but then I didn't have Friend. ----------- If someone has additional useful things regarding vm-bhyve let me know.

-
This tutorial is a supplement to the ESXi TCRP installation tutorial located here: https://xpenology.com/forum/topic/62547-tutorial-install-dsm-7x-with-tinycore-redpill-tcrp-loader-on-esxi/ Installing DSM 7.1.0.-42661 on UNRAID 6.10.3 I have been trying to install DSM 7.1 on my unraid server for the last night. After some problems and testing I have created this guide to install DSM 7.1 on UNRAID working perfectly. This is my vm config: STEP 1-Virtual machine creation: Download tiny core from https://github.com/pocopico/tinycore-redpill Select CentOS VM Template and apply correct options from the attached image. Select Q35-6.2 Select 3.0 (qemu XHCI) Load tiny red core as vdisk1 USB by selecting manually (you can create previously the name of the folder for the VM inside /domains and upload the tinycore img ) Create secondary disk 50G or whatever you want (this is your data storage for synology) as vdisk2 SATA Select Network model: e1000 Save. Uncheck "Start VM after creation" Edit again vdisk2 in the advanced xml template (top right corner) to controller='1' (if we don't do this tiny red core will not detect the disk properly when doing the satamap and will not install DSM correctly and will ask you to reinstall the *.pat infinitely) STEP 2-Start VM and connect via SSH Start VM and load tiny red core Once the OS is loaded, open the terminal and enter ifconfig to find out the ip of the machine Connect via ssh (with Putty) to the obtained IP address. user: tc password: P@ssw0rd STEP 3-Run the following commands: To update tiny red core with the latest data ./rploader.sh update now ./rploader.sh fullupgrade now To generate random mac and serial numbers (copy mac address generated to set on unraid vm template later) ./rploader.sh serialgen DS918+ (or whatever version you want, you can see all versions available with command info ./rploader.sh) To map the connected disks ./rploader.sh satamap now To record the vid/pid from usb ./rploader.sh identifyusb now To install NIC drivers (sometimes it loads the e1000e module instead of the e1000 and it doesn't work, adding this command will make sure that the e1000 module for the NIC is loaded correctly) For e1000 Network Card run: ./rploader.sh ext apollolake-7.1.0-42661 add https://raw.githubusercontent.com/pocopico/rp-ext/master/e1000/rpext-index.json NOTE: change version according your selection for CPU and DSM version For virtio-net Network Card run: ./rploader.sh ext apollolake-7.1.0-42661 add https://raw.githubusercontent.com/pocopico/rp-ext/master/v9fs/rpext-index.json NOTE: change version according your selection for CPU and DSM version To build the image ./rploader.sh build apollolake-7.1.0-42661 STEP 4-Download your .pat for your correct cpu architecture from official repo or mega download for this version apollolake , we will need it to install DSM later. https://global.download.synology.com/download/DSM/release/7.1/42661-1/DSM_DS918%2B_42661.pat - Offical repo STEP 5-Edit VM settings on advanced xml mode and install *.pat After doing all the above we shut down the machine. Edit the virtual machine on xml advanced mode (if we change mac address in normal editing mode you will lose controller="1" option set for vdisk2 we did previously so you will have to set it again everytime you change and/or save a setting from normal mode, try to edit always in xml advanced mode), look for MAC address and set the MAC generated by tiny red core. Save Start VM Select the first option USB and leave it a few minutes until we find it with synology assistant Open WebGui and install *.pat We now have DSM 7.1 working on unraid. There is other method with SATA boot but I have to test it better. Hope this guide help someone. Regards.
-
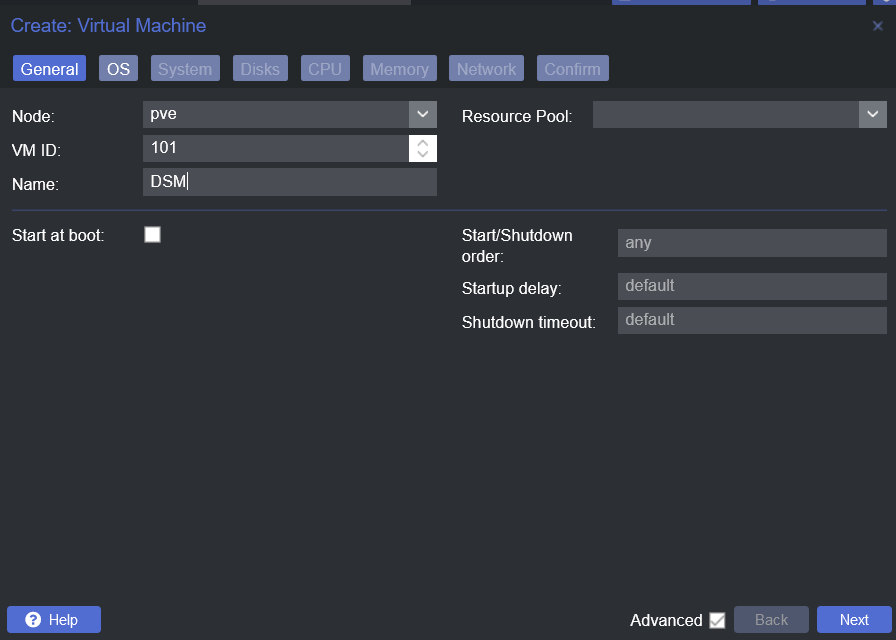
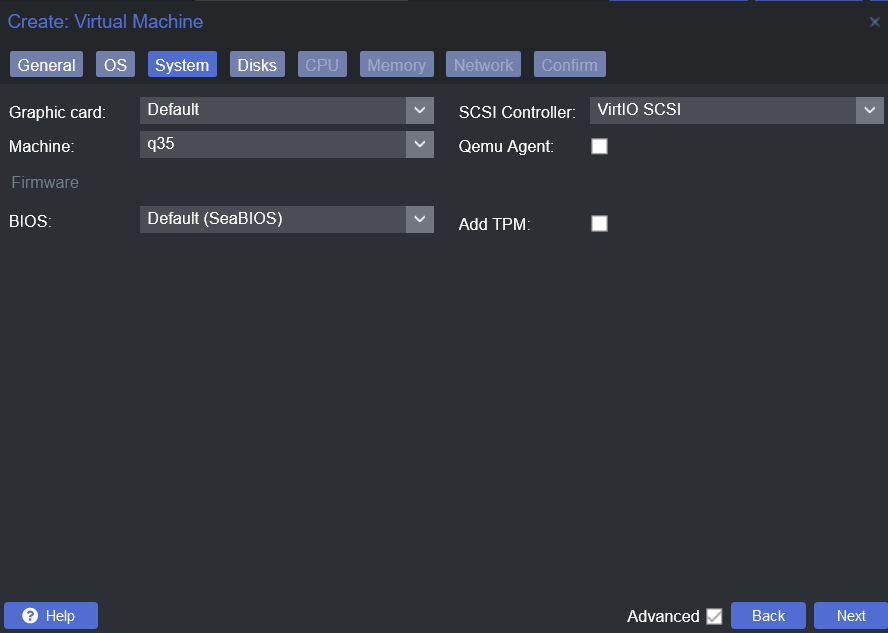
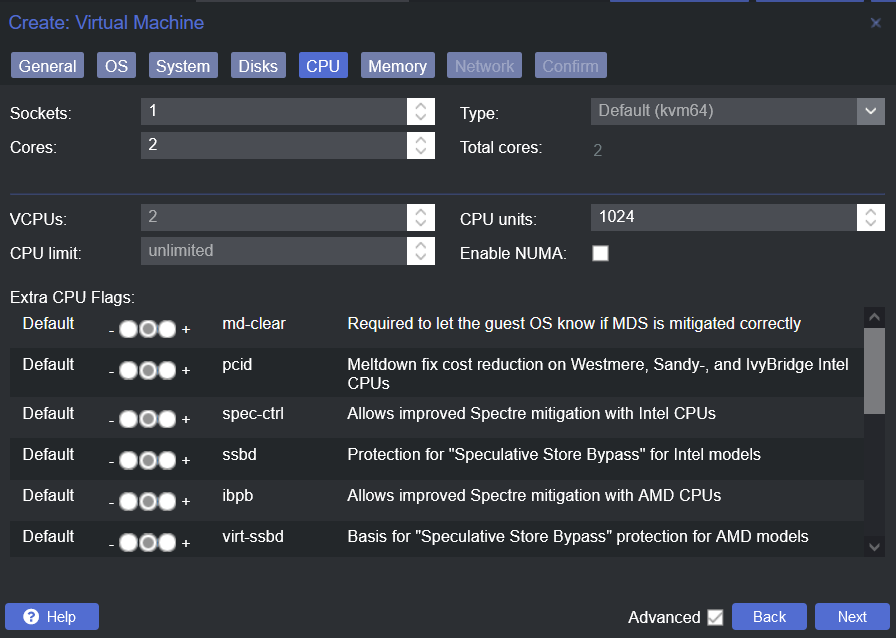
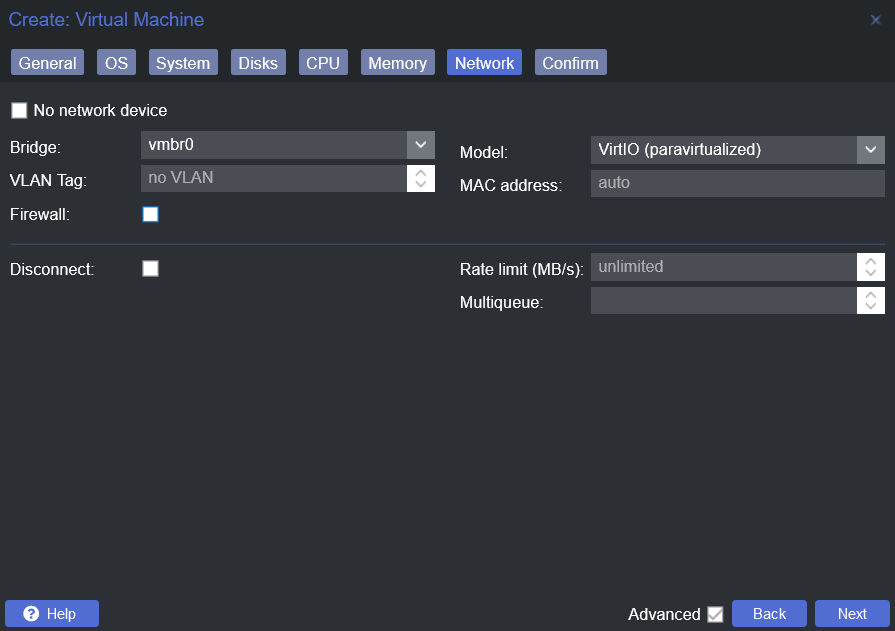
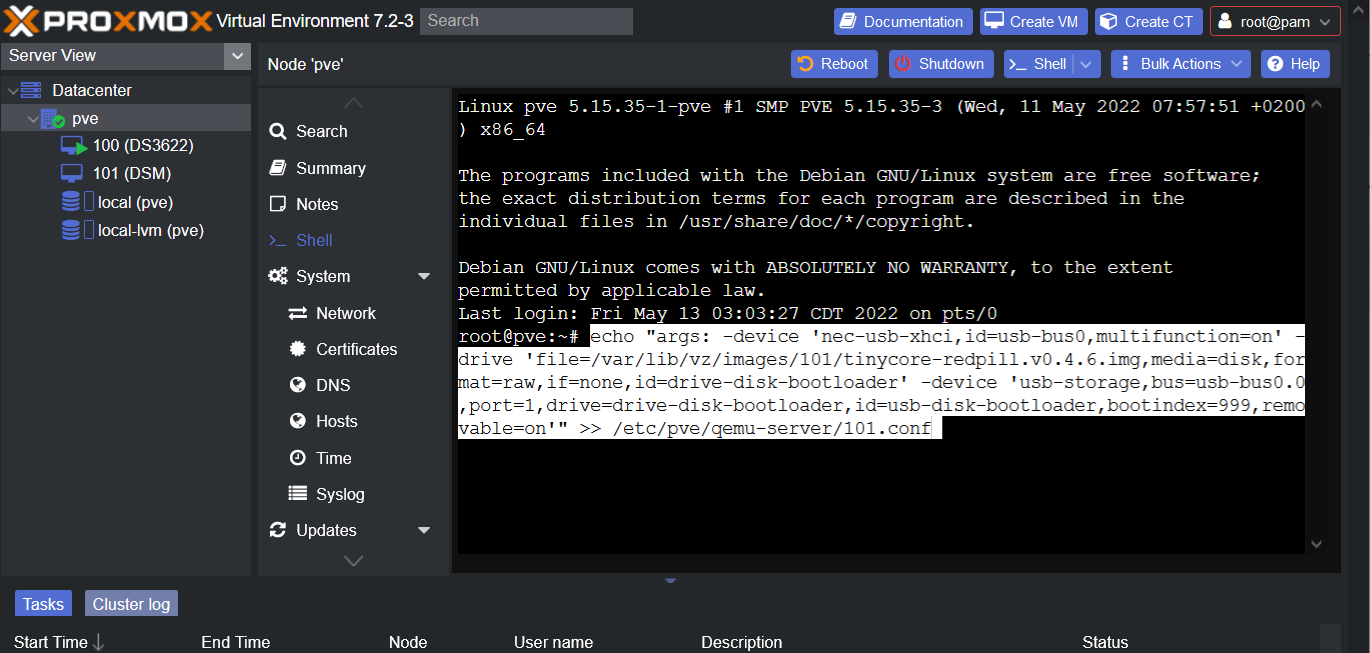
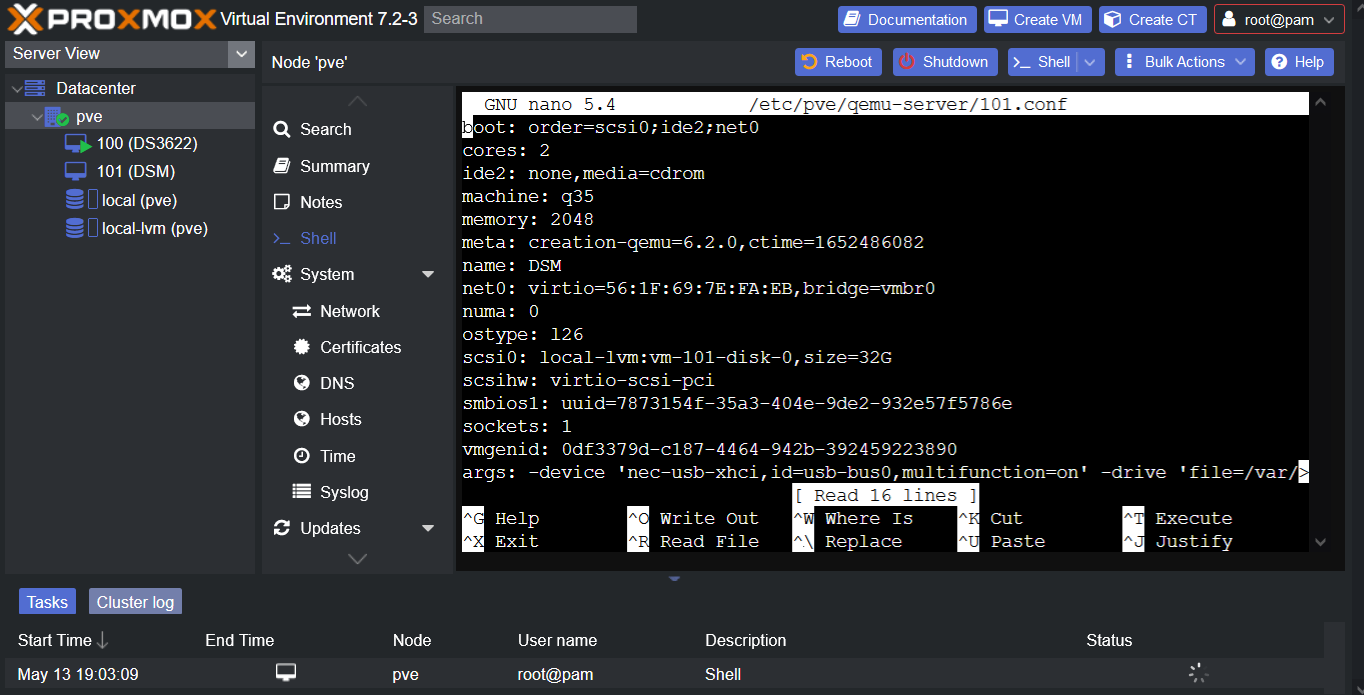
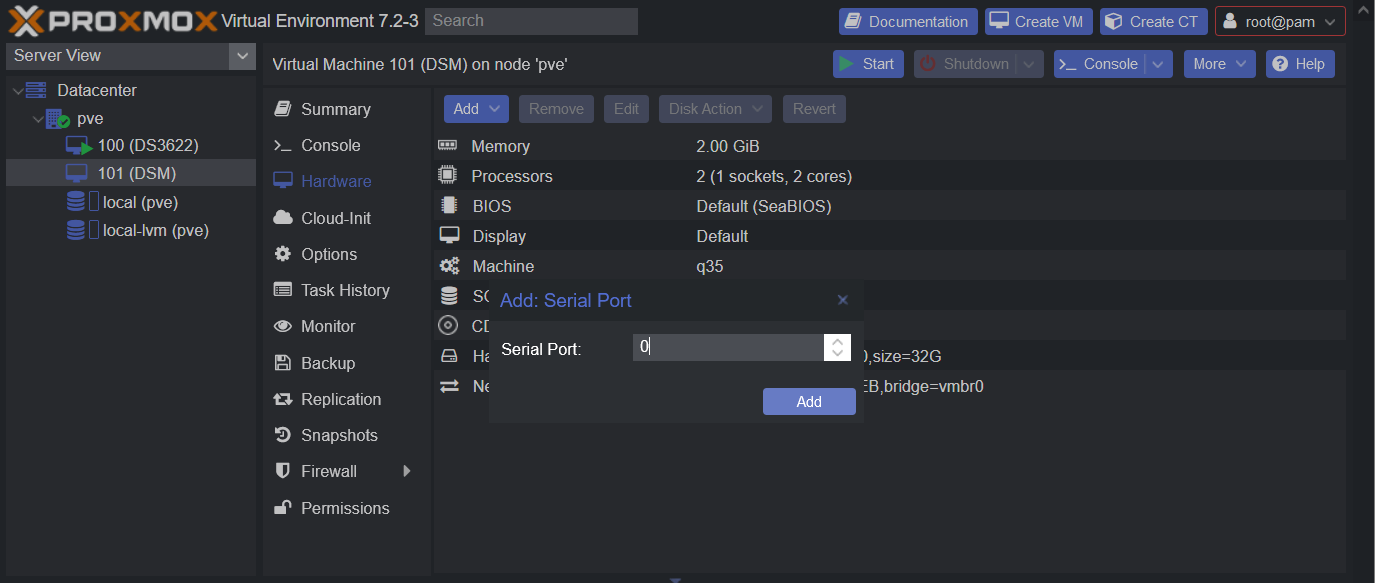
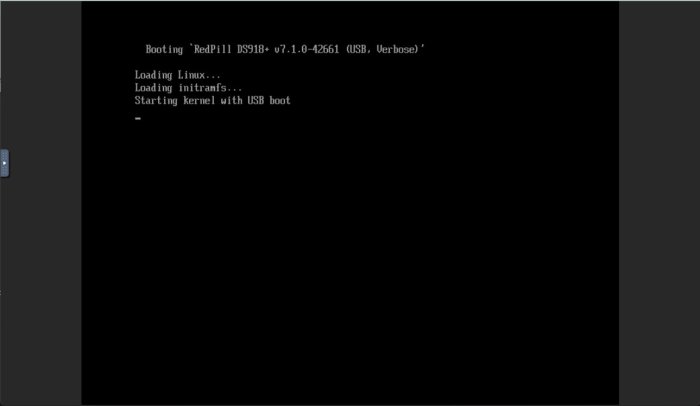
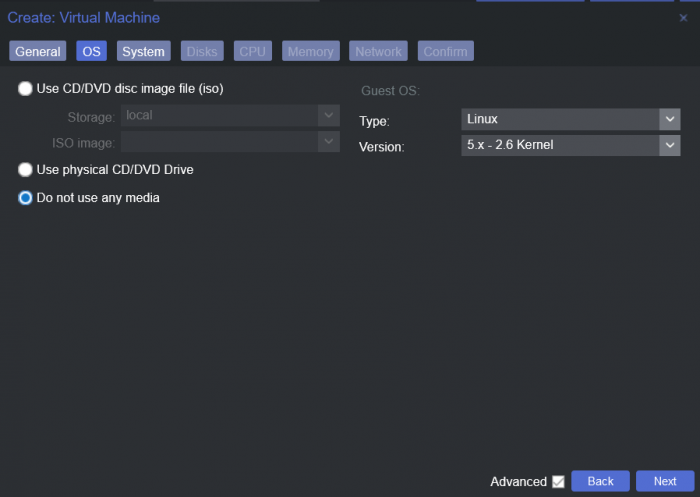
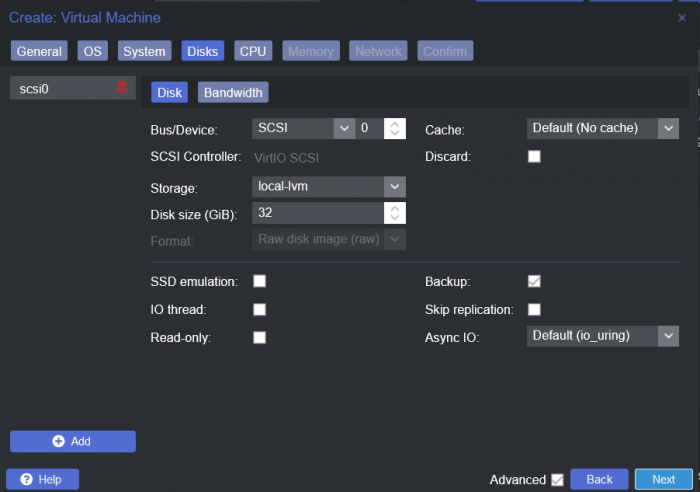
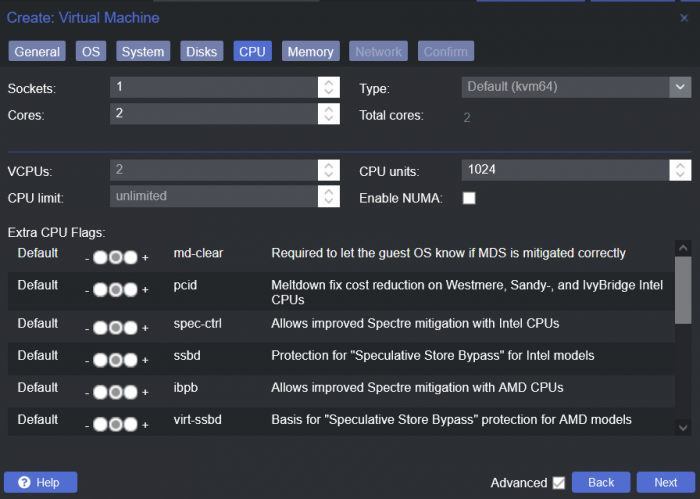
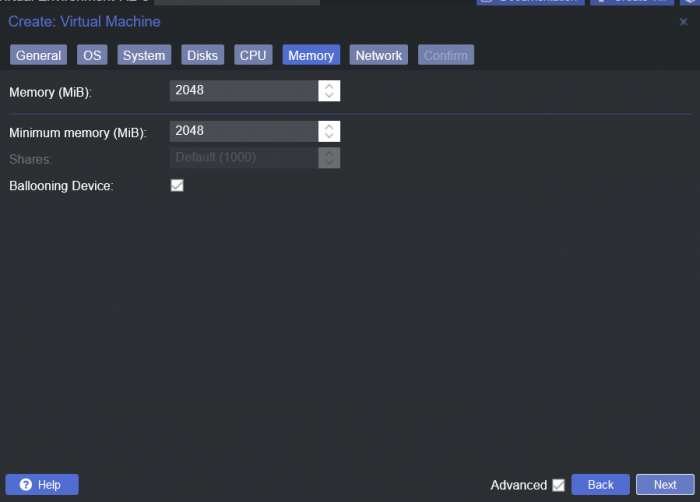
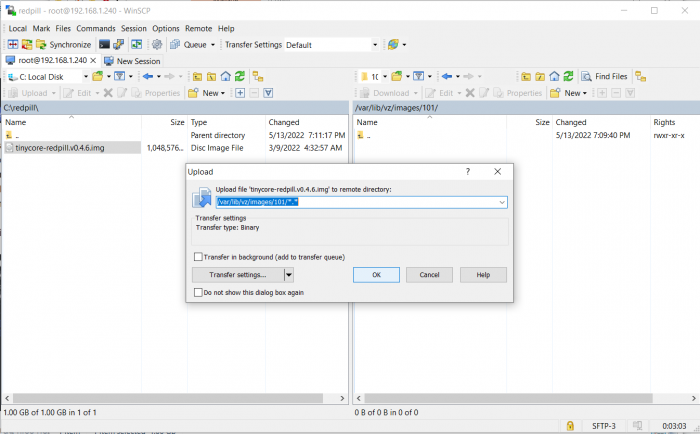
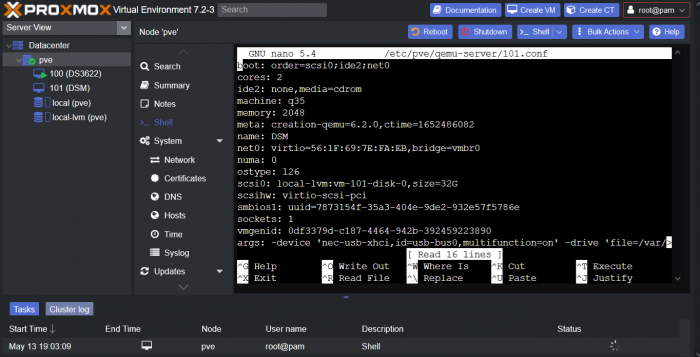
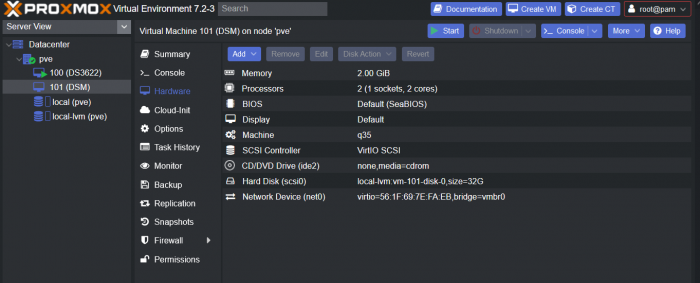
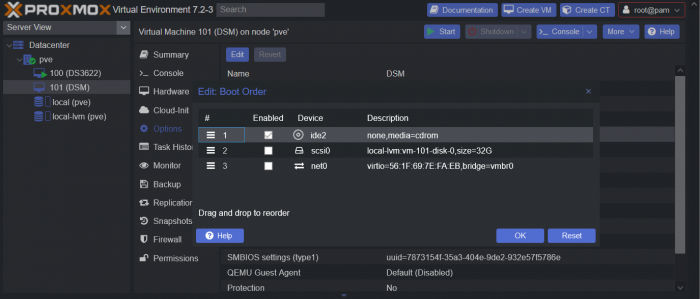
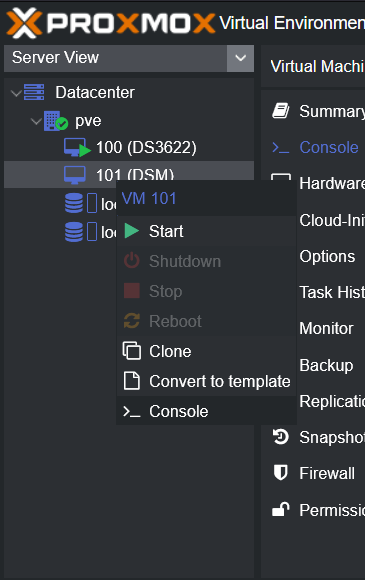
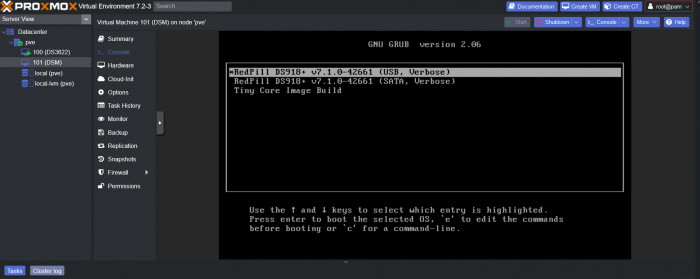
This is a simple guide and step by step tutorial on how I got tiny core red pill loader running and working on a proxmox server. This not the only way, just the way I do it and it seems to work. You will need a few things downloaded and ready to access on your local machine. The tiny core red pill image from @pocopico DOWNLOAD Putty for windows (or your mac equivalent) DOWNLOAD WinSCP for windows (or mac equivalent) DOWNLOAD and of course a working server with proxmox installed and running. DOWNLOAD The correct .pat dsm installation file downloaded directly from synology.com (you can handle this one on your own 😉) From proxmox create a VM. Most of the defaults work, change these according to your specific needs and requirements, I personally used: Q35, virtio nic, HDD is your choice, 2 cores and 2gb ram (again your choice). System Q35 is not required either, i440x works too, this is just what I used and it works. HDD is whatever you want, or pass thru complete drives or controllers.. again your choice based on your setup. Same for nic, cpu and ram. Just be sure to Use NO MEDIA in the OS section * REMEMBER THE VM ID # * you will need it later * Remember, do not use any media is selected here. Now, load WinSCP and connect to your proxmox server using your local ip and proxmox credentials. There on the right side, navigate to /var/lib/vz/images/ and create a folder/directory of whatever the vm number was you created, in these pictures its 101 so in this case it should be /var/lib/vz/images/101/ On the left side in WinSCP navigate to where you downloaded and extracted the tcrp image Copy the extracted tcrp img from your local machine to your proxmox vm directory Alternatively, you can enter a couple of command lines in the main pve node shell to download and extract the tcrp image without using winscp at all, but I do it the hard way. Either way works so its up to you. The alternative method is open the main pve node shell in proxmox and enter these commands (use copy and paste for each line) # set vm id to whatever it was at time of creation id=101 # create image directory, download and uncomporess mkdir -p /var/lib/vz/images/${id} curl --location https://github.com/pocopico/tinycore-redpill/raw/main/tinycore-redpill.v0.4.6.img.gz --output /var/lib/vz/images/${id}/tinycore-redpill.v0.4.6.img.gz gzip --decompress /var/lib/vz/images/${id}/tinycore-redpill.v0.4.6.img.gz --keep Now, at this point one way or another you should have a dir of your vm # in the correct location with the tcrp extracted image inside ready to issue the following commands, so now click your main pve node on the left panel and choose shell and paste this command there. (edit the 101 vm # with whatever your vm # is) echo "args: -device 'nec-usb-xhci,id=usb-bus0,multifunction=on' -drive 'file=/var/lib/vz/images/101/tinycore-redpill.v0.4.6.img,media=disk,format=raw,if=none,id=drive-disk-bootloader' -device 'usb-storage,bus=usb-bus0.0,port=1,drive=drive-disk-bootloader,id=usb-disk-bootloader,bootindex=999,removable=on'" >> /etc/pve/qemu-server/101.conf Now type nano and the last part of the above command (the directory part) to verify the entry into your vm .conf file so in this case nano /etc/pve/qemu-server/101.conf You easily verify the entry into the bottom of the .conf file of your vm, now press control x to exit. Now select your vm and choose hardware from the column Here using the Add button you should add a serial 0 console to monitor your dsm loader if needed (helpful for troubleshooting) and if you are adding hdd or using pass thru of hba controllers or sata controllers or any other specific hardware for your build add it here. Now select Options from the list column, and select only ide2 CD-ROM (uncheck all others) and make cd-rom priority #1 by dragging it to the top. Now you are ready to spin up your vm and build your loader. You can watch the process of booting by right clicking on the vm number/name and select >_ console a new window will open and you will see lines of code fly by, but only in this console monitor window. This is an optional step. At this point you should be booting tcrp and ready to build your loader... @Peter Suh has a great tutorial for that linked here. Follow his directions for building your loader. Use putty to SSH into tcrp to build the loader, The main thing when building if you used virtualized nic card, add the v9fs ext to get network port working, use this command before executing the redpill build command in putty. ./rploader.sh ext <build platform> add https://raw.githubusercontent.com/pocopico/rp-ext/master/v9fs/rpext-index.json After you successfully build your loader, and during the reboot, go back to proxmox gui and when you see the booting menu screen, press UP to select BOOT FROM USB, VERBOSE then press enter... that is very important. You only have to do this once, and it will save and retain that selection until you change it again. You do not want to boot from sata! At this point you load your browser, go to find.synology.com or use synology search application on your pc, or simply go to the ip of your new vm dsm and complete the process. If you had your console monitor opened from above, you should see sign in prompt, if you scroll up a little bit you will also see the ip of your dsm vm. If you successfully booted from usb, everything will work. If you did not change that during the first reboot, and you are booting from sata, you will most likely get a failure to install dsm. You will need to power down the vm, re-start the vm, and choose boot from usb verbose. If this guide helped you, please press the thanks button for me. 🖖😀 And remember to thank @pocopico and @Peter Suh Enjoy!


- 83 replies
-
- 15
-

-

-
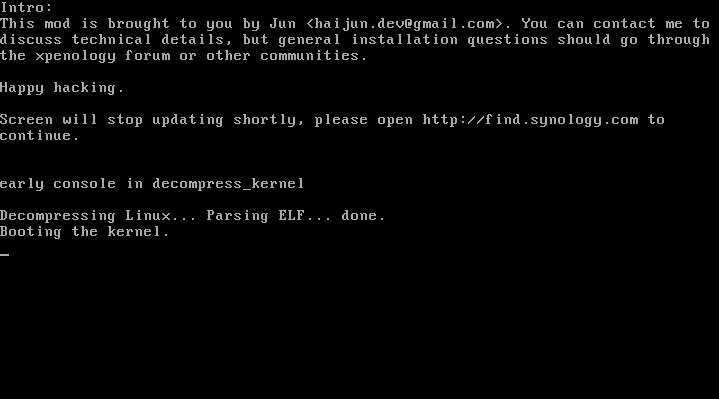
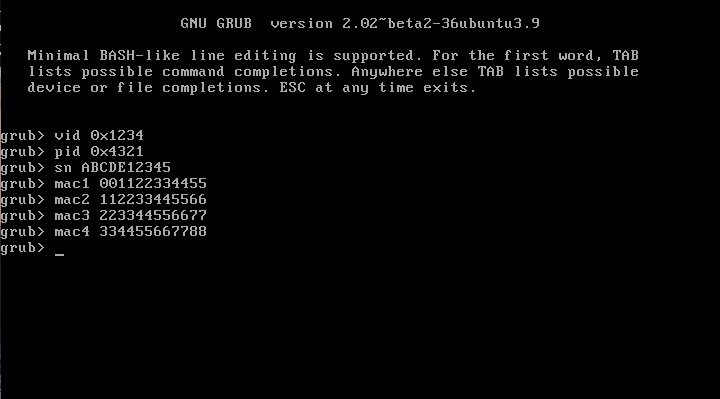
 This is an updated tutorial version from the one I made last year. It will enable you to migrate from DSM 5.2 to DSM 6.1.7 directly without the need to upgrade to DSM 6.0.2 first. If for some reason you want to upgrade to DSM 6.0.2 first or simply you do not want to upgrade to DSM 6.1.7 but only to DSM 6.0.2 then use the link above. To upgrade from DSM 6.0.2 to DSM 6.1.7 read here. As most of you know by now Jun was able to find a way to install DSM 6 on non Synology boxes. Here is the thread that I recommend reading. At least make an effort and read the OP: https://xpenology.com/forum/topic/6253-dsm-6xx-loader/ Below is what you need for the operation. I will assume you are doing all this under Windows 10, 8, 7 or XP. If you are on a MAC computer have a look at this post I made on how to burn the image to a USB drive and then mounting the USB drive for editing the content. The rest of the tutorial still applies. If you are currently using DSM 5.1 or below first update to DSM 5.2. If you are doing a fresh install of DSM 6.1 then carry on with the tutorial and omit references to DSM 5.2. - Win32 Disk Imager to make a bootable USB drive; - A 4GB (or any size really) USB drive (flash drive) to install the loader. Not that this is necessary but use preferably a brand name (Kingston, SanDisk...); - A way to read your USB drive VID/PID. Here is a how-to >>> VID and PID; - A good text editor: Notepad++ I really don't recommend using Windows's Notepad; - DSM 6.1.7 PAT file. Chose the one you need: DS3615sx or DS3617sx or DS916+. Download the ".pat" file not the ".pat.md5" - Jun's official v1.02b loader (mirror). This is a hybrid UEFI/BIOS loader so it should work in most machines which are capable or reading GUID partition table (GPT). For older machines that can only read MBR the above loader will simply not boot. If that is your case then use @Genesys's v1.02b loader rebuilt image which is MBR based. Note: Jun's loader supports Intel CPUs. For AMD CPUs Jun has stated that the loader needs some work but it has been reported by many users using HP machines that it actually works. The C1E function in the bios (in some HP machines) needs to be deactivated. I am unsure for other motherboards brands therefore if you have an AMD machine that is not an HP you might be out of luck. Try looking in the bios configuration and play around. - Custom extra.lzma ramdisk. This ramdisk is optional and should only be used if the default ramdisk included in the loader is not detecting your hardware. I am just providing it for those who are having issues with network detection or unrecognised HDD controllers. This custom ramdisk contains additional and updated modules & firmwares. Credits go to @IG-88 for compiling the modules against the latest DSM 6.1.3 source code. I do not warranty they all work but I think most do. If you chose to use this ramdisk, you will need to replace (or rename, so you can revert) the default extra.lzma ramdisk from Jun's loader with this one. If you a have question specific to the custom ramdisk please post it in the topic of IG-88, not here. - If you are doing a fresh install make sure your drives are plugged in direct succession starting from the 1st SATA port. Usually the first port is described as SATA0 on motherboards. Check with your MoBo manufacturer for exact nomenclature. - OSFMount to modify the grub.cfg file within the loader's image and if necessary to replace the extra.lzma ramdisk with the custom one. This is not strictly necessary as Jun has made it possible to configure what needs to be modified via the Grub Boot Menu. If you prefer using Jun's Grub Boot Menu configuration method, simply skip Point 4, read Note 4 instead and pick up at Point 5. PLEASE READ EVERYTHING PRIOR ATTEMPTING ANYTHING Use this loader at your own risk. I wont be held responsible for any loss of data or black smokes that may result in the use of this loader. Please note that this loader has a limited amount of modules (drivers) included. If it is fundamental for you to have a NAS operating as quick as possible I recommend you look at the included drivers very carefully at the bottom of this tutorial before attempting an upgrade. If they are not there you will have to compile your own modules/firmwares or use the custom ramdisk provided above. Don't ask me to compile modules for you. I wont do it. One last thing: DO NOT UPDATE DSM BEYOND VERSION 6.1.7 with loader v1.02b. IN OTHER WORDS DO NOT UPDATE TO DSM 6.2 You have been warned. Here we go: 1 - BACKUP your data and save your configuration prior any attempts to migrate from DMS 5.2 to DSM 6.1. I can't stress this enough. JUST DO IT, as Nike likes to say. Also, print this tutorial if you can. It will make your life easier. 2 - Turn off your NAS and unplug the USB drive you are currently using with DSM 5.2. I recommend you put this USB drive aside in case migration to DSM 6.1 doesn’t go as expected and you need to revert to DSM 5.2. It will just make your life easier. 3 - Now go to your workstation/PC, plug a new USB drive (or the old one if you really don’t have any spare USB drives). Use the link I provided earlier to check your USB drive VID/PID. Write down the info somewhere as we will need it later. 4 - Now launch OSFMount. Select Mount New, then select the image file you downloaded earlier (i.e. .img extension file) to open. Now select partition 0 (the one that is 15 MB). Click Ok. Then at the bottom of the window make sure to un-tick the "Read only drive". Click Ok. The partition should now be mounted in file explorer. At this point you can navigate to the /grub directory and edit the grub.cfg file. If you need to replace the extra.lzma ramdisk with the custom ramdisk provided above then you will also need to mount partition 1 (the one that is 30 MB). Below is what you will see in the grub.cfg file. I am only showing below the portion of the code that is relevant for the purpose of this tutorial [...] set extra_initrd="extra.lzma" set info="info.txt" set vid=0x058f set pid=0x6387 set sn=C7LWN09761 set mac1=0011322CA785 set rootdev=/dev/md0 set netif_num=1 set extra_args_3615='' set common_args_3615='syno_hdd_powerup_seq=0 HddHotplug=0 syno_hw_version=DS3615xs vender_format_version=2 console=ttyS0,115200n8 withefi elevator=elevator quiet' set sata_args='sata_uid=1 sata_pcislot=5 synoboot_satadom=1 DiskIdxMap=0C SataPortMap=1 SasIdxMap=0' set default='0' set timeout='1' set fallback='1' [...] You want to modify the following: Change vid=0x090C to vid=0x[your usb drive vid] Change pid=0x1000 to pid=0x[your usb drive pid] Change sn=C7LWN09761 to sn=generate your sn here with DS3615xs or DS 3617xs or DS916+ model (this will depend on which loader you chose) Change mac1=0011322CA785 to mac1=[your NIC MAC address #1]. You can also add set mac2=[your NIC MAC address #2] and so on until mac4 if you have multiple NICs. However, this is not necessary. Recommended: Change set timeout='1' to set timeout='4' - This will allow you more time to make a selection in the Grub Boot Menu when it appears on screen. Once you are done editing the grub.cfg file, save it and close your text editor. Now in OSFMount click on Dismount all & Exit. You are now ready to burn the image to your USB drive. 5 - Now use Win32 Disk Imager to burn the image file onto the USB drive. This will also make the USB drive bootable. 6 - Eject and unplug the USB drive from your workstation. Plug it in your NAS (avoid USB 3.0 ports. Use USB 2.0 port if available). Boot your NAS and before doing anything fancy, access your BIOS so to make your USB drive the 1st boot drive if it's not the case. The Jun official loader can boot in UEFI or in legacy BIOS, so you chose what suits you best. Also, make sure your HDDs are booting in AHCI mode and not in IDE. Finally, if disabled, also enable the serial port in BIOS. Some BIOS don't have this option so don't get too cranky on this if you can't find it. Save changes to the BIOS and REBOOT the NAS. 7 - Once rebooted, if you have a monitor connected to your NAS you will see the following Grub Boot Menu: ADVICE: even before you see the Grub Boot Menu press the up/down key. This will stop the countdown so you will be able to select the desired line. You won’t see much other than the following after you press enter: If you booted the USB drive in EFI mode then you will see the same text without the last 3 lines but that's ok. 8 - Now go back to your workstation, and launch Synology Assitant or go to http://find.synology.com. Within one minute or so you should normally be able to see your NAS on your local network (it took ~55 seconds on a test I did on a VM). Just follow the instructions and either chose "Install" if you wish to have a clean install or chose “Migration” if you are coming from DMS 5.2 and wish to update while retaining your data. You will be asked to provide the .PAT file you downloaded earlier (DSM_DS3615xs_15217.pat or DSM_DS3617xs_15217.pat or DSM_DS916+_15217.pat). 9 - When the migration is finished you will most probably have to update some of your packages. You can then proceed and update DSM 6.1.7 up to DSM 6.1.7 critical update 3. It is possible you might either need to hard reboot or re-image your usb drive. Make sure to deactivate auto-updates within DSM. Link to individual files (DSM and critical updates) can be found here: https://xpenology.com/forum/topic/7294-links-to-dsm-and-critical-updates/. DO NOT UPDATE TO DSM 6.2. The loader is not compatible. 10 - You are done. If you have questions, first search the forum and/or Google then leave a comment if nothing helps. Please provide your hardware specifications (motherboard model, LAN controller, driver controller etc). Failure to prove such information will lead to the post being deleted or not answered. -------------- Note 1: If after following the tutorial you can’t find your NAS through http://find.synology.com ou Synology Assistant it is highly possible that the drivers of your NIC are not included in the ramdisk of the loader. Make an effort and use Google to know what modules your NIC and HDD controller are using, then check if those modules are included in the custom extra.lzma ramdisk. If yes then use the custom ramdisk. Don't ask me to look for you. If nothing works then ask your question. Note 2: Synology increased security since the introduction of DSM 6. Root access through SSH is no longer possible out of the box. You can however use your admin account and elevate permissions with the following command if you need root permissions: sudo -i Note 3: Please check you have the right VID/PID prior proceeding. If you get the following error ”Failed to install the file. The file is probably corrupted. (13)" it most certainly means your VID and/or PID is/are wrong. If you still have the same error message after verifying the VID/PID then try another USB drive. Note 4: Configuration added to the grub.cfg file can also be done directly during the Grub Boot Menu, so technically you can skip Point 4 and burn the image on the USB drive without editing anything (read Point 5 onward first). If you wish to do the changes from the Grub Boot Menu directly you need to press the letter 'C' when you see the Boot Menu. You will literally only have one second, so be fast. Once you press 'C' you will be in a Grub command line environment. To change your VID enter the following: vid 0xYOUR 4 DIGITS USB DRIVE VID Do the same for pid, sn and mac1. Press enter at each command. The commands are: pid 0xYOUR 4 DIGITS USB DRIVE PID sn YOUR NAS SERIAL NUMBER mac1 YOUR NAS MAC1 ADDRESS If you have multiple NICs you can also issue mac2, mac3 and mac4 as commands. Maximum is mac4. See below: mac2 YOUR NAS MAC2 ADDRESS mac3 YOUR NAS MAC3 ADDRESS mac4 YOUR NAS MAC4 ADDRESS If you think you made a mistake in the numbers simply re-issue the command. When you are done press esc and select the appropriate menu entry. Below is an example (fake numbers) of how it looks under the Grub command line environment : Note 5: If you encounter the error "We've detected errors on your hard drives [drive number] and the SATA ports have also been disabled" during installation, then you have to fallback to adding SataPortMap to the grub environment. Press the letter 'C' at the Grub Boot Menu and then add the following: append SataPortMap=XX where XX is the number of drives. Don’t forget to update this parameter if you add additional drives to your machine. If you use Reinstall, don't forget to re-select the first line of the Boot Menu once the NAS has rebooted after the installation else the Loader will re-select Reinstall and you will be faced with some issues so please beware of this. @@@@@@@@ What does SataPortMap mean? @@@@@@@ @@@@@@@@@@@@@@@@@@@@@@@@@@@@@@@@@ ############## Know issues ##################### - When running on a slow single core machine, there is a race condition that causes the patcher to load too late. The most obvious sign is that console is not working properly. - Some ethernet drivers crash when set MTU above about 4096 (Jumbo frame). ############# Included default modules & firmwares in Jun's Loader ############# ############## Tutorial UPDATES ##################
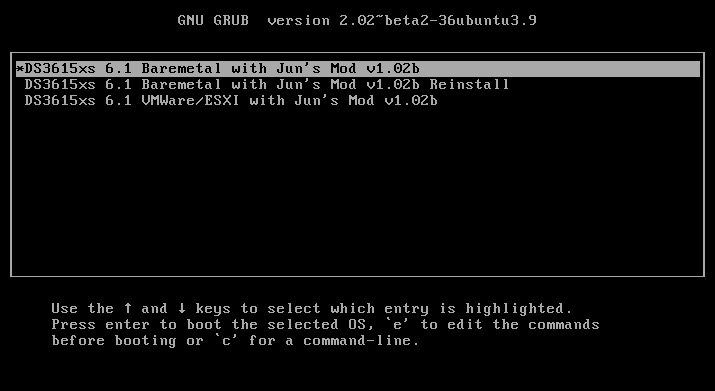
- 630 replies
-
- 32
-
-
-
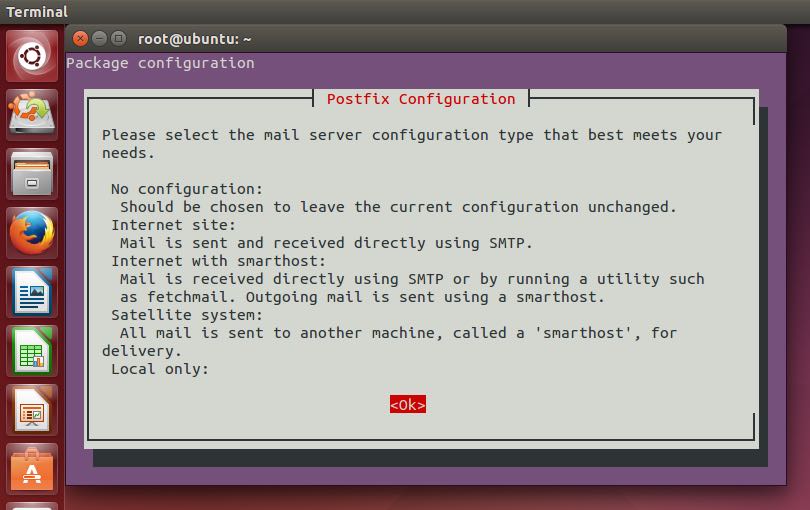
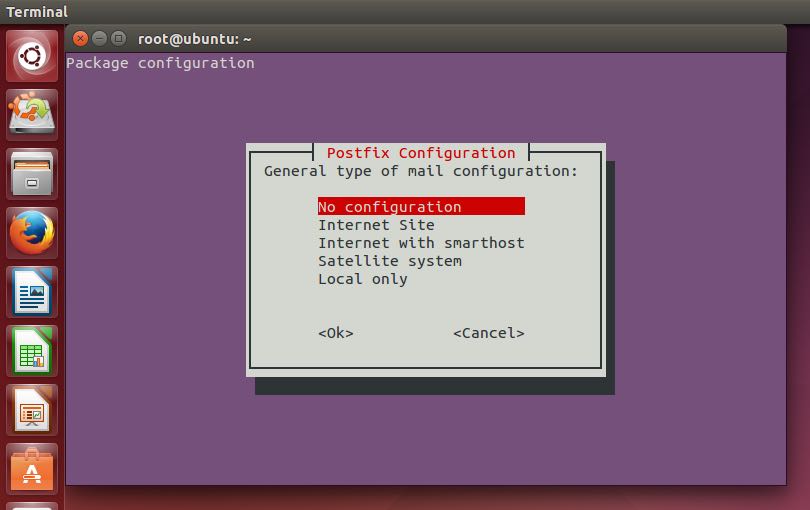
If you can't access your Xpenology box but you still wish to try and 'fix' some configuration files or perhaps you wish to finally make that backup that you should have done before fiddling with the root user, then you can access the content of the system partition and data partitions through a Live Ubuntu CD (or whatever unix flavoured OS you so desire). Here is how to: 1 - Make a Live Ubuntu USB drive. Ideally it is more convenient to make a persistent Live Ubuntu USB drive but that's not required for this tutorial and it would just complicate things unnecessarily. 2 - Once you're done burning Ubuntu on the USB flash drive, go plug it in your Xpenology box and boot from it. 3 - Once in Ubuntu, launch Terminal. You will need to first be root so type: sudo -i 4 - Now install mdadm and lvm2 by typing the following command: apt-get install mdadm lvm2 You should get the following Postfix Configuration menu: Select as shown in the pictures above. If you wish to mount the data partition alone then proceed with the following command: 5 - To mount the data partition, simply issue this command and you are done: mdadm -Asf && vgchange -ay If you also wish to mount the system partition then proceed with the following commands (adapt to your case accordingly): 6 - Then you need to check your raid array and partitioning of your drives: fdisk -l | grep /dev/sd In my case I see this. Note I only have 2 drives /dev/sda and /dev/sdb root@server:/etc.defaults# fdisk -l | grep /dev/sd Disk /dev/sda: 1.8 TiB, 2000398934016 bytes, 3907029168 sectors /dev/sda1 256 4980735 4980480 2.4G fd Linux raid autodetect /dev/sda2 4980736 9175039 4194304 2G fd Linux raid autodetect /dev/sda3 9437184 3907015007 3897577824 1.8T f W95 Ext'd (LBA) /dev/sda5 9453280 3907015007 3897561728 1.8T fd Linux raid autodetect Disk /dev/sdb: 1.8 TiB, 2000398934016 bytes, 3907029168 sectors /dev/sdb1 256 4980735 4980480 2.4G fd Linux raid autodetect /dev/sdb2 4980736 9175039 4194304 2G fd Linux raid autodetect /dev/sdb3 9437184 3907015007 3897577824 1.8T f W95 Ext'd (LBA) /dev/sdb5 9453280 3907015007 3897561728 1.8T fd Linux raid autodetect System partitions are the ones labeled sda1, sdb1. If you have more drives in the array, subsequent system partitions will probably be called sdc1, sdd1 so on and so forth. You get the point. 7 - Once you figured out all system partitions, you can examine the foreign endian array members by issuing (this is for my case, with 2 drives): mdadm -Ee0.swap /dev/sda1 /dev/sdb1 If you have 3 drives then you add /dev/sdc1. You get the idea. 8 - Finally, assemble the array and fix the byte order (this is for my case, with 2 drives): mdadm -AU byteorder /dev/md0 /dev/sda1 /dev/sdb1 Same comment as previous command; add any additional system partitions that you may have. Beware of the /dev/md0. It's normal, not a mistake. Your system partition should now be mounted and you can navigate through the system files. Simply unmount the drives and shutdown the machine when you are done. If for some reason you need to reboot and want to access the partitions again then you will need to re-install mdadm and lvm2 because the Live Ubuntu USB is not persistent. --------- Reference: https://www.synology.com/en-global/knowledgebase/DSM/tutorial/Storage/How_can_I_recover_data_from_my_DiskStation_using_a_PC http://xpenology.com/forum/viewtopic.php?f=2&t=22100&p=83631&hilit=version#p83631 http://xpenology.com/forum/viewtopic.php?f=2&t=20216&p=74659&hilit=mdadm#p74659 >> Thanks to Jun
- 51 replies
-
- 11
-
-
-
I created a tutorial for the French section so I thought, what the heck, let's do it for the English one as well. Here it goes. As most of you know by now Jun was able to find a way to install DSM 6 on non Synology boxes. Here is the thread that I recommend reading. At least make an effort and read the OP: https://xpenology.com/forum/topic/6253-dsm-6xx-loader/ Below is what you need for the operation. I will assume you are doing all this under Windows 10, 8, 7 or XP. If you are on a MAC computer have a look at this post I made on how to burn the image to a USB drive and then mounting the USB drive for editing the content. The rest of the tutorial still applies. If you are currently using DSM 5.1 or below first update to DSM 5.2. If you are doing a fresh install of DSM 6.0 then carry on with the tutorial and omit references to DSM 5.2. - Win32 Disk Imager to make a bootable USB drive; - A 4GB (or any size really) USB drive (flash drive) to install the loader. Not that this is necessary but use preferably a brand name (Kingston, SanDisk...); - A way to read your USB drive VID/PID. Here is a how-to >>> VID and PID; - A good text editor: Notepad++ I really don't recommend using Windows's Notepad; - DSM 6.0.2. The file comes straight from Synology servers; - Jun's official v1.01 loader (mirror). This is a hybrid UEFI/BIOS loader so it should work in most machines. Loader supports Intel and AMD CPUs; - Customized extra.lzma ramdisk. This ramdisk is optional and should only be used if the default ramdisk included in the loader is not detecting your hardware. I am just providing it for those who are having issues with network detection or unrecognised HDD controllers. This custom ramdisk contains additional modules (drivers) that were mostly taken from Quicknick's loader. I don't warranty they all work but I think most do. If you chose to use this ramdisk, you will need to replace (or rename, so you can revert) the default extra.lzma ramdisk from Jun's loader with this one. See change log at the end of the tutorial for additional modules. - Make sure your drives are plugged in direct succession starting from the 1st SATA port. Usually the first port is described as SATA0 on motherboards. Check with your MB manufacturer for exact nomenclature. - OSFMount to modify the grub.cfg file within the loader's image. This is not strictly necessary as Jun has made it possible to configure what needs to be modified via the Grub Boot Menu. I recommend you use OSFMount for now although it adds an extra step. If you prefer using Jun's new feature simply skip Point 5, read Note 4 instead and pick up at Point 6. PLEASE READ EVERYTHING PRIOR ATTEMPTING ANYTHING Use this loader at your own risk. I wont be held responsible for any loss of data or black smokes that may result in the use of this loader. Please note that this loader is based on DSM 6.0 Beta 2 branch 7274 and that a limited amount of drivers are included in the loader. If it is fundamental for you to have a NAS operating as quick as possible I recommend you look at the included drivers first at the bottom of this tutorial. If they are not there you will have to compile your own drivers. One last thing: DO NOT UPDATE DSM BEYOND VERSION 6.0.2 (6.0.3, 6.1, 6.1.X, 6.2) with loader v1.01. You have been warned. Here we go: 1 - BACKUP your data and save your configuration prior any attempts to migrate from DMS 5.2 to DSM 6.0.2. I can't stress this enough. JUST DO IT, as Nike likes to say. Also, print this tutorial if you can. It will make your life easier. 2 - Turn off your NAS and unplug the USB drive you are currently using with DSM 5.2. I recommend you put this USB drive aside in case migration to DSM 6.0.2 doesn’t go as expected and you need to revert to DSM 5.2. It will just make your life easier. 3 - Now go to your workstation/PC, plug a new USB drive (or the old one if you really don’t have any spare USB drives). Use the link I provided earlier to check your USB drive VID/PID. Write down the info somewhere as we will need it later. 4 - Unzip the loader you downloaded earlier. You will end up with a folder containing several files. Since we are installing on bare-metal you will only need the image file "synoboot.img". 5 - Now launch OSFMount. Select Mount New, then select the image file (i.e. synoboot.img) to open. Now select partition 0 (the one that is 30 MB). Click Ok. Then at the bottom of the window make sure to un-tick the "Read only drive". Click Ok. The EFI partition of the image file should now be mounted in file explorer. At this point you can navigate to the /image/DS3615xs directory and replace the extra.lzma ramdisk with the one provided above. When you are done come back to the root directory and go to the /grub directory and edit the grub.cfg file. Below is what you will see in the file. I am only showing below the portion of the code that is relevant for the purpose of this tutorial [...] set extra_initrd="extra.lzma" set info="info.txt" set vid=0x058f set pid=0x6387 set sn=C7LWN09761 set mac1=0011322CA785 set rootdev=/dev/md0 set netif_num=1 set extra_args_3615='' set common_args_3615='syno_hdd_powerup_seq=0 HddHotplug=0 syno_hw_version=DS3615xs vender_format_version=2 console=ttyS0,115200n8 withefi elevator=elevator quiet' set sata_args='sata_uid=1 sata_pcislot=5 synoboot_satadom=1 DiskIdxMap=0C SataPortMap=1 SasIdxMap=0' set default='0' set timeout='1' set fallback='1' [...] You want to modify the following: Change vid=0x090C to vid=0x[your usb drive vid] Change pid=0x1000 to pid=0x[your usb drive pid] Change sn=C7LWN09761 to sn=generate your sn here with DS3615xs model Change mac1=0011322CA785 to mac1=[your NIC MAC address]. You can also add set mac2=[your NIC MAC address #2] and so on until mac4 if you have multiple NICs. However, this is not necessary. Optional: Change set timeout='1' to set timeout='4' - This will allow you more time to make a selection in the Grub Boot Menu when it appears. Once you are done editing the grub.cfg file, save it and close your text editor. Now in OSFMount click on Dismount all & Exit. You are now ready to burn the image to your USB drive. 6 - Now use Win32 Disk Imager to burn the image file onto the USB drive. This will also make the USB drive bootable. 7 - Eject and unplug the USB drive from your workstation. Plug it in your NAS (avoid USB 3.0 ports. Use USB 2.0 port if available). Boot your NAS and before doing anything fancy, access your BIOS so to make your USB drive the 1st boot drive if it's not the case. The loader can boot in UEFI or in legacy BIOS, so you chose what suits you best. Also, make sure your HDDs are booting in AHCI mode and not in IDE, else it wont work. Finally, if disabled, also enable the serial port in BIOS. Some BIOS don't have this option so don't get too cranky on this if you can't find it. Save changes to the BIOS and REBOOT the NAS. 8 - Once rebooted, if you have a monitor connected to your NAS you will see the following Grub Boot Menu: If you are on an Intel based machine you can simply let it be and the loader will automatically start. However, if you are on a AMD based machine you will need to select the 4th line and then press enter. ADVICE: even before you see the Grub Boot Menu press the up/down key. This will stop the countdown so you will be able to select the desired line. You won’t see much other than the following after you press enter: If you booted the USB drive in EFI mode then you will see the same text without the last 3 lines but that's ok. 9 - Now go back to your workstation, and launch Synology Assitant or go to http://find.synology.com. Within one minute or so you should normally be able to see your NAS on the local network (it took 55 seconds on a test I did on a VM). Just follow the instructions and either chose "Install" if you wish to have a clean install or chose “Migration” if you are coming from DMS 5.2 and wish to update while retaining your data. You will be asked to provide the .PAT file you downloaded earlier (DSM_DS3615xs_8451.pat). 10 - When the migration is finished you will most probably have to update some of your packages. You can then proceed and update DSM 6.0 up to DSM 6.0.2-8451 update 11. It is possible you might either need to hard reboot or re-image your usb drive. DO NOT UPDATE DSM TO VERSIONS 6.0.3, 6.1, 6.1.x, 6.2, with loader v1.01. Make sure to deactivate auto-updates within DSM. 11 - You are done. If you have questions, first search the forum and/or Google then leave a comment if nothing helps. Please provide your hardware specifications (motherboard model, LAN controller, driver controller etc). Failure to prove such information will lead to the post being deleted. -------------- Note 1: If after following the tutorial you can’t find your NAS through http://find.synology.com ou Synology Assistant it is highly possible that the drivers of your NIC are not included in the ramdisk of the loader. Make an effort and use Google to know what modules your NIC and HDD controller are using, then check if those modules are included in the custom extra.lzma ramdisk. If yes then use the custom ramdisk. Don't ask me to look for you. If nothing works then ask your question. Note 2: Synology increased security in DSM 6. Root access through SSH is no longer available out of the box. You can however use your admin account and elevate permissions with the following command sudo -i Note 3: Please check you have the right VID/PID prior proceeding. If you get the following error ”Failed to install the file. The file is probably corrupted. (13)" it means your VID and/or PID is wrong. If you are 200% sure that your VID/PID is correct and you still get that error message then try to 'Force Install'. If that doesn't work then try another USB drive. Note 4: Changes made to the grub.cfg file can also be done directly during the Grub Boot Menu, so technically you can skip Point 5 and burn the image on the USB drive without editing anything (read Point 6 onward first). If you wish to do the changes from the Grub Boot Menu directly you need to press the letter 'C' when you see the Boot Menu. You will literally only have one second, so be fast. Once you press C you will be in a Grub command line environment. To change your VID enter the following: vid 0xYOUR 4 DIGITS USB DRIVE VID Do the same for pid, sn and mac1. Press enter at each command. The commands are: pid 0xYOUR 4 DIGITS USB DRIVE PID sn YOUR NAS SERIAL NUMBER mac1 YOUR NAS MAC1 ADDRESS If you have multiple NICs you can also issue mac2, mac3 and mac4 as commands. Maximum is mac4. See below: mac2 YOUR NAS MAC2 ADDRESS mac3 YOUR NAS MAC3 ADDRESS mac4 YOUR NAS MAC4 ADDRESS If you think you made a mistake in the numbers simply re-issue the command. When you are done press esc and select the appropriate menu entry. Below is an example of how it looks under the Grub command line environment: Note 5: If your encounter the error "We've detected errors on your hard drives [drive number] and the SATA ports have also been disabled" during installation, try the Force Install menu entry in the Grub Boot Menu. If this does not work then you have to fallback to adding SataPortMap to the grub environment. Press the letter 'C' at the Grub Boot Menu and then add the following: append SataPortMap=XX where XX is the number of drives. Don’t forget to update this parameter if you add additional drives to your machine. If you use Force Install, don't forget to re-select the first line of the Boot Menu once the NAS has rebooted after the installation else the Loader will re-select Force Install and you will be faced with some issues so please beware of this. @@@@@@@@ What does SataPortMap mean? @@@@@@@ @@@@@@@@@@@@@@@@@@@@@@@@@@@@@@@@@ ############## Know issues ##################### - When running on a slow single core machine, there is a race condition that causes the patcher to load too late. The most obvious sign is that console is not working properly. - Some ethernet drivers crash when set MTU above about 4096 (Jumbo frame). ############# Included default modules in Jun's Loader ############# ############# Additional modules in the custom extra.lzma ramdisk ############# ############## Tutorial UPDATES ##################
-

Tutorial: How to downgrade from 6.2 to 6.1 - Recovering a bricked system
Guest posted a topic in Tutorials and Guides
Hello! This is a short guide about how to downgrade from DSM 6.2 to DSM 6.1 after a failed upgrade. I made this mistake myself, so i'm sharing how to fix it! Your going to need a spare HDD or SSD. Make sure there is nothing on it. You've installed DSM before, so you should have your synoboot.img from JunsLoader. Your current bootloader on your USB in now NONFUNCTIONING, you will need to reflash your USB with JunsLoader. Once you have your new, reflashed USB stick, unplug ALL drives from the motherboard. Make sure there are NO SATA interfaces connected. Plug in your new, empty drive to the motherboard and boot from the USB stick. (You will need a keyboard for this step) The first option in the GRUB interface is what you are looking for. Use http://find.synology.com or Synology Web Assistant to find your DSM. Follow the steps and install DSM 6.1 from a PAT file. DO NOT INSTALL 6.2 IF YOU LEFT A DRIVE IN IT WILL SAY RECOVER. GOTO 2. Let Synology do its thing and eventually you will have a working 6.1. While the PC is ON, connect the drives to the motherboard (with you data on it). Under Storage Manager they will pop up and say Unused. You might need to reboot, at this option. It took me some fiddling around, but eventually Synology will prompt you with a Recover Crashed Partition prompt. Click Yes. All of your data will appear, and Synology will automatically perform RAID scrubbing. -
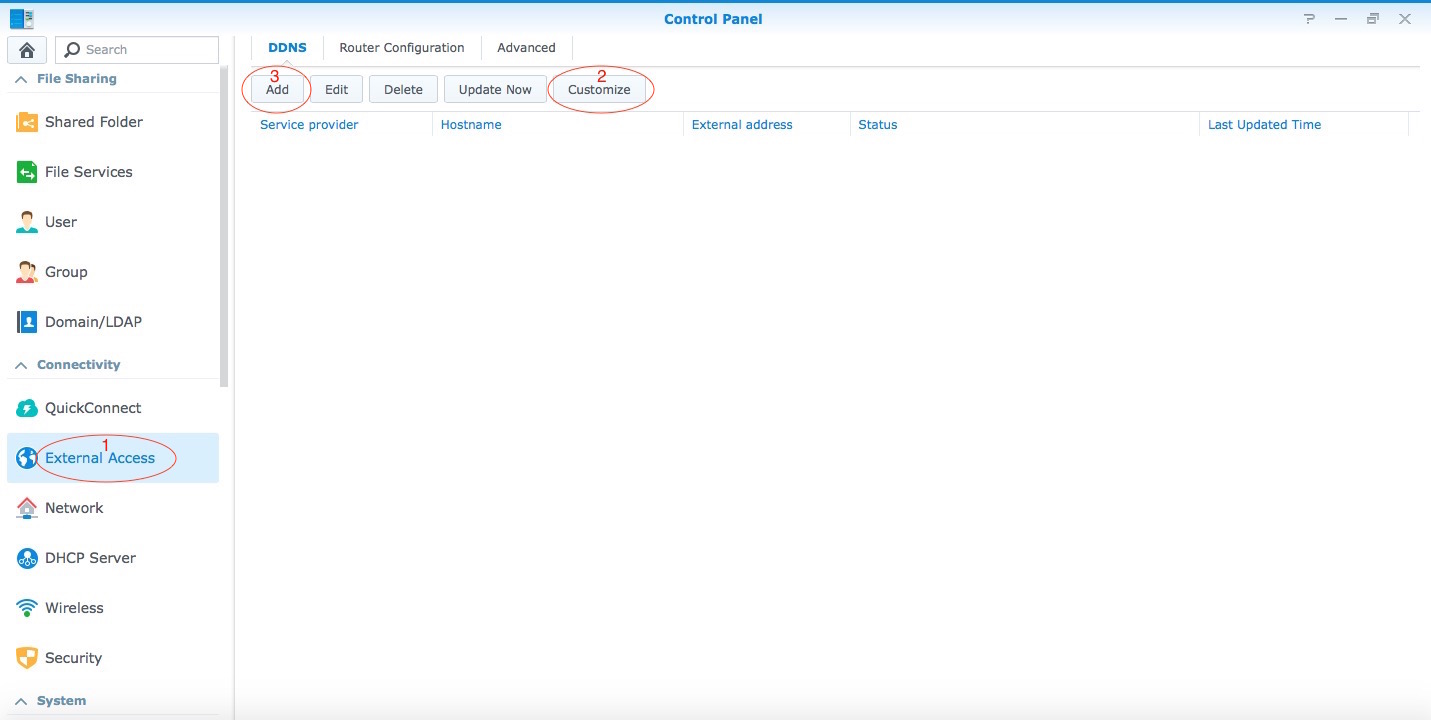
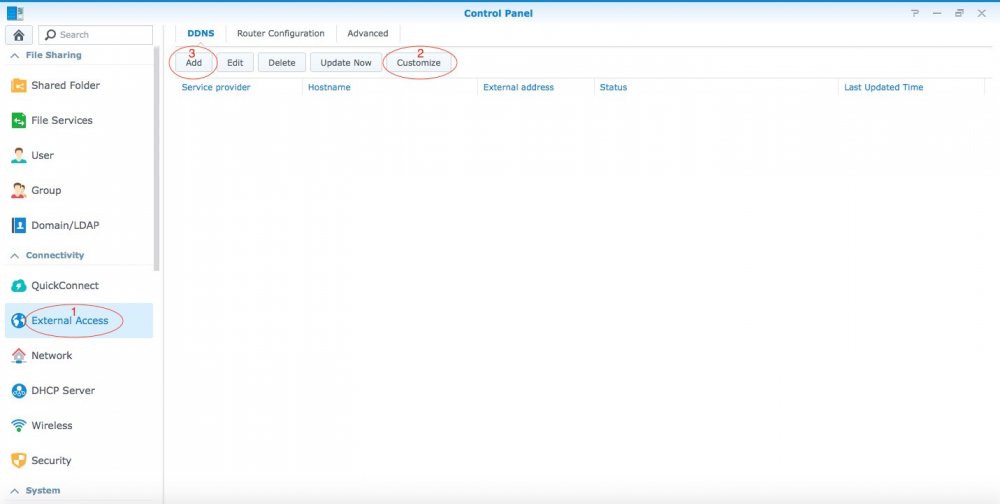
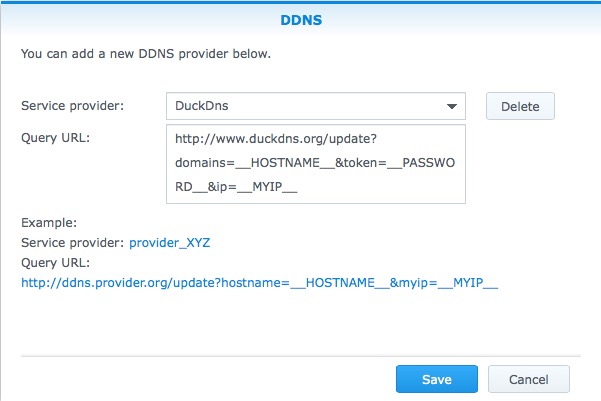
If you have a dynamic IP, you will need to setup a DDNS to access your NAS from outside your local network. So to start thing off you will need to open an account with a DDNS service provider. There are plenty out there, some paid, some free. The two below are the ones that I use personally. They are free. If you find others then you should also be able to use those. Some of these providers might already be part of the list included by Synology in which case you can skip the 'Customize' button and simply use the 'Add' button and select your service provider from there. The configuration example I am giving below will be based on duckdns.org because it's the easiest I have seen out there but unfortunately it is not included in the DDNS service providers list included by Synology so you will need to use the 'Customize' button first. - http://www.duckdns.org - http://www.nsupdate.info Once you have chosen your domain with duckdns.org you will need to configure DSM accordingly. So here is how to: In Control Panel go to External Access (1), then click on Customize (2). A new window should open. You need to fill in as per the image. To save you some time you can copy paste from the code tag provided below the image: http://www.duckdns.org/update?domains=__HOSTNAME__&token=__PASSWORD__&ip=__MYIP__ When you are done click Save. The window should close. Now click on Add (3), see first image. A new window should open. Select *DuckDns from the service provider list and fill in your duckdns domain, username and token: Click on Test Connection to verify that it's working. If it is working you should see the word Normal in green next to Status. You can then click Ok. If it is not working then it means you screwed up somewhere. Recheck query URL, domain, username and token. All that is left to do is to configure port forwarding on your router. This is called at times "port forwarding" or "port mapping". You need to check with your router's user guide as sometimes the wording differs from one brand to the other. The port(s) you will be forwarding to your box also need to be opened on DSM's firewall else DSM will refuse access to the port/service requested. If your ISP implements double NAT you might have to do some additional configuration to your router to allow the ports to be forwarded correctly. Check with your ISP first and also check this site or this site on how to overcome double NAT. Google is your friend. Note of caution here: If you want to make things very safe you would only port forward VPN ports. This means that you can only access your box via VPN which in turn then gives you full access to the box (and to your local network if configured accordingly) once a VPN connection is established. You could also port forward the GUI ports (usually 5000/5001 or the ones you would have customised). This would give you full GUI access to DSM from outside of your network but this can be unsafe specially if you don't have a strong password and proper firewall and safety mechanisms configured in DSM. You could also just forward the port(s)/service(s) that you need. It really all depends what you are using your box for but in most cases the VPN solution is the safest although not the most convenient. NEVER EVER port forward port 22 unless you know exactly what you are doing. To test that your box is accessible from the outside world while being at home you could use your smart phone in data mode (not in wifi) at the following address: http://[yourdomain].duckdns.org:[port number] or https://[yourdomain].duckdns.org:[port number] - Do no put www

- 49 replies
-
- 15
-
-
-
After fiddling with it for a day, and getting it to work, I thought it would be nice to share the knowledge, especially since "officially" only ESXi is supported, and ESXi is picky about supporting stuff... The main reason for me to move to a hypervisor was because Synology has not yet introduced NVMe support AT ALL. And even with a kernel driver, the Storage Manager will not see it as an SSD, as an HDD, or anything. Synology is silent about this, even though some have requested it on their forums (although they do not have a model with M.2 NVMe connector yet, they have some models with full sized x16 or x4 PCIe ports, which can be used with an adapter card for NVMe). So I decided to try with a hypervisor. On one hand it makes installation easier, upgrading also, and I don't need a display connected (since most hypervisors provide a VNC connection to the guest OS). On the other hand, I can install the measly 2-3GB hypervisor and all the tools on the NVMe SSD, and have the rest mounted as a VMDK (or any other virtual disk file). The rest of the hard drives would use passthrough of course. I fiddled around with multiple options. XenServer simply refused to boot in UEFI mode, ESXi does not support my network adapter, or my built-in SATA controller (B250 chipset), Microsoft's Hyper-V server has issues if you do not have a domain server on the network, also as soon as the display output goes off, the device drops network connection. It left me with Proxmox. Never used it, and during installation I had some issues with the bootloader (both on 4.4 release and 5.0 beta). Luckily there's a workaround, since it is based on Debian, one can use the Debian netinst image, create a very basic system, and install Proxmox on top. I won't bore you with the details, there are enough guides about installing it to make me think twice before I write an (n+1)th version. So let's begin! Requirements: A working install of Proxmox 5.0 - it can be 4.4 too, but I only tested this on 5.0. Follow the guide to create the bridged network interface! The loader you wish to use. I recommend Jun's Loader, specifically 1.02a2 at the time of the writing of this guide. Steps: 0. Edit the loader (if needed) to your liking - MAC address, serial number, etc. This is especially important if you have multiple XPE systems on the same network. 1. Create a new VM in Proxmox. 1.1 Set the name, and make sure to note down the VM ID (if it is your first VM, it should be 100). I'll be using {VM_ID} as a placeholder from now on. 1.2 OS type should be "Linux 4.x/3.x/2.6 Kernel". 1.3 Set the CD/DVD to "Do not use media" (we will remove the virtual disk drive any way later on). 1.4 For the HDD, you should create a new virtual disk with the format of your liking (qcow2, vmdk or raw), this will be the initial drive. I made sure that it uses nearly the whole storage of the OS drive it was installed on (in my case it was a 256GB NVMe SSD, which, after setup and partitioning, resulted in a 226GiB root drive, of which I had 211GB free, so I set the virtual disk's size to 200GB). You can set it to any kind of bus, EXCEPT VirtIO. With VirtIO I had performance issues, so I went with SCSI (it supports up to 12 devices any way, so it is better). This is for the virtual disk only, VirtIO works just fine with passthrough devices. So apart from the bus, size and format, you don't need to touch a thing. 1.5 For CPU, set kvm64 with as many cores as your host has (incl. virtual cores if you're on a HyperThreading supported CPU!). In my case with the Intel G4560 this is 4. 1.6 For RAM, you should leave some slack for the host OS, I went with 7.5GB from the 8GB I have. Ballooning is not required. 1.7 Networking. This is where many things can go wrong. The VirtIO paravirtualized network adapter should work, but to be safe I went with the Intel E1000. On the left select Bridged Mode, with the previously created bridge as the first choice. You can also enable Firewall if you do not trust Syno's own. Leave the rest of the settings as default. 1.8 On the Confirm page, confirm your settings and create the VM. 2. After the VM is created, first thing to do is to remove the virtual disk drive (IDE 2, if everything went right). Then comes the hard part. 3. You have to add each and every HDD to the config file that you want to use for passthrough. The command is simple: qm set {VM_ID} -[protocol][port] /dev/disk/by-id/[disk-id] The {VM_ID} part is obvious, but what about the rest? [protocol] is the connection protocol you want to use. This can be sata, ide, scsi or virtio. I'm using SATA here, but you can use anything (IDE is not IDEal for us). SATA supports up to 6 devices (port indexes 0-6), scsi supports up to 12 devices, and virtio does not have a limitation to my knowledge. [port] is the first unused port of said protocol. E.g. if you set the initial disk during setup to SATA0, and you want to use SATA further here, you have to start numbering from 1. [disk-id] is the unique identifier of your HDD. Go to /dev/disk/by-id/ and list the disks you see. For most SATA devices, you'll see entries like "ata-[MANUFACTURER]_[MODEL]_[sERIAL]". So let's say I have 4 disks, with the disk-id's ata-1, ata-2, ata-3, and ata-4 (yours will be a lot longer, but don't worry, you can use the bash autocomplete with the tab key). For this to work I execute the following commands: qm set 100 -sata1 /dev/disk/by-id/ata-1 qm set 100 -sata2 /dev/disk/by-id/ata-2 qm set 100 -sata3 /dev/disk/by-id/ata-3 qm set 100 -sata4 /dev/disk/by-id/ata-4 Of course later on you can add further HDDs to a VM config by using the same command, just keep in mind the limitations of the protocols. 4. Now comes the hard part, we'll have to add the bootloader image file to the config. The config file is located under /etc/pve/qemu-server/, and is named {VM_ID}.conf. Open it with nano. This config file defines everything about the VM. Disks to mount, which device to use for booting, RAM amount, CPU cores, name of the VM, et cetera. Don't touch anything else than the lines you see here! Copy the synoboot.img to somewhere on your server. If you want to be consistent with the Proxmox setup, copy it under /var/lib/vz/images/{VM_ID}/ - you'll need root for that. After that, come back to the conf file, and open it again. You'll enter a few things here, make sure you pay attention! Enter the following line into the conf file, and make sure you replace the parts in the path! args: -device 'piix3-usb-uhci,addr=0x18' -drive 'id=synoboot,file=/var/lib/vz/images/{VM_ID}/synoboot.img,if=none,format=raw' -device 'usb-storage,id=synoboot,drive=synoboot' Make sure to replace the path to the synoboot.img with your own! One more thing to edit here, the boot device. Find the line that begins with "boot: " and replace it so it looks like this: boot: synoboot Save the file, then start the VM. It should start up without an issue, and you'll be able to use find.synology.com to find your server and install it.
-

Tutorial: DSM 6.2 on VMWare Workstation Player 15
WhileDekker posted a topic in Tutorials and Guides
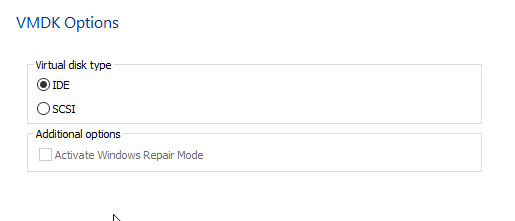
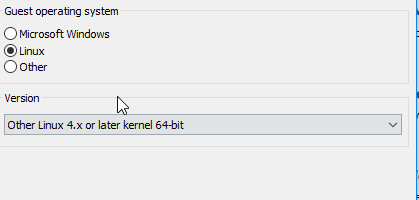
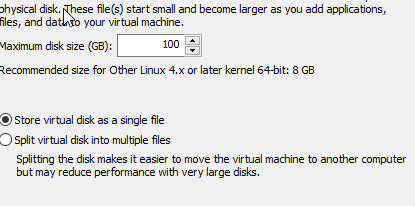
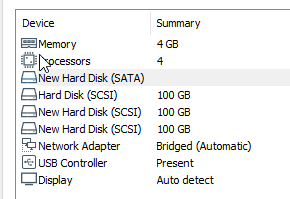
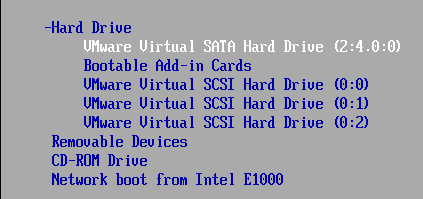
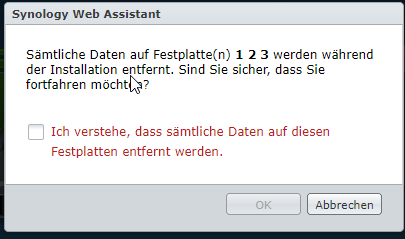
Hi this is how I managed to get DSM 6.2 running on the free VMWare Workstation Player 15. I know there are other tutorials for VMWare Workstation Pro and the procedure is quite similar. Following on of these tutorials (https://xpenology.com/forum/topic/13006-tutorial-vmware-workstation-dsm-62-install-esxi-compatible) brought me very close to my goal but still I had to do some try and error, therefore I am sharing my piece of the cake here. Please note: This is how I made it work, dont blame me if this is not working for you. 1. Loader Download Jun's Loader v1.03b DS3617xs Synoboot_3617.zip | 19.5 MB | MD5 = 94d18efbc349da2bd45d6e57adabc54f 2. Convert Loader img to vmdk with Starwind V2V Image Converter (free) 3. Run the "new vm wizzard" on VMWare Workstation Player The wizzard always creates a data hd, you can use this as your first data hd or delete it later. Finish the wizard Now edit the virtual machine settings This is what I do usually - Change cpu and ram to 4/4 - remove cd, soundcard, printer - change LAN to bridged - add x more scsi hds (same settings as when using the wizard) Copy the two vmdk files from the conversion above and add as a SATA hd (select the 1k file) and select keep existing format This is how my setup looks after that Power up the vm and you will realize it doesnt boot – change bios boot order and after saving select VMWare while booting (you need to be real quick this is only showing for some secs). Find your ds via find.synology.com and run installation as usual (I downloaded latest 6.2. using the link on xpenology to be sure to use a supported version). When the HD erase notification appears it should show you all your data hds you added – I added 1 boot hd and 3 data hds so 3 hds should be shown. Takeaways: - I was using an old version of Starwind V2V converter, this converted the image but apparently sth was different and it didnt really boot up correctly (no LAN). - When configuring the synoboot as scsi I was not able to connect to my nas (didnt get an IP from DHCP) - I had to select VMWare/ESXi on boot otherwise no data hd was shown during installation and dsm installation failed - I tried the same with DS918+, but this got me into a installation loop - Tested upgrade to 6.2.1. after that ds was broken – I guess the loader is not ready for it yet – so make sure auto update is disabled Again, this is just my thoughts and how I managed it. Maybe things in this are wrong or understood wrong by me - but at least this is how I managed to get it running. Cheers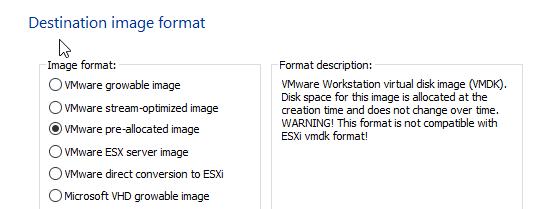


- 14 replies
-
- 1
-
-
- workstation player
- vmware
- (and 3 more)
-
I have a question regarding models. Running baremetal: DS3617XS 1.0.2b and 6.1.3 15152 Update1 Before I had ds3615xs installed. I migrated to ds3617xs becouse of my 2X Xeon prosessors. (2 X 2.16 quad) The thing i found out is that synocomunity and others dont support ds3617xs with their packages. I run Docker for some of these packages, but should I, or not, migrate back to ds3615xs with my prosessors in mind? Another thing that occured is that my 12Gb ram, was reduced to 8Gb ram after migrating to ds3617xs. That might be hardware fault, not sure. Thank you.
-
Can anyone link me to a PCIe Gigabit NIC that they have confirmed working on Jun's DSM6.1? Ordered an Intel nic on amazon, of course it was too old (used e1000e). Looking to buy one that I know will work. Thanks! Currently using an AR8151 on DSM5.2, but it doesn't seem to be working with Jun's loader.