Search the Community
Showing results for tags 'proxmox'.
-
Hi folks, Let me first introduce a bit: Years ago I managed to set up a Xpenology server on some random hardware. At that time it was what is called bare metal I guess. Long story short, some 5 or 6 years later we have moved to our new home and the Xpenology server has died somewhere along the road. (Not sure, but I think the usb key broke off) Today I'd like to get back on the road with Xpenology again and would like to set it up as a virtual machine on a Proxmox server. Now I have been searching around on youtube and found myriads of related video's and tutorials. The problem is that I can not follow either to a T, I guess because most of the "older" versions of the bootloaders are not available any more. So what have I working: - Proxmox 7.4-17 is up and running - I have created a vm based on DS920+ and have succeeded in loading TinyCore RedPill. I think it is version TinyCoreLinux 12.0 - I can log on to the virtual machine using ssh and terminal - Can use e.g. Transmit to move files to the Proxmox machine (I'm mostly on macOS) As far as I'm aware, I should load a couple of drivers such as virtio and acpid, but that is where I get stuck. For virtio I have tried the following command: virtio ./rploader.sh ext geminilake-7.1.1-42962 add https://raw.githubusercontent.com/pocopico/redpill-load/master/redpill-virtio/rpext-index.json and for acpid the following acpid ./rploader.sh ext geminilake-7.1.1-42962 add https://github.com/pocopico/redpill-load/raw/develop/redpill-acpid/rpext-index.json but all I get is tc@box:~$ ./rploader.sh ext geminilake-7.1.1-42962 add https://raw.githubusercontent.com/pocopico/redpill-load/master/redpill-virtio/rpext-ind ex.json Error : Platform not found : rploader.sh Version : 0.10.0.0 ---------------------------------------------------------------------------------------- Usage: ./rploader.sh <action> <platform version> <static or compile module> [extension manager arguments] Actions: build, ext, download, clean, update, listmods, serialgen, identifyusb, patchdtc, satamap, backup, backuploader, restoreloader, restoresession, mountdsmroot, postupdate, mountshare, version, monitor, bringfriend, downloadupgradepat, help I have tried to work out what these commands will do but my conclusion is that somehow I use a wrong syntax? How do I solve or circumvent this? Error : Platform not found : If I enter ./rploader.sh listmods ds920p-7.1.1-42962 this is what I get: tc@box:~$ ./rploader.sh listmods ds920p-7.1.1-42962 Rploader Version : 0.10.0.0 Loader source : https://github.com/pocopico/redpill-load.git Loader Branch : develop Redpill module source : https://github.com/pocopico/redpill-lkm.git : Redpill module branch : master Extensions : all-modules eudev disks misc Extensions URL : "https://github.com/pocopico/tcrp-addons/raw/main/all-modules/rpext-index.json", "https://github.com/pocopico/tcrp-addons/raw/main/eudev/rpext-index.json", "https://github.com/pocopico/tcrp-addons/raw/main/disks/rpext-index.json", "https://github.com/pocopico/tcrp-addons/raw/main/misc/rpext-index.json" TOOLKIT_URL : https://sourceforge.net/projects/dsgpl/files/toolkit/DSM7.0/ds.bromolow-7.0.dev.txz/download TOOLKIT_SHA : a5fbc3019ae8787988c2e64191549bfc665a5a9a4cdddb5ee44c10a48ff96cdd SYNOKERNEL_URL : https://sourceforge.net/projects/dsgpl/files/Synology%20NAS%20GPL%20Source/25426branch/bromolow-source/linux-3.10.x.txz/download SYNOKERNEL_SHA : 18aecead760526d652a731121d5b8eae5d6e45087efede0da057413af0b489ed COMPILE_METHOD : toolkit_dev TARGET_PLATFORM : ds920p TARGET_VERSION : 7.1.1 TARGET_REVISION : 42962 REDPILL_LKM_MAKE_TARGET : dev-v7 KERNEL_MAJOR : 4 MODULE_ALIAS_FILE : modules.alias.4.json SYNOMODEL : ds920p_42962 MODEL : DS920+ Local Cache Folder : /mnt/sda3/auxfiles DATE Internet : 04032024 Local : 04032024 Checking Internet Access -> OK Cloning into 'redpill-lkm'... remote: Enumerating objects: 1731, done. remote: Counting objects: 100% (601/601), done. remote: Compressing objects: 100% (114/114), done. remote: Total 1731 (delta 522), reused 487 (delta 487), pack-reused 1130 Receiving objects: 100% (1731/1731), 5.84 MiB | 7.69 MiB/s, done. Resolving deltas: 100% (1067/1067), done. Cloning into 'redpill-load'... remote: Enumerating objects: 5219, done. remote: Counting objects: 100% (65/65), done. remote: Compressing objects: 100% (44/44), done. remote: Total 5219 (delta 36), reused 45 (delta 21), pack-reused 5154 Receiving objects: 100% (5219/5219), 129.18 MiB | 14.32 MiB/s, done. Resolving deltas: 100% (2656/2656), done. Testing modules.alias.4.json -> File OK ------------------------------------------------------------------------------------------------ It looks that you will need the following modules : Found IDE Controller : pciid 8086d00007010 Required Extension : ata_piix Searching for matching extension for ata_piix Found VGA Controller : pciid 1234d00001111 Required Extension : No matching extension Found SATA Controller : pciid 8086d00002922 Required Extension : ahci Searching for matching extension for ahci Found Ethernet Interface : pciid 1af4d00001000 Required Extension : No matching extension ------------------------------------------------------------------------------------------------ tc@box:~$ I would be extremely grateful if someone could help me out or point to an up to date tutorial? Thanks a ton!
-
 As in the title, does anyone compile the spk of qemu-ga to respond power-on/off request from pve? on DSM 7.1.1-42962 Update 3 DS3622xs+ Pve version:7.3-4 Bootloader: ARPL v1.0 Beta10 with acpi plugins
 -
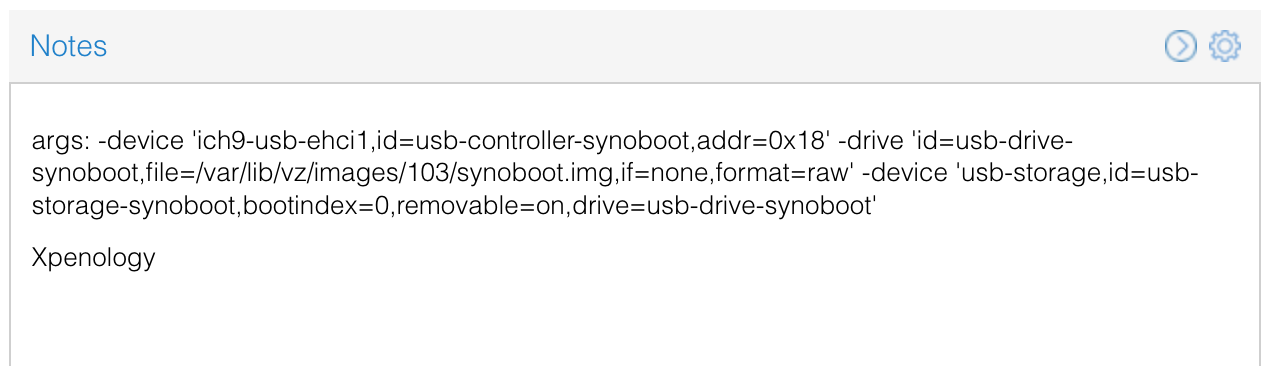
Мой вариант установки, пояснения в видео # set vm id vm=100 url=https://github.com/fbelavenuto/arpl/releases/download/v1.1-beta2a/arpl-1.1-beta2a.img.zip # download & uncomporess wget ${url} -O arpl.img.zip unzip -qo arpl.img.zip # create disk for sata1 pvesm alloc local-zfs ${vm} vm-${vm}-disk-1 32G # create vm qm create ${vm} \ --name dsm --ostype l26 --machine q35 \ --cores 2 --memory 4096 --numa 0 --sockets 1 \ --net0 virtio,bridge=vmbr0\ --boot order=sata0 --scsihw virtio-scsi-pci \ --sata0 local-zfs:0,import-from=/root/arpl.img,cache=writeback \ --sata1 local-zfs:vm-${vm}-disk-1,cache=writeback,size=32G # remove trash rm arpl.img arpl.img.zip # star vm qm start ${vm} # loader web interface # http://ip:7681/ # NAS web interface # http://ip:5000/ # прокинуть диски в виртуальную машину # lsblk # qm set 100 -sata2 /dev/sdc # qm set 100 -sata3 /dev/sdd # Репозиторий сообщества # https://synopackage.com/repository/spk/All # https://packages.synocommunity.com/
-
hi, im going to build a nas with the topton n6005 board and im wondering if it would be better to install xpenology with proxmox or on baremetal. any suggestions here?
-
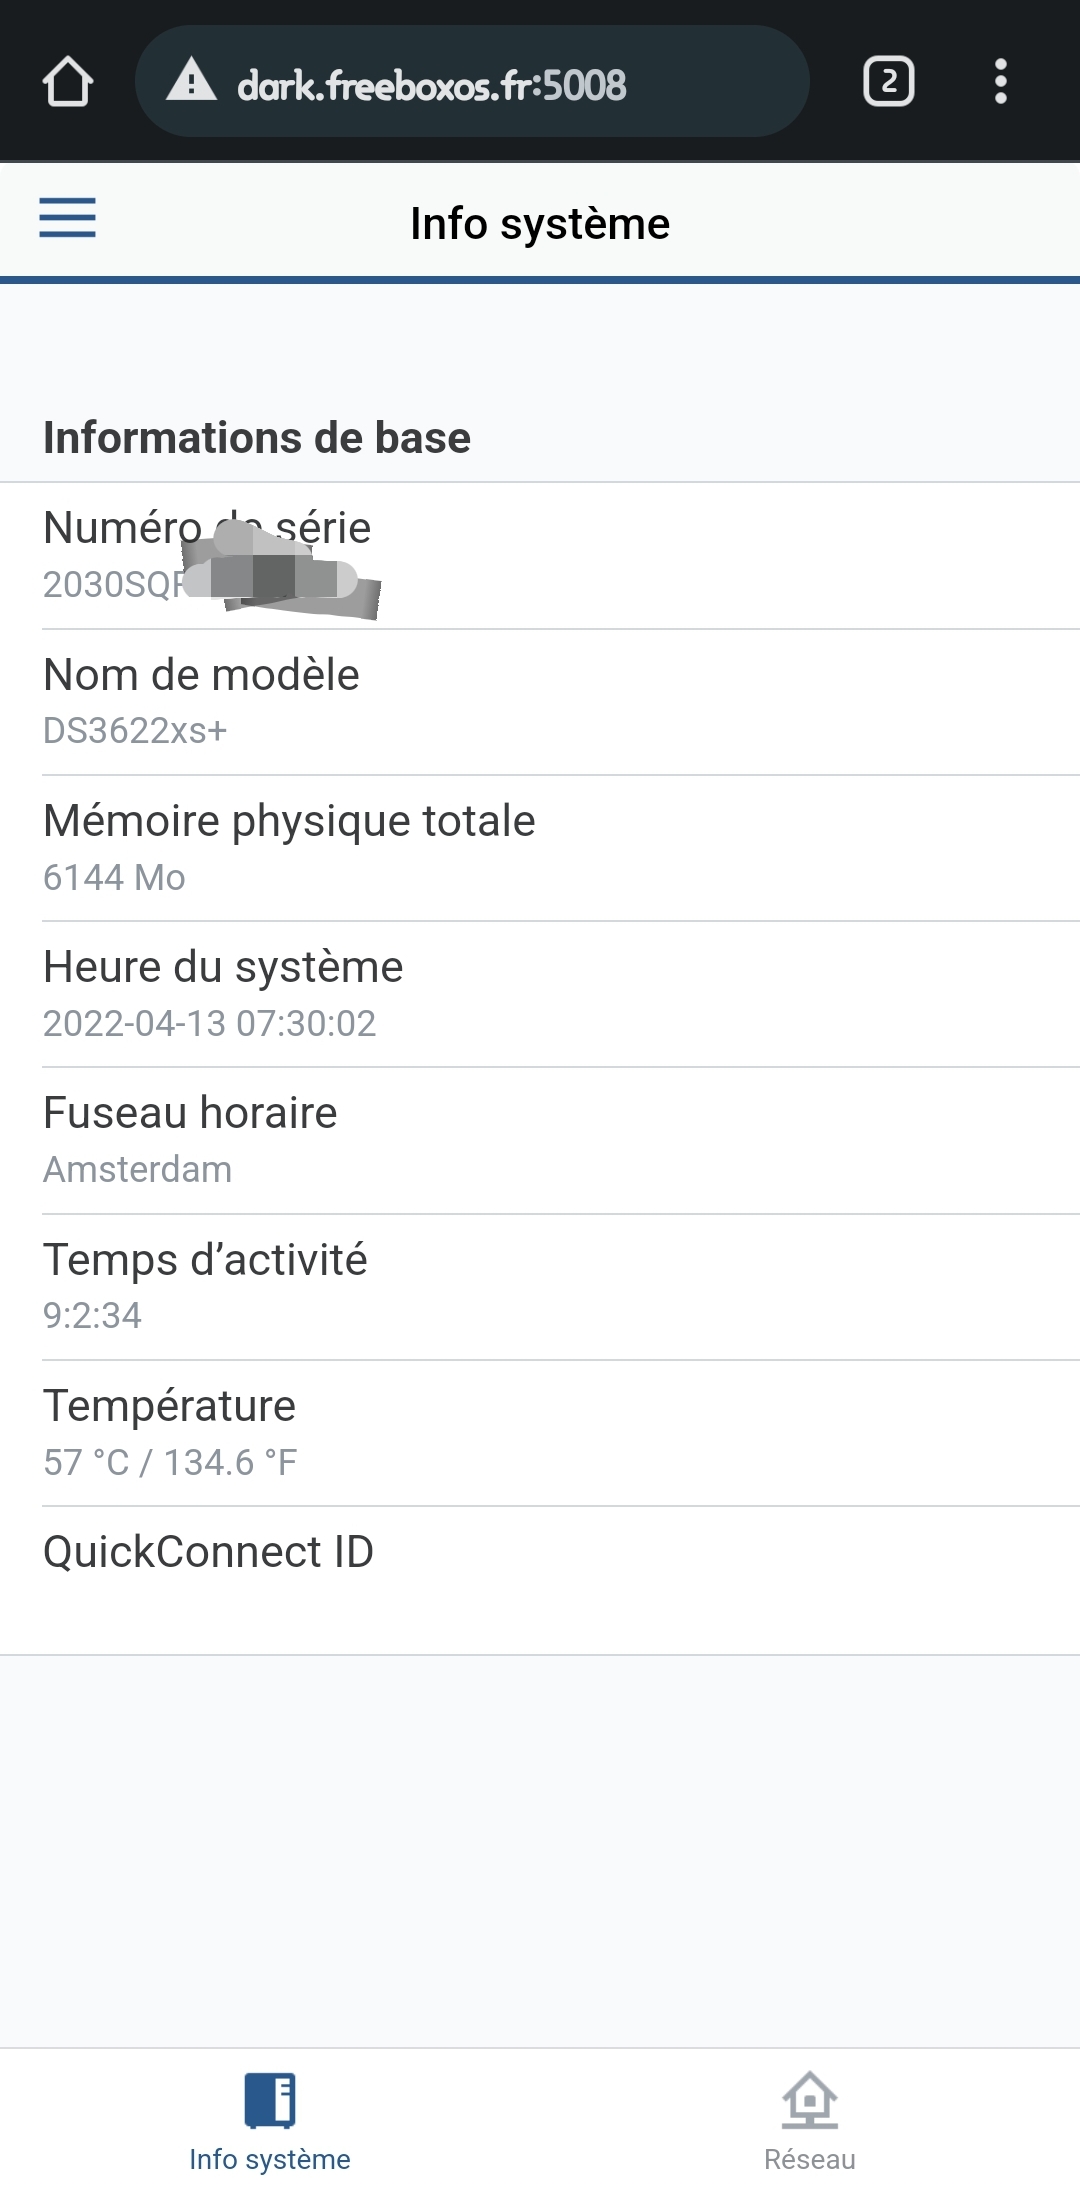
uname -a Linux DVA3221 4.4.180+ #42962 SMP Mon May 29 14:37:35 CST 2023 x86_64 GNU/Linux synology_denverton_dva3221 running as a VM on PVE 8.03 with gpu passthrough. Works great. Is it possible to install the QEMU Guest Agent on the DVA3221?
-
 I'm getting the following error messages from dmesg everytime DSM puts the HDDs to hibernation. I'm running ds918+ Redpill Tinycore DSM 7.0.1-42218 Update 2. Tips? kern :warn : [Mon Jun 27 13:02:38 2022] No such hdd enable pin. Index: 5 kern :warn : [Mon Jun 27 13:02:38 2022] ------------[ cut here ]------------ kern :warn : [Mon Jun 27 13:02:38 2022] WARNING: CPU: 1 PID: 4086 at drivers/ata/libata-core.c:453 SYNO_CTRL_HDD_POWERON+0x4f/0x60() kern :warn : [Mon Jun 27 13:02:38 2022] Modules linked in: cmac cifs tun nf_conntrack_ipv6 nf_defrag_ipv6 ip6table_filter ip6_tables ipt_MASQUERADE xt_REDIRECT nf_nat_masquerade_ipv4 xt_nat iptable_nat nf_nat_ipv4 nf_nat_redirect nf_nat xt_recent xt_iprange xt_limit xt_state xt_tcpudp xt_multiport xt_LOG nf_conntrack_ipv4 nf_defrag_ipv4 nf_conntrack iptable_filter ip_tables x_tables fuse 8021q vfat fat udf isofs loop vhost_scsi(O) vhost(O) tcm_loop(O) iscsi_target_mod(O) target_core_user(O) target_core_ep(O) target_core_multi_file(O) target_core_file(O) target_core_iblock(O) target_core_mod(O) syno_extent_pool(PO) rodsp_ep(O) synoacl_vfs(PO) raid456 async_raid6_recov async_memcpy async_pq async_xor async_tx nfsd btrfs ecryptfs zstd_decompress zstd_compress xxhash xor raid6_pq lockd grace rpcsec_gss_krb5 auth_rpcgss sunrpc aesni_intel kern :warn : [Mon Jun 27 13:02:38 2022] glue_helper lrw gf128mul ablk_helper apollolake_synobios(PO) hid_generic usbhid hid usblp i915 drm_kms_helper syscopyarea sysfillrect sysimgblt fb_sys_fops cfbfillrect cfbcopyarea cfbimgblt drm drm_panel_orientation_quirks iosf_mbi fb fbdev video backlight button uhci_hcd ehci_pci ehci_hcd r8168(O) i2c_algo_bit zram igb(O) e1000e(O) sg dm_snapshot dm_bufio crc_itu_t crc_ccitt psnap p8022 llc hfsplus md4 hmac sit tunnel4 ipv6 flashcache_syno(O) flashcache(O) syno_flashcache_control(O) dm_mod arc4 crc32c_intel cryptd sha256_generic ecb aes_x86_64 authenc des_generic ansi_cprng cts md5 cbc cpufreq_powersave cpufreq_performance processor cpufreq_stats vxlan ip6_udp_tunnel udp_tunnel ip_tunnel etxhci_hcd virtio_scsi(OE) virtio_net(OE) virtio_blk(OE) virtio_pci(OE) virtio_mmio(OE) virtio_ring(OE) kern :warn : [Mon Jun 27 13:02:38 2022] virtio(OE) usb_storage xhci_pci xhci_hcd usbcore usb_common [last unloaded: apollolake_synobios] kern :warn : [Mon Jun 27 13:02:38 2022] CPU: 1 PID: 4086 Comm: scsi_eh_10 Tainted: P W OE 4.4.180+ #42218 kern :warn : [Mon Jun 27 13:02:38 2022] Hardware name: QEMU Standard PC (Q35 + ICH9, 2009), BIOS rel-1.14.0-0-g155821a1990b-prebuilt.qemu.org 04/01/2014 kern :warn : [Mon Jun 27 13:02:38 2022] 0000000000000000 ffff88017830bcb0 ffffffff812ef89d 0000000000000009 kern :warn : [Mon Jun 27 13:02:38 2022] 0000000000000000 ffff88017830bce8 ffffffff8105255f 0000000000000bb8 kern :warn : [Mon Jun 27 13:02:38 2022] 0000000000000000 0000000000000001 ffff880178978000 0000000000000000 kern :warn : [Mon Jun 27 13:02:38 2022] Call Trace: kern :warn : [Mon Jun 27 13:02:38 2022] [<ffffffff812ef89d>] dump_stack+0x4d/0x70 kern :warn : [Mon Jun 27 13:02:38 2022] [<ffffffff8105255f>] warn_slowpath_common+0x7f/0xb0 kern :warn : [Mon Jun 27 13:02:38 2022] [<ffffffff81052646>] warn_slowpath_null+0x16/0x20 kern :warn : [Mon Jun 27 13:02:38 2022] [<ffffffff8141dcdf>] SYNO_CTRL_HDD_POWERON+0x4f/0x60 kern :warn : [Mon Jun 27 13:02:38 2022] [<ffffffff8142e825>] syno_libata_port_power_ctl+0xc5/0x1a0 kern :warn : [Mon Jun 27 13:02:38 2022] [<ffffffff8142f7c7>] syno_libata_set_deep_sleep+0x2b7/0x9c0 kern :warn : [Mon Jun 27 13:02:38 2022] [<ffffffff81436ee3>] ata_scsi_port_error_handler+0x133/0x1a30 kern :warn : [Mon Jun 27 13:02:38 2022] [<ffffffff8106b0fe>] ? cancel_delayed_work_sync+0xe/0x10 kern :warn : [Mon Jun 27 13:02:38 2022] [<ffffffff81432868>] ? ata_scsi_cmd_error_handler+0x118/0x190 kern :warn : [Mon Jun 27 13:02:38 2022] [<ffffffff8143887b>] ata_scsi_error+0x9b/0xe0 kern :warn : [Mon Jun 27 13:02:38 2022] [<ffffffff813f86f5>] scsi_error_handler+0xa5/0x530 kern :warn : [Mon Jun 27 13:02:38 2022] [<ffffffff81575bcf>] ? __schedule+0x2ef/0x820 kern :warn : [Mon Jun 27 13:02:38 2022] [<ffffffff813f8650>] ? scsi_eh_get_sense+0x170/0x170 kern :warn : [Mon Jun 27 13:02:38 2022] [<ffffffff810700f5>] kthread+0xd5/0xf0 kern :warn : [Mon Jun 27 13:02:38 2022] [<ffffffff81070020>] ? kthread_worker_fn+0x160/0x160 kern :warn : [Mon Jun 27 13:02:38 2022] [<ffffffff81579fef>] ret_from_fork+0x3f/0x80 kern :warn : [Mon Jun 27 13:02:38 2022] [<ffffffff81070020>] ? kthread_worker_fn+0x160/0x160 kern :warn : [Mon Jun 27 13:02:39 2022] ---[ end trace 4d3f8f657722e7be ]--- kern :err : [Mon Jun 27 13:02:42 2022] ata11: wake up successful, the reset fail can be ignored kern :err : [Mon Jun 27 13:02:45 2022] ata10: wake up from deepsleep, reset link now kern :err : [Mon Jun 27 13:02:48 2022] ata10: wake up successful, the reset fail can be ignore
 -
Немножко переделал под себя скрипт из этой темы, вместо загрузчика ARPL использовал ARC LOADER. #установить unzip apt-get install unzip -y # назначить vm id и адрес загрузчика, где vm=(ваш желаемый id), url=(адрес ссылки на актуальную версию загрузчика) vm=100 url=https://github.com/AuxXxilium/arc/releases/download/23.6.36a/arc-23.6.36a.img.zip # загрузить & распоковать wget ${url} -O arc.img.zip unzip -qo arc.img.zip # создать vm, где --name (желаемое имя ВМ), --cores (кол-во ядер ЦП), --memory (кол-во MB оперативки) qm create ${vm} \ --name Synology --ostype l26 --machine q35 \ --cores 12 --memory 8192 --numa 0 --sockets 1 \ --net0 virtio,bridge=vmbr0\ --boot order=sata0 --scsihw virtio-scsi-pci \ --sata0 local-zfs:0,import-from=/root/arc.img,cache=writeback # удалить мусор rm arc.img arc.img.zip # запустить vm qm start ${vm} # loader web interface # http://ip:7681/ # NAS web interface # http://ip:5000/ # прокинуть диски в виртуальную машину # lsblk # qm set 100 -sata2 /dev/sdc # qm set 100 -sata3 /dev/sdd # Репозиторий сообщества # https://synopackage.com/repository/sp... # https://packages.synocommunity.com/ Я не пробрасывал диски в ВМ, а пробросил сразу PCI-E контроллер ASM 1166 c 4 HDD и 2 SDD, это обеспечило прямой доступ к дискам и работу SMART, IOPS выше чем Virtio SCSI.
-
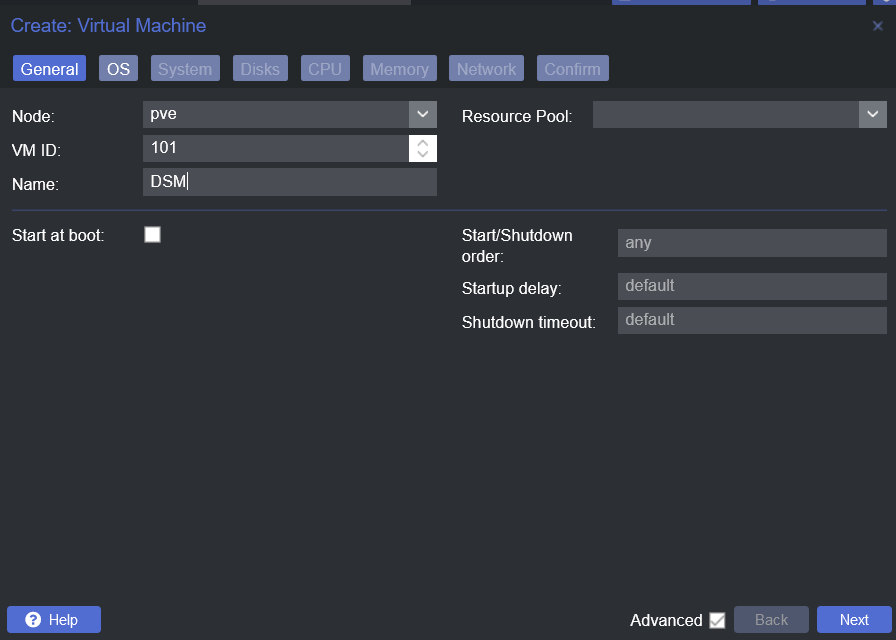
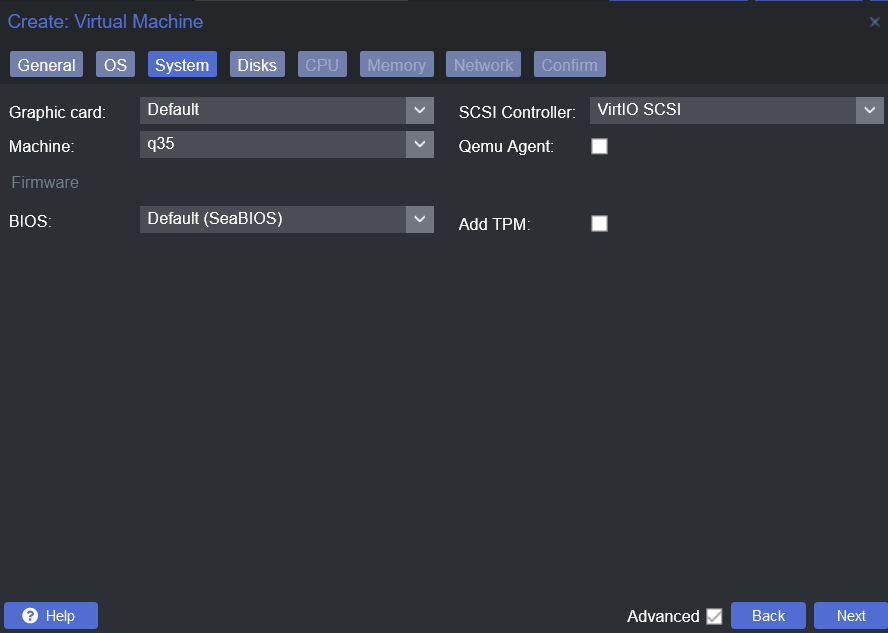
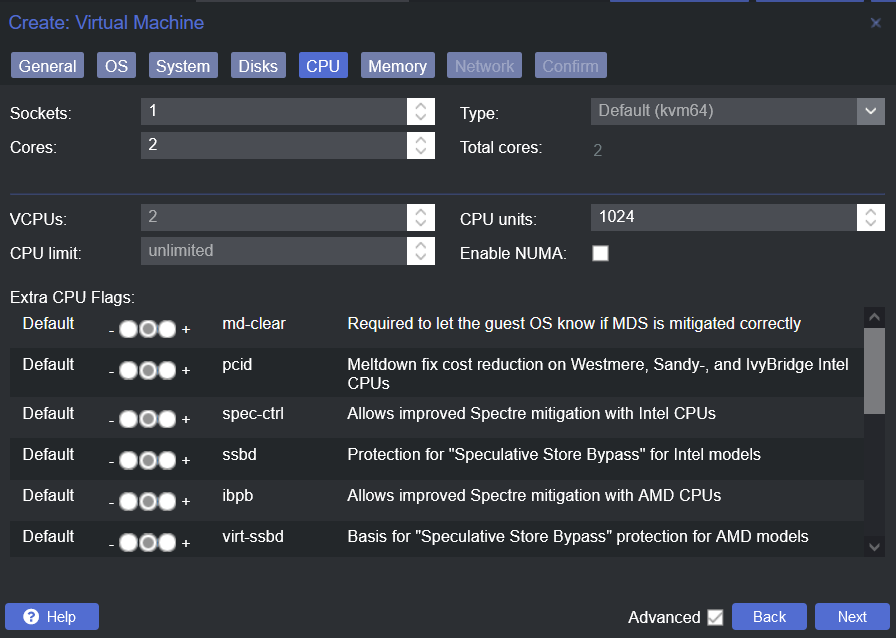
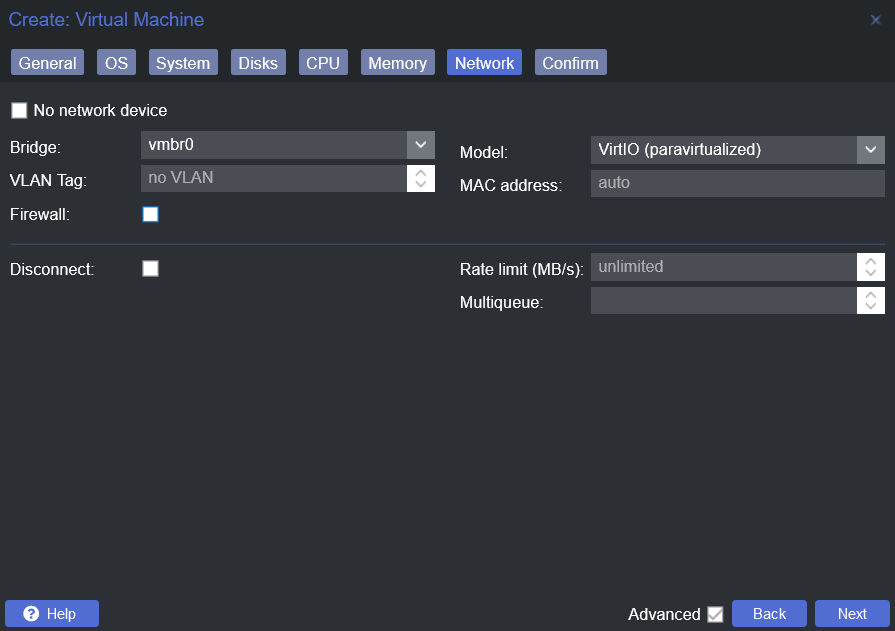
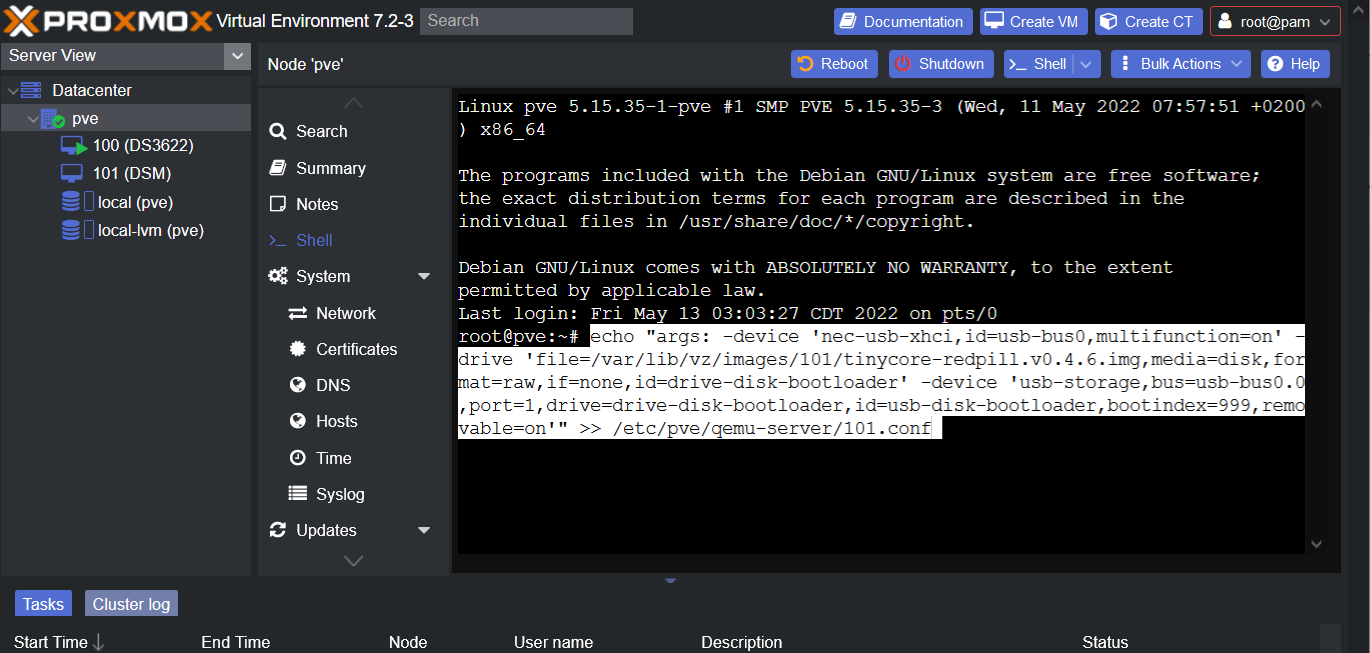
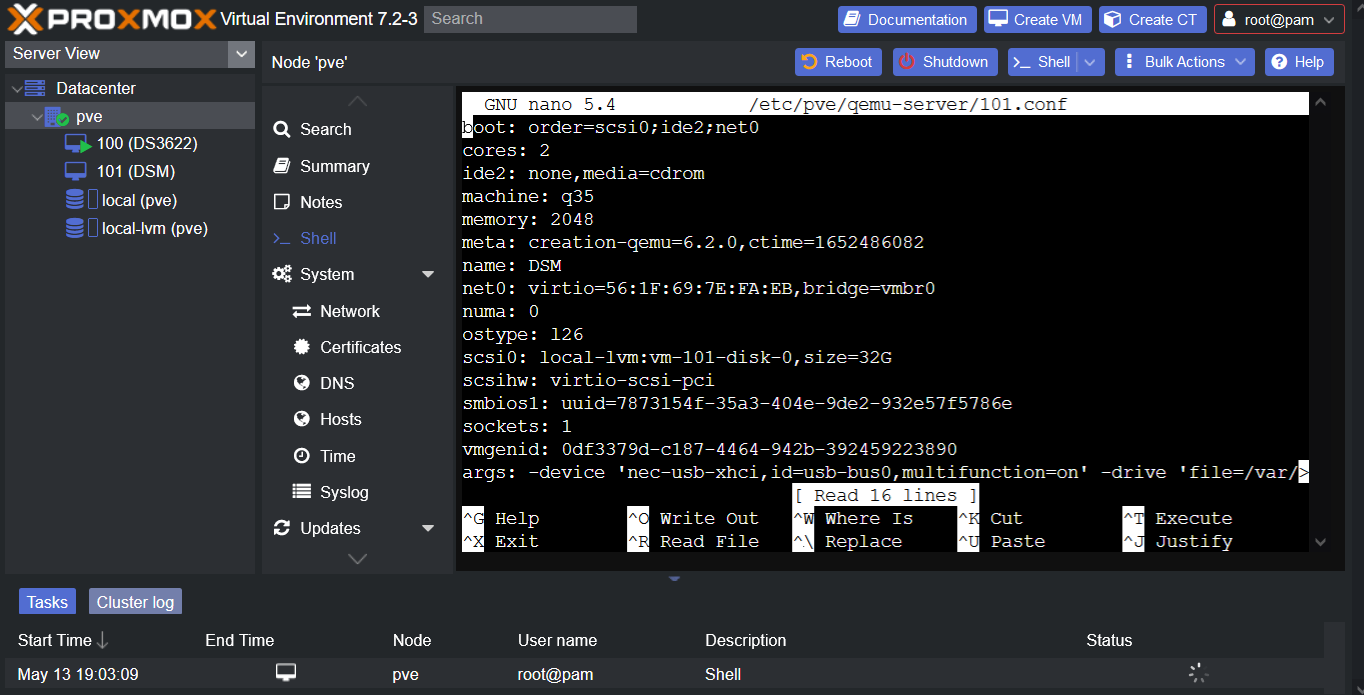
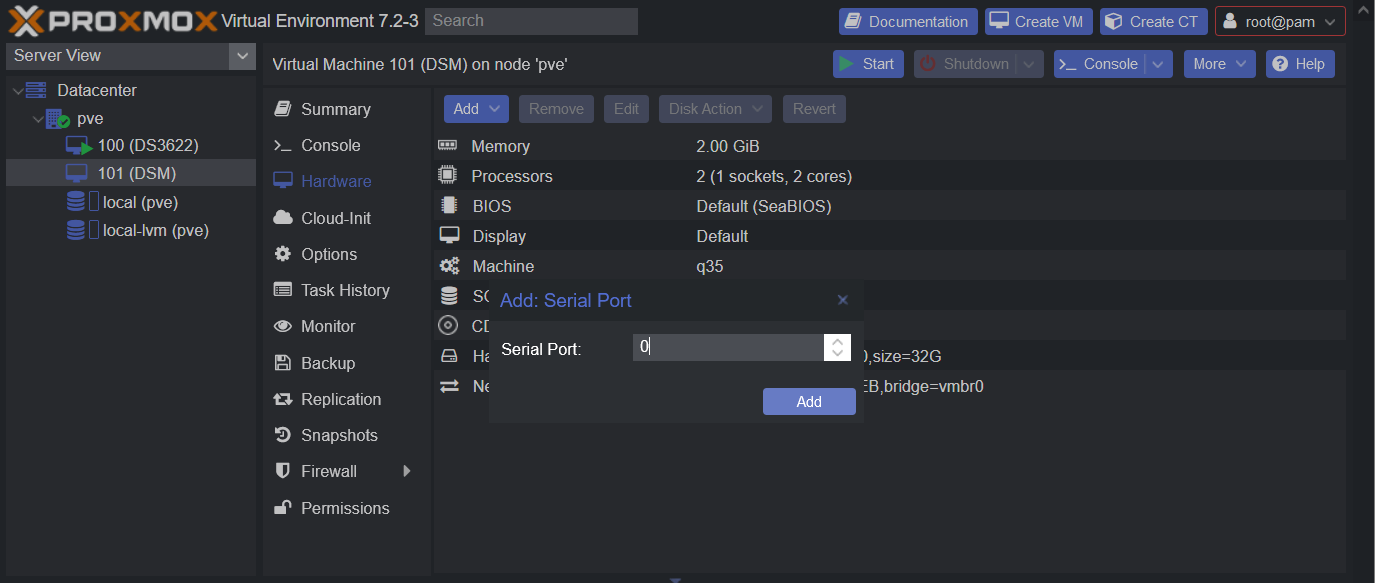
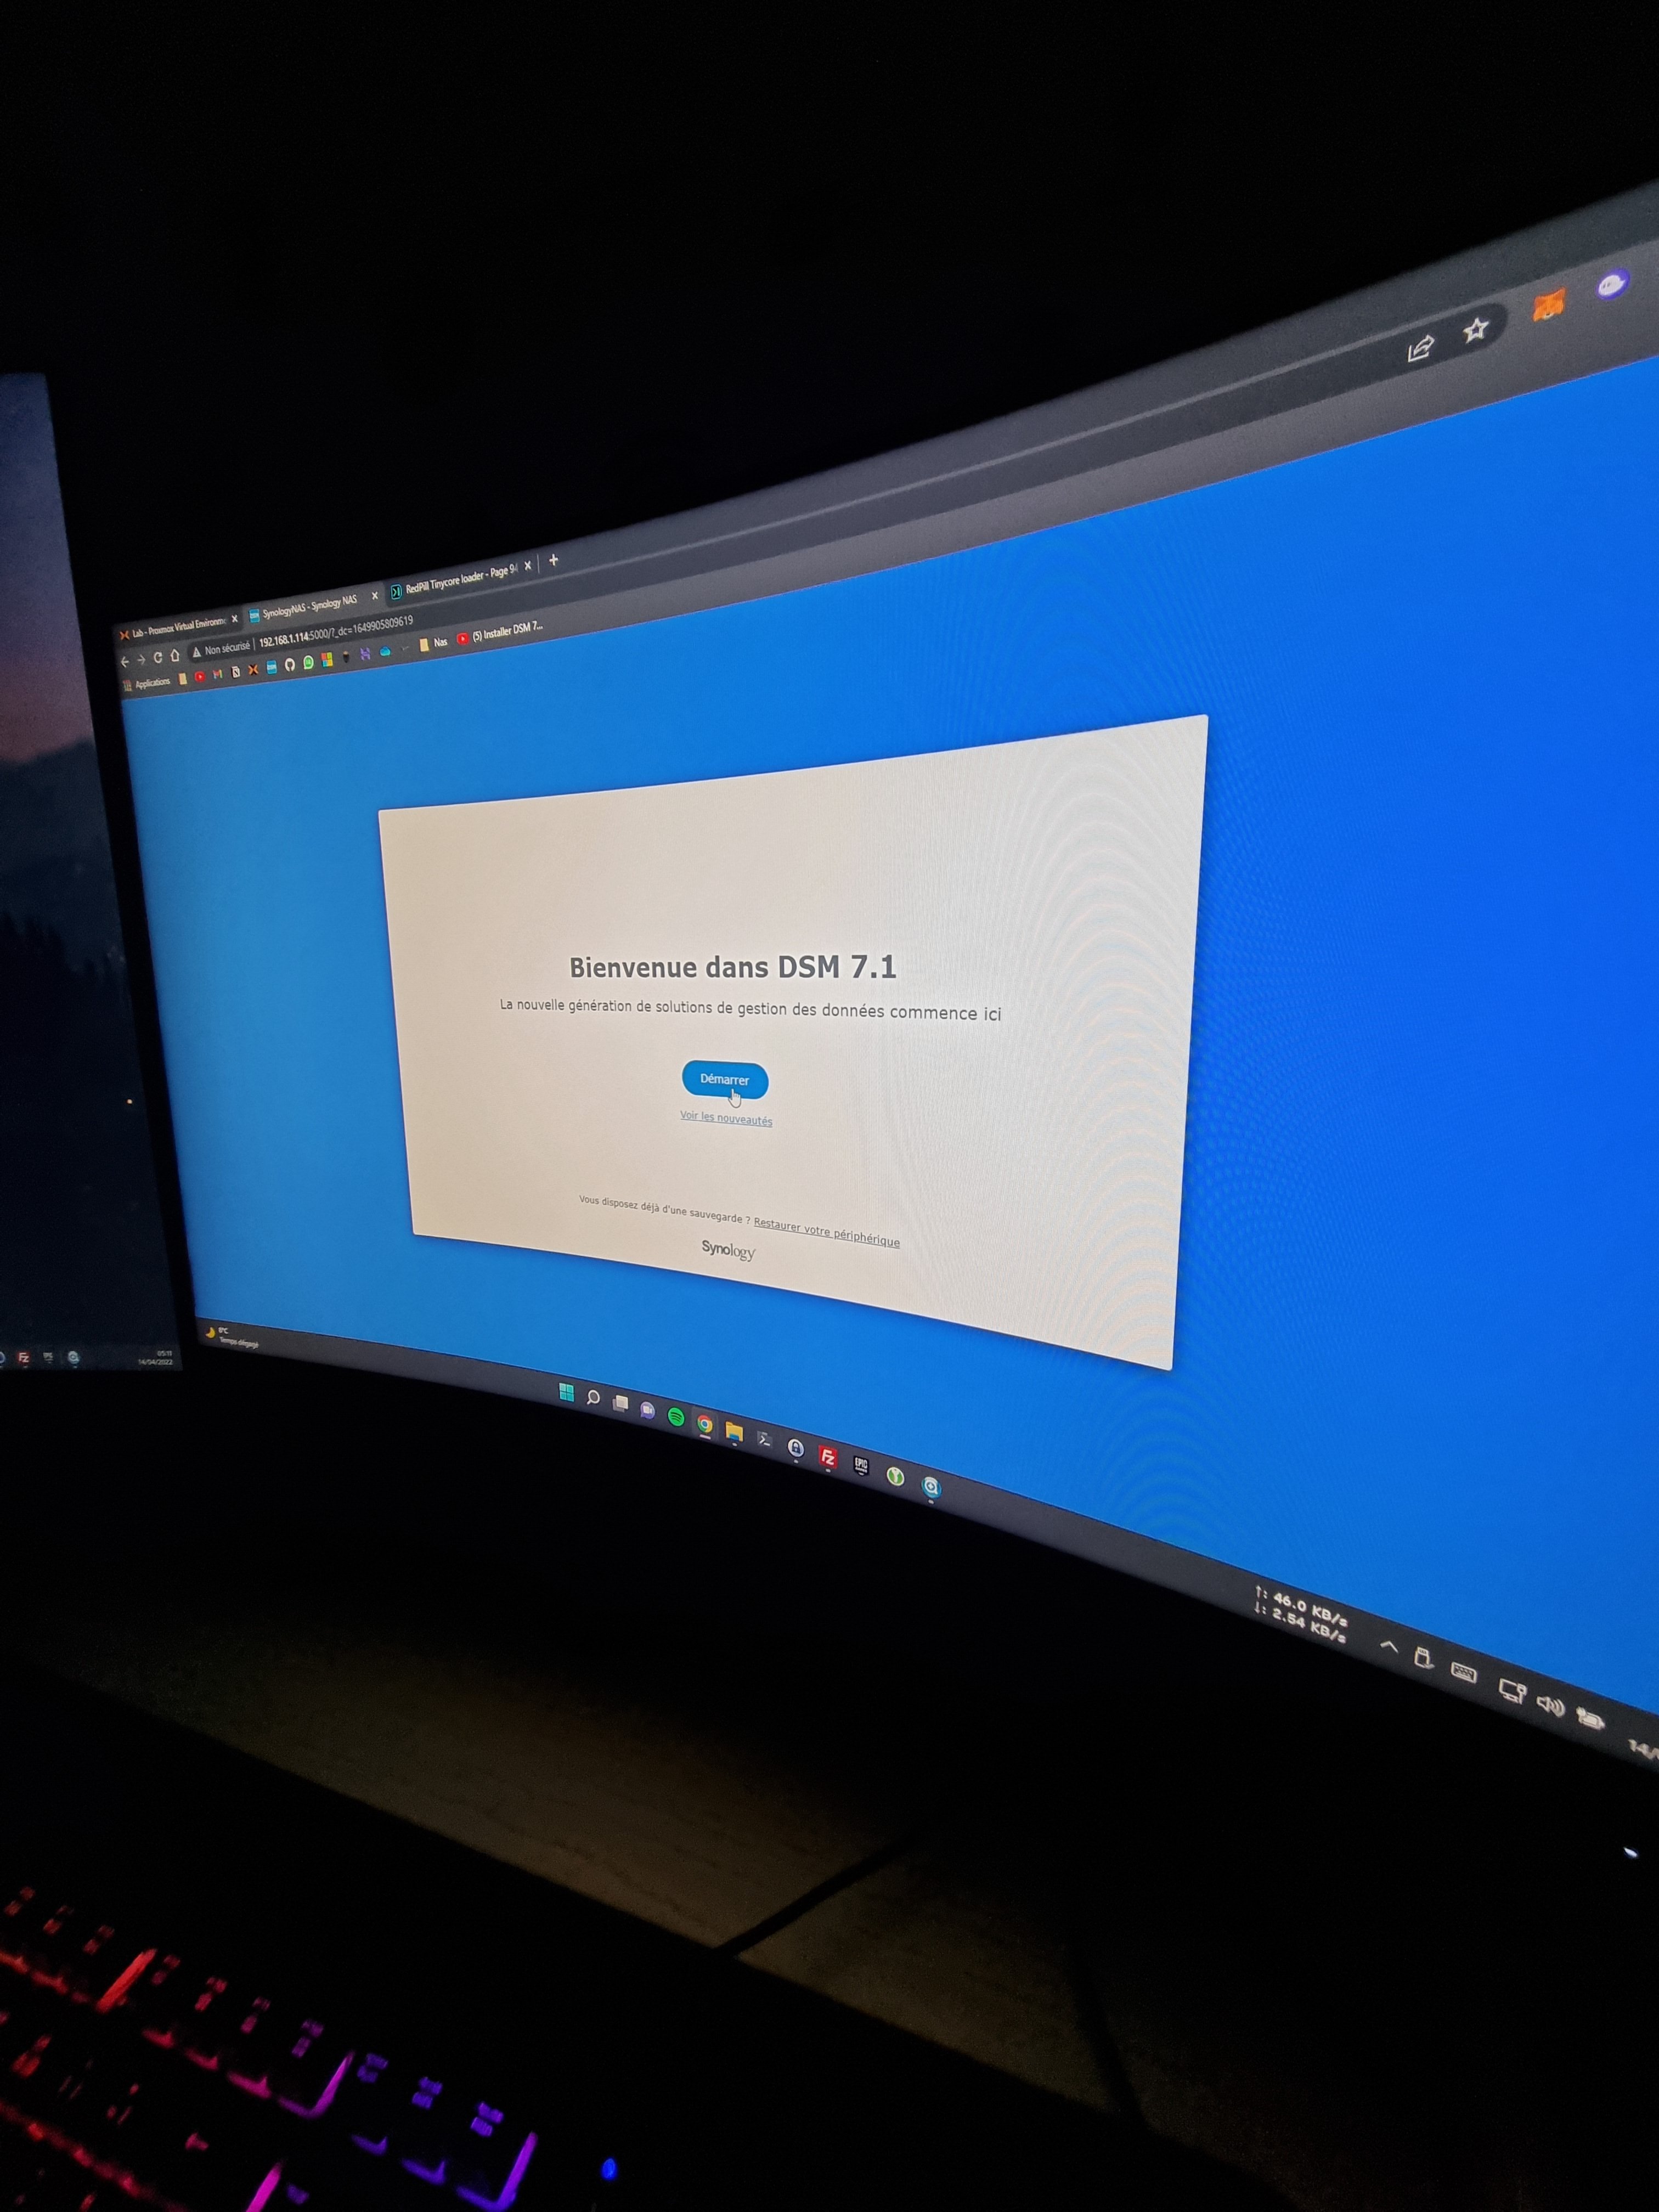
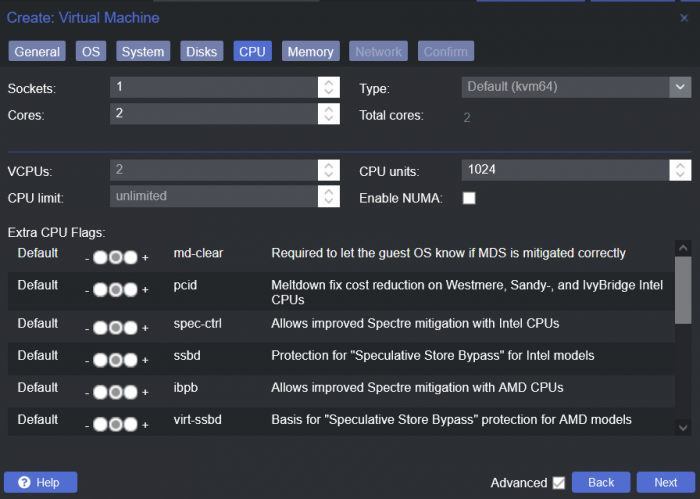
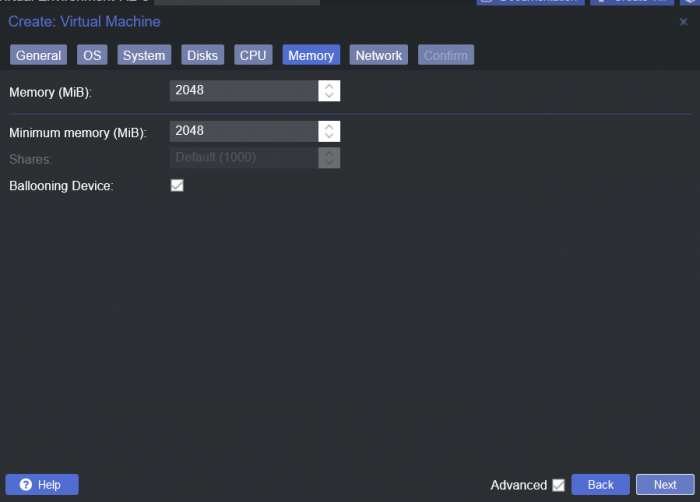
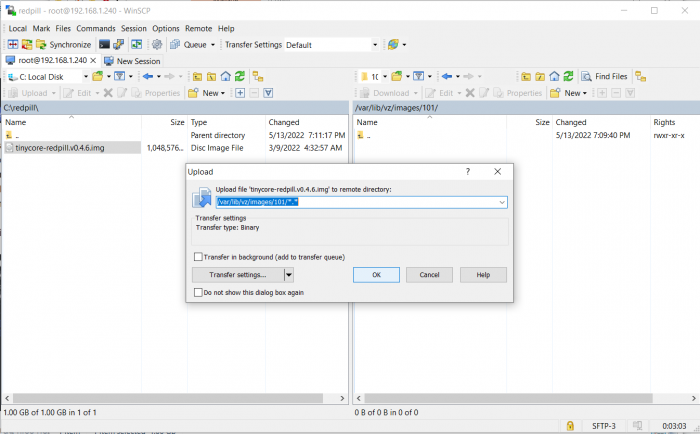
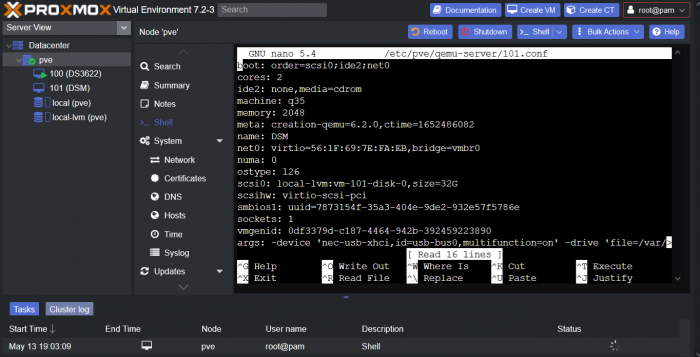
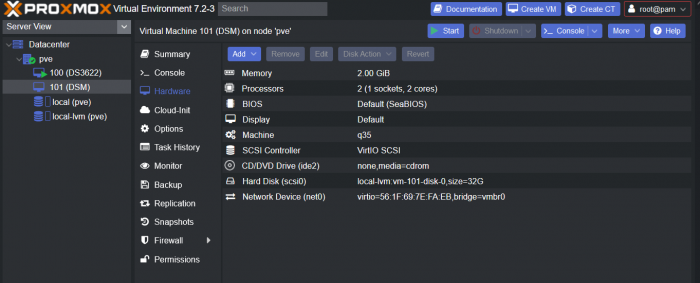
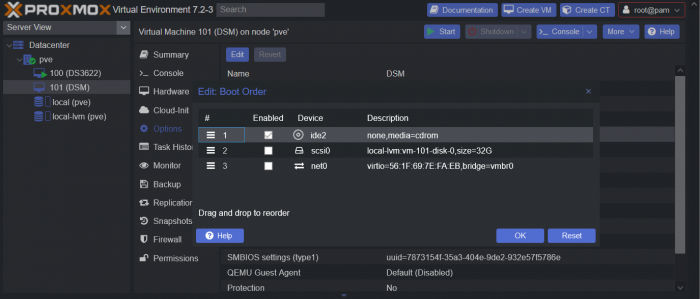
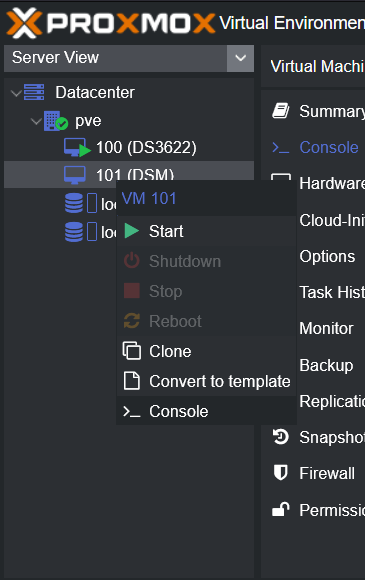
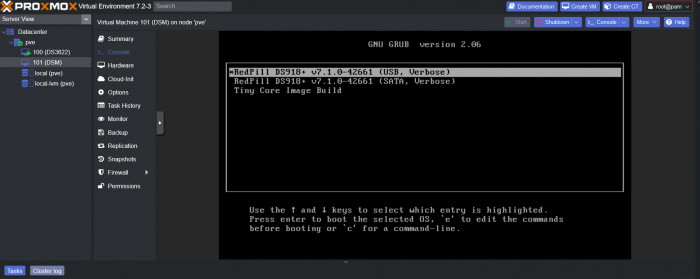
This is a simple guide and step by step tutorial on how I got tiny core red pill loader running and working on a proxmox server. This not the only way, just the way I do it and it seems to work. You will need a few things downloaded and ready to access on your local machine. The tiny core red pill image from @pocopico DOWNLOAD Putty for windows (or your mac equivalent) DOWNLOAD WinSCP for windows (or mac equivalent) DOWNLOAD and of course a working server with proxmox installed and running. DOWNLOAD The correct .pat dsm installation file downloaded directly from synology.com (you can handle this one on your own 😉) From proxmox create a VM. Most of the defaults work, change these according to your specific needs and requirements, I personally used: Q35, virtio nic, HDD is your choice, 2 cores and 2gb ram (again your choice). System Q35 is not required either, i440x works too, this is just what I used and it works. HDD is whatever you want, or pass thru complete drives or controllers.. again your choice based on your setup. Same for nic, cpu and ram. Just be sure to Use NO MEDIA in the OS section * REMEMBER THE VM ID # * you will need it later * Remember, do not use any media is selected here. Now, load WinSCP and connect to your proxmox server using your local ip and proxmox credentials. There on the right side, navigate to /var/lib/vz/images/ and create a folder/directory of whatever the vm number was you created, in these pictures its 101 so in this case it should be /var/lib/vz/images/101/ On the left side in WinSCP navigate to where you downloaded and extracted the tcrp image Copy the extracted tcrp img from your local machine to your proxmox vm directory Alternatively, you can enter a couple of command lines in the main pve node shell to download and extract the tcrp image without using winscp at all, but I do it the hard way. Either way works so its up to you. The alternative method is open the main pve node shell in proxmox and enter these commands (use copy and paste for each line) # set vm id to whatever it was at time of creation id=101 # create image directory, download and uncomporess mkdir -p /var/lib/vz/images/${id} curl --location https://github.com/pocopico/tinycore-redpill/raw/main/tinycore-redpill.v0.4.6.img.gz --output /var/lib/vz/images/${id}/tinycore-redpill.v0.4.6.img.gz gzip --decompress /var/lib/vz/images/${id}/tinycore-redpill.v0.4.6.img.gz --keep Now, at this point one way or another you should have a dir of your vm # in the correct location with the tcrp extracted image inside ready to issue the following commands, so now click your main pve node on the left panel and choose shell and paste this command there. (edit the 101 vm # with whatever your vm # is) echo "args: -device 'nec-usb-xhci,id=usb-bus0,multifunction=on' -drive 'file=/var/lib/vz/images/101/tinycore-redpill.v0.4.6.img,media=disk,format=raw,if=none,id=drive-disk-bootloader' -device 'usb-storage,bus=usb-bus0.0,port=1,drive=drive-disk-bootloader,id=usb-disk-bootloader,bootindex=999,removable=on'" >> /etc/pve/qemu-server/101.conf Now type nano and the last part of the above command (the directory part) to verify the entry into your vm .conf file so in this case nano /etc/pve/qemu-server/101.conf You easily verify the entry into the bottom of the .conf file of your vm, now press control x to exit. Now select your vm and choose hardware from the column Here using the Add button you should add a serial 0 console to monitor your dsm loader if needed (helpful for troubleshooting) and if you are adding hdd or using pass thru of hba controllers or sata controllers or any other specific hardware for your build add it here. Now select Options from the list column, and select only ide2 CD-ROM (uncheck all others) and make cd-rom priority #1 by dragging it to the top. Now you are ready to spin up your vm and build your loader. You can watch the process of booting by right clicking on the vm number/name and select >_ console a new window will open and you will see lines of code fly by, but only in this console monitor window. This is an optional step. At this point you should be booting tcrp and ready to build your loader... @Peter Suh has a great tutorial for that linked here. Follow his directions for building your loader. Use putty to SSH into tcrp to build the loader, The main thing when building if you used virtualized nic card, add the v9fs ext to get network port working, use this command before executing the redpill build command in putty. ./rploader.sh ext <build platform> add https://raw.githubusercontent.com/pocopico/rp-ext/master/v9fs/rpext-index.json After you successfully build your loader, and during the reboot, go back to proxmox gui and when you see the booting menu screen, press UP to select BOOT FROM USB, VERBOSE then press enter... that is very important. You only have to do this once, and it will save and retain that selection until you change it again. You do not want to boot from sata! At this point you load your browser, go to find.synology.com or use synology search application on your pc, or simply go to the ip of your new vm dsm and complete the process. If you had your console monitor opened from above, you should see sign in prompt, if you scroll up a little bit you will also see the ip of your dsm vm. If you successfully booted from usb, everything will work. If you did not change that during the first reboot, and you are booting from sata, you will most likely get a failure to install dsm. You will need to power down the vm, re-start the vm, and choose boot from usb verbose. If this guide helped you, please press the thanks button for me. 🖖😀 And remember to thank @pocopico and @Peter Suh Enjoy!


- 83 replies
-
- 15
-

-

-
Все привет, решил пересесть с DS1515+ на Proxmox Интересует возможность транскодинга, будет ли он работать, если пробросить видеокарту, использовав 918+ ? (UHD 730 i5 12400 6/12) Задача заключается в том, чтобы забекапленное видео (4к 60с) спокойно воспроизводить на телефоне в Photos Mobile. Или не париться и сделать DS3618+ дать побольше ядер/потоков и положиться на софт ? Про валидную пару серийника и мак знаю, при хорошем желании добыть возможно. Так же будет стоять карточка на 10гбит, видел, что народ добавляет виртуальную карту и все 10г работают (что было бы преимуществом, чтобы 10г использовать и для других виртуалок)
-
 Hello all: This is my hardware configuration HP MicroServer Proliant Gen8 , Intel Xeon E3 1265L V2. 16 GB RAM running with Proxmox 7.2-7 Successfully upgrade my DSM 6.2 to 7.1 using tinycore-redpill 0.8. Following this forum recommendations change hardware definition from DS3615xs to DS3622xs+. Everything is working pretty good but usb In my previous installation usb was configured by adding this lines to the config file usb0: host=1-1.1 usb1: host=1-1.2 usb2: host=5-1,usb3=1 But no working anymore. Nor usb storage recognized neither any other devices. Any solution ? Thanks for your help.
 -
Vous verez sur mon Github la procedure qui a marché pour moi si vous avez des question hésitez pas. https://github.com/U4I5/DS918_7.1_Proxmox/blob/main/README.md

-
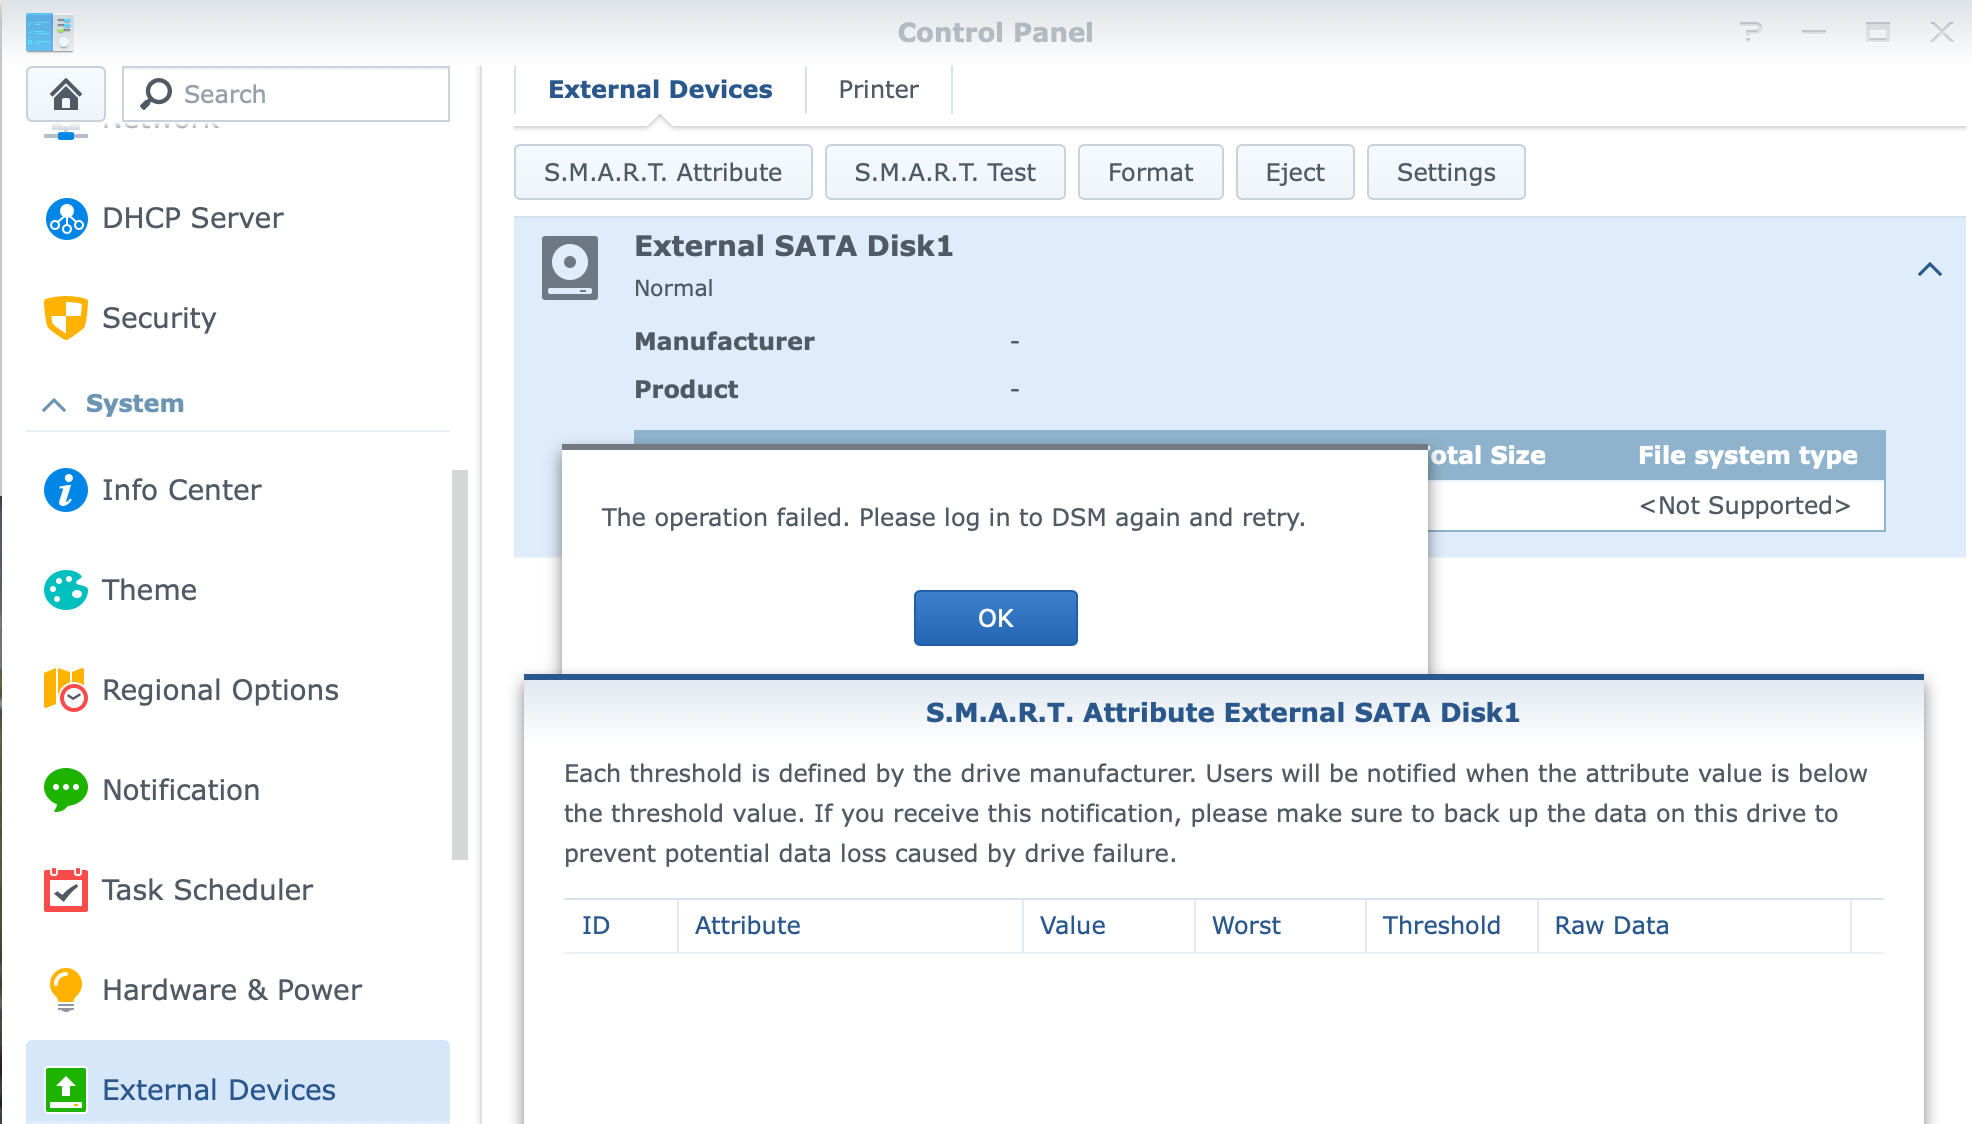
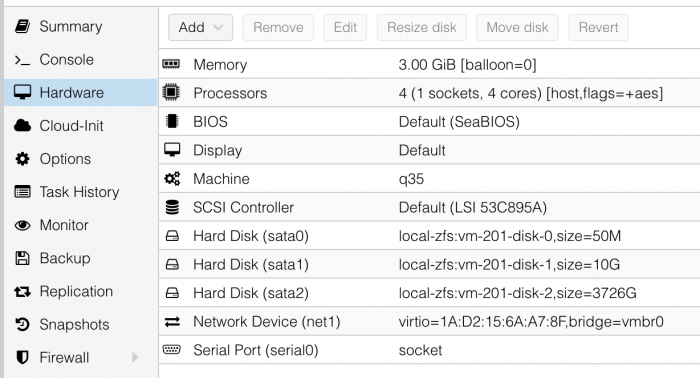
I'm running DSM 6.2.3-25426 Update 3 / DS3615xs on Proxmox. I have my actual HBA card (JMB585-based one) connected to the VM using PCI passthrough and it works perfectly. However I added another disk using Proxmox: However no matter what I do DSM doesn't see that disk in the UI. I tried changing "SCSI Controller": VMWare PVSCSI - disk is visible in CLI only (fdisk) VirtIO - not detected LSI 53C895A - not detected Some people suggested that VirtIO but DSM doesn't seem to support it. LSI 53C895A was mentioned in multiple tutorials for DSM but 6.2.3-25426 is not detecting disks connected to it. The only one which is sort-of working is the VMWare PVSCSI. However the disk is not visible in Storage Manager. DSM sees it as an eSATA disk to an extent: I checked my sata_args but I have no idea if I should change anything in them to make it working: set sata_args='sata_uid=1 sata_pcislot=5 synoboot_satadom=1 DiskIdxMap=0C SataPortMap=1 SasIdxMap=0' Can someone suggest how to make that additional disk working?


-
Voici ma méthode sur Proxmox [DS3622xs+] Pré-requis : 1 - Être sur Promox 2 - Mettre Sa carte Réseau en Intel e1000 (Ce qui voudrait dire que le pilote que vous aller installer est celui de intel et non virtio.) Sur Tiny Core en Ssh : sudo su (important pour ajouter le pilote Intel) ./rploader.sh update now ./rploader.sh fullupgrade now ./rploader.sh serialgen DS3622xs+ ./rploader.sh satamap now ./rploader.sh ext broadwellnk-7.0.1-42218 add https://raw.githubusercontent.com/pocopico/rp-ext/master/e1000/rpext-index.json ./rploader.sh build broadwellnk-7.0.1-42218 ./rploader.sh backup now ( Pour Sauvegarder tous ce que vous venez de faire) Pour Passer de DSM 7.0.1 à 7.1.0-42661 enchaîner avec cette commande (ça peut ne pas marcher): ./rploader.sh clean now ./rploader.sh build broadwellnk-7.1.0-42661 ./rploader.sh clean now rm -rf /mnt/sdb3/auxfiles rm -rf /home/tc/custom-module ./rploader.sh backup now N'oubliez pas de vérifier le Vid et le Pid dans User config json avant chaque build voir la video de @Sabrina

-
I need the steps because I did everything but it doesn't work either I have errors redpill/intercept_execve.c:82 or else nothing works help me!! I try to install it on Promox
-
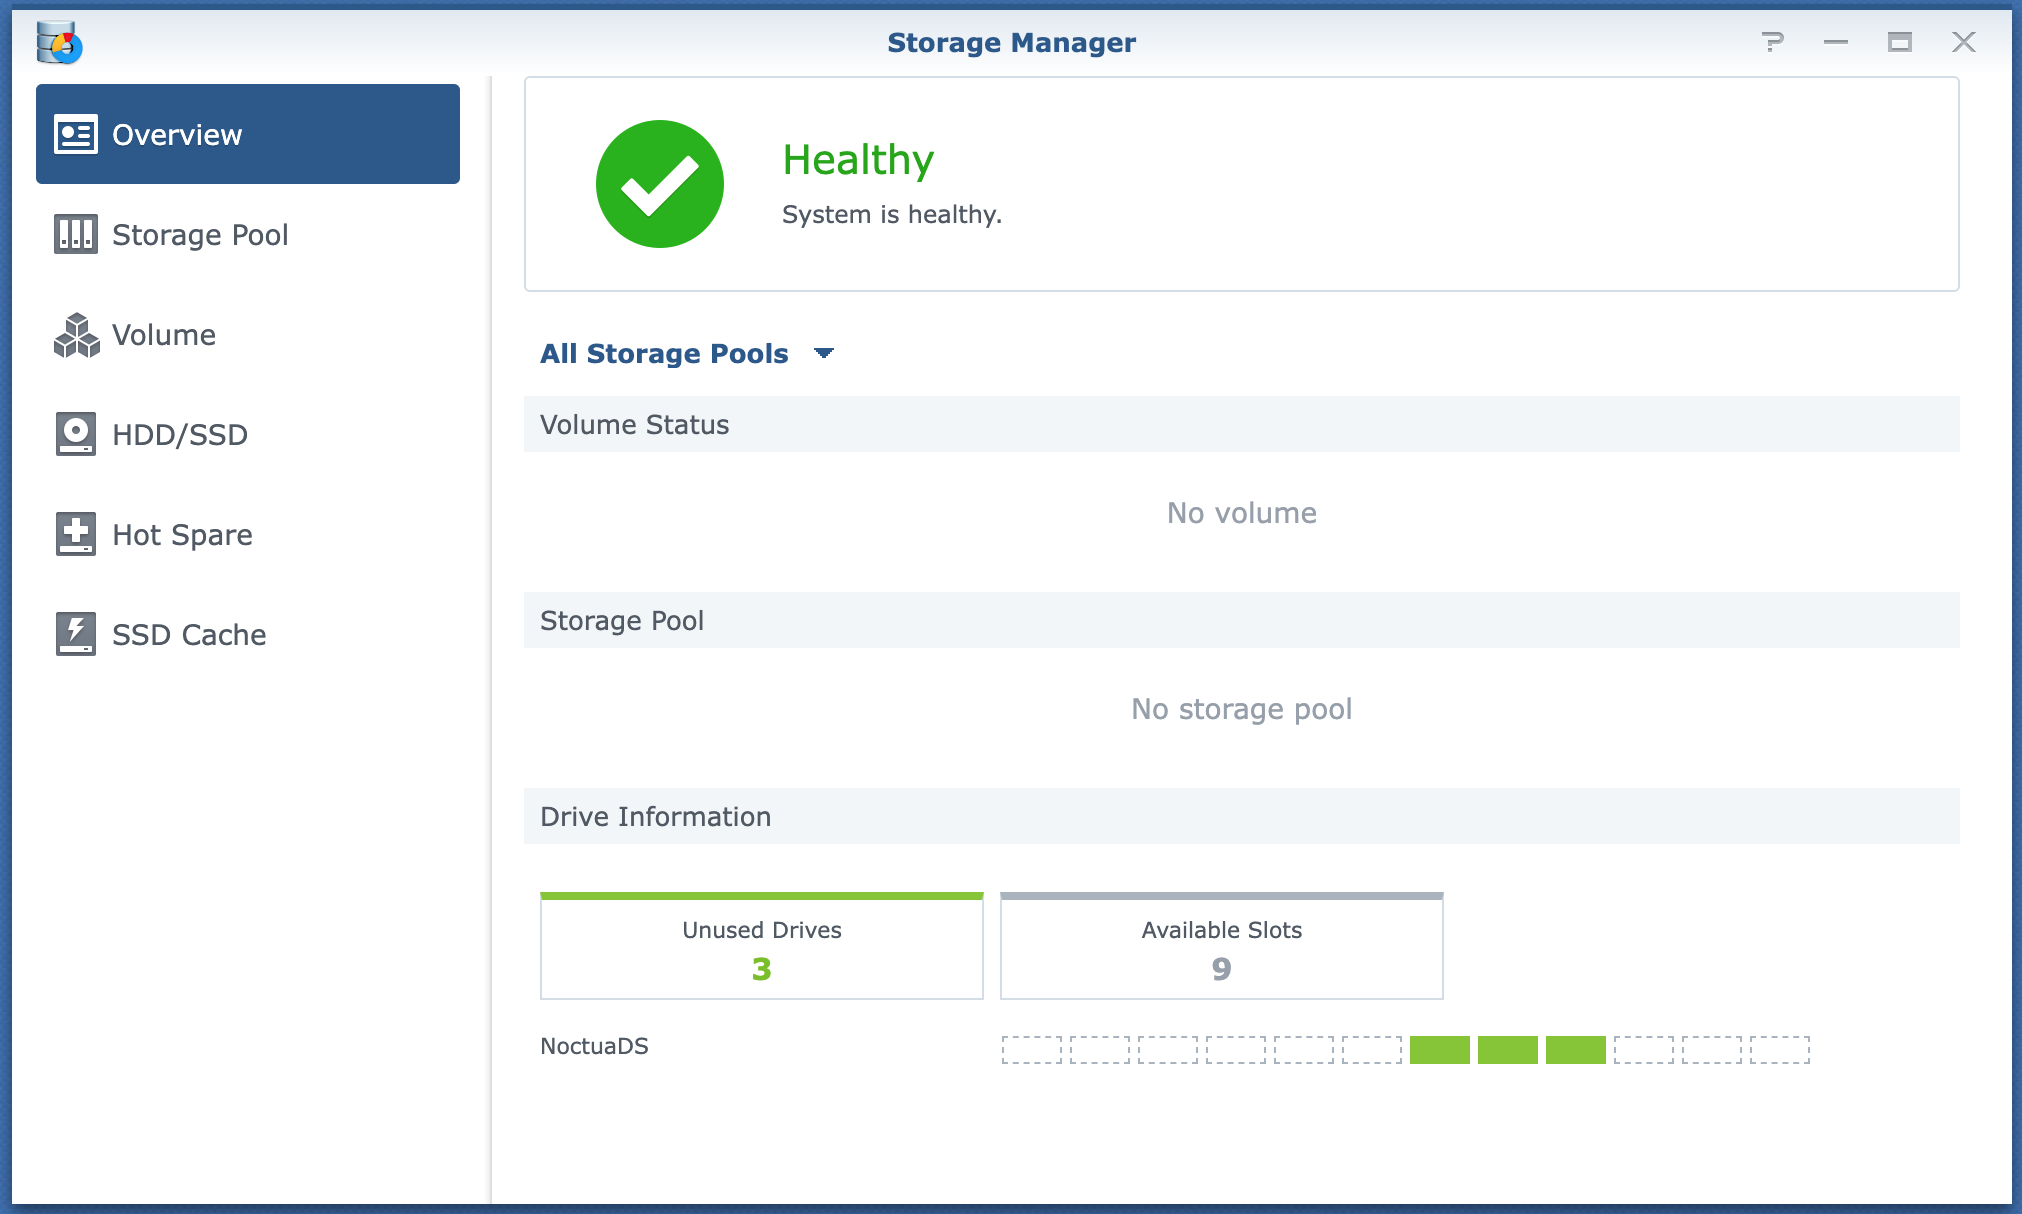
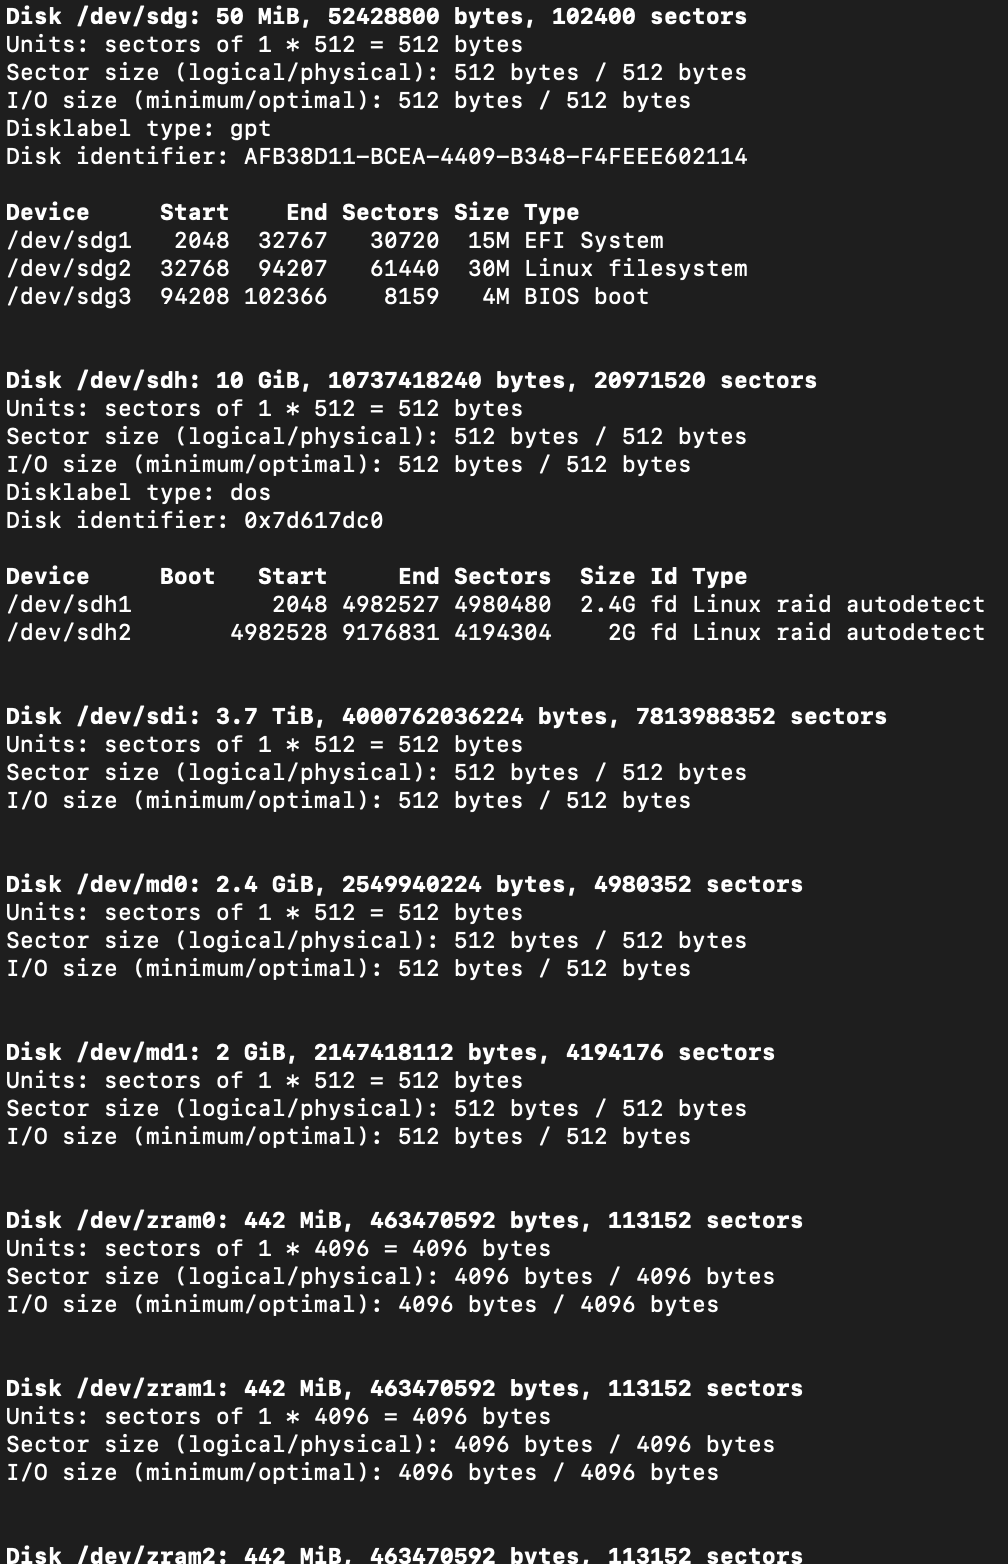
Hi there, After using Synology for 6 years I build a Proxmox server for some smart home stuff and also switched to Expenology for my DS214play I had. Yesterday I had a power outage but everything started right up afterwards. Only to notice now that I can login to Expenology but nothing is there... No volume, no storage pool. I used this tutorial to make it initially: I made some screenshots of everything to give additional info. Any info or pointers about what I can do to restore the volume? Of course I made the mistake to not have regular backups. The last one I got it couple of months old because I was still in the process of setting up a backup plan/schedule. The problem disk is /dev/sdi .


-
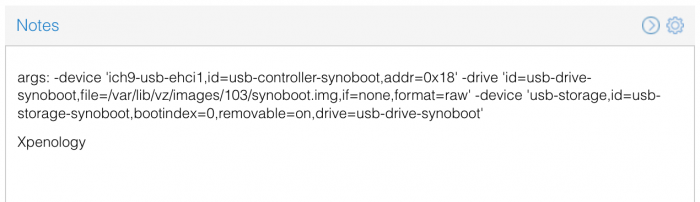
After fiddling with it for a day, and getting it to work, I thought it would be nice to share the knowledge, especially since "officially" only ESXi is supported, and ESXi is picky about supporting stuff... The main reason for me to move to a hypervisor was because Synology has not yet introduced NVMe support AT ALL. And even with a kernel driver, the Storage Manager will not see it as an SSD, as an HDD, or anything. Synology is silent about this, even though some have requested it on their forums (although they do not have a model with M.2 NVMe connector yet, they have some models with full sized x16 or x4 PCIe ports, which can be used with an adapter card for NVMe). So I decided to try with a hypervisor. On one hand it makes installation easier, upgrading also, and I don't need a display connected (since most hypervisors provide a VNC connection to the guest OS). On the other hand, I can install the measly 2-3GB hypervisor and all the tools on the NVMe SSD, and have the rest mounted as a VMDK (or any other virtual disk file). The rest of the hard drives would use passthrough of course. I fiddled around with multiple options. XenServer simply refused to boot in UEFI mode, ESXi does not support my network adapter, or my built-in SATA controller (B250 chipset), Microsoft's Hyper-V server has issues if you do not have a domain server on the network, also as soon as the display output goes off, the device drops network connection. It left me with Proxmox. Never used it, and during installation I had some issues with the bootloader (both on 4.4 release and 5.0 beta). Luckily there's a workaround, since it is based on Debian, one can use the Debian netinst image, create a very basic system, and install Proxmox on top. I won't bore you with the details, there are enough guides about installing it to make me think twice before I write an (n+1)th version. So let's begin! Requirements: A working install of Proxmox 5.0 - it can be 4.4 too, but I only tested this on 5.0. Follow the guide to create the bridged network interface! The loader you wish to use. I recommend Jun's Loader, specifically 1.02a2 at the time of the writing of this guide. Steps: 0. Edit the loader (if needed) to your liking - MAC address, serial number, etc. This is especially important if you have multiple XPE systems on the same network. 1. Create a new VM in Proxmox. 1.1 Set the name, and make sure to note down the VM ID (if it is your first VM, it should be 100). I'll be using {VM_ID} as a placeholder from now on. 1.2 OS type should be "Linux 4.x/3.x/2.6 Kernel". 1.3 Set the CD/DVD to "Do not use media" (we will remove the virtual disk drive any way later on). 1.4 For the HDD, you should create a new virtual disk with the format of your liking (qcow2, vmdk or raw), this will be the initial drive. I made sure that it uses nearly the whole storage of the OS drive it was installed on (in my case it was a 256GB NVMe SSD, which, after setup and partitioning, resulted in a 226GiB root drive, of which I had 211GB free, so I set the virtual disk's size to 200GB). You can set it to any kind of bus, EXCEPT VirtIO. With VirtIO I had performance issues, so I went with SCSI (it supports up to 12 devices any way, so it is better). This is for the virtual disk only, VirtIO works just fine with passthrough devices. So apart from the bus, size and format, you don't need to touch a thing. 1.5 For CPU, set kvm64 with as many cores as your host has (incl. virtual cores if you're on a HyperThreading supported CPU!). In my case with the Intel G4560 this is 4. 1.6 For RAM, you should leave some slack for the host OS, I went with 7.5GB from the 8GB I have. Ballooning is not required. 1.7 Networking. This is where many things can go wrong. The VirtIO paravirtualized network adapter should work, but to be safe I went with the Intel E1000. On the left select Bridged Mode, with the previously created bridge as the first choice. You can also enable Firewall if you do not trust Syno's own. Leave the rest of the settings as default. 1.8 On the Confirm page, confirm your settings and create the VM. 2. After the VM is created, first thing to do is to remove the virtual disk drive (IDE 2, if everything went right). Then comes the hard part. 3. You have to add each and every HDD to the config file that you want to use for passthrough. The command is simple: qm set {VM_ID} -[protocol][port] /dev/disk/by-id/[disk-id] The {VM_ID} part is obvious, but what about the rest? [protocol] is the connection protocol you want to use. This can be sata, ide, scsi or virtio. I'm using SATA here, but you can use anything (IDE is not IDEal for us). SATA supports up to 6 devices (port indexes 0-6), scsi supports up to 12 devices, and virtio does not have a limitation to my knowledge. [port] is the first unused port of said protocol. E.g. if you set the initial disk during setup to SATA0, and you want to use SATA further here, you have to start numbering from 1. [disk-id] is the unique identifier of your HDD. Go to /dev/disk/by-id/ and list the disks you see. For most SATA devices, you'll see entries like "ata-[MANUFACTURER]_[MODEL]_[sERIAL]". So let's say I have 4 disks, with the disk-id's ata-1, ata-2, ata-3, and ata-4 (yours will be a lot longer, but don't worry, you can use the bash autocomplete with the tab key). For this to work I execute the following commands: qm set 100 -sata1 /dev/disk/by-id/ata-1 qm set 100 -sata2 /dev/disk/by-id/ata-2 qm set 100 -sata3 /dev/disk/by-id/ata-3 qm set 100 -sata4 /dev/disk/by-id/ata-4 Of course later on you can add further HDDs to a VM config by using the same command, just keep in mind the limitations of the protocols. 4. Now comes the hard part, we'll have to add the bootloader image file to the config. The config file is located under /etc/pve/qemu-server/, and is named {VM_ID}.conf. Open it with nano. This config file defines everything about the VM. Disks to mount, which device to use for booting, RAM amount, CPU cores, name of the VM, et cetera. Don't touch anything else than the lines you see here! Copy the synoboot.img to somewhere on your server. If you want to be consistent with the Proxmox setup, copy it under /var/lib/vz/images/{VM_ID}/ - you'll need root for that. After that, come back to the conf file, and open it again. You'll enter a few things here, make sure you pay attention! Enter the following line into the conf file, and make sure you replace the parts in the path! args: -device 'piix3-usb-uhci,addr=0x18' -drive 'id=synoboot,file=/var/lib/vz/images/{VM_ID}/synoboot.img,if=none,format=raw' -device 'usb-storage,id=synoboot,drive=synoboot' Make sure to replace the path to the synoboot.img with your own! One more thing to edit here, the boot device. Find the line that begins with "boot: " and replace it so it looks like this: boot: synoboot Save the file, then start the VM. It should start up without an issue, and you'll be able to use find.synology.com to find your server and install it.
-
After 4-5 years happy usage of Debian9 + Proxmox5.2 + Xpenology dsm 5.2 I upgraded six months ago to DSM6.2.3 Proxmox6.3-3 Debian10. All went well, until a few weeks ago... One night at 3am my volume 2 crashed! Since then I can read my shares from volume 2, but not write. It is read-only. I suspect the activation of write back cache in proxmox is the reason. Status of SMART and all my harddrives and raid controller is just fine, so I suspect no hardware issue. After using google, this forum and youtube I still have no solution. The crashed volume has all my music, video's, photo's and documents. I have a spare 3TB WD RED HD directly connected to the MB and copied most importend files. However I have a backup of the most important files, I prefer to restore the crashed volume, but starting to become a bit desparate. I think the solution is to stop /dev/md3 and re-create /dev/md3 with the same values, but something is keeps /dev/md3 bussy and prevents me to do. Could someone please help me? Setup: - Hardware: Asrock µATX Bxxx(I forgot), Adaptec 8158Z raid controller with 4 x 3TB WD RED (2 new, 2 second hand and already replaced b'cos broken within waranty) -Software: XPenology DSM6.2.3 Proxmox6.3-3 Debian10 -Xpenology: Volume1 is 12GB and has the OS (i guess?), Volume2 is single unprotected 8TB ext4 and has all my shares. 4GB RAM and 2 cores. Output: see attachment output.txt
-
Hi All, So i have built myself a new setup and having issues with Synology VMM. So what i would like to know is there any point for me to Re-Do my setup on Proxmox or ESXI. I have the Hardware and I can move my data to build a new RAID 5 Setup etc.... If this is an good Idea how will i go about it and what is the Recommendations. Thanks in advanced.
-
I try to install dsm under proxmox ve with 1.02b loader, sata0 is the loader and sata1 should be the system disk. When I boot it, sata0 works well and I can visit the install web page. But the web page says NO HARDISK FOUND ON DS3615xs using qm terminal I find " Exit on error [1] DISK NOT INSTALLED... " . I doubt it's the root cause. But I don't know what should I do ? the last msg is DiskStation login: but I don't know username and password root@pve:/etc# cat pve/nodes/pve/qemu-server/100.conf boot: cores: 4 ide2: none,media=cdrom memory: 2048 name: synology2021 net0: e1000e=00:11:32:2c:a7:85,bridge=vmbr0 numa: 0 onboot: 1 ostype: l26 sata0: ZFS:vm-100-disk-0,size=50M sata1: ZFS:vm-100-disk-1,size=32G scsihw: virtio-scsi-pci serial0: socket smbios1: uuid=4f5c1d50-f483-4418-896e-833336e3f335 sockets: 1 vmgenid: 185a0acf-7d9f-4faf-afad-c6214fef7a9d
-
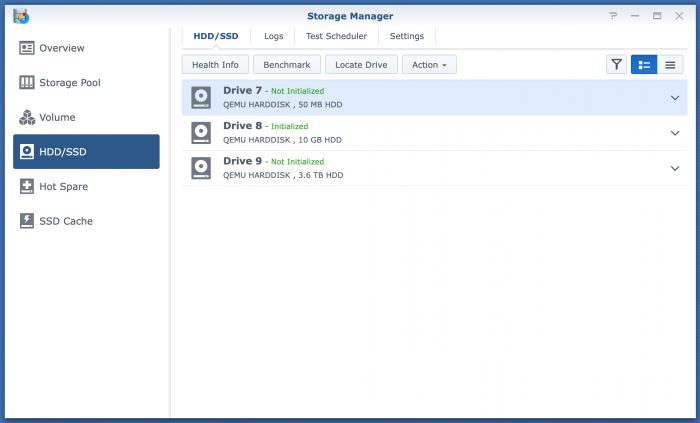
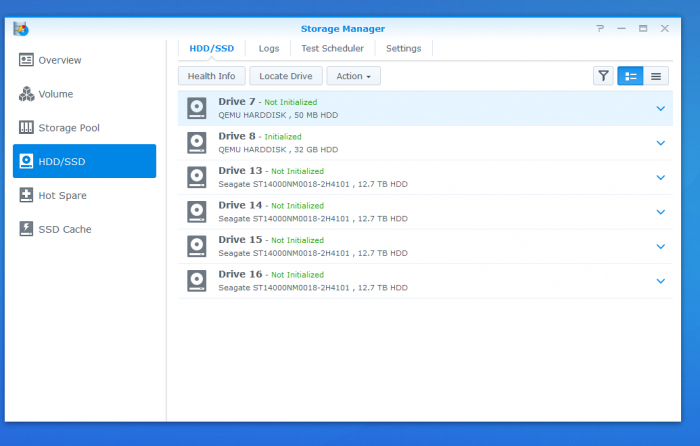
After wracking my brain for the New Years weekend and scouring both Xpe and Proxmox forums, I finally got IOMMU pass-through working for my LSI card. (Pay attention to the little details guys!!! The code goes on one line, one line!!!! It isn't delineated line by line. 😩 /rant) Prior to the PT fix, Proxmox was showing all of the 7 drives installed on the LSI PCI card. After pass-through obviously not as the Xpenology VM is accessing. However, upon logging into DSM I'm seeing some weird behavior and I don't even know where to begin so maybe someone has seen this before and can point me in the right direction. [Just as a side note, yes only 7 drives even though hard drive caddy and PCI card can support 8.] As you can see in the picture, drives are listed from 7-16. I am running two ssd's zfsmirror as the boot for Proxmox and image loader for VMs. I have 7 drives of 8 installed on the LSI 9211-8i PCI card. I see 4 of those drives as Drive 13-16. Drive 7 and 8 are the VM sata drives for the boot and loader information. Missing 3 on the other LSI SAS plug [assuming the three missing are all on the second SAS/SATA plug as it makes sense and it is port #2 on the card]. My guess is there is a max capacity of 16 drives in the DSM software. The mobo has a 6sata chipset (+2 NVME PCI/SATA unused), the two boot sata devices [drive 7 and 8] are technically virtual. 6 from the physical sata ports from chipset, +2 virtual sata for boot, +4 [of 8] from the LSI = the 16 spots listed. Is my train of thought on the right track? If so, my next thought then is, how do we block the empty [non-used] sata ports from the Chipset from taking up wasted space on the Xpe-VM? Like I said, I'm stuck. I need a helpful push in the right direction. Space below left for future editing of OP for any requested information.
-
Hi, I am new to Xpenology and Proxmox but I just managed to install Xpenology DSM 6.2.3 on Proxmox 6.2-4. DSM was assigned a single disk that is created by Proxmox from a RAID10 (mirrored striped) ZFS storage. Seeing that this disk used by DSM already has redundancy from the underlying ZFS storage and also has some features similar to BTRFS like snapshots, replication, quotas, integrity protection, Is it redundant to use BTRFS instead of ext4 for a new volume in DMS? Should we use 'Basic', 'JBOD' for the storage pool in DMS? DSM only sees a single disk here. Thank you for any guidance on this issue!
-
Hallo zusammen, ich bin neu hier im Forum. Ich wusste bis gestern gar nicht, dass es so etwas wie Expenology gibt........ Ich habe auch gleich mal eine Frage: Ich nutze derzeit eine Synology DS918+ als Mailserver / Plex / ecoDMS / Datengrab. Darüber hinaus habe ich einen Proxmox Rechnern auf dem 4 VMs laufen (W10, 2x Ubuntu). Darüber hinaus habe ich noch diverse Container (ca. 10) am laufen (nginx, ioBroker, influxDB, Grafana usw.). Die Synology hat nicht genug Power und daher möchte ich gerne aufrüsten. Ich habe gedacht einen HP Proliant G8 oder G9 zu kaufen und auf dem Proxmox oder Exsi zu installieren. Dort soll dann auch Xpenology laufen, so dass ich die restliche Hardware abschaffen kann. Macht das für Euch Sinn bzw. welcher Rackserver oder Chip ist dafür geeignet? Kann Xpenology operativ vollumfänglich eingesetzt werden (Backups werden natürlich gemacht) bzw. ich habe gelesen, dass es mit Updates Schwierigkeiten gibt? Wenn Ihr noch weitere Infos habt --> dann gerne her damit. Viele Grüße Rafael
-
Ciao a tutti, sto tentando di installare xpenology su proxmox. Ho tentato varie guide, anche quella ufficiale su questo forum, ma senza successo. Inizialmente son riuscito a farlo partire, rilevava il nas (il sito di ricerca), tentavo di installarlo ma al 56% mi dava errore. Allora ho mollato per un giorno, oggi ho ripreso ma ora non viene rilevato nessun nas nonostante il booloader parta normalmente. Ora un paio di domandeda niubbio: - che cosa cambia tra i vari bootloader? 1.02, 1.03 ecc ecc - con che criterio scegliere il modello? (918, 3615 ecc ecc) C'è qualcuno che è riuscito nell'impresa? ho proxmox 6.2.4 Grazie!
-
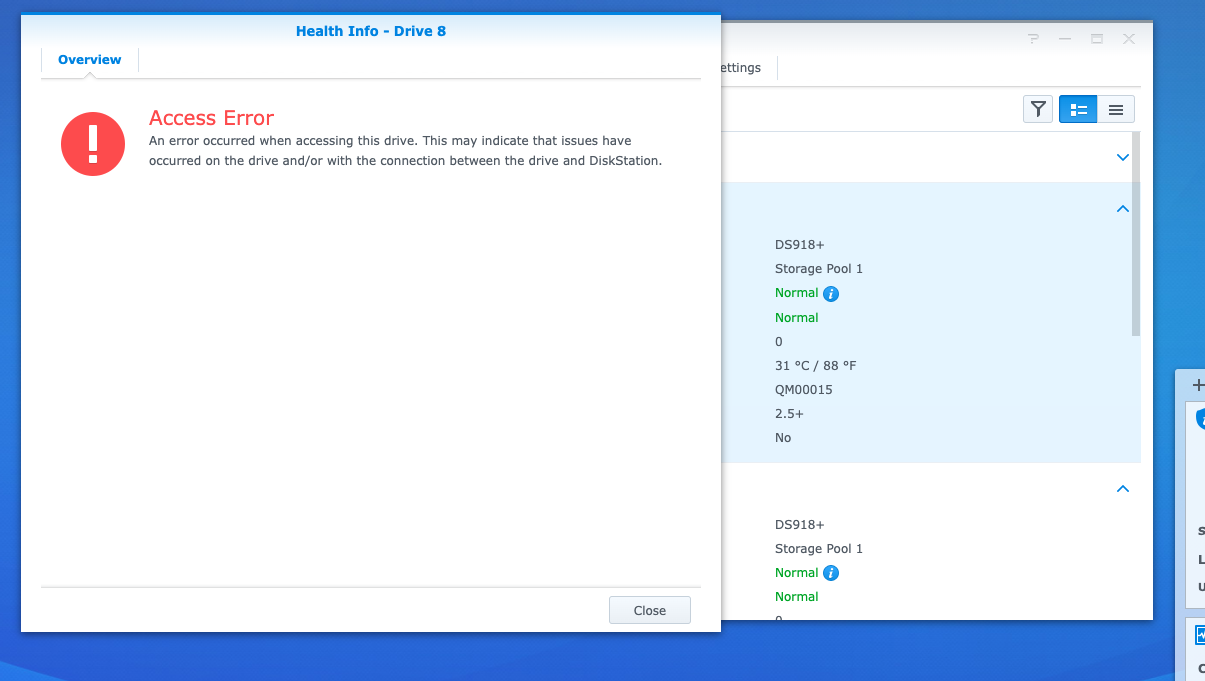
Hello! I searched, and didn't see this anywhere sorry if I missed it. Proxmox VE 5.4-13 DSM 6.2.2-24922 Update 6 DS918+ Jun's Loader v1.04b DS918+ Trying to build a second XP DSM node in proxmox with a LSI 9240-8i flashed to IT mode and a ConnectX-3 10gbe ethernet card. I can't get the node to start when I try to passthrough the ConnectX-3 card. When I press the Health Info button it says "Access Error An error occurred when accessing this drive. This may indicate that issues have occurred on the drive and/or with the connection between the drive and DiskStation." It health status is normal otherwise, and proxmox can read the SMART data on the drives. Proxmox Config balloon: 0 bios: ovmf boot: cdn bootdisk: sata0 cores: 4 efidisk0: local-lvm:vm-103-disk-1,size=4M ide2: none,media=cdrom machine: q35 memory: 4096 name: XDSM62x net0: e1000=A6:XX:XX:XX:XX:01,bridge=vmbr0,firewall=1 numa: 0 ostype: l26 sata0: local-lvm:vm-103-disk-2,size=52M sata1: /dev/disk/by-id/ata-ST6000VN0033-2EE110_ZADAA2B1,size=5860522584K sata2: /dev/disk/by-id/ata-ST6000NE0023-2EX110_ZAD9XGJ5,size=5860522584K sata3: /dev/disk/by-id/ata-ST6000NE0023-2EX110_ZAD98QHG,size=5860522584K sata4: /dev/disk/by-id/ata-ST6000VN0033-2EE110_ZAD9E3X2,size=5860522584K scsihw: virtio-scsi-pci serial0: socket smbios1: uuid=32137da6-3ab3-4806-97bc-078d83976665 sockets: 1 Hardware Info Intel i3 8100 ASUS Prime H370M-Plus/CSM LGA1151 Dell Perc H310 / LSI 9240-8i - Flashed to P19 2118 IT Mellanox ConnectX-3 MCX311A-XCAT CX311A Error Code for ConnectX-3 kvm: -device vfio-pci,host=04:00.0,id=hostpci0,bus=ich9-pcie-port-1,addr=0x0: vfio error: 0000:04:00.0: failed to setup INTx fd: Operation not permitted start failed: command '/usr/bin/kvm -id 103 -name XDSM62x -chardev 'socket,id=qmp,path=/var/run/qemu-server/103.qmp,server,nowait' -mon 'chardev=qmp,mode=control' -chardev 'socket,id=qmp-event,path=/var/run/qmeventd.sock,reconnect=5' -mon 'chardev=qmp-event,mode=control' -pidfile /var/run/qemu-server/103.pid -daemonize -smbios 'type=1,uuid=32137da6-3ab3-4806-97bc-078d83976665' -drive 'if=pflash,unit=0,format=raw,readonly,file=/usr/share/pve-edk2-firmware//OVMF_CODE.fd' -drive 'if=pflash,unit=1,format=raw,id=drive-efidisk0,file=/dev/pve/vm-103-disk-1' -smp '4,sockets=1,cores=4,maxcpus=4' -nodefaults -boot 'menu=on,strict=on,reboot-timeout=1000,splash=/usr/share/qemu-server/bootsplash.jpg' -vnc unix:/var/run/qemu-server/103.vnc,x509,password -cpu kvm64,+lahf_lm,+sep,+kvm_pv_unhalt,+kvm_pv_eoi,enforce -m 4096 -device 'vmgenid,guid=708f7b34-e4f5-4f70-aff8-1a24f4958302' -readconfig /usr/share/qemu-server/pve-q35.cfg -device 'usb-tablet,id=tablet,bus=ehci.0,port=1' -device 'vfio-pci,host=04:00.0,id=hostpci0,bus=ich9-pcie-port-1,addr=0x0' -chardev 'socket,id=serial0,path=/var/run/qemu-server/103.serial0,server,nowait' -device 'isa-serial,chardev=serial0' -device 'VGA,id=vga,bus=pcie.0,addr=0x1' -iscsi 'initiator-name=iqn.1993-08.org.debian:01:b290e3ce623' -drive 'if=none,id=drive-ide2,media=cdrom,aio=threads' -device 'ide-cd,bus=ide.1,unit=0,drive=drive-ide2,id=ide2,bootindex=200' -device 'ahci,id=ahci0,multifunction=on,bus=pci.0,addr=0x7' -drive 'file=/dev/pve/vm-103-disk-2,if=none,id=drive-sata0,format=raw,cache=none,aio=native,detect-zeroes=on' -device 'ide-hd,bus=ahci0.0,drive=drive-sata0,id=sata0,bootindex=100' -drive 'file=/dev/disk/by-id/ata-ST6000VN0033-2EE110_ZADAA2B1,if=none,id=drive-sata1,format=raw,cache=none,aio=native,detect-zeroes=on' -device 'ide-hd,bus=ahci0.1,drive=drive-sata1,id=sata1' -drive 'file=/dev/disk/by-id/ata-ST6000NE0023-2EX110_ZAD9XGJ5,if=none,id=drive-sata2,format=raw,cache=none,aio=native,detect-zeroes=on' -device 'ide-hd,bus=ahci0.2,drive=drive-sata2,id=sata2' -drive 'file=/dev/disk/by-id/ata-ST6000NE0023-2EX110_ZAD98QHG,if=none,id=drive-sata3,format=raw,cache=none,aio=native,detect-zeroes=on' -device 'ide-hd,bus=ahci0.3,drive=drive-sata3,id=sata3' -drive 'file=/dev/disk/by-id/ata-ST6000VN0033-2EE110_ZAD9E3X2,if=none,id=drive-sata4,format=raw,cache=none,aio=native,detect-zeroes=on' -device 'ide-hd,bus=ahci0.4,drive=drive-sata4,id=sata4' -netdev 'type=tap,id=net0,ifname=tap103i0,script=/var/lib/qemu-server/pve-bridge,downscript=/var/lib/qemu-server/pve-bridgedown' -device 'e1000,mac=A6:XX:XX:XX:XX:01,netdev=net0,bus=pci.0,addr=0x12,id=net0,bootindex=300' -machine 'type=q35'' failed: exit code 1

-
 Hi, I booted from loader 1.03b-ds3617xs, entered Syno's web-GUI and chose to install latest DSM (6.2.2-24922-4). Then rebooted and now I always get a Kernel panic when booting. Proxmox's host is Ivy Bridge: CPU model name : Intel(R) Xeon(R) CPU E3-1265L V2 @ 2.50GHz This is my Proxmox's config, which basically includes: e1000e hack Since Proxmox may only boot from USB if using UEFI and 1.03b doesn't support UEFI, I selected Seabios but did another hack: booting from CD and then chain-loads to USB. 1.03b loader is embeded in a physical USB Boot process log (ends up with kernel panic) : Any idea why it's failing? Can anybody post a full working Proxmox config (/etc/pve/qemu-server/XXX.conf)? Thanks in advance for your help. Cheers. -r