Search the Community
Showing results for tags '6.x'.
Found 3 results
-
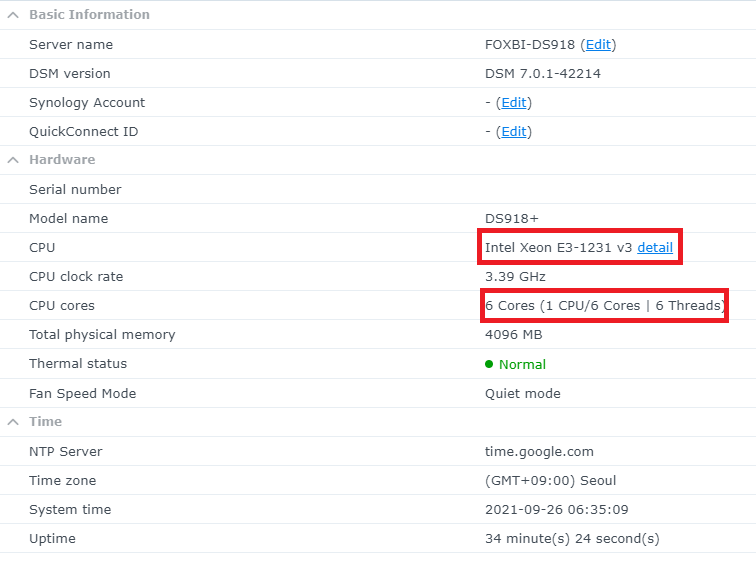
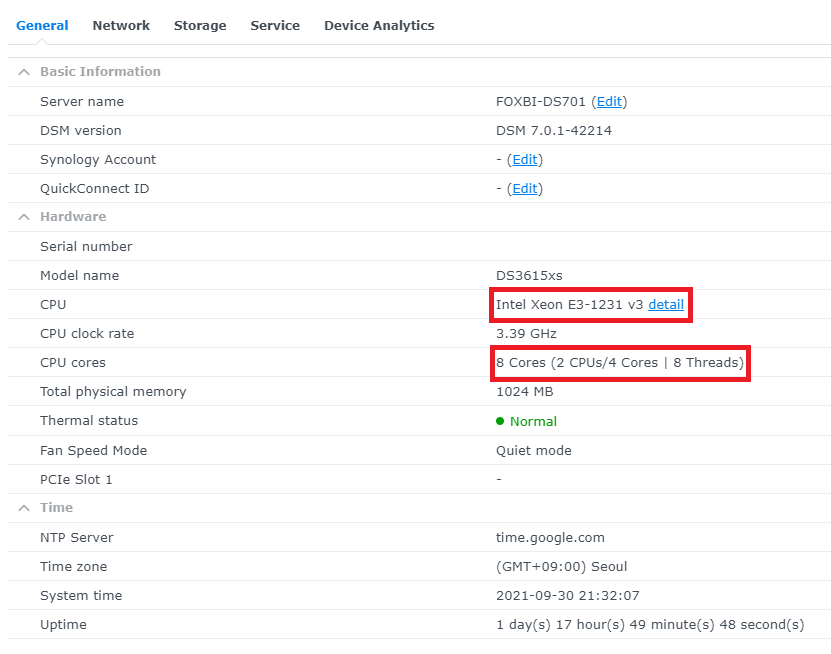
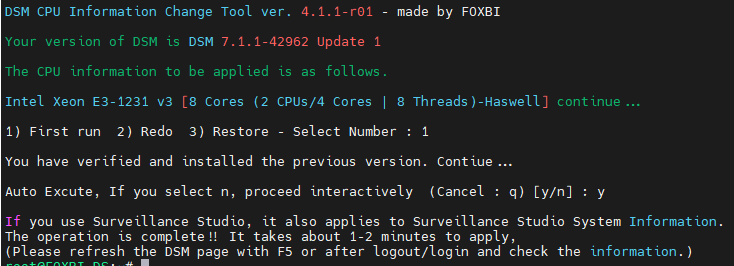
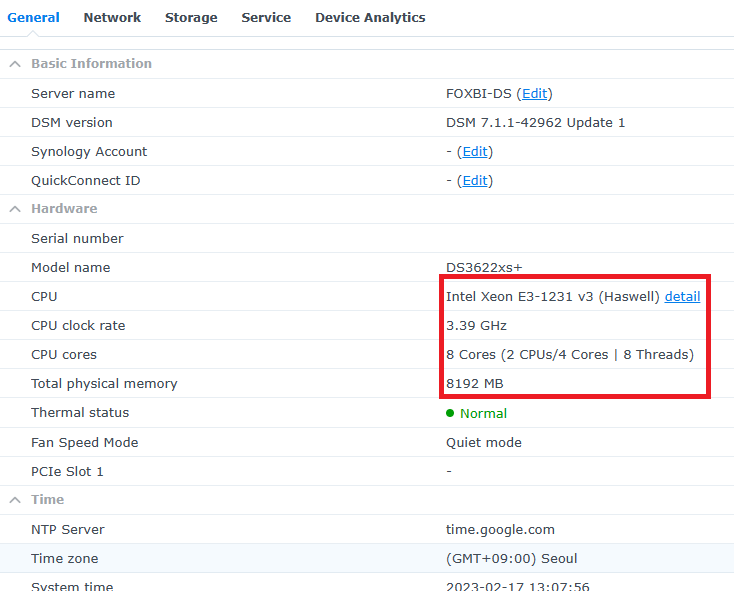
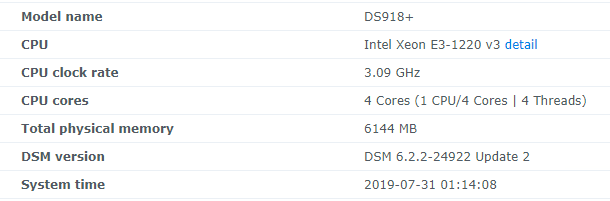
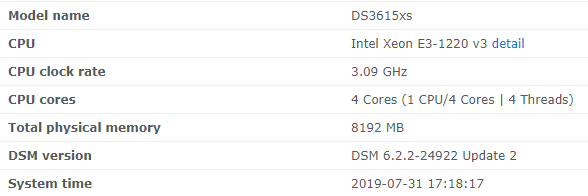
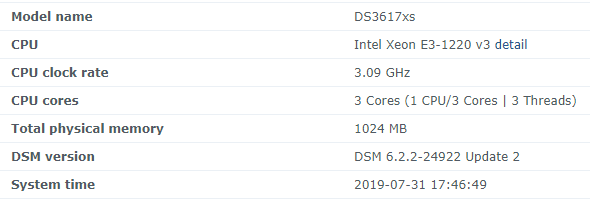
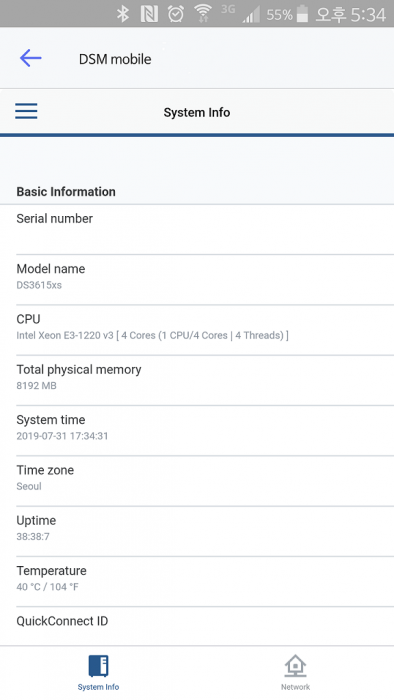
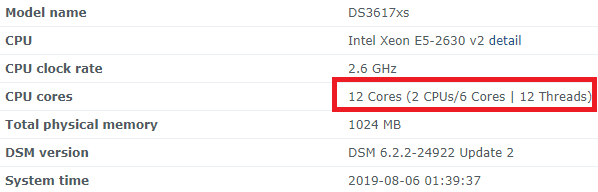
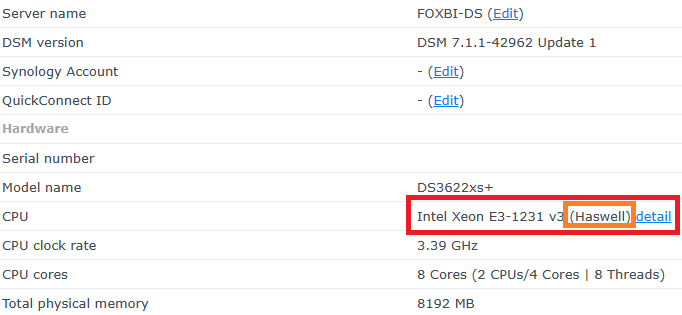
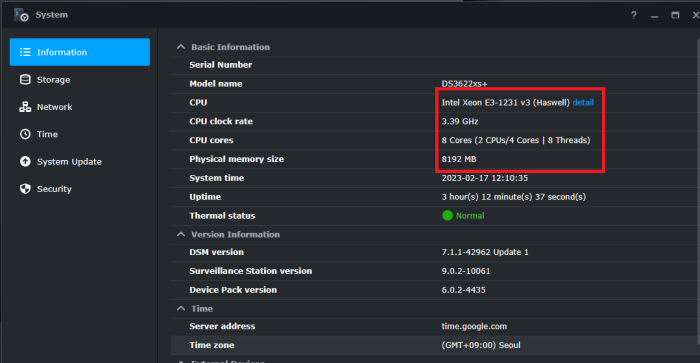
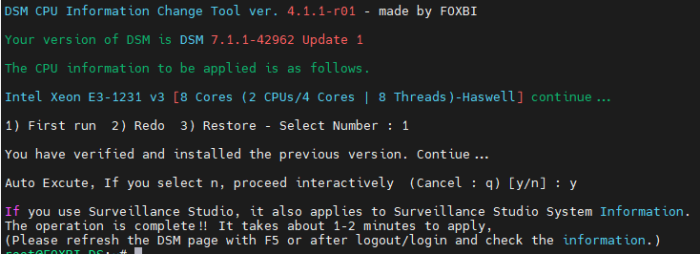
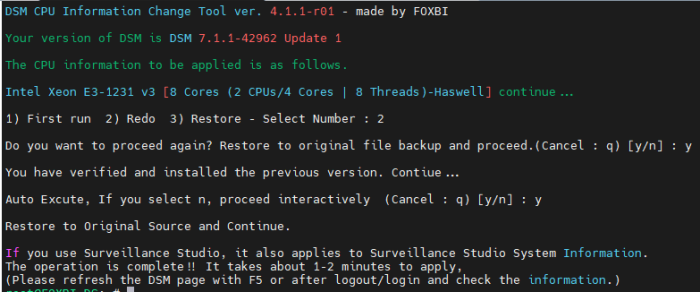
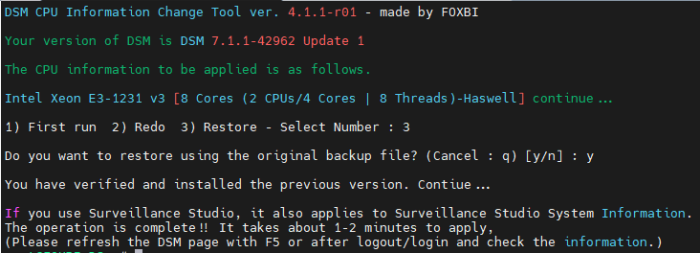
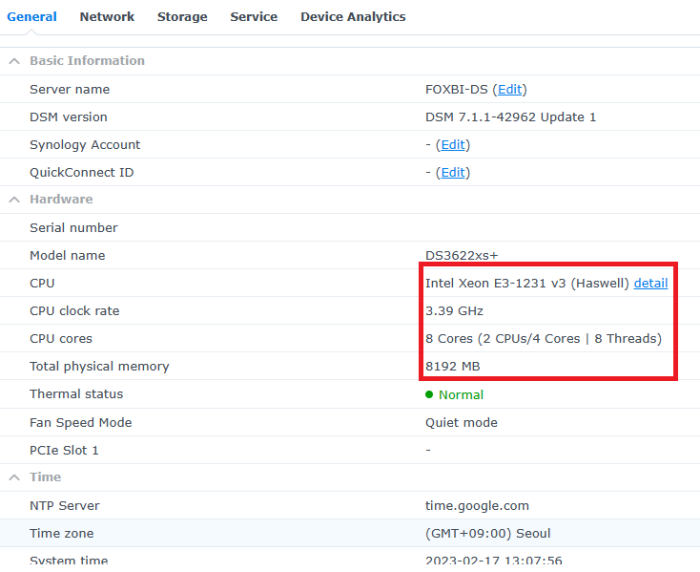
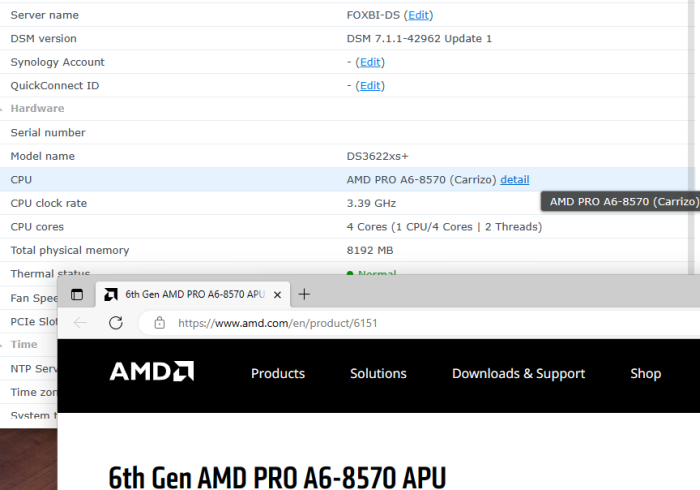
Hello! I am xpenology user. And I am an IT engineer who creates shell scripts as hobbies. Please understand that it is written by a google translate site. because i’m korean who is not fluent in English. I created a tool to change cpu information for Xpenology’s users. Modify the actual cpu name and cores of your pc or server. Howto Run ============================================================= 1. Download attached file on your PC (ch_cpuinfo.tar) (ch_cpuinfo_en.tar) / (ch_cpuinfo_kr.tar is file for korean) 2. Upload file to your DSM location (by filestation, sftp, webdav etc....) 3. Connect to ssh by admin account. (dsm > control panel > terminal & snmp > terminal > enable ssh check) 4. Switch user to root: sudo su - (input admin password) 5. Change directory to where ch_cpuinfo.tar file is located: cd /volume1/temp 5-1. in another way, Download ch_cpuinfo.tar with wget wget https://github.com/FOXBI/ch_cpuinfo/releases/download/ch_cpuinfo/ch_cpuinfo.tar 6. Decompress file & check file: tar xvf ch_cpuinfo.tar ls -lrt (check root’s run auth) 7. Run to Binary file ./ch_cpuinfo or ./ch_cpuinfo.sh (If you use busybox in DSM 5.x, you can use it as a source file) 8. When you execute it, proceed according to the description that is output. 9. Check your DSM’s CPU name, CPU cores at “information center” made a video of the how to run ch_cpuinfo. Extra Action If you want to use ch_cpuinfo in your language Modify and use the LANG.txt file in the same path as ch_cpuinfo. It is possible to use after changing the English content of each variable after translation and changing the value of CUSTLANG in line 8 to Y. Sample image(by Google trans) ==================================================== Addtional, Adjust binary to excute file made by shc(http://www.datsi.fi.upm.es/~frosal) The tool does not inclue worms, bad code. If you want to edit the CPU information yourself manually, please refer to the contents below. ——————————————————————————————————————————————————————————————— Location : /usr/syno/synoman/webman/modules/AdminCenter Source : admin_center.js / admin_center.js.gz(above 6.2) Add Before -> if(Ext.isDefined(h.cpu_vendor)&&Ext.isDefined(h.cpu_family)&&Ext.isDefined(h.cpu_series)){ o.push([_T("status","cpu_model_name"),String.format("{0} {1} {2}",h.cpu_vendor,h.cpu_family,h.cpu_series)])} if(Ext.isDefined(h.cpu_cores)){o.push([_T("status","cpu_cores"),h.cpu_cores])} Add contents: h.cpu_vendor="Intel";h.cpu_family="Xeon";h.cpu_series="E3-1220 V3";h.cpu_cores="4 Cores (1 CPU/4 Cores | 4 Threads)"; h.cpu_detail="<a href='https://ark.intel.com/content/www/us/en/ark/search.html?_charset_=UTF-8&q=E3-1220 V3' target=_blank>detail</a>" Change contens: String.format("{0} {1} {2}",h.cpu_vendor,h.cpu_family,h.cpu_series) to String.format("{0} {1} {2} {3}",h.cpu_vendor,h.cpu_family,h.cpu_series,h.cpu_detail) ——————————————————————————————————————————————————————————————— Finally, All descriptions are based on version 6.2, and the actual executable file supports 5.x, 6.x and 7.x Publish the source through github(https://github.com/FOXBI/ch_cpuinfo). For versions DSM 6.x and later, you can use the binary as before. If you use busybox in DSM 5.x, you can use it as a source file(ch_cpuinfo.sh). Please contact me by comment or bug report, i’ll respond to you as much as possible within my ability. Test & Made Environment ———————————————————————————————————— Base Server : HP ML310e v2 gen8 + VMware ESXi 6.0 + RDM DSM : DSM 6.2.3-25426 Update 3 (DS3615xs) Base Server : HP ML310e v2 gen8 + VMware ESXi 6.0 DSM : DSM 7.0.1-42214 (DS3615xs) Base Server : HP ML310e v2 gen8 + VMware ESXi 6.0 DSM : DSM 7.0.1-42214 (DS918+) Base Server : HP ML310e v2 gen8 + VMware ESXi 6.0 DSM : DSM 6.2.4-25556 (DS3615xs) Base Server : Intel E5-2630 v2 + VMware ESXi 6.7u2 DSM : 6.2.2-24922 Update 2 (DS3617xs) ———————————————————————————————————— Change Log Update new version (ch_cpuinfo ver 4.2.0-r01) 2023.02.18 - Application of AMD's CPU information collection function improvement - xpenlib(cpu_info.sh) refered https://github.com/FOXBI/xpenlib/blob/main/cpu_info.sh Update new version (ch_cpuinfo ver 4.2.1-r01) 2023.03.05 - Fixed error when users of previous version perform redo with version 4.2.0-r01 (Thanks for the @Mentat report.) I am sorry for not being able to actively respond to your inquiries due to busy life. Thank you!! Have a nice day!! Cheer up!! We can do it!! Reduce activity & Stay home & Wear a Mask!! Let's overcome COVID-19 !! Let's pray and support together for the two countries where the earthquake caused great damage and many deaths and missing people. ============================================= Download links: ch_cpuinfo ver 4.2.0-r01 - new version update -> ch_cpuinfo ver 4.2.1-r01 - new version update -> ch_cpuinfo.tar Reference images # 1.04b + DS918+ # 1.03b + DS3615xs # 1.03b + DS3617xs # Normal output is possible even when using more than 8core. # Support DSM 7.x


- 394 replies
-
- 54
-

-

-
Hello everyone, I have install DSM on my Qnap TS559 pro+, all work without problem except the hibernation. I have the problem with 6.2.3 and I have downgrade to 6.2.2 but same problem. Anyone know how can I resolve the problem ?
-
After fiddling with it for a day, and getting it to work, I thought it would be nice to share the knowledge, especially since "officially" only ESXi is supported, and ESXi is picky about supporting stuff... The main reason for me to move to a hypervisor was because Synology has not yet introduced NVMe support AT ALL. And even with a kernel driver, the Storage Manager will not see it as an SSD, as an HDD, or anything. Synology is silent about this, even though some have requested it on their forums (although they do not have a model with M.2 NVMe connector yet, they have some models with full sized x16 or x4 PCIe ports, which can be used with an adapter card for NVMe). So I decided to try with a hypervisor. On one hand it makes installation easier, upgrading also, and I don't need a display connected (since most hypervisors provide a VNC connection to the guest OS). On the other hand, I can install the measly 2-3GB hypervisor and all the tools on the NVMe SSD, and have the rest mounted as a VMDK (or any other virtual disk file). The rest of the hard drives would use passthrough of course. I fiddled around with multiple options. XenServer simply refused to boot in UEFI mode, ESXi does not support my network adapter, or my built-in SATA controller (B250 chipset), Microsoft's Hyper-V server has issues if you do not have a domain server on the network, also as soon as the display output goes off, the device drops network connection. It left me with Proxmox. Never used it, and during installation I had some issues with the bootloader (both on 4.4 release and 5.0 beta). Luckily there's a workaround, since it is based on Debian, one can use the Debian netinst image, create a very basic system, and install Proxmox on top. I won't bore you with the details, there are enough guides about installing it to make me think twice before I write an (n+1)th version. So let's begin! Requirements: A working install of Proxmox 5.0 - it can be 4.4 too, but I only tested this on 5.0. Follow the guide to create the bridged network interface! The loader you wish to use. I recommend Jun's Loader, specifically 1.02a2 at the time of the writing of this guide. Steps: 0. Edit the loader (if needed) to your liking - MAC address, serial number, etc. This is especially important if you have multiple XPE systems on the same network. 1. Create a new VM in Proxmox. 1.1 Set the name, and make sure to note down the VM ID (if it is your first VM, it should be 100). I'll be using {VM_ID} as a placeholder from now on. 1.2 OS type should be "Linux 4.x/3.x/2.6 Kernel". 1.3 Set the CD/DVD to "Do not use media" (we will remove the virtual disk drive any way later on). 1.4 For the HDD, you should create a new virtual disk with the format of your liking (qcow2, vmdk or raw), this will be the initial drive. I made sure that it uses nearly the whole storage of the OS drive it was installed on (in my case it was a 256GB NVMe SSD, which, after setup and partitioning, resulted in a 226GiB root drive, of which I had 211GB free, so I set the virtual disk's size to 200GB). You can set it to any kind of bus, EXCEPT VirtIO. With VirtIO I had performance issues, so I went with SCSI (it supports up to 12 devices any way, so it is better). This is for the virtual disk only, VirtIO works just fine with passthrough devices. So apart from the bus, size and format, you don't need to touch a thing. 1.5 For CPU, set kvm64 with as many cores as your host has (incl. virtual cores if you're on a HyperThreading supported CPU!). In my case with the Intel G4560 this is 4. 1.6 For RAM, you should leave some slack for the host OS, I went with 7.5GB from the 8GB I have. Ballooning is not required. 1.7 Networking. This is where many things can go wrong. The VirtIO paravirtualized network adapter should work, but to be safe I went with the Intel E1000. On the left select Bridged Mode, with the previously created bridge as the first choice. You can also enable Firewall if you do not trust Syno's own. Leave the rest of the settings as default. 1.8 On the Confirm page, confirm your settings and create the VM. 2. After the VM is created, first thing to do is to remove the virtual disk drive (IDE 2, if everything went right). Then comes the hard part. 3. You have to add each and every HDD to the config file that you want to use for passthrough. The command is simple: qm set {VM_ID} -[protocol][port] /dev/disk/by-id/[disk-id] The {VM_ID} part is obvious, but what about the rest? [protocol] is the connection protocol you want to use. This can be sata, ide, scsi or virtio. I'm using SATA here, but you can use anything (IDE is not IDEal for us). SATA supports up to 6 devices (port indexes 0-6), scsi supports up to 12 devices, and virtio does not have a limitation to my knowledge. [port] is the first unused port of said protocol. E.g. if you set the initial disk during setup to SATA0, and you want to use SATA further here, you have to start numbering from 1. [disk-id] is the unique identifier of your HDD. Go to /dev/disk/by-id/ and list the disks you see. For most SATA devices, you'll see entries like "ata-[MANUFACTURER]_[MODEL]_[sERIAL]". So let's say I have 4 disks, with the disk-id's ata-1, ata-2, ata-3, and ata-4 (yours will be a lot longer, but don't worry, you can use the bash autocomplete with the tab key). For this to work I execute the following commands: qm set 100 -sata1 /dev/disk/by-id/ata-1 qm set 100 -sata2 /dev/disk/by-id/ata-2 qm set 100 -sata3 /dev/disk/by-id/ata-3 qm set 100 -sata4 /dev/disk/by-id/ata-4 Of course later on you can add further HDDs to a VM config by using the same command, just keep in mind the limitations of the protocols. 4. Now comes the hard part, we'll have to add the bootloader image file to the config. The config file is located under /etc/pve/qemu-server/, and is named {VM_ID}.conf. Open it with nano. This config file defines everything about the VM. Disks to mount, which device to use for booting, RAM amount, CPU cores, name of the VM, et cetera. Don't touch anything else than the lines you see here! Copy the synoboot.img to somewhere on your server. If you want to be consistent with the Proxmox setup, copy it under /var/lib/vz/images/{VM_ID}/ - you'll need root for that. After that, come back to the conf file, and open it again. You'll enter a few things here, make sure you pay attention! Enter the following line into the conf file, and make sure you replace the parts in the path! args: -device 'piix3-usb-uhci,addr=0x18' -drive 'id=synoboot,file=/var/lib/vz/images/{VM_ID}/synoboot.img,if=none,format=raw' -device 'usb-storage,id=synoboot,drive=synoboot' Make sure to replace the path to the synoboot.img with your own! One more thing to edit here, the boot device. Find the line that begins with "boot: " and replace it so it looks like this: boot: synoboot Save the file, then start the VM. It should start up without an issue, and you'll be able to use find.synology.com to find your server and install it.