Search the Community
Showing results for tags 'dsm7'.
-
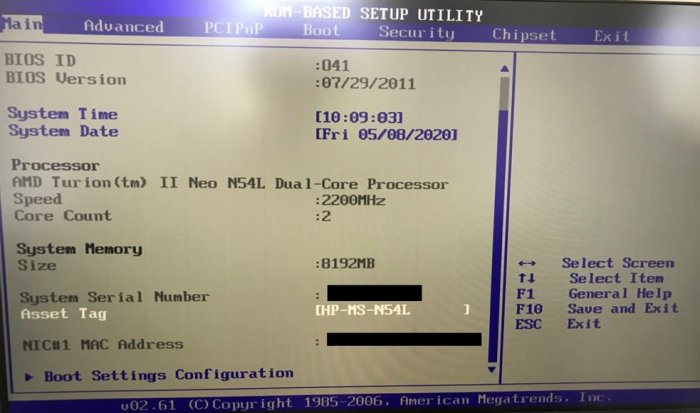
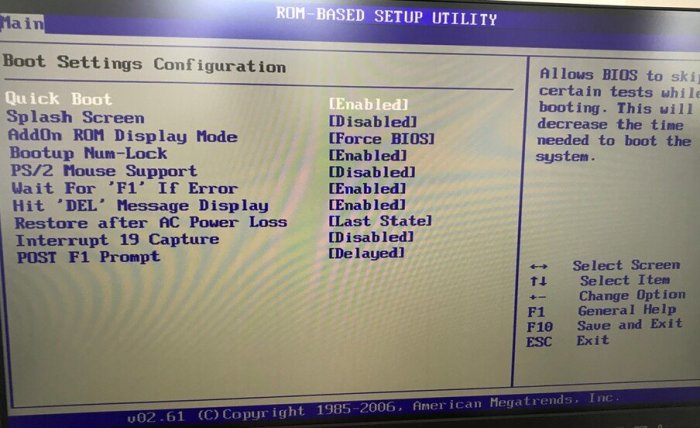
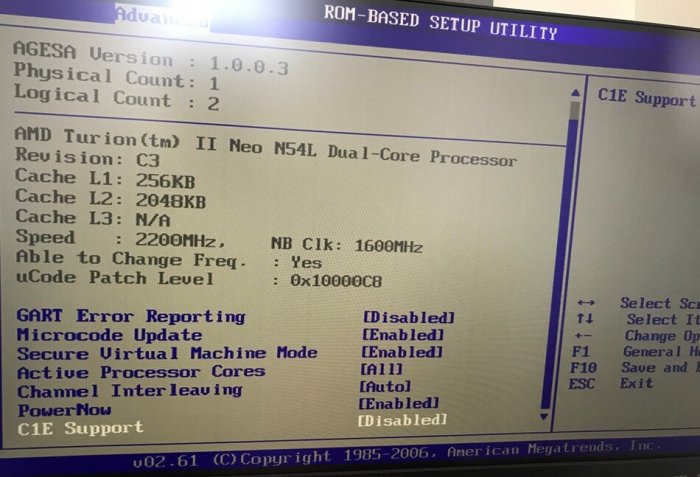
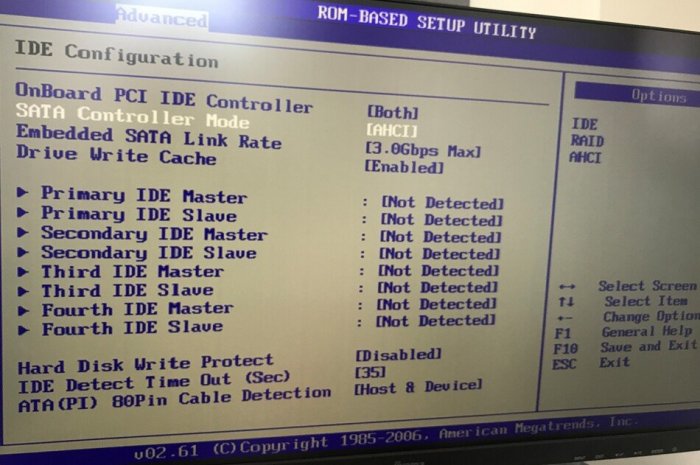
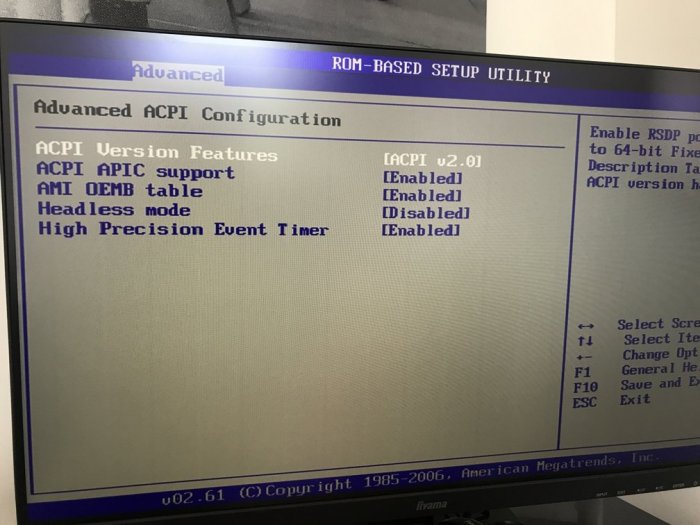
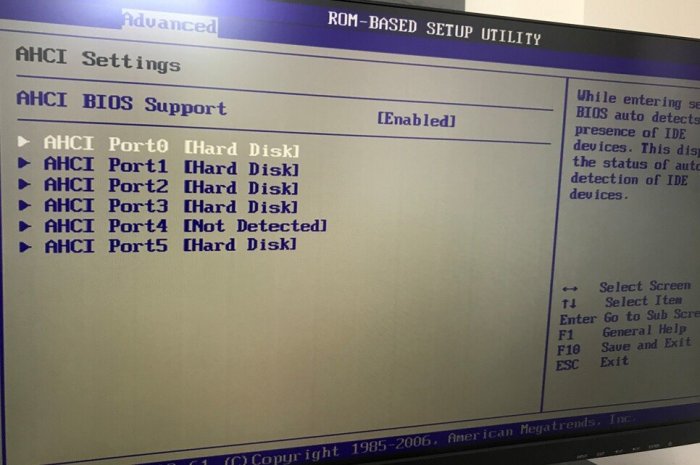
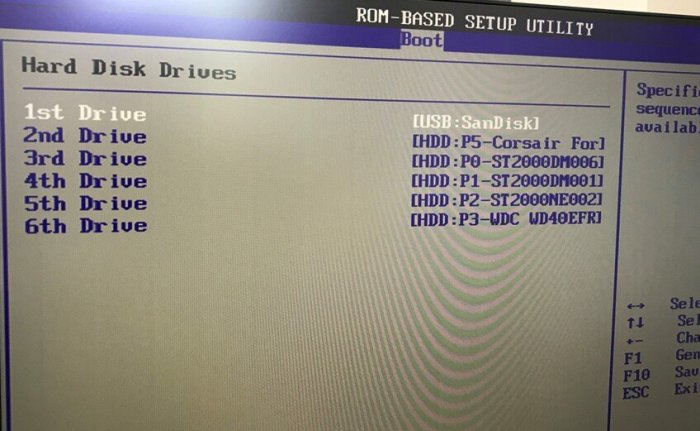
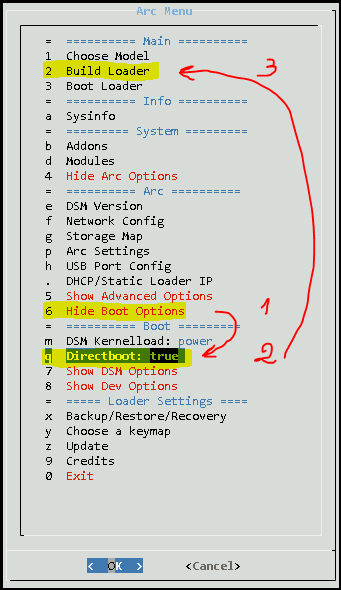
Bonjour, [EDIT] @nicoueron21/10/2023 : Changement du mode de configuration du flag directboot [EDIT] @nicoueron16/10/2023 : Factorisation du tuto avec le tuto principal [EDIT] @nicoueron02/10/2023 : Refonte avec le loader arpl-i18n [EDIT] @nicoueron05/05/2023 : révélation de la section BIOS [EDIT] @nicoueron24/11/2022 : ajout section "mise à jour" [EDIT] @nicoueron19/11/2022 : version DSM7.1.1 minimum + adaptations commande suite aux changements du loader >v0.9.2.9 [EDIT] @nicoueron07/10/2022 : fin support <DSM7.1 [EDIT] @nicoueron26/09/2022 : Ajout capture écran paramètre IDE pour avoir les disques 5 et 6 de visible [EDIT] @nicoueron27/06/2022 : support DS3622XS+ et note sur l'incompatibilité de l'USB avec DSM7.1 [EDIT] @nicoueron28/04/2022 : prise en charge de l'USB [EDIT] @nicoueron22/03/2022 : précision sur la pile du bios [EDIT] @nicoueron16/03/2022 : ajout de DSM 7 [EDIT] @nicoueron08/05/2020 : adaptation du tuto pour DSM 6.2.3 sans aucun matos nécessaire en plus. Pré-requis 1 : Service DHCP et Accès internet Un service DHCP doit être actif sur votre réseau. De même, lors de la construction du loader, le serveur doit avoir accès à Internet. Pré-requis 2 : Vérifier la pile du BIOS Avant tout de chose, le serveur HP N54L gen7 étant maintenant très ancien, je conseille fortement de procéder au remplacement de la pile du BIOS, pour info la référence est CR2032. N'hésitez pas à faire des captures d'écrans des options de votre BIOS avant son remplacement, à défaut les options ci-dessous devraient pouvoir vous aider Pré-requis 3 : Flashé le BIOS avec cette version correctement configurée Celui de 2011 (V041 - 2011): TheBay_Microserver_Bios_041.rar Le Bios Mod: o41072911mod.rom Il suffit de supprimer celui présent sur la clé, de copier/coller le fichier mod.rom et de le renommer comme l'ancien. Vous pouvez suivre ce Tuto qui est très explicite : How to flash Bios HP Proliant (c'est le même Bios pour les 3 servers N36L; N40L et N54L). Une fois le BIOS flashé faites les réglages suivants : Onglet Main: Onglet Main > Boot Setting Configuration : Onglet Advanced > CE1 Support = Disabled Onglet Advanced > IDE Configuration > SATA Controller Mode AHCI Onglet Advanced > Advanced ACPI Configurtation > ACPI v2.0 Onglet Advanced > AHCI Settings > ici il faut vous assurer que TOUS les disques sont bien détectés et que le paramètre AHCI BIOS Support est sur Enabled Onglet Boot > Hard Disk Drives > ici positionner la clé USB en premier Onglet Chipset > ici positionner l'option onChip IDE Type sur IDE Loader Arc : ==>Suivre à la lettre le tuto générique : [Tuto] DSM 7 pour tous la seule différence porte sur le point suivant qui doit être réalisé juste avant la construction du loader (point n°11) : Dérouler le menu Boot Options (1) > Sélectionner "Directboot: true" (2) > Build Loader (3) et.... c'est tout ! En effet, le reste est identique au tuto ==> Enjoy
- 865 replies
-
- 15
-

-

-
I have managed to compile the i915.ko module (and associated modules) for Intel 10th Gen CPUs (i.e. 9BC8 etc.) Tested and working on DS918+ 7.0.1-42218 up3; Redpill loader on baremetal instance. The patched i915 module from IG88 had issues and would end up in a hardlockup/kernel panic for me. For anyone who wants to test, i have attached the compiled modules. https://www.filehosting.org/file/details/3054890/i915.7z https://www104.zippyshare.com/v/oPItjx82/file.html https://dailyuploads.net/41tops2ix61g
-
Please help me, I want to use ABB but i can't activate trough the os, the web interface, the offline activation and the special url. everytime it shows an error. please help me with this
- 1 reply
-
- activation
- active
-
(and 4 more)
Tagged with:
-
Hi all! I updated from DSM 6 to 7 on my HPE Microserver Gen8 (baremetal install, emulating DS3622xs+, current DSM 7.1-42661 Update 1) and on 2nd try all went well but now I cannot access my USD DAC E30, which earlier DSM "saw" as USB Speakers, and new DSM "sees" (i.e. if I connect it, writes "USB audio in info) but I cannot use it with Audio Station. I've searched both this forum and the net for a solution, and found at least two variants to install USB drivers to DSM7 the first is here, https://mariushosting.com/synology-how-to-add-usb-support-on-dsm-7/ and the idea is a short script that uses modprobe and lter another using insmod. I tried it as described and by accessing via SSH. I successfully added (at least no errors were shown) drivers, but it still does not "see" DAC as a possible output for Audio station the second option is a bit harder, so I haven't tried it yet, it can be found here https://github.com/robertklep/dsm7-usb-serial-drivers - here the problem is that in the list of Supported platforms there is no broadwellnk - I guess it can be the same as one of the lisyed but I cannot be sure I will be glad if this info helps anyone and still hope that someone will tell me a step-by-step way to recover my access to USB DAC, preferably w/o rebuilding the whole system (my meagre skills mean I may err even in simplest tasks) I guess I have to find out what USB driver is used by my DAC (how?) and then to get it from linux which runs the same core as my NAS (again how?) If there are any guides on this forum, which I missed, please direct me
- 17 replies
-
- 1
-

-
- usb dac
- usb drvier
-
(and 2 more)
Tagged with:
-
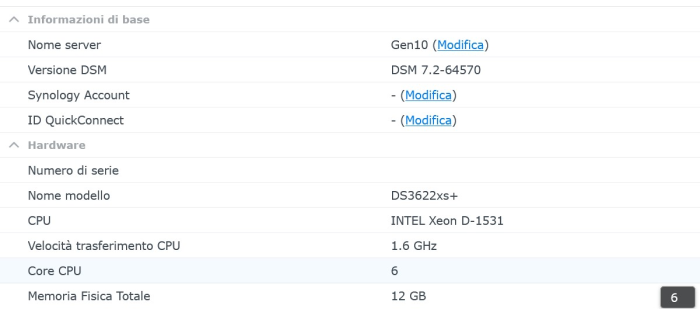
Hello all, I have a HP Microserver Gen10 with 16GB of RAM and 4 disk WD red 3TB (drives are in passthrough). I'd like to go back from virtual machine to bare-metal due to performance issue. What steps should i do considering that i've updated to DSM7.2-64570 - DS3622xs? i have only to create the usb boot or i have to perform any other step? Any other consideration? Thank you in advance!
-
I'm getting the following error messages from dmesg everytime DSM puts the HDDs to hibernation. I'm running ds918+ Redpill Tinycore DSM 7.0.1-42218 Update 2. Tips? kern :warn : [Mon Jun 27 13:02:38 2022] No such hdd enable pin. Index: 5 kern :warn : [Mon Jun 27 13:02:38 2022] ------------[ cut here ]------------ kern :warn : [Mon Jun 27 13:02:38 2022] WARNING: CPU: 1 PID: 4086 at drivers/ata/libata-core.c:453 SYNO_CTRL_HDD_POWERON+0x4f/0x60() kern :warn : [Mon Jun 27 13:02:38 2022] Modules linked in: cmac cifs tun nf_conntrack_ipv6 nf_defrag_ipv6 ip6table_filter ip6_tables ipt_MASQUERADE xt_REDIRECT nf_nat_masquerade_ipv4 xt_nat iptable_nat nf_nat_ipv4 nf_nat_redirect nf_nat xt_recent xt_iprange xt_limit xt_state xt_tcpudp xt_multiport xt_LOG nf_conntrack_ipv4 nf_defrag_ipv4 nf_conntrack iptable_filter ip_tables x_tables fuse 8021q vfat fat udf isofs loop vhost_scsi(O) vhost(O) tcm_loop(O) iscsi_target_mod(O) target_core_user(O) target_core_ep(O) target_core_multi_file(O) target_core_file(O) target_core_iblock(O) target_core_mod(O) syno_extent_pool(PO) rodsp_ep(O) synoacl_vfs(PO) raid456 async_raid6_recov async_memcpy async_pq async_xor async_tx nfsd btrfs ecryptfs zstd_decompress zstd_compress xxhash xor raid6_pq lockd grace rpcsec_gss_krb5 auth_rpcgss sunrpc aesni_intel kern :warn : [Mon Jun 27 13:02:38 2022] glue_helper lrw gf128mul ablk_helper apollolake_synobios(PO) hid_generic usbhid hid usblp i915 drm_kms_helper syscopyarea sysfillrect sysimgblt fb_sys_fops cfbfillrect cfbcopyarea cfbimgblt drm drm_panel_orientation_quirks iosf_mbi fb fbdev video backlight button uhci_hcd ehci_pci ehci_hcd r8168(O) i2c_algo_bit zram igb(O) e1000e(O) sg dm_snapshot dm_bufio crc_itu_t crc_ccitt psnap p8022 llc hfsplus md4 hmac sit tunnel4 ipv6 flashcache_syno(O) flashcache(O) syno_flashcache_control(O) dm_mod arc4 crc32c_intel cryptd sha256_generic ecb aes_x86_64 authenc des_generic ansi_cprng cts md5 cbc cpufreq_powersave cpufreq_performance processor cpufreq_stats vxlan ip6_udp_tunnel udp_tunnel ip_tunnel etxhci_hcd virtio_scsi(OE) virtio_net(OE) virtio_blk(OE) virtio_pci(OE) virtio_mmio(OE) virtio_ring(OE) kern :warn : [Mon Jun 27 13:02:38 2022] virtio(OE) usb_storage xhci_pci xhci_hcd usbcore usb_common [last unloaded: apollolake_synobios] kern :warn : [Mon Jun 27 13:02:38 2022] CPU: 1 PID: 4086 Comm: scsi_eh_10 Tainted: P W OE 4.4.180+ #42218 kern :warn : [Mon Jun 27 13:02:38 2022] Hardware name: QEMU Standard PC (Q35 + ICH9, 2009), BIOS rel-1.14.0-0-g155821a1990b-prebuilt.qemu.org 04/01/2014 kern :warn : [Mon Jun 27 13:02:38 2022] 0000000000000000 ffff88017830bcb0 ffffffff812ef89d 0000000000000009 kern :warn : [Mon Jun 27 13:02:38 2022] 0000000000000000 ffff88017830bce8 ffffffff8105255f 0000000000000bb8 kern :warn : [Mon Jun 27 13:02:38 2022] 0000000000000000 0000000000000001 ffff880178978000 0000000000000000 kern :warn : [Mon Jun 27 13:02:38 2022] Call Trace: kern :warn : [Mon Jun 27 13:02:38 2022] [<ffffffff812ef89d>] dump_stack+0x4d/0x70 kern :warn : [Mon Jun 27 13:02:38 2022] [<ffffffff8105255f>] warn_slowpath_common+0x7f/0xb0 kern :warn : [Mon Jun 27 13:02:38 2022] [<ffffffff81052646>] warn_slowpath_null+0x16/0x20 kern :warn : [Mon Jun 27 13:02:38 2022] [<ffffffff8141dcdf>] SYNO_CTRL_HDD_POWERON+0x4f/0x60 kern :warn : [Mon Jun 27 13:02:38 2022] [<ffffffff8142e825>] syno_libata_port_power_ctl+0xc5/0x1a0 kern :warn : [Mon Jun 27 13:02:38 2022] [<ffffffff8142f7c7>] syno_libata_set_deep_sleep+0x2b7/0x9c0 kern :warn : [Mon Jun 27 13:02:38 2022] [<ffffffff81436ee3>] ata_scsi_port_error_handler+0x133/0x1a30 kern :warn : [Mon Jun 27 13:02:38 2022] [<ffffffff8106b0fe>] ? cancel_delayed_work_sync+0xe/0x10 kern :warn : [Mon Jun 27 13:02:38 2022] [<ffffffff81432868>] ? ata_scsi_cmd_error_handler+0x118/0x190 kern :warn : [Mon Jun 27 13:02:38 2022] [<ffffffff8143887b>] ata_scsi_error+0x9b/0xe0 kern :warn : [Mon Jun 27 13:02:38 2022] [<ffffffff813f86f5>] scsi_error_handler+0xa5/0x530 kern :warn : [Mon Jun 27 13:02:38 2022] [<ffffffff81575bcf>] ? __schedule+0x2ef/0x820 kern :warn : [Mon Jun 27 13:02:38 2022] [<ffffffff813f8650>] ? scsi_eh_get_sense+0x170/0x170 kern :warn : [Mon Jun 27 13:02:38 2022] [<ffffffff810700f5>] kthread+0xd5/0xf0 kern :warn : [Mon Jun 27 13:02:38 2022] [<ffffffff81070020>] ? kthread_worker_fn+0x160/0x160 kern :warn : [Mon Jun 27 13:02:38 2022] [<ffffffff81579fef>] ret_from_fork+0x3f/0x80 kern :warn : [Mon Jun 27 13:02:38 2022] [<ffffffff81070020>] ? kthread_worker_fn+0x160/0x160 kern :warn : [Mon Jun 27 13:02:39 2022] ---[ end trace 4d3f8f657722e7be ]--- kern :err : [Mon Jun 27 13:02:42 2022] ata11: wake up successful, the reset fail can be ignored kern :err : [Mon Jun 27 13:02:45 2022] ata10: wake up from deepsleep, reset link now kern :err : [Mon Jun 27 13:02:48 2022] ata10: wake up successful, the reset fail can be ignore
-
Переходить с 6-ки на DSM 7? Нужна виртуалка Win10 или Win11
garmoniya duha posted a question in Остальное
Есть Хрень DSM 6.2.3-25426 Update 3 забыл когда уже ставил. Работает и хорошо. Но сейчас поменялись цели, поэтому вопросы... Да и 7 ка уже не новость давно... 1. На какую максимальную версию можно обновиться на моем железе? 2. Какой загрузчик использовать? 3. Потребности - хранение файлов, синхронизация (стандартно) - и нужно запустить виртуалку на Windows, где будет стоять Zoom, который будет сразу кидать записи конференций на облако. - еще не разу не запускал виртуалку на хрени, какой образ Win нужен, обычный Pro, LTSC или какие-то другие версии? - cколько надо для такого оперативки, есть 6, но можно сделать 12. - на новой версии DSM есть Virtual Machine Manager 2.6.0-12122, которая вроде запускает Win 11 или смотреть в сторону Win10? Подскажите с чего начать...- 5 replies
-
- windows 11
- windows 10
-
(and 2 more)
Tagged with:
-
Распознование лиц (Face Recognition) в DSM 7.0.1+
Infinity6 posted a topic in Програмное обеспечение
Друзья, Обновился до DS3615xs - DSM 7.0.1. Активировал кодеки по вот этой инструкции. Показ видео в Photos работает отлично. Вопросов нет. Однако что-то не так с разпознаванием лиц. Судя по всему оно не работает. Вот такое "XXX photos to be discovered" висит уже часы... Есть ли идеи куда капнуть дальше чтобы эта штука заработала? -
Добрый день! установлена DSM 7.1.1-42962 Update 4 DS1621 стоит проц AMD phenom II x4 965 и оперативки 16 гиг Проблема появилась после установки сетевой карты 2.5 гб. суть в том, когда копирование идет с NAS, все норм, скорость хорошая, но когда копируешь на сервер(к примеру фильм на 25 гиг), то сначала скорость за 300мбит и на середине падает в двое, за тем до килобайтов, при этом RAM заполняется на 96% и не обнуляется(сброс кэша SMB не помогает), и все встает колом, спасает только ребут. Сетевухи менял, результат тот же. может кто то сталкивался, может както настроки подредактировать?
-
In English. Hello, currently owner of an HP Micro Server Gen8, with 16GB of ECC RAM, an Intel Xeon E3-1260L, I added a PCI Express card to put a NVME SSD but I can not find how to add support for this device in DSM, would you have an idea? En français. Bonjours, actuellement possesseur d'un HP Micro Server Gen8, avec 16Go de RAM ECC, un Intel Xeon E3-1260L, j'ai rajouté un carte PCI Express pour mettre un SSD NVME mais je n'arrive pas a trouvé comment rajouté le support de ce périphérique dans DSM, auriez vous une idée?
-
Все привет, решил пересесть с DS1515+ на Proxmox Интересует возможность транскодинга, будет ли он работать, если пробросить видеокарту, использовав 918+ ? (UHD 730 i5 12400 6/12) Задача заключается в том, чтобы забекапленное видео (4к 60с) спокойно воспроизводить на телефоне в Photos Mobile. Или не париться и сделать DS3618+ дать побольше ядер/потоков и положиться на софт ? Про валидную пару серийника и мак знаю, при хорошем желании добыть возможно. Так же будет стоять карточка на 10гбит, видел, что народ добавляет виртуальную карту и все 10г работают (что было бы преимуществом, чтобы 10г использовать и для других виртуалок)
-
Имеется хрень - tcrp, ds920+, dsm 7.1.0-42661 на железе старого ноута (lenovo g50-30, bay trail-m, celeron n2830, сеть realtek RTL8168/8111, ddr3-1333 2Gb, ssd samsung 850pro 1tb). Изучаю возможности и тестирую под свои задачи, важно наличие usb 3.0 на соответствующей ему скорости.. Сейчас порт 3.0 работает но при копировании с флешки на ssd скорость не превышает 40мб/сек (та же флешка воткнутая в пк на винде дает при копировании 130мб/сек), реально получить те же 130мб/сек на хрени ? На этом же железе загрузился с Win PEшки, получил 80мб/сек (другая флешка, на бб так же), в общем железо исправно.
-
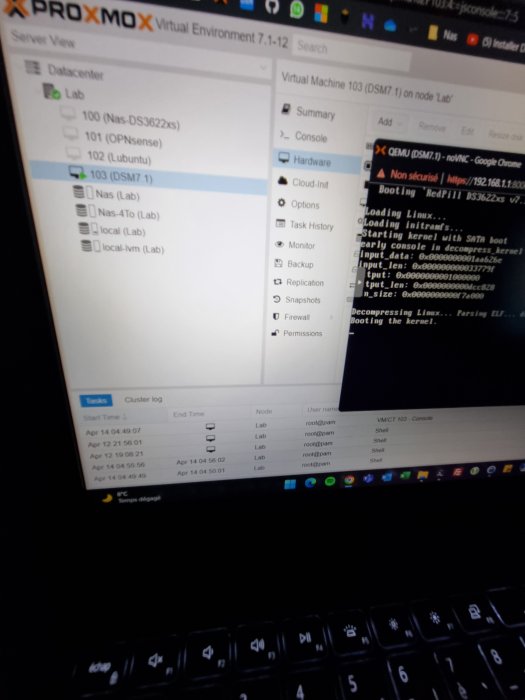
Vous verez sur mon Github la procedure qui a marché pour moi si vous avez des question hésitez pas. https://github.com/U4I5/DS918_7.1_Proxmox/blob/main/README.md
-
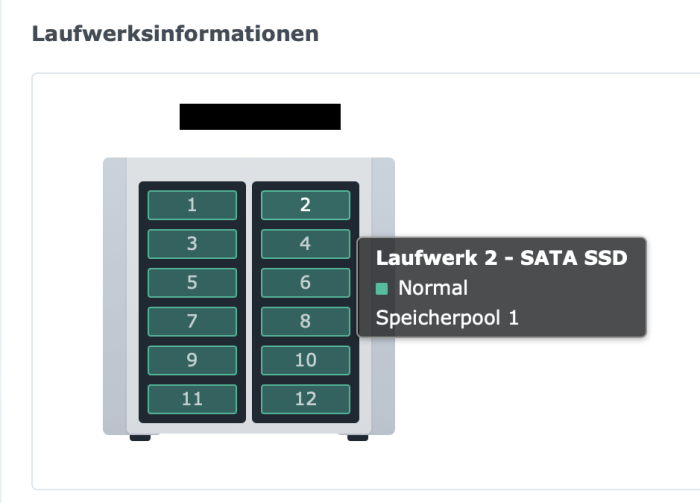
Is it possible to display expansion units (Synology DX1222) or pci-cards (intel X540-t2) in DSM7-TCRP like this? I am asking because it would be nice if I could see all my (22) drives and for example instantly know which drive I have to replace. For now it looks like this. My guess is, DSM only displays 12 drives in use because the DS3622xs+ has only 12 slots.
-
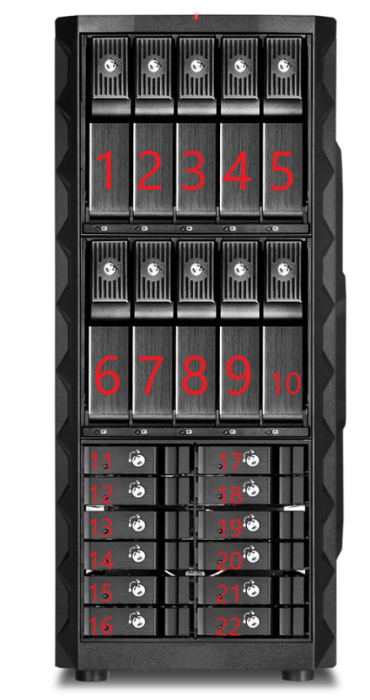
I am currently switching from DSM 6.2 to 7.1 and my setup is as follows: How to expand drive number in DSM7? Now my problem is, that it is not possible to do the same trick in DSM 7 to expand beyond x drives like it was in 6.2. (My setup would allow 22 in total from which 14 are used for now) I already chattet with @Peter Suhabout this topic but unfortunetly we could not solve my problem. Things I tried: Building the loader as described by @Peter Suh (Guide) installed the latest tcrp image with rufus on usb booted in tc & connected via ssh ./rploader.sh update ./my.sh ./rploader.sh clean ./my.sh DS3622xs+J poco noclean Building the loader as described by @flyride (Guide) installed the latest tcrp image with rufus on usb booted in tc & connected via ssh ./rploader.sh update ./rploader.sh fullupgrade ./rploader.sh identifyusb ./rploader.sh serialgen DS3622xs+ #I tried building the loader with and without this command ./rploader.sh satamap vi user_config.json # adding those lines: "maxdisks" : "22", "esataportcfg" : "0x00", "usbportcfg" : "0xc000000", "internalportcfg" : "0x3fffff", ./rploader.sh build broadwellnk-7.1.0-42661 ./rploader.sh backup ./rploader.sh backuploader exitcheck.sh reboot Seutp & outcome VM or BareMetal : BareMetal Hardware (Motherboard/CPU) : MSI MPG Z390 / Intel 9900T Storage-Controller: 2x LSI SAS 9211-8i (HBA in IT mode) Hot Plug Applied : Yes Network Interface 1 : Intel i217v (e1000e) Network Interface 2 : Intel X540-T2 (10 Gbit) Network Interface 3 : Intel X540-T2 (10 Gbit) Loader : TCRP 0.4.6 version of rploader.sh : 0.8.3 Platform : 3622xs+ Platform Version : 7.1 Platform Revision : 42661-U1 GRUB Boot selection : USB Unfortunetly both methods resulted in the same outcome which is the following: My NAS looks physically like this. I numbered the drive slots from 1 - 22 to have an easier time explaining my issue. So slotnumber 1-8 are connected to HBA 2 9,10 and 17-22 are connected to HBA 1 11-16 are connected to the mainboard SATA ports I have 3 PCIx16 Slots on my mainboard First one is used for Intel X540 T2 10 GBit NIC Second one is used for HBA1 Third one is used for HBA2 Currently the slots below are occupied: 1-4 = 4 HDDs 6-9 = 4 HDDs 11-13 = 3 SSDs 17-19 = 3 SSDs = 14 drives in total. Now in this config either slot 6 or 7 isnt recognised in DSM, every other drive works. When I put the drive from slot 6 into slot 5 it is reconised, BUT unfortunately one drive from slots 1-4 is missing then. I tried this with multiple combinations. The outcome was always that 1 drive was missing (not a specific HDD/SSD or SLOT). As soon as I add more than 13 drives it keeps getting weird. Since my setup worked in DSM6 my guess is that either I am missing something or TCRP is missing something. Troubleshooting: TinyCore sd list lrwxrwxrwx 1 root root 0 Jun 26 09:08 loop0 -> ../devices/virtual/block/loop0 lrwxrwxrwx 1 root root 0 Jun 26 09:08 loop1 -> ../devices/virtual/block/loop1 lrwxrwxrwx 1 root root 0 Jun 26 09:11 loop10 -> ../devices/virtual/block/loop10 lrwxrwxrwx 1 root root 0 Jun 26 09:11 loop11 -> ../devices/virtual/block/loop11 lrwxrwxrwx 1 root root 0 Jun 26 09:11 loop12 -> ../devices/virtual/block/loop12 lrwxrwxrwx 1 root root 0 Jun 26 09:11 loop13 -> ../devices/virtual/block/loop13 lrwxrwxrwx 1 root root 0 Jun 26 09:11 loop14 -> ../devices/virtual/block/loop14 lrwxrwxrwx 1 root root 0 Jun 26 09:11 loop15 -> ../devices/virtual/block/loop15 lrwxrwxrwx 1 root root 0 Jun 26 09:11 loop16 -> ../devices/virtual/block/loop16 lrwxrwxrwx 1 root root 0 Jun 26 09:11 loop17 -> ../devices/virtual/block/loop17 lrwxrwxrwx 1 root root 0 Jun 26 09:11 loop18 -> ../devices/virtual/block/loop18 lrwxrwxrwx 1 root root 0 Jun 26 09:11 loop19 -> ../devices/virtual/block/loop19 lrwxrwxrwx 1 root root 0 Jun 26 09:08 loop2 -> ../devices/virtual/block/loop2 lrwxrwxrwx 1 root root 0 Jun 26 09:11 loop20 -> ../devices/virtual/block/loop20 lrwxrwxrwx 1 root root 0 Jun 26 09:11 loop21 -> ../devices/virtual/block/loop21 lrwxrwxrwx 1 root root 0 Jun 26 09:11 loop22 -> ../devices/virtual/block/loop22 lrwxrwxrwx 1 root root 0 Jun 26 09:11 loop23 -> ../devices/virtual/block/loop23 lrwxrwxrwx 1 root root 0 Jun 26 09:11 loop24 -> ../devices/virtual/block/loop24 lrwxrwxrwx 1 root root 0 Jun 26 09:11 loop25 -> ../devices/virtual/block/loop25 lrwxrwxrwx 1 root root 0 Jun 26 09:11 loop26 -> ../devices/virtual/block/loop26 lrwxrwxrwx 1 root root 0 Jun 26 09:11 loop27 -> ../devices/virtual/block/loop27 lrwxrwxrwx 1 root root 0 Jun 26 09:11 loop28 -> ../devices/virtual/block/loop28 lrwxrwxrwx 1 root root 0 Jun 26 09:11 loop29 -> ../devices/virtual/block/loop29 lrwxrwxrwx 1 root root 0 Jun 26 09:08 loop3 -> ../devices/virtual/block/loop3 lrwxrwxrwx 1 root root 0 Jun 26 09:11 loop30 -> ../devices/virtual/block/loop30 lrwxrwxrwx 1 root root 0 Jun 26 09:11 loop31 -> ../devices/virtual/block/loop31 lrwxrwxrwx 1 root root 0 Jun 26 09:11 loop32 -> ../devices/virtual/block/loop32 lrwxrwxrwx 1 root root 0 Jun 26 09:11 loop33 -> ../devices/virtual/block/loop33 lrwxrwxrwx 1 root root 0 Jun 26 09:11 loop34 -> ../devices/virtual/block/loop34 lrwxrwxrwx 1 root root 0 Jun 26 09:11 loop35 -> ../devices/virtual/block/loop35 lrwxrwxrwx 1 root root 0 Jun 26 09:11 loop36 -> ../devices/virtual/block/loop36 lrwxrwxrwx 1 root root 0 Jun 26 09:11 loop37 -> ../devices/virtual/block/loop37 lrwxrwxrwx 1 root root 0 Jun 26 09:11 loop38 -> ../devices/virtual/block/loop38 lrwxrwxrwx 1 root root 0 Jun 26 09:11 loop39 -> ../devices/virtual/block/loop39 lrwxrwxrwx 1 root root 0 Jun 26 09:08 loop4 -> ../devices/virtual/block/loop4 lrwxrwxrwx 1 root root 0 Jun 26 09:11 loop40 -> ../devices/virtual/block/loop40 lrwxrwxrwx 1 root root 0 Jun 26 09:11 loop41 -> ../devices/virtual/block/loop41 lrwxrwxrwx 1 root root 0 Jun 26 09:11 loop42 -> ../devices/virtual/block/loop42 lrwxrwxrwx 1 root root 0 Jun 26 09:11 loop43 -> ../devices/virtual/block/loop43 lrwxrwxrwx 1 root root 0 Jun 26 09:11 loop44 -> ../devices/virtual/block/loop44 lrwxrwxrwx 1 root root 0 Jun 26 09:11 loop45 -> ../devices/virtual/block/loop45 lrwxrwxrwx 1 root root 0 Jun 26 09:11 loop46 -> ../devices/virtual/block/loop46 lrwxrwxrwx 1 root root 0 Jun 26 09:11 loop47 -> ../devices/virtual/block/loop47 lrwxrwxrwx 1 root root 0 Jun 26 09:11 loop48 -> ../devices/virtual/block/loop48 lrwxrwxrwx 1 root root 0 Jun 26 09:11 loop49 -> ../devices/virtual/block/loop49 lrwxrwxrwx 1 root root 0 Jun 26 09:08 loop5 -> ../devices/virtual/block/loop5 lrwxrwxrwx 1 root root 0 Jun 26 09:11 loop50 -> ../devices/virtual/block/loop50 lrwxrwxrwx 1 root root 0 Jun 26 09:11 loop51 -> ../devices/virtual/block/loop51 lrwxrwxrwx 1 root root 0 Jun 26 09:08 loop6 -> ../devices/virtual/block/loop6 lrwxrwxrwx 1 root root 0 Jun 26 09:08 loop7 -> ../devices/virtual/block/loop7 lrwxrwxrwx 1 root root 0 Jun 26 09:11 loop8 -> ../devices/virtual/block/loop8 lrwxrwxrwx 1 root root 0 Jun 26 09:11 loop9 -> ../devices/virtual/block/loop9 lrwxrwxrwx 1 root root 0 Jun 26 09:08 ram0 -> ../devices/virtual/block/ram0 lrwxrwxrwx 1 root root 0 Jun 26 09:08 ram1 -> ../devices/virtual/block/ram1 lrwxrwxrwx 1 root root 0 Jun 26 09:08 ram2 -> ../devices/virtual/block/ram2 lrwxrwxrwx 1 root root 0 Jun 26 09:08 ram3 -> ../devices/virtual/block/ram3 lrwxrwxrwx 1 root root 0 Jun 26 09:08 ram4 -> ../devices/virtual/block/ram4 lrwxrwxrwx 1 root root 0 Jun 26 09:08 ram5 -> ../devices/virtual/block/ram5 lrwxrwxrwx 1 root root 0 Jun 26 09:08 ram6 -> ../devices/virtual/block/ram6 lrwxrwxrwx 1 root root 0 Jun 26 09:08 ram7 -> ../devices/virtual/block/ram7 lrwxrwxrwx 1 root root 0 Jun 26 09:08 sda -> ../devices/pci0000:00/0000:00:17.0/ata1/host0/target0:0:0/0:0:0:0/block/sda lrwxrwxrwx 1 root root 0 Jun 26 09:08 sdb -> ../devices/pci0000:00/0000:00:17.0/ata2/host1/target1:0:0/1:0:0:0/block/sdb lrwxrwxrwx 1 root root 0 Jun 26 09:08 sdc -> ../devices/pci0000:00/0000:00:17.0/ata5/host4/target4:0:0/4:0:0:0/block/sdc lrwxrwxrwx 1 root root 0 Jun 26 09:08 sdd -> ../devices/pci0000:00/0000:00:14.0/usb1/1-5/1-5:1.0/host6/target6:0:0/6:0:0:0/block/sdd lrwxrwxrwx 1 root root 0 Jun 26 09:08 zram0 -> ../devices/virtual/block/zram0 Synology sd list dummy@NAS:~$ ll /sys/block total 0 drwxr-xr-x 2 root root 0 Jun 26 11:00 . dr-xr-xr-x 12 root root 0 Jun 26 11:00 .. lrwxrwxrwx 1 root root 0 Jun 26 11:05 dm-0 -> ../devices/virtual/block/dm-0 lrwxrwxrwx 1 root root 0 Jun 26 11:05 dm-1 -> ../devices/virtual/block/dm-1 lrwxrwxrwx 1 root root 0 Jun 26 11:05 dm-2 -> ../devices/virtual/block/dm-2 lrwxrwxrwx 1 root root 0 Jun 26 11:05 dm-3 -> ../devices/virtual/block/dm-3 lrwxrwxrwx 1 root root 0 Jun 26 11:00 dm-4 -> ../devices/virtual/block/dm-4 lrwxrwxrwx 1 root root 0 Jun 26 11:00 dm-5 -> ../devices/virtual/block/dm-5 lrwxrwxrwx 1 root root 0 Jun 26 11:00 dm-6 -> ../devices/virtual/block/dm-6 lrwxrwxrwx 1 root root 0 Jun 26 11:05 loop0 -> ../devices/virtual/block/loop0 lrwxrwxrwx 1 root root 0 Jun 26 11:05 loop1 -> ../devices/virtual/block/loop1 lrwxrwxrwx 1 root root 0 Jun 26 11:05 loop2 -> ../devices/virtual/block/loop2 lrwxrwxrwx 1 root root 0 Jun 26 11:05 loop3 -> ../devices/virtual/block/loop3 lrwxrwxrwx 1 root root 0 Jun 26 11:05 loop4 -> ../devices/virtual/block/loop4 lrwxrwxrwx 1 root root 0 Jun 26 11:05 loop5 -> ../devices/virtual/block/loop5 lrwxrwxrwx 1 root root 0 Jun 26 11:05 loop6 -> ../devices/virtual/block/loop6 lrwxrwxrwx 1 root root 0 Jun 26 11:05 loop7 -> ../devices/virtual/block/loop7 lrwxrwxrwx 1 root root 0 Jun 26 11:00 md0 -> ../devices/virtual/block/md0 lrwxrwxrwx 1 root root 0 Jun 26 11:00 md1 -> ../devices/virtual/block/md1 lrwxrwxrwx 1 root root 0 Jun 26 11:00 md2 -> ../devices/virtual/block/md2 lrwxrwxrwx 1 root root 0 Jun 26 11:00 md3 -> ../devices/virtual/block/md3 lrwxrwxrwx 1 root root 0 Jun 26 11:00 md5 -> ../devices/virtual/block/md5 lrwxrwxrwx 1 root root 0 Jun 26 11:05 ram0 -> ../devices/virtual/block/ram0 lrwxrwxrwx 1 root root 0 Jun 26 11:05 ram1 -> ../devices/virtual/block/ram1 lrwxrwxrwx 1 root root 0 Jun 26 11:05 ram10 -> ../devices/virtual/block/ram10 lrwxrwxrwx 1 root root 0 Jun 26 11:05 ram11 -> ../devices/virtual/block/ram11 lrwxrwxrwx 1 root root 0 Jun 26 11:05 ram12 -> ../devices/virtual/block/ram12 lrwxrwxrwx 1 root root 0 Jun 26 11:05 ram13 -> ../devices/virtual/block/ram13 lrwxrwxrwx 1 root root 0 Jun 26 11:05 ram14 -> ../devices/virtual/block/ram14 lrwxrwxrwx 1 root root 0 Jun 26 11:05 ram15 -> ../devices/virtual/block/ram15 lrwxrwxrwx 1 root root 0 Jun 26 11:05 ram2 -> ../devices/virtual/block/ram2 lrwxrwxrwx 1 root root 0 Jun 26 11:05 ram3 -> ../devices/virtual/block/ram3 lrwxrwxrwx 1 root root 0 Jun 26 11:05 ram4 -> ../devices/virtual/block/ram4 lrwxrwxrwx 1 root root 0 Jun 26 11:05 ram5 -> ../devices/virtual/block/ram5 lrwxrwxrwx 1 root root 0 Jun 26 11:05 ram6 -> ../devices/virtual/block/ram6 lrwxrwxrwx 1 root root 0 Jun 26 11:05 ram7 -> ../devices/virtual/block/ram7 lrwxrwxrwx 1 root root 0 Jun 26 11:05 ram8 -> ../devices/virtual/block/ram8 lrwxrwxrwx 1 root root 0 Jun 26 11:05 ram9 -> ../devices/virtual/block/ram9 lrwxrwxrwx 1 root root 0 Jun 26 11:00 sda -> ../devices/pci0000:00/0000:00:17.0/ata1/host0/target0:0:0/0:0:0:0/block/sda lrwxrwxrwx 1 root root 0 Jun 26 11:00 sdb -> ../devices/pci0000:00/0000:00:17.0/ata2/host1/target1:0:0/1:0:0:0/block/sdb lrwxrwxrwx 1 root root 0 Jun 26 11:00 sde -> ../devices/pci0000:00/0000:00:17.0/ata5/host4/target4:0:0/4:0:0:0/block/sde lrwxrwxrwx 1 root root 0 Jun 26 11:00 sdg -> ../devices/pci0000:00/0000:00:01.1/0000:02:00.0/host6/port-6:0/end_device-6:0/target6:0:0/6:0:0:0/block/sdg lrwxrwxrwx 1 root root 0 Jun 26 11:00 sdh -> ../devices/pci0000:00/0000:00:01.1/0000:02:00.0/host6/port-6:1/end_device-6:1/target6:0:1/6:0:1:0/block/sdh lrwxrwxrwx 1 root root 0 Jun 26 11:00 sdi -> ../devices/pci0000:00/0000:00:01.1/0000:02:00.0/host6/port-6:2/end_device-6:2/target6:0:2/6:0:2:0/block/sdi lrwxrwxrwx 1 root root 0 Jun 26 11:00 sdj -> ../devices/pci0000:00/0000:00:01.1/0000:02:00.0/host6/port-6:3/end_device-6:3/target6:0:3/6:0:3:0/block/sdj lrwxrwxrwx 1 root root 0 Jun 26 11:00 sdk -> ../devices/pci0000:00/0000:00:1b.4/0000:04:00.0/host8/port-8:0/end_device-8:0/target8:0:0/8:0:0:0/block/sdk lrwxrwxrwx 1 root root 0 Jun 26 11:00 sdl -> ../devices/pci0000:00/0000:00:1b.4/0000:04:00.0/host8/port-8:1/end_device-8:1/target8:0:1/8:0:1:0/block/sdl lrwxrwxrwx 1 root root 0 Jun 26 11:00 sdm -> ../devices/pci0000:00/0000:00:1b.4/0000:04:00.0/host8/port-8:2/end_device-8:2/target8:0:2/8:0:2:0/block/sdm lrwxrwxrwx 1 root root 0 Jun 26 11:00 sdn -> ../devices/pci0000:00/0000:00:1b.4/0000:04:00.0/host8/port-8:3/end_device-8:3/target8:0:3/8:0:3:0/block/sdn lrwxrwxrwx 1 root root 0 Jun 26 11:00 sdo -> ../devices/pci0000:00/0000:00:1b.4/0000:04:00.0/host8/port-8:4/end_device-8:4/target8:0:4/8:0:4:0/block/sdo lrwxrwxrwx 1 root root 0 Jun 26 11:00 sdp -> ../devices/pci0000:00/0000:00:1b.4/0000:04:00.0/host8/port-8:5/end_device-8:5/target8:0:5/8:0:5:0/block/sdp lrwxrwxrwx 1 root root 0 Jun 26 11:00 synoboot -> ../devices/pci0000:00/0000:00:14.0/usb1/1-5/1-5:1.0/host7/target7:0:0/7:0:0:0/block/synoboot lrwxrwxrwx 1 root root 0 Jun 26 11:00 zram0 -> ../devices/virtual/block/zram0 lrwxrwxrwx 1 root root 0 Jun 26 11:00 zram1 -> ../devices/virtual/block/zram1 lrwxrwxrwx 1 root root 0 Jun 26 11:00 zram2 -> ../devices/virtual/block/zram2 lrwxrwxrwx 1 root root 0 Jun 26 11:00 zram3 -> ../devices/virtual/block/zram3 lrwxrwxrwx 1 root root 0 Jun 26 11:00 zram4 -> ../devices/virtual/block/zram4 lrwxrwxrwx 1 root root 0 Jun 26 11:00 zram5 -> ../devices/virtual/block/zram5 lrwxrwxrwx 1 root root 0 Jun 26 11:00 zram6 -> ../devices/virtual/block/zram6 lrwxrwxrwx 1 root root 0 Jun 26 11:00 zram7 -> ../devices/virtual/block/zram7 Ubuntu tryout sd list root@ubuntu:~# ll /sys/block total 0 drwxr-xr-x 2 root root 0 Jun 26 09:24 ./ dr-xr-xr-x 13 root root 0 Jun 26 09:24 ../ lrwxrwxrwx 1 root root 0 Jun 26 09:24 loop0 -> ../devices/virtual/block/loop0/ lrwxrwxrwx 1 root root 0 Jun 26 09:24 loop1 -> ../devices/virtual/block/loop1/ lrwxrwxrwx 1 root root 0 Jun 26 09:24 loop2 -> ../devices/virtual/block/loop2/ lrwxrwxrwx 1 root root 0 Jun 26 09:24 loop3 -> ../devices/virtual/block/loop3/ lrwxrwxrwx 1 root root 0 Jun 26 09:24 loop4 -> ../devices/virtual/block/loop4/ lrwxrwxrwx 1 root root 0 Jun 26 09:24 loop5 -> ../devices/virtual/block/loop5/ lrwxrwxrwx 1 root root 0 Jun 26 09:24 loop6 -> ../devices/virtual/block/loop6/ lrwxrwxrwx 1 root root 0 Jun 26 09:24 loop7 -> ../devices/virtual/block/loop7/ lrwxrwxrwx 1 root root 0 Jun 26 09:25 loop8 -> ../devices/virtual/block/loop8/ lrwxrwxrwx 1 root root 0 Jun 26 09:27 loop9 -> ../devices/virtual/block/loop9/ lrwxrwxrwx 1 root root 0 Jun 26 09:24 sda -> ../devices/pci0000:00/0000:00:01.1/0000:02:00.0/host0/port-0:0/end_device-0:0/target0:0:0/0:0:0:0/block/sda/ lrwxrwxrwx 1 root root 0 Jun 26 09:24 sdb -> ../devices/pci0000:00/0000:00:01.1/0000:02:00.0/host0/port-0:1/end_device-0:1/target0:0:1/0:0:1:0/block/sdb/ lrwxrwxrwx 1 root root 0 Jun 26 09:24 sdc -> ../devices/pci0000:00/0000:00:01.1/0000:02:00.0/host0/port-0:2/end_device-0:2/target0:0:2/0:0:2:0/block/sdc/ lrwxrwxrwx 1 root root 0 Jun 26 09:24 sdd -> ../devices/pci0000:00/0000:00:01.1/0000:02:00.0/host0/port-0:3/end_device-0:3/target0:0:3/0:0:3:0/block/sdd/ lrwxrwxrwx 1 root root 0 Jun 26 09:24 sde -> ../devices/pci0000:00/0000:00:1b.4/0000:04:00.0/host7/port-7:0/end_device-7:0/target7:0:0/7:0:0:0/block/sde/ lrwxrwxrwx 1 root root 0 Jun 26 09:24 sdf -> ../devices/pci0000:00/0000:00:1b.4/0000:04:00.0/host7/port-7:1/end_device-7:1/target7:0:1/7:0:1:0/block/sdf/ lrwxrwxrwx 1 root root 0 Jun 26 09:24 sdg -> ../devices/pci0000:00/0000:00:1b.4/0000:04:00.0/host7/port-7:2/end_device-7:2/target7:0:2/7:0:2:0/block/sdg/ lrwxrwxrwx 1 root root 0 Jun 26 09:24 sdh -> ../devices/pci0000:00/0000:00:1b.4/0000:04:00.0/host7/port-7:3/end_device-7:3/target7:0:3/7:0:3:0/block/sdh/ lrwxrwxrwx 1 root root 0 Jun 26 09:24 sdi -> ../devices/pci0000:00/0000:00:1b.4/0000:04:00.0/host7/port-7:4/end_device-7:4/target7:0:4/7:0:4:0/block/sdi/ lrwxrwxrwx 1 root root 0 Jun 26 09:24 sdj -> ../devices/pci0000:00/0000:00:1b.4/0000:04:00.0/host7/port-7:5/end_device-7:5/target7:0:5/7:0:5:0/block/sdj/ lrwxrwxrwx 1 root root 0 Jun 26 09:24 sdk -> ../devices/pci0000:00/0000:00:14.0/usb1/1-5/1-5:1.0/host8/target8:0:0/8:0:0:0/block/sdk/ lrwxrwxrwx 1 root root 0 Jun 26 09:24 sdl -> ../devices/pci0000:00/0000:00:17.0/ata1/host1/target1:0:0/1:0:0:0/block/sdl/ lrwxrwxrwx 1 root root 0 Jun 26 09:24 sdm -> ../devices/pci0000:00/0000:00:17.0/ata2/host2/target2:0:0/2:0:0:0/block/sdm/ lrwxrwxrwx 1 root root 0 Jun 26 09:24 sdn -> ../devices/pci0000:00/0000:00:17.0/ata5/host5/target5:0:0/5:0:0:0/block/sdn/ I would appreciate any hints🙂
