Search the Community
Showing results for tags 'usb'.
Found 19 results
-
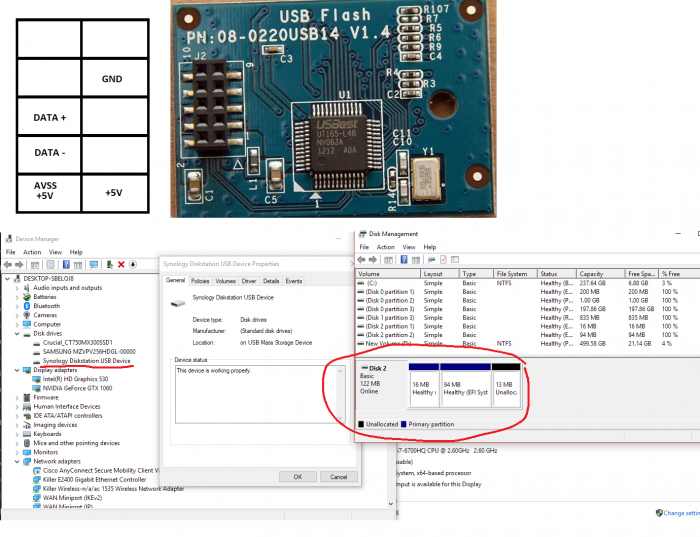
Hi, Here is a pinout of the DS412+ USB flash module, part 08-0220USB14 v1.4 I hope this helps someone. Be careful. Happy hacking. - wool
- 306 replies
-
- 1
-

-
- firmware
- 08-0220usb14
- (and 4 more)
-
 Hello all: This is my hardware configuration HP MicroServer Proliant Gen8 , Intel Xeon E3 1265L V2. 16 GB RAM running with Proxmox 7.2-7 Successfully upgrade my DSM 6.2 to 7.1 using tinycore-redpill 0.8. Following this forum recommendations change hardware definition from DS3615xs to DS3622xs+. Everything is working pretty good but usb In my previous installation usb was configured by adding this lines to the config file usb0: host=1-1.1 usb1: host=1-1.2 usb2: host=5-1,usb3=1 But no working anymore. Nor usb storage recognized neither any other devices. Any solution ? Thanks for your help.
 -
Hallo, ich versuche schon seit Stunden Xpenology auf meinem NAS zu installieren. Leider komme ich nicht weiter. Habe den Bootstick erstellt, das hat glaube ich auch alles funktioniert. Leider kann ich nach dem Booten das NAS nicht im Netzwerk finden finden. Habe schon alle Loader durchprobiert. Habe das Asrock h410m-itx mit einem Pentium G6400. Welche DSM bzw. welchen Loader sollte ich nutzen? Mir kommt es so vor, als wenn die Netzwerkarte nicht erkannt wird?
-
I've created an Ansible Playbook for creating an Xpenology USB. https://github.com/stevenhrabok/ansible-xpenology-usb Currently it's only written for Mac OSX. In future I may add the ability to create USB Devices in Linux if there is interest in using the tool. I wrote this to help automate the workflow and make the USB drive creation process more consistent. It also helps avoid forgetting a steps in the process. Features: Prompts for information serial number - changed in grub.cfg nic 1 mac address - changed in grub.cfg bootloader/synoboot filename - used to write synoboot.img to usb extra drivers filename (optional) - used to replace extra.lzma files in partition 2 of usb synology pat filename - used to replace rd.gz and zImage on partition 2 of usb Discovery of plugged in USB devices scans for all plugged in usb drives prompt for selection of usb drive to use collects pid and vid of usb - changed in grub.cfg formats usb drive Extract files extract bootloader/synoboot from zip extract extra drivers from zip (when provided) extract synology pat with 7zip Writes synoboot.img to USB Mounts USB partitions locally Changes to grub.cfg and file imports Prompt to make additional manual changes User can modify partition 1 and partition 2 files modify grub.cfg for custom settings (sataportmap, timeout, etc) import other files (custom drivers, etc) User can verify changes made Unmount of USB partitions Eject of USB drive Cleanup of working directory (extracted files and folders from playbook) I found there was very few guides related to OSX so hopefully this is helpful to any of the OSX users out there.
-
***For experienced individuals comfortable with synology and linux command line, I take no responsibility for any issues encountered*** ***Read fully before considering*** Please read all necessary documentation for setting up Xpenology before reading this guide. Try the start-here guides below: https://xpenology.com/forum/forum/83-faq-start-here/ This guide docuements the process of using Linux to modify the synoboot.img for your environment and writing to a usb hard drive. Additonally, this guide shows the upgrade process from 6.1.7 to 6.2.2 with extra drivers (extra.lzma file), your use case my not have the same requirements, so please make you know the process for your environment regardless of the directions shown here. Collect required files ***this guide is using synology model 3617, adjust accordingly for the model you want to use*** Recommended to save your files to a unique folder on your system, in this example we will use folder "xpenology-3716-20200215" (model and timestamp) Download the 6.2 boot loader from this post: https://xpenology.com/forum/topic/12952-dsm-62-loader/ Downloaded extra drivers files from this post (this post also includes links to the synology pat file as well): ***Extra Drivers are only needed if your devices are not supported by the current boot loader files*** https://xpenology.com/forum/topic/21663-driver-extension-jun-103b104b-for-dsm622-for-3615xs-3617xs-918/ Download the synology pat file (from the post above) Extact files for modifications Extract synoboot zip file unzip synoboot_3617.zip -d synoboot Extract extra drivers zip file unzip extra3517_v0.5_test.zip -d extra_lzma Extract Synology DSM pat file ***Requires 7zip*** Install 7zip for your linux distribution (example shown is Ubuntu) sudo apt install p7zip-full p7zip-rar Use 7zip to extract pat file 7z -odsm x DSM_DS3617xs_24922.pat Your folder should now have 3 new folders within as shown ls -1 Output: dsm <--- new folder DSM_DS3617xs_24922.pat extra3617_v0.5_test.zip extra_lzma <--- new folder synoboot <--- new folder synoboot_3617.zip Create mount folders to modify synoboot.img files make these folders to mount the partitions of the synoboot.img for editing mkdir usb mkdir usb/part1 mkdir usb/part2 mkdir usb/part3 Mount synoboot.img partitions First view the partition layout of the synoboot.img for mounting information fdisk -l synoboot/ds3617_6.2/synoboot.img Output: Disk synoboot/ds3617_6.2/synoboot.img: 50 MiB, 52428800 bytes, 102400 sectors Units: sectors of 1 * 512 = 512 bytes Sector size (logical/physical): 512 bytes / 512 bytes I/O size (minimum/optimal): 512 bytes / 512 bytes Disklabel type: gpt Disk identifier: B3CAAA25-3CA1-48FA-A5B6-105ADDE4793F Device Start End Sectors Size Type synoboot/ds3617_6.2/synoboot.img1 2048 32767 30720 15M EFI System synoboot/ds3617_6.2/synoboot.img2 32768 94207 61440 30M Linux filesystem synoboot/ds3617_6.2/synoboot.img3 94208 102366 8159 4M BIOS boot Important mounting information Units byte size: here its 512 bytes Start byte for each partition: to mount these partitions you need to multiply the start byte by the unit byte size for the offset Mount partition 1 (we use bash arithmetic expansion to multiple the offset) sudo mount -o loop,offset=$((512*2048)) synoboot/ds3617_6.2/synoboot.img usb/part1 Mount partition 2 sudo mount -o loop,offset=$((512*32768)) synoboot/ds3617_6.2/synoboot.img usb/part2 Mount partition 3 ***This partition does not get modified and does not need to be mounted, but shown for those interested in looking at the contents*** sudo mount -o loop,offset=$((512*94208)) synoboot/ds3617_6.2/synoboot.img usb/part3 Collect required hardware information for modifying grub.cfg in partition 1 Get USB vid/pid information ***Run this command before plugging in your usb drive*** lsusb Output: Bus 002 Device 002: ID 8087:0024 Intel Corp. Integrated Rate Matching Hub Bus 002 Device 001: ID 1d6b:0002 Linux Foundation 2.0 root hub Bus 004 Device 001: ID 1d6b:0003 Linux Foundation 3.0 root hub Bus 003 Device 001: ID 1d6b:0002 Linux Foundation 2.0 root hub Bus 001 Device 003: ID 1bcf:2c07 Sunplus Innovation Technology Inc. Bus 001 Device 002: ID 8087:0024 Intel Corp. Integrated Rate Matching Hub Bus 001 Device 001: ID 1d6b:0002 Linux Foundation 2.0 root hub Plugin your USB drive and run lsusb again to see the new device (comparing the two outputs makes this easier to know which drive is the USB) Output: Bus 002 Device 009: ID 0781:5583 SanDisk Corp. <--- new drive Bus 002 Device 002: ID 8087:0024 Intel Corp. Integrated Rate Matching Hub Bus 002 Device 001: ID 1d6b:0002 Linux Foundation 2.0 root hub Bus 004 Device 001: ID 1d6b:0003 Linux Foundation 3.0 root hub Bus 003 Device 001: ID 1d6b:0002 Linux Foundation 2.0 root hub Bus 001 Device 003: ID 1bcf:2c07 Sunplus Innovation Technology Inc. Bus 001 Device 002: ID 8087:0024 Intel Corp. Integrated Rate Matching Hub Bus 001 Device 001: ID 1d6b:0002 Linux Foundation 2.0 root hub Our USB VID is 0781 Our USB PID is 5583 Get Network Interface Card (NIC) MAC address Find MAC address of NIC on your synology device (can be found in bios, use a bootable usb linux distribution, or physical nic mac information on card label if available) Our MAC was in the bios of our motherboard, it is 90:2B:34:AC:9F:C4 If you have access to your device through cli you can use ifconfig to find the MAC address as well Get Synology Serial Number Generate a serial number for the model being used or use existing if your device is being upgraded (https://xpenogen.github.io/serial_generator/index.html) Our Serial Generated is 1130ODN024917 (Note these are not official synology serial numbers) We will use these values for modifying grub.cfg on partition 1 Modify grub.cfg on partition 1 ***VIM is the editor used to modify files, please ensure you are familiar with the editor you choose*** Edit grub.cfg sudo vi usb/part1/grub/grub.cfg Modify the following lines (Shift+i to go into insert mode in VIM) set vid=0x0781 <--- Our VID found earlier set pid=0x5583 <--- Our PID found earlier set sn=1330NZN022235 <--- Our Serial Number generated earlier set mac1=902B34AC9FC4 <--- Our NIC MAC address found earlier ***You may want to modify SataPortMap for your environment and timeout if you want a faster boot time when grub loads*** Save changes (Hit escape a few times) :wq (write and quit) Add extra driver files (optional) to partition 2 ***Only needed if you require extra drivers*** List current files in partition 2 to view permissions and ownership ls -la usb/part2/ Output: total 11068 drwxr-xr-x 2 root root 16384 Dec 31 1969 ./ drwxrwxr-x 3 user user 4096 Feb 16 09:46 ../ -rwxr-xr-x 1 root root 1860613 Aug 1 2018 extra.lzma* -rwxr-xr-x 1 root root 6441636 Aug 1 2018 rd.gz* -rwxr-xr-x 1 root root 3006864 Aug 1 2018 zImage* Copy extra.lzma file to partition 2 sudo cp extra_lzma/extra.lzma usb/part2/ sudo cp dsm/rd.gz usb/part2/ sudo cp dsm/zImage usb/part2/ List files in partition 2 to view permissions and ownership after copy ls -la usb/part2/ Output: total 13748 drwxr-xr-x 2 root root 16384 Dec 31 1969 ./ drwxrwxr-x 3 user user 4096 Feb 16 09:46 ../ -rwxr-xr-x 1 root root 4570532 Feb 16 09:55 extra.lzma* -rwxr-xr-x 1 root root 6465192 Feb 16 09:58 rd.gz* -rwxr-xr-x 1 root root 3019392 Feb 16 09:58 zImage* Each file should retain root ownership and permissions, the files copied should have a different size and date stamp Unmount partitions sudo umount usb/part1/ sudo umount usb/part2/ sudo umount usb/part3/ confirm each partition is unmounted ls -la usb/part1/ ls -la usb/part2/ ls -la usb/part3/ Output: total 8 drwxrwxr-x 2 user user 4096 Feb 16 09:46 ./ drwxrwxr-x 3 user user 4096 Feb 16 09:46 ../ Find USB device name Ensure USB drive is unplugged ls -1 /dev/sd* Output: /dev/sda /dev/sda1 This shows the existing storage devices, sda is the drive (my laptop root hdd), sda1 is the first partition Plug in your USB drive ls -1 /dev/sd* Output: /dev/sda /dev/sda1 /dev/sdb /dev/sdb1 /dev/sdb2 /dev/sdb3 You may not see the same partitions, but you want to see the additional device (sdb) showing Format USB drive ***Please backup any data you want to retain from this drive, as it will be lost*** ***Commands shown here are potentially dangerous, make sure you know the correct drives to format and double check your syntax (or use an alternative tool within your comfort level)*** Unmount any partitions that may have auto mounted (example shown here attempts to unmount any drives listed for the USB drive device sdb) sudo umount /dev/sdb1 sudo umount /dev/sdb2 sudo umount /dev/sdb3 Wipe all filesystems off existing drive sudo wipefs --all /dev/sdb Output: /dev/sdb: 8 bytes were erased at offset 0x00000200 (gpt): 45 46 49 20 50 41 52 54 /dev/sdb: 8 bytes were erased at offset 0xe51fffe00 (gpt): 45 46 49 20 50 41 52 54 /dev/sdb: 2 bytes were erased at offset 0x000001fe (PMBR): 55 aa /dev/sdb: calling ioctl to re-read partition table: Success Check USB drive layout sudo fdisk -l /dev/sdb Output: Disk /dev/sdb: 57.3 GiB, 61505273856 bytes, 120127488 sectors Units: sectors of 1 * 512 = 512 bytes Sector size (logical/physical): 512 bytes / 512 bytes I/O size (minimum/optimal): 512 bytes / 512 bytes Confirm clean output without any partitions remaining Write Synoboot Image to USB drive ***Commands shown here are potentially dangerous, make sure you know the correct drives to write to and double check your syntax*** sudo dd if=synoboot/ds3617_6.2/synoboot.img of=/dev/sdb bs=512 Output: 102400+0 records in 102400+0 records out 52428800 bytes (52 MB, 50 MiB) copied, 9.14248 s, 5.7 MB/s Check drive and partition information to ensure it was written correctly sudo fdisk -l /dev/sdb Output: GPT PMBR size mismatch (102399 != 120127487) will be corrected by w(rite). <--- this can be ignored, it alerts because fdisk does not support GPT partitions Disk /dev/sdb: 57.3 GiB, 61505273856 bytes, 120127488 sectors Units: sectors of 1 * 512 = 512 bytes Sector size (logical/physical): 512 bytes / 512 bytes I/O size (minimum/optimal): 512 bytes / 512 bytes Disklabel type: gpt Disk identifier: B3CAAA25-3CA1-48FA-A5B6-105ADDE4793F Device Start End Sectors Size Type /dev/sdb1 2048 32767 30720 15M EFI System /dev/sdb2 32768 94207 61440 30M Linux filesystem /dev/sdb3 94208 102366 8159 4M BIOS boot Unmount and plug into your Xpenology device sudo umount /dev/sdb1 sudo umount /dev/sdb2 sudo umount /dev/sdb3 Last minute changes after write You can still make changes to the paritions/files on the USB drive by mounting the partition on your system sudo mount /dev/sdb1 usb/part1 sudo mount /dev/sdb2 usb/part2 sudo mount /dev/sdb3 usb/part3 This mounts the usb drive directly to the folder specified, you can edit files as per previous steps in the guide
-
 For a long time I am using a Seagate USB 3.0 drive for external backups. It seems starting with DSM 6.1.7-15284 the drive is no longer recognised. Test with other USB 3.0 drives have same results. On USB 2.0 all drives do work. I am using same hardware, same loader (Jun v.1.02b) as before, when all worked without any issues. Anybody any suggestions how to fix this? Many thanks!
 -
Hello to all and big think you for all the work! Please excuse any stupid mistakes I have made, I have tried to read as much as I can before doing anything! I Installed to Athlon based machine using "Jun’s Loader v1.03b DS3615xs" and "DSM_DS3615xs_23739.pat" and all went well - added users etc and data, only after realising I had forgotten to change the MAC address in my grub.cfg I searched up on changing it in the running config and that seemed it would be ok. So I updated my USB stick and then rebooted the machine with a "ubuntu live" USB so I could read the MAC address, all good so far. But after that one boot of the ubuntu stick, it will not boot from the HDD any more, it will and does boot fine from the install USB! I tried a re-install of the DSM and restored my config, all went well but it still will not boot as it did after the first install from the HDD. Just stops on the BIOS message "Loading Operating System" Can you manually restore grub? Any help would be appreciated, I would not like to have to start over again! Many thanks, Mark
-
Hi Folks, Apologies for my Noob questions (I'm not very techincal, so probably out of my depth in most of the forums). I have an N54L with Xpenology installed for 4+ years mainly using Plex and it worked beautifully, until I recently bent the USB Bootloader so the NAS no longer works I've had a look around the forums and on google, but I'm either a complete dullard (possible) or I'm overthinking things..... How do I recreate the bootloader without losing the contents of the NAS? I still have the original files I used to perform the install, however I don't recall whether I performed any DSM version updates. The original files are: gnoboot-alpha10.5 DSM_DS3612xs_4458.pat I tried to work out which version I was on, but I was unable to locate the version file or the system files using - I did find the following, but still wasn't sure whether it was what I needed - I can't be the only person that's encountered this problem, but I guess most Xpenology users are of a decent level of technical knowledge. Appreciate any assistance. Cheers
-
hey, quick and dirty. connect via terminal over ssh ... became "root" permissions sudo -i list disks fdisk -l in this example, my source drive Disk /dev/sdr: 931.5 GiB, ... Device Boot Start End Sectors Size Id Type /dev/sdr1 2048 4982527 4980480 2.4G fd Linux raid autodetect /dev/sdr2 4982528 9176831 4194304 2G fd Linux raid autodetect /dev/sdr3 9437184 1953320351 1943883168 926.9G fd Linux raid autodetect look for an free md-slot and change "/dev/mdX" mdadm -A --verbose --run /dev/mdX /dev/sdr3 message... mdadm: looking for devices for /dev/md4 mdadm: /dev/sdr3 is identified as a member of /dev/md4, slot 0. mdadm: added /dev/sdr3 to /dev/md4 as 0 mdadm: /dev/md4 has been started with 1 drive. ... ok, its fine needed or not? mdadm -Sf /dev/md4 mdadm -Asf && vgchange -ay check for correctness fdisk -l message... Disk /dev/md4: 926.9 GiB, ... Disk /dev/md127: 2 GiB, ... Disk /dev/md126: 2.4 GiB, ... ... ok make a dir in useable range for "File Station" mkdir /volume1/public/tmp mount "/dev/mdX" with read-only permission mount /dev/md4 /volume1/public/tmp -o ro greets Sky
-
Salut, Toujours dans le cadre de faire fonctionner Octoprint sur le nas, j'ai abandonné l'idée de passer par le paquet qui est en beta et je test la version docker, malheureusement j'ai l'impression que le nas ne détecte pas le port USB : la commande ls /dev | grep -i "usb" ne retourne rien. sur mon pc, je n'ai pas de souci de détection. j'ai testé sur tous les ports mais ko admin@ServeurNAS:/$ lsusb |__usb1 1d6b:0002:0310 09 2.00 480MBit/s 0mA 1IF (xhci_hcd 0000:00:14.0) hub |__1-1 10c4:ea60:0100 00 2.00 12MBit/s 100mA 1IF (Silicon Labs CP2102N USB to UART Bridge Controller 3868a0802d67e911a836f163867e4c5a) |__1-3 125f:601a:0100 00 2.00 480MBit/s 100mA 1IF (ADATA IUM01-512MFHL 120825741539000106) |__1-5 f400:f400:0100 00 2.00 480MBit/s 200mA 1IF (Generic Mass Storage 02ADF454) |__usb2 1d6b:0003:0310 09 3.00 5000MBit/s 0mA 1IF (xhci_hcd 0000:00:14.0) hub dmesg : [10357.312775] usb 1-1: new full-speed USB device number 10 using xhci_hcd
-
I am new with ESXi server and virtual machine. With some tutorial I make my hardware works: now I have ESXi 6.7 load from a internal USB Stick (4Gb) I create a datastore on external USB Stick (32Gb) where I installa a VM with XPEnology I use the internal SATA HDD like phisycal drive on VM (map with vmkfstools -z on a local vmdk ) All works with DSM 6.2.2 that was my goal BUT my problem is that i HAVE to use also two NTFS HDD connected on external USB3 to share with XPEnology ... NOW in point 2. (to use a datastore on external USB) I use also command "chkconfig usbarbitrator off" and I think this is WHY I can't set the external NTFS HDD on virtual machine! if I set "chkconfig usbarbitrator on" after reboot, i can't see the datastore on external USB... so ESXi not find VM... what is the correct method to use a datastore on USB AND USB passthrough for my USB NTFS HDD? The perfect solution (for me) was to use the free USB space on the internal USB stick Is there a way to use the same USB STICK for boot ESXi and create a datastore for VM in the free space ? I not find a tutorial to make this... but only to use a entire USB stick, so I have to use two USB stick: one for boot and one for datastore Thanks
-
Hi, I bought a second-hand Netgear ReadyNAS NV+ just as a cheap introduction to NAS drives. Everything works fine, but, my main intention was to use it as an IP camera footage storage device (NVR?). Someone mentioned Synology, and I was prepared to go that way, until I heard about 'licensing' per camera! I find this ridiculous, as there is no additional cost to the manufacturer for each camera added. Then someone pointed me at XPEnology, which sounds to be just the ticket. I'll scour this site, but, if anyone can point me at any links that will help me for this device - then thank you. (p.s. First I'll try the USB boot option, then probably have a go at flashing the internal firmware.
-
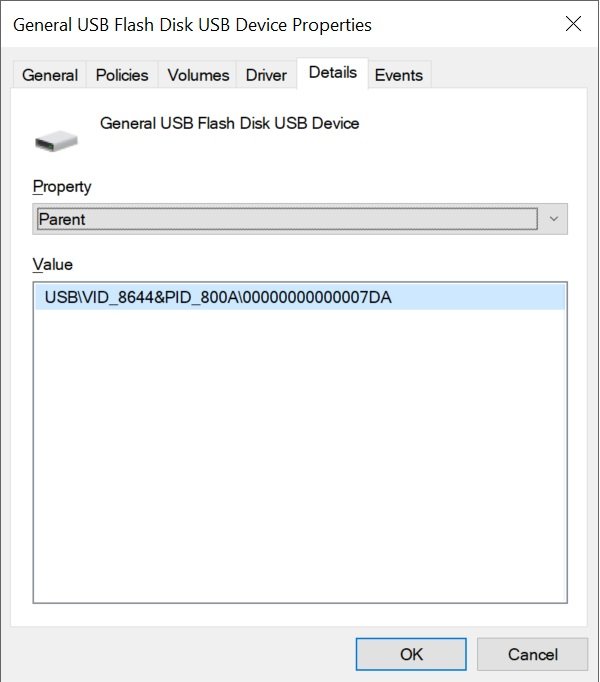
 Trying to setup a new stick to move from loader 1.02 to 1.03 Plugged in 2 random USB sticks I have & niether of them have a VID & PID shown in device manager under the Hardware Ids drop down. I do see them under the parent drop down but that sounds like could relate to the parent hardware, maybe the usb controller. Any advise where I can get the actual VID/PID from or are the parent opnes correct?
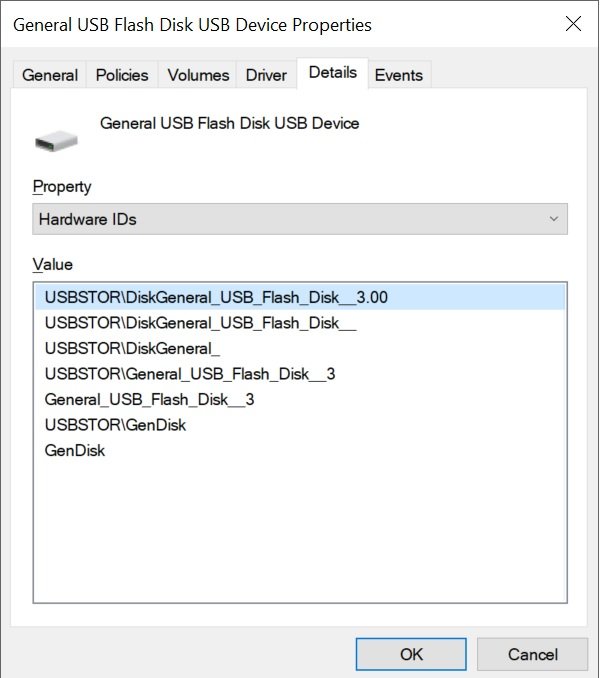
-
Hi everyone, I recently got my hands on an older Shuttle PC (a very compact square little PC) with the following specs: - Core 2 Quad Q9300 - 4x 2GB DDR2 @800mhz - 2x 1TB HDD - 1x 128GB SSD - Nvidia GT 210 I would like to use this machine to run my Plex media server using XPEnology. I got 5.2 to work once but ruined it by attempting to update it to 6.2 (Plex Media Server apparently requires at least 6.0 to run). Since then I haven't been able to get any version of XPEnology to boot from a multiple different USB sticks. I've tried basically everything: - Two different brands and sizes of USB 2.0 sticks and one again differently sized USB 3.0 stick - Writing images with both Rufus and Win32DiskImager - Formatting sticks in both NTFS and FAT32 - Using UEFI settings and MBR settings in Rufus and Win32DiskImager - Basically every loader available on the internet, almost every version of Jun's, Quicknick's and Xenoboot's loaders - Every BIOS setting that may influence boot behaviour I've followed numerous guides and videos online but every time I end up with my Shuttle freezing at post whenever a USB with any version of a loader prepared on it is inserted. The only time I almost succeeded was with 5.2 again, with which the Shuttle did come past post but ended up with a boot error. I noticed that in most guides they refer to the syslinux.cfg file placed on the USB, which should be opened with preferably notepad++ to be edited. This .cfg file is missing for me with every loader I've written to any USB so far. Most of the files which should be on the USB after using Rufus or Win32DiskImager seem to be missing. What am I doing wrong? Would greatly appreciate some help here!
-
sorry for my poor english. i used DSM 6.1.7 on my asrock J3455-ITX for a while, it works ok except the usb3.0 speed. i got only 20~30M/s of copy speed when i plug my USB3.0 flash disk into J3455-ITX. but when i plug into my desktop computer it can get 100M/s as it should be. here is another interesting thing: at first i thougt it was due to the old linux kernel (3.10.x). but not long ago i occasionally saw someone from a local NAS fans group say that j3455 works very well on 5.1-5055 including usb copy speed. so i tried a fresh install 5.1-5055 on J3455-ITX i found it works! i can get 100M/s copy speed! when i upgrade to 5.2 it slows down again. and i also tried a fresh install 6.2 and still slow. so i think it may be the driver is broken or something wrong rather than the old kernel version. and i guess only DSM 5.1-5055 can reach the normal performance? is there anyone use the same motherboard(or asrock j3455b-itx/j4205-itx i think the same usb chip) can test usb 3.0 copy speed?
-
 Hi Guys, I picked up some old hardware from my work, and I wanted to try out Xpenology on the system. I'm running into a hiccup when trying to install it on an old HP xw8400 system. I'm using a USB to install the DSM and using Rufus to write the .iso or .img file to the USB. When I go to install it I'm greeted with a lovely "no system disk or disk error" message when I go to boot from the USB (The option is available under the boot menu). I've scoured the BIOS settings, but I'm still unsure what the issue could be. Following many attempts of different Rufus settings, and trying both the .iso and .img files created by JUN version 6.2 I'm still unable to get past that point. I then tried a copy of UNRAID to see if it was an issue with the USB boot, but it loaded up just fine. I also took the same .img file and used Rufus on the same exact USB I've been attempting the install with, and it worked without a hiccup on a Supermicro system that is from the same era (within 2 years of the HP workstation). If someone has some knowledge of what has worked for them, or if there is a BIOS setting I'm missing please let me know. I did see that there is a BIOS update, but according the release notes there isn't any changes made to booting or USB. The latest build is 2010, and I have the 2008 version currently. My system is HP xw8400 2x xeon 5150 16GB RAM 12 port LSI RAID Card Quadro Graphics Card 14 Hard drives of various sizes ranging from 3, 2, and 1 TB in size (4 of which are plugged into the motherboard, but I tried with them plugged in and with them not) Dual Redundant power supplies Any help is appreciated!
 -
 Hi guys, I recently updated to the latest DSM version 6.1.5. Despite all those successful updates mentioned in the "critical updates" section/subforum, my personal update experience did not went that smooth. I had to reinstall/migrate what in turn went pretty easy. Unfortunately my TVButler USB-C tuner is not recognized as an USB device anymore. I can't see it under "external devices" and Plex is not able to find it. "dmesg | grep usb" results in: [ 4.860148] usbcore: registered new interface driver usbfs [ 4.860936] usbcore: registered new interface driver hub [ 4.864212] usbcore: registered new interface driver ethub [ 4.866747] usbcore: registered new device driver usb [ 5.004325] usbcore: registered new interface driver usb-storage [ 5.220902] usb 1-1: new high-speed USB device number 2 using ehci-pci [ 5.479767] usb 2-1: new high-speed USB device number 2 using ehci-pci [ 5.615099] drivers/usb/core/hub.c (2679) Same device found. Change serial to ffffffd1ffffffb2ffffffdbffffffa0 [ 5.699805] usb 1-1.5: new high-speed USB device number 3 using ehci-pci [ 5.882709] usb 1-1.6: new high-speed USB device number 4 using ehci-pci [ 5.978992] usb-storage 1-1.6:1.0: USB Mass Storage device detected [ 5.979727] scsi6 : usb-storage 1-1.6:1.0 [ 6.063615] usb 2-1.3: new high-speed USB device number 3 using ehci-pci [ 6.158822] drivers/usb/core/hub.c (2679) Same device found. Change serial to ffffffd1ffffffb2ffffffdbffffffa0 [ 6.158825] drivers/usb/core/hub.c (2679) Same device found. Change serial to ffffffd1ffffffb2ffffffdbffffffa1 [ 25.421336] usbcore: registered new interface driver ax88179_178a [ 51.292046] usbcore: registered new interface driver usblp [ 51.325380] usbcore: registered new interface driver usbhid [ 51.325384] usbhid: USB HID core driver The "USB Mass Storage" should be the bootloader stick I guess. I use a HP Gen8 with baremetal installation. Any ideas?
 -
I found Hyper-V 2016 support PCI-E pass through Is that possible pass through USB device on PCIE bus to boot DSM on physical disk? I want to try it but may be some one else already tried If work can solve DSM 6.1.x can't work on HV I think.
-
 Im running ESXi 6.5 on a HP Proliant MicroServer G8. I managed successfully to run the latest XPEnology on a new VM and I attached a couple of virtual disk on it for testing before I transfer my data. Everything looks fine until I tried to mount my USB Disk which will store my MacBook's Time Machine Backups. The same disk can be mounted on my Win Server VM but, not on the XPEnology one. I even tried to hard mount it via SSH without any luck. I installed vmware tools but nothing again. I tried both USB2 and USB3 ports. What else would you advised me to try in order to mount that disk?