Search the Community
Showing results for tags 'guide'.
Found 4 results
-
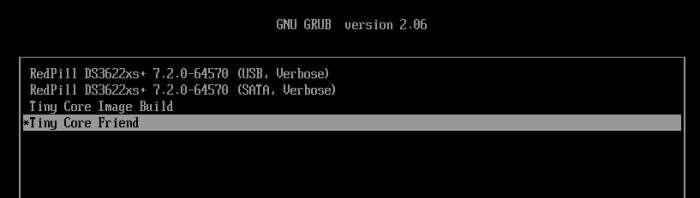
Install DSM 7.2 on FreeBSD using vm-bhyve and TinyCoreRedPill This guide is for installing DSM 7.2 on a Virtual Machine with a Virtual Disk using bhyve with TCRP Friend kernel. To make this guide I used the main TCRP Guide, the ESXi Guide and I got most of my conf file from this Bhyve Guide. I didn't explain much, just some vm-bhyve relevant info, more in depth explanations can be found in those guides. I used DSM 7.2.0-64570 and DS3622xs+ My CPU is Xeon so I used DS3622xs+ Download site for DSM 7.2 for DS3622xs+. Direct link to download DSM_DS3622xs+_64570.pat Link to Tiny Core RedPill Releases. I used the uefi img tinycore-redpill-uefi.v0.9.4.9.img.gz Step 1 - (Config file) After bhyve is installed use this "synology.conf" config file below. It goes in with the rest of the vm-bhyve config files poossibly at "/pool/vm/.templates" directory. synology.conf loader="uefi" cpu=8 cpu_sockets=1 cpu_cores=4 cpu_threads=2 memory=16G ahci_device_limit="1" disk0_type="ahci-hd" disk0_name="tinycore-redpill-uefi.v0.9.4.9.img" disk1_type="ahci-hd" disk1_name="disk0.img" disk1_opts="sectorsize=4096/4096" disk1_size="10T" debug="yes" network0_type="e1000" network0_switch="public" graphics="yes" xhci_mouse="yes" graphics_res="1600x900" Notes: Network type "virtio-net" driver did not work for version 7.1.1-42962 and I did not try it yet with friend, so I still used the e1000 driver instead. I also have not tried "virtio-blk" and "sparse-zvol" recently. Step 2 - (Create VM) Create a VM named "synology" using the template synology.conf sudo vm create -t synology synology This creates two empty files, or two disks in the /pool/vm/synology/ directory. disk0 named "tinycore-redpill-uefi.v0.9.4.9.img" - the boot disk. disk1 named "disk0" - data disk. I named the disk0 "tinycore-redpill-uefi.v0.9.4.9.img" because now the actual TCRP disk file needs to be copied to the VM directory to overwrite the empty disk with the same name. Deflate the img.gz file using "gzip -d tinycore-redpill-uefi.v0.9.4.9.img.gz" Copy the downloaded disk img file to the VM directory sudo cp /pool/vm/.iso/tinycore-redpill-uefi.v0.9.4.9.img /pool/vm/synology The config file uses UEFI bootloader and graphics so the VM will run on a VNC port. Step 3 - (Start VM) Start the VM sudo vm start synology This will start the VM and boot the TCRP disk since TCRP is in the first place, the disk0 place. The disk1 is just named "disk0" but it still comes at second place after the TCRP disk. Step 4 - (Booting TCRP) Boot will have one option. When TCRP boots get the IP info by running "ifconfig" ssh into it with user "tc" and password "P@ssw0rd". Step 5 - (Install DSM) Below is the commands needed to install DMS from the TCRP Loader Guide. Type "y" and hit enter to update the json file. One important point is to use "realmac" when running DSM in a VM as explained in the ESXi Guide . On "satamap" command type number "1" and hit enter. You can also just hit enter but if you hit enter without typing 1 it will say DSM install will fail but it does not fail. Probably because it's a VM. ./rploader.sh update ./rploader.sh fullupgrade ./rploader.sh serialgen DS3622xs+ realmac ./rploader.sh satamap ./rploader.sh build ds3622xsp-7.2.0-64570 exitcheck.sh reboot After reboot: When TCRP boots choose "Tiny Core Friend" option, hit enter to boot. That option will be selected by default. Then go to https://finds.synology.com/ and hit connect, or you can see the IP from Friend and add port :5000 to the IP. Click install. Select to manually upload the DSM pat file you downloaded earlier (DSM_DS3622xs+_64570.pat). Wait up to 10 minutes. DSM will install packages. After you create an account select not to auto update DSM but to install them manually. ------------------------------------------------------------------------------------------------------------------------------------------------------------------------- Notes and things I noticed: Without Friend using tcrp 0.9.4.2 I was able to install version 7.1.1-42962 by choosing the SATA option, but SATA option did not work for newer versions. I did actually install the latest version (7.2.0-64570) at first with SATA option but then after DSM is done it says "something went wrong" and it wants to rebuild, but then if I force shutdown the VM and start it again but with Friend option Synology continues to install the packages and installs. After DSM is installed SATA option also works as well as Friend option. While back I tried to manually update from version 42661 but it failed, but then I didn't have Friend. ----------- If someone has additional useful things regarding vm-bhyve let me know.

-
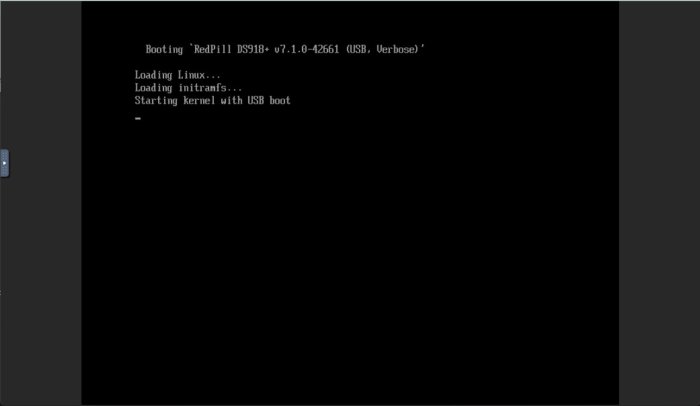
This tutorial is a supplement to the ESXi TCRP installation tutorial located here: https://xpenology.com/forum/topic/62547-tutorial-install-dsm-7x-with-tinycore-redpill-tcrp-loader-on-esxi/ Installing DSM 7.1.0.-42661 on UNRAID 6.10.3 I have been trying to install DSM 7.1 on my unraid server for the last night. After some problems and testing I have created this guide to install DSM 7.1 on UNRAID working perfectly. This is my vm config: STEP 1-Virtual machine creation: Download tiny core from https://github.com/pocopico/tinycore-redpill Select CentOS VM Template and apply correct options from the attached image. Select Q35-6.2 Select 3.0 (qemu XHCI) Load tiny red core as vdisk1 USB by selecting manually (you can create previously the name of the folder for the VM inside /domains and upload the tinycore img ) Create secondary disk 50G or whatever you want (this is your data storage for synology) as vdisk2 SATA Select Network model: e1000 Save. Uncheck "Start VM after creation" Edit again vdisk2 in the advanced xml template (top right corner) to controller='1' (if we don't do this tiny red core will not detect the disk properly when doing the satamap and will not install DSM correctly and will ask you to reinstall the *.pat infinitely) STEP 2-Start VM and connect via SSH Start VM and load tiny red core Once the OS is loaded, open the terminal and enter ifconfig to find out the ip of the machine Connect via ssh (with Putty) to the obtained IP address. user: tc password: P@ssw0rd STEP 3-Run the following commands: To update tiny red core with the latest data ./rploader.sh update now ./rploader.sh fullupgrade now To generate random mac and serial numbers (copy mac address generated to set on unraid vm template later) ./rploader.sh serialgen DS918+ (or whatever version you want, you can see all versions available with command info ./rploader.sh) To map the connected disks ./rploader.sh satamap now To record the vid/pid from usb ./rploader.sh identifyusb now To install NIC drivers (sometimes it loads the e1000e module instead of the e1000 and it doesn't work, adding this command will make sure that the e1000 module for the NIC is loaded correctly) For e1000 Network Card run: ./rploader.sh ext apollolake-7.1.0-42661 add https://raw.githubusercontent.com/pocopico/rp-ext/master/e1000/rpext-index.json NOTE: change version according your selection for CPU and DSM version For virtio-net Network Card run: ./rploader.sh ext apollolake-7.1.0-42661 add https://raw.githubusercontent.com/pocopico/rp-ext/master/v9fs/rpext-index.json NOTE: change version according your selection for CPU and DSM version To build the image ./rploader.sh build apollolake-7.1.0-42661 STEP 4-Download your .pat for your correct cpu architecture from official repo or mega download for this version apollolake , we will need it to install DSM later. https://global.download.synology.com/download/DSM/release/7.1/42661-1/DSM_DS918%2B_42661.pat - Offical repo STEP 5-Edit VM settings on advanced xml mode and install *.pat After doing all the above we shut down the machine. Edit the virtual machine on xml advanced mode (if we change mac address in normal editing mode you will lose controller="1" option set for vdisk2 we did previously so you will have to set it again everytime you change and/or save a setting from normal mode, try to edit always in xml advanced mode), look for MAC address and set the MAC generated by tiny red core. Save Start VM Select the first option USB and leave it a few minutes until we find it with synology assistant Open WebGui and install *.pat We now have DSM 7.1 working on unraid. There is other method with SATA boot but I have to test it better. Hope this guide help someone. Regards.
-
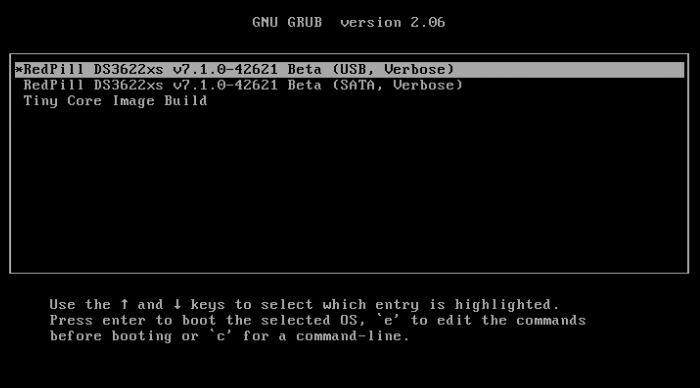
 This guide is dedicated to installing DSM 7.0.1 BareMetal. It is a translation from Korean to English using a translator. Please understand if there is a slight misunderstanding. Existing RedPill, which has been released since last year, can generate IMG files directly through the bootloader compilation process only if Linux is available separately. This tinyCore RedPill provides a USB boot image with tinyCore Linux. It's much easier to work without having to install Linux separately. As usual, you can add the desired driver directly from the selection header and build it. Tinycore supports the following platforms (DS918+/DS3615xs/DS3617xs/DS3622xs+/DS1621+/DV3221/DS920+). You can continuously change the bootloader without re-creating the image (model/sn/mac, etc.) Tinycore supports both legacy versions for baremetal and virtual environments. 1. Prepare bootloader IMG file With the Download button in the middle of the GITHUB link below.Download the gz file. In it, 0.4.6 version img.You can unzip the gz file again and use the img file. (All files) https://github.com/pocopico/tinycore-redpill (for LEGACY) https://github.com/pocopico/tinycore-redpill/raw/main/tinycore-redpill.v0.4.6.img.gz (for UEFI) https://github.com/pocopico/tinycore-redpill/raw/main/tinycore-redpill-uefi.v0.4.6.img.gz (for VMWARE) https://github.com/pocopico/tinycore-redpill/raw/main/tinycore-redpill.v0.4.6.vmdk.gz 2. Bootloader IMG file USB recording Use the above tinycore-redpill.v0.4.6.img file to burn to USB with convenient image tools such as WinImage and Rufus. There is no need to pre-adjust the configuration file to modify the VID/PID/Serial/MAC/SATAPortMap like JUN loader. If you want to create a USB image on Mac or Linux, you can use the following DD command at the terminal. (Suppose the USB DEVICE ID identified by diskutil is disk4) sudo diskutil unmountDisk /dev/disk4 sudo dd if=/Users/MyAccount/Downloads/tinycore-redpill.v0.4.6.img of=/dev/disk4 bs=4m agree eject. 3.tinyCore Linux Boot USB boot by plugging into the PC you want to use as XPENOLOGY (you can start using UEFI 1 partition or USB CSM) Only TinyCore Linux menu appears and runs automatically Start the terminal app on the far right icon. Use the ifconfig command to verify the ip address where the en0 LAN card is automatically allocated. 4. CONFIG adjustment after SSH connection Connect ssh from another PC, such as putty. ( id:tc / pass : P@ssw0rd ) After connecting, update to the latest version with the following command. tc@box:~$ ./rploader.sh update now Tinycore Redpill is still in a stable state of stabilization. PocoPico, the developer of this program, will frequently fix bugs and announce rebuilding. There's a possibility that this rebuild will happen from time to time. Even if you use the first IMG file version of 0.4.6, you can continue to receive real-time updates of changes through the Internet. Therefore, before using it for the first time, please make sure to download the final patch status with the update option. If you've continued to migrate from JUN's XPhenology, tc@box:~$vi user_config.json The user_config.json file's VID/PID/Sn/Mac/SataPortMap, etc. are existing grub.Please refer to the cfg and insert it as it is. For new installers, perform serial GEN/USB VID, PID auto detect, SataPortMap auto detect, etc. as follows. The next process is DS3622xs+, which is currently undergoing the most stable session first. I will focus on explaining. tc@box:~$ ./rploader.sh serialgen DS3622xs+ tc@box:~$ ./rploader.sh identifyusb now tc@box:~$./rploader.sh satamap now (HBA card users are not required) You can see that the contents of user_config.json are changed automatically. Finally, it is common for existing users and new installers. tc@box:~$catuser_config.json, assuming there are 4 built-in sata ports. SataPortMap = "4", DiskIdxMap = "00" Please check if it is changed to the back. After find.synology.com, you may not be able to find the SATA HDD during DSM installation. The following is an example when a 6-port SATA expansion card is installed. SataPortMap = "46", DiskIdxMap = "0000" (For those who use cards such as H200, H310, H710, etc., exceptional, you do not need to erase the option of this SataPortMap and DiskIdxMap itself. Please erase the lines of the above two options in the vi editor and organize them well so that they don't end with Syntex errors. Of course. ./rploader.sh satamap now command is not required.) 5.BIOS built-in SATA port Hot Plug disable -> enable (important) To avoid temporarily reducing the SataPortMap value set above by the number of HDD physically connected by Sata cable during DSM installation, Be sure to turn on the Hot Plug function. This reduces the probability of encountering an error message saying that the HDD cannot be found because the number of SataPortMap automatically above is recognized as normal recognized. However, if M.2 and Sata ports are Muxed Sata ports that share Lane, it should be considered unusable. 6. Build bootloader after SSH connection When you have finished adding the above extension driver, you will finally build the bootloader. tc@box:~$ ./rploader.sh build broadwellnk-7.0.1-42218 The list of supported platforms can only be found in Help with the following commands: tc@box:~$ ./rploader.sh 7. backup and reboot for bootloader use After successfully completing the build, back up the configuration with the following command and restart the genology with USB. tc@box:~$ filetool.sh -b &&/usr/bin/exitcheck.sh Or tc@box:~$ ./rploader.sh backup now tc@box:~$ sudo reboot It has the same effect. The backed up settings and ext drivers remain the same. The next time TinyCore Linux starts for correction, the setting value will be restored from the mydata.tgz file. 8. Launch the Grub Menu BareMetal must select the first USB boot menu. The first USB menu will be automatically selected. The last selected menu will be stored and used for the next boot. 9. Installing DSM with find.synology.com On an XPhenology PC, There is a delay of about 1 to 2 minutes for IP allocation, so please wait a little longer. There is nothing more to do on this XPhenology PC once you have checked the Kernel boot message. Now look for XPhenology on another PC at find.synology.com. If found successfully, proceed with the initial installation of DSM or the expected migration DSM installation process.
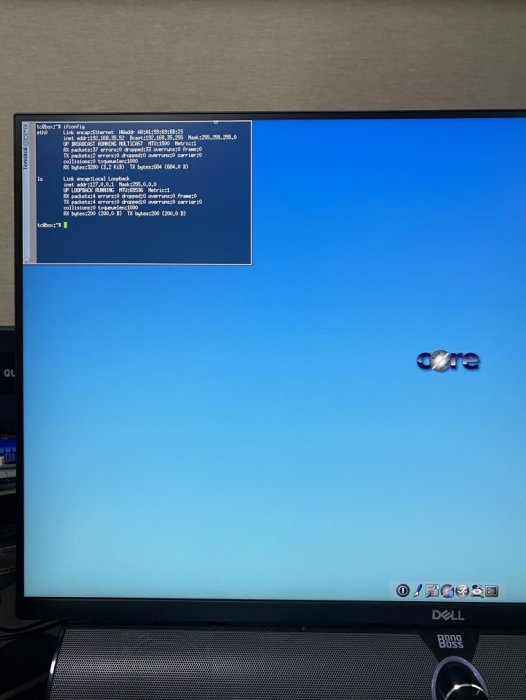
-
 Hello I installed Contao CSM 4.9 in DMS 6.2.1-23824-6 (DS918+) successfully and I would like to share this guide How to install contao 4 in synology 6.pdf that describes all necessary steps with all of you are interested in it and you are willing to make this kind of advanced modifications of the DSM configuration by yourself and at your own risk. Best regards


