Search the Community
Showing results for tags '6.1'.
Found 20 results
-
 Sorry if this is already posted but had a hard time finding it. I need help with best steps on how to update from 6.1 to latest possible with DS3617xs Is there an easy to use tutorial on how to do so? I have tried wiping clean and going straight to 6.2.1 but the find.synology.com does not find the NAS. Was going to try the force install option on boot up but that option was not listed.
 -
I am in the process of building a kvm host, and will have xpenology running on it. But notice the lack of virtio and sr-iov (ixgbevf) modules. So in the process of building them decided to create some helper functions to facilitate the process. Here is the link to the github page with the script: xdsm-build-utils I was able to create a synoboot image that supports both ixgbevf and virtio_net for bromolow 6.1, I was also able to make one for 6.2 but it only worked for the first boot/initial install once you install the .pat file it would error out. (May need to change the config for make but not sure what am I missing or maybe I am using the wrong source) There are also some helper functions to run inside the NAS to obtain and set MAC the real MAC address to generate and set the serial number (based on https://xpenogen.github.io/serial_generator/index.html) and to get and set the pid/vid for the boot device plus mounting the synoboot partitions. Anyway here is the link for anyone that wants to use it. XDSM-UTILS
-

Mac Mini Server 2012 Runs on 6.1 but can't connect wiht 6.2
SwisherSweet posted a question in General Questions
I have been able to get my Mac Mini Server 2012 model to boot with Jun's 6.1 3617 loader and it works great. I was able to see the NAS on the network using Synology Assistant and connect just fine. However, I have had no luck getting Jun's 6.2 beta loader to connect to the network. It appears to boot just fine, but I never see it on the network. I tried: Both the 3615 and 3517 loaders Set the PID/VID of the USB Tried 2 different USB drives; all boot, no network Set the mac1 to the actual NIC mac address. I assume the NIC chipset is compatible since it works in 6.1. Is it possible that 6.2 doesn't support my NIC chipset while 6.1? Or, have I failed to cover all my bases on setup/configuration? Thank you. -
Hi , I have setup a dsm 6.1.7 on esxi 6.7. The setup is: - jun loader 1.02b vmware boot option - loader boot disk is alone on first sata port - unique data disk is on paravirtualized scsi controller - network is vmxnet3 10gb I've install all 6.1.7 updates , only packages installed are stock file station , universal search and open-vm-tools. The system will be a test environment for a spk package development so I don't need special package but need high i/o speed because my app move a lot of data. Using 10GBe as network and ssd as vmfs storage I get all performance I want. Now I'm testing the setup before starting to use it , doing that I found two problem: First , inspecting logs I see that /var/log/messages has a lot of: 2018-07-05T15:39:57+02:00 syn synostoraged: SmartDataRead(108) read value /dev/sda fail 2018-07-05T15:39:57+02:00 syn synostoraged: disk/disk_temperature_get.c:99 read value /dev/sda fail This is repeat every minute and the log file continue to grow... Now , I know that smart is not available in a vmware virtual machine but i would like to know if there's a way to disable smart check and continue error logging. Second , I've try to enable jumbo frame in the vm to maximize network performance , the virtual switch and the phisical one have both jumbo frame enable ( mtu 9000 ) and so is the client used for test. I've found a strange problem , when I use vmxnet3 ( only way to get 10gb without assign a direct nic to vm ) i can't raise mtu more than 3050 , I don't know why exactly 3050 , but if I set mtu to 3051 I get a kernel crash and the dsm hangs. This is the same raising mtu on command line or from dsm interface ( if someone would like to test the best way is use command line because a reboot solve the problem ). Using e1000e virtual adapter in place of vmxnet3 solve the problem and let me use a mtu of 9000 but obviously I get only 1GB connection. Is there some place where to see the source of the compiled modules contained in the loader or there's a way to report a bug to who maintain it ?
-

Tutorial: How to downgrade from 6.2 to 6.1 - Recovering a bricked system
Guest posted a topic in Tutorials and Guides
Hello! This is a short guide about how to downgrade from DSM 6.2 to DSM 6.1 after a failed upgrade. I made this mistake myself, so i'm sharing how to fix it! Your going to need a spare HDD or SSD. Make sure there is nothing on it. You've installed DSM before, so you should have your synoboot.img from JunsLoader. Your current bootloader on your USB in now NONFUNCTIONING, you will need to reflash your USB with JunsLoader. Once you have your new, reflashed USB stick, unplug ALL drives from the motherboard. Make sure there are NO SATA interfaces connected. Plug in your new, empty drive to the motherboard and boot from the USB stick. (You will need a keyboard for this step) The first option in the GRUB interface is what you are looking for. Use http://find.synology.com or Synology Web Assistant to find your DSM. Follow the steps and install DSM 6.1 from a PAT file. DO NOT INSTALL 6.2 IF YOU LEFT A DRIVE IN IT WILL SAY RECOVER. GOTO 2. Let Synology do its thing and eventually you will have a working 6.1. While the PC is ON, connect the drives to the motherboard (with you data on it). Under Storage Manager they will pop up and say Unused. You might need to reboot, at this option. It took me some fiddling around, but eventually Synology will prompt you with a Recover Crashed Partition prompt. Click Yes. All of your data will appear, and Synology will automatically perform RAID scrubbing. -
I have a DSM 6.1.5 running on a LSI 9207-8i controller with 8 Samsung EVO 250gb SATA drives. The raid group is a RAID10. I have also tested with a single disk basic volume as well.I cannot see the tab that allows SSD trim to be enabled. I was running in RAID6 prior, but rebuilt in RAID10. I know the option was not allowed in RAID6, but I know it *used* to be configurable and could be enabled in DSM 5.2. I upgraded from 5.2 to 6.1, so I do not know when it might have broken. Does anyone else have a different experience? What might I be missing? *edit* Forgot to mention I am using the ds3615xs firmware if that matters.
-
Hello folks, I have search on the forum and internet and I can't find an information on how to do it. There is some tutorial to do it without esxi but not with it. Currently, I don't have enough space on other disk to save everything and make a fresh install. So I would like to update without loosing any data. Does someone already did it ? For my understanding, I should select Jun's mod 1.02b vmdk file and start it as a primary drive. But will it update or overwrite the current xpenology? Thx, David
-
Hallo zusammen, ich verfolge die Threads zum Thema Update jetzt schon seit ein paar Monaten und lese unterschiedliche Dinge. Vielleicht kann mir jemand auf die Sprünge helfen. Mein HP Microserver Gen8 läuft immer noch auf DSM 5.2 und mich juckt es langsam auf eine neue Version zu gehen. Aktuell gibt es ja nur den Bootloader von June als Alpha, der aber angeblich relativ stabil läuft (vor allem für den Gen8!?). Andere schreiben wiederum, dass man auf den offiziellen Bootloader warten soll, mit Releasedatum unbekannt (?). Macht es Sinn jetzt mit dem June Loader auf DSM 6.1 zu gehen oder lieber noch warten? Vielleicht auf 6.2? Sind Spectre und Meltdown hier auch ein Thema? Man macht sich ja nicht jeden Tag die Arbeit mit dem Update, daher würde ich gerne länger etwas von dem Zeitinvest haben. Danke vorab. Gruß Kewl
-
Hey guys, I'm moving my machine to some better hardware: i5-6400T H110I PRO AC Crucial 8GB Single DDR4 Now for networking I want to go 10GBe SFP+ I am looking at: 2X - Mellanox ConnectX-2 https://www.ebay.com/itm/391459428428 1X - Cisco Genuine SFP-H10GB-CU3M SFP+ https://www.ebay.com/itm/201986388845 ^^^ will these work out of the box with 6.1 DS3615xs version? Thanks!
-
Hello, Can someone help me how to install 6.1 dsm on my mac pro? Spec: Mac Pro 3.1 intel 8 core, 16gb memory. 4tb hdd. I like to install without virtual programs.
-
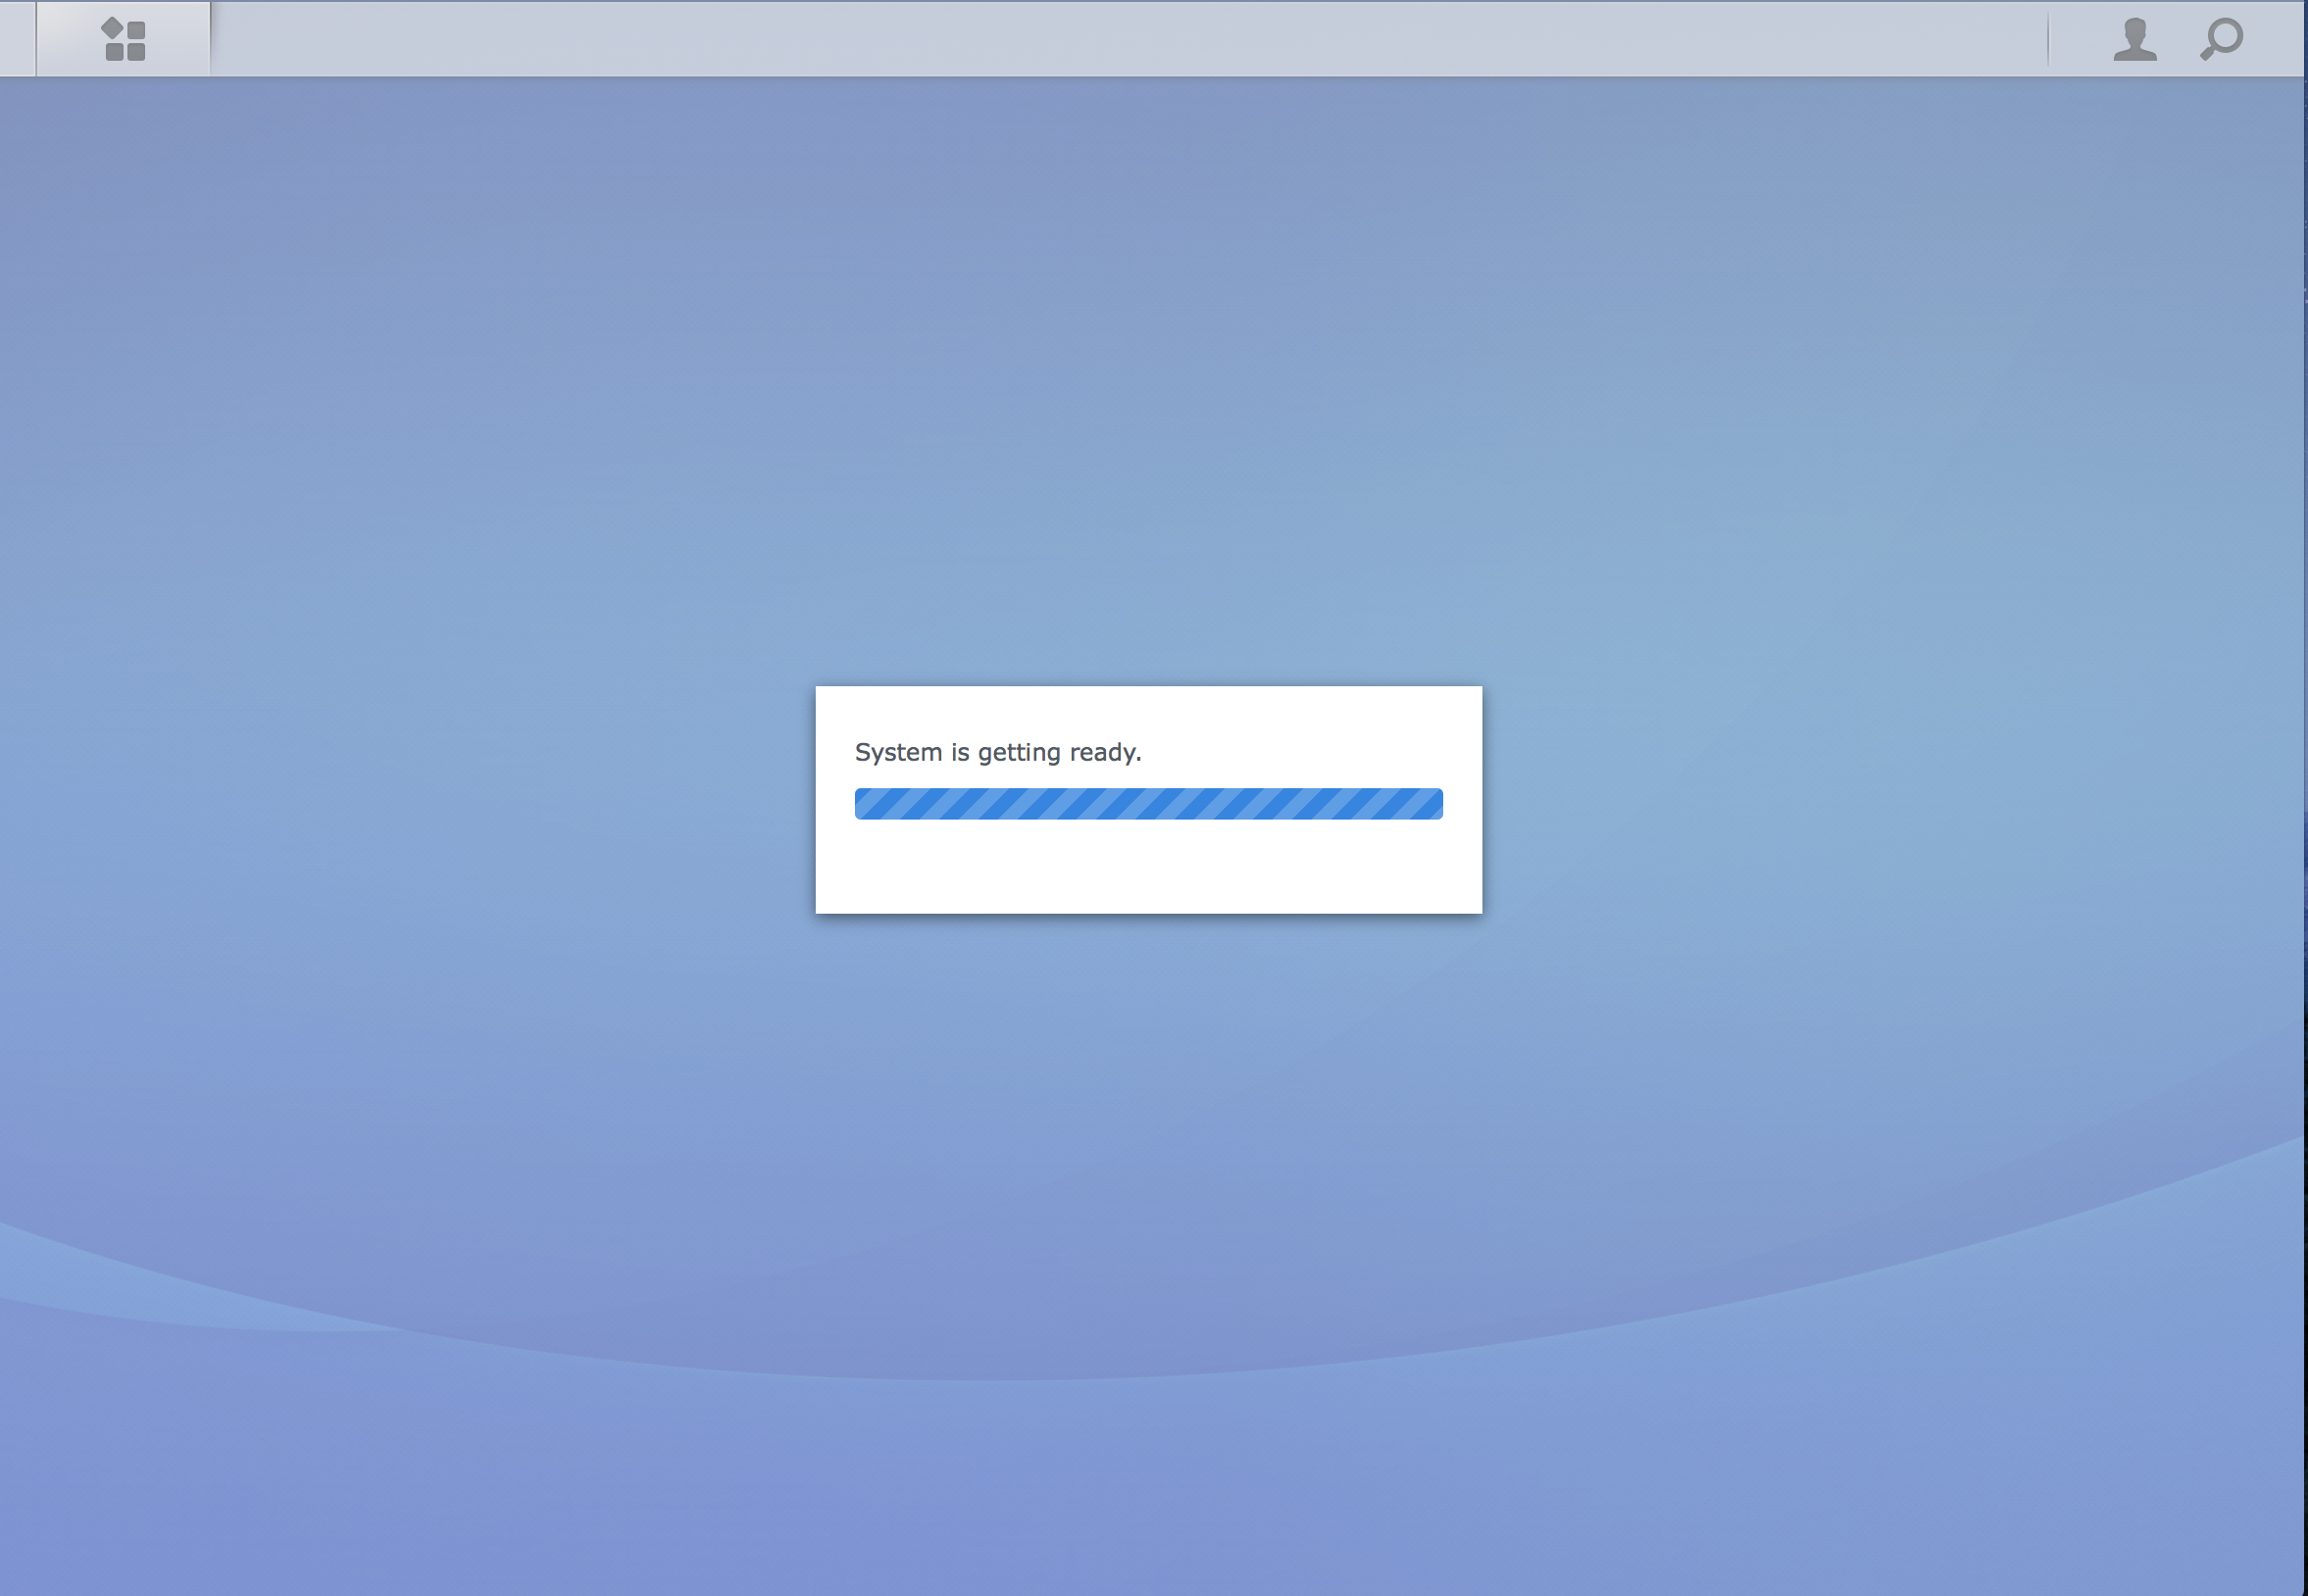
Hey Folks - We have made some great progress with our install and stuck on the very last step. 😩 Our Disktation installs successfully, reboots and comes back up again - after a few minutes the interface refreshes and says "Starting Services" in the assistant, if you browse to the web interface it states "System is getting ready" and simply sits there.... After a good 30 minutes nothing happens and it doesn't seem to move past this stage. We have Juns 1.02b boot loader and the DSM_DS3615xs_15152.pat file for the installation as per the guide. Hardware Setup: SuperMicro X9DBL-IF Motherboard 2 x Intel XEON E5-2418L 48Gb Ram ECC 3 x LSi 9211-8i (Flashed to IT Mode - Dell H200) HP NC365T Ethernet controller Various Hard Drives on the LSi's Has anyone else experienced anything similar to the above or can offer any insight / guidance as to what might be up? Many Thanks! MrTPN

-
I have a question regarding models. Running baremetal: DS3617XS 1.0.2b and 6.1.3 15152 Update1 Before I had ds3615xs installed. I migrated to ds3617xs becouse of my 2X Xeon prosessors. (2 X 2.16 quad) The thing i found out is that synocomunity and others dont support ds3617xs with their packages. I run Docker for some of these packages, but should I, or not, migrate back to ds3615xs with my prosessors in mind? Another thing that occured is that my 12Gb ram, was reduced to 8Gb ram after migrating to ds3617xs. That might be hardware fault, not sure. Thank you.
-
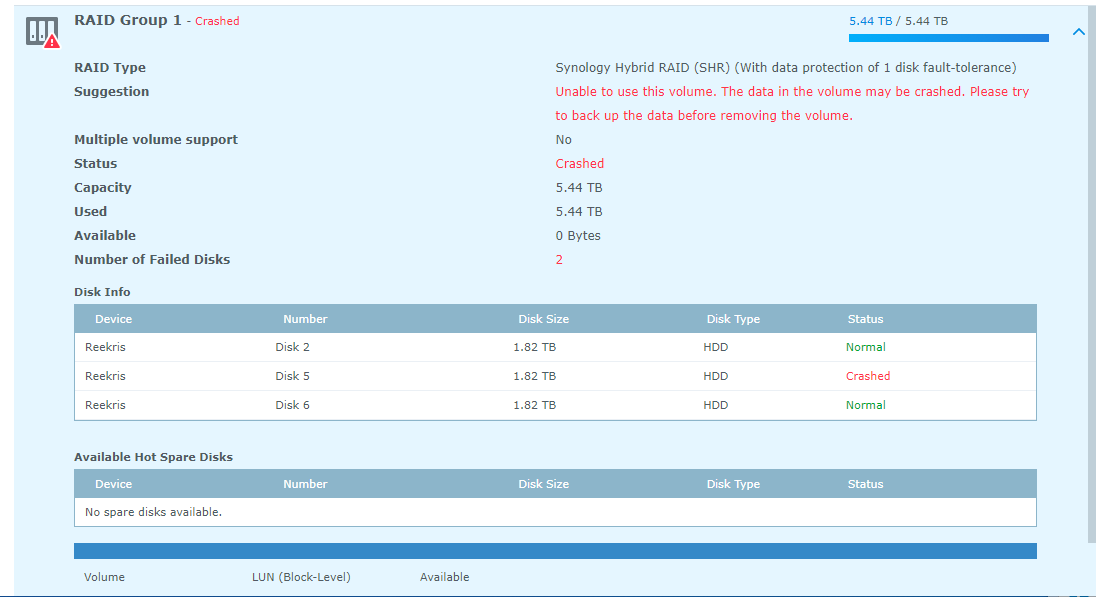
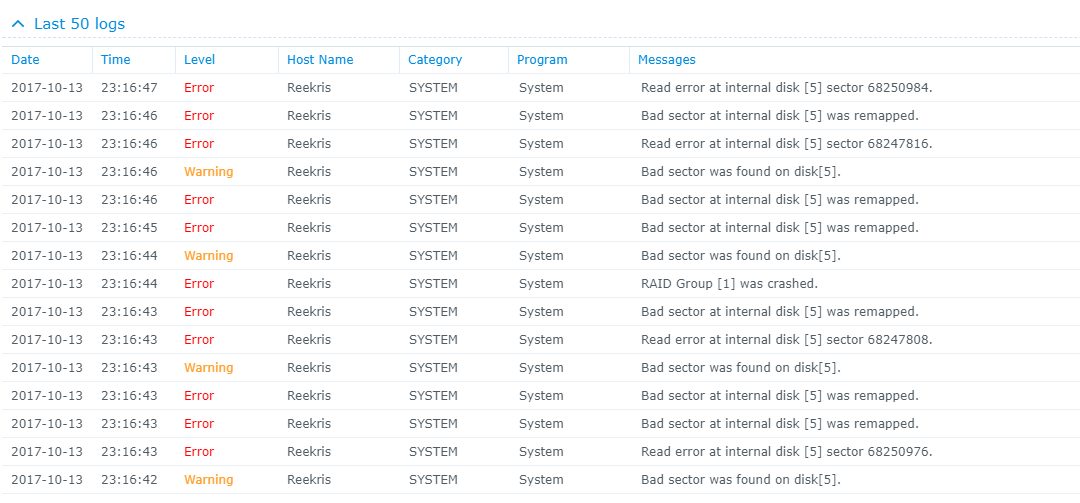
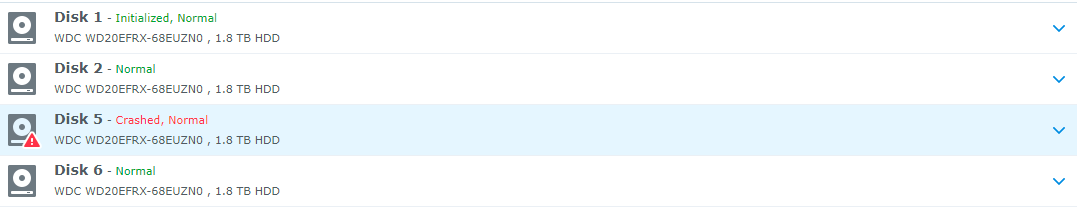
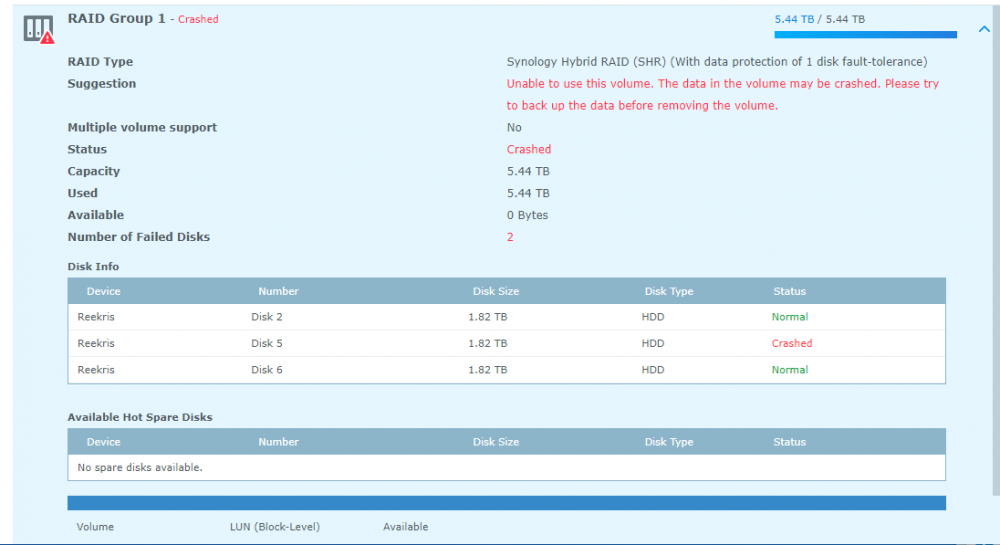
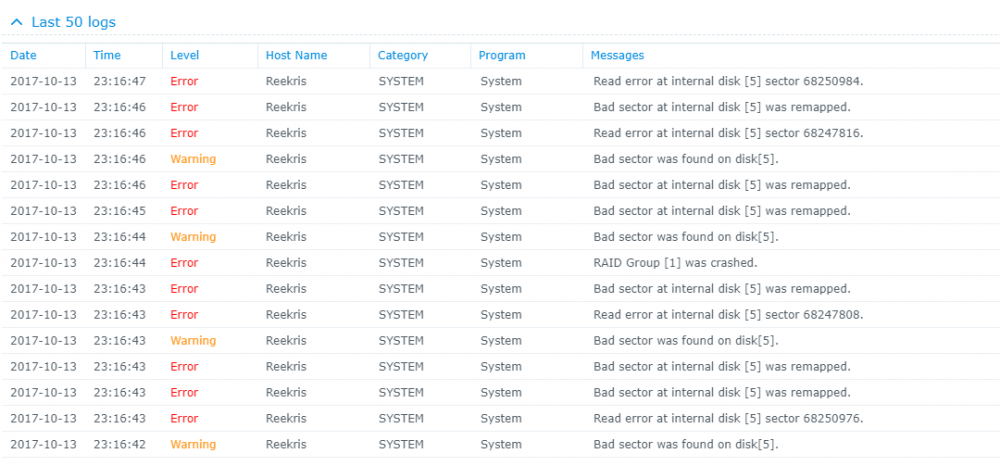
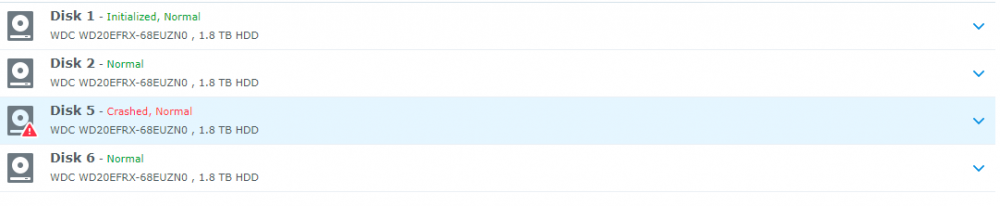
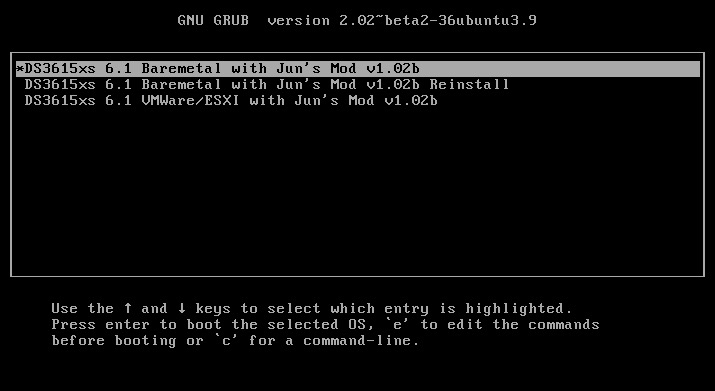
Alright, strap yourselves in, because this might get long... Hardware setup: 4x WD 2TB Red in SHR ASRock H81M-HDS Mobo Intel Celeron Processor 8GB Crucial Ballistix RAM First, some background: A few days ago I noted the network drives that I have on my system were not showing up in Windows so I navigated to the system via my browser and the system told me I needed to install an update and that my drives were from an old system and would need migration. I wrote a different post about that here: The versions it wanted to install was the same version (or slightly higher) of 5.2 so I thought nothing of it and agreed to let the system update. It went through the install smoothly, but never rebooted. Eventually I was able to navigate back to the web browser and it told me I now had 5.2 firmware, but 6.1-15152 DSM. I am still unclear how this install happened, but I assume that it downloaded it automatically from the internet even though I had enabled the "only install security patches" option. As I posted in the Tutorial forum a few posts after the linked one, I was able to get Jun's loader installed and boot into 6.1-15152 and I thought all was well. However, when I booted into the DSM, I was in a world of hurt. I have one bad disk in the array clearly that lists bad sectors, but that's the point of the SHR array right? Well I let the RAID start to repair itself and always around 1.5% into the repair it crashes and tells me the System Volume has crashed. However, you'll notice in the Disk Info Section there are only 3 disks. Looking into the logs show that Disk 5 (the bad one) failed at trying to correct bad sectors: However, when this happens Disk 1 (AFAIK, perfectly fine drive) switched into Initialized, Normal but drops out of the RAID array and then it goes into crash mode. I don't understand the relationship between Disk 5 crashing out when repairing the RAID and Disk 1 disappearing. It stands to reason that if Disk 1 is fine, which is seems to be that it would just fail and stay in degraded mode until I can swap in a new drive. I have tried starting the system with Disk 5 unplugged, but that does no good. I have also begun playing around with attempts at data recovery in a LiveUSB of Ububntu using some of Synology's guides as well as just googling around. So I suppose I have a few questions. 1. Does anyone know of a relationship between possibly installing the new system, and the bad disk causing the good disk to crash? 2. How likely is it that Disk 1 (AFAIK good disk) is also toast. 3. Do you have any tips for recovering data from a situation like this? I would greatly appreciate any help or advice you can provide. I have been banging my head against a wall for 3 nights working on this. I have all the really important stuff backed up to the cloud so it is not a matter of life and death (5 year, 10000 photos) but there is a lot of other media that I am willing to do a lot to not replace or only replace some of.
-
Hello all, Unfortunately, I was unable to install 1.02b on esxi 6.0 Update 3 by following different guides throughout the forum. So after a few hours of testing, I wrote myself a guide for future use. I tested these situations: 1. DS3615 baremetal in basic disk -> VM 2. DS3615 baremetal in raid 1 disk -> VM 3. DS3617 baremetal in basic disk -> VM 4. DS3617 baremetal in raid 1 disk -> VM 5. VMs back to baremetal in both basic and raid 1 disk without losing any data. My personal guide is attached as a PDF. Install on ESXi 6.0U3.pdf
-
Can anyone link me to a PCIe Gigabit NIC that they have confirmed working on Jun's DSM6.1? Ordered an Intel nic on amazon, of course it was too old (used e1000e). Looking to buy one that I know will work. Thanks! Currently using an AR8151 on DSM5.2, but it doesn't seem to be working with Jun's loader.
-
Ce tuto est une mise à jour du tuto que j'ai déjà fait l'année dernière. Le tuto ci-dessous permet d'installer/migrer DSM 5.2 à DSM 6.1.7 directement sans devoir à passer par DSM 6.0.2. Si pour une raison ou une autre vous voulez migrer à DSM 6.0.2 d'abord ou alors tout simplement vous ne voulait pas migrer à DSM 6.1.7 mais souhaiter migrer à DSM 6.0.2 uniquement alors utilisez le lien ci dessus. Pour mettre à jour DSM 6.0.2 à DSM 6.1.7 voir ici. Comme la plupart de vous doivent déjà le savoir Jun a réussi un exploit en créant un loader permettant l'installation de DSM 6 sur du matériel non Synology. Voici le fil de la discussion pour ceux que ça intéressent: https://xpenology.com/forum/topic/6253-dsm-6xx-loader/. Il va vous falloir quelques outils. Je pars du principe que vous êtes sous Windows 10, 8, 7, Vista ou XP. Si vous êtes sur un MAC OS et que vous comprenez l'anglais réfèrerez vous au post que j'ai fait sur comment écrire et monter l'image sur une clef USB. Vous pouvez ensuite revenir sur ce tuto après avoir effectué les manips nécessaires sur MAC OS. Si vous avez des doutes n'hésitez pas à laisser un commentaire. Si vous êtes à DSM 5.1 ou sur une version antérieur, il faut tout d'abord mettre à jour DSM à la version 5.2. Si vous faites une installation fraîche de DSM 6.1 alors vous êtes bon pour la suite. Simplement omettez toute référence à DSM 5.2 Voici ce dont vous avez besoin: - Win32 Disk Imager. Application permettant de rendre une clef USB bootable. - Une clef USB que l'on utilisera pour y mettre le loader. 4GB suffiront largement. Je conseille une clef de marque (Kingston, SandDisk ou autre). Cela évitera les problèmes dans le future. - Comment connaitre le VID et PID de votre clef usb >>> voir ici - Un éditeur de texte avancé. Notepad++ fera l'affaire. L'éditeur de text Notepad inclu avec Windows est déconseillé. - DSM 6.1.7. Télécharger un des fichiers relatifs à un des 3 modèles suivant: DS3615sx ou DS3617sx ou DS916+. Télécharger uniquement le fichier avec l'extension ".pat" et non celui avec l'extension ".pat.md5". Les fichiers PAT viennent directement des serveurs de Synology, donc sans aucune altération. - Le loader (miroir) officiel v1.02b de Jun. Ce loader est hybrid c'est à dire qu'il marche en EFI ou BIOS donc il devrait marcher sur une majorité de machines capable de lire du GTP. Pour les machines plus vielles qui ne peuvent lire que du MBR ce loader ne marchera pas. Utilisez alors l'image du loader v1.02b faites par @Genesys construite à partir du loader de Jun mais faite avec une table de partitionnement de type MBR. Note: Le loader v1.02b de Jun est compatible avec les CPU Intel. Pour les CPU AMD cela n'est pas entièrement le cas mais plusieurs personnes ont mentionnée qu'il était possible d'utiliser ce loader. Il serait d'après eux nécessaire de désactiver la fonction C1E dans le BIOS (applicable aux machines HP comme le N40L ou N54L par exemple). Si vous avez un autre model/marque de machine AMD ne me demandez pas, je ne sais pas. Il faudra que vous regardiez dans le bios et fassiez des tests vous même. Partagez voter expérience ca en aidera surement d'autres. - Le ramdisk personnalisé extra.lzma. Ce ramdisk est optionnel et ne doit être utiliser que si le ramdisk par défaut inclus dans le loader ne permet pas la détection du matériel. Je le fourni pour ceux qui pourraient avoir des problèmes de détection réseau ou de contrôleurs de disques non reconnus. Ce ramdisk personnalisé contient des modules (drivers) additionnels qui ont été compilé par @IG-88 avec le code source de DSM 6.1.3. Je ne garantie pas qu'ils marchent tous. Vous devrez remplacer (ou renommer, au cas ou!) le ramdisk par défaut extra.lzma par celui ci. Si vous avez des questions spécifiquement liées au ramdisk de IG-88 merci de les poster directement dans le fil de discussion de IG-88, pas ici. - Faites attention à branchez vos HDD successivement en commençant par le premier port SATA normalement décrit comme SATA0 sur les cartes mères. Vérifiez avec le fabriquant de votre carte mère. Si vous faites une migration à partir de DSM 5.2 alors laissez tel quel. - OSFMount. Application permettant de modifier le fichier grub.cfg directement sur l'image. Ceci n'est pas strictement nécessaire car Jun a rendu possible la configuration du VID/PID, S/N et MAC directement à partir du Menu Boot Grub. Si vous préférez utiliser la nouvelle méthode il suffit d'omettre le Point 4, lisez plutôt la Note 4 et reprenez le tuto à partir du Point 5. SVP LISEZ TOUT LE TUTO AVANT DE FAIRE N'IMPORTE QUOI L'utilisation de ce loader relève de votre entière responsabilité. Ne me tenez pas responsable si vous perdez vos données ou que votre NAS part en fumée. Sachez aussi que ce loader contient moins de drivers que sous DSM 5.2 donc si il est primordiale pour vous d'avoir une machine opérationnelle h24 je vous conseille de lire en bas du tuto les drivers disponibles. Si votre module n'est pas inclus alors il vous faudra les compiler vous même ou utiliser le ramdisk personnalisé qui se trouve ci-dessus. Ne me demandez pas de compiler des modules à votre place, je ne le ferais pas. NE METTEZ PAS A JOUR DSM AU DELA DE LA VERSION 6.1.7 AVEC LE LOADER v1.02b. EN D'AUTRES TERMES NE METTEZ PAS A JOUR DSM A LA VERSION 6.2 A bon entendeur. Maintenant que vous avez tout ce qu'il vous faut, passons aux choses sérieuses: 1 - Faites un backup de vos données et de votre configuration avant toute chose. Cela évitera la pleurniche plus tard. Imprimez ce tuto si nécessaire. 2 - Eteignez votre NAS. Déconnectez votre clef USB avec votre loader 5.2. Je conseille que vous mettiez de coté la clef USB que vous utilisez actuellement avec DSM 5.2 et prenez une nouvelle clef USB pour DSM 6.1. Cela évitera de la refaire si l'upgrade ne marche pas pour vous et que vous avez besoin de revenir à DSM 5.2. 3 - Allez à votre PC, branchez votre clef USB et lancez votre application de choix permettant de voir le VID et PID de votre clef USB. Notez ça quelque part car vous en aurez besoin sous peu. 4 - Maintenant lancez OSFMount. Sélectionnez "Mount New", puis choisissez votre loader (fichier au format .img) dans "Image File". Une autre fenêtre s'ouvre. Sélectionnez la partition 0 (celle de 15 MB). Cliquez Ok. Sur la fenêtre principale décochez la case "Read only drive". Cliquez Ok. La partition de l'image devrait maintenant être montée dans votre explorateur de fichiers. Vous pouvez maintenant aller au dossier /grub et remplacer (ou renommé) le ramdisk par défaut extra.lzma par celui que j'ai fourni un peu plus haut. Maintenant revenez en arrière et aller dans le dossier /grub et éditer le fichier grub.cfg avec votre éditeur de texte avancé. Si vous avez besoin de remplacer le ramdisk par défaut par le ramdisk extra.lzma personnalisé il vous faudra alors aussi monter la partition 1 (celle de 30MB) avec OSFMount. Le contenue du fichier grub.cfg est le suivant: Je ne mets uniquement ici que la portion du code qui nous intéresse dans le cadre de ce tuto: [...] set extra_initrd="extra.lzma" set info="info.txt" set vid=0x058f set pid=0x6387 set sn=C7LWN09761 set mac1=0011322CA785 set rootdev=/dev/md0 set netif_num=1 set extra_args_3615='' set common_args_3615='syno_hdd_powerup_seq=0 HddHotplug=0 syno_hw_version=DS3615xs vender_format_version=2 console=ttyS0,115200n8 withefi elevator=elevator quiet' set sata_args='sata_uid=1 sata_pcislot=5 synoboot_satadom=1 DiskIdxMap=0C SataPortMap=1 SasIdxMap=0' set default='0' set timeout='1' set fallback='1' [...] Les données à modifier sont les suivantes: vid=0x090C par vid=0x[le vid de votre clef usb] pid=0x1000 par pid=0x[le pid de votre clef usb] sn=C7LWN09761 par sn=générez votre sn ici avec le modèle DS3615xs ou DS3617xs ou DS916+ (cela va dépendre que quel loader vous avez choisi) mac1=0011322CA785 par mac1=[l'adresse MAC du port réseau #1]. Vous pouvez rajouter set mac2=[l'adresse MAC du port réseau #2] si vous avez un 2ième port réseau et ainsi de suite jusqu'à mac4 mais ceci n'est pas nécessaire. Conseil: changez timeout='1' par timeout='4' - Cela rallonge la durée d'affichage du Menu Boot Grub lorsqu'il apparaitra à l'écran. Une fois finie l'édition du fichier grub.cfg, sauvegardez les changements et fermez l'éditeur de texte. Sur OSFMount cliquez sur "Dismount all & Exit". Vous êtes maintenant fin prêt à écrire l'image sur votre clef USB. 5 - Utilisez Win32 Disk Imager pour rendre votre clef USB bootable avec l'image que vous venez d'éditer. 6 - Ejectez votre clef USB chaude et brulante proprement. Branchez la sur votre NAS (évitez les ports USB 3.0). Démarrez la machine et accédez immédiatement à votre BIOS afin de le reconfigurer pour que le boot se fasse à partir de la nouvelle clef usb. Faites les changements nécessaires pour redémarrer en UEFI ou en legacy bios, c'est à vous de choisir. Aussi, dans le BIOS, les HDD doivent être configurés en AHCI et non pas en IDE. Finalement et si possible, activez dans le BIOS le port série si il ne l'est déjà pas. Toutes les cartes mère n'ont pas forcément de port série. Si c'est le cas pour vous alors ce n'est pas bien grave, le loader se chargera du problème. Sauvegarder les changements fait au BIOS et redémarrez. 7 - Une fois redémarré, si vous avez un écran connecté au NAS vous verrez le Menu Boot Grub suivant: CONSEIL: avant même que le Menu Boot Grub n'apparaisse cliquez de façon répétée les touches haut ou bas. Cela aura comme effet d'arrêter le compte à rebours et vous donnera le temps de choisir la ligne que vous voulez. Vous verrez l'écran suivant après avoir fait entrer: Si vous avez démarrer la clef USB en mode EFI vous ne verrez normalement pas les 3 dernières lignes. Rien de grave. 8 - Retournez à votre PC et lancez de préférence Synology Assistant ou alors allez à http://find.synology.com. Normalement si vous avez bien tout suivi votre NAS devrait être détectée sur votre réseau local au bout d'une minute environ (j'ai testé avec un machine virtuelle et ça a prit ~55 secondes). Il suffit ensuite de suivre les indications pour soit faire une installation fraîche soit faire la migration de DSM 5.2 à DSM 6.1. A un moment donné DSM vous demandera le fichier PAT (DSM_DS3615xs_15217.pat ou DSM_DS3617xs_15217.pat ou DSM_DS916+_15217.pat) que vous avez normalement déjà téléchargé. 9 - Une fois finie la MAJ ou l'installation fraîche, accédez à votre NAS comme d'habitude. Il vous faudra surement mettre à jour plusieurs applications. Vous pouvez ensuite mettre à jour DSM 6.1.7 jusqu'à DSM 6.1.7 (critical update 3). Il est possible que vous soyez obligé de faire un reboot forcé. Certaines personnes ont dû refaire la clef usb aussi. Désactivez la mise à jour automatique dans DSM. Si besoin est, voici ou télécharger les fichiers individuels (DSM et updates): https://xpenology.com/forum/topic/7294-links-to-dsm-and-critical-updates/ 10 - Voila c'est fini. Si vous avez des questions cherchez le forum/Google d'abord. Si vous êtes toujours bloqué alors posez votre question en donnant les spécifications de votre matériel (model carte mère, contrôleur LAN, contrôleur disk etc) faute de quoi votre post sera supprimé ou sciemment ignoré. -------------- Note 1: Si après avoir suivi le tuto votre NAS n'est pas accessible via http://find.synology.com ou Synology Assistant la raison la plus probable c'est que les drivers de votre carte réseau n'ont pas été inclus dans le loader. Faites un effort et utilisez Google pour savoir quel module votre carte réseau et/ou votre contrôleur de disque utilisent sous linux suite à quoi vérifiez que ces modules soient inclus dans le ramdisk personnalisé. Si vous le voyez alors utilisez le ramdisk personnalisé. Si rien ne marche alors poser votre question. Note 2: Une fois passé à DSM 6.1 sachez que vous n'aurez plus accès au NAS via ssh avec le compte root. Vous pouvez ceci dit y accéder avec votre compte administrateur puis élever les droits en utilisant sudo -i Ceci est tout à fait normal. C'est Synology qui a voulu sécuriser l'accès à DSM. Note 3: Vérifiez bien le VID/PID de votre clef USB avant d'entamer la MAJ. Si lors de la migration vous obtenez l'erreur suivante: "Failed to install the file. The file is probably corrupted. (13)" (ou l'équivalent en français) c'est que le VID/PID ne correspond pas à votre clef USB. Si vous avez toujours des problèmes après avoir bien vérifié le VID/PID alors essayez une autre clef usb. Note 4: Les changements effectués sur le fichier grub.cg peuvent aussi être fait directement à partir du Menu Boot Grub donc en principe il est tout à fait possible d'ignorer le Point 4 et écrire l'image synoboot.img sur votre clef USB sans rien modifier (il suffit de continuer à lire à partir du Point 6). Pour faire les modifications il faut appuyer sur la lettre 'C' lorsque vous voyez le Menu Boot Grub apparaitre. Il faut être vif car vous n'avez qu'une seconde avant que le menu disparaisse. Apres avoir appuyé sur la lettre C vous vous retrouverez dans une invite de commande grub. Pour changer le VID vous devez écrire comme suit: vid 0xLES 4 CHIFFRES VID DE VOTRE CLEF USB Faites la même chose pour pid, sn et mac1. Appuyez sur entrer à chaque commande. Les commandes sont les suivantes: pid 0xLES 4 CHIFFRES PID DE VOTRE CLEF USB sn LE NUMERO DE SERIE DE VOTRE NAS mac1 L'ADRESSE MAC1 DE VOTRE NAS Si vous avez plusieurs cartes réseau vous pouvez les rajouter de la meme manière: Le maximum c'est mac4. Voir ci dessous: mac2 L'ADRESSE MAC2 DE VOTRE NAS mac3 L'ADRESSE MAC3 DE VOTRE NAS mac4 L'ADRESSE MAC4 DE VOTRE NAS Si vous pensez avoir fait une erreur il suffit de refaire la commande. Lorsque vous avez fini appuyez sur Esc et sélectionnez la ligne du menu qui convient. Ci dessous un example a quoi ressemble l'invite de commande grub avec les commandes: Note 5: Si lors de l'installation vous recevez un message d'erreur de type "Nous avons détecté des erreurs sur les disques [numero des disques] et les ports sata ont également été désactivés, remplacer les disques et réessayer" alors il faut rajouter SataPortMap dans l'invite de commande Grub (ou dans le fichier grub.cfg). Appuyer sur la letter C lors du Menu Boot Grub et écrivez ceci: append SataPortMap=XX XX est le nombre de HDD présent. N'oubliez pas de mettre à jour ce paramètres si vous rajouter des HDD. Par ailleurs, si vous êtes amené à utiliser Reinstall, il ne faut pas oublier de sélectionner le mode normal (première ligne du menu grub) lors du reboot automatique après l’installation, sinon le loader sélectionnera à nouveau Reinstall et cela occasionnera des problèmes ultérieurement. @@@@@@@@ Précisions sur ce que veut dire SataPortMap= @@@@@@@@ @@@@@@@@@@@@@@@@@@@@@@@@@@@@@@@@@@@@@@@@@@@@ ############## Problèmes connus ##################### - Sur des machines à coeur unique et lent le "patcher" charge trop tard. - Certains drivers de cartes réseau plantent lorsque le MTU est au delà de 4096 (Jumbo frame). ############# Modules inclus dans le Loader de Jun par défaut ############# ############### Log des modifications du Tuto ###################


-
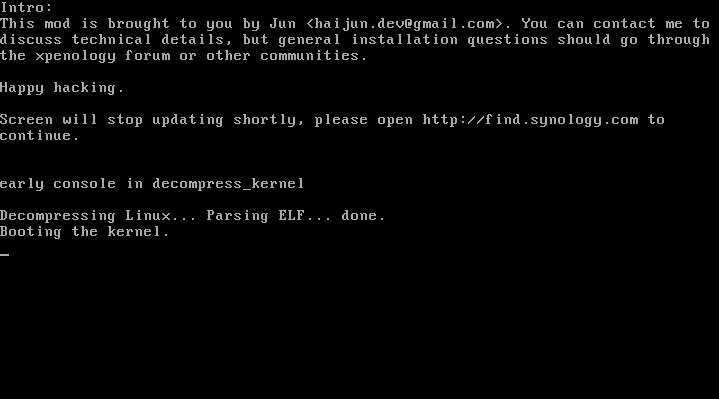
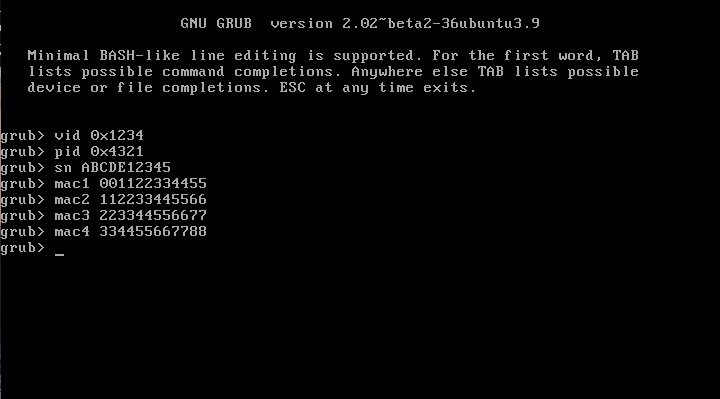
 This is an updated tutorial version from the one I made last year. It will enable you to migrate from DSM 5.2 to DSM 6.1.7 directly without the need to upgrade to DSM 6.0.2 first. If for some reason you want to upgrade to DSM 6.0.2 first or simply you do not want to upgrade to DSM 6.1.7 but only to DSM 6.0.2 then use the link above. To upgrade from DSM 6.0.2 to DSM 6.1.7 read here. As most of you know by now Jun was able to find a way to install DSM 6 on non Synology boxes. Here is the thread that I recommend reading. At least make an effort and read the OP: https://xpenology.com/forum/topic/6253-dsm-6xx-loader/ Below is what you need for the operation. I will assume you are doing all this under Windows 10, 8, 7 or XP. If you are on a MAC computer have a look at this post I made on how to burn the image to a USB drive and then mounting the USB drive for editing the content. The rest of the tutorial still applies. If you are currently using DSM 5.1 or below first update to DSM 5.2. If you are doing a fresh install of DSM 6.1 then carry on with the tutorial and omit references to DSM 5.2. - Win32 Disk Imager to make a bootable USB drive; - A 4GB (or any size really) USB drive (flash drive) to install the loader. Not that this is necessary but use preferably a brand name (Kingston, SanDisk...); - A way to read your USB drive VID/PID. Here is a how-to >>> VID and PID; - A good text editor: Notepad++ I really don't recommend using Windows's Notepad; - DSM 6.1.7 PAT file. Chose the one you need: DS3615sx or DS3617sx or DS916+. Download the ".pat" file not the ".pat.md5" - Jun's official v1.02b loader (mirror). This is a hybrid UEFI/BIOS loader so it should work in most machines which are capable or reading GUID partition table (GPT). For older machines that can only read MBR the above loader will simply not boot. If that is your case then use @Genesys's v1.02b loader rebuilt image which is MBR based. Note: Jun's loader supports Intel CPUs. For AMD CPUs Jun has stated that the loader needs some work but it has been reported by many users using HP machines that it actually works. The C1E function in the bios (in some HP machines) needs to be deactivated. I am unsure for other motherboards brands therefore if you have an AMD machine that is not an HP you might be out of luck. Try looking in the bios configuration and play around. - Custom extra.lzma ramdisk. This ramdisk is optional and should only be used if the default ramdisk included in the loader is not detecting your hardware. I am just providing it for those who are having issues with network detection or unrecognised HDD controllers. This custom ramdisk contains additional and updated modules & firmwares. Credits go to @IG-88 for compiling the modules against the latest DSM 6.1.3 source code. I do not warranty they all work but I think most do. If you chose to use this ramdisk, you will need to replace (or rename, so you can revert) the default extra.lzma ramdisk from Jun's loader with this one. If you a have question specific to the custom ramdisk please post it in the topic of IG-88, not here. - If you are doing a fresh install make sure your drives are plugged in direct succession starting from the 1st SATA port. Usually the first port is described as SATA0 on motherboards. Check with your MoBo manufacturer for exact nomenclature. - OSFMount to modify the grub.cfg file within the loader's image and if necessary to replace the extra.lzma ramdisk with the custom one. This is not strictly necessary as Jun has made it possible to configure what needs to be modified via the Grub Boot Menu. If you prefer using Jun's Grub Boot Menu configuration method, simply skip Point 4, read Note 4 instead and pick up at Point 5. PLEASE READ EVERYTHING PRIOR ATTEMPTING ANYTHING Use this loader at your own risk. I wont be held responsible for any loss of data or black smokes that may result in the use of this loader. Please note that this loader has a limited amount of modules (drivers) included. If it is fundamental for you to have a NAS operating as quick as possible I recommend you look at the included drivers very carefully at the bottom of this tutorial before attempting an upgrade. If they are not there you will have to compile your own modules/firmwares or use the custom ramdisk provided above. Don't ask me to compile modules for you. I wont do it. One last thing: DO NOT UPDATE DSM BEYOND VERSION 6.1.7 with loader v1.02b. IN OTHER WORDS DO NOT UPDATE TO DSM 6.2 You have been warned. Here we go: 1 - BACKUP your data and save your configuration prior any attempts to migrate from DMS 5.2 to DSM 6.1. I can't stress this enough. JUST DO IT, as Nike likes to say. Also, print this tutorial if you can. It will make your life easier. 2 - Turn off your NAS and unplug the USB drive you are currently using with DSM 5.2. I recommend you put this USB drive aside in case migration to DSM 6.1 doesn’t go as expected and you need to revert to DSM 5.2. It will just make your life easier. 3 - Now go to your workstation/PC, plug a new USB drive (or the old one if you really don’t have any spare USB drives). Use the link I provided earlier to check your USB drive VID/PID. Write down the info somewhere as we will need it later. 4 - Now launch OSFMount. Select Mount New, then select the image file you downloaded earlier (i.e. .img extension file) to open. Now select partition 0 (the one that is 15 MB). Click Ok. Then at the bottom of the window make sure to un-tick the "Read only drive". Click Ok. The partition should now be mounted in file explorer. At this point you can navigate to the /grub directory and edit the grub.cfg file. If you need to replace the extra.lzma ramdisk with the custom ramdisk provided above then you will also need to mount partition 1 (the one that is 30 MB). Below is what you will see in the grub.cfg file. I am only showing below the portion of the code that is relevant for the purpose of this tutorial [...] set extra_initrd="extra.lzma" set info="info.txt" set vid=0x058f set pid=0x6387 set sn=C7LWN09761 set mac1=0011322CA785 set rootdev=/dev/md0 set netif_num=1 set extra_args_3615='' set common_args_3615='syno_hdd_powerup_seq=0 HddHotplug=0 syno_hw_version=DS3615xs vender_format_version=2 console=ttyS0,115200n8 withefi elevator=elevator quiet' set sata_args='sata_uid=1 sata_pcislot=5 synoboot_satadom=1 DiskIdxMap=0C SataPortMap=1 SasIdxMap=0' set default='0' set timeout='1' set fallback='1' [...] You want to modify the following: Change vid=0x090C to vid=0x[your usb drive vid] Change pid=0x1000 to pid=0x[your usb drive pid] Change sn=C7LWN09761 to sn=generate your sn here with DS3615xs or DS 3617xs or DS916+ model (this will depend on which loader you chose) Change mac1=0011322CA785 to mac1=[your NIC MAC address #1]. You can also add set mac2=[your NIC MAC address #2] and so on until mac4 if you have multiple NICs. However, this is not necessary. Recommended: Change set timeout='1' to set timeout='4' - This will allow you more time to make a selection in the Grub Boot Menu when it appears on screen. Once you are done editing the grub.cfg file, save it and close your text editor. Now in OSFMount click on Dismount all & Exit. You are now ready to burn the image to your USB drive. 5 - Now use Win32 Disk Imager to burn the image file onto the USB drive. This will also make the USB drive bootable. 6 - Eject and unplug the USB drive from your workstation. Plug it in your NAS (avoid USB 3.0 ports. Use USB 2.0 port if available). Boot your NAS and before doing anything fancy, access your BIOS so to make your USB drive the 1st boot drive if it's not the case. The Jun official loader can boot in UEFI or in legacy BIOS, so you chose what suits you best. Also, make sure your HDDs are booting in AHCI mode and not in IDE. Finally, if disabled, also enable the serial port in BIOS. Some BIOS don't have this option so don't get too cranky on this if you can't find it. Save changes to the BIOS and REBOOT the NAS. 7 - Once rebooted, if you have a monitor connected to your NAS you will see the following Grub Boot Menu: ADVICE: even before you see the Grub Boot Menu press the up/down key. This will stop the countdown so you will be able to select the desired line. You won’t see much other than the following after you press enter: If you booted the USB drive in EFI mode then you will see the same text without the last 3 lines but that's ok. 8 - Now go back to your workstation, and launch Synology Assitant or go to http://find.synology.com. Within one minute or so you should normally be able to see your NAS on your local network (it took ~55 seconds on a test I did on a VM). Just follow the instructions and either chose "Install" if you wish to have a clean install or chose “Migration” if you are coming from DMS 5.2 and wish to update while retaining your data. You will be asked to provide the .PAT file you downloaded earlier (DSM_DS3615xs_15217.pat or DSM_DS3617xs_15217.pat or DSM_DS916+_15217.pat). 9 - When the migration is finished you will most probably have to update some of your packages. You can then proceed and update DSM 6.1.7 up to DSM 6.1.7 critical update 3. It is possible you might either need to hard reboot or re-image your usb drive. Make sure to deactivate auto-updates within DSM. Link to individual files (DSM and critical updates) can be found here: https://xpenology.com/forum/topic/7294-links-to-dsm-and-critical-updates/. DO NOT UPDATE TO DSM 6.2. The loader is not compatible. 10 - You are done. If you have questions, first search the forum and/or Google then leave a comment if nothing helps. Please provide your hardware specifications (motherboard model, LAN controller, driver controller etc). Failure to prove such information will lead to the post being deleted or not answered. -------------- Note 1: If after following the tutorial you can’t find your NAS through http://find.synology.com ou Synology Assistant it is highly possible that the drivers of your NIC are not included in the ramdisk of the loader. Make an effort and use Google to know what modules your NIC and HDD controller are using, then check if those modules are included in the custom extra.lzma ramdisk. If yes then use the custom ramdisk. Don't ask me to look for you. If nothing works then ask your question. Note 2: Synology increased security since the introduction of DSM 6. Root access through SSH is no longer possible out of the box. You can however use your admin account and elevate permissions with the following command if you need root permissions: sudo -i Note 3: Please check you have the right VID/PID prior proceeding. If you get the following error ”Failed to install the file. The file is probably corrupted. (13)" it most certainly means your VID and/or PID is/are wrong. If you still have the same error message after verifying the VID/PID then try another USB drive. Note 4: Configuration added to the grub.cfg file can also be done directly during the Grub Boot Menu, so technically you can skip Point 4 and burn the image on the USB drive without editing anything (read Point 5 onward first). If you wish to do the changes from the Grub Boot Menu directly you need to press the letter 'C' when you see the Boot Menu. You will literally only have one second, so be fast. Once you press 'C' you will be in a Grub command line environment. To change your VID enter the following: vid 0xYOUR 4 DIGITS USB DRIVE VID Do the same for pid, sn and mac1. Press enter at each command. The commands are: pid 0xYOUR 4 DIGITS USB DRIVE PID sn YOUR NAS SERIAL NUMBER mac1 YOUR NAS MAC1 ADDRESS If you have multiple NICs you can also issue mac2, mac3 and mac4 as commands. Maximum is mac4. See below: mac2 YOUR NAS MAC2 ADDRESS mac3 YOUR NAS MAC3 ADDRESS mac4 YOUR NAS MAC4 ADDRESS If you think you made a mistake in the numbers simply re-issue the command. When you are done press esc and select the appropriate menu entry. Below is an example (fake numbers) of how it looks under the Grub command line environment : Note 5: If you encounter the error "We've detected errors on your hard drives [drive number] and the SATA ports have also been disabled" during installation, then you have to fallback to adding SataPortMap to the grub environment. Press the letter 'C' at the Grub Boot Menu and then add the following: append SataPortMap=XX where XX is the number of drives. Don’t forget to update this parameter if you add additional drives to your machine. If you use Reinstall, don't forget to re-select the first line of the Boot Menu once the NAS has rebooted after the installation else the Loader will re-select Reinstall and you will be faced with some issues so please beware of this. @@@@@@@@ What does SataPortMap mean? @@@@@@@ @@@@@@@@@@@@@@@@@@@@@@@@@@@@@@@@@ ############## Know issues ##################### - When running on a slow single core machine, there is a race condition that causes the patcher to load too late. The most obvious sign is that console is not working properly. - Some ethernet drivers crash when set MTU above about 4096 (Jumbo frame). ############# Included default modules & firmwares in Jun's Loader ############# ############## Tutorial UPDATES ##################
- 630 replies
-
- 32
-

-

-
 Bonjour, Pour ceux qui avaient un peu lacher l'affaire avec leur N54L à cause des boot loaders n'acceptant pas les processeurs AMD, sachez qu'en faite... ca marche (oui, c'est bizarre). Sur les topics anglais il y a des discutions qui en parlent, et là je viens de tester la migration pour le mien. Voici la marche à suivre pour ceux qui sont un peu rouillé comme moi : Aller ici pour charger le bootloader de votre choix : https://xpenology.com/forum/topic/7848-mirror-links-to-loaders/ euh, oui il y a 3 versions de NAS, au pif je suis resté sur le DS3615xs comme avant redémarrer son NAS pour aller dans le Setup : dans les options de CPU, désactiver le support des processeurs C1E. mettre à jour sa clé USB (bien sauver son ancien fichier grub.cfg pour pouvoir réutiliser les informations qu'il contient : VID / PID / SN / MAC). Pour le logiciel, j'utilise toujours un vieux "win32diskimager-v0.9-binary" remettre la clé USB dans le NAS et le rédémarrer charger sur le site de Synology le dernier DSM Lancer Synology Assistant Faire un clic droit sur le nas trouvé, et lancer l'installation à partir du DSM téléchargé. suivre les étapes de la migration et puis c'est tout! Voila. Ah si, dernière chose, j'ai pas réussis à faire d'update par contre. Bonne migration!
 -
Buondì, qualcuno è riuscito a installare DSM >= 6.1 su HP MicroServer? Io ho fatto varie prove (anche modificando la chiavetta secondo quanto suggerito da Jun), ma senza successo. In pratica riesco a far partire la chiavetta (modificando la zImage), ma poi non lo trovo con l'Assistant. Qui c'è il tutorial: Il terzo post (di Jun) è quello che spiega come aggiornare su AMD. Grazie!
-
Bonjour je suis actuellement en DSM 6.0.2 avec un DS3615xs et je souhaiterais migrer vers un DSM 6.1 en DS3617xs est-ce faisable ? Mon loader actuel est le 1.01 de Jun's. j'ai tenté de mettre une autre clé USB avec la version 1.02 de Jun's en DS3615xs mais quand le DSM boot et que je vais sur l'interface web j'ai un message disant que mes volumes ont été effacé du coup je n'ai pas pris le risque de faire la mise à jour