Search the Community
Showing results for 'mtu issue login'.
-
You're lucky because with last release 24.3.10 I have no progress ... force reinstall do not solve issue on my side ...
-
Sorry a little bit late, but I had the same issue that the dom is not recognized because it hat an error and is running under usb 1.1 and the bios is not making it, so i but everything to a usb stick with hacking pid and vid and now its working again over usb. I uploaded the image, but it has a fake SN (CBKAN99999), so you need to go on the second partition and edit the vendor file with a hex editor. put in your serial, the last diggit is the checksum of the serial. can be calculated here: https://www.scadacore.com/tools/programming-calculators/online-checksum-calculator/ but in the serial in ASCII input and take the "CheckSum8 Modulo 256" in hex after the SN in vendor file Image is here: https://filer.net/get/fgr73l4drvtvkxcj It is from a original DS1512+ only changed vendor SN Hope that will help someone out.
-
 I'm getting the following error messages from dmesg everytime DSM puts the HDDs to hibernation. I'm running ds918+ Redpill Tinycore DSM 7.0.1-42218 Update 2. Tips? kern :warn : [Mon Jun 27 13:02:38 2022] No such hdd enable pin. Index: 5 kern :warn : [Mon Jun 27 13:02:38 2022] ------------[ cut here ]------------ kern :warn : [Mon Jun 27 13:02:38 2022] WARNING: CPU: 1 PID: 4086 at drivers/ata/libata-core.c:453 SYNO_CTRL_HDD_POWERON+0x4f/0x60() kern :warn : [Mon Jun 27 13:02:38 2022] Modules linked in: cmac cifs tun nf_conntrack_ipv6 nf_defrag_ipv6 ip6table_filter ip6_tables ipt_MASQUERADE xt_REDIRECT nf_nat_masquerade_ipv4 xt_nat iptable_nat nf_nat_ipv4 nf_nat_redirect nf_nat xt_recent xt_iprange xt_limit xt_state xt_tcpudp xt_multiport xt_LOG nf_conntrack_ipv4 nf_defrag_ipv4 nf_conntrack iptable_filter ip_tables x_tables fuse 8021q vfat fat udf isofs loop vhost_scsi(O) vhost(O) tcm_loop(O) iscsi_target_mod(O) target_core_user(O) target_core_ep(O) target_core_multi_file(O) target_core_file(O) target_core_iblock(O) target_core_mod(O) syno_extent_pool(PO) rodsp_ep(O) synoacl_vfs(PO) raid456 async_raid6_recov async_memcpy async_pq async_xor async_tx nfsd btrfs ecryptfs zstd_decompress zstd_compress xxhash xor raid6_pq lockd grace rpcsec_gss_krb5 auth_rpcgss sunrpc aesni_intel kern :warn : [Mon Jun 27 13:02:38 2022] glue_helper lrw gf128mul ablk_helper apollolake_synobios(PO) hid_generic usbhid hid usblp i915 drm_kms_helper syscopyarea sysfillrect sysimgblt fb_sys_fops cfbfillrect cfbcopyarea cfbimgblt drm drm_panel_orientation_quirks iosf_mbi fb fbdev video backlight button uhci_hcd ehci_pci ehci_hcd r8168(O) i2c_algo_bit zram igb(O) e1000e(O) sg dm_snapshot dm_bufio crc_itu_t crc_ccitt psnap p8022 llc hfsplus md4 hmac sit tunnel4 ipv6 flashcache_syno(O) flashcache(O) syno_flashcache_control(O) dm_mod arc4 crc32c_intel cryptd sha256_generic ecb aes_x86_64 authenc des_generic ansi_cprng cts md5 cbc cpufreq_powersave cpufreq_performance processor cpufreq_stats vxlan ip6_udp_tunnel udp_tunnel ip_tunnel etxhci_hcd virtio_scsi(OE) virtio_net(OE) virtio_blk(OE) virtio_pci(OE) virtio_mmio(OE) virtio_ring(OE) kern :warn : [Mon Jun 27 13:02:38 2022] virtio(OE) usb_storage xhci_pci xhci_hcd usbcore usb_common [last unloaded: apollolake_synobios] kern :warn : [Mon Jun 27 13:02:38 2022] CPU: 1 PID: 4086 Comm: scsi_eh_10 Tainted: P W OE 4.4.180+ #42218 kern :warn : [Mon Jun 27 13:02:38 2022] Hardware name: QEMU Standard PC (Q35 + ICH9, 2009), BIOS rel-1.14.0-0-g155821a1990b-prebuilt.qemu.org 04/01/2014 kern :warn : [Mon Jun 27 13:02:38 2022] 0000000000000000 ffff88017830bcb0 ffffffff812ef89d 0000000000000009 kern :warn : [Mon Jun 27 13:02:38 2022] 0000000000000000 ffff88017830bce8 ffffffff8105255f 0000000000000bb8 kern :warn : [Mon Jun 27 13:02:38 2022] 0000000000000000 0000000000000001 ffff880178978000 0000000000000000 kern :warn : [Mon Jun 27 13:02:38 2022] Call Trace: kern :warn : [Mon Jun 27 13:02:38 2022] [<ffffffff812ef89d>] dump_stack+0x4d/0x70 kern :warn : [Mon Jun 27 13:02:38 2022] [<ffffffff8105255f>] warn_slowpath_common+0x7f/0xb0 kern :warn : [Mon Jun 27 13:02:38 2022] [<ffffffff81052646>] warn_slowpath_null+0x16/0x20 kern :warn : [Mon Jun 27 13:02:38 2022] [<ffffffff8141dcdf>] SYNO_CTRL_HDD_POWERON+0x4f/0x60 kern :warn : [Mon Jun 27 13:02:38 2022] [<ffffffff8142e825>] syno_libata_port_power_ctl+0xc5/0x1a0 kern :warn : [Mon Jun 27 13:02:38 2022] [<ffffffff8142f7c7>] syno_libata_set_deep_sleep+0x2b7/0x9c0 kern :warn : [Mon Jun 27 13:02:38 2022] [<ffffffff81436ee3>] ata_scsi_port_error_handler+0x133/0x1a30 kern :warn : [Mon Jun 27 13:02:38 2022] [<ffffffff8106b0fe>] ? cancel_delayed_work_sync+0xe/0x10 kern :warn : [Mon Jun 27 13:02:38 2022] [<ffffffff81432868>] ? ata_scsi_cmd_error_handler+0x118/0x190 kern :warn : [Mon Jun 27 13:02:38 2022] [<ffffffff8143887b>] ata_scsi_error+0x9b/0xe0 kern :warn : [Mon Jun 27 13:02:38 2022] [<ffffffff813f86f5>] scsi_error_handler+0xa5/0x530 kern :warn : [Mon Jun 27 13:02:38 2022] [<ffffffff81575bcf>] ? __schedule+0x2ef/0x820 kern :warn : [Mon Jun 27 13:02:38 2022] [<ffffffff813f8650>] ? scsi_eh_get_sense+0x170/0x170 kern :warn : [Mon Jun 27 13:02:38 2022] [<ffffffff810700f5>] kthread+0xd5/0xf0 kern :warn : [Mon Jun 27 13:02:38 2022] [<ffffffff81070020>] ? kthread_worker_fn+0x160/0x160 kern :warn : [Mon Jun 27 13:02:38 2022] [<ffffffff81579fef>] ret_from_fork+0x3f/0x80 kern :warn : [Mon Jun 27 13:02:38 2022] [<ffffffff81070020>] ? kthread_worker_fn+0x160/0x160 kern :warn : [Mon Jun 27 13:02:39 2022] ---[ end trace 4d3f8f657722e7be ]--- kern :err : [Mon Jun 27 13:02:42 2022] ata11: wake up successful, the reset fail can be ignored kern :err : [Mon Jun 27 13:02:45 2022] ata10: wake up from deepsleep, reset link now kern :err : [Mon Jun 27 13:02:48 2022] ata10: wake up successful, the reset fail can be ignore
 -
Devs owe you nothing. Maintaining old releases available is not an option. Deal with latest release, give useful logs for the dev to help you fix your issue, in case there is really an issue... If you have nothing than (it works slower) then stop bothering devs and helpers. There are also alternatives, you can try TCRP M-shell instead of ARC or RR.
-
 Doing to update from dsm 701 to 7.1 broken Advanced Media Extensions... It requires a synology account, which I have, a valid serial, when it has (real from another synology box not on my lan), but immediately fails and says to contact customer service. The rp box is listed in my synology account, but AME still wont work. I see other apps have this issue, what works on 7.1?
 -
 Hi Guys, My custom built i3 10th gen box works fine for about two years - until Thursday. I want to log in to my NAS, but received the following message: You cannot login to the system because the disk space is full currently. SSH enabled, but permission denied. All file services (SMB, FTP, Plex, Sync files app) down after restart - but before restart, everything worked fine, except the login to DSM via browser. I found the following comment and the tutorial, but I'm a fully Linux noob. I tried to read the instructions for mdadm , but I'm afraid I'll completely brick the system. I booted an Ubuntu live pendrive, I see my drives using the commands in the tutorial. However, I don't know how to proceed. I have four 3.6Tb drives, SHR-2 filesystem, I have sda, sdb, sdc, sdd, sde, sdf drives. I know I need to do something with /dev/md0 on all first partitions. Can someone please write me a complete step-by-step tutorial? Or can you suggest me another way to take back the control? Thank you!!!
 -
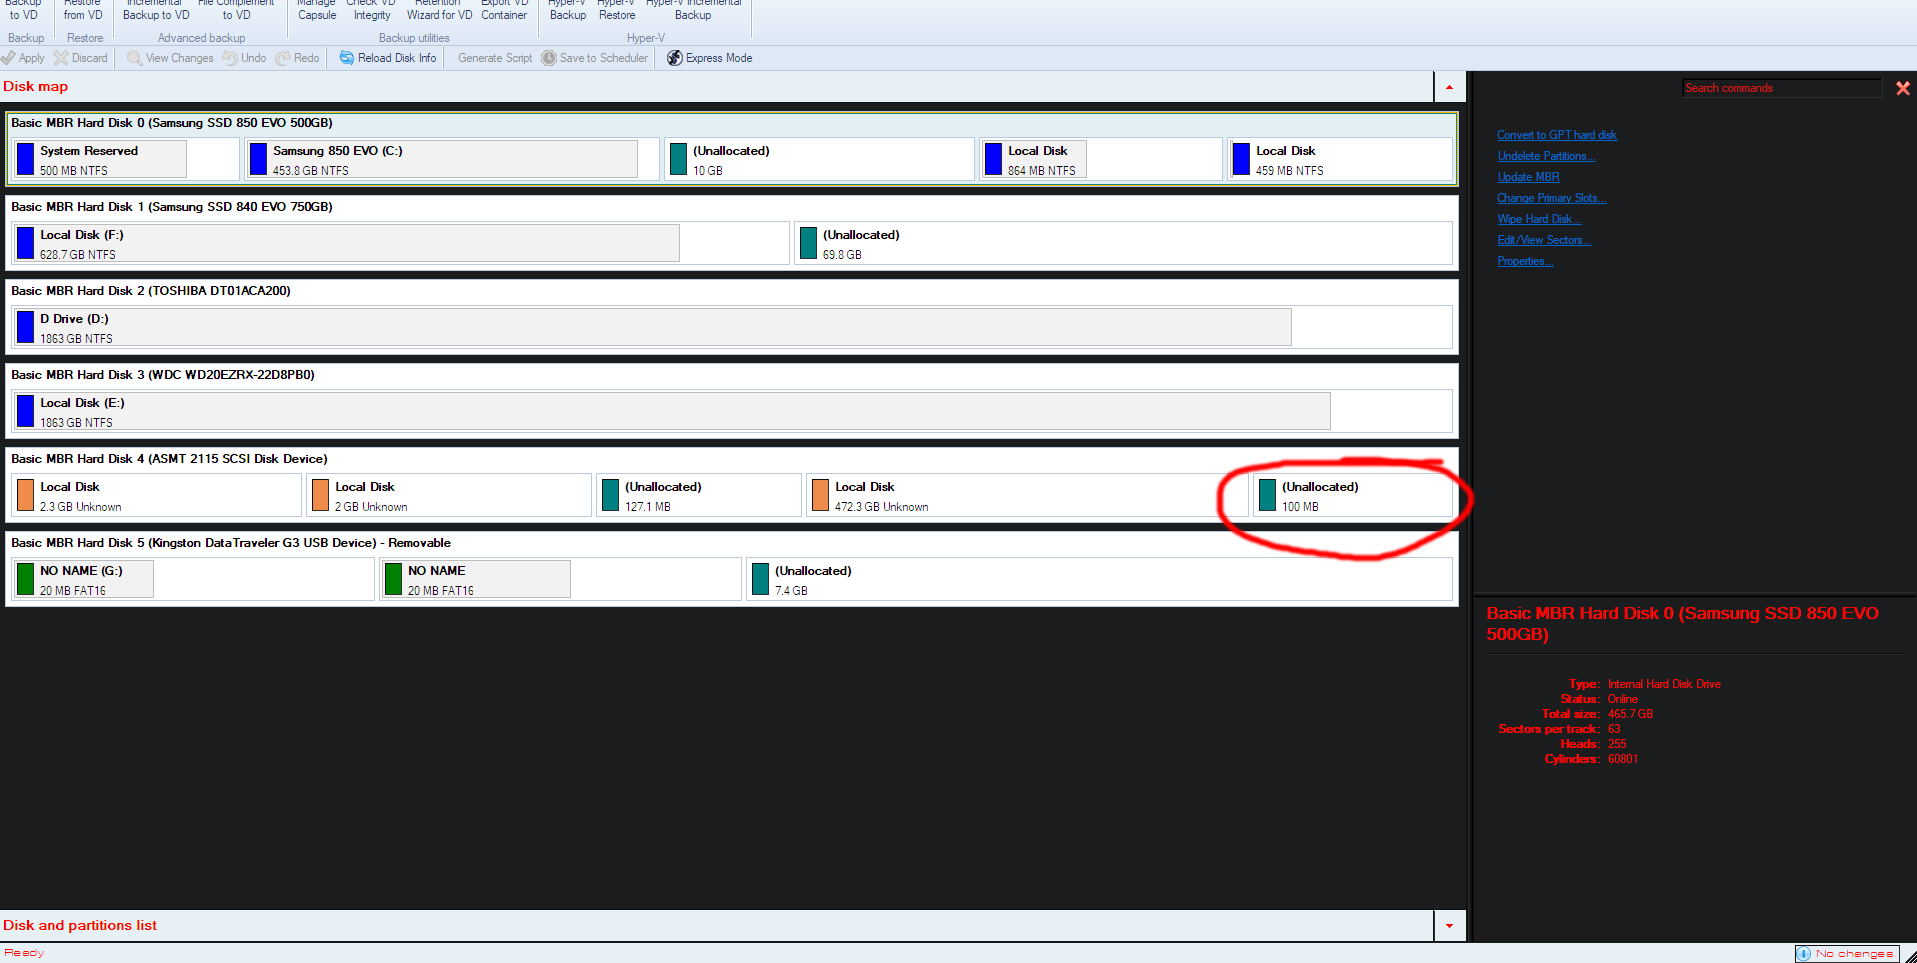
 In this tutorial we are going to place the bootloader alongside the DSM OS and the remaining storage Keep in mind that i use DSM 6.1 and not 6.2! What you need: Win32DiskImager Jun's loader v1.02b DS3615xs with MBR partition DSM 6.1 (15047) grub2 (i used grub2-for-windows) partition/hard disk manager (i used Paragon Hard Disk Manager 15) USB stick for the bootloader empty SSD First we are going to put the bootloader on a USB stick using Win32DiskImager Then we are going to install DSM normally After the installation of DSM and configuring your device name, username, etc goto the Storage Manager and create a RAID Group for only the SSD in Basic then click Apply and goto Volume and create one (doesn't matter what File system you used, but i use ext4) then click OK and shutdown the server Now we are going to do some fun things with the SSD drive where DSM and the storage are installed on put the SSD drive and the USB stick with the bootloader on it (we need some files later) out of the DiskStation machine and put them in your main PC Start up your partition/hard disk manager and look for the SSD that you installed DSM on it should look like this: Look at the last Unallocated partition, it should be 100MB big thats plenty for the loader so we are going to make a new partition (50MB is enough) and make sure you put it at the very end of the drive dont forget to put the drive as Active and assign a drive letter to it Now we are going to install grub2 on that 50MB partition i used this website to make one (because i use Windows) After you have install grub2 on that partition that we need to copy all the files from the 2nd partition of the usb drive and place them in the root directory of the 50MB partition don't forget to place the grub.cfg (from the 1st partition) in the /grub folder of 50MB partition Now unplug the SSD from your PC and place it in your DiskStation pc and boot it up (you dont need to edit anything just let it boot) you can use Synology Assistant to find your DiskStation pc and you should see a normal welcome page were you can login After you have logged in you should see an error message, that is because of the small FAT16 partition you will get that everytime you startup that machine Storage Manager should say that your system is healthy. Thats it, you can now use it normally without an USB bootloader also you can update to the latest 6.1 version if you want (make sure you don't install 6.2, haven't tested that one)
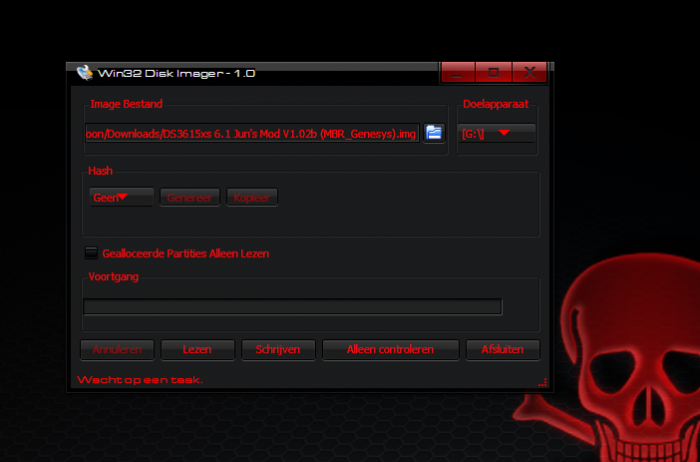


-

TinyCore RedPill Loader Build Support Tool ( M-Shell )
Peter Suh replied to Peter Suh's topic in Software Modding
[NOTICE] Distribution of nvmevolume-onthefly addon (immediate version) This is an addon that further complements the existing nvme volume. I originally tried to reflect the requests of users who asked if it could be operated alone without a SATA type disk by creating a volume using only nvme, but after testing for several days, it did not work well. Instead, SATA disks still need to be present, but this is improved with out-of-the-box volumeting capabilities. The reason why this immediate reflection version was developed is that the existing version uses a service scheduling method, so even though the libhwcontrol.so.1 file has been hexa-patched once at the DSM installation completion stage, at least one more boot is required for the volume to appear. It flies. Because users were not aware of this, many of them received the patch script from the original author, @007revad, twice and processed it. This improved, immediate version allows volume conversion to be confirmed immediately upon first login after installing DSM and creating an account. Analyzing the original author @007revad's script, I found that it simply ended up patching only one hex value, like when activating the nvme cache of DS918+ in the past. One line of xxd command processing is enough. Back up the original to /lib64/libhwcontrol.so.1.bak. https://github.com/PeterSuh-Q3/tcrp-addons/blob/main/nvmevolume-onthefly/src/install.sh I don't know if this is an appropriate expression since my native language is not English. @007revad's script method is called "AFTER SHOT". I think that most REDPILL ADDON methods should be “ON THE FLY”. Otherwise, a reboot must always follow after script processing. Testing has only been completed focusing on version 7.2, so I hope users can verify older versions. As always, you must rebuild the loader to change to the new addon. This addon seems to help maintain the continuity of volume that temporarily disappears after migrating to another model or installing a version upgrade. -
 Hi, I cannot login anymore into DSM because 2FA code is not accepted. Yet date+time is perfect to the very second. As suggested by many people, I first tried to delete the file /usr/syno/etc/preference/username/google_authenticator but DSM still ask me for 2FA code, it then just throws me a different error message. I tried an old trick of creating a new administrator user to then be able to disable 2FA for the first user, but 2FA seems to now be enforced for all new users on my DSM and it's also broken there. It basically says "Cannot save settings", which is weird and worrisome. So I cannot even set 2FA for that new temporary user... I'm going into circles and crazy...!!! I searched for a command line (I have ssh access) that could at least as a starting point disable the "enforce 2fa" setting but nothing. I'm clueless and stuck... Any idea ? Thank you
 -
 UPDATE- This is for someone else in the future should they run into this issue. This was EASY. I used the ARC method. I got my system up and running in 10 minutes. It's currently rebuilding my 3rd drive probably because I moved the location of the SATA connection on my motherboard from 3 to 4th. I went to GitHub link, and downloaded the xxx.img.zip. I unzipped and then burned the image to USB3 (16gb drive). Booted the computer/NAS and followed the directions. It was EASY. I picked some options/boxes such as marking the disk check healthy option (don't recall the exact name but you will see it...Synology now gives a warning for Seagate Ironwolf and other drives. That option removes the error from the NAS when you are running). I also picked the Photo station patch option. It did not work the first time, it went to the end of the 10 minutes and then said something went wrong. I reran the ARC/USB stick and picked FORCED REINSTALL and that worked. I'm currently rebuilding my 3rd drive because I originally moved where it was connected to the SATA port from 3rd to 4th position on the motherboard (if that made a difference hence the rebuild). IMPORTANT - WAIT WAIT and WAIT - Arc runs slow, just WAIT...it will eventually get to the end showing the root info saying ARC and telling you to log into your NAS. THANKS! I will try to follow what you said. YOU ARE RIGHT, I forgot what to do, haven't updated in a while. I did save my notes and original manual. I thought Tiny Loader updated itself whenever it reboots. Funny you mentioned ARC as I saw a youtube video few days ago. I'll look more into it.
 -
 With rr 24.2.0 I am still unable to get hotplug to work, the out of the box dts file looked correct when comparing to syno_block_info so I'm not sure what's up there. There is also a repeating error in the logs: 2024-02-15T21:57:19-05:00 MediaVaultXL synostgd-disk[31748]: disk/disk_is_mv1475_driver.c:66 Can't get sata chip name from pattern /sys/block/sata15/device/../../scsi_host/host*/proc_name 2024-02-15T21:57:19-05:00 MediaVaultXL synostgd-disk[31750]: disk/disk_is_mv_soc_driver.c:71 Can't get sata chip name from pattern /sys/block/sata16/device/../../scsi_host/host*/proc_name 2024-02-15T21:57:19-05:00 MediaVaultXL synostgd-disk[31750]: disk/disk_is_mv1475_driver.c:66 Can't get sata chip name from pattern /sys/block/sata16/device/../../scsi_host/host*/proc_name Maybe I'm doing something wrong with the dts file or missing clarity on what to do. I have 40 disks populated and it sees all of them and works with them without issue aside from the hotplugging.
 -
Since there have been some reports of a few complaints about performance on the new 1.04b - 6.2.1 loader - I thought I'd look into a simple benchmark for Synology.. There are other threads using movie conversions (and another one that uses dd for file transfer benchmark) but I wanted something quick and easy for a CPU test - with no installation.. Turns out you can use DD to do both.. Connect to the Synology using SSH, and run the following.. CPU.. dd if=/dev/zero bs=1M count=1024 | md5sum (it basically gives it a CPU intensive task to do - good enough for a rough guide) Question I have, if anyone's familiar, which disk does the dev/zero reside on? Is it in RAM or is it any and all of the disks in my machine as the system partition is synched to each disk? If it happens to use a HDD, rather than a SSD, what difference does that make and can we specify a different location (if disk is a bottleneck for this test)? DISK.. (I needed to use Sudo for this) sudo dd bs=1M count=256 if=/dev/zero of=/volumeX/share/testx conv=fdatasync Where volumeX/share is the volume and share you want to copy the file to.. It's case sensitive.. Be careful! Not sure if it tests using all cores (the second VM tested had 4 CPUs as opposed to 2) Now, the 1st of these machines is under load (web cams) but it gives a rough idea! For two bare metal machines I have.. 1.. J3455-ITX on DSM 6.2.1 DS918+ . 12GB. CPU = 217MB/s average (its under load, slightly) Disk = 146MB/s to HDD, 347MB/s to SSD. 2.. i3 4130 on Asus H87i-plus DSM 6.2U2 DS3617. 8GB CPU = 663 MB/s Disks later 2 Syno 'test' VMs running on ESXi.. 3. ESXi with i7 3770s on ASus P8z77v-pro DSM 6.21 DS3617. 16GB Both had CPU = 630MB/s Disks later but a quick test showed me I had an issue with one of my drives..
-
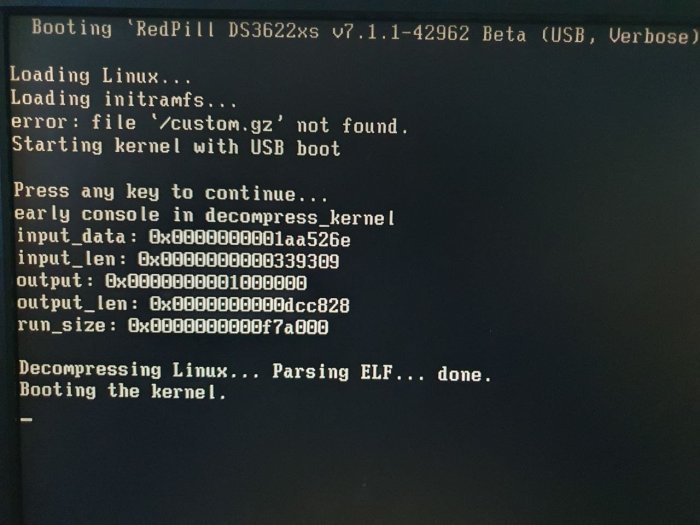
Hi all, I have been using a HP G7 N54L Microserver with the standard 4 drives (4x 2TB Seagate SATA NASware, ancient but still working) and embedded NIC, and a SanDisk 16GB USB3.0 flashdrive running DSM5.0 that was setup by a friend around 10 years ago and it has worked flawlessly but given the age of the software I figured it was time to upgrade to DSM7.1.1. I'm a noob to xpenology myself so please be gentle. I've read up a fair bit but I've still got a ways to go. I've been following the well written upgrade guide here https://tomvanveen.eu/installing-synology-dsm-7-x-on-a-hp-n54l-in-2022/ in combination with the excellent post by flyride here: Many people have had success with it but I've run into a problem during the build in TinyCore. First I flashed the BIOS successfully using Kamzata's ROM (https://www.bios-mods.com/forum/showthread.php?pid=75965#pid75965). I didn't realise this reset the BIOS clock which I thought might be the issue but I've since updated it and the issue persists. I've also disabled the C1E Support setting so it's not that. I'm using older TC v0.9.3.0 as recommended in the guide for N54Ls, with the BIOS/CSM/Legacy boot from USB flash drive image. I can run through all the commands successfully but when I boot into RedPill USB option in the GRUB menu I get this "error: file './custom.gz' not found" (pic attached) and my router is not assigning an IP address so I can't find Synology in Synology Assistant (checked the ports/cables so issue is not router related). I noticed these issues following the build command in the TinyCore terminal: menuentry 'RedPill DS3622xs v7.1.1-42962 Beta (USB, Verbose)' { menuentry 'RedPill DS3622xs v7.1.1-42962 Beta (SATA, Verbose)' { Updated user_config with USB Command Line : withefi earlyprintk syno_hw_version=DS3622xs+ console=ttyS0,115200n8 netif_num=1 pid=0x5580 earlycon=uart8250,io,0x3f8,115200n8 syno_port_thaw=1 mac1=9CB65407E0C3 sn=2030SQRH8LJAM vid=0x0781 elevator=elevator loglevel=15 HddHotplug=0 DiskIdxMap=00 syno_hdd_detect=0 vender_format_version=2 syno_hdd_powerup_seq=0 log_buf_len=32M root=/dev/md0 SataPortMap=6 Updated user_config with SATA Command Line : withefi earlyprintk syno_hw_version=DS3622xs+ console=ttyS0,115200n8 netif_num=1 pid=0x5580 earlycon=uart8250,io,0x3f8,115200n8 synoboot_satadom=1 syno_port_thaw=1 mac1=9CB65407E0C3 sn=2030SQRH8LJAM vid=0x0781 elevator=elevator loglevel=15 HddHotplug=0 DiskIdxMap=00 syno_hdd_detect=0 vender_format_version=2 syno_hdd_powerup_seq=0 log_buf_len=32M root=/dev/md0 SataPortMap=6 Generating GRUB entries for model :ds3622xsp_42962 in /home/tc ./rploader.sh: line 2260: /home/tc/include/grubmgr.sh: No such file or directory Failed to generate grub.cfg ./rploader.sh: line 2261: /home/tc/include/grubmgr.sh: No such file or directory Failed to add USB entry ./rploader.sh: line 2262: /home/tc/include/grubmgr.sh: No such file or directory Failed to add SATA entry ./rploader.sh: line 2263: /home/tc/include/grubmgr.sh: No such file or directory Failed to add SATA entry ./rploader.sh: line 2264: /home/tc/include/grubmgr.sh: No such file or directory Failed to add SATA entry cp: cannot create regular file '/home/tc/redpill-load/part1/boot/grub/grub.cfg': Permission denied grep: /home/tc/grub.cfg: No such file or directory Copying grub file /home/tc/grub.cfg to /home/tc/redpill-load/localdiskp1/boot/grub/grub.cfg cp: cannot stat '/home/tc/grub.cfg': No such file or directory menuentry 'RedPill DS3622xs v7.1.1-42962 Beta (USB, Verbose)' { menuentry 'RedPill DS3622xs v7.1.1-42962 Beta (SATA, Verbose)' { Setting next grub entry Setting next grub entry to Friend : sudo: /usr/local/bin/grub-editenv: command not found sudo: /usr/local/bin/grub-editenv: command not found Grub entry has been set to : Ramdisk in not compressed 48778 blocks 42649 blocks 91425 blocks Cleaning up files Caching files for future use No adequate space on TCRP loader partition /mnt/sde3 to cache pat file Found /mnt/sde3/auxfiles/ds3622xsp_42962.pat file Removing older cached pat files to cache current Found /home/tc/redpill-load/cache/ds3622xsp_42962.pat, copying to cache directory : /mnt/sde3/auxfiles Saving user session for future use. Saving current extensions -> OK ! Saving current user_config.json -> OK ! Also worth noting (I think) is that when I attempt to boot into RedPill in the GRUB menu, the TinyCore option is no longer present, which it seems to be on successful installs. Apologies for the long first post. In my rookie status I'm stumped so any advice on what I can look into in order to proceed will be greatly appreciated. If any additional info or part of the command logs will be useful I can include it.
-
You can build a new system with an intel CPU, but unless you have the old 5.2.xxx PAT file, you may have to upgrade to a newer DSM version. If your motherboard just died and there was no issue with your disks, all your data should be in tact when you migrate. Is there a reason why you are still using DSM 5.2 and not upgrading to 6.x or 7? Here are some guides for you to look at: https://xpenology.com/forum/topic/61634-dsm-7x-loaders-and-platforms/#comment-281190 This is to select your platform/motherboard combination https://xpenology.com/forum/topic/62221-tutorial-installmigrate-to-dsm-7x-with-tinycore-redpill-tcrp-loader/ This is if you want to migrate to DSM 7.x
-
Hi system works fine but can't login in my synology account . What's wrong? i was in TRP bootloader with 7.1 and was fantastic.
-
Hello everyone. I had to move my esxi and dsm6 from old hp microserver gen8 to same spec another motherboard. And while doing it I give a shot to dsm7. Sata Controller Passthrough to DSM7VM like DSM6. Its very slow to boot. like 20 minutes to login screen. Then when entering password its giving error of "system is getting ready please try again later" vs.vs. And It takes almost 20-30 minutes. My Arc Loader VM at NVMe and DSM7VM has 4gb / 8gb ram with 8 core.
-
 Hi! I'm trying to do it using WinSCP, but I obtained "Permission denied". How can I login as root user?
 -
 Hi guys I'm running ARPL i18n using ds918+ as the model. I have 4 usb drives connected, randomly I lose the usb and the system shows the message, the system has detected a drive (drive 2x) that is not in use. The system tries to use the drive as internal. The only option I have is to rebuild the loader then I get the drives back and recover the system. Any help would be appreciated. TIA
 -
 Though I used ./rsloader.sh fullupgrade and it saying loader is current but issue still same. How do I setup new loader for my version of DSM? if I format existing pendrive?
 -
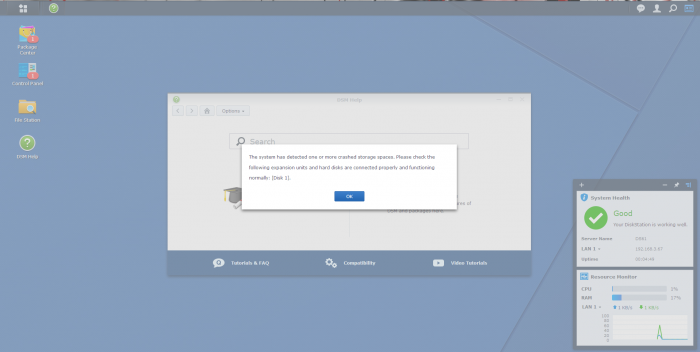
 System is Supermicro M'brd X11SSL-CF including 8xSAS (Storage Pool 1, volume 1); Kaby Lake Xeon E3-1245v6; second 8 port SAS controller in PCIe slot (Storage Pool 2, volume 2); two GbE ports. Both Storage Pools are completely populated with 16TB HDDs (14 x Exos 16; 2x IronWolf). All files/folders are BTRFS. DSM 7.2-64570 Update 1. Trying to Install Container Manager yesterday caused the install to 'hang' - nothing happened for several hours and unable to cancel/end the install, I tried to force shutdown/restart the system with damaging consequences. Now no applications are working; the system is not showing up in Synology Assistant and it was not possible to get a login until we ran the command "syno-ready" via a "Putty" session to the system. We've managed to reboot the system; and using "PUTTY", we've managed to mount the disks: Storage Pools/volumes (appear intact and can be read). Some screen captures are available of what's been achieved, so far. root@dumbo:/dev/mapper# lvdisplay --- Logical volume --- LV Path /dev/vg2/syno_vg_reserved_area LV Name syno_vg_reserved_area VG Name vg2 LV UUID 7In8lA-Tkar-3pbr-4Hl7-aVVH-G3lY-GV905o LV Write Access read/write LV Creation host, time , LV Status available # open 0 LV Size 12.00 MiB Current LE 3 Segments 1 Allocation inherit Read ahead sectors auto - currently set to 1536 Block device 249:0 --- Logical volume --- LV Path /dev/vg2/volume_2 LV Name volume_2 VG Name vg2 LV UUID TuHfCo-Ui9K-VlYg-TzLg-AIQL-eYTu-V5fOVu LV Write Access read/write LV Creation host, time , LV Status available # open 1 LV Size 87.26 TiB Current LE 22873600 Segments 1 Allocation inherit Read ahead sectors auto - currently set to 1536 Block device 249:1 --- Logical volume --- LV Path /dev/vg1/syno_vg_reserved_area LV Name syno_vg_reserved_area VG Name vg1 LV UUID ywtTe5-Nxt7-L3Q3-o9mZ-KGrt-hnfe-3zpE5r LV Write Access read/write LV Creation host, time , LV Status available # open 0 LV Size 12.00 MiB Current LE 3 Segments 1 Allocation inherit Read ahead sectors auto - currently set to 1536 Block device 249:2 --- Logical volume --- LV Path /dev/vg1/volume_1 LV Name volume_1 VG Name vg1 LV UUID 2SBxA1-6Nd6-Z9B2-M0lx-PL8x-NFjv-KkxqT3 LV Write Access read/write LV Creation host, time , LV Status available # open 1 LV Size 87.29 TiB Current LE 22882304 Segments 2 Allocation inherit Read ahead sectors auto - currently set to 1536 Block device 249:3 root@dumbo:/dev/mapper# lvm vgscan Reading all physical volumes. This may take a while... Found volume group "vg2" using metadata type lvm2 Found volume group "vg1" using metadata type lvm2 root@dumbo:/dev/mapper# lvm lvscan ACTIVE '/dev/vg2/syno_vg_reserved_area' [12.00 MiB] inherit ACTIVE '/dev/vg2/volume_2' [87.26 TiB] inherit ACTIVE '/dev/vg1/syno_vg_reserved_area' [12.00 MiB] inherit ACTIVE '/dev/vg1/volume_1' [87.29 TiB] inherit root@dumbo:/# cat /proc/mdstat Personalities : [raid1] [raid6] [raid5] [raid4] [raidF1] md3 : active raid6 sdi6[0] sdl6[7] sdj6[6] sdn6[5] sdm6[4] sdp6[3] sdk6[2] sdo6[1] 46871028864 blocks super 1.2 level 6, 64k chunk, algorithm 2 [8/8] [UUUUUUUU] md2 : active raid6 sdi5[0] sdk5[6] sdp5[7] sdm5[8] sdn5[9] sdo5[3] sdl5[11] sdj5[10] 46855172736 blocks super 1.2 level 6, 64k chunk, algorithm 2 [8/8] [UUUUUUUU] md4 : active raid6 sda5[0] sdh5[7] sdg5[6] sdf5[5] sde5[4] sdd5[3] sdc5[2] sdb5[1] 93690928896 blocks super 1.2 level 6, 64k chunk, algorithm 2 [8/8] [UUUUUUUU] md1 : active raid1 sdi2[0] sdh2[12](S) sdc2[13](S) sdb2[14](S) sda2[15](S) sdf2[11] sdd2[10] sde2[9] sdg2[8] sdo2[7] sdm2[6] sdn2[5] sdp2[4] sdk2[3] sdl2[2] sdj2[1] 2097088 blocks [12/12] [UUUUUUUUUUUU] md0 : active raid1 sdi1[0] sda1[12](S) sdb1[13](S) sdc1[14](S) sdh1[15](S) sdf1[11] sdd1[10] sde1[9] sdg1[8] sdo1[7] sdl1[6] sdm1[5] sdn1[4] sdp1[3] sdj1[2] sdk1[1] 2490176 blocks [12/12] [UUUUUUUUUUUU] root@dumbo:/dev/mapper# vgchange -ay 2 logical volume(s) in volume group "vg2" now active 2 logical volume(s) in volume group "vg1" now active root@dumbo:/dev/mapper# mount /dev/vg1/volume_1 /volume1 mount: /volume1: /dev/vg1/volume_1 already mounted or mount point busy. Main Question Now is: How to repair the system such that: a: It appears to Synology Assistant as a functioning DS3622XS+ with correct IP, Status, MAC address, Version, Model and Serial no. b: It functions again correctly; presenting Login prompt and applications work correctly and accessing relevant data in Storage Pools/Volumes/Folders and files. In the absence of responses of workable solutions, we're considering actually "blowing away" backed up data (Storage Pool 2/Volume 2), Creating a new system on that volume group, then copying back the data stored in the original Storage Pool 1/Volume 1 to the new installation.
 -
Hello all, Password set to ABC123, two-factor login disabled. that doesn't work for me. i tried every time in incognito tab for line 1 and in SAME tab, copy/paste line 2 I got SUCCESS with line 1 every time. I got error 102 with line 2, whatever the package to activate. I tried to download and install Active backup gsuite and stop it, then line 2, error 102 again. i'm in DSM 7.1.1-42962 Update 3 with HP Gen10+ baremetal
-
I'm thinking of moving to ARC loader of my old j3455 (before it was j1900) DSM 7.2-64570 installation - which was before dsm 6.0 surely - maybe even dsm 5 - I'm wondering how to check this btw - the initial dsm version. In any case I found info in ARC wiki - https://github.com/AuxXxilium/AuxXxilium/wiki#important - that dsm v6 have different partitions layout, maybe this is related to your issue @Polanskiman /dev/md0 of mine: df -h /dev/md0 Filesystem Size Used Avail Use% Mounted on /dev/md0 2.3G 1.4G 822M 63% /
-

TinyCore RedPill Loader Build Support Tool ( M-Shell )
Captainfingerbang replied to Peter Suh's topic in Software Modding
I have a couple things left to do guys and still using TCRP Friend by Peter Suh for new build. I need to get my QC from 918+ working over to SA6400 machine , its not allowing me. Then move 10 ssd shr over without issue. Peter, are you suggesting that because the DS920+ is the Successor to the DS918+ is why QC still works? Like same family? Now i need a solution for Creating video thumbnails for 4k videos that are HEVC Backing up 918+ now. Any suggestions? I want to just throw this all away and purchase new INTEL setup with IGPU. Frustrating. -
TinyCore RedPill Loader Build Support Tool ( M-Shell )
Captainfingerbang replied to Peter Suh's topic in Software Modding
So what i just attempted was: I used my real serial and mac from my original 918+ but now using SA6400 TCRP FRIEND new test build, of course i turned off the 918+, im able to login to Synology site from DSM but when i go to enable QC i get this error: I dns already set to 8.8.8.8. 8.8.4.4 so i dont know if i have to wait?? Peter how did you get this working?
-
@pocopico, @wjz304 Since the release of 7.2-64570 U2 a few days ago, M.2 NVMe unrecognition has been observed on the Device-Tree Base platform. Because TCRP and ARPL go through a similar dtb patch process, the result is the same. Both loaders don't seem to work. Currently, it seems that all scripts of the disks addon started by the ARC developer are unified. Yesterday, only the dtb patch part of the disks add-on script of ARC was extracted and applied to M SHELL. https://github.com/PeterSuh-Q3/tcrp-addons/blob/main/dtbpatch/releases/install.sh ARC, ARPL-i18n, TCRP by pocopico, MSHELL for TCRP Same situation for all 4 modules. It has been confirmed that there is no cache disappearing phenomenon in genuine DS920+. Even if you analyze the model.dtb file, changes since 64570 U1 are not confirmed in model.dtb for U2. synoinfo.conf doesn't seem to have anything special either, This part will be checked again by acquiring files from genuine DS920+ users. Did you start checking the manufacturer's compatibility of M.2 SDD from the U2 version? I think we should think about it together. The model.dtb file below is the contents extracted from ARPL-i18n. The nvme0n1 device is being identified. root@ARPL_VM:~# curl -kLO https://raw.githubusercontent.com/pocopico/tinycore-redpill/master/tools/dtc; chmod +x dtc root@ARPL_VM:~# ./dtc -I dtb -O dts /etc.defaults/model.dtb > /etc.defaults/model.dts; cat /etc.defaults/model.dts <stdout>: Warning (unit_address_vs_reg): /internal_slot@1: node has a unit name, but no reg or ranges property <stdout>: Warning (unit_address_vs_reg): /internal_slot@2: node has a unit name, but no reg or ranges property <stdout>: Warning (unit_address_vs_reg): /nvme_slot@1: node has a unit name, but no reg or ranges property /dts-v1/; / { compatible = "Synology"; model = "synology_geminilake_920+"; version = <0x01>; internal_slot@1 { protocol_type = "sata"; ahci { pcie_root = "00:11.0,04.0"; ata_port = <0x00>; }; }; internal_slot@2 { protocol_type = "sata"; ahci { pcie_root = "00:11.0,04.0"; ata_port = <0x02>; }; }; nvme_slot@1 { pcie_root = "00:15.0,00.0"; port_type = "ssdcache"; }; }; root@ARPL_VM:~# ./dtc -I dtb -O dts /etc/model.dtb > /etc/model.dts; cat /etc.defaults/model.dts <stdout>: Warning (unit_address_vs_reg): /internal_slot@1: node has a unit name, but no reg or ranges property <stdout>: Warning (unit_address_vs_reg): /internal_slot@2: node has a unit name, but no reg or ranges property <stdout>: Warning (unit_address_vs_reg): /nvme_slot@1: node has a unit name, but no reg or ranges property /dts-v1/; / { compatible = "Synology"; model = "synology_geminilake_920+"; version = <0x01>; internal_slot@1 { protocol_type = "sata"; ahci { pcie_root = "00:11.0,04.0"; ata_port = <0x00>; }; }; internal_slot@2 { protocol_type = "sata"; ahci { pcie_root = "00:11.0,04.0"; ata_port = <0x02>; }; }; nvme_slot@1 { pcie_root = "00:15.0,00.0"; port_type = "ssdcache"; }; }; root@ARPL_VM:~# ll /sys/block | grep -e nvme -e sata lrwxrwxrwx 1 root root 0 Jul 26 22:29 nvme0n1 -> ../devices/pci0000:00/0000:00:15.0/0000:03:00.0/nvme/nvme0/nvme0n1 lrwxrwxrwx 1 root root 0 Jul 26 22:29 sata1 -> ../devices/pci0000:00/0000:00:11.0/0000:02:04.0/ata1/host0/target0:0:0/0:0:0:0/block/sata1 lrwxrwxrwx 1 root root 0 Jul 26 22:29 sata2 -> ../devices/pci0000:00/0000:00:11.0/0000:02:04.0/ata3/host2/target2:0:0/2:0:0:0/block/sata2