Leaderboard


Popular Content
Showing content with the highest reputation on 04/11/2022 in all areas
-
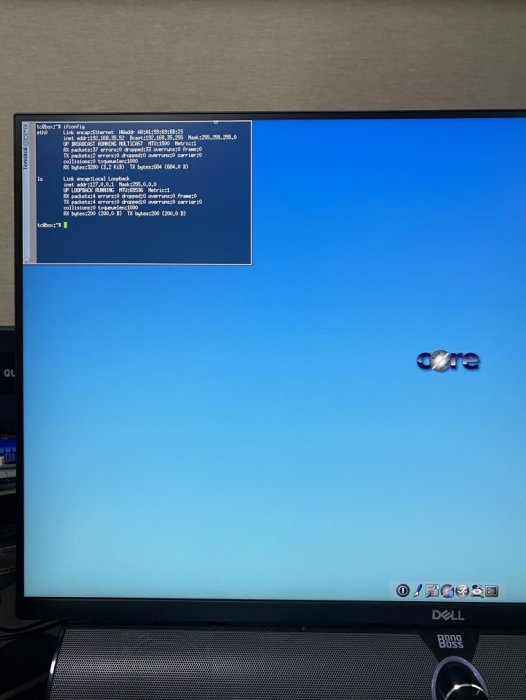
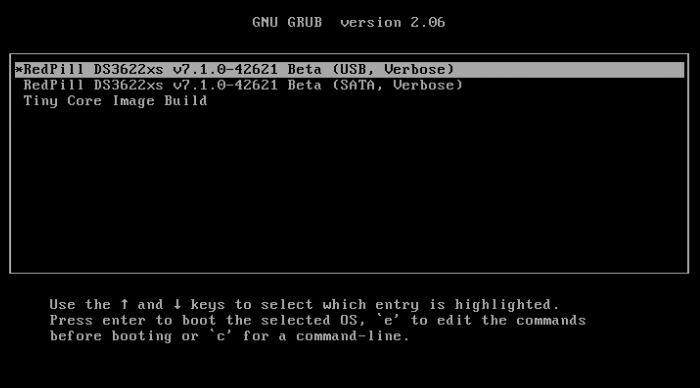
This guide is dedicated to installing DSM 7.0.1 BareMetal. It is a translation from Korean to English using a translator. Please understand if there is a slight misunderstanding. Existing RedPill, which has been released since last year, can generate IMG files directly through the bootloader compilation process only if Linux is available separately. This tinyCore RedPill provides a USB boot image with tinyCore Linux. It's much easier to work without having to install Linux separately. As usual, you can add the desired driver directly from the selection header and build it. Tinycore supports the following platforms (DS918+/DS3615xs/DS3617xs/DS3622xs+/DS1621+/DV3221/DS920+). You can continuously change the bootloader without re-creating the image (model/sn/mac, etc.) Tinycore supports both legacy versions for baremetal and virtual environments. 1. Prepare bootloader IMG file With the Download button in the middle of the GITHUB link below.Download the gz file. In it, 0.4.6 version img.You can unzip the gz file again and use the img file. (All files) https://github.com/pocopico/tinycore-redpill (for LEGACY) https://github.com/pocopico/tinycore-redpill/raw/main/tinycore-redpill.v0.4.6.img.gz (for UEFI) https://github.com/pocopico/tinycore-redpill/raw/main/tinycore-redpill-uefi.v0.4.6.img.gz (for VMWARE) https://github.com/pocopico/tinycore-redpill/raw/main/tinycore-redpill.v0.4.6.vmdk.gz 2. Bootloader IMG file USB recording Use the above tinycore-redpill.v0.4.6.img file to burn to USB with convenient image tools such as WinImage and Rufus. There is no need to pre-adjust the configuration file to modify the VID/PID/Serial/MAC/SATAPortMap like JUN loader. If you want to create a USB image on Mac or Linux, you can use the following DD command at the terminal. (Suppose the USB DEVICE ID identified by diskutil is disk4) sudo diskutil unmountDisk /dev/disk4 sudo dd if=/Users/MyAccount/Downloads/tinycore-redpill.v0.4.6.img of=/dev/disk4 bs=4m agree eject. 3.tinyCore Linux Boot USB boot by plugging into the PC you want to use as XPENOLOGY (you can start using UEFI 1 partition or USB CSM) Only TinyCore Linux menu appears and runs automatically Start the terminal app on the far right icon. Use the ifconfig command to verify the ip address where the en0 LAN card is automatically allocated. 4. CONFIG adjustment after SSH connection Connect ssh from another PC, such as putty. ( id:tc / pass : P@ssw0rd ) After connecting, update to the latest version with the following command. tc@box:~$ ./rploader.sh update now Tinycore Redpill is still in a stable state of stabilization. PocoPico, the developer of this program, will frequently fix bugs and announce rebuilding. There's a possibility that this rebuild will happen from time to time. Even if you use the first IMG file version of 0.4.6, you can continue to receive real-time updates of changes through the Internet. Therefore, before using it for the first time, please make sure to download the final patch status with the update option. If you've continued to migrate from JUN's XPhenology, tc@box:~$vi user_config.json The user_config.json file's VID/PID/Sn/Mac/SataPortMap, etc. are existing grub.Please refer to the cfg and insert it as it is. For new installers, perform serial GEN/USB VID, PID auto detect, SataPortMap auto detect, etc. as follows. The next process is DS3622xs+, which is currently undergoing the most stable session first. I will focus on explaining. tc@box:~$ ./rploader.sh serialgen DS3622xs+ tc@box:~$ ./rploader.sh identifyusb now tc@box:~$./rploader.sh satamap now (HBA card users are not required) You can see that the contents of user_config.json are changed automatically. Finally, it is common for existing users and new installers. tc@box:~$catuser_config.json, assuming there are 4 built-in sata ports. SataPortMap = "4", DiskIdxMap = "00" Please check if it is changed to the back. After find.synology.com, you may not be able to find the SATA HDD during DSM installation. The following is an example when a 6-port SATA expansion card is installed. SataPortMap = "46", DiskIdxMap = "0000" (For those who use cards such as H200, H310, H710, etc., exceptional, you do not need to erase the option of this SataPortMap and DiskIdxMap itself. Please erase the lines of the above two options in the vi editor and organize them well so that they don't end with Syntex errors. Of course. ./rploader.sh satamap now command is not required.) 5.BIOS built-in SATA port Hot Plug disable -> enable (important) To avoid temporarily reducing the SataPortMap value set above by the number of HDD physically connected by Sata cable during DSM installation, Be sure to turn on the Hot Plug function. This reduces the probability of encountering an error message saying that the HDD cannot be found because the number of SataPortMap automatically above is recognized as normal recognized. However, if M.2 and Sata ports are Muxed Sata ports that share Lane, it should be considered unusable. 6. Build bootloader after SSH connection When you have finished adding the above extension driver, you will finally build the bootloader. tc@box:~$ ./rploader.sh build broadwellnk-7.0.1-42218 The list of supported platforms can only be found in Help with the following commands: tc@box:~$ ./rploader.sh 7. backup and reboot for bootloader use After successfully completing the build, back up the configuration with the following command and restart the genology with USB. tc@box:~$ filetool.sh -b &&/usr/bin/exitcheck.sh Or tc@box:~$ ./rploader.sh backup now tc@box:~$ sudo reboot It has the same effect. The backed up settings and ext drivers remain the same. The next time TinyCore Linux starts for correction, the setting value will be restored from the mydata.tgz file. 8. Launch the Grub Menu BareMetal must select the first USB boot menu. The first USB menu will be automatically selected. The last selected menu will be stored and used for the next boot. 9. Installing DSM with find.synology.com On an XPhenology PC, There is a delay of about 1 to 2 minutes for IP allocation, so please wait a little longer. There is nothing more to do on this XPhenology PC once you have checked the Kernel boot message. Now look for XPhenology on another PC at find.synology.com. If found successfully, proceed with the initial installation of DSM or the expected migration DSM installation process.
 5 points
 -
Check both, fixed i think3 points
-
my extra.lzma has a newer driver then jun's original (that one was made years back), there can be newer revisions or phy chips that will need a driver made/compiled from newer driver source at least intel does provide one driver fitting all cases (same for realtek), i also have seen drivers where every oem had its own revision with custom firmware files making it a puzzle game to get them all together to create a driver that fits all hardware available2 points
-
Thanks @pocopico !!! Did it! force_junior was the right thing to get the System installed again with keeping my Raid-Set alive. Great. Maybe my previous Installation was running, as I saw my PCIe Passthrough Devices weren't complete (X540-T2 was missing) so I powered off my ESXi VM while that. That caused system failure in the OS I think. Anyway, is running like Charm again. May somebody knows how I get my first Disk to my real first disk and not the VM Disk with the Bootloader on it??? Just cosmetic but may be easy? please @ me so I can read about it if you have an solution for this. Config: 2x HBA (LSI 2008 IT) PCIe Passthrough; VM ESXi with 1 Disk (SATA) for TCRP; X540-T2 PCIe Passthrough, 4 Cores CPU; 16GB RAM
 2 points
 -
Here's the tutorial your looking for My personal experience was using dsm701, manual update to 7.1-42661 from synology, on the reboot press down arrow on keyboard to load back to TC and complete the 2 build upgrade process linked by peter suh.. worked for me first try Good luck2 points
-
Sure. Its possible to force re-install. While at GRUB , in the linux line you can add force_junior at the end of the line. Then you will end up in DSM GUI to reinstall.2 points
-
You need the redpill-misc extension. If you have serial or ssh connection to the DSM you can edit manually : /lib/modules-load.d/70-cpufreq-kernel.conf and comment or remove the line that start with acpi2 points
-
For users who are confused by multiple installation guides, I will define the purpose of each guide. A. It is a TinyCore Redfill (shortened as TCRP) introductory document that installs only DSM 7.0.1. B. It is a guide that utilizes postupdate action when DSM 7 is already installed and updates are needed. C. This is a guide that requires the build process of TWOS STEP UPDATE (referred to as TSU for single installation of DSM 7.1).2 points
-
So far, a total of three platforms have been successfully installed with BAREMETAL. The method is to start from 7.0.1 build as guided by @pocopico It is a two step update build method. The rest of the platforms still have errors, so I will continue to report bugs to @pocopico. The following commands were used. [DS3622xs+] ./rploader.sh update now ./rploader.sh fullupgrade now ./rploader.sh serialgen DS3622xs+ ./rploader.sh identifyusb now ./rploader.sh satamap now ./rploader.sh build broadwellnk-7.0.1-42218 ./rploader.sh clean now ./rploader.sh build broadwellnk-7.1.0-42661 ./rploader.sh clean now; rm -rf /mnt/sdb3/auxfiles; rm -rf /home/tc/custom-module; ./rploader.sh backup now; [DS918+] ./rploader.sh update now ./rploader.sh fullupgrade now ./rploader.sh serialgen DS918+ ./rploader.sh identifyusb now ./rploader.sh satamap now ./rploader.sh build apollolake-7.0.1-42218 ./rploader.sh clean now ./rploader.sh build apollolake-7.1.0-42661 ./rploader.sh clean now; rm -rf /mnt/sdb3/auxfiles; rm -rf /home/tc/custom-module; ./rploader.sh backup now; [DS3615xs] ./rploader.sh update now ./rploader.sh fullupgrade now ./rploader.sh serialgen DS3615xs ./rploader.sh identifyusb now ./rploader.sh satamap now ./rploader.sh build bromolow-7.0.1-42218 ./rploader.sh clean now ./rploader.sh build bromolow-7.1.0-42661 ./rploader.sh clean now; rm -rf /mnt/sdb3/auxfiles; rm -rf /home/tc/custom-module; ./rploader.sh backup now;
 2 points
 -
I uses it with proxmox, AMD 3900x + Asrock X470 TaiChi I recommend to use xpenology always with hypervisor for best compatibility and minimum loss of performance.1 point
-
I think firstly I try boot up redpill without any add-ons, and if PHY not be worked i try to use different drivers modules... chip was referring the the network chip itself and phy chip to the chip responsible for the network physical layer https://en.wikipedia.org/wiki/PHY#PHY both features of the hardware you use, if a older driver recognizes the the network chip but not the phy chip it will also result in a non working system, newer driver might have support for that newer phy chip and would work it was often seen on 6.2.3 with intel onboard nic's and with realtek's r8125 (2.5G nic) and the usual fix was to use the latest driver1 point
-
Same issue here on Proxmox . DS3622xs working fine on same hardware, same procedure . Can’t get Ds918+ 7.1 working from fresh or using postupdate , 7.0.1 working ok Can’t find Hard Drive with DS920+ (Added virtio ext )1 point
-
that would be called "overwriting the partition table"1 point
-
I do the same, like Dreadnought and it's work for me too I also got error: modprobe: ERROR: could not insert 'aesni_intel': No such device but after that DSM boot but FileStation doesn't work. Baremetall Asus P5Q-E + Intel Q9550. It turns out that the whole thing is in the AES-NI instruction unsupported by the processor. It is strange that for 7.0 this was not a problem. It's sad, a lot of good boards are left behind, for example GA-C1007UN Maybe you can do something1 point
-
super duper ! worked first try
 1 point
 -
I've noticed that during the installation the DSM goes and grabs some more files from syno. Maybe that is causing an issue1 point
-
Yes I did and the following extensions: ./rploader.sh ext broadwellnk-7.1.0-42661 add https://github.com/pocopico/redpill-load/raw/master/redpill-misc/rpext-index.json ./rploader.sh ext broadwellnk-7.1.0-42661 add https://github.com/pocopico/redpill-load/raw/master/redpill-virtio/rpext-index.json ./rploader.sh ext broadwellnk-7.1.0-42661 add https://github.com/pocopico/redpill-load/raw/master/redpill-acpid/rpext-index.json ./rploader.sh ext broadwellnk-7.1.0-42661 add https://raw.githubusercontent.com/pocopico/rp-ext/master/e1000e/rpext-index.json ./rploader.sh ext broadwellnk-7.1.0-42661 add https://raw.githubusercontent.com/pocopico/rp-ext/master/sky2/rpext-index.json1 point
-
A little work around. I installed 7.0.1 activated telnet via DSM-Settings Then I upgraded to DSM 7.1, via DSM settings too Reboot with a new stick with tinyLoader and created the 7.1 Loader while booting connected via telnet and executed the command1 point
-
Hi All, First of all, thank you @pocopico and @Peter Suh Here are my findings. Last week I was testing to install DSM 7.0.1-42218 on several machines. First I used a SuperMicro server with an Intel Xeon L5630 cpu and 24Gb of ram. So far so good, I could install version 7.0.1-42218 and installation is successfull. After reading a lot posts over here, I tried to upgrade from 7.0.1-42218 to 7.1.0-42661 and it failed using the instruction of @Peter Suh Even if I first installed 7.0.1-42218 complete and then upgrade, it failed, keeps nagging about corrupt file. When I tried to do a fresh install, samething, keeps nagging about corrupt file, even when I downloaded the file from the cache on TC, same thing. The following instructions was entered: Then after hours of trying I used the Dell R320 to give it a try. Installing DSM 7.0.1-42218, perfect it runs and see all the drives. The did a full wipe (so to have a clean installation, even drives where wiped). Entered the instructions as noted by @Peter Suh And it starts up to DSM 7.1, but just with one drive (no other sataport/drive where found). Again, started to TC, did a clean instruction and changed the satamap to the following: "SataPortMap": "46", "DiskIdxMap": "0000" rebuild everything again with ./rploader.sh build broadwellnk-7.1.0-42661 rebooted the server and started to DSM 7.1, did the installation steps en all drives where found. It looks like something about which components you use ? With every server I used, I have changed the mac adres to the mac adres from the nic's I have installed now DS918+ on an asrock motherbord with an Apollo Lake cpu on it running DSM 7.0.1-42218 Will try to do an upgrade to DSM 7.1.0-42661 next time and will write to outcome here. Thank you for reading this post Kind regards
 1 point
 -
Just swappoing both USB cables has worked as you said. Thanks a lot for the advice1 point
-
with postupdate its also required but you can point to : https://github.com/pocopico/redpill-load/tree/develop/config/DVA32211 point
-
@pocopico could you please also correct the url parameter for https://github.com/pocopico/redpill-load/raw/master/redpill-virtio/rpext-index.json Here I get the same error like for acpid2 before. acpid2 looks great now. UPDATE: @pocopico thanks for your fix, now the build process is working1 point
-
before executing build you can use ./rploader.sh ext <platform> add https://github.com/pocopico/redpill-load/raw/master/redpill-misc/rpext-index.json1 point
-
The version will not be used in postupdate process. It reads these values from the DSM root partition1 point
-
Have a look here1 point
-
Found a solution to getting ReakTek USB lan adapters to work. My onboard 2nd NIC port. It seems we were fighting against dsm removing that function of supporting usb lan adapters, not having the correct r8152 driver at build. It required a modified r8152 driver that will load and run in dsm7 with its restrictions in place. This guy figured it out, and my second nic port worked immediately. though it still shows it default mac and not mac2= in user_config.json, I do not how to change its mac, if anyone can help with that. https://github.com/bb-qq/r8152/releases he has instruction, basically get his file in the right folder and presto, my second nic port eth1 internal but obviously on the usb bus not the pci bus. Instantly worked... @pocopico needs to add this in the package building, that way it will just work on build. @IG-88 tried to help me with this too, so I hope he gets the chance to see it working and hopefully get it included in the next release or at least an easy add ext command. @Jizar Stoffel method didnt work for me, but this method did. ds918 apollolake dsm7.1-42661 works no issues. Thank you all for the help.1 point
-
The "RedPill TinyCore Loader Installation Guide for DSM 7.0.1 Bare Metal" has been approved to be listed as a separate topic in the "Tutorials and Guides" section. Please forget about the postupdate action, which is the transition action in the middle. @pocopico agreed to this. Guide to Two Step Update (TSU) that has been built more than once Based on the approved guide, I'll upload it as the second guide.1 point
-
Finally I managed to do the update, I had to change the option "support_disk_compatibility"
 1 point
 -
On usb stick of 8Gb sde3 is only 800Mb... With Mini Partition tool free you can easely up size of sde3 because when the img is write on your stick you have lot of free space analoued1 point
-
В современных реалиях для пользователей из России хранить свои данные где-то может быть не просто, а что-то может быть утеряно безвозвратно. Для себя же функционал гуглофото и фото нахожу идентичным. Мне хватает за глаза.1 point
-
imho WOL is still the same as it always was, if you have your real mac configured then it should work, you can check the results of tinycore by looking into the grub.cfg of the 1st partition of your usb flash drive (\boot\grub\grub.cfg, mac1=...) same goes for the extensions, there is a custom.gz on the 1st partition and the things in there are used when starting the loader, so you can check by openg it with a packer like 7zip1 point
-
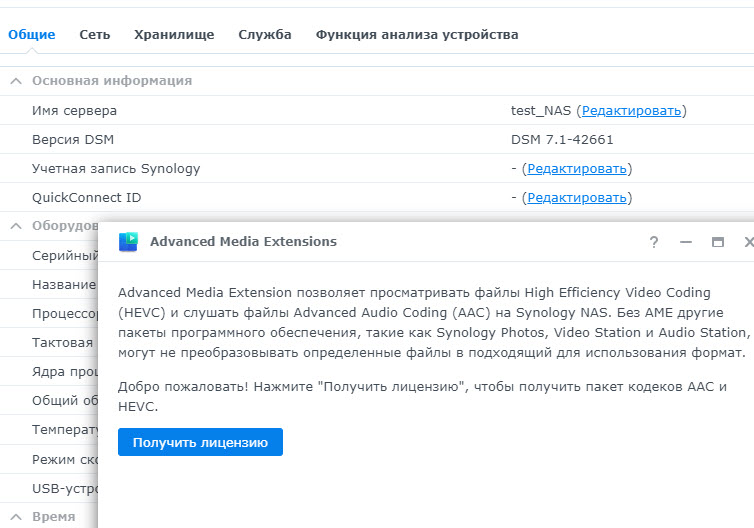
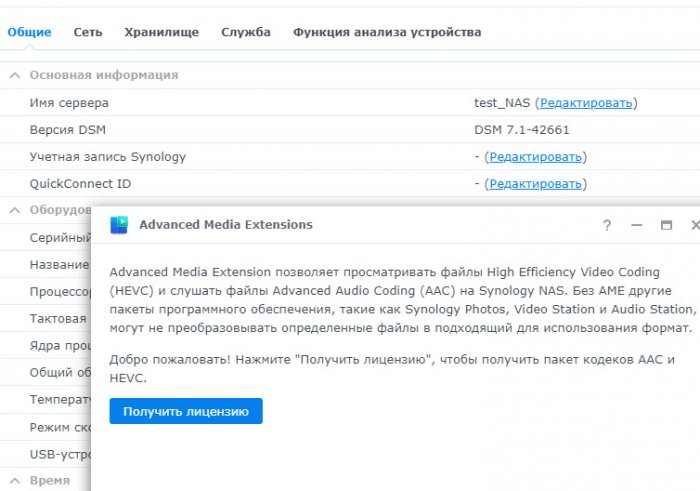
Проверил под VMWare переход на 7.1.0-42661 для 918+ с исходной версии 7.0.1-42218 (с установленными приложениями, настройками, пользователями, правами... - спасибо use-nas😞 1) Подготовка тестовой среды (установка "с нуля" 7.0.1-42218) sudo ./rploader.sh update now sudo ./rploader.sh fullupgrade now sudo ./rploader.sh serialgen DS918+ sudo ./rploader.sh identifyusb now sudo ./rploader.sh satamap now sudo ./rploader.sh build apollolake-7.0.1-42218 2) Загрузился, установил DSM_DS918+_42218.pat; настроил диски; установил пакеты (Photos, Video Station, Audio Station...), завёл пару пользователей, раздал права, подложил фото, видео, музыку; поставил Docker, запустил контейнер; что-то ещё по мелочи - имитация своей рабочей железки. 3) Обновление версии DSM: Панель управления\ Обновление и восстановление\ Обновление DSM вручную - подложил DSM_DS918+_42661.pat - приготовился перехватывать перезагрузку 4) Обновление загрузчика. Во время перезагрузки (здесь на физической железке потребуется подключение к монитору и клавиатуре!) выбрал пункт Tiny Core Image Build. После загрузки в нём: sudo ./rploader.sh clean now sudo ./rploader.sh build apollolake-7.1.0-42661 sudo ./rploader.sh backup apollolake-7.1.0-42661 sudo reboot 5) После успешной загрузки DSM многие пакеты неактивны, т.к. требуют обновления - не надо спешить и пытаться исправить вручную, через некоторое время сама предложит их "восстановить". После восстановления всё работает. Добавился пакет Advanced Media Extension, для лицензирования требует входа в Synology Account - не понял пока, чем это грозит теперь буду готовиться к обновлению на реальной железке. Для начала всё же сделаю бэкап на всякий случай...
 1 point
 -
drivers are not one big package that is all present in rp loader, every driver is a single extension that needs to be added, in your case r8152 it look like as if the driver is not present/loaded in 7.x (lsusb only shows the hardware but no loaded driver for it) if the extension is not added then it needs to be added manually to the loader1 point
-
Due to the authority issue, unnecessary commands were organized and further simplified. If you only use Intel LAN, you only need to execute 3 commands that are marked big and bold. --------------------------------------------------------------------------------------------------------- https://drive.google.com/file/d/1Msg-dBHns__GexG0WcA6qdS6RI30YqH_/view?usp=sharing scp [download path]/tc.tgz tc@192.168.1.2:/home tc@box:~$ cd /home; sudo rm -rf tc; tar -xvf tc.tgz; cd tc; (Add if needed) ./rploader.sh ext broadwellnk-7.0.1-42218 add https://raw.githubusercontent.com/PeterSuh-Q3/rp-ext/master/mpt3sas/rpext-index.json ./rploader.sh ext broadwellnk-7.0.1-42218 add https://raw.githubusercontent.com/PeterSuh-Q3/rp-ext/master/r8169/rpext-index.json (Add to Virtual Environment) ./rploader.sh ext broadwellnk-7.0.1-42218 add https://raw.githubusercontent.com/PeterSuh-Q3/rp-ext/master/vmxnet3/rpext-index.json (type y for all questions ./rploader.sh build broadwellnk-7.0.1-42218 manual (This question needs to come up) Want to use firmware files from /home/tc/custom-module/*.pat ? [yY/nN] : y (type y for all questions) ./rploader.sh build broadwellnk-7.1.0-42661 manual ------------------------------------------------------------------------ (EXT already included) ./rploader.sh ext broadwellnk-7.1.0-42661 add https://github.com/PeterSuh-Q3/redpill-load/raw/develop/redpill-misc/rpext-index.json ./rploader.sh ext broadwellnk-7.1.0-42661 add https://github.com/PeterSuh-Q3/redpill-ext/blob/master/redpill-boot-wait/rpext-index.json ./rploader.sh ext broadwellnk-7.1.0-42661 add https://raw.githubusercontent.com/PeterSuh-Q3/rp-ext/master/igb/rpext-index.json ./rploader.sh ext broadwellnk-7.1.0-42661 add https://raw.githubusercontent.com/PeterSuh-Q3/rp-ext/master/e1000e/rpext-index.json1 point
-
Google Drive's tc.zip was deleted due to permission issues and replaced with the following tc.tgz. https://drive.google.com/file/d/1Msg-dBHns__GexG0WcA6qdS6RI30YqH_/view?usp=sharing scp [download path]/tc.tgz tc@192.168.1.2:/home cd /home sudo rm -rf tc tar -xvf tc.tgz cd tc1 point
-
Do you know if the compatibility with extension tg3 with 7.1.0 been fixed? Sent from my SM-T878U using Tapatalk1 point
-
thank you for the information. If the script gets CPU information, it is normal to get it like this, usually E3-1265L If there are multiple versions, It is normal to come out like the link below. https://ark.intel.com/content/www/us/en/ark/search.html?_charset_=UTF-8&q=E3-1265L But, This page should appear Because currently your cpuinfo gets the value as E31265L https://ark.intel.com/content/www/us/en/ark/search.html?_charset_=UTF-8&q=E31265L This is how the address is generated to find the page. It seems to be a problem caused by importing the cpuinfo information itself in the form of missing " - "1 point
-
The instruction of DS3622xs+ for DSM 7.1 RC must use TCRP. 1. Download the DSM 7.1 PAT file from the Synology Download Center with 7.0.1 already installed. Update and restore in the synology DSM 7.0.1 to manually update. (You must precede this course.) Please do not go to update the bootloader below.) https://global.download.synology.com/download/DSM/release/7.1/42621/DSM_DS3622xs%2B_42621.pat?model=DS3622xs%2B&bays=12&dsm_version=7.1&build_number=42621&_ga=2.102639492.468865575.1648586076-1552442944.1645047990 2. Once rebooted, quickly boot to the bottom Tinycore Linux on the keyboard. 3. As a default tc user (no root switching to sudo su, especially for HBA SCSI drivers, absolutely prohibited using sudo, what @pocopico has confirmed) below Execute any command without omission. ./rploader.sh update now ./rploader.sh backuploader now ./rploader.sh download broadwellnk-7.0.1-42218 (Expanded driver that only needs DS3622xs+) ./rploader.sh ext broadwellnk-7.0.1-42218 add https://github.com/jumkey/redpill-load/raw/develop/redpill-misc/rpext-index.json (BROADWELLNK Model: DS3622xs+ Version: 7.1.0-42621 Loader versioning process is required for two questions y) ./rploader.sh postupdate broadwellnk-7.0.1-422181 point
-
This command sequence is the final successful result !!!! No editing is required, and the original version of the pocopico is used as it is. ./rploader.sh update now ./rploader.sh fullupgrade now ./rploader.sh clean now ./rploader.sh serialgen DS3622xs+ ./rploader.sh identifyusb now ./rploader.sh satamap now ./rploader.sh build broadwellnk-7.0.1-42218 ./rploader.sh clean now (This part is important, erase old config.json made in 7.0.1 above.) ./rploader.sh download broadwellnk-7.1.0-42621 ./rploader.sh ext broadwellnk-7.1.0-42621 add https://github.com/jumkey/redpill-load/raw/develop/redpill-misc/rpext-index.json ./rploader.sh build broadwellnk-7.1.0-426211 point
-
According to pocopico's guide, to make 7.1 loader, 7.0.1 loader should be made first. I hope Pocopico will check it again I think the order of the building below is correct. ./rploader.sh update now ./rploader.sh fullupgrade now ./rploader.sh clean now ./rploader.sh serialgen DS3622xs+ ./rploader.sh identifyusb now ./rploader.sh satamap now ./rploader.sh download broadwellnk-7.0.1-42218 ./rploader.sh ext broadwellnk-7.0.1-42218 add https://github.com/jumkey/redpill-load/raw/develop/redpill-misc/rpext-index.json ./rploader.sh build broadwellnk-7.0.1-42218 ./rploader.sh build broadwellnk-7.1.0-426211 point
-
For anyone with a test DVA3221, i have tested succesfully the TCRP two stage upgrade to 7.1.0-42621. Please proceed with caution and only on test systems. The process is : - Manual upgrade using DSM to 7.1 RC - On reboot, select to boot tinycore redpill - While on TCRP run the following ./rploader.sh update now ./rploader.sh backuploader now ./rploader.sh download ./rploader.sh download denverton-7.0.1-42218 ./rploader.sh postupdate denverton-7.0.1-42218 Fix the acpi systemd issue otherwise DSM will shutdown on access ./rploader.sh mountdsmroot now sed -i 's/^acpi-cpufreq/# acpi-cpufreq/g' /mnt/dsmroot/usr/lib/modules-load.d/70-cpufreq-kernel.conf && cat /mnt/dsmroot/usr/lib/modules-load.d/70-cpufreq-kernel.conf for people NOT having an NVIDIA card the following sould also be performed otherwise DSM will shutdown on access Remove both lines on : /mnt/dsmroot/usr/lib/modules-load.d/70-syno-nvidia-gpu.conf1 point
-
hello, the api url change try this (it's working for me) https://your-ip:5001/webapi/auth.cgi?api=SYNO.API.Auth&version=3&method=login&account=admin&passwd=your_admin_password&format= cookie the other url (for activation) not change https://URL:PORT/webapi/entry.cgi?api=SYNO.ActiveBackup.Activation&method=set&version=1&activated=true&serial_number="SERIALNUMBER" regards1 point
-
Check this out for solution: https://github.com/SynoCommunity/spksrc/issues/4897 Essentially this commands can fix it: # ssh to your NAS first sudo -i mv /etc/ssl/certs/ca-certificates.crt /etc/ssl/certs/ca-certificates.crt.bak curl -Lko /etc/ssl/certs/ca-certificates.crt https://curl.se/ca/cacert.pem1 point
-
1. В центре пакетов, добавляете источник пакетов https://packages.synocommunity.com (в настройках разрешаете установку из любых источниках) 2. Устанавливайте SynoCli file tool. 3. Кидаем на хрень libsynophoto-plugin-detection.so в свою главную папку т.е home (или куда душе угодно) 4. Подключайтесь через pytty 5. логин - пасс. потом команда sudo su спросит пароль 6. mc 7. Появится список файлов главной папки там и будет libsynophoto-plugin-detection.so . Выделяем его, жмем Ctrl+x затем C 8. Ставим права на файл (визуально это будет выглядеть так) 0 - Это значит не отмечено 0 0 0 X X X X 0 X X 0 X 9. жмем TAB переходим в правую колонку идем по пути /var/packages/SynologyMoments/target/usr/lib/ . Возвращаемся в левую колонку TAB. Если не выделен файл libsynophoto-plugin-detection.so выделяем. Жмем F5 соглашаемся на замену. 10. Останавливаем пакет moments и снова запускаем. Профит !!!!1 point
-
(1) Original developer Thorgroup team has identified the kernel timer issue(?) but had abruptly left the scene before its fixed. (2) I really appreciate every kind of their fundamental effort so that now we can have different working loaders. (3) I pick up bits by bits information by going through all different posts, and really make my appreciation again on Peter's effort in making working tutorial. (4) Not sure why you want to complain "WOL doesnt work" in tutorial section, I guess here is not the "Developer discussion section", right? As long as no other developers take over the original project to fix #1, this will become the known issue, even though it seems unknown to you.0 points