Search the Community
Showing results for 'UFS Explorer'.
-
Rufst Du die Freigaben über eine IP-Adresse oder über den Namen der NAS auf? \\<IP-ADRESSE> oder \\MEINENAS ? Oder verwendest Du Netzlaufwerke? Wenn der Winblöd Explorer bei sowas ins Essen kotzt, liegt das meistens an folgenden Dingen: - schlechte Netzwerkkonfig (Gammelkabel, Loopbacks in Switchen, mickrige WLAN-Verbindung) - Pseudosicherheitsmegasuperduperfirewall-Software, die jedes Paket erstmal blockt und sich dann überlegt, in Zusammenarbeit mit der zusätzlich aktivierten Windows-Firewall die Pakete dann doch irgendwann freizugeben - fehlerhafte DNS-Konfiguration/Namensauflösungen Wie ist Deine NAS denn konfiguriert? Selbes Subnetz? Statische IP? Und als was wird Deine Netzwerkumgebung angezeigt? Öffentlich, Privat, Arbeit?
-

Conseils Gen8, ESXi et Xpenology....
mprinfo replied to pierricktpt's topic in Installation Virtuelle
sur gen8 il faut reconnaître le ssd en premier dans la carte raid (raid 0) ensuite tu peux installer esxi depuis les dernières versions on peut installer esxi et datastore sur le même ssd. personnellement je suis d'accord pour la qualité de carte SD ou clef usb mais une fois esxi charger il n'y a pas beaucoup d écriture lecture sur la SD tout ce fait dans le datastore. j'ai fais un tuto sur le forum domotique fibaro. Ne pas oublier de faire un downgrade du pilote raid sinon tu vas avoir des débits très faible. il faudra ensuite déclaré chaque HDD en raid 0 et ensuite faire ton RDM. A priori le AHCI et esxi ne sont pas conseillé. Pour l'installation de esxi fait cela avec ILO. le console fonctionne sous internet explorer. Pour une licence ILO tu trouveras cela sur ebay pour 15 à 20 euros Envoyé de mon SM-G901F en utilisant Tapatalk -
Привет всем! Чем могу помогу, материалов есть несколько и даже с интел сетевыми... Прокурил форум, полазил на китайском сайте, гуглом переводил, но пока не ставил, все читаю. Качаю сейчас u-nas-3, позже закину куда-то, чтобы тоже смогли попробовать. Если че я в помощь-я упертый!! u-nas - DEMO U-NAS 3.0.2 UNAS3.0.2 выпущен, чтобы приветствовать всех вас активно загружать, устанавливать, использовать, пожалуйста , присылайте Ваши предложения или нашли ошибку обратно в U-отчета это содержание доля «советы и форумы об ошибке раздел обратной связи». продукты Выпуск U-NAS 3.0.2 в основном состоит из трех частей: U-Nasos 3.0.2, мобильное приложение, клиент PC. U-NAS OS 3.0.2 для интерфейса UI оптимизирован, увеличивая повсеместной U (проникновение сети), File Explorer, U-NAS Cloud такие функции, как APP. Конец мобильное приложение включает в себя U-файлы и U-Media, который, U-File можно передавать файлы на NAS и управлять телефоном, который поддерживает множество протоколов, U-Media может играть в онлайн видео развлекательных файлов на U-NAS и толкнул играть смарт-телевизор. PC клиенты включают U-искатель , U-NAS облако, которое, U-Искатель должен найти LAN U-NAS инструментов и оборудование; U-NAS Облако функция синхронизации облака может быть U-NAS файл на ПК конце синхронизации файлов . Получить товар Перейти на официальный сайт Ван http://www.u-nas.cn/resources.html загрузить соответствующее программное обеспечение. Инструкция по монтажу U-NAS OS 3.0.2: Скачать ссылку на скачивание страницы официальной версии сетевых ресурсов унас 3.0.2 файл ISO, теоретически, в конфигурации подобного компьютера или даже виртуальной машины также может быть установлена версия 3.0.2 НАНУ ISO (строго не проверено), ИСО SDA устройство крепится непосредственно к значениям по умолчанию, рекомендуется сохранить только установленные, когда системный диск, данные на диске разгрузки, чтобы избежать потери данных. Установка, использование унас версия 3.0 сообщества не требует активации лицензии. Испытано поддержка Firefox, хром, край, сафари браузер, пожалуйста, используйте другой скоростной режим браузера (не IE ядра) режим использования. Инструкции по установке , пожалуйста , посетите : http://www.u-nas.cn/download/U-NAS3.0XTAZJC.pdf Android App: В странице загрузки официального сайта установки ресурсов APK, или двумерный установка коды сканирования. IOS App: установлен для загрузки страницы в двумерном коде сканируемого официальный сайт. Другое программное обеспечение: Ресурсы в официальном веб-страницу загрузки для загрузки и установки. Учебное пособие: http://www.u-nas.cn/download/U-NAS-3.0.pdf Более подробный учебник , пожалуйста , перейдите на официальный сайт Ван http://www.u-nas.cn/resources.html запрос на. Hide
-
Вы читали мануал по ссылке в предыдущем посте? Там про grub расписано абсолютно всё, где и что искать, и что редактировать. Копирую именно тот пункт сюда. 4 - Now launch OSFMount. Select Mount New, then select the image file you downloaded earlier (i.e. .img extension file) to open. Now select partition 0 (the one that is 15 MB). Click Ok. Then at the bottom of the window make sure to un-tick the "Read only drive". Click Ok. The partition should now be mounted in file explorer. At this point you can navigate to the /grub directory and edit the grub.cfg file. If you need to replace the extra.lzma ramdisk with the custom ramdisk provided above then you will also need to mount partition 1 (the one that is 30 MB). Below is what you will see in the grub.cfg file. I am only showing below the portion of the code that is relevant for the purpose of this tutorial [...] set extra_initrd="extra.lzma" set info="info.txt" set vid=0x058f set pid=0x6387 set sn=C7LWN09761 set mac1=0011322CA785 set rootdev=/dev/md0 set netif_num=1 set extra_args_3615='' set common_args_3615='syno_hdd_powerup_seq=0 HddHotplug=0 syno_hw_version=DS3615xs vender_format_version=2 console=ttyS0,115200n8 withefi elevator=elevator quiet' set sata_args='sata_uid=1 sata_pcislot=5 synoboot_satadom=1 DiskIdxMap=0C SataPortMap=1 SasIdxMap=0' set default='0' set timeout='1' set fallback='1' [...] You want to modify the following: Change vid=0x090C to vid=0x[your usb drive vid] Change pid=0x1000 to pid=0x[your usb drive pid] Change sn=C7LWN09761 to sn=generate your sn here with DS3615xs or DS 3617xs or DS916+ model (this will depend on which loader you chose) Change mac1=0011322CA785 to mac1=[your NIC MAC address #1]. You can also add set mac2=[your NIC MAC address #2] and so on until mac4 if you have multiple NICs. However, this is not necessary. Recommended: Change set timeout='1' to set timeout='4' - This will allow you more time to make a selection in the Grub Boot Menu when it appears on screen. Once you are done editing the grub.cfg file, save it and close your text editor. Now in OSFMount click on Dismount all & Exit. You are now ready to burn the image to your USB drive.
-
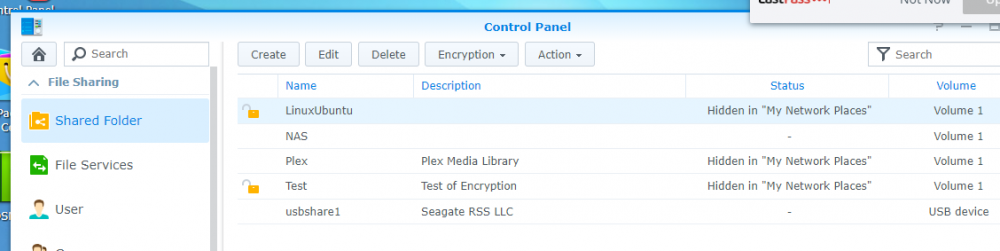
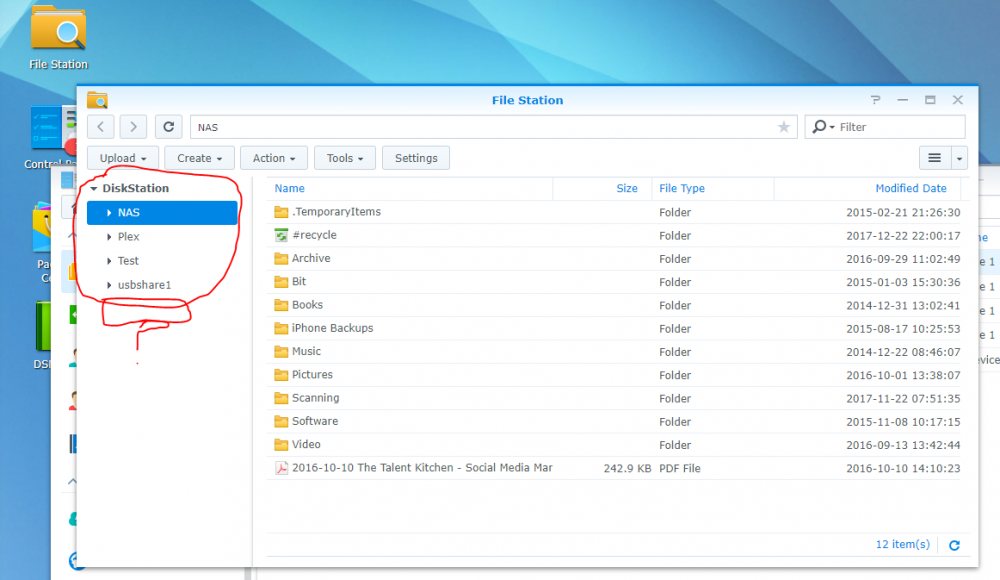
As per the screenshot, I have a few shares. One of them, "LinuxUbuntu" has become unaccesible. I'm unable to map it via WIndows, I'm even unable to browse it when typing in the address directly into Windows Explorer. E.g. \\diskstation\LinuxUbuntu. I'm able to access all other shares, both via Windows and via the Diskstation's built in File Station. Of concern, when I browse the Diskstation's built in File Station, I can't see the "LinuxUbuntu" share. (as Capture2.png). I've tried mounting and un-mounting this share multiple times, but it fails to show. What can I do to access the data in this share?
-
Hi to all. Firtst at all I want to apologize about my poor English, I am a Spanish man. After reading some topics in this forum i did not understand if I will can use the iOS apps of Synology in my future 6.1 Xpenology. I have could create a pair of S/N Mac from other model of NAS Synology different from DS3615xs. If it will be not possible, there's another way to control the download station with my iPhone without using a web explorer? Thanks for your answers.
-
ASRock J3710-ITX mit DS3125xx / DS916+ Hatte superlahmen download im W10-Explorer; Bei mir funtionierte es mit der Beschränkung auf IPV4 am W10-Rechner. Danach wieder 100+ MB/s wie gewöhnt...
-
ASRock J3710-ITX with DS3125xx / DS916+: In W10 Explorer download speed drops to 2-3 MB/s; Solved with deactivated IPV6 connection on Windows-PC. With IPV4 up- + download with more than 100 MB/s.
-
Didn't know that. Very happy that it it is supported! Done that, but didn' change anything, still no harddisk recognized... I was thinking if i have done something wrong adding the extra ramdisk into the image? I followed your tutorial exactly ( with OSFMount mounting partition 0 and 1 of the *.img file, then in Windows explorer going to the mounted drive deleting the extra.lzma file, copying the new extra.lzma with the extra drivers V3 in instead and then dismounting both partitions and "burning" the altered image to my USB stick.) I hope I did it right this way but please correct me if I'm wrong. Thanks!
-
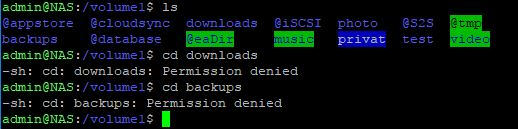
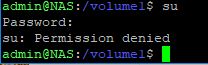
System - ESXi 6.5 - Xpenology VM Modellname: DS3615xs DSM: DSM 6.1.3-15152 Update 7 Ordner: - music (vom System erstellt) - indiziert - video (vom System erstellt) - indiziert - backups (manuell erstellt) - downloads (manuell erstellt) Auf allen Ordnern sollte für jewöhnlich der Admin Lese/Schreibrechte haben, auf "music" und "videos" komme ich nach wie vor drauf, seit geraumer Zeit, vermutlich nachdem Update von 6.1.? auf DSM 6.1.3-15152 Update 7, komme ich nicht mehr auf die Ordner "backups" und "downloads" diese werden pern UNC Pfad unter Windows zwar weiterhin angezeigt aber ein Zugriff auf die Verzeichnisse ist nicht mehr möglich, es folgt eine Aufforderung der Netzwerkanmeldeinformationen ("Der Zugriff wird verweigert") - sobald ich meinen User oder sogar den Admin der berechtigt sein sollte dort eintrage, erscheint die Abfrage erneut. Auf "music" und "videos" komme ich nach wie vor drauf, sogar neu erstellte Ordner sind kein Problem. Unter "Gemeinsame Ordner" -> Ordner "Backups" wird mir sogar die "Größe des freigegebenen Ordners" angezeigt bei dem Ordner Downloads ist dies nicht der Fall, beide Ordner lassen sich auch bearbeiten, jedoch geht es mir hier um den Inhaltn der Ordner Wie komme ich an die darin befindlichen Dateien noch heran? Der "File Explorer" der Weboberfläche scheint die bei Ordner auch nicht mehr zu erkennen... Evtl. per SSH / Telnet? Gibt es noch andere Möglichkeiten? Hoffe jemand kann mir helfen EDIT: Mit SSH komme ich leider auch nicht voran - aber immerhin sehe ich das ich keine Berechtigung habe ... -.- EDIT: SU scheint nicht das selbige Passwort zu sein
-
поздравляю с успехом! на будущее (мож ещё кому пригодится): если нужно только прочитать данные - можно попробовать UFS Explorer Professional Recovery тестировал под виндой чтение стандартных рейдов, создаваемых из-под Synology, и она показала себя очень хорошо. SHR не тестировал, работает ли с ним - не знаю.
-

Tutorial: Install/Migrate DSM 5.2 to 6.1.x (Jun's loader)
rquinn19 replied to Polanskiman's topic in Tutorials and Guides
I had 6.1.3 running with no issues. Recently needed the USB drive in a pinch. I copied the drive to my computer. Is there an easy way to recreate the bootable drive? I was thinking create an iso from the backed up data then create the bootable drive with that iso. When backing up I just did a copy paste in Windows Explorer of the whole drive. Thanks! Not sure if this is new post worthy -
@Water The Media Server package needs to be installed and running for that icon to come up. If it's not the case then install it in the Package Center first. Then on your computer go to the Computer tab in Windows Explorer >Access Media > Connect to a media server. Let it install. When finished refresh the window and voila. Google could have help: https://forum.synology.com/enu/viewtopic.php?t=109576
-
It's not really an issue of why shouldn't the PC see the NAS but more why SHOULD it. There are a bunch of things that have to be set up right for the PC to see the NAS. - they must both have a file sharing protocol enabled (the PC is the client, the NAS is the server). this is typically SMB or CIFS. it's hard to believe it's disabled on the PC, but it is not on by default on the NAS. double check that file sharing protocols are enabled and all sub requirements such as workgroups match up. - they must be able to physically see each other on the network. you must be able to ping back and forth. typically they're on the same subnet, e.g., 192.168.1.* with the same net mask (255.255.255.0). keep in mind ping commands can get bounced by the nas. you could temporarily enable ssh, but you need to determine that the boxes can see each other. - there must be no intervening device such as a firewall blocking the two from seeing each other. windows PCs, Synology NAS and many routers have built-in firewalls which may prevent traffic. while you're getting this worked out try disabling the firewall on the PC, the NAS, and any intervening network device. - authentication: SMB still requires authentication, a user and password, that has been set up on the NAS (unless you're using LDAP on the NAS for your users but that seems unlikely given the problem you're having) bottom line you need to prove to yourself that it should work and not assume it will. If you determine your NASes IP, and go to Windows Explorer, and put in //<ip of NAS>, what happens?
-
Moin, ich habe seit gestern das gleiche Problem. Meine "DS" hat die Version 5.2-5644 update 5. Das System startet, über den Windowsrechner kann ich über den Explorer auf die Verzeichnisse zugreifen, Plex funktioniert aber ich kann mich an der Weboberfläche nicht anmelden, egal welches Endgerät versucht sich dort anzumelden. Am PC steht eben die Meldung, als wenn man sich zu früh anmeldet. Im Synology Assistant steht "Dienste werden gestartet". Das macht es jetzt bereits die ganze Nacht. Anfänglich war das System noch am rödeln, inzwischen ist nur noch unrhythmisch die HDD-Aktivität gekennzeichnet. Im Synology Assistant kann ich so natürlich auch keine Neuinstallation anstoßen. Weiß jemand, was zu tun ist? Dieser Threat brach ja irgendwann ab, ohne durchgeführten Lösungsweg.
-
 Hello, I am storing a file in nearly all my directories to store some custom data (metadata, md5 hash etc.). I would like to hide these files from the File Station and the CIFS share, latter I can do through explorer but that's a bit annoying to do for that much files and it's also not hiding on DSM. The preceding dot like on other Linux systems doesn't seem to work for DSM so does someone know how I could hide files otherwise?
 -

Tutorial: Install/Migrate DSM 5.2 to 6.1.x (Jun's loader)
Polanskiman replied to Polanskiman's topic in Tutorials and Guides
Yes and no. You can do that with Windows 10. However, if my memory serves me well earlier versions of Windows will not allow the usb to mount in the file explorer thus the need to use OSFMount. As for Linux or any other flavoured unix OS (ubuntu, xubuntu etc etc) it should mount without any problem. -

TS-Proxy в docker контейнере для просмотра torrent-tv
b0g0m0l replied to arh's topic in Виртуализация
По адресу http://192.168.1.50:6878/server открылся, только очень долго и в explorer'e Еще на нескольких устройствах просмотр не должен работать? Как можно сделать автозагрузку докера и этого контейнера. И еще случаем не подскажите как в коди прикрутить иконки, раньше в плейлисте с помойки был прописан путь на иконку tvg-logo="Ani.png", а в этом плейлисте такого нет, хотя логотипы подгрузились автоматом в ace stream server -

Tutorial: Install/Migrate DSM 5.2 to 6.1.x (Jun's loader)
ACCakut replied to Polanskiman's topic in Tutorials and Guides
Am I wrong or can step 4 be drastically speed up by burning the .img to the stick and editing the grub.cfg on the stick (showing up in Windows Explorer)? So no OSFMount needed... -
Just migrated this morning from 5.2 to 6.1.3 The migration option comes on next page after "install". I was so afraid to erase my data but looks like all is working. One thing though, i'm not able to see the NAS in windows explorer. Making network drives and access NAS via ip is working fine though. Update: I have 2 NICs, I enabled "DHCP" instead of "manual configuration", unplugged network cable from LAN1 and plugged it in LAN2. Now NAS was visible in windows explorer. I plugged cable back to LAN1 and problem solved.
-
- OSFMount to modify the grub.cfg file within the loader's image. 5 - Now launch OSFMount. Select Mount New, then select the image file (i.e. synoboot.img) to open. Now select partition 0 (the one that is 30 MB). Click Ok. Then at the bottom of the window make sure to un-tick the "Read only drive". Click Ok. The EFI partition of the image file should now be mounted in file explorer. At this point you can navigate to the /image/DS3615xs directory and replace the extra.lzma ramdisk with the one provided above. When you are done come back to the root directory and go to the /grub directory and edit the grub.cfg file. Below is what you will see in the file. set extra_initrd="extra.lzma" set info="info.txt" set vid=0x058f set pid=0x6387 set sn=C7LWN09761 set mac1=0011322CA785 set rootdev=/dev/md0 set netif_num=1 set extra_args_3615='' set common_args_3615='syno_hdd_powerup_seq=0 HddHotplug=0 syno_hw_version=DS3615xs vender_format_version=2 console=ttyS0,115200n8 withefi elevator=elevator quiet' set sata_args='sata_uid=1 sata_pcislot=5 synoboot_satadom=1 DiskIdxMap=0C SataPortMap=1 SasIdxMap=0' set default='0' set timeout='1' set fallback='1' здесь поставте задержку что бы успеть выбрать загрузку set timeout='5'
-

Tutorial: Compile Xpenology Drivers in Windows 10
Lordbl4 replied to Err0r's topic in Tutorials and Guides
Compile drivers xpenology DSM 6.1 with windows 10 and build in bash I’m going to show you today how to compile drivers for dsm 6.1-15047 (bromolow) with windows and bash. First you need to get the anniversary update of windows 10. Click here for instructions to enable this update. When you already have the update, you need to install bash shell command line (It’s ubuntu) Read here how to enable Bash When you are finished installing the anniversary update and you enabled bash, proceed with the tutorial. 1) Start bash for windows. Type bash in the search field and start it. 2) When your shell is open update and upgrade your distribution. apt-get update && apt-get upgrade 3) Install some packages needed. apt-get install mc make gcc build-essential kernel-wedge libncurses5 libncurses5-dev libelf-dev binutils-dev kexec-tools makedumpfile fakeroot lzma 4) Get the source and Tool Chains. wget https://sourceforge.net/projects/dsgpl/files/Synology%20NAS%20GPL%20Source/15047branch/bromolow-source/linux-3.10.x.txz/download -O linux-3.10.x.txz wget https://sourceforge.net/projects/dsgpl/files/DSM%206.1%20Tool%20Chains/Intel%20x86%20linux%203.10.102%20%28Bromolow%29/bromolow-gcc493_glibc220_linaro_x86_64-GPL.txz/download -O bromolow-gcc493_glibc220_linaro_x86_64-GPL.txz 5) Unpack both archives. It could take some time.. tar xvf linux-3.10.x.txz tar xvf bromolow-gcc493_glibc220_linaro_x86_64-GPL.txz 6) We now make an alias so we don’t have to type the whole thing over and over again. PS. We unpacked the archives in folder /root so if you put it somewhere else do not forget to change the path in the command below. alias dsm6make='make ARCH=x86_64 CROSS_COMPILE=/root/x86_64-pc-linux-gnu/bin/x86_64-pc-linux-gnu-' 7) cd into the linux-3.10.x directory. cd linux-3.10.x 8) We now need to copy a new config so we can configure the drivers we want. cp synoconfigs/bromolow .config 9) When the config is copied we can start the compile menu. We use the alias we created. dsm6make menuconfig The menu looks like this. You can navigate with the arrow keys and select with the spacebar. To compile a driver, lookup your hardware and press the M key. If you see a M before the name of the hardware, the driver is going to be compiled. When you are finished press save and write the config. When that’s done, Exit the menu. (press ESC couple of times) 10) We now can compile the drivers you selected. dsm6make modules This can take a while.. 11) When compiling is finished you have *.ko files in the /root/linux-3.10.x/<dirs> directories. To get all *.ko files in one directory run 2 commands: mkdir newmodules find ./linux-3.10.x/ -iname "*.ko" -type f -exec cp -p {} ./newmodules/ \; All your compiled modules are now in the directory newmodules. In Ubuntu Userspace for Windows, the Ubuntu file system root directory is at C:\Users\%username%\AppData\Local\lxss\root\ There you can find the directory newmodules with all your compiled drivers. 12) The next step is to create a new extra.lzma with your new drivers. Download OSFMount here and mount the synoboot.img OSF Mount Select Mount New Select the image file synoboot.img. Now select partition 1 (30 MB). Click Ok. Then at the bottom of the window make sure to un-tick the “Read only drive”. Click Ok. The partition of the image file should now be mounted in file explorer. 13) Go to your usb disk partition and copy the extra.lzma to your c: drive. (I copied the file to C:\Users\%username%\AppData\Local\lxss\root\ but that doesn’t work. File is not there..) 14) Run the following commands in /root mkdir extract cd /mnt/c mv extra.lzma /root/extract cd /root/extract 14) Decompress “extra.lzma” to “extra” on the ubuntu command line: lzma -d extra.lzma 15) Extract the extra file cpio -idv < extra 16) Delete the extra file rm -rf extra 17) In directory /root/extract you have 3 directories: etc init usr Copy your new /root/newmodules/*.ko files into usr/lib/modules 18) Edit the file etc/rc.modules And add your new modules. You need to add the name of the module without the extension .ko in the rc.modules file. Network drivers etc. under EXTRA_MODULES Storage drivers under DISK_MODULES Firmwares under EXTRA_FIRMWARES if your controller or nic needs a firmware, you add the firmware file under usr/lib/modules/firmware/ and add the appropriate line in EXTRA_FIRMWARES, if there is a extra directory inside “firmware” we need to add it into the rc.modules file. The directory is added to the name, see the bnx2 firmware files in rc.modules for an example. 19) If everything is in place run the following command to create a new extra.lzma. We recreate the cpio file, re-compress it as lzma and write it one directory up as “extra.lzma” (find . -name modprobe && find . \! -name modprobe) | cpio --owner root:root -oH newc | lzma -8 > ../extra.lzma 20) We now copy “extra.lzma” from C:\Users\%username%\AppData\Local\lxss\root\ to synoboot.img Open OSFmount once again and open the 30mb partition. Replace the “extra.lzma” with the new one, dismount the image and close OSFmount. Burn the synoboot.img to usb with Win32diskimager because our new synoboot.img is ready to test. © https://xpenology.club/compile-drivers-xpenology-with-windows-10-and-build-in-bash/ copy paste here, if something gone wrong -
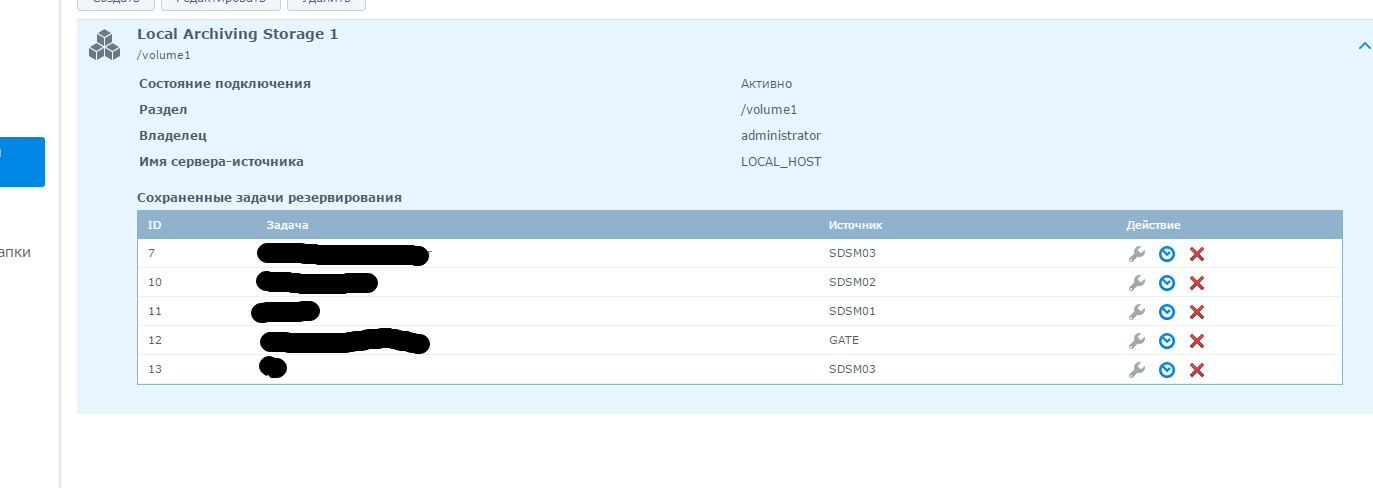
Чтобы не плодить тем, задам еще один вопрос здесь. Есть у меня DSM который используется под бекапы, как Место назначения резервирования. Я хотел бы, используя отчеты из Анализатора системы хранения узнавать сколько места использовали разные машины которые резервируют данные на моей SDSM04. То есть, SDSM01, SDSM02, SDSM03 используют для бекапа SDSM04, я хочу создать на SDSM04 отчет который будет считать количество использованного места. Прикреплена картинка. Но, когда я создаю отчет, там в Типах отчета есть "Квота использования", "Использование раздела" и "Папки общего доступа" - я попробовал выделить все три и создать отчет. В отчете совершенно не указано место которое используется под бекап, там только папки с обычными файлами, которые можно посмотреть в File Explorer. Возможно ли с помощью Анализатора создать отчет о Месте назначения резервирования?

-
he intentado abrir desde explorer, mozilla y chrome ninguno me deja descrgar el .iso DS3625xs5.2-5644.5. Alguien que tenga el iso y me lo pueda pasar se le agradecera mucho
-
Yes, I have now installed web station, php 5.6 and 7 and apache 2.2 and 2.4. Still, when I try and run Wordpress I get an error "cannot reach this page" When I go into file explorer and try and run the \\DiskStation\web\wordpress\wp-admin\install.php I get "Error php is not running".