Search the Community
Showing results for 'SataPortMap'.
-
Are you planning to switch from DSM6 bare metal to DSM7 VMs? You don't usually do this well, do you? Migration from bare metal to bare metal and from VM to VM seems safe. The most critical problem in the migration from DSM6 -> DSM7 is The point is that setting up SataPortMap is not easy, especially in REDPILL. Of course, there are users who are lucky enough to pass easily. The recommended method is to remove all data disks in use from the XPE PC and install only a few new disks for testing. Install and prepare the existing DSM 6 first, After creating one more REDPILL DSM7 bootloader on a separate USB, The first thing to do is to test the migration. If there are no problems in this test, it is OK to migrate the real data disk. Unless you intentionally initialize the disk, In any case, there is no need to worry as the data partition area is not damaged.
-
I have tried to reproduce the error, but it is (was) all working with loader version v0.4.6 If I execute the "./rploader.sh satamap now" it will detect the controllers and write the correct values to the user config: tc@box:~$ ./rploader.sh satamap now Machine is VIRTUAL Hypervisor=KVM HBA: 00:07.0 Disks : 6 HBA: 00:01.1 Disks : 2 SataPortMap=62 DiskIdxMap=0002 Should i update the user_config.json with these values ? [Yy/Nn] When I do the update and fullupgrade the "satamap" is not working on proxmox and I have to manually adjust the values Just to let you know...
-
"not attach your data disks to the same controller" ??? "SCSI controller" ??? I don't understand. BTW, I just upgraded from 7.0.1 to 7.1u2 as a DS918+ in a KVM VM. I have 6 drives, all as SATA drives: 1 TC .img file 4 passthrough physical hard drives 1 virtual drive Before upgrade all drives were recognized. After upgrade DSM says the virtual drive is not found. Also, my physical and the virtual drives are listed as drives # 12, 13, 14, 15, 16 in DSM... Here is the part related to drives in Virt-Manager xml: <disk type="file" device="disk"> <driver name="qemu" type="raw"/> <source file="/var/lib/libvirt/images/tinycore-redpill-uefi.v0.8.0.0.img"/> <target dev="sda" bus="sata"/> <address type="drive" controller="0" bus="0" target="0" unit="0"/> </disk> <disk type="block" device="disk"> <driver name="qemu" type="raw" cache="none" io="native"/> <source dev="/dev/disk/by-id/ata-WDC_WD60EFZX-68B3FN0_WD-C80JZ76G"/> <target dev="sdb" bus="sata"/> <address type="drive" controller="0" bus="0" target="0" unit="1"/> </disk> <disk type="block" device="disk"> <driver name="qemu" type="raw" cache="none" io="native"/> <source dev="/dev/disk/by-id/ata-WDC_WD60EFZX-68B3FN0_WD-CA0JXUUK"/> <target dev="sdc" bus="sata"/> <address type="drive" controller="0" bus="0" target="0" unit="2"/> </disk> <disk type="block" device="disk"> <driver name="qemu" type="raw" cache="none" io="native"/> <source dev="/dev/disk/by-id/ata-ST3000VN000-1HJ166_W6A04AVT"/> <target dev="sdd" bus="sata"/> <address type="drive" controller="0" bus="0" target="0" unit="3"/> </disk> <disk type="block" device="disk"> <driver name="qemu" type="raw" cache="none" io="native"/> <source dev="/dev/disk/by-id/ata-ST3000VN007-2E4166_Z6A0FLNR"/> <target dev="sde" bus="sata"/> <address type="drive" controller="0" bus="0" target="0" unit="4"/> </disk> <disk type="file" device="disk"> <driver name="qemu" type="qcow2"/> <source file="/var/lib/libvirt/images/Synology-Volume3-Docker.qcow2"/> <target dev="sdf" bus="sata"/> <address type="drive" controller="0" bus="0" target="0" unit="5"/> </disk> Should I change all drives to use "SCISI" bus ? Or should I just put all drives after the first TC drive on a different controller (i.e. 1 instead of 0) ? When I upgraded I restarted my TC image from scratch but added back my old user_config file and also added ACPI and VirtIO extensions. Here is my user_config.json: { "extra_cmdline": { "pid": "0xa4a5", "vid": "0x0525", "sn": "123XXXXXXXXXX", "mac1": "00XXXXXXXXXX", "SataPortMap": "58", "DiskIdxMap": "0A00" }, "synoinfo": { "internalportcfg" : "0xffff", "maxdisks" : "16", "support_bde_internal_10g" : "no", "support_disk_compatibility" : "no", "support_memory_compatibility" : "no" }, "ramdisk_copy": {} } Thank you
-
Hello team, I need the help of audience.... I've got the mobo Asrock C3558D4I-4L ... supported 9 SATA ports in different configurations.. I have tried to install many different images: ./my.sh DS920+, /my.sh DS918+, /my.sh DS3622xs+ and Syno Assist can't find any disk: for the Config.1: Found "00:13.0 Intel Corporation DNV SATA Controller 0 (rev 11)" Detected 8 ports/3 drives. Bad ports: -7 -6 -5 -4. Override # of ports or ENTER to accept <8> Found "00:14.0 Intel Corporation DNV SATA Controller 1 (rev 11)" Detected 6 ports/0 drives. Bad ports: 1 2 3 4 5. Override # of ports or ENTER to accept <6> Computed settings: SataPortMap=86 DiskIdxMap=0008 WARNING: Bad ports are mapped. The DSM installation will fail! for the config.2: Found "00:14.0 Intel Corporation DNV SATA Controller 1 (rev 11)" Detected 6 ports/1 drives. Bad ports: 3. Override # of ports or ENTER to accept <6> Computed settings: SataPortMap=6 DiskIdxMap=00 WARNING: Bad ports are mapped. The DSM installation will fail! ALSO I've tried to build the image with the disk tree mode: ./my.sh DS920+J jumkey noclean and ./my.sh DS1621+J jumkey noclean ... the same result Need your help please! Any suggestions? Thanks..
-
Hi Flyride, Proxmox is running on an Asrock J1900 motherboard and the output from "satamap" is: tc@box:~$ ./rploader.sh satamap Machine is VIRTUAL Hypervisor=KVM Found "00:07.0 Intel Corporation 82801IR/IO/IH (ICH9R/DO/DH) 6 port SATA Controller [AHCI mode] (rev 02)" Detected 6 ports/3 drives. Mapping SATABOOT drive after maxdisks WARNING: Other drives are connected that will not be accessible! Computed settings: SataPortMap=1 DiskIdxMap=10 For somehow the user_config.json file is adjusted to: "SataPortMap": "58", "DiskIdxMap": "0A00" I have two drives attached in Proxmox. Maybe one drive is not recognized because it is 10GB. (and the other drive is 100GB) As I have red there had to be one drive over 21GB....Maybe the 10GB is too small... EDIT: Changed the small drive to 22GB. Now it's working!
-

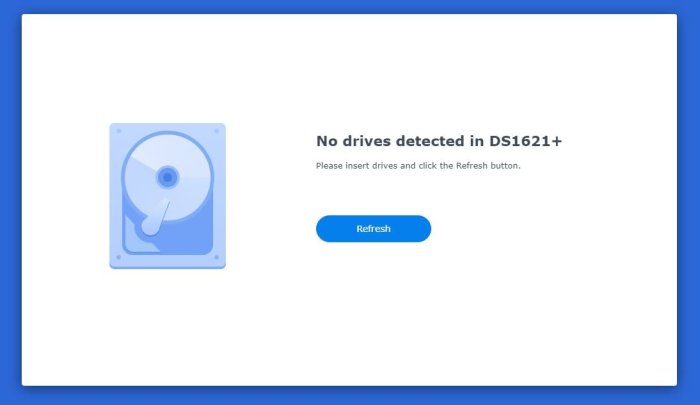
No drives detected
flyride replied to trublu's topic in General Installation Questions/Discussions (non-hardware specific)
The LSI has to be recognized by DSM. You are posting results from Tinycore. SataPortMap=1 and DiskIdxMap=00 is correct for baremetal and no AHCI SATA disks. Is the "no disks" error from DSM installation? Then you need to look at serial output in junior mode (when GUI is at installation) and see how the HBA disks are being addressed, if at all. ls -la /sys/class/scsi_disk -

How to install XPEnology (DVA3221) on Unraid
borzoy replied to erazor1112's topic in Tutorials and Guides
at the moment, the dsm is installed immediately on the hardware and during installation indicated "SataPortMap": "62", "DiskIdxMap": "0006" -
I am using tinycore-redpill.v0.4.6.img to install DSM7.1 on Proxmox KVM. For storage I have attached 2 SATA drives. Everytime I use "./rploader.sh mapsata" I get incorrect output: "SataPortMap": "1", "DiskIdxMap": "10", When Build for "Appololake 918+" There are no drives detected. If I changed to an already working VM (Sataportmap: 62, DiskIdxMap:0002) Then only one drive is working. Am I doing something wrong?
-
FWIW, satamp does not ask about LSI controller ports as it is not a AHCI SATA controller. LSI ignores SataPortMap and DiskIdxMap - those only apply to AHCI SATA. It just tacks on its ports at the end of whatever SATA ports are defined.
-
Quite a lot have change in 3 week. On the 14 may i can install redpill in esxi with Pcie LSI card. At the: sudo ./rploader.sh satamap now it was asking how many ports should be mapped, on the vmware Sata ctrl. with 1 drive connected (detected) Then it continue directly the second question: how many ports should be mapped for this controller. : As being the LSI ctrl. Now as on the 17jun and 18, the instal command don't ask this anymore for the LSI. By chance i screengrab the setting. As the only way is to enter this manually. to put : SataPortMap=148 DiskIdxMap=100004. With the Lsi card, it cannot get a proper dhcp ip when the dsm first boot. Never found in the synoAssistant. But when install with only sata 0 : redpill , sata 1:0 a new hdd and nothing else. it can install. Then i try to edit file in /proc/cmdline to mod the sataportmap and Disklxdxmap. And at boot i punch 'e' and also add there. And the lsi is show. Don't know if it survive multiple reboot or a cold shutdown. Also, for the update, by doing it give lot of error: sudo ./rploader.sh update sudo ./rploader.sh postupdate broadwellnk-7.1.0-42661 i got that : remote: Total 1253 (delta 302), reused 284 (delta 283), pack-reused 928 Receiving objects: 100% (1253/1253), 469.84 KiB | 692.00 KiB/s, done. Resolving deltas: 100% (865/865), done. Cloning into 'redpill-load'... remote: Enumerating objects: 2028, done. error: RPC failed; curl 56 OpenSSL SSL_read: Connection timed out error: 6376 bytes of body are still expected fetch-pack: unexpected disconnect while reading sideband packet fatal: early EOF fatal: fetch-pack: invalid index-pack output Removing any old redpill.ko modules Looking for redpill for : ds3622xsp_42661 Getting file https://raw.githubusercontent.com/pocopico/rp-ext/master/redpill/releases/redpill-4.4.180plus-broadwellnk.tgz Extracting module Getting file https://raw.githubusercontent.com/pocopico/rp-ext/master/redpill/src/check-redpill.sh mv: cannot move '/home/tc/redpill.ko' to '/home/tc/redpill-load/ext/rp-lkm/redpill-linux-v4.4.180+.ko': No such file or directory Creating temp ramdisk space Mounting partition sda1} Mounting partition sda2} Extracting update ramdisk unlzma: /mnt/sda2/rd.gz: Compressed data is corrupt 52176 blocks Found Version : 7.1-42661-2 Do you want to use this for the loader ? [yY/nN] : y Extracting redpill ramdisk And in the folder i don't have the file listed here as : exitcheck.sh i simply reboot to normal mode and in dsm it show 7.1u2. Is the ext driver install with 7.1u1 are still present, or the cleanup made in the first place to remove all ?
-
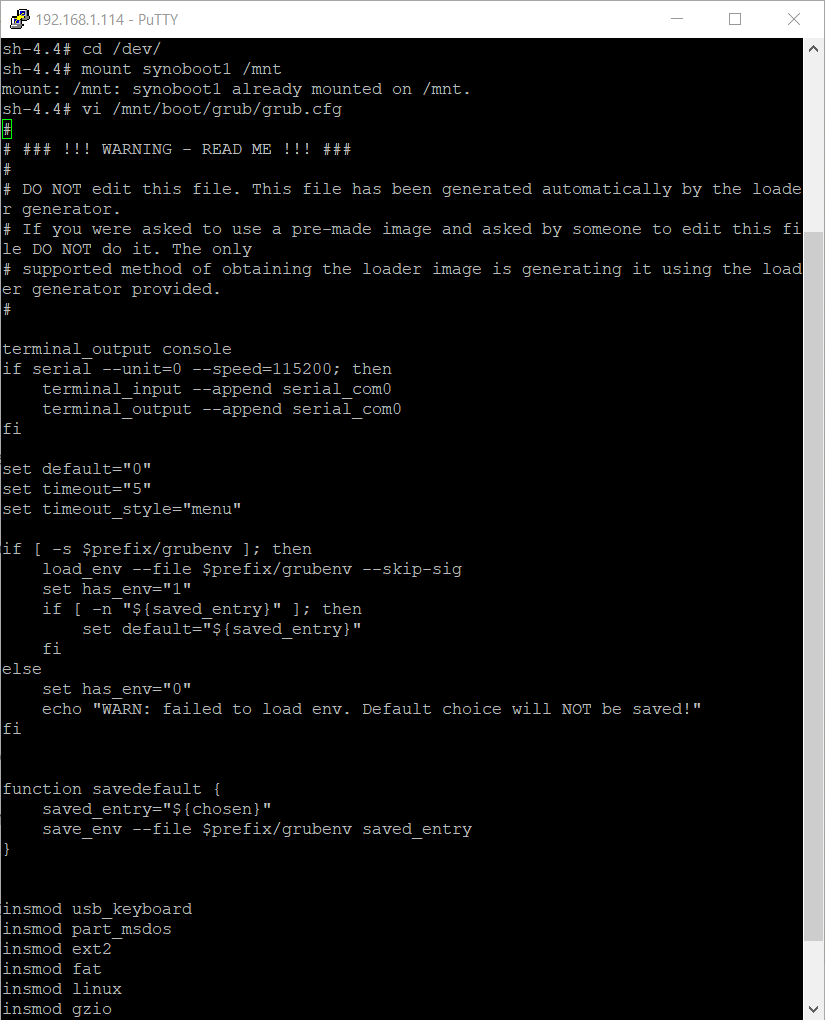
I did it guys First wasn"t a success but after I read the comments i find this " Try 3615xs it works. Commands as follows ./rploader.sh update ./rploader.sh fullupgrade Configure System-Specific Parameters USB flash drive VID/PID : ./rploader.sh identifyusb Serial number/MAC : ./rploader.sh serialgen DS3615xs realmac 5. Build the Loader ./rploader.sh build bromolow-7.1.0-42661 exitcheck.sh Load Usb stick in another computer and in grub.cfg edit following to DiskIdxMap=00 SataPortMap=1"
-

RedPill - the new loader for 6.2.4 - Discussion
maxime replied to ThorGroup's topic in Developer Discussion Room
Splitting commands it seems to work, but I don't find SataPortMap option Sorry, I'm linux noob. Thank you for your patience
-
What you have described suggests that you have set the SATA1 controller up with two ports - i.e. SataPortMap=12 and DiskIdxMap=1000 (or 100002) With RedPill, there will always be a gap from the last SATA controller to the first HBA device. You could delete your SATA1:0 controller and attached virtual disks(s) and then rebuild the loader with SataPortMap=1 - then your HBA would start at port 2. That's the best on ESXi unless you want to passthrough a real USB flash drive and boot from that.
-
 It is unfortunate that only 2 out of 4 Sata Ports can be used in DS3622xs which is None dtc method. It remains to be seen whether all motherboards with the H61 chipset are like that. Interesting fact. Alternatively, use the Linux DT (Device Tree) as a DS920+ or DS1621+ Try changing the installation model. There is no need to worry as the migration from the installed DS3622xs+ to DS920+ etc. will be smooth. Even if something goes wrong, install DS3622xs+ again and migrate once more. I will show you how to build more easily by using the m shell I developed. Download and decompress my.sh with the following command in TC linux. tc@box:~$ curl --location "https://github.com/PeterSuh-Q3/tinycore-redpill/raw/main/my.sh.gz" --output my.sh.gz; tar -zxvf my.sh.gz; After that, if you use the following command line, SN/MAC/VID/PID and build are processed at once. ./rploader.sh clean ./my.sh DS920+J jumkey This option builds DS920+ in jun mode with jumkey's dynamic dtc method. For jun mode, refer to the discussion in the forum, The advantage of jumkey's dynamic dtc is that it can avoid the issue of ghost ports or muxed ports (M.2 + Sata Mix) as above. Also, the newly added disk without using sataportmap automatically recognizes whether it is installed or not. DS920+ supports up to 4 disks, DS1621+ supports up to 6 disks, It must be used only with the built-in SATA port.
 -
RedPill TinyCore Loader Installation Guide for DSM 7.1 BareMetal
maxime replied to Peter Suh's topic in Tutorials and Guides
I did the procedure one more time. Now after "./rploader.sh postupdate broadwellnk-7.1.0-42661" I have to edit user_config.json and change SataPortMap=2 DiskIdxMap=00 After changed user_config.json and saved it, how do I apply the modified user_config.json? It seems that the system keep loading the original user_config.json...
-
RedPill - the new loader for 6.2.4 - Discussion
maxime replied to ThorGroup's topic in Developer Discussion Room
Thanks! I installed it with SataPortMap=2 and it worked. 🙂 Now, how can I "delete SataPortMap option and add sata_remap=4\>2:5\>3 option"? Sorry for the stupid question, but I can't understand how to do it 😥 -

RedPill - the new loader for 6.2.4 - Discussion
ikky_phoenix replied to ThorGroup's topic in Developer Discussion Room
It's easy to overcome that problem. Install with SataPortMap=1 (or 2), after successful installation, delete SataPortMap option and add sata_remap=4\>2:5\>3 option. Your disks will show 1, 2, 3 and 4 -

RedPill - the new loader for 6.2.4 - Discussion
vbz14216 replied to ThorGroup's topic in Developer Discussion Room
Very interesting but also frustrating at the same time. H61 only come with 4 SATA ports. But the problem is that Intel states "SATA ports 2 and 3 are disabled" in the datasheet. It's possible those ports are hardcoded as disabled but still visible from software side(hence bad ports). Try if you can install DSM by overriding SataPortMap=4(and 6 if that doesn't work), if not then you're out of luck for baremetal. H67, H77 and B75 boards are dirt cheap nowadays so it's a good solution.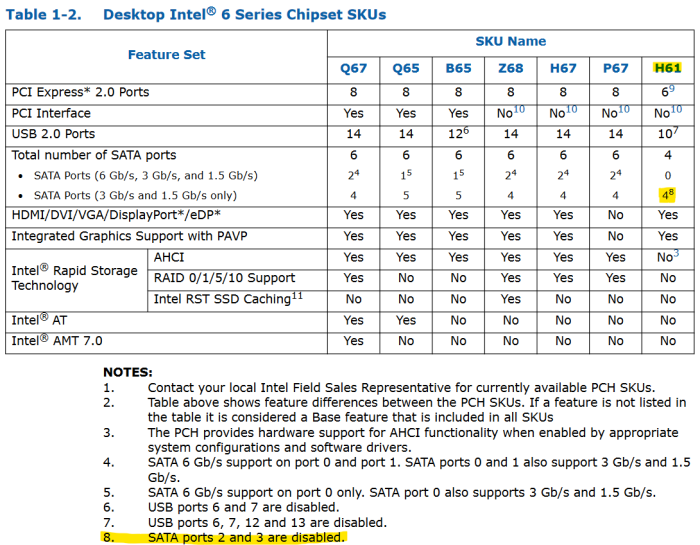
-
Ich werde mal das probieren. SataPortMap=42 DiskIdxMap=0200 genau das selbe nur das jetzt schacht 2 keine platte angeblich hatt.. 3 platten werden nur ekannt ich versuche vorsichthalber SataPortMap=22 DiskIdxMap=0002 ich glaube es war bei mir dies.. SataPortMap=22 DiskIdxMap=0004
-

Develop and refine the DS3622xs+ loader
irishj replied to yanjun's topic in Developer Discussion Room
Thanks for your reply - Never used "netif_num=2" before. Added to "user_config.json" and rebuilt the loader, made no difference. { "extra_cmdline": { "pid": "0x1a06", "vid": "0x1b1c", "sn": "XXXXXXXXXXXXX", "mac1": "80615F08FEFC", "mac2": "80615F08FEFD", "netif_num": "2", "SataPortMap": "6", "DiskIdxMap": "00" }, "synoinfo": { "internalportcfg": "0xffff", "maxdisks": "16", "support_bde_internal_10g": "no", "support_disk_compatibility": "no", "support_memory_compatibility": "no" }, "ramdisk_copy": {} } Tried your suggestion of seeing if the NIC was on the USB bus and here is the output. tc@box:~$ lspci -nnq 00:00.0 Host bridge [0600]: Intel Corporation Device [8086:3e30] (rev 0d) 00:01.0 PCI bridge [0604]: Intel Corporation Skylake PCIe Controller (x16) [8086:1901] (rev 0d) 00:01.1 PCI bridge [0604]: Intel Corporation Skylake PCIe Controller (x8) [8086:1905] (rev 0d) 00:02.0 VGA compatible controller [0300]: Intel Corporation CoffeeLake-S GT2 [UHD Graphics 630] [8086:3e98] (rev 02) 00:08.0 System peripheral [0880]: Intel Corporation Skylake Gaussian Mixture Model [8086:1911] 00:12.0 Signal processing controller [1180]: Intel Corporation Cannon Lake PCH Thermal Controller [8086:a379] (rev 10) 00:14.0 USB controller [0c03]: Intel Corporation Cannon Lake PCH USB 3.1 xHCI Host Controller [8086:a36d] (rev 10) 00:14.2 RAM memory [0500]: Intel Corporation Cannon Lake PCH Shared SRAM [8086:a36f] (rev 10) 00:14.3 Network controller [0280]: Intel Corporation Cannon Lake PCH CNVi WiFi [8086:a370] (rev 10) 00:16.0 Communication controller [0780]: Intel Corporation Cannon Lake PCH HECI Controller [8086:a360] (rev 10) 00:17.0 SATA controller [0106]: Intel Corporation Cannon Lake PCH SATA AHCI Controller [8086:a352] (rev 10) 00:1b.0 PCI bridge [0604]: Intel Corporation Cannon Lake PCH PCI Express Root Port #17 [8086:a340] (rev f0) 00:1b.4 PCI bridge [0604]: Intel Corporation Cannon Lake PCH PCI Express Root Port #21 [8086:a32c] (rev f0) 00:1d.0 PCI bridge [0604]: Intel Corporation Cannon Lake PCH PCI Express Root Port #9 [8086:a330] (rev f0) 00:1f.0 ISA bridge [0601]: Intel Corporation Z390 Chipset LPC/eSPI Controller [8086:a305] (rev 10) 00:1f.4 SMBus [0c05]: Intel Corporation Cannon Lake PCH SMBus Controller [8086:a323] (rev 10) 00:1f.5 Serial bus controller [0c80]: Intel Corporation Cannon Lake PCH SPI Controller [8086:a324] (rev 10) 01:00.0 Serial Attached SCSI controller [0107]: LSI Logic / Symbios Logic SAS2308 PCI-Express Fusion-MPT SAS-2 [1000:0087] (rev 05) 02:00.0 Ethernet controller [0200]: Intel Corporation Ethernet Controller 10G X550T [8086:1563] (rev 01) 02:00.1 Ethernet controller [0200]: Intel Corporation Ethernet Controller 10G X550T [8086:1563] (rev 01) 04:00.0 Non-Volatile memory controller [0108]: Samsung Electronics Co Ltd NVMe SSD Controller SM981/PM981/PM983 [144d:a808] 05:00.0 Non-Volatile memory controller [0108]: Samsung Electronics Co Ltd NVMe SSD Controller SM981/PM981/PM983 [144d:a808] Thanks ! -
Hallo IG-88, es ist aktuell das config: SataPortMap=22 DiskIdxMap=0002 Bei dies kam palatten fehler. SataPortMap=42 DiskIdxMap=0004 Ich werde mal das probieren. SataPortMap=42 DiskIdxMap=0200 In der dmesg war auch ein fehler mit SataPortMap und DiskIdxMap.
-
hallo guten tag satamap now siet so aus noch mals vielen dank an alle füe euere hilfe Found "00:1f.2 Intel Corporation 7 Series/C210 Series Chipset Family 6-port SATA Controller [AHCI mode] (rev 04)" Detected 6 ports/1 drives. Override # of ports or ENTER to accept <6> 04 Recommended settings: SataPortMap=04 DiskIdxMap=00 Should i update the user_config.json with these values ? [Yy/Nn] y Done. tc@box:~$
.thumb.png.476c3f838240a632fb13b17a891a4982.png)
-
das wären die gefundenen zwei ahci controller [ 7.124508] ahci 0000:00:1f.2: AHCI 0001.0100 32 slots 4 ports 3 Gbps 0x3 impl SATA mode [ 7.200092] ahci 0000:01:00.0: AHCI 0001.0000 32 slots 2 ports 3 Gbps 0x3 impl SATA mode es müsste auf dem board 6 sata ports geben und zwei sollten eine andere farbe haben, die platte würde man an die 4 gleichen ports anschließen das würde dann theoretisch das ergeben (was vermutlich im moment konfiguriert ist) SataPortMap=42 DiskIdxMap=0004 dam log nach scheinen 2 platten am ersten controller (2 von 4 ports benutzt) und die anderen zwei platten am 2. controller aber man kann auch versuchen die zwei extra ports als erstes zu plazieren und den 4er controller "dahinter", dan gäbe es keine lücke SataPortMap=42 DiskIdxMap=0200 oder man blendet die zwei hinteren ports des 4er controllers aus so als wären sie nicht vorhanden SataPortMap=22 DiskIdxMap=0002
-
 tc@box:~$ ./rploader.sh satamap now Found "00:1f.2 Intel Corporation 6 Series/C200 Series Chipset Family SATA AHCI Controller (rev 05)" Detected 6 ports/3 drives. Bad ports: 3 4 5. Override # of ports or ENTER to accept <6> tc@box:~$ How to fix it? Only 2 drives shows in Synology. How correct setup SataPortMap & DiskIdxMap? dmesg |grep sd [ 0.608968] sd 0:0:0:0: [sda] 625142448 512-byte logical blocks: (320 GB/298 GiB) [ 0.608975] sd 0:0:0:0: [sda] Write Protect is off [ 0.608976] sd 0:0:0:0: [sda] Mode Sense: 00 3a 00 00 [ 0.608987] sd 0:0:0:0: [sda] Write cache: enabled, read cache: enabled, doesn't support DPO or FUA [ 0.612395] sd 1:0:0:0: Attached scsi generic sg1 type 0 [ 0.612441] sd 1:0:0:0: [sdb] 976773168 512-byte logical blocks: (500 GB/466 GiB) [ 0.612443] sd 1:0:0:0: [sdb] 4096-byte physical blocks [ 0.612452] sd 1:0:0:0: [sdb] Write Protect is off [ 0.612454] sd 1:0:0:0: [sdb] Mode Sense: 00 3a 00 00 [ 0.612469] sd 1:0:0:0: [sdb] Write cache: enabled, read cache: enabled, doesn't support DPO or FUA [ 0.612600] sd 5:0:0:0: Attached scsi generic sg2 type 0 [ 0.612673] sd 5:0:0:0: [sdc] 976773168 512-byte logical blocks: (500 GB/466 GiB) [ 0.612675] sd 5:0:0:0: [sdc] 4096-byte physical blocks [ 0.612682] sd 5:0:0:0: [sdc] Write Protect is off [ 0.612683] sd 5:0:0:0: [sdc] Mode Sense: 00 3a 00 00 [ 0.612693] sd 5:0:0:0: [sdc] Write cache: enabled, read cache: enabled, doesn't support DPO or FUA [ 0.637211] sda: sda1 sda2 sda3 [ 0.637367] sd 0:0:0:0: [sda] Attached SCSI disk [ 0.654625] sdb: sdb1 sdb2 sdb3 sdb4 sdb5 sdb6 [ 0.654820] sd 1:0:0:0: [sdb] Attached SCSI disk [ 1.946040] sdc: sdc1 sdc2 sdc3 sdc4 [ 1.946210] sd 5:0:0:0: [sdc] Attached SCSI disk [ 2.172790] usbcore: registered new interface driver ums-isd200 [ 2.172807] usbcore: registered new interface driver ums-sddr09 [ 2.172811] usbcore: registered new interface driver ums-sddr55 [ 4.027022] sd 6:0:0:0: Attached scsi generic sg3 type 0 [ 4.027693] sd 6:0:0:0: [sdd] 30720000 512-byte logical blocks: (15.7 GB/14.6 GiB) [ 4.028327] sd 6:0:0:0: [sdd] Write Protect is off [ 4.028331] sd 6:0:0:0: [sdd] Mode Sense: 03 00 00 00 [ 4.029056] sd 6:0:0:0: [sdd] No Caching mode page found [ 4.029058] sd 6:0:0:0: [sdd] Assuming drive cache: write through [ 4.044667] sdd: sdd1 sdd2 sdd3 [ 4.047169] sd 6:0:0:0: [sdd] Attached SCSI removable disk [ 11.110992] FAT-fs (sdc2): Volume was not properly unmounted. Some data may be corrupt. Please run fsck. [ 16.536867] FAT-fs (sdc2): Volume was not properly unmounted. Some data may be corrupt. Please run fsck. [ 24.636814] FAT-fs (sdc2): Volume was not properly unmounted. Some data may be corrupt. Please run fsck.
 -
I am back in business!! In the end the solution was easy! With the typo in the script rploader.sh the DiskIdxMap is not correct. So the first time (with the typo) i got: Computed settings: SataPortMap=126 DiskIdxMap=000103 As I only have 1 VMDK (as a single virtual SSD) as data disk and 4 HDDs on the physical internal SATA-Controller of the Microserver Gen8 this even works and I was able to do the upgrade from DSM 6.2U3 to DSM 7.1. The step where things went a little bit wrong were as I updated to DSM 7.1U2. I have to boot after the update into TCRP again and fire up: sudo ./rploader.sh update sudo ./rploader.sh postupdate broadwellnk-7.1.0-42661 exitcheck.sh reboot Then I read about the type in rploader.sh and recognize my fault about the missing second NIC in the user_config.json. I added the second NIC, repaired the rploader.sh and got this (new & correct) satamap in the end: Computed settings: SataPortMap=126 DiskIdxMap=100002 Then I compiled the loader again: sudo ./rploader.sh clean sudo ./rploader.sh fullupgrade sudo ./rploader.sh listmods broadwellnk-7.1.0-42661 sudo ./rploader.sh build broadwellnk-7.1.0-42661 sudo ./rploader.sh backup exitcheck.sh reboot After the next reboot I got the page "Welcome back: Click here to migrate your diskstation". And here is the trick: - DO NOT JUST REBOOT into DSM after click on "Migrate"! - Reboot again in TCRP and run (once again): sudo ./rploader.sh postupdate broadwellnk-7.1.0-42661 exitcheck.sh reboot The "postupdate"-command will throw a lot of messages about a lot of existing files and folders. But in the end there will be the message: ... The new smallupdate version will be : 7.1-42661-2 Do you want to use this for the loader ? [yY/nN] : y Recreating ramdisk 52185 blocks Adding fake sign ... The next boot will be successfully and the NAS will be normal, stable and functional. So i learned: If a minor patch is installed on top of a major DSM-Release, one have to boot into TCRP again and run the "postupdate"-function again even after a "Migration" when changing e.g. the NIC-Settings and recreating the whole boot-loader. I still have some error messages but I got these also on my other installations: root@diskstation:~# systemctl list-units --state failed UNIT LOAD ACTIVE SUB DESCRIPTION ● syno-oob-check-status.service loaded failed failed Out of Band Management Status Check ● synoindex-checkpackage.service loaded failed failed synoindex check if there are any synoindex-related packages ● SynoInitEth.service loaded failed failed Adjust NIC sequence LOAD = Reflects whether the unit definition was properly loaded. ACTIVE = The high-level unit activation state, i.e. generalization of SUB. SUB = The low-level unit activation state, values depend on unit type. 3 loaded units listed. Pass --all to see loaded but inactive units, too. To show all installed unit files use 'systemctl list-unit-files'. Do someone knows if these failing services are important or irrelevant? The NICs are running fine and I miss nothing and can't see anything which is not running correctly.


.png.ed17cd30cd367ac71748eb93a7e7b718.png)

