Search the Community
Showing results for tags 'tutorials'.
-
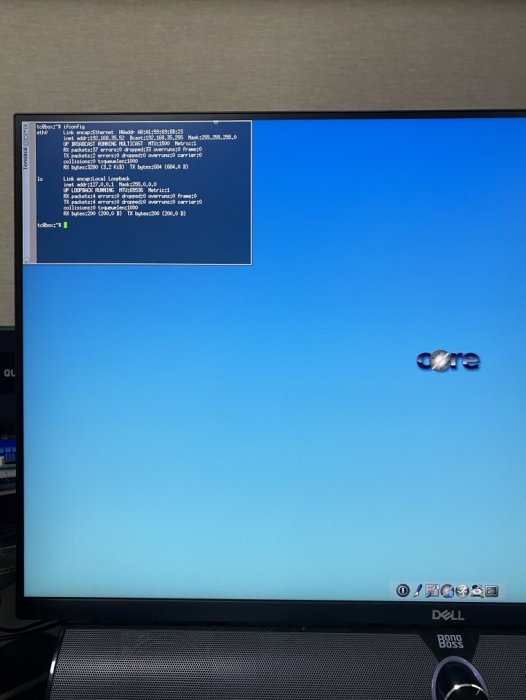
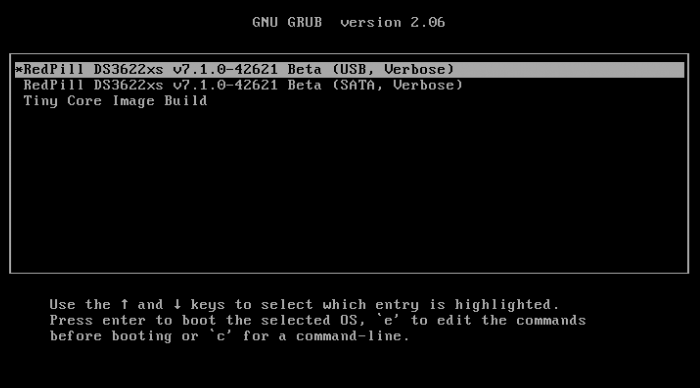
Hello. If you are using an existing 7.0.1 after the version of the Synology DSM was updated to 7.1, you may want to update to 7.1 or this is a guide for those who want to install 7.1 from the beginning. For those who are new to this article, I will share it with you by adding and subtracting it from the existing 7.0.1 guide. It is a translation from Korean to English using a translator. Please understand if there is a slight misunderstanding. Existing RedPill, released last year, can generate IMG files directly through the compilation process of the bootloader only if Linux is available separately In the case of tinyCore RedPill, it comes completely with tinyCore Linux in the form of a USB boot image It's much easier without having to install and prepare linux separately. You can add the drivers you want to build after you select them and add them directly. The latest version of tinycore supports a total of 7 models (DS3622xs+/DS918+/DS3615xs/DS3617xs/DS1621+/DS920+/DVA3221) You can continuously change the boot loader on your own without re-imaging it (model/sn/mac, etc.) Tinycore supports both img for native installation and vmdk for virtual environments. 1.Preparing Bootloader IMG Use the Download button in the middle of the beam link below.Download the gz file In it 0.4.6 version img.You can decompress the gz file one more time and use the img file. (Full File) https://github.com/pocopico/tinycore-redpill (for LEGACY / EFI) https://github.com/pocopico/tinycore-redpill/raw/main/tinycore-redpill.v0.4.6.img.gz (for VMWARE) https://github.com/pocopico/tinycore-redpill/raw/main/tinycore-redpill.v0.4.6.vmdk.gz 2. Bootloader IMG File USB Recording Use the above tinycore-redfill.v0.4.6.img file to burn it with USB with a convenient image tool such as WinImage or Rufus. You don't need to adjust the configuration file in advance to modify the VID/PID/Serial/MAC/SATAPortMap like the JUN loader. If you want to create a USB image on a Mac or Linux like me, you can use the DD command below in the terminal. (Assuming that the DEVICE ID of the USB verified by diskutil is disk4) sudo diskutil unmountDisk /dev/disk4 sudo dd if=/Users/MyAccount/Downloads/tinycore-redpill.v0.4.5.img of=/dev/disk4 bs=1m sudo diskutil eject /dev/disk4 3.Starting TinyCore Linux USB boot by plugging it into a PC for xpenology (UEFI 1 partition or USB CSM can be booted) The tinyCore Linux (tinyCore Image Build menu) is running and appears. Run the far right icon terminal app here. Check the ip address automatically assigned an en0 LAN card with ifconfig. [tinyCore Linux Screen] 4. Adjust CONFIG after SSH connection Ssh connection with putty etc. from PC other than xpenology. ( id:tc / pass : P@ssw0rd ) I'm connecting. Tinycore Redfill is stabilizing right now PocoPico, the original author of this program, fixes bugs from time to time and announces rebuilding. There's a possibility that this rebuild will happen from time to time Even with the final image version of 0.4.6, changes can still be updated in real time over the Internet. Sometimes the rploader.sh file itself changes if there is a bug. If you've migrated from JUN xpenology, at tc@box:~$user_config.json Existing grub such as VID/PID/Sn/Mac/SataPortMap in user_config.json file.Refer to the cfg and move it as it is. For new installers, perform serial GEN/USB VID, PID auto-detect, SataPortMap auto-detect, etc. as shown below. For the next process, I will share the command focusing on the platform that I have completed the most normal verification. tc@box:~$./rploader.sh serialgen (select one from DS3622x+/DS918+/DS3615xs/DS3617xs/DS1621+/DS920+/DV3221) tc@box:~$ ./rploader.sh identifyusb now tc@box:~$./rploader.sh satamap now (no HBA card user required) You can see that the contents of user_config.json have been changed automatically. Finally, the commonality of existing users and new installers is tc@box:~$catuser_config.json If you assume that there are 4 internal Sata ports, SataPortMap = "4", DiskIdxMap = "00" Please check if it's changed to the back. After find.synology.com, you may not be able to find SATA HDDs during DSM installation. The following is an example of a 6-port SATA additional expansion card. SataPortMap = "46", DiskIdxMap = "0000" (Except for those who use H200, H310, H710, etc. cards, you don't have to clear the options for this SataPortMap and DiskIdxMap itself and use it. Please erase the lines of the above two options with the vi editor and organize them well so that there are no Syntex errors. Of course. ./rploader.sh satamap now command is not required.) 5.BIOS Internal SATA Port Hot Plug disable -> enable Handling (Important) To avoid temporarily reducing the number of SATA PortMap maps set above by the number of HDDs physically connected by the Sata cable during the DSM installation process: Make sure to turn on the Hot Plug function. This reduces the probability of encountering an error message stating that the above automatically recognizes the number of SATAPortMaps and the HDD is not found. Please refer to the link below for the relevant details highlighted by TheSTREET. http://www.2cpu.co.kr/nas/37891 6.Add boot loader extension driver after SSH connection (optional) (You can skip this part. The required expansion driver is automatically discovered and received during BUILD 6 process.) A detailed list of extension drivers can be found below. https://github.com/pocopico/rp-ext The supported platforms are as follows: DS918 apollake, DS3615xs bromolow, DS3617xs broodwell, and ds3622xs+broadwellnk. In my case, I added three types of extension drivers: Realtech, Intel LAN, and DELL PERC as follows. tc@box:~$ ./rploader.sh ext broadwellnk-7.0.1-42218 add https://raw.githubusercontent.com/pocopico/rp-ext/master/r8101/rpext-index.json tc@box:~$ ./rploader.sh ext broadwellnk-7.0.1-42218 add https://raw.githubusercontent.com/pocopico/rp-ext/master/r8125/rpext-index.json tc@box:~$ ./rploader.sh ext broadwellnk-7.0.1-42218 add https://raw.githubusercontent.com/pocopico/rp-ext/master/r8152/rpext-index.json tc@box:~$ ./rploader.sh ext broadwellnk-7.0.1-42218 add https://raw.githubusercontent.com/pocopico/rp-ext/master/r8168/rpext-index.json tc@box:~$ ./rploader.sh ext broadwellnk-7.0.1-42218 add https://raw.githubusercontent.com/pocopico/rp-ext/master/r8169/rpext-index.json tc@box:~$ ./rploader.sh ext broadwellnk-7.0.1-42218 add https://raw.githubusercontent.com/pocopico/rp-ext/master/igp/rpext-index.json tc@box:~$ ./rploader.sh ext broadwellnk-7.0.1-42218 add https://raw.githubusercontent.com/pocopico/rp-ext/master/e1000/rpext-index.json tc@box:~$ ./rploader.sh ext broadwellnk-7.0.1-42218 add https://raw.githubusercontent.com/pocopico/rp-ext/master/e1000e/rpext-index.json tc@box:~$ ./rploader.sh ext broadwellnk-7.0.1-42218 add https://raw.githubusercontent.com/pocopico/rp-ext/master/mpt3sas/rpext-index.json 7.Build Boot Loader After SSH Connection (Two Step Update - TSU) If you are done adding the above extension drivers, build the bootloader at the end. After 7.0.1 build, check if the custom-module -> /mnt/sdb3/auxfiles directory is created well with the ll command. Without this directory, the second 7.1.0 build will fail. If you do not see the custom-module -> /mnt/sdb3/auxfiles directory, Please do the 7.0.1 build again. [DS3622xs+] ./rploader.sh update now ./rploader.sh fullupgrade now ./rploader.sh serialgen DS3622xs+ ./rploader.sh identifyusb now ./rploader.sh satamap now ./rploader.sh build broadwellnk-7.0.1-42218 ./rploader.sh clean now ./rploader.sh build broadwellnk-7.1.0-42661 ./rploader.sh clean now; rm -rf /mnt/sdb3/auxfiles; rm -rf /home/tc/custom-module; ./rploader.sh backup now; [DS918+] ./rploader.sh update now ./rploader.sh fullupgrade now ./rploader.sh serialgen DS918+ ./rploader.sh identifyusb now ./rploader.sh satamap now ./rploader.sh build apollolake-7.0.1-42218 ./rploader.sh clean now ./rploader.sh build apollolake-7.1.0-42661 ./rploader.sh clean now; rm -rf /mnt/sdb3/auxfiles; rm -rf /home/tc/custom-module; ./rploader.sh backup now; [DS3615xs] ./rploader.sh update now ./rploader.sh fullupgrade now ./rploader.sh serialgen DS3615xs ./rploader.sh identifyusb now ./rploader.sh satamap now ./rploader.sh build bromolow-7.0.1-42218 ./rploader.sh clean now ./rploader.sh build bromolow-7.1.0-42661 ./rploader.sh clean now; rm -rf /mnt/sdb3/auxfiles; rm -rf /home/tc/custom-module; ./rploader.sh backup now; The last line doesn't get restored even if you reboot later It is the process of organizing the folders where the pat file exists and reducing the capacity and completing the backup. 8-1.Using the bootloader (update user) tc@box:~$ sudo poweroff Place the 7.1 bootloader on the bottom well In the existing 7.0.1 henol boot state, obtain the DSM 7.1.0-42661.pat file separately from the Sinology Download Center https://www.synology.com/ko-kr/support/download Click the Control Panel -> Update and Restore -> DSM Update -> Manual DSM Update button and proceed with the update to the prepared pat file above. If you are asked to wait 10 minutes after the update, use the telnet connection method that appears in the NAS column by searching for the title telnet I'll power off. -> using putty and telnet it using user=root without password. after you type root then enter, it will goes to linux prompt. By the way, if there are a lot of actual packages installed, it says that you have to wait 20 minutes. Very few packages appear to wait 10 minutes. If you don't want to let me go to the Wi-Telnet connection process, check the monitor to see if you want to power down when rebooting or when rebooting I think you can change it quickly to enter TC Linux. Replace the USB with the 7.1 boot loader prepared above and proceed with the boot You can use it. (There's nothing else I can do for you.) If you want to update from 7.0.1 to 7.1, Process 8-1 in the guide above, and if you're using it, boot from USB and enter Tinycore Linux again You can start from number 3. Tynicore Linux is the third menu, so you have to switch quickly in 4 seconds. This is a method that can be carried out without preparing one more USB memory, but the existing 7.0.1 boot loader may be erased You can use the new functions, backuploader now and restoreloader now action 8-2.Use bootloader (new installer) After successfully completing the build above, reboot the xpenology with USB using the command below. tc@box:~$ sudo reboot The settings or ext drivers that were backed up remain the same The setting values are restored from the mydata.tgz file and remain intact at the next Tiny Core Image Build boot for modification. (The default setting for automatic entry within 4 seconds is USB, Verbose at the top. If you don't touch it with your keyboard, it will automatically enter USB mode.) xpenology On-Screen After PC Boots In the case of the existing RedPill, you will be asked to find it at find.synology.com like the existing Jun loader For this tinyCore: Decompressing Linux... Parsing ELF... done. Booting the kernel. This is the message. There is a delay of 1 to 2 minutes from the IP allocation, so please wait a little bit. In this state, browse to find.synology.com on another PC and you will find the xpenology IP. After that, you can proceed with the installation process of the Synology DSM as you are working on the existing xpenology.


