Search the Community
Showing results for 'detected that the hard drives'.
-
I have had Syno Nas's for decades but a few years back I thought I would try Qnap out and purchased a TS-h973ax. I finally had enough of their OS although their HW is very good, better than Synology on comparable offerings. To have the best of both worlds I put xpenology on it, would have liked to use Arc loader but the Qnap has no video output so used TCRP as it can be done by putty. I had no end of trouble getting any usb drive to be successfully identified until I decided to remove the Qnap dom from motherboard, then all worked well. I used the DS2422+ as the model due to being AMD processor and sata mapping being automatic based on fitted drives. I now have a rock solid Syno nas running on latest update for the model installed, good to be back home
-
hi, i've got the lspci -pp from ubuntu looking like this... " 00:1f.2 SATA controller: Intel Corporation C600/X79 series chipset 6-Port SATA AHCI Controller (rev 06) 00:1f.3 SMBus: Intel Corporation C600/X79 series chipset SMBus Host Controller (rev 06) 00:1f.6 Signal processing controller: Intel Corporation C600/X79 series chipset Thermal Management Controller (rev 06) 00:01.0/01:00.0 Serial Attached SCSI controller: Broadcom / LSI SAS3008 PCI-Express Fusion-MPT SAS-3 (rev 02) 00:02.0/02:00.0 PCI bridge: PLX Technology, Inc. PEX 8724 24-Lane, 6-Port PCI Express Gen 3 (8 GT/s) Switch, 19 x 19mm FCBGA (rev ca) 00:02.0/02:00.0/03:00.0 PCI bridge: PLX Technology, Inc. PEX 8724 24-Lane, 6-Port PCI Express Gen 3 (8 GT/s) Switch, 19 x 19mm FCBGA (rev ca) 00:02.0/02:00.0/03:08.0 PCI bridge: PLX Technology, Inc. PEX 8724 24-Lane, 6-Port PCI Express Gen 3 (8 GT/s) Switch, 19 x 19mm FCBGA (rev ca) 00:02.0/02:00.0/03:09.0 PCI bridge: PLX Technology, Inc. PEX 8724 24-Lane, 6-Port PCI Express Gen 3 (8 GT/s) Switch, 19 x 19mm FCBGA (rev ca) 00:02.0/02:00.0/03:00.0/04:00.0 Serial Attached SCSI controller: Broadcom / LSI SAS3008 PCI-Express Fusion-MPT SAS-3 (rev 02) 00:02.0/02:00.0/03:09.0/06:00.0 Serial Attached SCSI controller: Broadcom / LSI SAS3008 PCI-Express Fusion-MPT SAS-3 (rev 02) 00:03.0/07:00.0 Ethernet controller: Intel Corporation Ethernet Controller 10-Gigabit X540-AT2 (rev 01) 00:03.0/07:00.1 Ethernet controller: Intel Corporation Ethernet Controller 10-Gigabit X540-AT2 (rev 01) 00:11.0/09:00.0 Serial Attached SCSI controller: Intel Corporation C602 chipset 4-Port SATA Storage Control Unit (rev 06) " I do havy physical 2 HBAs in the system 00:01.0/01:00.0 Serial Attached SCSI controller: Broadcom / LSI SAS3008 PCI-Express Fusion-MPT SAS-3 (rev 02) > 9300-4i4e with ext SAS Expander (only external is connected) 00:02.0/02:00.0/03:00.0/04:00.0 Serial Attached SCSI controller: Broadcom / LSI SAS3008 PCI-Express Fusion-MPT SAS-3 (rev 02) 00:02.0/02:00.0/03:09.0/06:00.0 Serial Attached SCSI controller: Broadcom / LSI SAS3008 PCI-Express Fusion-MPT SAS-3 (rev 02) > 9300-16i with direct attaced drives with ls -al /sys/block /sd* i get this output, which shows 16 external connected and 14 internal connected drives to both HBAs lrwxrwxrwx 1 root root 0 May 6 2024 sdaa -> ../devices/pci0000:00/0000:00:02.0/0000:02:00.0/0000:03:09.0/0000:06:00.0/host10/port-10:1/end_device-10:1/target10:0:1/10:0:1:0/block/sdaa lrwxrwxrwx 1 root root 0 May 6 2024 sdab -> ../devices/pci0000:00/0000:00:02.0/0000:02:00.0/0000:03:09.0/0000:06:00.0/host10/port-10:2/end_device-10:2/target10:0:2/10:0:2:0/block/sdab lrwxrwxrwx 1 root root 0 May 6 2024 sdac -> ../devices/pci0000:00/0000:00:02.0/0000:02:00.0/0000:03:09.0/0000:06:00.0/host10/port-10:3/end_device-10:3/target10:0:3/10:0:3:0/block/sdac lrwxrwxrwx 1 root root 0 May 6 2024 sdad -> ../devices/pci0000:00/0000:00:02.0/0000:02:00.0/0000:03:09.0/0000:06:00.0/host10/port-10:4/end_device-10:4/target10:0:4/10:0:4:0/block/sdad lrwxrwxrwx 1 root root 0 May 6 2024 sdae -> ../devices/pci0000:00/0000:00:02.0/0000:02:00.0/0000:03:09.0/0000:06:00.0/host10/port-10:5/end_device-10:5/target10:0:5/10:0:5:0/block/sdae lrwxrwxrwx 1 root root 0 May 6 2024 sdaf -> ../devices/pci0000:00/0000:00:02.0/0000:02:00.0/0000:03:09.0/0000:06:00.0/host10/port-10:6/end_device-10:6/target10:0:6/10:0:6:0/block/sdaf lrwxrwxrwx 1 root root 0 May 6 2024 sdag -> ../devices/pci0000:00/0000:00:02.0/0000:02:00.0/0000:03:09.0/0000:06:00.0/host10/port-10:7/end_device-10:7/target10:0:7/10:0:7:0/block/sdag lrwxrwxrwx 1 root root 0 May 6 2024 sdb -> ../devices/pci0000:00/0000:00:01.0/0000:01:00.0/host1/port-1:0/expander-1:0/port-1:0:0/end_device-1:0:0/target1:0:0/1:0:0:0/block/sdb lrwxrwxrwx 1 root root 0 May 6 2024 sdc -> ../devices/pci0000:00/0000:00:01.0/0000:01:00.0/host1/port-1:0/expander-1:0/port-1:0:1/end_device-1:0:1/target1:0:1/1:0:1:0/block/sdc lrwxrwxrwx 1 root root 0 May 6 2024 sdd -> ../devices/pci0000:00/0000:00:01.0/0000:01:00.0/host1/port-1:0/expander-1:0/port-1:0:2/end_device-1:0:2/target1:0:2/1:0:2:0/block/sdd lrwxrwxrwx 1 root root 0 May 6 2024 sde -> ../devices/pci0000:00/0000:00:01.0/0000:01:00.0/host1/port-1:0/expander-1:0/port-1:0:3/end_device-1:0:3/target1:0:3/1:0:3:0/block/sde lrwxrwxrwx 1 root root 0 May 6 2024 sdf -> ../devices/pci0000:00/0000:00:01.0/0000:01:00.0/host1/port-1:0/expander-1:0/port-1:0:4/end_device-1:0:4/target1:0:4/1:0:4:0/block/sdf lrwxrwxrwx 1 root root 0 May 6 2024 sdg -> ../devices/pci0000:00/0000:00:01.0/0000:01:00.0/host1/port-1:0/expander-1:0/port-1:0:5/end_device-1:0:5/target1:0:5/1:0:5:0/block/sdg lrwxrwxrwx 1 root root 0 May 6 2024 sdh -> ../devices/pci0000:00/0000:00:01.0/0000:01:00.0/host1/port-1:0/expander-1:0/port-1:0:6/end_device-1:0:6/target1:0:6/1:0:6:0/block/sdh lrwxrwxrwx 1 root root 0 May 6 2024 sdi -> ../devices/pci0000:00/0000:00:01.0/0000:01:00.0/host1/port-1:0/expander-1:0/port-1:0:7/end_device-1:0:7/target1:0:7/1:0:7:0/block/sdi lrwxrwxrwx 1 root root 0 May 6 2024 sdj -> ../devices/pci0000:00/0000:00:01.0/0000:01:00.0/host1/port-1:0/expander-1:0/port-1:0:8/end_device-1:0:8/target1:0:8/1:0:8:0/block/sdj lrwxrwxrwx 1 root root 0 May 6 2024 sdk -> ../devices/pci0000:00/0000:00:01.0/0000:01:00.0/host1/port-1:0/expander-1:0/port-1:0:9/end_device-1:0:9/target1:0:9/1:0:9:0/block/sdk lrwxrwxrwx 1 root root 0 May 6 2024 sdl -> ../devices/pci0000:00/0000:00:01.0/0000:01:00.0/host1/port-1:0/expander-1:0/port-1:0:10/end_device-1:0:10/target1:0:10/1:0:10:0/block/sdl lrwxrwxrwx 1 root root 0 May 6 2024 sdm -> ../devices/pci0000:00/0000:00:01.0/0000:01:00.0/host1/port-1:0/expander-1:0/port-1:0:11/end_device-1:0:11/target1:0:11/1:0:11:0/block/sdm lrwxrwxrwx 1 root root 0 May 6 2024 sdn -> ../devices/pci0000:00/0000:00:01.0/0000:01:00.0/host1/port-1:0/expander-1:0/port-1:0:12/end_device-1:0:12/target1:0:12/1:0:12:0/block/sdn lrwxrwxrwx 1 root root 0 May 6 2024 sdo -> ../devices/pci0000:00/0000:00:01.0/0000:01:00.0/host1/port-1:0/expander-1:0/port-1:0:13/end_device-1:0:13/target1:0:13/1:0:13:0/block/sdo lrwxrwxrwx 1 root root 0 May 6 2024 sdp -> ../devices/pci0000:00/0000:00:01.0/0000:01:00.0/host1/port-1:0/expander-1:0/port-1:0:14/end_device-1:0:14/target1:0:14/1:0:14:0/block/sdp lrwxrwxrwx 1 root root 0 May 6 2024 sdq -> ../devices/pci0000:00/0000:00:01.0/0000:01:00.0/host1/port-1:0/expander-1:0/port-1:0:15/end_device-1:0:15/target1:0:15/1:0:15:0/block/sdq lrwxrwxrwx 1 root root 0 May 6 2024 sdr -> ../devices/pci0000:00/0000:00:1f.2/ata2/host2/target2:0:0/2:0:0:0/block/sdr lrwxrwxrwx 1 root root 0 May 6 2024 sds -> ../devices/pci0000:00/0000:00:02.0/0000:02:00.0/0000:03:00.0/0000:04:00.0/host9/port-9:0/end_device-9:0/target9:0:0/9:0:0:0/block/sds lrwxrwxrwx 1 root root 0 May 6 2024 sdt -> ../devices/pci0000:00/0000:00:02.0/0000:02:00.0/0000:03:00.0/0000:04:00.0/host9/port-9:1/end_device-9:1/target9:0:1/9:0:1:0/block/sdt lrwxrwxrwx 1 root root 0 May 6 2024 sdu -> ../devices/pci0000:00/0000:00:02.0/0000:02:00.0/0000:03:00.0/0000:04:00.0/host9/port-9:2/end_device-9:2/target9:0:2/9:0:2:0/block/sdu lrwxrwxrwx 1 root root 0 May 6 2024 sdv -> ../devices/pci0000:00/0000:00:02.0/0000:02:00.0/0000:03:00.0/0000:04:00.0/host9/port-9:4/end_device-9:4/target9:0:4/9:0:4:0/block/sdv lrwxrwxrwx 1 root root 0 May 6 2024 sdw -> ../devices/pci0000:00/0000:00:02.0/0000:02:00.0/0000:03:00.0/0000:04:00.0/host9/port-9:3/end_device-9:3/target9:0:3/9:0:3:0/block/sdw lrwxrwxrwx 1 root root 0 May 6 2024 sdx -> ../devices/pci0000:00/0000:00:02.0/0000:02:00.0/0000:03:00.0/0000:04:00.0/host9/port-9:5/end_device-9:5/target9:0:5/9:0:5:0/block/sdx lrwxrwxrwx 1 root root 0 May 6 2024 sdy -> ../devices/pci0000:00/0000:00:1d.0/usb1/1-1/1-1.1/1-1.1:1.0/host4/target4:0:0/4:0:0:0/block/sdy lrwxrwxrwx 1 root root 0 May 6 2024 sdz -> ../devices/pci0000:00/0000:00:02.0/0000:02:00.0/0000:03:09.0/0000:06:00.0/host10/port-10:0/end_device-10:0/target10:0:0/10:0:0:0/block/sdz the drives from HBA 9300-4i4e (0-15) are correctly addressed so far, it's only the internal HBA which right now pushes me to the cliff.... i've got 4 Dev_Bus addresses currently here (because of the pcie switch).... can you please show me your disk-settings and lspci -pp for them? so i can compare to my ones
-
- Outcome of the update: SUCCESSFUL - DSM version prior update: DSM 7.2 64570 Update 3 | ARPL 23.8.1 - Loader version and model: RR v24.5.1 | DS918+ - Using custom extra.lzma: NO - Installation type: Baremetal ASRock J3160DC-ITX, mini-pcie Intel 82574 (E1000e) ethernet card, 16 GB RAM, 4x SATA drives - Additional comments: 1. Created new USB boot disk, using RR v24.5.1.img 2. Configured via web interface 3. findsynology > Recover 4. Once back into DSM, performed update to U5 from the web console, reboot
-
Hi guys I'm running arpl on a hp gen 8 microserver, model ds3622xs, dsm 7.2.1 69057 update 4 with the latest arpl release. When I insert a USB drive a message pops up saying a newly inserted drive has been detected, if I go to storage manager it's there to be formatted. Anyone any ideas how to recognise the usb drive as a usb. TIA
-
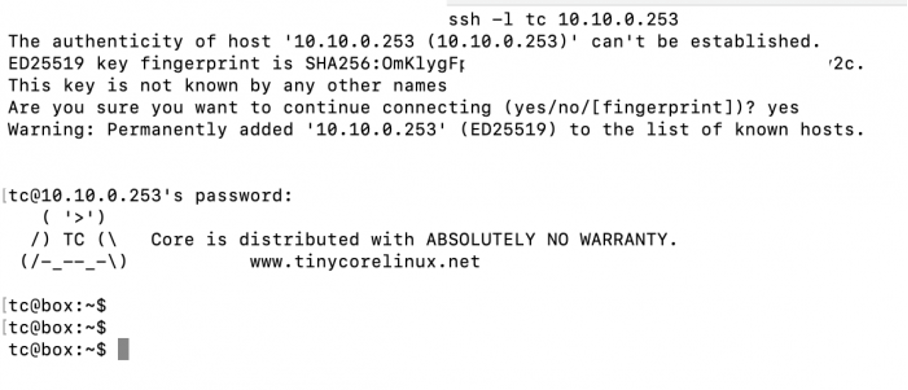
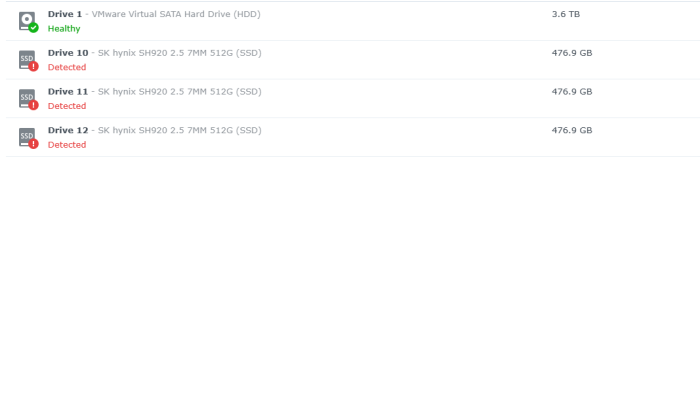
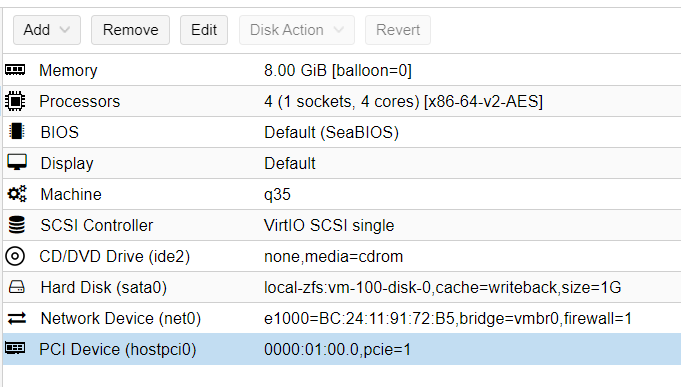
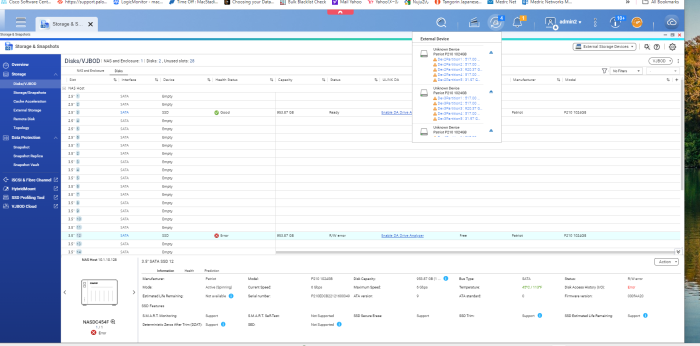
After nearly more than one year I have a problem on my DS3622x (on ESXi-7.0U3o-22348816) Today in the morning I rebooted and Redpill Friend updated to 0.0.6 and I lost three drives. I checked them in the BIOS on the LSI SAS9211-8i IT controller and all are visible. I am not quite sure what could happened. I thought maybe something crashed so I decided to update to DSM 7.2, (I was going to do it anyway ) so I did it and I used new tinycore-redpill.v0.10.0.0.vmdk file and create new bootloader I used the same MAC and SN. I have one physical drive (HDD) connected to SATA port on the motherboard and 6 SSD drives connected to above SAS controller -> pass-through. After I type ./rploader.sh satamap tc@box:~$ ./rploader.sh satamap Machine is VIRTUAL Hypervisor=VMware Found SCSI HBAs, We need to install the SCSI modules scsi-5.10.3-tinycore64 is already installed! Succesfully installed SCSI modules Found "02:00.0 VMware SATA AHCI controller" Detected 30 ports/1 drives. Mapping SATABOOT drive after maxdisks Found "02:01.0 VMware SATA AHCI controller" Detected 30 ports/1 drives. Defaulting 8 virtual ports for typical system compat ibility Override # of ports or ENTER to accept <8> Found SCSI/HBA "03:00.0 LSI Logic / Symbios Logic SAS2308 PCI-Express Fusion-MPT SAS-2 (rev 05)" (0 drives) Computed settings: SataPortMap=18 DiskIdxMap=1000 Should i update the user_config.json with these values ? [Yy/Nn] y Done. I created bootloader and proceed with installation and upgrade. In the new system I still cannot see these three drives: ( I attached pictures) I would like ask for the advice or help what I can do. Thanks M

-

ANY loader that supports 40 drives + lsi hba?
Captainfingerbang posted a question in General Questions
My buddy is in need of a loader rr, arc,tcrp etc etc that allows for 40 drives, PLUS allows for using am HBA card like lsi 9x00 or close. Like HD6500 but with the ability to install and use hba cards.. Anything like this out there? Even if its a mish mash of patches/drivers ? -
I can also confirm full USB functionality and advanced speed via TCRP. My systems are not only used for testing purposes. As of a year ago, ARPL didn't work. It's also super easy and quick to migrate from internal RAID0 using a single Linux mdadm-command. If you have an external single drive, you should ideally place the parity disk of a RAID4 there. If you have a dual(or more)-case, it makes sense to place the mirror drives of the RAID10 (RAID0+1 with 2 near-copies) there. In general, the slow hard drive performance when writing in RAID 5/6 scenarios, with only 3-5 drives, is out of the question for me anyway. I can also imagine the long recovery times with the associated collapse in performance. We're not talking about a data center-sized installation where the penalty is almost negligible. Always remember that the higher the number of hard drives, the more likely (I love RAID4 there) it is that a hard drive will fail.
-
 Is there an in-depth tutorial on how DSM/Xpen responds to changes in SATA disks? (perhaps also covering USB). I ask because so far all I can find are forum responses "do this", "edit sataportmap/DiskIdxMap values", "I did this..." Do I have to reinstall/recover whenever I rearrange drives? I'm hoping for an in-depth planning guide that covers a lot of general info, AFTER INSTALL, on what happens / what-to-do when adding/rearranging SATA drives, controllers, swapping out drives (e.g. for single-disk volumes), covering all scenarios. And perhaps about attaching/removing USB dives too. Again, so all I've found are posts that address specific issues when somebody is migrating a drive, or adding a new drive... I'm hoping to find a broad tutorial that answers questions I don't have yet. More... Rather than one-time build a reasonably spec'd box, I'm using misc leftover hardware, so I expect to have a lot of sata drive changes over time (tho I expect that's not ideal, I'm just the type that will tweak-as-I-go.) My choice hardware is very limiting (Lenovo M900 tiny), and I know I should just use more suitable stuff, but... I'm still in discovery mode, and when I get far along then I'd like to avoid having to rebuild from scratch. So what's specifically eluding me is... Using ARC loader, I seem to need at least one Sata drive to install -- I can't install on NVMe? Even tho I thought I'm installing on the USB stick, is it really installing on a base sata drive? What happens if I wish to remove the 1st (only) sata drive at a later time to upgrade it? Does this 1st sata drive get used for core DSM apps, so it's required and can't be removed? Is rearranging SATA drives a matter of "edit config file and cross fingers"? No dynamic behavior by DSM? If I were to use a JBOD sata box (my sata port supports port-multiplier), and occasionally pop in a drive, or delete a volume and remove a drive, whether I'll have to edit the If I were to add an ASMedia or JMB585 secondary sata controller, then could I jockey sata drives on those? I've been monkeying with DS920+, which doesn't seem to have satamap command ... should I switch to DS3622xs+? So with this external sata JBOD 5-bay drive rack, if it's so much trouble to swap drives, I could instead connect it with a USB-SATA bridge (instead of attaching it to an add-on sata controller), and use via File Station(?) That would be quite limiting -- no software DSM-based RAID (I'm fine with that), but would I otherwise be able to share files via apps like Plex Server off of those USB-attached drives? Any links to tutorials that address these topics? Thanks!!!
 -
Firstly, appologies, I know I've read about this somewhere previously, but a search didn't find me anything... I've been running my HP Microserver N54L (I think that is gen7?) for a while with 4 drives, and I want to stick a 5th in. I believe that can be done by fitting it to the optical bay, but some kind of BIOS settings / mod are required to do so? Does anyone have a handy link to where / how to do this please? The few I've located elsewhere all seem to have expired (I know, I'm a bit late to this particular party... ) TIA!
-
 This project started about two weeks ago at the suggestion of @wjz304 . A guide that can be processed with Jun's loader in DSM 6 already exists as shown below. This method requires a lot of manual work through MS Windows. Redpil plans to create a simpler automatic script as a menu function. https://github.com/PeterSuh-Q3/tinycore-redpill/blob/main/menu_m.sh#L1688 The part where tcrp-mshell is slightly different from rr is tcrp, as its name suggests, is a redpill loader that uses tinycore Linux, so it includes one more kernel. The kernels used by rr and tcrp are as follows. 1. rr kernel (tcrp is friend kernel) 2. dsm kernel (same for tcrp) 3. tc kernel (tcrp only) rr contains all the functions that the tc kernel and friend kernel must perform in the rr kernel. This is why the menu starts directly with ./menu.sh in the rr kernel. The reason I explained these kernels is Ultimately, these kernel files (2 per kernel) must be ported to the hard drive. The existing DSM 6 Jun's loader had a kernel size of only 50M, so 100M of spare space at the end of the first hard drive was sufficient. However, Red Pill is equipped with various kernels, and the files for each kernel are close to 100M. 1. tc kernel (20M, mydata.tgz backup file is variable) 2. Friend kernel (61M fixed size) 3. dsm kernel (based on ds3622xs+ 7.2.1-69057, 82M initrd-dsm is variable [including driver modules and addons for each model]) The loader on the original USB stick is all in the 3rd partition with a lot of free space. It is impossible to store all of this in 100M on one hard drive. Give up less and only take items 2 and 3 and use 2 hard drives. Two hard drives created as Basic or JBOD type are required. Assuming that the structure of each hard drive on which the storage pool is created is of the above two types, It consists of system partition 8G + 2G and data partition (the entire remaining area). I thought there was only about 100M space behind the data partition. If you look closely, there is about 128M more free space between the system partition and data partition. You will see that the Start / End sectors are not connected and are empty. In the meantime, create an extended partition, sd#4, and create additional logical partitions where the bootloader partitions should exist. This capture shows bootloader partitions 1, 2, and 3 split into two hard drives. The first partition has 98M space. Contains the friend kernel from number 2 above. Because the location of the kernel changed, modifications were made to a separate grub.cfg. The existing boot loader searches for (hd0, msdos1) and includes the part where grub is set to boot. Use grub-install to readjust it to point to (hd0,msdos5) = /dev/sd#5. Activate /dev/sd#5, which corresponds to the first partition of the boot loader, to Active so that the hard drive can boot grub on its own. The second partition does not require a lot of space, but The important part contains rd.gz extracted from the original dsm pat file. When an update for SmallFixVersion is detected, it automatically assists in update processing through Ramdisk automatic patching. Currently, DSM 7.2.1-69057 is a file required to automatically update U0 to U4. In the 3rd partition The DSM kernel for each model is included. This is a kernel file that keeps changing and being regenerated every time you rebuild the loader. The intermediate file custom.gz (contains rd.gz and the driver) is also included. Because the size is not trivial, the final result, initrd-dsm, contains almost the same content. We have found a way to exclude it and have recently reflected it in the friend kernel version upgrade in advance. In the case of rr, the size of custom.gz and initrd-dsm contains too many modules (e.g. wifi module, etc.) compared to tcrp. As it is, only 2 hard drives are insufficient. I am not sure if wjz304 is well aware of this and is adjusting the kernel size related to this. With this preparation in place, you can boot with the bootloader implanted using only two BASIC type hard drives. For this purpose, remove the original bootloader, USB or SATA DOM bootloader. Up to this point, I have implemented the bootloader script and completed the first test. Following this topic, I would like to separately explain the problems and solutions I would like to consider.

-

TinyCore RedPill Loader Build Support Tool ( M-Shell )
midiman007 replied to Peter Suh's topic in Software Modding
Thanks for the reply. This is why I was asking before I started pulling my hair out and spending hours trying to resolve it but only to find out that the MSI board my no support it. The only thing I found strange is that I had a ds2422+ with @fbelavenuto REDPILL it powered off but not on then I used your REDPlILL to update to a ds1823xs+ and it worked for a few days. Then I was getting that network error so I used your REDPILL wiped the drives and rebuilt it to a clean ds1823xs+ now it only shuts down. Strange yes I know. I am not saying it's anything you are anyone did just that it is intermittent. -
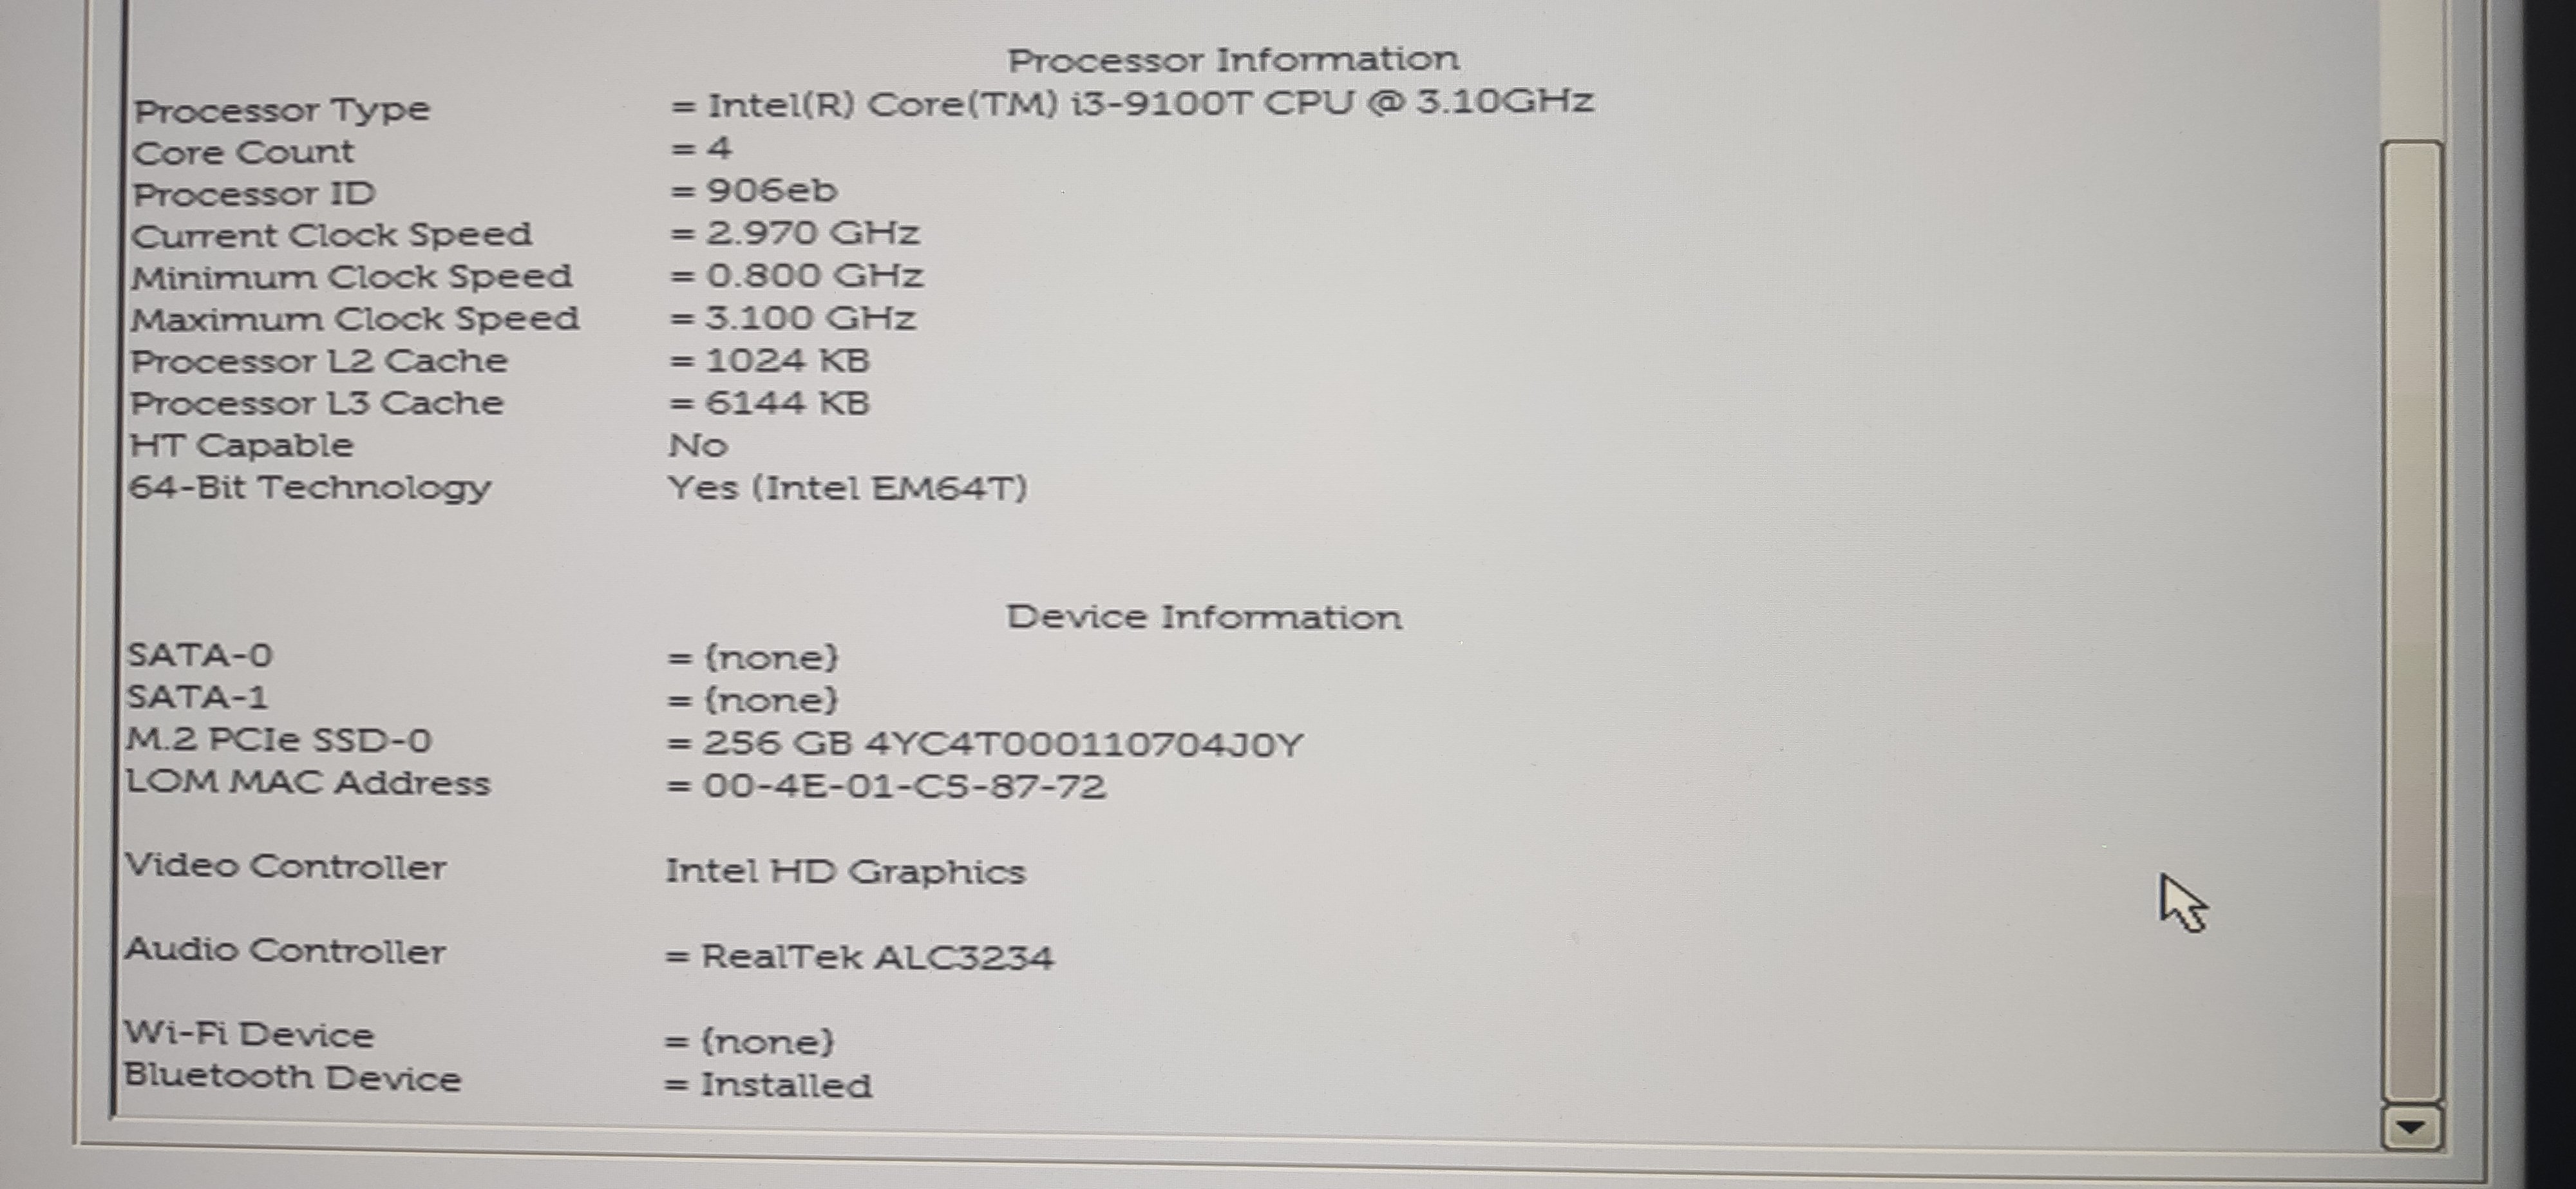
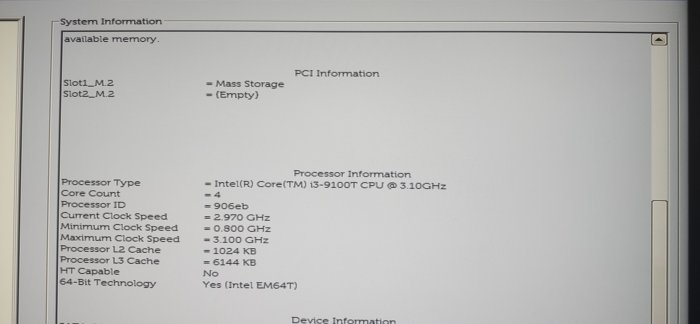
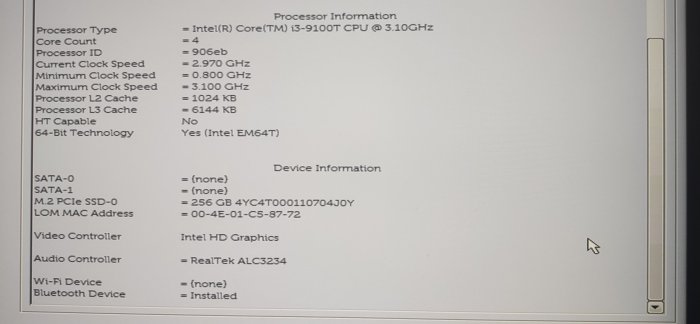
 I am trying install DSM 7.2 - DS3622xs+ on the following system: Ryzen 5 4650g Rog Strix b550i (4xsata, 2xNvme) 32gb ram On motherboard sata: 2xSSD for Proxmox boot, 2xSSD for Proxmox VMs, 2xNVME for Xpenology cache On LSI/Broadcom SAS3008 HBA Controller in IT Mode: 4x18tb HDD, 2x SSD for VMs, 2xSata empty for future expansion ARC Loader 21.4.24.img I followed some PCIE passthrough tutorials to install xpenology using the manual HDD pass-through method which worked fine but was limited to 6 sata ports only. Installed with ARC Loader 21.4.24, selected the first option for SataportMap: Active Ports*. When I got to the find.synology.com screen, it recognized I had drives 2 to 7 and installed DSM. However, I would like the option to have more drives in the future, so I scrapped the VM and try to install again by passing the whole HBA card to the VM itself. I added- Raw Device - select HBA Card - ROM-BAR and PCI-Express Checked. I have tried every option for the SataportMap, but each time I get 'No Drives Detected'. In the Arc Loader sysinfo, when you scroll down, it recognizes the HBA card and says it has 6 drives attached to it. This told me that the loader can see the drives, so I manually passed through one of my NVME drives using scsi. When you get to the find.synology.com screen, it recognized the 1 nvme drive and was able to install DSM. When it finally loads, my 4x18th and 2xSSDs attached to the HBA are visible and working fine in DSM. So what am I missing? Can I not boot into DSM without having at least one HDD or SSD manually passed through? My eyes are going cross trying to troubleshoot every possibility, I wanted to list here everything I have done to troubleshoot but that would be a huge post. Should I skip trying to pass through the whole HBA Card and just manually pass through the drives? How do I add more drives then? Any suggestions are welcome.
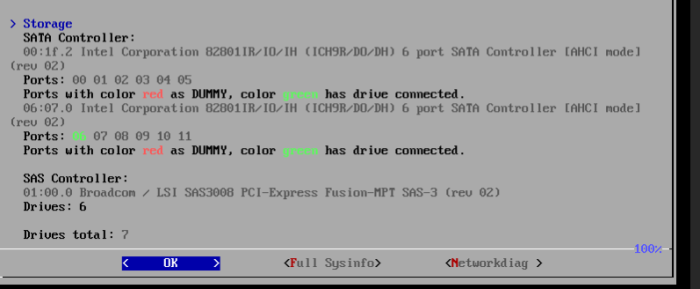
-
Hi, using DSM7, with a set of HDD connected to motherboard. But i needed more SATA ports, so purchased an ASM1116 card. It is not detected. Anyone managed to make it work? Ty!
-
TinyCore RedPill Loader Build Support Tool ( M-Shell )
midiman007 replied to Peter Suh's topic in Software Modding
Peter thanks for your reply. Again thank you for your hard work on the loader. After a complete rebuild the PC will shut down and not power on. Really strange. Yes I did notice that even though the error appeared the boxes were checked and the PC shutdown at night but will not power on in the morning. I will try removing the weekend task and just use the weekday and see if that is the issue. I don't know about a true Sysology NAS since all of my OEM NAS's are QNaps. -
no, there is no such thing that tricks dsm (xpenology or original) into accepting a "normal" sata (or sas) enclosure as one of there original expansion units afaik there is some tinkering in specific drivers kernel code and firmware checks for the external unit involved (was introduced ~2012/2013 before that any eSATA unit that presented every disks as single disk worked) also worth mentioning is that technically its a simple sata multiplier and you use the amount of disk in that external unit through that one 6Mbit sata connection, all drives involved (external unit) sharing this bandwidth) as long a you just have to handle a 1Gbit nic you wont see much difference but if you want to max out what lets say 4 + 4 10TB drives can do and use a 10G nic you will see some differences and raid rebuild might speed might also suffer in eSATA connection scenarios also a general problem with that kind of scenario is reliability as when accidentally cutting power to the external unit there will be massive raid problems afterwards usually resulting in loss of the raid volume and when manually forcing repairs its about how much data is lost and hot to know what data (files) is involved i dont know if synology has any code in place to "soften" that for there own external units (like caching to ram or system partition when sensing that "loss" by a heartbeat from external and bringing the raid to a read only mode to keep the mdadm raid in working condition) as you can use internal up to 24 drives with xpenology and only your hardware is the limit (like having room internal for disks and enough sata ports) there is only limited need for even connecting drives external and some people doing this hat seen raid problems if you dont have backup from you main nas then don't do that kind of stuff, its way better to sink some money in hardware then learning all about lvm and mdadm data recovery to make things work again (external company for recovery is most often out of question because of pricing) maybe a scenario with a raid1 with one internal and one external disk might be some carefree thing bat anything that goes above the used raid's spec's for loosing disks is very dangerous and not suggested and to bridge to the answer from above, in theory usb and esata externel drives are handled the same, so it should be possible to configure esata ports in the same way as usb ports to work as internel ports, as esata is old technology and mostly in the way when it comes to xpenology config files it's most often set to 0 and not in use, i used one esata port as internal port years back with dsm 6.x - but as a ootb solution is the thing then externel usb as internel drives is the common thing now and with 5 or 10 Gbits usb is just as capable as esata for a single disk (and you will have a good amount of usb ports on most systems where esata is usually, if there as any, is just one if you want to use usb drives as "intrnal" drives then you can look here (arc loader wiki) https://github.com/AuxXxilium/AuxXxilium/wiki/Arc:-Choose-a-Model-|-Platform its listed specifically that its usable that way
-
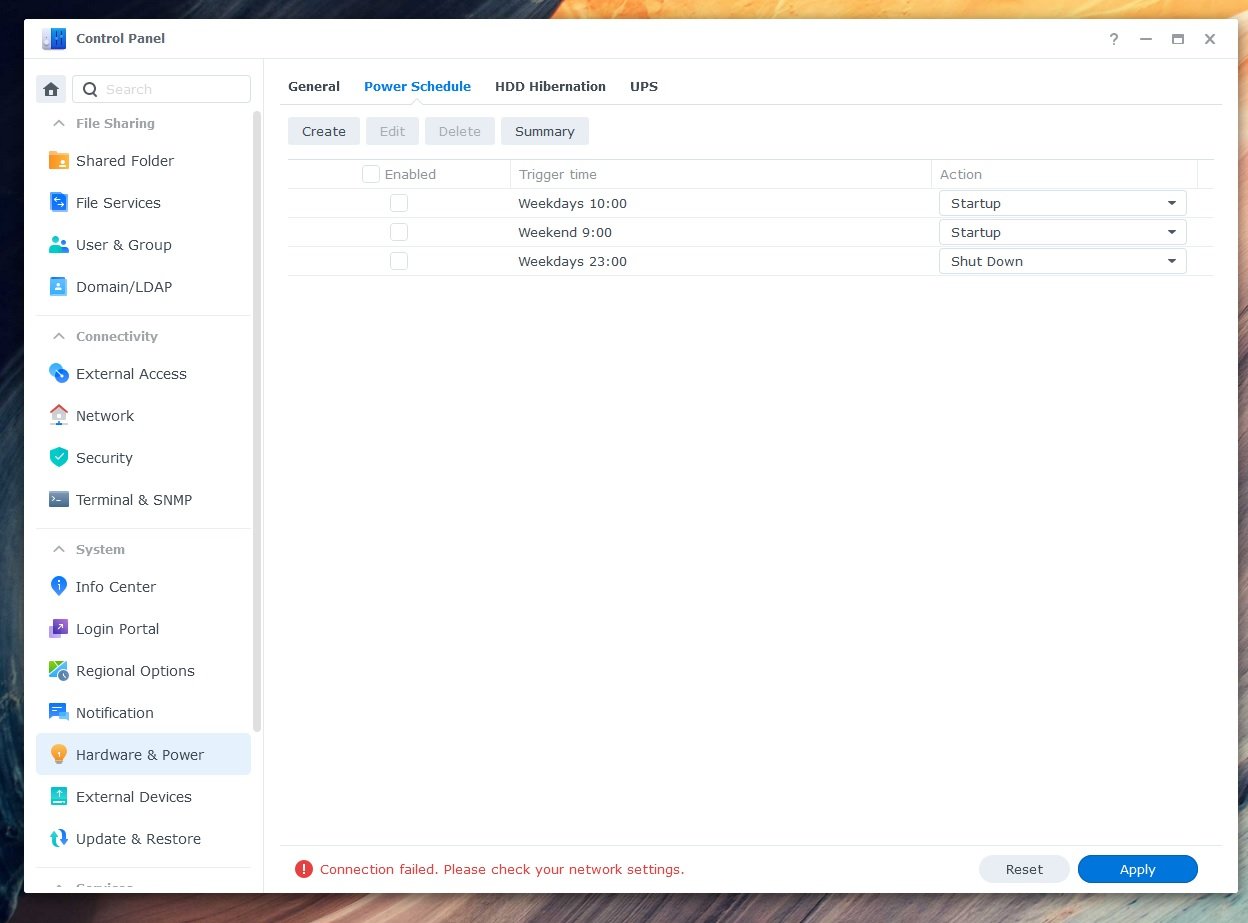
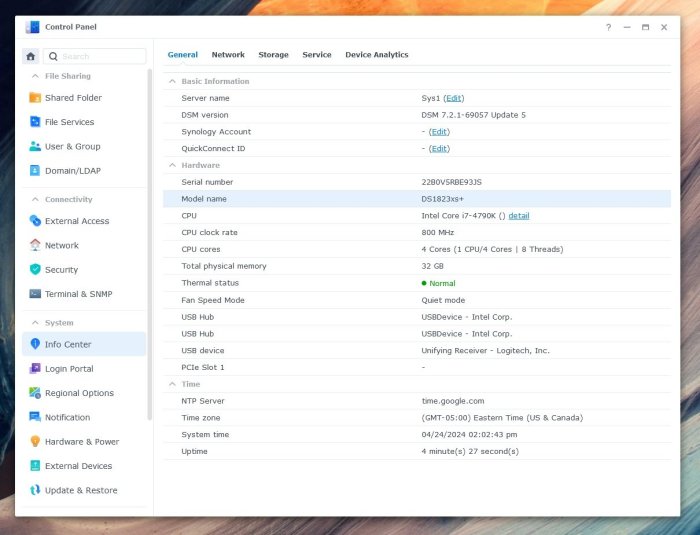
Yes Both are really good @Peter Suh IS fantastic. I Used @fbelavenuto Before but the later would not let me install 7.2.1. As far as @Peter Suh Please fix he any key to continue since the space bar does not work change it to hit enter Key. Not a biggie just mentioning it. Any ideas on why I an getting this error when I set the power schedule? It sets but it's not working it powers off but not back on any more after a rebuild from scratch. See the error in red at the bottom of the image Please. Also any comments if I over did the build with this model with a 4790 k and a MSI Z97-GD65 Gaming LGA 1150. 32 GB ram. I used this hard ware because I had it from my old desktop and it was collecting dust. What I mean did I chose the proper DSM box. THe case has Six hd slots the MB has 8. I don't trans code much but should I chose a build that supports it. I mostly stream movies to my TV via Plex or samba and use the NAS for storage. Any input would be greatly be appreciated.

-
I expand real devices and Xpenologies via external USB3 enclosures. These are also available as internal drives via Settings.
-
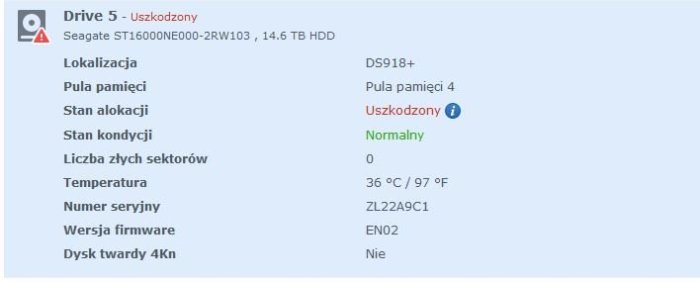
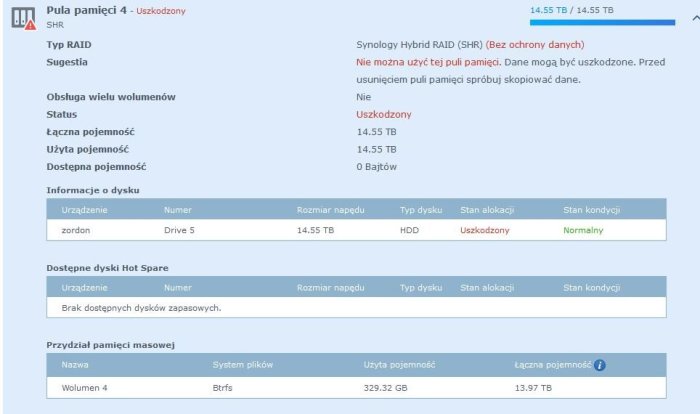
Hello everyone, I am using DSM 6.2.2-24922 update 6 system on my Dell Vostro 3900 MT i5-4460 computer, with four storage pools (Synology Hybrid RAID SHR without data protection) of sizes 2x 926 GB, 1x 3.63 TB and 1x 14.55 TB. Two days ago, one of the 14.55 TB disks had a failure and in the "Storage Manager" module, I received a message saying "Cannot use this storage pool. Data may be damaged. Try copying data before removing the storage pool." The status field shows "Damaged" while the "Health Status" field shows "Normal." Unfortunately, I am not sure what could be causing this issue. In the "HDD/SSD" module, I found the information that "This disk has been removed from the storage pool by the system. Please replace the disk and go to the Storage Pool tab to select the pool that needs repair, then click Actions > Repair" - unfortunately, after following these steps, the "Repair" option is greyed out and cannot be clicked. Using "File Station", I was able to access some of the directories stored on this disk and managed to transfer some of the necessary data - however, I have also lost system applications such as VPN server and others that were installed on this disk. I kindly ask for help from the esteemed members of this forum in solving this challenge - any advice or suggestions would be greatly appreciated. PS Sorry if I raised this topic in a wrong place - if so, please point me where I should post it.


-
 Thanks. I will do that, once I get the new hard drives to maximize my NAS capacity. Currently I am with TT loader (previously ARPL) which works great, although doesn't update easily. I am also interested to know if there is any easy to implement patch for Fan control? as all the guides I've seen requires some serious Linux knowledge, and mostly are also too dated.
 -
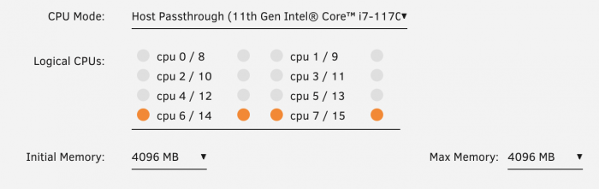
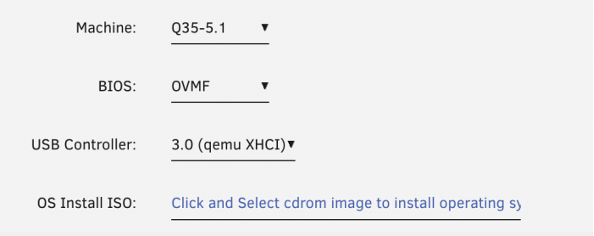
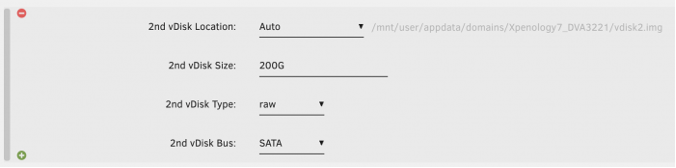
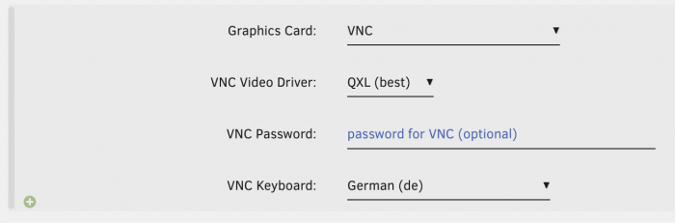
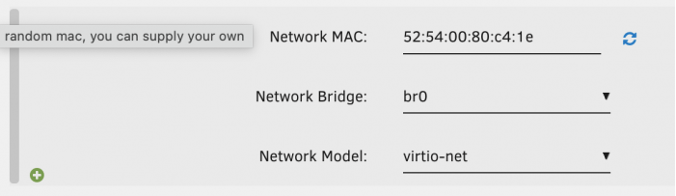
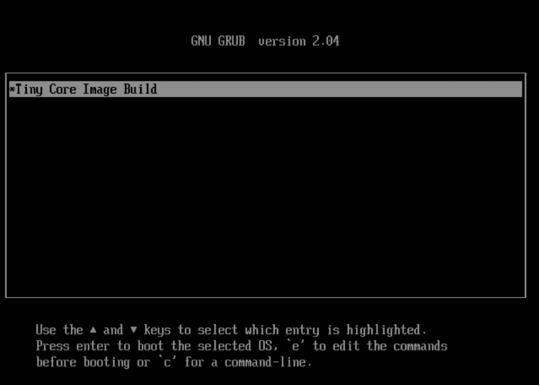
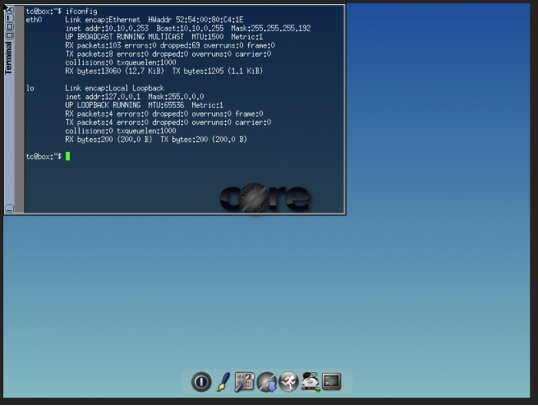
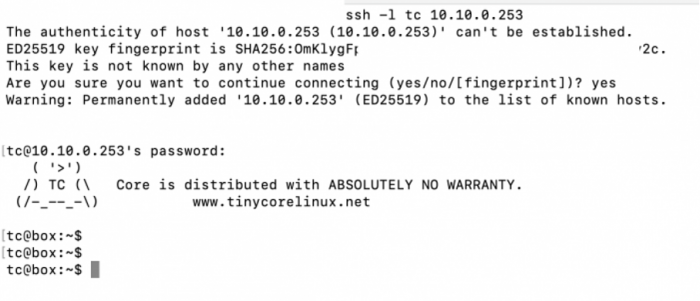
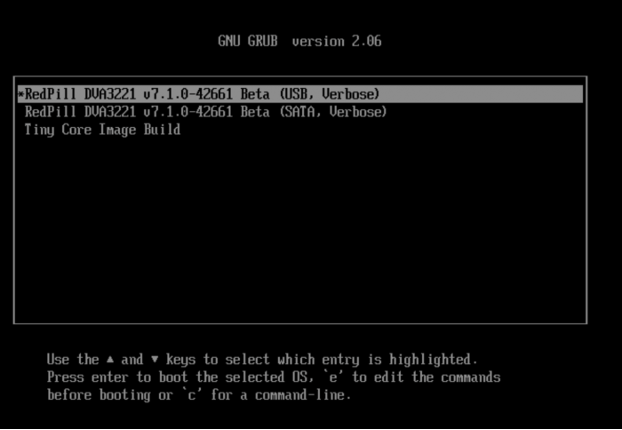
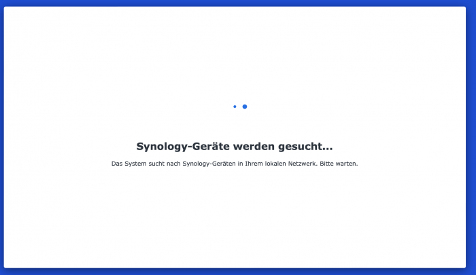
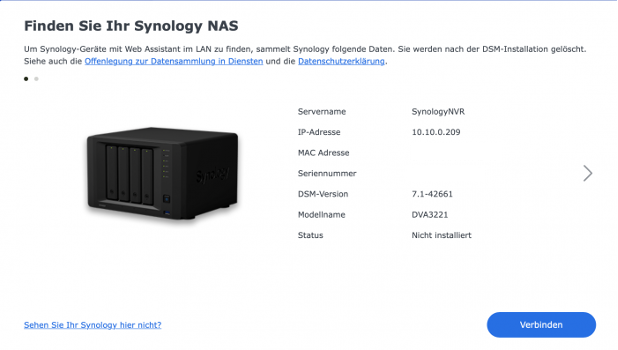
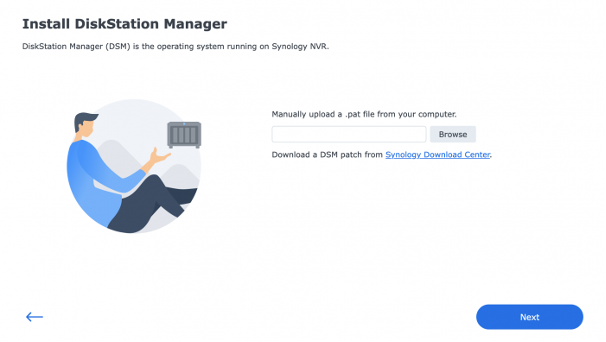
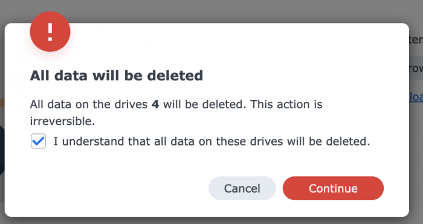
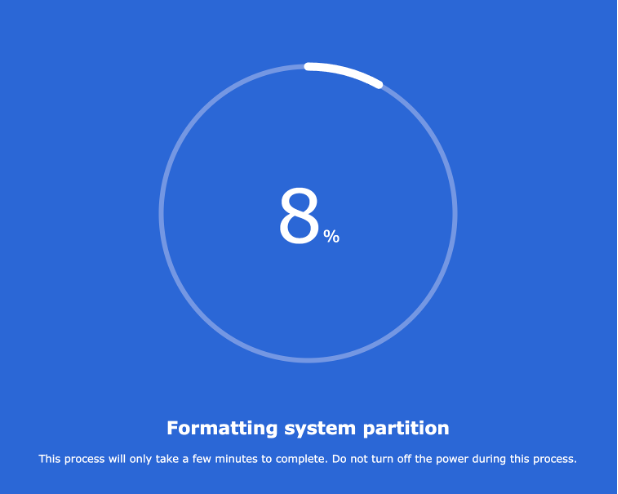
Here is a walkthrough how to install XPenology (DVA-3221) on Unraid. My Setup: Unraid Version 6.10.0 Mainboard: ASRock H570M-ITX/ac CPU: 11th Gen Intel i7-11700K Memory: 32GB Memory 1.) Add a new Virtual Machine Use CentOS Template and type in a Name 2.) CPU Mode: Host Passthrough 3.) Logical CPUs: 4 cores (should also work with more or less) I remove CPU0 / 8 because this is also used by unraid itself. 4.) Initial Memory: 4096 MB (should also work with more or less) 5.) Machine: Q35-5.1 (Successfully tested with Q35-6.1) 6.) Bios OVMF 7.) USB Controller 3.0 (qemu XHCI) 8.) Download tinycore redpill 0.4.6 uefi image from @pocopico https://github.com/pocopico/tinycore-redpill 9.) 1st Disk = Choose Manual and enter the path to "tinycore-redpill-uefi.v0.4.6.img" 10.) vDisk Bus must be USB 11.) 2nd Disk = Choose Auto and enter a vDisk size 12.) Leave vDisk Type raw 13.) Set vDisk Bus to SATA 14.) Graphics Card : VNC (other settings can remain on default) 15.) Choose Network Model "virtio-net" Works also with e1000 which needs to be manual entered in Form View. 16.) Save and start the Virtual Machine 17.) You should see the Grub Loader with "Tiny Core Image Build" (System will automatically boot) 18.) Open the Terminal and check the IP Address by using "ifconfig" 19.) Connect with ssh to Tiny Core ssh -l tc @<IP ADDR> Username: tc Password: P@ssw0rd 20.) Run the following commands and answer all with Yes ./rploader.sh update now ./rploader.sh fullupgrade now ./rploader.sh serialgen DVA3221 ./rploader.sh satamap now ./rploader.sh identifyusb now For e1000 Network Card run: ./rploader.sh ext denverton-7.1.0-42661 add https://raw.githubusercontent.com/pocopico/rp-ext/master/e1000/rpext-index.json For virtio-net Network Card run: ./rploader.sh ext denverton-7.1.0-42661 add https://raw.githubusercontent.com/pocopico/rp-ext/master/v9fs/rpext-index.json ./rploader.sh build denverton-7.1.0-42661 manual ./rploader.sh backup now sudo reboot 21.) Grub Loader should now have 3 options, You need to Boot the USB Entry! 22.) Boot Screen should show: 23.) Open a browser and try to find the Appliance using http://find.synology.com 24.) Download DVA3221 42261 PAT File from Synology https://global.download.synology.com/download/DSM/release/7.1/42661-1/DSM_DVA3221_42661.pat 25.) Manually upload the .pat file using the browse button. 26.) Confirm to delete All data on the drives 27.) DSM will be installed and is reachable on the same IP Address after the reboot. That's it. Have Fun. Btw. DVA3221 has 8 Camera Licenses included for Surveillance Station and it Works also with Version Surveillance Station 9.0.0-7660


-
 I have a fully functional DS412+. I want to try DSM 7.2 on it. Here's what I did: 1) Removed the DOM from the motherboard 2) Use Rufus to write the Arc loader to a USB stick (PID=F400, VID=F400) 3) Insert the USB stick into the front USB port of the DS412+ 4) Power on the unit 5) Access the Arc loader web console (port 7681) to configure the loader. Chose DS918+ as the model. Build the loader. 6) From Arc loader, choose "Boot the loader". 7) It boots into DSM. I can access the web for DSM installation. But it says "No drives detected on DS918+". I think it's the SATA mapping issue in the loader because those drives work fine in native DSM 6.2. How shall I troubleshoot? Thank you! I also read from this thread that the DSM image can be mod to spoof another model (e.g. spoof a 412+ into a 713+). How is that option compared to the loader option? Thank you!
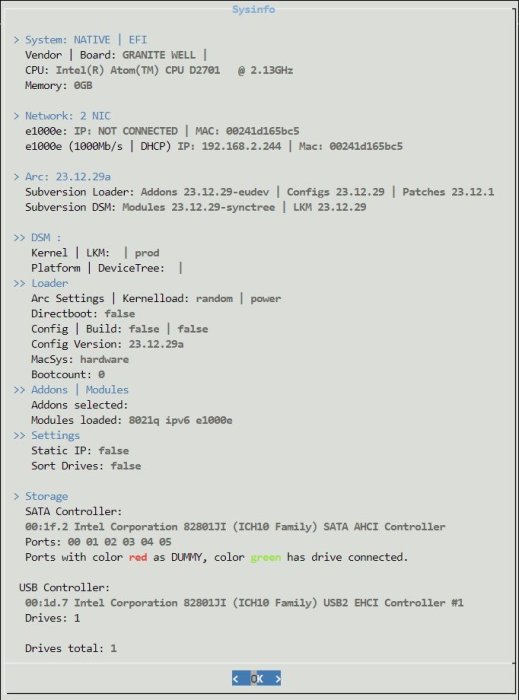
-
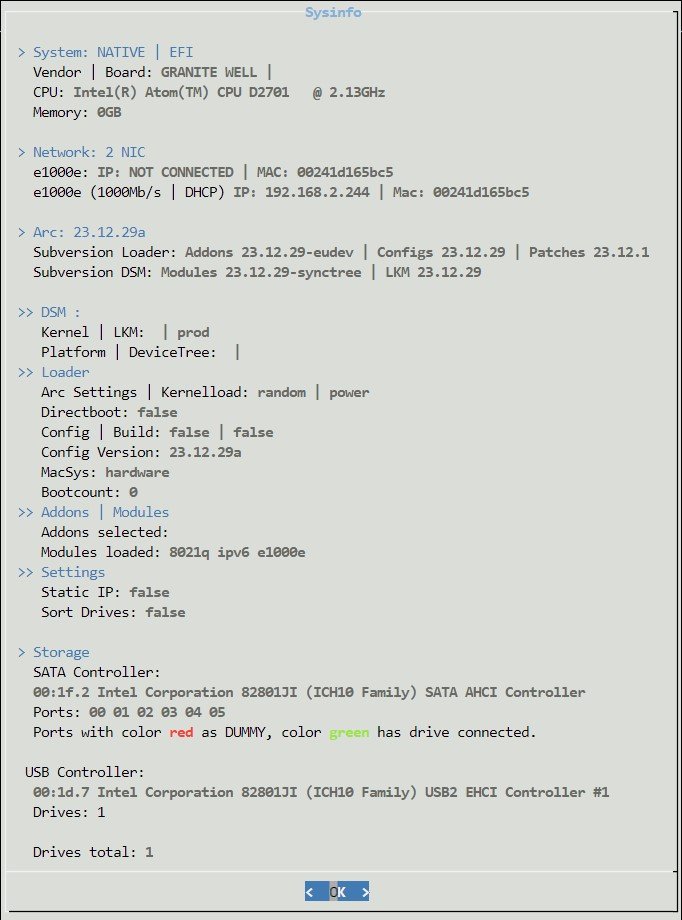
What is this? tc@box:~$ ./rploader.sh satamap now usb Loader BUS: usb Found SCSI HBAs, We need to install the SCSI modules scsi-5.10.3-tinycore64 is already installed! Succesfully installed SCSI modules Found "00:1f.2 Intel Corporation 8 Series/C220 Series Chipset Family 6-port SATA Controller 1 [AHCI mode] (rev 05)" Detected 6 ports/5 drives. Override # of ports or ENTER to accept <6> Found SCSI/HBA "01:00.0 LSI Logic / Symbios Logic SAS2008 PCI-Express Fusion-MPT SAS-2 [Falcon] (rev 02)" (0 drives) lspci: -s: Invalid slot number Found SCSI/HBA "" (0 drives) lspci: -s: Invalid slot number Found SCSI/HBA "" (0 drives) lspci: -s: Invalid bus number Found SCSI/HBA "" (0 drives) lspci: -s: Invalid slot number Found SCSI/HBA "" (0 drives) lspci: -s: Invalid slot number Found SCSI/HBA "" (0 drives) lspci: -s: Invalid slot number Found SCSI/HBA "" (84 drives) lspci: -s: Invalid slot number Found SCSI/HBA "" (0 drives) lspci: -s: Invalid slot number Found SCSI/HBA "" (0 drives) lspci: -s: Invalid slot number Found SCSI/HBA "" (0 drives) lspci: -s: Invalid slot number Found SCSI/HBA "" (0 drives) lspci: -s: Invalid slot number Found SCSI/HBA "" (0 drives) lspci: -s: Invalid slot number Found SCSI/HBA "" (0 drives) lspci: -s: Invalid slot number Found SCSI/HBA "" (0 drives) lspci: -s: Invalid slot number Found SCSI/HBA "" (0 drives) lspci: -s: Invalid slot number Found SCSI/HBA "" (0 drives) Computed settings: SataPortMap=6 DiskIdxMap=00 Should i update the user_config.json with these values ? [Yy/Nn] n OK remember to update manually by editing user_config.json file tc@box:~$ exit In fact, the model is Controladora Fujitsu Lsi 9211-8i Model: D2607-a21. Is that error means that my HBA is not been recognised? 5 of 6 HDD on HBA is been shown on DSM.
-
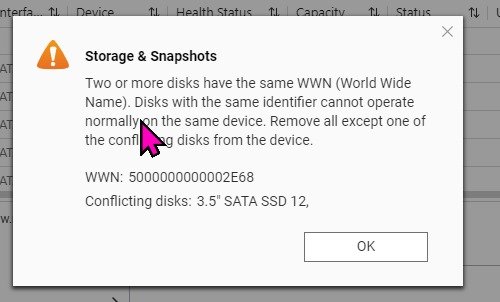
I have this system loaded Cstate disabled C1E disabled only using UEFI with LSI 9211-8i IT mode and HBA see it load up in Boot up fine. The Disk shows up but getting errors disk is saying conflict even when its the only disk installed and when other disk are installed it shows them up as external drives not sure why...
-
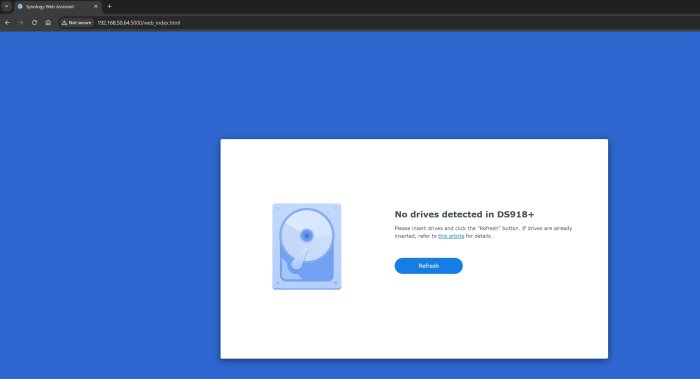
Hi, I am a noob and I want some help to manage to install DSM OS on Dell Optiplex 3070. The problem is after I prepare the boot loader and connect to IP I have the message "No drives detected on DS918+" I attached also print screens from Bios in which you can see that I have a 256 Gb ssd where I want to install the DSM OS. Thank you, Best regards, Ciprian

-
i lost all my data so rebuilt the loader i used before. now some of my drives are that connected via the lsi hba card are showing as external drives. any ideas how i can make that appear as internal drives so i can add them to my pool. The loader is aprl