Search the Community
Showing results for 'Intel PRO 1000 GT'.
-
 Hello My name is bigcid10 I used the current loader(red pill) on my XPS 8920 intel i7-7700/16GB ddr4/ssd/2x6TB hdd only thing upgraded from stock was a nvidia gtx1070 card I used the DS-923+ profile with dsm 7.1.1-42962 it installed fine but I would like to try and update to 7.2.1 will it work and can I use the same loader as I now use Thank you I think I posted this in the wrong section before
 -
Hello My name is bigcid10 I used the current loader(red pill) on my XPS 8920 intel i7-7700/16GB ddr4/ssd/2x6TB hdd only thing upgraded from stock was a nvidia gtx1070 card I used the DS-923+ profile with dsm 7.1.1-42962 it installed fine but I would like to try and update to 7.2.1 will it work and can I use the same loader as I now use Thank you
-
а сейчас - какая версия ESXi? Если 6 или ещё ниже, то да - хорошо бы обновить (можно даже на 8 ) В устройствах для проброски должно появиться Intel UHD Graphics
-
а на картинке - Xeon E3-1200 - он без видеоядра. Для i3-9100 пробрасывать ндо будет Intel UHD Graphics 630
-
 There is not enough RAM in your DS220j. In addition, the CPU is too slow. The right device is the DS223j, where 2.5GbE also works via the USB port. If the processor should be an Intel one, the DS224+ is the device of choice.
 -
Synology Plus series internal Flash/DOM repair and model-modding
DSfuchs replied to DSfuchs's topic in Hardware Modding
But we can take advantage of the lack of quality control ;-). A little play on words here with QuickConnect and Quality Control, hope you know what I mean. The device options for the Intel Cedarview CPU are already at the end, because there is no newer model that supports DSM >=7.2. -
Bonjour à tous, Compte tenu de l'actualité VMWare avec son rachat par Broadcom, le support d'ESXi ne sera plus assuré par mes soins! Je bascule donc sur son concurrent Proxmox tout aussi puissant voire mieux . La philosophie est très proche mais certains réglages doivent être précis d'où ces nombreux screenshots. PRE-REQUIS : Votre serveur Proxmox est déjà installé et configuré. Les captures d'écrans sont basées sur Proxmox VE 8.2. Un serveur DHCP est fonctionnel sur le réseau Si vous souhaitez mapper votre contrôleur SATA ou/et votre iGPU dans Proxmox alors activer le PCIE Passthrough : Vérifier dans votre BIOS que les instructions IOMMU et/ou VT-x sont bien activées Editer le fichier /etc/default/grub du nœud Proxmox adapter la ligne GRUB_CMDLINE_LINUX_DEFAULT avec les bons paramètres. Pour un CPU Intel : GRUB_CMDLINE_LINUX_DEFAULT="quiet intel_iommu=on iommu=pt intel_pstate=disable" Pour un CPU AMD : GRUB_CMDLINE_LINUX_DEFAULT="quiet amd_iommu=on" Exécuter la commande update-grub pour appliquer les modifications Redémarrer le nœud Proxmox TUTO : 1. Télécharger l'image du loader https://github.com/AuxXxilium/arc/releases : 2. Extraire l'image de l'archive avec 7zip ou tout autre logiciel de gestion d'archives compressées : [Optionnel] renommer le fichier arc.img avec le nom de la version associée. Cela vous permettra de connaitre précisement la version importée par la suite : 3. Uploader l'image du loader dans Proxmox : Dans l'UI de Proxmox : sélectionner le nœud (ici nommé proxmox) > sélectionner l'espace de stockage associé aux ISO ou templates (ici nommé local) > ISO Images > Upload 4. Patientez le temps de l'upload et noter le nom du fichier : ... Par exemple ici : /var/lib/vz/template/iso/arc-24.5.12.img 5. Créer la VM DSM via le bouton en haut à gauche : 6. Onglet General : Valider ou adapter le VM ID selon votre nomenclature habituelle ainsi que le nom de la VM Si vous souhaitez que la VM soit automatiquement lancée au démarrage du serveur Proxmox, activer la case à cocher "Advanced" puis cliquer sur Start at boot. Cliquer sur Next 7. Onglet OS : OS : Linux 6.x - 2.6 Kernel Do not use any media 8. Onglet System : Activer Qemu Agent (celui-ci sera utile tout à la fin du tuto pour avoir une remontée de l'IP et l'agent Proxmox opérationnel Laisser les autres paramètres par défaut 9. Onglet Disks : Supprimer le disque scsi0 en cliquant sur la corbeille. En effet nous le ferons plus tard --> 10. Onglet CPU : Type : host Cores : dépend de votre CPU physique, le mien ayant 4 cores, je lui alloue les 4. 11. Onglet Memory : Memory (MiB) : minimum 4096, plus si affinité 12. Onglet Network : Bridge : vmbr0 selon votre configuration réseau de votre serveur Proxmox Model : VirtIO (paravirtualized) 13. Onglet Confirm : Ne pas cocher Start after created car nous allons maintenant l'adapter. 14. Import du loader dans la VM : Cliquer sur le noeud Proxmox > Shell et saisir la commande suivante (adapter l'ID de la VM et la version du fichier img évidement) : qm importdisk [VM_ID] /var/lib/vz/template/iso/arc-24.5.12.img local-lvm Dans mon exemple, cela donne : La commande doit ainsi convertir l'image img que nous avons téléchargée au point 4 dans un format compatible à la VM Proxmox 15. Valider l'import du loader : Cliquer sur la VM > Hardware > Unused Disk 0 > Edit Sélectionner le bus : SATA 0 16. Supprimer le lecteur CD/DVD : Sélectionner 'CD/DVD Drive' et cliquer sur Remove puis Yes 17. Ajouter vos disques de données A partir de là, il existe 3 options AU CHOIX, dépliez la vue selon votre cas : Soit vous pouvez utiliser des disques virtuels classiques (c'est bien pour des tests) Soit vous pouvez faire un mapping entre des disques virtuels et vos disques physiques (c'est comme le RDM de VMWare mais vous n'aurez aucune remontée SMART de vos disques dans DSM) Soit vous mappez carrément votre/vos contrôleurs SATA à la VM et vos disques ne seront plus du tout visible par Proxmox mais vous aurez toutes les informations SMART de vos disques visibles dans DSM (option recommandée). 18. Adapter l'ordre de démarrage de la VM Sélectionner la VM-> Options > Boot order > Edit Faire en sorte de mettre le sata0 (correspondant au loader) en 1 et désactiver les autres. 19. Désactiver l'émulation du pointeur 20. Démarrer la VM et connectez-vous à la console de la VM 📓pour la suite de ce tuto, les captures d'écran suivantes se basent toutes sur la base d'un seul disque virtuel de 50Go 📓la configuration du loader peut se faire à distance ou directement depuis la console Proxmox de la VM, peu importe. Choisir le model : Pour ce tuto, je sélectionne SA6400 car c'est celui qui est le plus compatible avec mon matériel, à adapter selon votre configuration et ce que propose le loader, en effet celui-ci vous affiche normalement la liste des loaders exclusivement compatible avec votre couple carte-mère/CPU Sélectionner la version de DSM : Activer l'arc-patch Sélectionner les addons dont vous auriez besoin, la liste proposée dépend du modèle sélectionné précédemment. Je vous surligne ici ceux que je recommande --> Lancer la construction du loader : --> --> Une fois le pat téléchargé et le loader construit, lancer le boot du loader : --> la VM va alors rebooter en mode Installation de DSM... Patienter 1 à 2 min le temps que le processus d'installation de DSM se lance 21. Installation de DSM Noter l'IP et le port afficher par le loader dans la console de la VM Proxmox. Dans le navigateur saisir l'url affichée, ici : http://192.168.1.165:5000 (ou scanner le Qrcode pour les plus geek d'entre vous) et cliquer sur Installer Logiquement, vous pouvez laisser DSM gérer le téléchargement du PAT Si les disques sont vierges ou ne comprennent pas de partitions Synology celui-ci doit vous proposer de les formater, dans le cas contraire il vous proposera de les migrer. Le nombre indiqué correspond à l'id des disques sur le port SATA. Recopier le nom du modèle pour confirmer avant de lancer le formatage (question de sécurité il parait!) --> --> Patienter le temps de l'installation de DSM, une fois à 100% le compte à rebours de 10 min démarre. En arrière-plan la VM va rebooter. Patientez quelques minutes. 📢Vérifier en parallèle que la VM ne reboote pas 2x... Si c'est le cas cela conduit à une boucle de récupération de DSM et vous n'arrivez jamais à la page de configuration de DSM. Cela est dû à une incompatibilité du modèle choisi avec votre matériel. Mon conseil : reconstruire le loader avec un autre modèle. --> A la fin vous devriez atterrir sur la page de configuration de DSM A partir de là je vous laisse les mains pour finaliser la configuration (login, volume de stockage, paquets, config réseau, etc. etc.) ... ___________________________________________________________________________________________________ 22. Configuration de l'agent Qemu Une VM digne de ce nom doit pouvoir être le mieux possible intégrée à son hyperviseur! Pour ce faire, si vous avez bien suivi ce tuto, la VM est capable d'interagir avec un agent Qemu et ainsi remonter qq infos à Proxmox : Avant Après Ajouter la source paquets suivante dans le gestionnaire de paquets de DSM : https://spk7.imnks.com/ et installer le paquet QEMU Guest Agent mais sans le démarrer! --> Créer une tâche dans le planificateur de tâches de DSM, Utilisateur : root Script : sudo sed -i 's/package/root/g' /var/packages/qemu-ga/conf/privilege --> Exécuter la tâche Démarrer le paquet QEMU Guest Agent depuis le gestionnaire de paquets Vérifier dans Proxmox que le(s) IP de la VM DSM est correctement remontée : ___________________________________________________________________________________________________ 23. [Optionnel] Mise en place d'un cache SSD Si vous disposez d'un SSD nvme sur lequel par exemple est installé Proxmox, il est possible d'utiliser une partie de ce disque pour en faire un cache SSD. Voici comment faire : Sélectionner la VM DSM > Add (Hard Disk) Bus : SATA et choisir un id supérieur aux id des disques existants Cache : Write back Cliquer sur Advanced et activer SSD emulation 📓Si vous souhaitez un cache SDD en lecture ET écriture il faudra créer 2 disques SSD de la même façon à la VM. Redémarrer la VM De nouveau dans DSM, ouvrir le Gestionnaire de stockage et constater la présence d'un nouveau disque SSD : Sélectionner le groupe de stockage sur lequel vous souhaiter créer ce cache SSD et suivre les instructions. 📢Si vous avez mis au moins deux disques SSD alors vous pourrez aussi en faire un cache en écriture via un RAID logiciel géré par DSM. ___________________________________________________________________________________________________ 24. [Optionnel] Transcodage iGPU si votre CPU intègre un contrôleur graphique compatible avec le modèle choisi Sélectionner le nœud Proxmox > Shell et exécuter la commande lspci Chez moi cela donne ceci, noter l'id correspondant à la carte graphique, ici 00:02.0 Retourner dans les paramètres de la VM DSM > Hardware et ajouter un nouveau périphérique PCI Device : Sélection Raw Device > choisir l'id correspondant à la carte graphique et cliquer sur "All Functions" Redémarrer la VM Une fois DSM redémarré, connectez-vous via SSH sur la VM DSM vous devriez voir le fichier /dev/dri comme ceci : ls -l /dev/dri Libre à vous ensuite de l'affecter à un conteneur Docker Plex ou Jellyfin. Si vous utilisez le gestionnaire de paquets alors vous n'aurez rien d'autre à faire !!! ENJOY !!!


-

DS video mauvaise qualité H265
plomkiolki replied to plomkiolki's topic in Paquets, mods & fonctionnalités DSM
Salut, alors le probleme est présent sur tous les supports: Apple TV avec l'app DS video, téléphone (android et iphone), PC avec le navigateur web... A priori le codec H265 est supporté sur chrome depuis la version 107 mais là pareil, la qualité est très mauvaise. J'ai le sentiment que le transcodage se fait au niveau du NAS dans tous les cas. Pour info ma config est la suivante: DSM 7.2.1-69057 Update 1 DS923+ Intel Core i3-6100U AME 3.1.0-3005 installé FFmpeg 6 installé Est ce qu'un autre modèle que le DS923+ serait plus adapté pour ce type de besoin? -

TinyCore RedPill Loader Build Support Tool ( M-Shell )
boldizsarszasz replied to Peter Suh's topic in Software Modding
Hi! Which model should I use for a 4th gen intel xeon e3-1225 v3? I would use ARPL at building the loader. Thanks in advance! -
X520-DA1 is working well, assuming Intel 82599EN very common chipset onboard, shall be recognized and configured 1st on your base computer as baremetal etc.
-
https:ipc.net/products/h670-q670-8-bay-nas-motherboard-support-intel-12-13-14th-cpu-3x-m-2-nvme-8x-sata3-0-2x-intel-2-5g-network-port-hdmi-dp-4k-60hz-vpro-enterprise-class-commercial-nas-board
-
https:ipc.net/products/h670-q670-8-bay-nas-motherboard-support-intel-12-13-14th-cpu-3x-m-2-nvme-8x-sata3-0-2x-intel-2-5g-network-port-hdmi-dp-4k-60hz-vpro-enterprise-class-commercial-nas-board He can shop to UK
-
Which spk module should I use for an Intel Core 5-11600KF?
-
Outcome of the update: SUCCESSFUL DSM version prior update: DSM 7.2.1-69057 update-4 Loader version and model: arc 23.11.10 on / DS918+ Installation type: J3455-itx + SATA + Intel RJ45 Additional comments: Downloaded and automatically Installed from dsm interface. Reboot took about 6min
-
Для i3 8300 не требуется аддон i915 (он нужен только для тех процессоров, которые официально не поддерживаются DS918+/DS920+... - например, для Intel 10-го поколения). photosfacepatch - нужен для тех случаев, когда видеоядро в процессоре (iGPU) отсутствует (или не опознаётся даже с аддоном i915), тогда этот патч позволят распознавать лица в Photos за счёт CPU (это будет дольше, но зато работает).
-
lspci -pp 00:00.0 Host bridge: Intel Corporation Device 4e24 00:02.0 VGA Compatible controller: Intel Corporation JasperLake [UHD Graphics] (rev 01) 00:04.0 Signal processing controller: Intel Corporation Dynamic Tuning Service 00:08.0 System peripheral: Intel Corporation Device 4e11 00:14.0 USB controller: Intel Corporation Device 4ded (rev 01) 00:14.2 RAM memory: Intel Corporation Device 4def (rev 01)) 00:15.0 Serial bus controller: Intel Corporation Serial IO I2C Host Controller (rev 10) 00:15.2 Serial bus controller: Intel Corporation Device 4dea (rev 10) 00:16.0 Communication controller: Intel Corporation Management Engine Interface (rev 01) 00:17.0 SATA controller: Intel Corporation Device 4dd3 (rev 01) 00:19.0 Serial bus controller: Intel Corporation Device 4dc5 (rev 01) 00:19.1 Serial bus controller: Intel Corporation Device 4dc6 (rev 01) 00:1c.0 PCI bridge: Intel Corporation Device 4db8 (rev 01) 00:1c.1 PCI bridge: Intel Corporation Device 4db9 (rev 01) 00:1c.4 PCI bridge: Intel Corporation Device 4dbc (rev 01) 00:1c.5 PCI bridge: Intel Corporation Device 4dbd (rev 01) 00:1e.0 Communication controller: Intel Corporation Device 4da8 (rev 01) 00:1e.3 Serial bus controller: Intel Corporation Device 4dab (rev 01) 00:1f.0 ISA bridge: Intel Corporation Device 4d87 (rev 01) 00:1f.3 Audio device: Intel Corporation JasperLake HD Audio (rev 01) 00:1f.4 SMBus: Intel Corporation JasperLake SMBus (rev 01) 00:1f.5 Serial bus controller: Intel Corporation Jasper Lake SPI Controller (rev 01) 01:00.0 Ethernet controller: Intel Corporation Ethernet controller I225-v (rev 03) 02:00.0 Ethernet controller: Intel Corporation Ethernet controller I225-v (rev 03) 03:00.0 Non-Volatile memory controller: Device 1ed0:2283 04:00.0 Non-Volatile memory controller: Device 1ed0:2283 ls -al /sys/block ../devices/pci0000:00/0000:00:1c.4/0000:03:00.0/nvme/nvme0/nvme0n1 ../devices/pci0000:00/0000:00:1c.5/0000:04:00.0/nvme/nvme1/nvme1n1 ../devices/pci0000:00/0000:00:1c.5/ata2/host2/target1:0:0/1:0:0:0/block/sdb ../devices/pci0000:00/0000:00:17.0/ata2/host1/target0:0:0/0:0:0:0/block/sda ../devices/pci0000:00/0000:00:17.0/ata2/host2/target1:0:0/1:0:0:0/block/sdb ../devices/pci0000:00/0000:00:14.0/usb2/2-1/2-1:1.0/host2/target2:0:0/2:0:0:0/block/sdc ../devices/pci0000:00/0000:00:14.0/usb1/1-5/1-5:1.0/host3/target3:0:0/3:0:0:0/block/sdd usb2 (sdc) is the debian usb which I booted from usb1 (sdd) is the empty USB (it will be used for everything later boot included and no longer needs to be removed) please help in creating model.conf for the above disk setup and TVS-472XT as target model
-
hi, i've got the lspci -pp from ubuntu looking like this... " 00:1f.2 SATA controller: Intel Corporation C600/X79 series chipset 6-Port SATA AHCI Controller (rev 06) 00:1f.3 SMBus: Intel Corporation C600/X79 series chipset SMBus Host Controller (rev 06) 00:1f.6 Signal processing controller: Intel Corporation C600/X79 series chipset Thermal Management Controller (rev 06) 00:01.0/01:00.0 Serial Attached SCSI controller: Broadcom / LSI SAS3008 PCI-Express Fusion-MPT SAS-3 (rev 02) 00:02.0/02:00.0 PCI bridge: PLX Technology, Inc. PEX 8724 24-Lane, 6-Port PCI Express Gen 3 (8 GT/s) Switch, 19 x 19mm FCBGA (rev ca) 00:02.0/02:00.0/03:00.0 PCI bridge: PLX Technology, Inc. PEX 8724 24-Lane, 6-Port PCI Express Gen 3 (8 GT/s) Switch, 19 x 19mm FCBGA (rev ca) 00:02.0/02:00.0/03:08.0 PCI bridge: PLX Technology, Inc. PEX 8724 24-Lane, 6-Port PCI Express Gen 3 (8 GT/s) Switch, 19 x 19mm FCBGA (rev ca) 00:02.0/02:00.0/03:09.0 PCI bridge: PLX Technology, Inc. PEX 8724 24-Lane, 6-Port PCI Express Gen 3 (8 GT/s) Switch, 19 x 19mm FCBGA (rev ca) 00:02.0/02:00.0/03:00.0/04:00.0 Serial Attached SCSI controller: Broadcom / LSI SAS3008 PCI-Express Fusion-MPT SAS-3 (rev 02) 00:02.0/02:00.0/03:09.0/06:00.0 Serial Attached SCSI controller: Broadcom / LSI SAS3008 PCI-Express Fusion-MPT SAS-3 (rev 02) 00:03.0/07:00.0 Ethernet controller: Intel Corporation Ethernet Controller 10-Gigabit X540-AT2 (rev 01) 00:03.0/07:00.1 Ethernet controller: Intel Corporation Ethernet Controller 10-Gigabit X540-AT2 (rev 01) 00:11.0/09:00.0 Serial Attached SCSI controller: Intel Corporation C602 chipset 4-Port SATA Storage Control Unit (rev 06) " I do havy physical 2 HBAs in the system 00:01.0/01:00.0 Serial Attached SCSI controller: Broadcom / LSI SAS3008 PCI-Express Fusion-MPT SAS-3 (rev 02) > 9300-4i4e with ext SAS Expander (only external is connected) 00:02.0/02:00.0/03:00.0/04:00.0 Serial Attached SCSI controller: Broadcom / LSI SAS3008 PCI-Express Fusion-MPT SAS-3 (rev 02) 00:02.0/02:00.0/03:09.0/06:00.0 Serial Attached SCSI controller: Broadcom / LSI SAS3008 PCI-Express Fusion-MPT SAS-3 (rev 02) > 9300-16i with direct attaced drives with ls -al /sys/block /sd* i get this output, which shows 16 external connected and 14 internal connected drives to both HBAs lrwxrwxrwx 1 root root 0 May 6 2024 sdaa -> ../devices/pci0000:00/0000:00:02.0/0000:02:00.0/0000:03:09.0/0000:06:00.0/host10/port-10:1/end_device-10:1/target10:0:1/10:0:1:0/block/sdaa lrwxrwxrwx 1 root root 0 May 6 2024 sdab -> ../devices/pci0000:00/0000:00:02.0/0000:02:00.0/0000:03:09.0/0000:06:00.0/host10/port-10:2/end_device-10:2/target10:0:2/10:0:2:0/block/sdab lrwxrwxrwx 1 root root 0 May 6 2024 sdac -> ../devices/pci0000:00/0000:00:02.0/0000:02:00.0/0000:03:09.0/0000:06:00.0/host10/port-10:3/end_device-10:3/target10:0:3/10:0:3:0/block/sdac lrwxrwxrwx 1 root root 0 May 6 2024 sdad -> ../devices/pci0000:00/0000:00:02.0/0000:02:00.0/0000:03:09.0/0000:06:00.0/host10/port-10:4/end_device-10:4/target10:0:4/10:0:4:0/block/sdad lrwxrwxrwx 1 root root 0 May 6 2024 sdae -> ../devices/pci0000:00/0000:00:02.0/0000:02:00.0/0000:03:09.0/0000:06:00.0/host10/port-10:5/end_device-10:5/target10:0:5/10:0:5:0/block/sdae lrwxrwxrwx 1 root root 0 May 6 2024 sdaf -> ../devices/pci0000:00/0000:00:02.0/0000:02:00.0/0000:03:09.0/0000:06:00.0/host10/port-10:6/end_device-10:6/target10:0:6/10:0:6:0/block/sdaf lrwxrwxrwx 1 root root 0 May 6 2024 sdag -> ../devices/pci0000:00/0000:00:02.0/0000:02:00.0/0000:03:09.0/0000:06:00.0/host10/port-10:7/end_device-10:7/target10:0:7/10:0:7:0/block/sdag lrwxrwxrwx 1 root root 0 May 6 2024 sdb -> ../devices/pci0000:00/0000:00:01.0/0000:01:00.0/host1/port-1:0/expander-1:0/port-1:0:0/end_device-1:0:0/target1:0:0/1:0:0:0/block/sdb lrwxrwxrwx 1 root root 0 May 6 2024 sdc -> ../devices/pci0000:00/0000:00:01.0/0000:01:00.0/host1/port-1:0/expander-1:0/port-1:0:1/end_device-1:0:1/target1:0:1/1:0:1:0/block/sdc lrwxrwxrwx 1 root root 0 May 6 2024 sdd -> ../devices/pci0000:00/0000:00:01.0/0000:01:00.0/host1/port-1:0/expander-1:0/port-1:0:2/end_device-1:0:2/target1:0:2/1:0:2:0/block/sdd lrwxrwxrwx 1 root root 0 May 6 2024 sde -> ../devices/pci0000:00/0000:00:01.0/0000:01:00.0/host1/port-1:0/expander-1:0/port-1:0:3/end_device-1:0:3/target1:0:3/1:0:3:0/block/sde lrwxrwxrwx 1 root root 0 May 6 2024 sdf -> ../devices/pci0000:00/0000:00:01.0/0000:01:00.0/host1/port-1:0/expander-1:0/port-1:0:4/end_device-1:0:4/target1:0:4/1:0:4:0/block/sdf lrwxrwxrwx 1 root root 0 May 6 2024 sdg -> ../devices/pci0000:00/0000:00:01.0/0000:01:00.0/host1/port-1:0/expander-1:0/port-1:0:5/end_device-1:0:5/target1:0:5/1:0:5:0/block/sdg lrwxrwxrwx 1 root root 0 May 6 2024 sdh -> ../devices/pci0000:00/0000:00:01.0/0000:01:00.0/host1/port-1:0/expander-1:0/port-1:0:6/end_device-1:0:6/target1:0:6/1:0:6:0/block/sdh lrwxrwxrwx 1 root root 0 May 6 2024 sdi -> ../devices/pci0000:00/0000:00:01.0/0000:01:00.0/host1/port-1:0/expander-1:0/port-1:0:7/end_device-1:0:7/target1:0:7/1:0:7:0/block/sdi lrwxrwxrwx 1 root root 0 May 6 2024 sdj -> ../devices/pci0000:00/0000:00:01.0/0000:01:00.0/host1/port-1:0/expander-1:0/port-1:0:8/end_device-1:0:8/target1:0:8/1:0:8:0/block/sdj lrwxrwxrwx 1 root root 0 May 6 2024 sdk -> ../devices/pci0000:00/0000:00:01.0/0000:01:00.0/host1/port-1:0/expander-1:0/port-1:0:9/end_device-1:0:9/target1:0:9/1:0:9:0/block/sdk lrwxrwxrwx 1 root root 0 May 6 2024 sdl -> ../devices/pci0000:00/0000:00:01.0/0000:01:00.0/host1/port-1:0/expander-1:0/port-1:0:10/end_device-1:0:10/target1:0:10/1:0:10:0/block/sdl lrwxrwxrwx 1 root root 0 May 6 2024 sdm -> ../devices/pci0000:00/0000:00:01.0/0000:01:00.0/host1/port-1:0/expander-1:0/port-1:0:11/end_device-1:0:11/target1:0:11/1:0:11:0/block/sdm lrwxrwxrwx 1 root root 0 May 6 2024 sdn -> ../devices/pci0000:00/0000:00:01.0/0000:01:00.0/host1/port-1:0/expander-1:0/port-1:0:12/end_device-1:0:12/target1:0:12/1:0:12:0/block/sdn lrwxrwxrwx 1 root root 0 May 6 2024 sdo -> ../devices/pci0000:00/0000:00:01.0/0000:01:00.0/host1/port-1:0/expander-1:0/port-1:0:13/end_device-1:0:13/target1:0:13/1:0:13:0/block/sdo lrwxrwxrwx 1 root root 0 May 6 2024 sdp -> ../devices/pci0000:00/0000:00:01.0/0000:01:00.0/host1/port-1:0/expander-1:0/port-1:0:14/end_device-1:0:14/target1:0:14/1:0:14:0/block/sdp lrwxrwxrwx 1 root root 0 May 6 2024 sdq -> ../devices/pci0000:00/0000:00:01.0/0000:01:00.0/host1/port-1:0/expander-1:0/port-1:0:15/end_device-1:0:15/target1:0:15/1:0:15:0/block/sdq lrwxrwxrwx 1 root root 0 May 6 2024 sdr -> ../devices/pci0000:00/0000:00:1f.2/ata2/host2/target2:0:0/2:0:0:0/block/sdr lrwxrwxrwx 1 root root 0 May 6 2024 sds -> ../devices/pci0000:00/0000:00:02.0/0000:02:00.0/0000:03:00.0/0000:04:00.0/host9/port-9:0/end_device-9:0/target9:0:0/9:0:0:0/block/sds lrwxrwxrwx 1 root root 0 May 6 2024 sdt -> ../devices/pci0000:00/0000:00:02.0/0000:02:00.0/0000:03:00.0/0000:04:00.0/host9/port-9:1/end_device-9:1/target9:0:1/9:0:1:0/block/sdt lrwxrwxrwx 1 root root 0 May 6 2024 sdu -> ../devices/pci0000:00/0000:00:02.0/0000:02:00.0/0000:03:00.0/0000:04:00.0/host9/port-9:2/end_device-9:2/target9:0:2/9:0:2:0/block/sdu lrwxrwxrwx 1 root root 0 May 6 2024 sdv -> ../devices/pci0000:00/0000:00:02.0/0000:02:00.0/0000:03:00.0/0000:04:00.0/host9/port-9:4/end_device-9:4/target9:0:4/9:0:4:0/block/sdv lrwxrwxrwx 1 root root 0 May 6 2024 sdw -> ../devices/pci0000:00/0000:00:02.0/0000:02:00.0/0000:03:00.0/0000:04:00.0/host9/port-9:3/end_device-9:3/target9:0:3/9:0:3:0/block/sdw lrwxrwxrwx 1 root root 0 May 6 2024 sdx -> ../devices/pci0000:00/0000:00:02.0/0000:02:00.0/0000:03:00.0/0000:04:00.0/host9/port-9:5/end_device-9:5/target9:0:5/9:0:5:0/block/sdx lrwxrwxrwx 1 root root 0 May 6 2024 sdy -> ../devices/pci0000:00/0000:00:1d.0/usb1/1-1/1-1.1/1-1.1:1.0/host4/target4:0:0/4:0:0:0/block/sdy lrwxrwxrwx 1 root root 0 May 6 2024 sdz -> ../devices/pci0000:00/0000:00:02.0/0000:02:00.0/0000:03:09.0/0000:06:00.0/host10/port-10:0/end_device-10:0/target10:0:0/10:0:0:0/block/sdz the drives from HBA 9300-4i4e (0-15) are correctly addressed so far, it's only the internal HBA which right now pushes me to the cliff.... i've got 4 Dev_Bus addresses currently here (because of the pcie switch).... can you please show me your disk-settings and lspci -pp for them? so i can compare to my ones
-
- Outcome of the update: SUCCESSFUL - DSM version prior update: DSM 7.2 64570 Update 3 | ARPL 23.8.1 - Loader version and model: RR v24.5.1 | DS918+ - Using custom extra.lzma: NO - Installation type: Baremetal ASRock J3160DC-ITX, mini-pcie Intel 82574 (E1000e) ethernet card, 16 GB RAM, 4x SATA drives - Additional comments: 1. Created new USB boot disk, using RR v24.5.1.img 2. Configured via web interface 3. findsynology > Recover 4. Once back into DSM, performed update to U5 from the web console, reboot
-
Всем доброго времени суток. Решил собрать NAS для дома. Толком ничего про это ещё не знаю, так что решил попробовать, посмотреть, как он облегчит мне жизнь. Откопал старый комп, из рабочего там были: Материнская плата — Gigabyte H61M-S2-B3; Процессор (вместе с no-name кулером) — Intel i5-2400; Оперативная память — 2x4 ГБ Kingston DDR3; и старый корпус V-Lazer неизвестной модели. Ко всему этому добру хочу прикупить: HDD под RAID1 — 2x4ТБ Seagate Exos 7E8 (ST4000NM000A); SSD — Apacer AS340 PANTHER (присмотрел по отзывам, чтобы не отстегнулся через месяц); Блок питания — DEEPCOOL PK550D (да, перебор, но решил взять со всеми защитами на всякий случай); Ну и остальное по мелочи, чтобы снизить шумы и повысить защиты: кулеры Arctic Cooling, патчкорд ARDOR GAMING HtsPcSffC8050, кабель питания, sata-шлейфы, сетевой фильтр Pilot L GP, антивибр.гвозди, пылевые фильтры, антивибр.шайбы для HDD, ножки для пк и стяжки для кабелей. Вопрос такой: будет ли работать NAS на дисках Seagate Exos? И ещё вопрос: что нужно сделать, чтобы была возможность подключиться к NAS вне дома?
-
Результат: Успешно (DS3622xs+) - Версия загрузчика: Arc 24.4.30 - Версия DSM: - DSM 7.2.1-69057 Update 4 -> Update 5 - Дополнительные модули: по умолчанию установленные в загрузчике. - Аппаратное обеспечение: MB Jingsha x99-D8, Xeon E5-2630 v3 (8/16); Ram 2x8Gb 2133 ECC; Ethernet 1 (internal): 1Gb адаптер RLT 8111; Ethernet 2 (pci-e): 1Gb адаптер Intel e1000; Блок Питания Sea Sonic 500W Gold; Дисковая система: 2 x Sata в Raid 1 - cерверные Transcend 256 Gb SSD470K, 2 x Sata в Raid 1 - IronWolf 6Tb 7200; ИБП Ippon 850 по USB работает. - Вход в учетную запись Synology с привязкой SN: ОК - Завелось без проблем. - Поднят FreeBPX на виртуалке. P.S.: Китайская материнка Jingsha x99-D8 перепрошита на стоковый биос, т.к. продают обычно с разгоном и унлоком. Интегрированная и дискретная видеокарты отсутствуют.
-
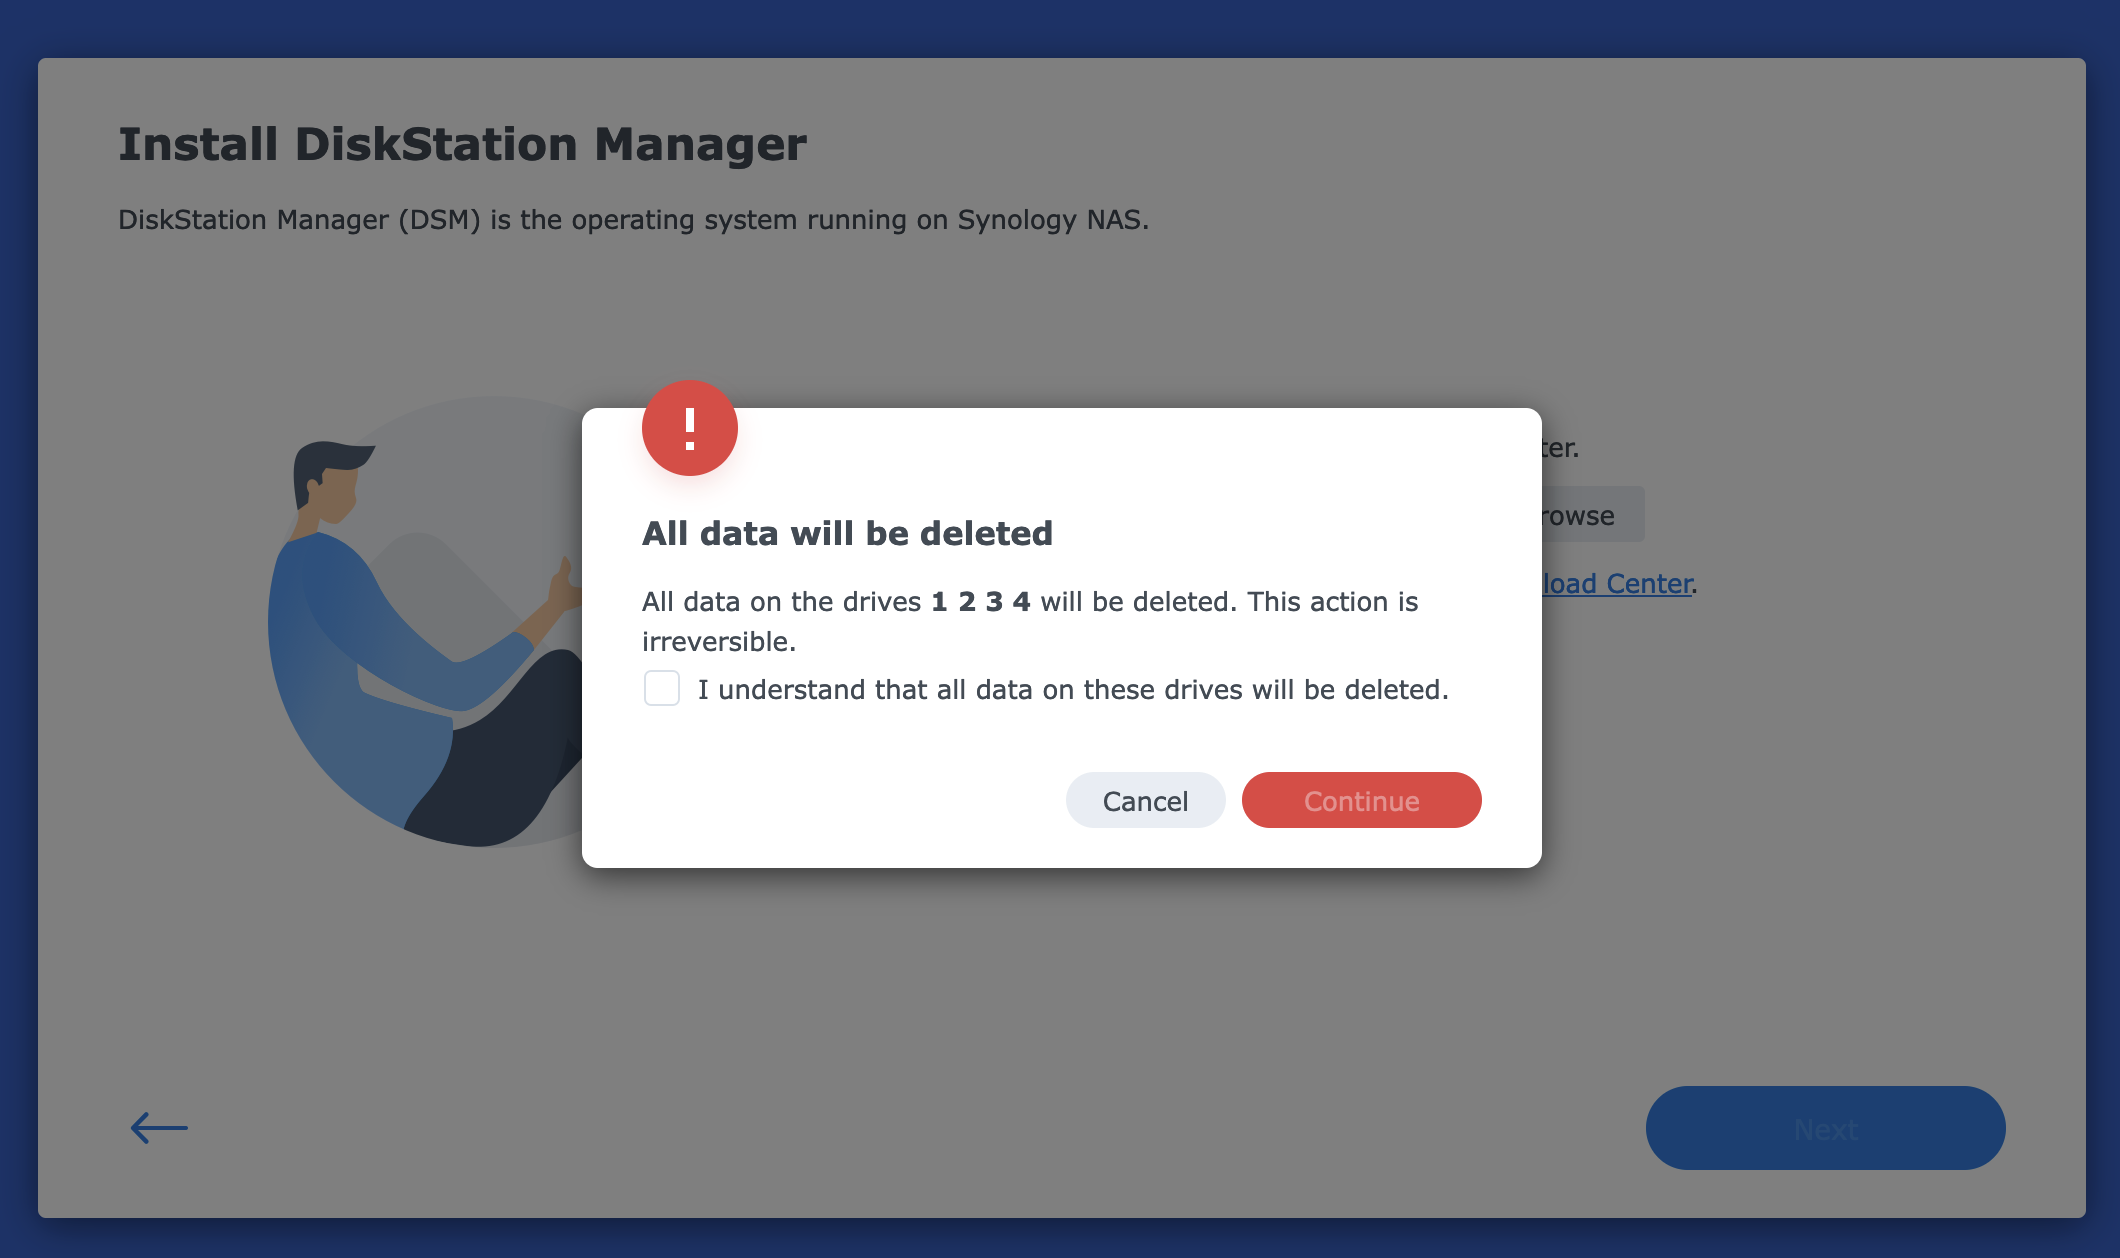
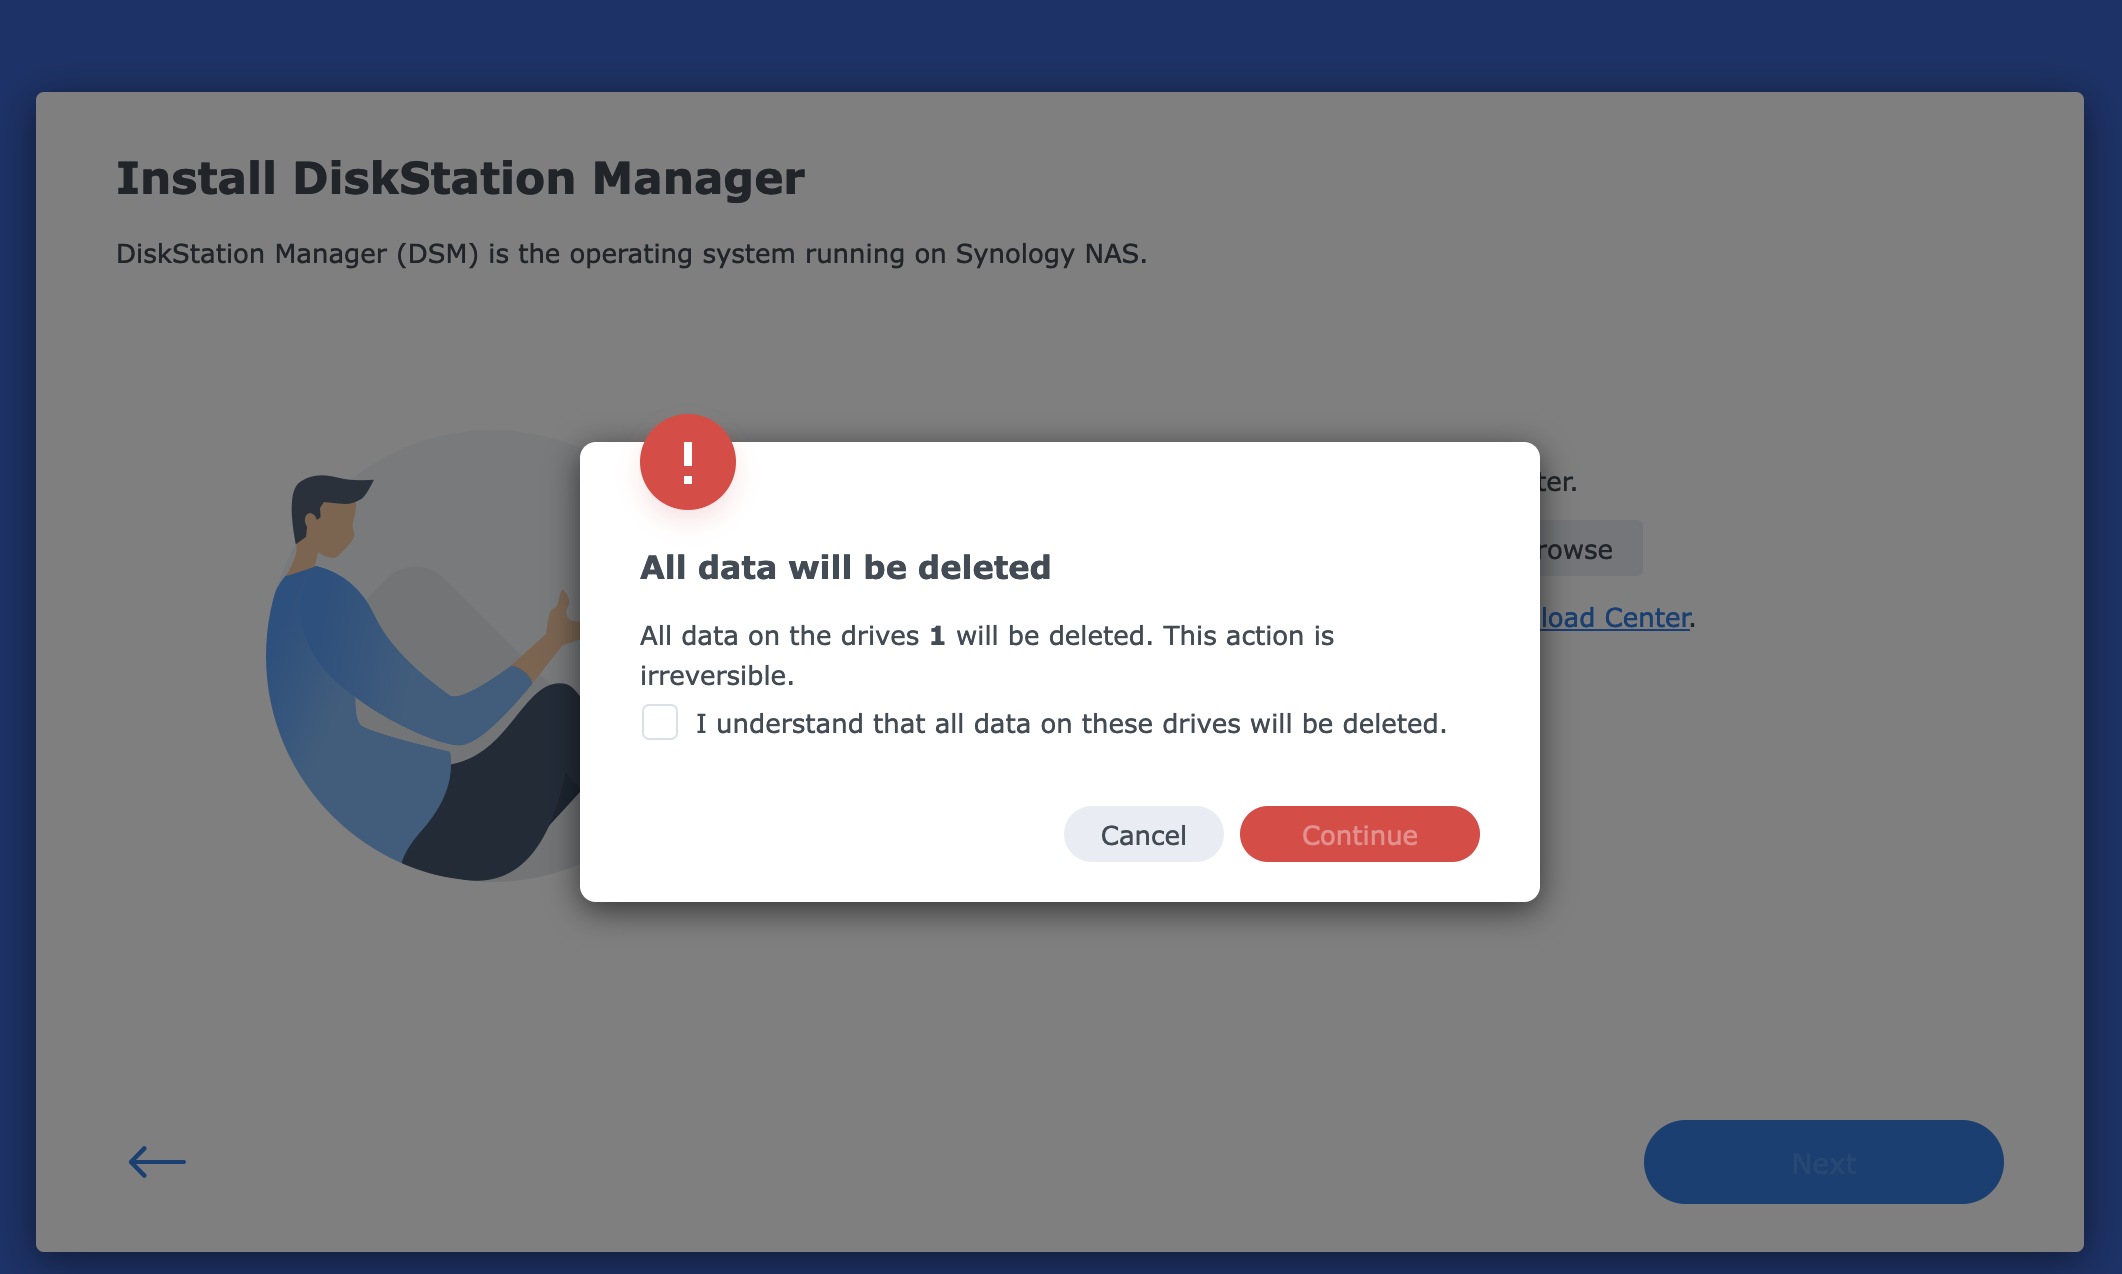
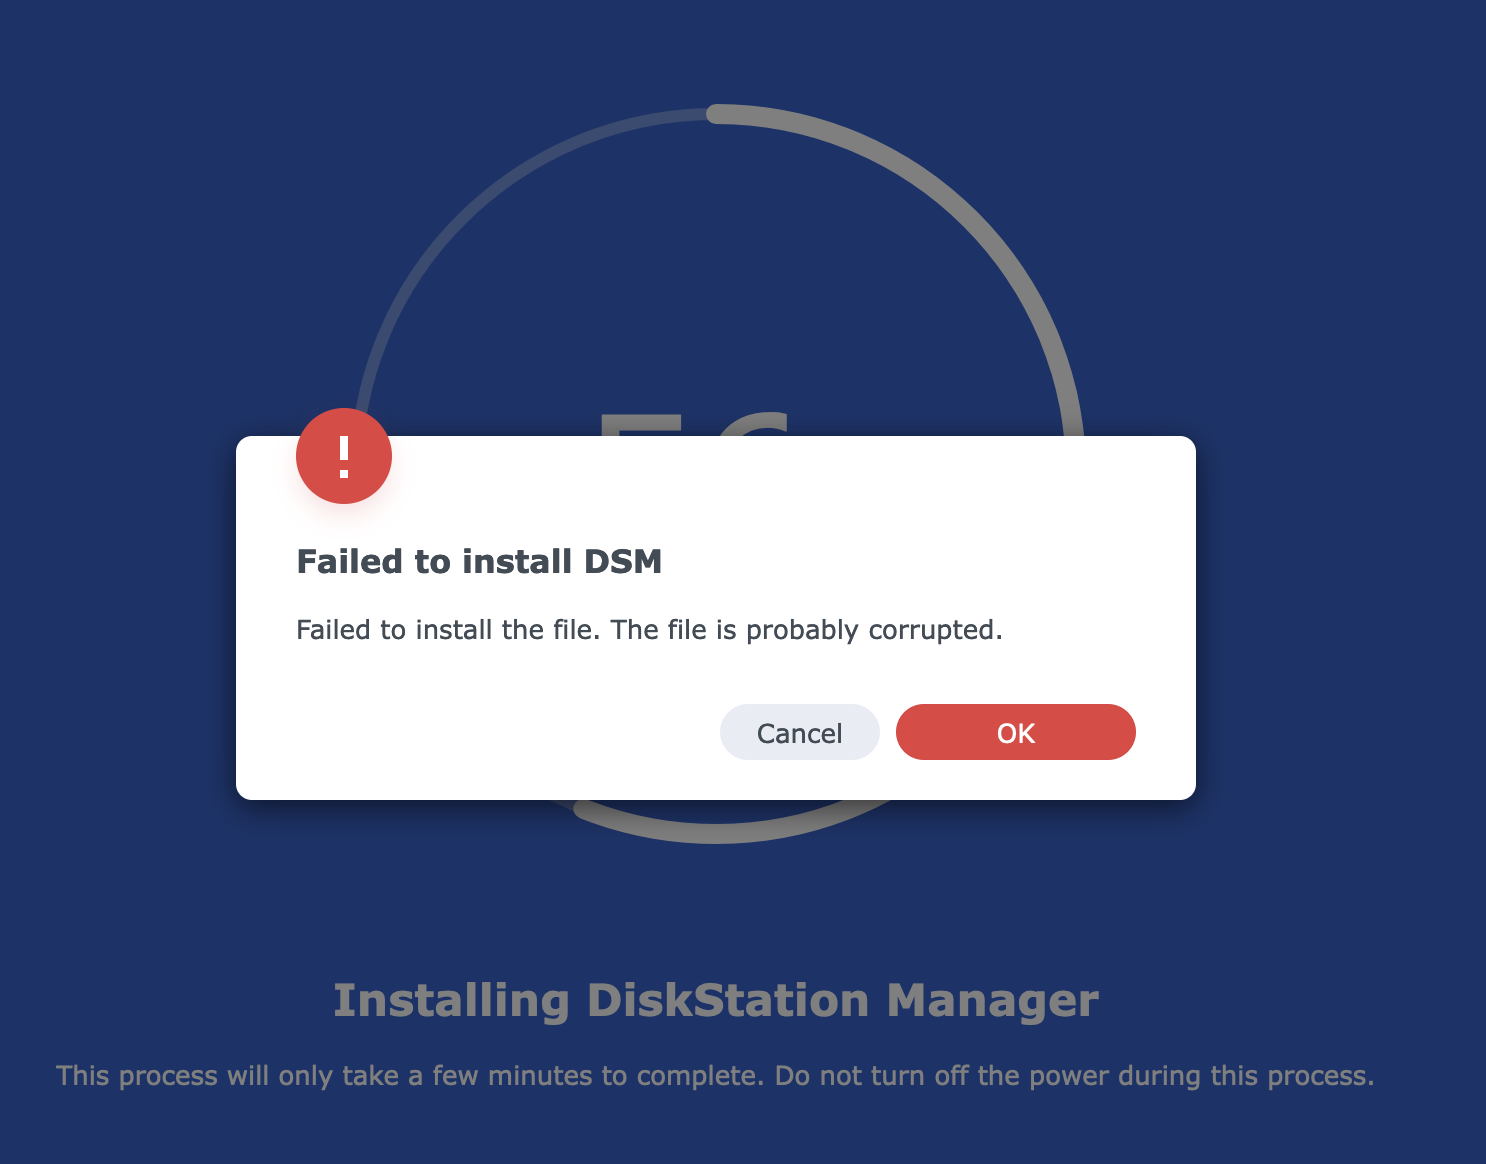
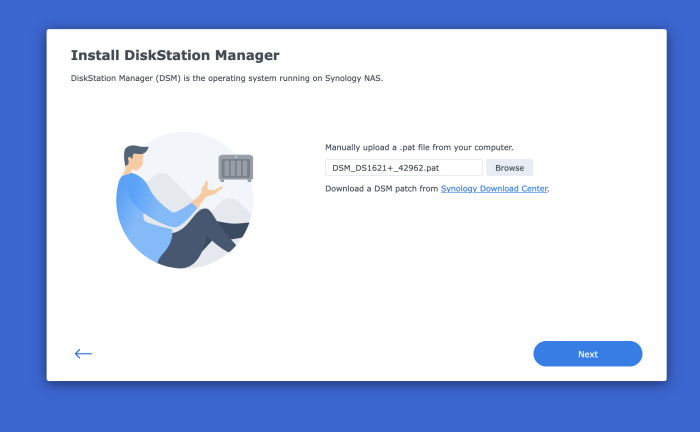
I need to install a fully functioning version of DSM (not the Virtual DSM available from Synology). Long story, but in short I need to restore an "Entire System" Hyper Backup from my RS1221+ in order to go through the postgres database of that backup. The Virtual DSM available from Synology does not allow to restore "Entire System". Through trial and error, I've been able to get close. I create a new vm in Synology VMM by importing the TCRP vmdk image and adding 3 more sata drives. The process breaks during the DSM Installation. Here below is a summary of the VM I create: Import a virtual machine Summary Item Value Storage HDD VM Storage Name vdsm5 CPU(s) 4 Memory 8 GB Video Card vga CPU Relative Weight Normal Description - Enable CPU compatibility mode Disabled Reserved CPU Threads - Virtual Disk 1 10 GB (SATA) Virtual Disk 2 100 GB (SATA) Virtual Disk 3 200 GB (SATA) Virtual Disk 4 300 GB (SATA) Auto Switch Disabled Network Default VM Network (e1000) Autostart No Keyboard Layout Default Virtual USB Controller Disabled Firmware Legacy BIOS ISO File Unmounted, Unmounted Users with permissions - Groups with permissions administrators I boot up the VM and ssh into TinyCore, then do the following: sudo ./rploader.sh update sudo ./rploader.sh fullupgrade sudo ./rploader.sh serialgen DS1621+ realmac sudo ./rploader.sh satamap sudo vi user_config.json <-- here I change the model and the version sudo ./rploader.sh listmods ds1621p-7.1.1-42962 sudo ./rploader.sh ext ds1621p-7.1.1-42962 add https://raw.githubusercontent.com/pocopico/rp-ext/master/e1000/rpext-index.json sudo ./rploader.sh ext ds1621p-7.1.1-42962 add https://raw.githubusercontent.com/pocopico/rp-ext/master/v9fs/rpext-index.json sudo ./rploader.sh build ds1621p-7.1.1-42962 sudo ./rploader.sh backup sudo vi user_config.json <-- just to make sure everything looks good sudo exitcheck.sh reboot During the above steps, when I do 'sudo ./rploader.sh satamap', I get a warning saying "Other drives are connected that will not be accessible!": tc@box:~$ sudo ./rploader.sh satamap Machine is VIRTUAL Hypervisor=KVM Found "00:1a.0 Intel Corporation 82801IR/IO/IH (ICH9R/DO/DH) 6 port SATA Controller [AHCI mode] (rev 02)" Detected 6 ports/4 drives. Mapping SATABOOT drive after maxdisks WARNING: Other drives are connected that will not be accessible! Computed settings: SataPortMap=1 DiskIdxMap=10 Should i update the user_config.json with these values ? [Yy/Nn] y Done. tc@box:~$ Here is what my user_config.json looks like. I changed the hashes, sn, and mac1. { "general": { "model": "DS1621+", "version": "7.1.1-42962", "smallfixnumber": "0", "zimghash": "XXXXXXX", "rdhash": "XXXXXXX", "usb_line": "earlyprintk syno_hw_version=DS1621+ console=ttyS0,115200n8 netif_num=1 synoboot2 pid=0xa4a5 earlycon=uart8250,io,0x3f8,115200n8 mac1=1234567890 sn=1234567890 SMBusHddDynamicPower= "sata_line": "earlyprintk syno_hw_version=DS1621+ console=ttyS0,115200n8 netif_num=1 synoboot2 pid=0xa4a5 earlycon=uart8250,io,0x3f8,115200n8 synoboot_satadom=2 mac1=1234567890 sn=1234567890 S "redpillmake": "prod", "friendautoupd": "true", "staticboot": "false", "hidesensitive": "false" }, "ipsettings": { "ipset": "", "ipaddr": "", "ipgw": "", "ipdns": "", "ipproxy": "" }, "extra_cmdline": { "pid": "0xa4a5", "vid": "0x0525", "sn": "1234567890", "mac1": "1234567890", "netif_num": "1", "SataPortMap": "1", "DiskIdxMap": "10" }, "synoinfo": { "internalportcfg": "0xffff", "maxdisks": "16", "support_bde_internal_10g": "no", "support_disk_compatibility": "no", "support_memory_compatibility": "no", "maxlanport": "8", "netif_seq": "0 1 2 3 4 5 6 7" }, "ramdisk_copy": {} } After I boot up, I select the 'RedPill DS1621+ 7.7.1-42962 (SATA, Verbose)' option. After this I go to https://find.synology.com/ and select the one that shows the IP address of the vm, accept the EULA, then I get the Synology NAS Welcome Screen, I click Install, then it asks me to Manually upload a .pat file from my computer, which I do as shown below. The file is downloaded from https://global.download.synology.com/download/DSM/release/7.1.1/42962/DSM_DS1621%2B_42962.pat When I click next, I get the following screen, showing the VM is recognizing all 4 drives: If I click the checkbox and continue, the installation begins, but it fails at around 56% and I get the following message saying the file is probably corrupted. I tried doing this whole same process with DSM 7.2 and got the same message with that different file. I doubt it's the file. After I click OK, it takes me back to the screen where it asks to manually upload .pat file from my computer. When I do that, however, there is a small change from before: It seems it's only recognizing 1 drive, not 4 like the previous attempt, as shown here: After clicking the checkbox and continue, the process fails once again at the same point and I get the same Fail screen: If I force reboot the VM, it doesn't boot up. What am I doing wrong? What do I need to do in order to go through with the installation properly? Thank you.


-
Outcome of the update: SUCCESSFUL - DSM version prior to update: DSM 7.2.1-69057 Update 4 - DSM version after update: DSM 7.2.1 69057 Update 5 - Loader version and model: ARC 24.4.10 / DS920+ - Installation type: BAREMETAL - Intel i5-10500T on ASUS ROG STRIX Z490-I with 16GB - Additional comments: no ARC loader update needed, will do it later as Restore config function isn't recommanded at all Outcome of the update: SUCCESSFUL - DSM version prior to update: DSM 7.2.1-69057 Update 4 - DSM version after update: DSM 7.2.1 69057 Update 5 - Loader version and model: ARC 24.4.10 / DS920+ - Installation type: BAREMETAL - Intel i5-10500T on ASRock Z490 ITX/TB3 with 32GB - Additional comments: no ARC loader update needed, will do it later as Restore config function isn't recommanded at all
-
After much research and more Research between the different model.conf this forum and this site --> (https://imnks.com/4925.html) I have been able to build 4 different system TS-2483XU TES-3085U(SAS with expander only) TS-3088XU TS-3087XU [LSI 9211-8I with SAS expander, LSI 3005-24i, m.2 nvme , gpu, Ethernet: 1G Intel I210 Intel 10G x540 and 10G (marvel chipset nic card] Still not sure why my HBA physical drive starts are 8 and the other starts at 12 but QNAP respects the physical port more than the port or slot number Internal nics you should use the Ubuntu usb image and run lspci -PP that will help because some cards have two DEV BUS number and for internal devices you should use the first one and for pcie slot you should use the second 00:1d.0/05:00.0 internal nic vs 00:1b.0/03:00.0 external nic PCI NVME use 00:1c.0/04:00.0 the first for pcie slot and the second one for mapping to a system disk slot I turned of CE1 and CSTATE but I did have success with them on and I use CSM UEFI boot with OX QNAP disk tc@ubuntu:~$ lspci -PP 00:00.0 Host bridge: Intel Corporation Device 3e31 (rev 0a) 00:01.0 PCI bridge: Intel Corporation 6th-10th Gen Core Processor PCIe Controller (x16) (rev 0a) 00:01.1 PCI bridge: Intel Corporation Xeon E3-1200 v5/E3-1500 v5/6th Gen Core Processor PCIe Controller (x8) (rev 0a) 00:08.0 System peripheral: Intel Corporation Xeon E3-1200 v5/v6 / E3-1500 v5 / 6th/7th/8th Gen Core Processor Gaussian Mixture Model 00:12.0 Signal processing controller: Intel Corporation Cannon Lake PCH Thermal Controller (rev 10) 00:14.0 USB controller: Intel Corporation Cannon Lake PCH USB 3.1 xHCI Host Controller (rev 10) 00:14.2 RAM memory: Intel Corporation Cannon Lake PCH Shared SRAM (rev 10) 00:15.0 Serial bus controller: Intel Corporation Cannon Lake PCH Serial IO I2C Controller #0 (rev 10) 00:15.1 Serial bus controller: Intel Corporation Cannon Lake PCH Serial IO I2C Controller #1 (rev 10) 00:16.0 Communication controller: Intel Corporation Cannon Lake PCH HECI Controller (rev 10) 00:16.4 Communication controller: Intel Corporation Cannon Lake PCH HECI Controller #2 (rev 10) 00:17.0 SATA controller: Intel Corporation Cannon Lake PCH SATA AHCI Controller (rev 10) 00:1b.0 PCI bridge: Intel Corporation Cannon Lake PCH PCI Express Root Port #21 (rev f0) 00:1c.0 PCI bridge: Intel Corporation Cannon Lake PCH PCI Express Root Port #1 (rev f0) 00:1d.0 PCI bridge: Intel Corporation Cannon Lake PCH PCI Express Root Port #9 (rev f0) 00:1d.1 PCI bridge: Intel Corporation Cannon Lake PCH PCI Express Root Port #10 (rev f0) 00:1d.2 PCI bridge: Intel Corporation Cannon Lake PCH PCI Express Root Port #11 (rev f0) 00:1e.0 Communication controller: Intel Corporation Cannon Lake PCH Serial IO UART Host Controller (rev 10) 00:1f.0 ISA bridge: Intel Corporation Device a30a (rev 10) 00:1f.4 SMBus: Intel Corporation Cannon Lake PCH SMBus Controller (rev 10) 00:1f.5 Serial bus controller: Intel Corporation Cannon Lake PCH SPI Controller (rev 10) 00:01.0/01:00.0 VGA compatible controller: NVIDIA Corporation GP106 [GeForce GTX 1060 6GB] (rev a1) 00:01.0/01:00.1 Audio device: NVIDIA Corporation GP106 High Definition Audio Controller (rev a1) 00:01.1/02:00.0 Serial Attached SCSI controller: Broadcom / LSI SAS2008 PCI-Express Fusion-MPT SAS-2 [Falcon] (rev 03) 00:1c.0/04:00.0 Non-Volatile memory controller: Phison Electronics Corporation Device 5015 (rev 01) 00:1d.0/05:00.0 Ethernet controller: Intel Corporation I210 Gigabit Network Connection (rev 03) 00:1d.1/06:00.0 PCI bridge: ASPEED Technology, Inc. AST1150 PCI-to-PCI Bridge (rev 04) 00:1d.1/06:00.0/07:00.0 VGA compatible controller: ASPEED Technology, Inc. ASPEED Graphics Family (rev 41) 00:1d.2/08:00.0 Ethernet controller: Intel Corporation I210 Gigabit Network Connection (rev 03)
-
С автозапуском DSM решилось просто... Подумалось, один ... пересобирать arc. Взял и обновил его из него до 24.5.1 Так потом вообще ничего делать не пришлось! Он пробилдился сам и DSM реинсталлил и польку-бабочку сбацал ! Ну и на последней перезагрузке - пожалте, таймер обратного отсчёта щёлкает. Присоединюсь с доп. вопросом... Дело в том, что мои эксперименты проходят на железке с пассивным охладом( Intel N100), которая готовится заменить старенький Acer Revo 3610, верой и правдой прослуживший на DSM 5.2 хз сколько лет. Так вот, при всяческих манипуляциях с загрузчиком корпус (он типа радиатор) еле-еле тёплый. А вот при запущенной DSM он прилично горяченький, хотя по Монитору ресурсов никто ничего практически не делает. Как-то это не алё... P.S. А можно надеяться на штатную(в смысле при инсталляции 7.2) миграцию c 5.2, если подсунуть диск из Асера при установке DSM?
-
Arc: Modules Да.... Карту применить можно не именно от Intel, а всего лишь с чипом от Intel.