Search the Community
Showing results for 'detected that the hard drives'.
-
 Regardless of the reading pattern, reading under RAID1 has twice the performance anyway, since two hard drives offer the same content and the second read head is already delivering data even though the other one is still busy. Therefore, a read cache is quite unnecessary under RAID1/RAID10.
 -
 That might be some of the reasons why he wants to build a Xpenology box @SrBas97 Your DSM will automaticly be installed on your "data disks", as a Raid1 mirrored across "all" of them. The drives will get 3 separate partitions during install: 1=System (for DSM), 2=Swap, 3=Data storage, and you do not need to think about it. If you have a singe SSD, you *can* use it for cache, but just as "read-cache", and depending of usage pattern, it might be un-useful.
 -
You can't control this, it is written mirrored to at least the first two hard drives.
-
2 SSDs are required for a cache, as they must be mirrored. This only makes sense if they are enterprise SSDs with SLC memory that does not wear out. The "DSM" operating system is installed on both drives for data. You set up a RAID1 as normal, just not SHR!
-
 Hello, I have bare metal desktop PC and DSM 7.2.1-69057 Update 5 running on Proxmox 8.2.2. I have six disks which I used like that: On Proxmox: I add 512GB ssd disk (not important for this issue). I add every disk separately and I create RAW data file inside each disk 998 GB (for RAID 10), so I can able use that file to add disk in synology. I add 2TB disk for full raw back up of RAID 10 system. on Synology one 512GB ssd disk SHR (single disk mode) for system itself only use. four 1TB disk RAID 10 for my all data are in here one 2TB disk SHR (single disk mode) for my all data backup is here from RAID 10. using as a hard copy of everything. Synology system gives error that on second disk "storage pool has degraded" on RAID 10. so how can I resolve that issue ? Can I try to remove this problematic disk in RAID 10 system. and re-format in proxmox and re-create that RAW disk file. and then I can try to add this new disk file in RAID 10 system ? I want to test this disk before buying new disk. so therefore I can follow that above steps to check disk is working normal. and to be sure it just something happened to disk file in proxmox. Please check attached screenshots files. Thank you.

-

DS video mauvaise qualité H265
nicoueron replied to plomkiolki's topic in Paquets, mods & fonctionnalités DSM
Plex est payant si tu as besoin de faire du transcodage hard et plus si affinité. Mais bien souvent la version gratuite suffit amplement. Jellyfin tourne effectivement dans Docker, mais ce dernier ne consomme rien si tu n'as pas de conteneur. Donc entre 1 conteneur Docker ou un serveur Média tel que DS Video dédié via le gestionnaire de paquets c'est du pareil au même en terme de ressource ! Emby, idem je n'ai jamais testé mais les retours sont aussi très positif -

Synology Plus series internal Flash/DOM repair and model-modding
reiou replied to DSfuchs's topic in Hardware Modding
Thank you for your replies. I'm sure I can get around the lack of QC via actually setting up my environment/network to properly support external access. And regarding updating DSM to a higher version, I will try to update to the latest supported with the single free hard drive method you suggest. Out of curiousity, what are our device options for modding? Modding DS412+ to DS713+ and RS814+ both worked successfully. What other devices are we able to use? I'm wondering if we can go up to DSM 7.2 (or higher in future...?) on the DS412+ by using other devices. -
Bonjour à tous, Compte tenu de l'actualité VMWare avec son rachat par Broadcom, le support d'ESXi ne sera plus assuré par mes soins! Je bascule donc sur son concurrent Proxmox tout aussi puissant voire mieux . La philosophie est très proche mais certains réglages doivent être précis d'où ces nombreux screenshots. PRE-REQUIS : Votre serveur Proxmox est déjà installé et configuré. Les captures d'écrans sont basées sur Proxmox VE 8.2. Un serveur DHCP est fonctionnel sur le réseau Si vous souhaitez mapper votre contrôleur SATA ou/et votre iGPU dans Proxmox alors activer le PCIE Passthrough : Vérifier dans votre BIOS que les instructions IOMMU et/ou VT-x sont bien activées Editer le fichier /etc/default/grub du nœud Proxmox adapter la ligne GRUB_CMDLINE_LINUX_DEFAULT avec les bons paramètres. Pour un CPU Intel : GRUB_CMDLINE_LINUX_DEFAULT="quiet intel_iommu=on iommu=pt intel_pstate=disable" Pour un CPU AMD : GRUB_CMDLINE_LINUX_DEFAULT="quiet amd_iommu=on" Exécuter la commande update-grub pour appliquer les modifications Redémarrer le nœud Proxmox TUTO : 1. Télécharger l'image du loader https://github.com/AuxXxilium/arc/releases : 2. Extraire l'image de l'archive avec 7zip ou tout autre logiciel de gestion d'archives compressées : [Optionnel] renommer le fichier arc.img avec le nom de la version associée. Cela vous permettra de connaitre précisement la version importée par la suite : 3. Uploader l'image du loader dans Proxmox : Dans l'UI de Proxmox : sélectionner le nœud (ici nommé proxmox) > sélectionner l'espace de stockage associé aux ISO ou templates (ici nommé local) > ISO Images > Upload 4. Patientez le temps de l'upload et noter le nom du fichier : ... Par exemple ici : /var/lib/vz/template/iso/arc-24.5.12.img 5. Créer la VM DSM via le bouton en haut à gauche : 6. Onglet General : Valider ou adapter le VM ID selon votre nomenclature habituelle ainsi que le nom de la VM Si vous souhaitez que la VM soit automatiquement lancée au démarrage du serveur Proxmox, activer la case à cocher "Advanced" puis cliquer sur Start at boot. Cliquer sur Next 7. Onglet OS : OS : Linux 6.x - 2.6 Kernel Do not use any media 8. Onglet System : Activer Qemu Agent (celui-ci sera utile tout à la fin du tuto pour avoir une remontée de l'IP et l'agent Proxmox opérationnel Laisser les autres paramètres par défaut 9. Onglet Disks : Supprimer le disque scsi0 en cliquant sur la corbeille. En effet nous le ferons plus tard --> 10. Onglet CPU : Type : host Cores : dépend de votre CPU physique, le mien ayant 4 cores, je lui alloue les 4. 11. Onglet Memory : Memory (MiB) : minimum 4096, plus si affinité 12. Onglet Network : Bridge : vmbr0 selon votre configuration réseau de votre serveur Proxmox Model : VirtIO (paravirtualized) 13. Onglet Confirm : Ne pas cocher Start after created car nous allons maintenant l'adapter. 14. Import du loader dans la VM : Cliquer sur le noeud Proxmox > Shell et saisir la commande suivante (adapter l'ID de la VM et la version du fichier img évidement) : qm importdisk [VM_ID] /var/lib/vz/template/iso/arc-24.5.12.img local-lvm Dans mon exemple, cela donne : La commande doit ainsi convertir l'image img que nous avons téléchargée au point 4 dans un format compatible à la VM Proxmox 15. Valider l'import du loader : Cliquer sur la VM > Hardware > Unused Disk 0 > Edit Sélectionner le bus : SATA 0 16. Supprimer le lecteur CD/DVD : Sélectionner 'CD/DVD Drive' et cliquer sur Remove puis Yes 17. Ajouter vos disques de données A partir de là, il existe 3 options AU CHOIX, dépliez la vue selon votre cas : Soit vous pouvez utiliser des disques virtuels classiques (c'est bien pour des tests) Soit vous pouvez faire un mapping entre des disques virtuels et vos disques physiques (c'est comme le RDM de VMWare mais vous n'aurez aucune remontée SMART de vos disques dans DSM) Soit vous mappez carrément votre/vos contrôleurs SATA à la VM et vos disques ne seront plus du tout visible par Proxmox mais vous aurez toutes les informations SMART de vos disques visibles dans DSM (option recommandée). 18. Adapter l'ordre de démarrage de la VM Sélectionner la VM-> Options > Boot order > Edit Faire en sorte de mettre le sata0 (correspondant au loader) en 1 et désactiver les autres. 19. Désactiver l'émulation du pointeur 20. Démarrer la VM et connectez-vous à la console de la VM 📓pour la suite de ce tuto, les captures d'écran suivantes se basent toutes sur la base d'un seul disque virtuel de 50Go 📓la configuration du loader peut se faire à distance ou directement depuis la console Proxmox de la VM, peu importe. Choisir le model : Pour ce tuto, je sélectionne SA6400 car c'est celui qui est le plus compatible avec mon matériel, à adapter selon votre configuration et ce que propose le loader, en effet celui-ci vous affiche normalement la liste des loaders exclusivement compatible avec votre couple carte-mère/CPU Sélectionner la version de DSM : Activer l'arc-patch Sélectionner les addons dont vous auriez besoin, la liste proposée dépend du modèle sélectionné précédemment. Je vous surligne ici ceux que je recommande --> Lancer la construction du loader : --> --> Une fois le pat téléchargé et le loader construit, lancer le boot du loader : --> la VM va alors rebooter en mode Installation de DSM... Patienter 1 à 2 min le temps que le processus d'installation de DSM se lance 21. Installation de DSM Noter l'IP et le port afficher par le loader dans la console de la VM Proxmox. Dans le navigateur saisir l'url affichée, ici : http://192.168.1.165:5000 (ou scanner le Qrcode pour les plus geek d'entre vous) et cliquer sur Installer Logiquement, vous pouvez laisser DSM gérer le téléchargement du PAT Si les disques sont vierges ou ne comprennent pas de partitions Synology celui-ci doit vous proposer de les formater, dans le cas contraire il vous proposera de les migrer. Le nombre indiqué correspond à l'id des disques sur le port SATA. Recopier le nom du modèle pour confirmer avant de lancer le formatage (question de sécurité il parait!) --> --> Patienter le temps de l'installation de DSM, une fois à 100% le compte à rebours de 10 min démarre. En arrière-plan la VM va rebooter. Patientez quelques minutes. 📢Vérifier en parallèle que la VM ne reboote pas 2x... Si c'est le cas cela conduit à une boucle de récupération de DSM et vous n'arrivez jamais à la page de configuration de DSM. Cela est dû à une incompatibilité du modèle choisi avec votre matériel. Mon conseil : reconstruire le loader avec un autre modèle. --> A la fin vous devriez atterrir sur la page de configuration de DSM A partir de là je vous laisse les mains pour finaliser la configuration (login, volume de stockage, paquets, config réseau, etc. etc.) ... ___________________________________________________________________________________________________ 22. Configuration de l'agent Qemu Une VM digne de ce nom doit pouvoir être le mieux possible intégrée à son hyperviseur! Pour ce faire, si vous avez bien suivi ce tuto, la VM est capable d'interagir avec un agent Qemu et ainsi remonter qq infos à Proxmox : Avant Après Ajouter la source paquets suivante dans le gestionnaire de paquets de DSM : https://spk7.imnks.com/ et installer le paquet QEMU Guest Agent mais sans le démarrer! --> Créer une tâche dans le planificateur de tâches de DSM, Utilisateur : root Script : sudo sed -i 's/package/root/g' /var/packages/qemu-ga/conf/privilege --> Exécuter la tâche Démarrer le paquet QEMU Guest Agent depuis le gestionnaire de paquets Vérifier dans Proxmox que le(s) IP de la VM DSM est correctement remontée : ___________________________________________________________________________________________________ 23. [Optionnel] Mise en place d'un cache SSD Si vous disposez d'un SSD nvme sur lequel par exemple est installé Proxmox, il est possible d'utiliser une partie de ce disque pour en faire un cache SSD. Voici comment faire : Sélectionner la VM DSM > Add (Hard Disk) Bus : SATA et choisir un id supérieur aux id des disques existants Cache : Write back Cliquer sur Advanced et activer SSD emulation 📓Si vous souhaitez un cache SDD en lecture ET écriture il faudra créer 2 disques SSD de la même façon à la VM. Redémarrer la VM De nouveau dans DSM, ouvrir le Gestionnaire de stockage et constater la présence d'un nouveau disque SSD : Sélectionner le groupe de stockage sur lequel vous souhaiter créer ce cache SSD et suivre les instructions. 📢Si vous avez mis au moins deux disques SSD alors vous pourrez aussi en faire un cache en écriture via un RAID logiciel géré par DSM. ___________________________________________________________________________________________________ 24. [Optionnel] Transcodage iGPU si votre CPU intègre un contrôleur graphique compatible avec le modèle choisi Sélectionner le nœud Proxmox > Shell et exécuter la commande lspci Chez moi cela donne ceci, noter l'id correspondant à la carte graphique, ici 00:02.0 Retourner dans les paramètres de la VM DSM > Hardware et ajouter un nouveau périphérique PCI Device : Sélection Raw Device > choisir l'id correspondant à la carte graphique et cliquer sur "All Functions" Redémarrer la VM Une fois DSM redémarré, connectez-vous via SSH sur la VM DSM vous devriez voir le fichier /dev/dri comme ceci : ls -l /dev/dri Libre à vous ensuite de l'affecter à un conteneur Docker Plex ou Jellyfin. Si vous utilisez le gestionnaire de paquets alors vous n'aurez rien d'autre à faire !!! ENJOY !!!


-

DVA3221 loader development thread
Jonathan Stork replied to Orphée's topic in Developer Discussion Room
Hi, I have managed to successfully build a tcrp loader for DVA3221 (latest 0.10.0 release). It runs nicely in QEMU/KVM environment. My intention is to pass through an nvidia GPU to it. I have put the loader onto a virtio disk (that gets ignored by the DSM) installer and added 1 SCSI disk into the virtual host. Unfortunately, the DSM installer (I picked DSM_DVA3221_64570.pat from the Synology download center) failed. I managed to extract /var/log/messages from the failed installation and I can look further around if needed. The log file is full of various errors but kinda hard to tell where to start. Would anybody be willing to have a brief look into it? Thank you, Jonathan Below is a brief extract from the log + full log is in the attachment. I am a former embedded Linux developer, so I can investigate in any direction somebody could point me to. May 12 19:01:50 kernel: [ 24.129288] Brand: Synology May 12 19:01:50 kernel: [ 24.129689] Model: DVA-3221 May 12 19:01:50 kernel: [ 24.130092] This is default settings: set group disks wakeup number to 1, spinup time deno 1 May 12 19:01:50 kernel: [ 24.131289] synobios cpu_arch proc entry initialized May 12 19:01:50 kernel: [ 24.132008] synobios crypto_hw proc entry initialized May 12 19:01:50 kernel: [ 24.132730] synobios syno_platform proc entry initialized May 12 19:01:50 kernel: [ 24.141747] Module [denverton_synobios] is removed. May 12 19:01:50 kernel: [ 24.142458] synobios: unload May 12 19:01:50 kernel: [ 24.207574] md: md0 stopped. May 12 19:01:50 kernel: [ 24.208569] md: bind<sda1> May 12 19:01:50 kernel: [ 24.209252] md/raid1:md0: active with 1 out of 16 mirrors May 12 19:01:50 kernel: [ 24.256748] md0: detected capacity change from 0 to 8589869056 May 12 19:01:50 kernel: [ 24.455029] EXT4-fs (md0): couldn't mount as ext3 due to feature incompatibilities May 12 19:01:50 kernel: [ 24.479963] EXT4-fs (md0): mounted filesystem with ordered data mode. Opts: (null) May 12 19:01:50 kernel: [ 24.559274] EXT4-fs (md0): couldn't mount as ext3 due to feature incompatibilities May 12 19:01:50 kernel: [ 24.622080] EXT4-fs (md0): mounted filesystem with ordered data mode. Opts: prjquota,rootprjquota May 12 19:01:50 kernel: [ 25.882473] VFS: opened file in mnt_point: (/dev), file: (/urandom), comm: (ttyd) May 12 19:01:50 kernel: [ 25.883709] VFS: opened file in mnt_point: (/dev), file: (/null), comm: (sh) May 12 19:01:50 kernel: [ 25.884861] VFS: opened file in mnt_point: (/dev), file: (/null), comm: (sh) May 12 19:01:50 kernel: [ 25.906925] VFS: opened file in mnt_point: (/dev), file: (/urandom), comm: (ttyd) May 12 19:01:50 kernel: [ 25.908113] VFS: opened file in mnt_point: (/dev), file: (/null), comm: (sh) May 12 19:01:50 kernel: [ 25.909209] VFS: opened file in mnt_point: (/dev), file: (/null), comm: (sh) May 12 19:01:50 kernel: [ 25.990325] md: md1 stopped. May 12 19:01:50 kernel: [ 25.991847] md: bind<sda2> . . May 12 19:01:57 findhostd: ninstaller.c:698 Dev: sda, DiskPath: /dev/sda, Partition version: 9 May 12 19:01:57 findhostd: ninstaller.c:139 Mount partion /dev/md0 /tmpRoot May 12 19:01:57 kernel: [ 35.572654] EXT4-fs (md0): couldn't mount as ext3 due to feature incompatibilities May 12 19:01:57 root: Failed to curl [https://dataupdate7.synology.com/juniorexpansionpack/v1/getUpdate?platform=denverton&buildnumber=64570][7] May 12 19:01:57 findhostd: ninstaller.c:168 umount partition /tmpRoot May 12 19:01:57 kernel: [ 35.640131] EXT4-fs (md0): mounted filesystem with ordered data mode. Opts: (null) May 12 19:01:57 avahi-daemon[6058]: /etc/avahi/services/http.service: parse failure: service group incomplete. May 12 19:01:57 avahi-daemon[6058]: Failed to load service group file /etc/avahi/services/http.service, ignoring. May 12 19:01:57 findhostd: ninstaller.c:139 Mount partion /dev/md0 /tmpRoot May 12 19:01:57 kernel: [ 35.746642] EXT4-fs (md0): couldn't mount as ext3 due to feature incompatibilities May 12 19:01:57 findhostd: ninstaller.c:168 umount partition /tmpRoot May 12 19:01:57 kernel: [ 35.762100] EXT4-fs (md0): mounted filesystem with ordered data mode. Opts: (null) May 12 19:01:57 findhostd: ninstaller.c:139 Mount partion /dev/md0 /tmpRoot May 12 19:01:57 kernel: [ 35.790132] EXT4-fs (md0): couldn't mount as ext3 due to feature incompatibilities May 12 19:01:57 findhostd: ninstaller.c:446 failed to get upnpmodelname from [/tmpRoot/etc.defaults/synoinfo.conf]. May 12 19:01:57 findhostd: ninstaller.c:453 failed to get buildnumber from [/tmpRoot/etc.defaults/VERSION]. May 12 19:01:57 findhostd: ninstaller.c:460 failed to get productversion from [/tmpRoot/etc.defaults/VERSION]. May 12 19:01:57 findhostd: ninstaller.c:462 failed to get majorversion from [/tmpRoot/etc.defaults/VERSION]. May 12 19:01:57 findhostd: ninstaller.c:465 failed to get minorversion from [/tmpRoot/etc.defaults/VERSION]. May 12 19:01:57 findhostd: lib/system/system_platform_get.c:35 failed to get unique from /tmpRoot/etc.defaults/synoinfo.conf errno=[0x0900 file_get_key_value.c:28] May 12 19:01:57 findhostd: ninstaller.c:477 failed to get platform from [/tmpRoot/etc.defaults/synoinfo.conf]. May 12 19:01:57 findhostd: lib/system/system_max_align_get.c:93 [/tmpRoot/.system_info/pgsql_alignment] doesn't exist, check model name for alignment May 12 19:01:57 findhostd: lib/system/system_endian_get.c:61 [/tmpRoot/.system_info/endian] doesn't exist, check model name for endian May 12 19:01:57 findhostd: lib/system/system_bit_get.c:58 [/tmpRoot/.system_info/bits] doesn't exist, check model name for bits May 12 19:01:57 findhostd: ninstaller.c:510 fail to get admin port from /tmpRoot/etc/synoinfo.conf... try another way May 12 19:01:57 findhostd: ninstaller.c:390 /tmpRoot/usr/syno/etc/www/DSM.json not exist May 12 19:01:57 findhostd: ninstaller.c:513 fail to get admin port from /tmpRoot/usr/syno/etc/www/DSM.json May 12 19:01:57 findhostd: ninstaller.c:541 failed to get nvr key from [/tmpRoot/etc.defaults/synoinfo.conf]. May 12 19:01:57 kernel: [ 35.805486] EXT4-fs (md0): mounted filesystem with ordered data mode. Opts: (null) May 12 19:01:57 findhostd: util_junior.c:348 fail to read [unique] from [/tmpRoot//etc.defaults/synoinfo.conf] May 12 19:01:57 findhostd: ninstaller.c:880 Model not match [/etc.defaults/synoinfo.conf, /tmpRoot//etc.defaults/synoinfo.conf] May 12 19:01:57 findhostd: ninstaller.c:1265 SYSTEM_NORMAL, [Recoverable=0] May 12 19:01:57 findhostd: ninstaller.c:168 umount partition /tmpRoot May 12 19:01:57 findhostd: ninstaller.c:1180(FillUpgradeVolumeInfo): gszUpgradeVolDev = /dev/md0 May 12 19:01:57 findhostd: ninstaller.c:1181(FillUpgradeVolumeInfo): gszUpgradeVolMnt = /tmpData May 12 19:01:57 findhostd: ninstaller.c:1289 gblSupportRaid: 1, gSysStatus: 1, gblCreateDataVol: 0, gblSystemRecoverable: 0 May 12 19:02:02 synoagentregisterd: synoagentregisterd.c:151 Generating register key... May 12 19:02:02 synoagentregisterd: synoagentregisterd.c:165 Generated register key [90DC452A.1992.4AF2.BA01.D42CCB97C300]. May 12 19:02:27 root: Failed to curl [https://dataupdate7.synology.com/juniorexpansionpack/v1/getUpdate?platform=denverton&buildnumber=64570][7] May 12 19:02:29 login[6120]: root login on 'console' May 12 19:02:57 root: Failed to curl [https://dataupdate7.synology.com/juniorexpansionpack/v1/getUpdate?platform=denverton&buildnumber=64570][7] May 12 19:02:58 synoupgrade: synoupgrade.c:1257 fail to perform curl, CURLcode returns 60 May 12 19:02:58 synoupgrade: autocleanup/mount.c:19 run '/usr/bin/mount /dev/md0 /_disk' May 12 19:02:58 kernel: [ 97.126257] EXT4-fs (md0): couldn't mount as ext3 due to feature incompatibilities May 12 19:02:59 synoupgrade: autocleanup/mount.c:27 mount's exit status is zero . . . May 12 19:03:37 install.cgi: ninstaller.c:510 fail to get admin port from /tmpRoot/etc/synoinfo.conf... try another way May 12 19:03:37 install.cgi: ninstaller.c:390 /tmpRoot/usr/syno/etc/www/DSM.json not exist May 12 19:03:37 install.cgi: ninstaller.c:513 fail to get admin port from /tmpRoot/usr/syno/etc/www/DSM.json May 12 19:03:37 install.cgi: ninstaller.c:541 failed to get nvr key from [/tmpRoot/etc.defaults/synoinfo.conf]. May 12 19:03:37 install.cgi: util_junior.c:348 fail to read [unique] from [/tmpRoot//etc.defaults/synoinfo.conf] May 12 19:03:37 install.cgi: ninstaller.c:880 Model not match [/etc.defaults/synoinfo.conf, /tmpRoot//etc.defaults/synoinfo.conf] May 12 19:03:37 install.cgi: ninstaller.c:1265 SYSTEM_NORMAL, [Recoverable=0] May 12 19:03:37 install.cgi: ninstaller.c:168 umount partition /tmpRoot May 12 19:03:37 install.cgi: ninstaller.c:1180(FillUpgradeVolumeInfo): gszUpgradeVolDev = /dev/md0 May 12 19:03:37 install.cgi: ninstaller.c:1181(FillUpgradeVolumeInfo): gszUpgradeVolMnt = /tmpData May 12 19:03:37 install.cgi: ninstaller.c:1289 gblSupportRaid: 1, gSysStatus: 1, gblCreateDataVol: 0, gblSystemRecoverable: 0 May 12 19:03:37 install.cgi: synoupgrade.c:785 system status = 2 May 12 19:03:37 install.cgi: ninstaller.c:1772 CreateDataVol=[0] May 12 19:03:37 install.cgi: ninstaller.c:168 umount partition /tmpData May 12 19:03:37 install.cgi: ninstaller.c:172 Fail to execute [/bin/umount -f /tmpData > /dev/null 2>&1] May 12 19:03:37 install.cgi: ninstaller.c:1783 installer cmd=[/usr/syno/sbin/installer.sh -r >> /tmp/installer_sh.log 2>&1] May 12 19:03:37 burnin: B1 not started May 12 19:03:37 kernel: [ 131.181913] md0: detected capacity change from 8589869056 to 0 May 12 19:03:37 kernel: [ 131.182949] md: md0: set sda1 to auto_remap [0] May 12 19:03:37 kernel: [ 131.183688] md: md0 stopped. May 12 19:03:37 kernel: [ 131.184173] md: unbind<sda1> May 12 19:03:37 kernel: [ 131.189095] md: export_rdev(sda1) May 12 19:03:37 raidtool: space_error_log.c:47 SpaceCommand:command="/sbin/mdadm -S /dev/md0" Error="mdadm: stopped /dev/md0 " May 12 19:03:37 raidtool: raid_internal_lib.c:160 [Info] clean RAID superblock of /dev/md0 May 12 19:03:37 raidtool: external/external_disk_port_check.c:158 expected sdx or /dev/sdx, not name, not match any port type May 12 19:03:37 raidtool: disk/disk_port_to_container.c:38 Unknown diskType May 12 19:03:37 raidtool: partition_path_enum.c:35 Failed to parsing device: name May 12 19:03:37 raidtool: external/external_disk_port_check.c:158 expected sdx or /dev/sdx, not ram, not match any port type May 12 19:03:37 raidtool: disk/disk_port_to_container.c:38 Unknown diskType May 12 19:03:37 raidtool: partition_path_enum.c:35 Failed to parsing device: ram0 May 12 19:03:37 raidtool: external/external_disk_port_check.c:158 expected sdx or /dev/sdx, not ram, not match any port type May 12 19:03:37 raidtool: disk/disk_port_to_container.c:38 Unknown diskType May 12 19:03:37 raidtool: partition_path_enum.c:35 Failed to parsing device: ram1 May 12 19:03:37 raidtool: external/extern[ 1427.445064] serial8250: too much work for irq4 al_disk_port_check.c:158 expected sdx or /dev/sdx, not ram, not match any port type May 12 19:03:37 raidtool: disk/disk_port_to_container.c:38 Unknown diskType May . . . May 12 19:03:52 install.cgi: RemoveUpgradeFile: Remove /tmpData/upd@te.pat... May 12 19:03:52 install.cgi: Verify checksum of [/tmpData/upd@te]... May 12 19:03:54 install.cgi: Pass checksum of /tmpData/upd@te... May 12 19:03:54 updater: updater.c:6194 Start of the updater... May 12 19:03:54 updater: updater.c:3277 orgBuildNumber = 64570.0, newBuildNumber = 64570.0 May 12 19:03:54 updater: util/updater_util.cpp:90 fail to read company in /tmpRoot//etc.defaults/synoinfo.conf May 12 19:03:54 updater: util/check_patch_support_hw_revision.cpp:63 This patch supports HW revision of this machine May 12 19:03:54 updater: child exit normally with [0] May 12 19:03:54 updater: updater.c:6501 ==== Start flash update ==== May 12 19:03:54 updater: updater.c:6505 This is X86 platform May 12 19:03:54 updater: updater.c:5823 Failed to mount boot partition May 12 19:03:54 updater: updater.c:3195 No need to reset reason for v.64570 May 12 19:03:54 updater: updater.c:7120 Failed to accomplish the update! (errno = 21) May 12 19:03:54 install.cgi: ninstaller.c:1652 Executing [/tmpData/upd@te/updater -v /tmpData > /dev/null 2>&1] error[21] May 12 19:03:57 install.cgi: ninstaller.c:139 Mount partion /dev/md0 /tmpRoot May 12 19:03:57 install.cgi: ninstaller.c:1621 Moving updater for configuration upgrade...cmd=[/bin/mv -f /tmpData/upd@te/updater /tmpRoot/.updater > /dev/null 2>&1] May 12 19:03:57 install.cgi: ninstaller.c:168 umount partition /tmpRoot May 12 19:03:57 install.cgi: ErrFHOSTCleanPatchDirFile: After updating /tmpData/upd@te...cmd=[/bin/rm -rf /tmpData/upd@te > /dev/null 2>&1] May 12 19:03:57 install.cgi: ErrFHOSTCleanPatchDirFile: Remove /tmpData/upd@te.pat... May 12 19:03:57 install.cgi: ErrFHOSTDoUpgrade(1986): child process failed, retv=-21 May 12 19:03:57 install.cgi: ninstaller.c:2008(ErrFHOSTDoUpgrade) err=[-1] May 12 19:03:57 install.cgi: ninstaller.c:2012(ErrFHOSTDoUpgrade) retv=[-21] May 12 19:03:57 install.cgi: install.c:458 Upgrade by the manual patch fail. May 12 19:03:57 install.cgi: install.c:760 Upgrade by the uploaded patch /tmpData/@autoupdate/upload.pat fail. Jan 1 00:00:00 install.cgi: ninstaller.c:168 umount partition /tmpData Jan 1 00:00:04 root: Failed to curl [https://dataupdate7.synology.com/juniorexpansionpack/v1/getUpdate?platform=denverton&buildnumber=64570][7] Jan 1 00:01:14 synoupgrade: synoupgrade.c:1257 fail to perform curl, CURLcode returns 60 Jan 1 00:01:14 synoupgrade: autocleanup/mount.c:19 run '/usr/bin/mount /dev/md0 /_disk' Jan 1 00:01:14 kernel: [ 225.518858] EXT4-fs (md0): couldn't mount as ext3 due to feature incompatibilities Jan 1 00:01:14 kernel: [ 225.622128] EXT4-fs (md0): mounted filesystem with ordered data mode. Opts: (null) Jan 1 00:01:14 synoupgrade: autocleanup/mount.c:27 mount's exit status is zero Jan 1 00:01:14 synoupgrade: get_disk_dsm_version.c:59 try reading disk dsm's version at file '/_disk//etc.defaults/VERSION' of key 'buildnumber' Jan 1 00:01:14 synoupgrade: get_disk_dsm_version.c:36 failed to load key 'buildnumber' from /_disk/etc.defaults/VERSION Jan 1 00:01:14 synoupgrade: get_disk_dsm_version.c:65 failed to read dsm version on '/_disk' Jan 1 00:01:14 synoupgrade: autocleanup/mount.c:44 run '/usr/bin/umount -l /_disk' Jan 1 00:01:14 synoupgrade: autocleanup/mount.c:54 umount's exit status is zero Jan 1 00:01:14 synoupgrade: autocleanup/directory.c:38 remove directory /_disk, result is 0 Jan 1 00:01:14 synoupgrade: synoupgrade.c:248 unable to get dsm version from disk device Jan 1 00:01:14 synoupgrade: synoupgrade.c:312 unable to append query string of disk dsm version dva3221-in-kvm-failed-install-messages.txt -

Change MAC address and serial in Jun's loader on 6.2
IG-88 replied to tle2099's topic in The Noob Lounge
you can take what its written in the arc wiki The DSM kernel is only compatible with SATA Controller, not HBA/Raid/etc. For Device-Tree Models (DT) SATA Controller are working, HBA/Raid Controller are in experimental Stage. For nonDT Models, other Type of Controller (like HBA/Raid/SCSI Controller) may work. there are driver for the older ata mode satra stuff, might work but only on non DT (devicetree) models like 3615/17 most simple und universal solution is to disable onboard old piix ata stuff if its nor working as ahci and add ahci sata cards, most only use two pcie lanes and if its just pcie 2.0 then it can limit the possible performance it there are to many drives on these two lanes (pcie 2.0 = 500 MByte/s per pcie lane, good old hdd's can't do much above 250MByte/s except where the tiny hdd cache is in use), ahci controllers are more universal as they are supported in all synology kernels where hba's are limited to some models if there are enough pcie slots the ahci cards (2,4,5,6 ports) are a good option asm1166 can be a problem as they present 32 ports to the system and only have 6 ports, can get messy with the numbering of drives (but afaik will work anyway) i prefer(ed) jmb585 based cars with 2 ports (pcie 1x slot) and 5 ports in pcie 4x/8x/16x slots past because my recent setup uses 5 bigger disks and can work with the 6 onboard sata (but if i need to i would reuse my jmb585 cards again and backup system with older drives still uses jmb585) you can read some about that stuff here (its no faq its just a timeline kind of collection about things) https://xpenology.com/forum/topic/35882-new-sataahci-cards-with-more-then-4-ports-and-no-sata-multiplexer/ also there might be some cards that use pcie multiplexer chips in a useful way but they will be more expansive for the 10-12 sata ports and might do some fake stuff, so its always good to know what the chips on the card are supposed to do and what they really can do by the specs of the chip) -
Synology Plus series internal Flash/DOM repair and model-modding
DSfuchs replied to DSfuchs's topic in Hardware Modding
Since the update problem has nothing to do with modding, the manufacturer is responsible. I would only try with a single otherwise free hard drive. When the level is reached, I would then plug in the correct hard drives. -
Synology Plus series internal Flash/DOM repair and model-modding
DSfuchs replied to DSfuchs's topic in Hardware Modding
If you mess up your hard drives, only the "cat /proc/mdstat" command will be able to help you, but not the GUI. -
Ok, I figured it out. The procedure is simple in the end: Run this command on your synology box via ssh or some other means: dmesg|grep "ata[0-9]*[:] SATA link" Read out the ataX with the highest number for X. Use a calculator to convert (2^X - 1) to HEX. go into rr's synoinfo menu setting and set internalportcfg to the hex value you just calculated. rebuild the bootloader and you're done! Now when you boot up, all drives should show up in storage manager.
-
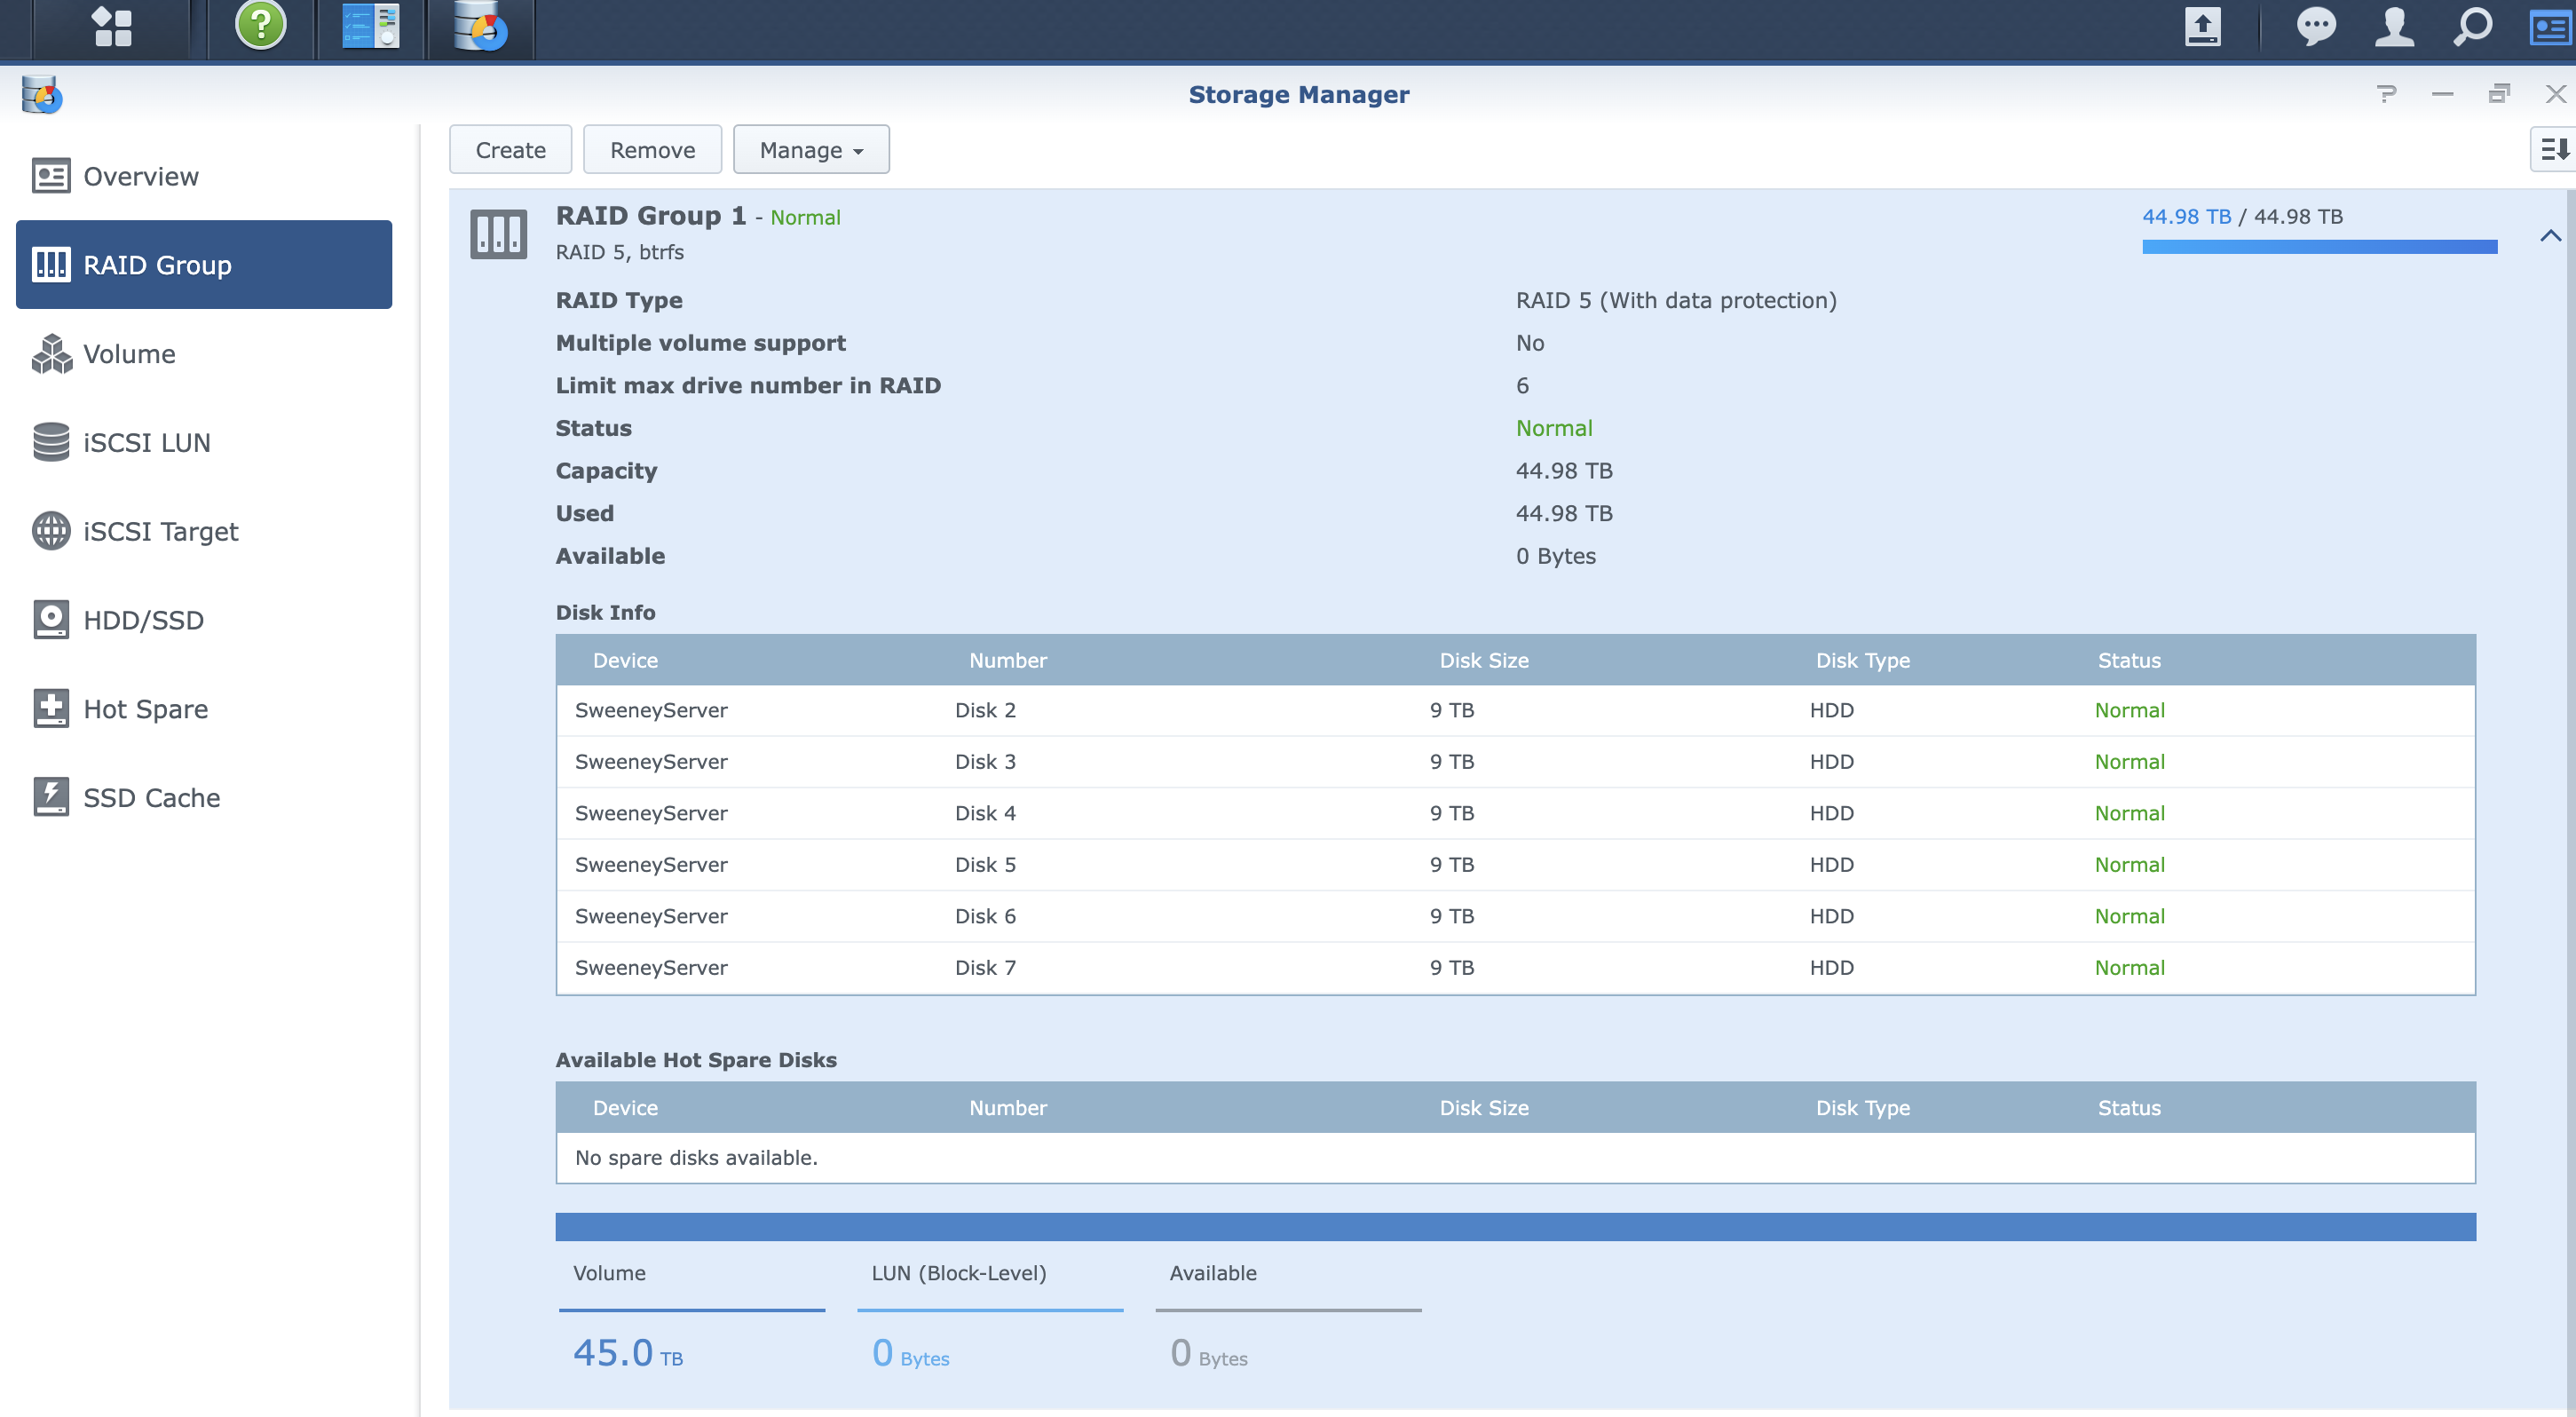
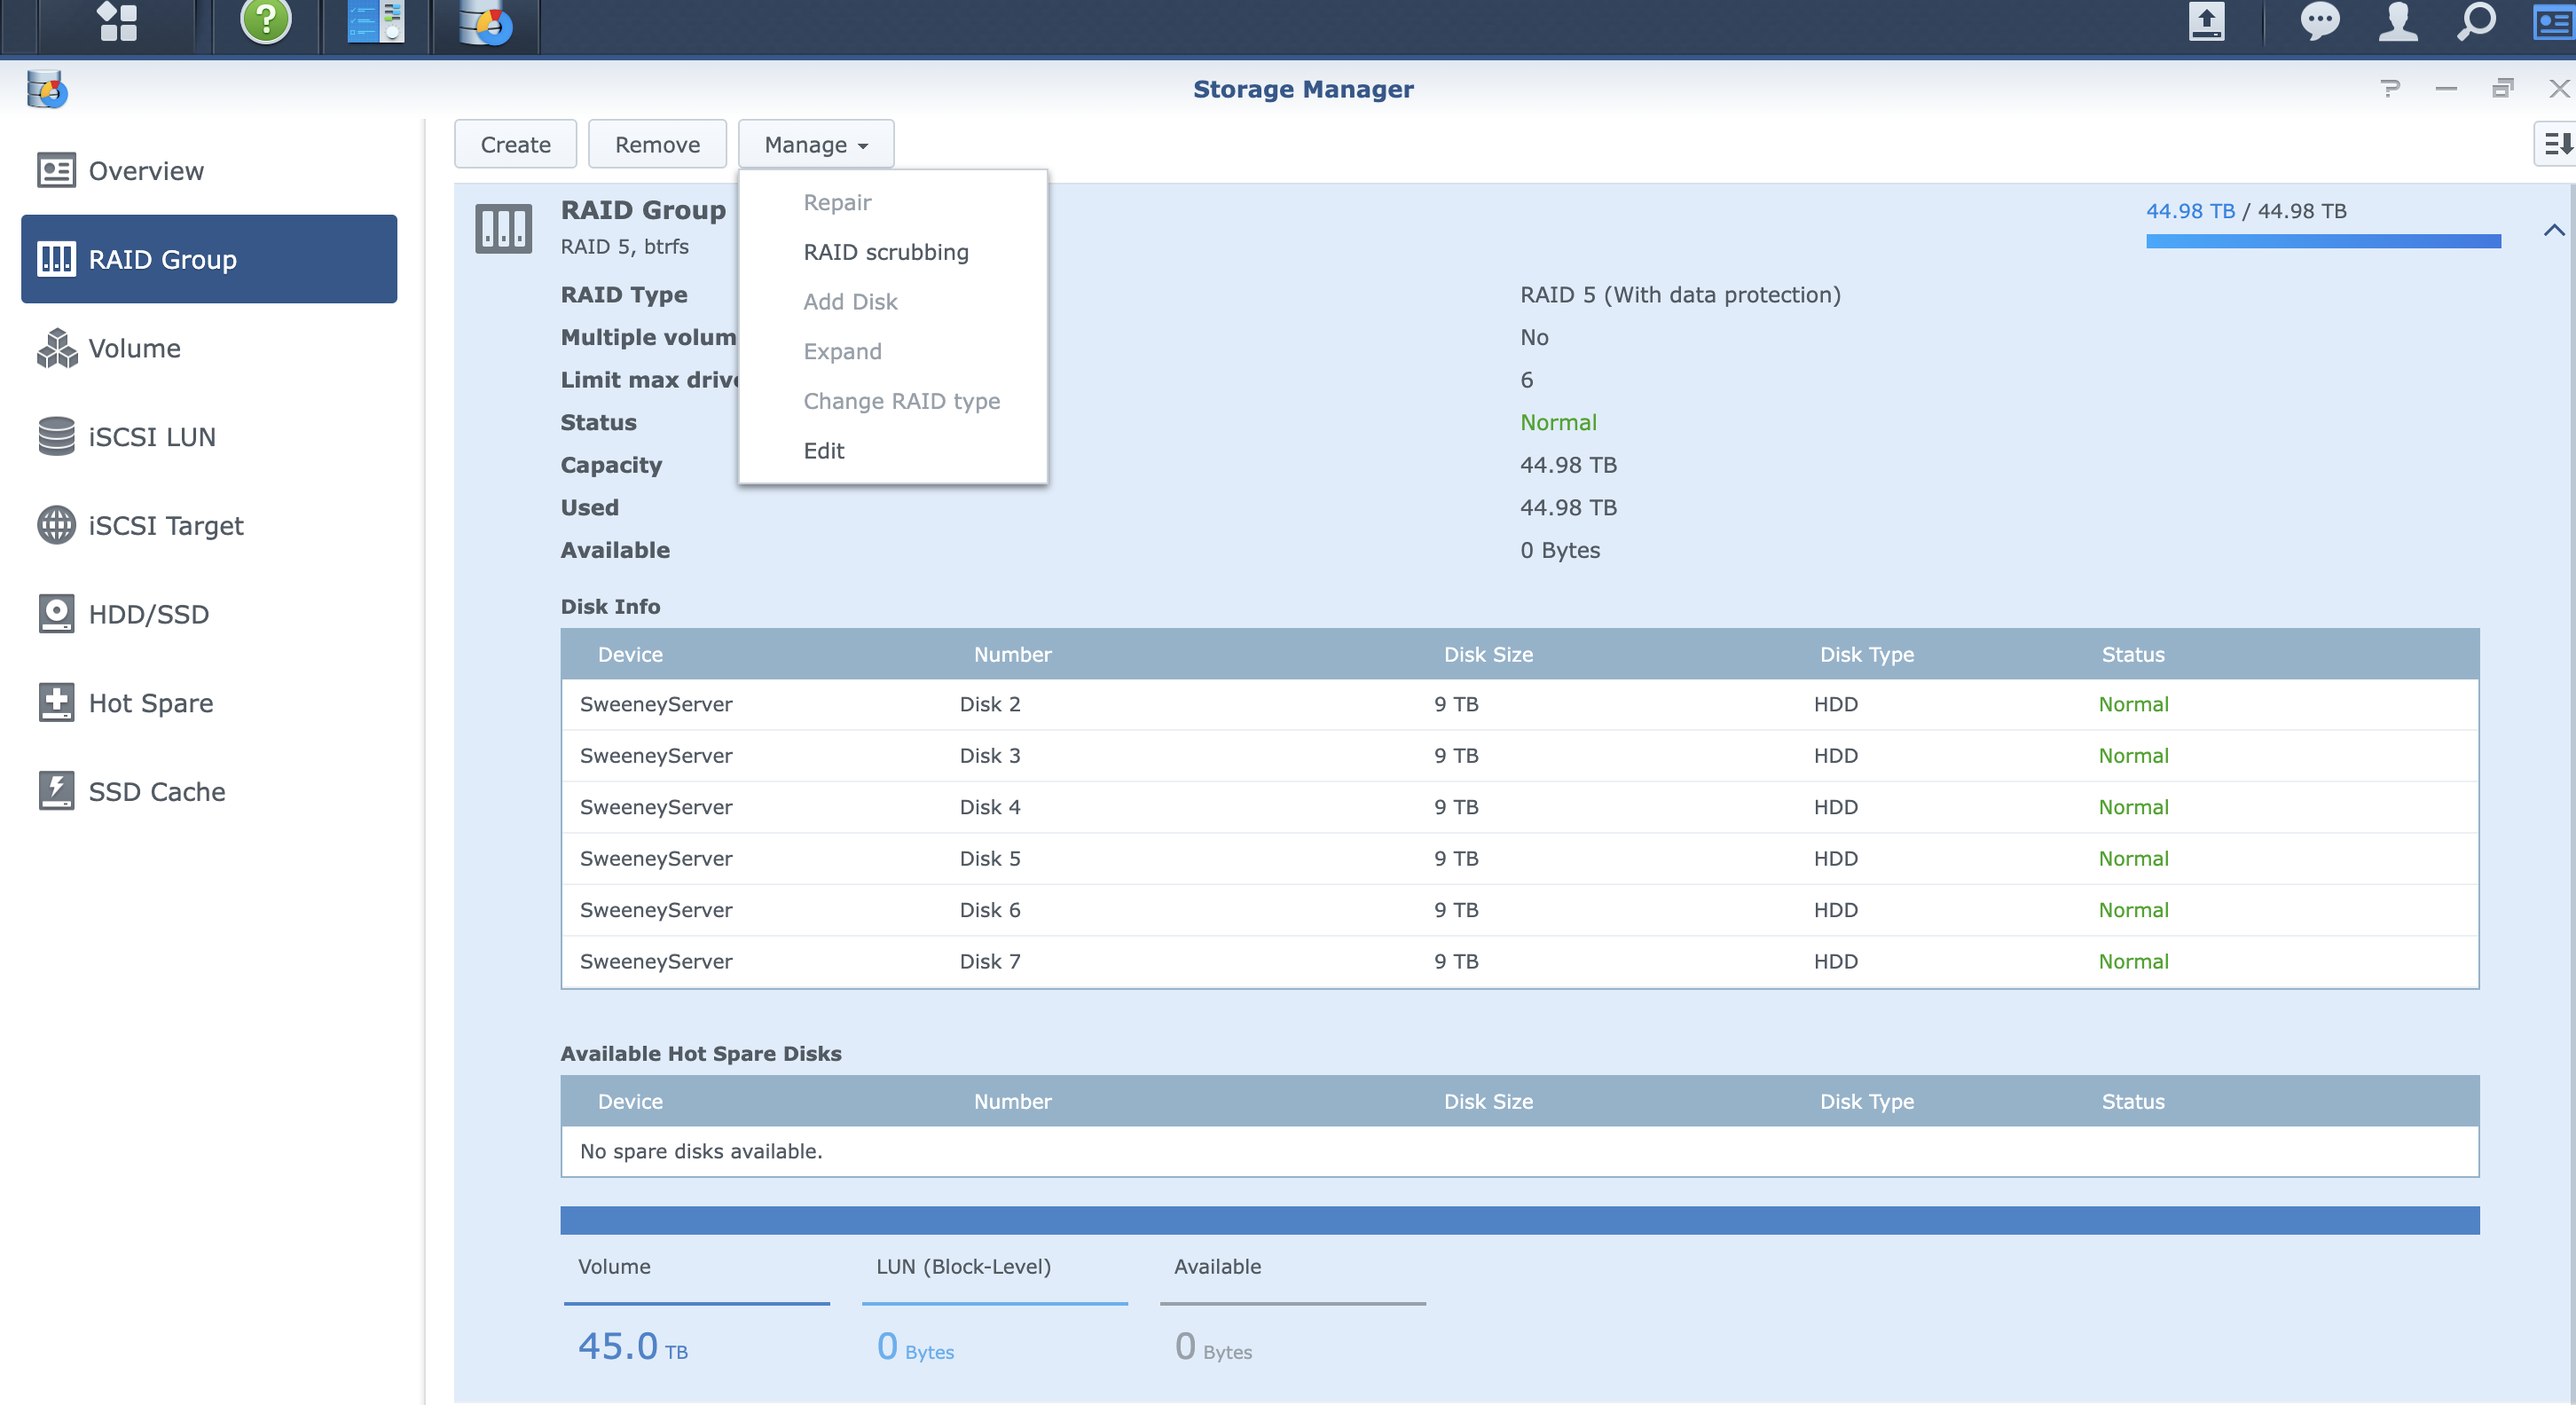
Hey guys, Running DSM 6.0.2 My raid group 1 is set to be Raid 5 and when I created it set the max drive number in raid to be 6 because I probably thought I’d never need more storage than that. The raid pool currently has 6 WD Red Plus 10TB drives. I just bought 5 more drives (WD Red Plus 10TB) and ideally want to expand my raid 5 group so I don’t lose 9TB’s by having two different raid 5 pools. Is it possible to change this setting? If not can I make a new raid pool with a max of 12 or 24 drives and bring the drives from raid group 1 in without losing any of my data?


-

Change MAC address and serial in Jun's loader on 6.2
tle2099 replied to tle2099's topic in The Noob Lounge
thank you so much for telling me about auxxxilium. i had all but given up on tcrp. it was so hit and miss on older hardware that i had to recreate so many usb drives. and even when it did finally boot dsm, it would never install detect the drives or fail to install dsm. almost nowhere in the forums were there much mention of arc loader or tcrpfriend, much less a tutorial. i just have one last question if you or anyone could answer. is AHCI a must for any DSM configuration? i have several really old pcs like dell optiplex 380 or 390 that only have ATA as an option. no AHCI or RAID. those pcs just will not find any drives when booted into DSM. are those just SOL? i've tried DS3622xs, DS3615 and DS3617 but no luck -
Hello all, after my last aborted attempt to upgrade, and this time seems to have gone better with rr-24.5.1.img installing DS3622xs+ version 7.1-42962. This is on an AMD FX-8120 that has been running DSM 6.x for years. Everything installed great this time and I loaded DSM just fine, and I have only one issue: only the 6 drives connected to the the motherboard SATA ports show up, the 4 drives connected to my PCI SATA III card are not showing up in the storage manager. When I boot into the rr.img, I can see all of the drives under /dev/sdX so clearly there's a linux driver. Did I perhaps miss a step during the install? I thought all of the drivers were checked. Or is it perhaps because I installed 7.1-42962 rather than the 7.1.0-42661 shown in the loaders and platforms table? Any help is much appreciated.
-
Change MAC address and serial in Jun's loader on 6.2
IG-88 replied to tle2099's topic in The Noob Lounge
afair its about how the partitions are set up initially in the img file used to prep the usb drive the partiton itself should already have a drive letter try to start your editor (notepad++ should be ok for linux based files and windows default editor is not suggested) with elevated right like right click on the shortcut (or exe) and choose "run as administrator" if you then go to "open file" and choose the drive letter in question you should now be able to access the config file jun's loader and dsm 6.2 are outdated and kind of hard(er) to use then recent loaders for dsm 7.x i would highly recommend to check out arc loader (www.auxxxilium.tech) or tcrpfriend loader (https://github.com/PeterSuh-Q3/tcrpfriend) both are menu based and easy to use, you might also check for youtube content to get some more guidance if needed -
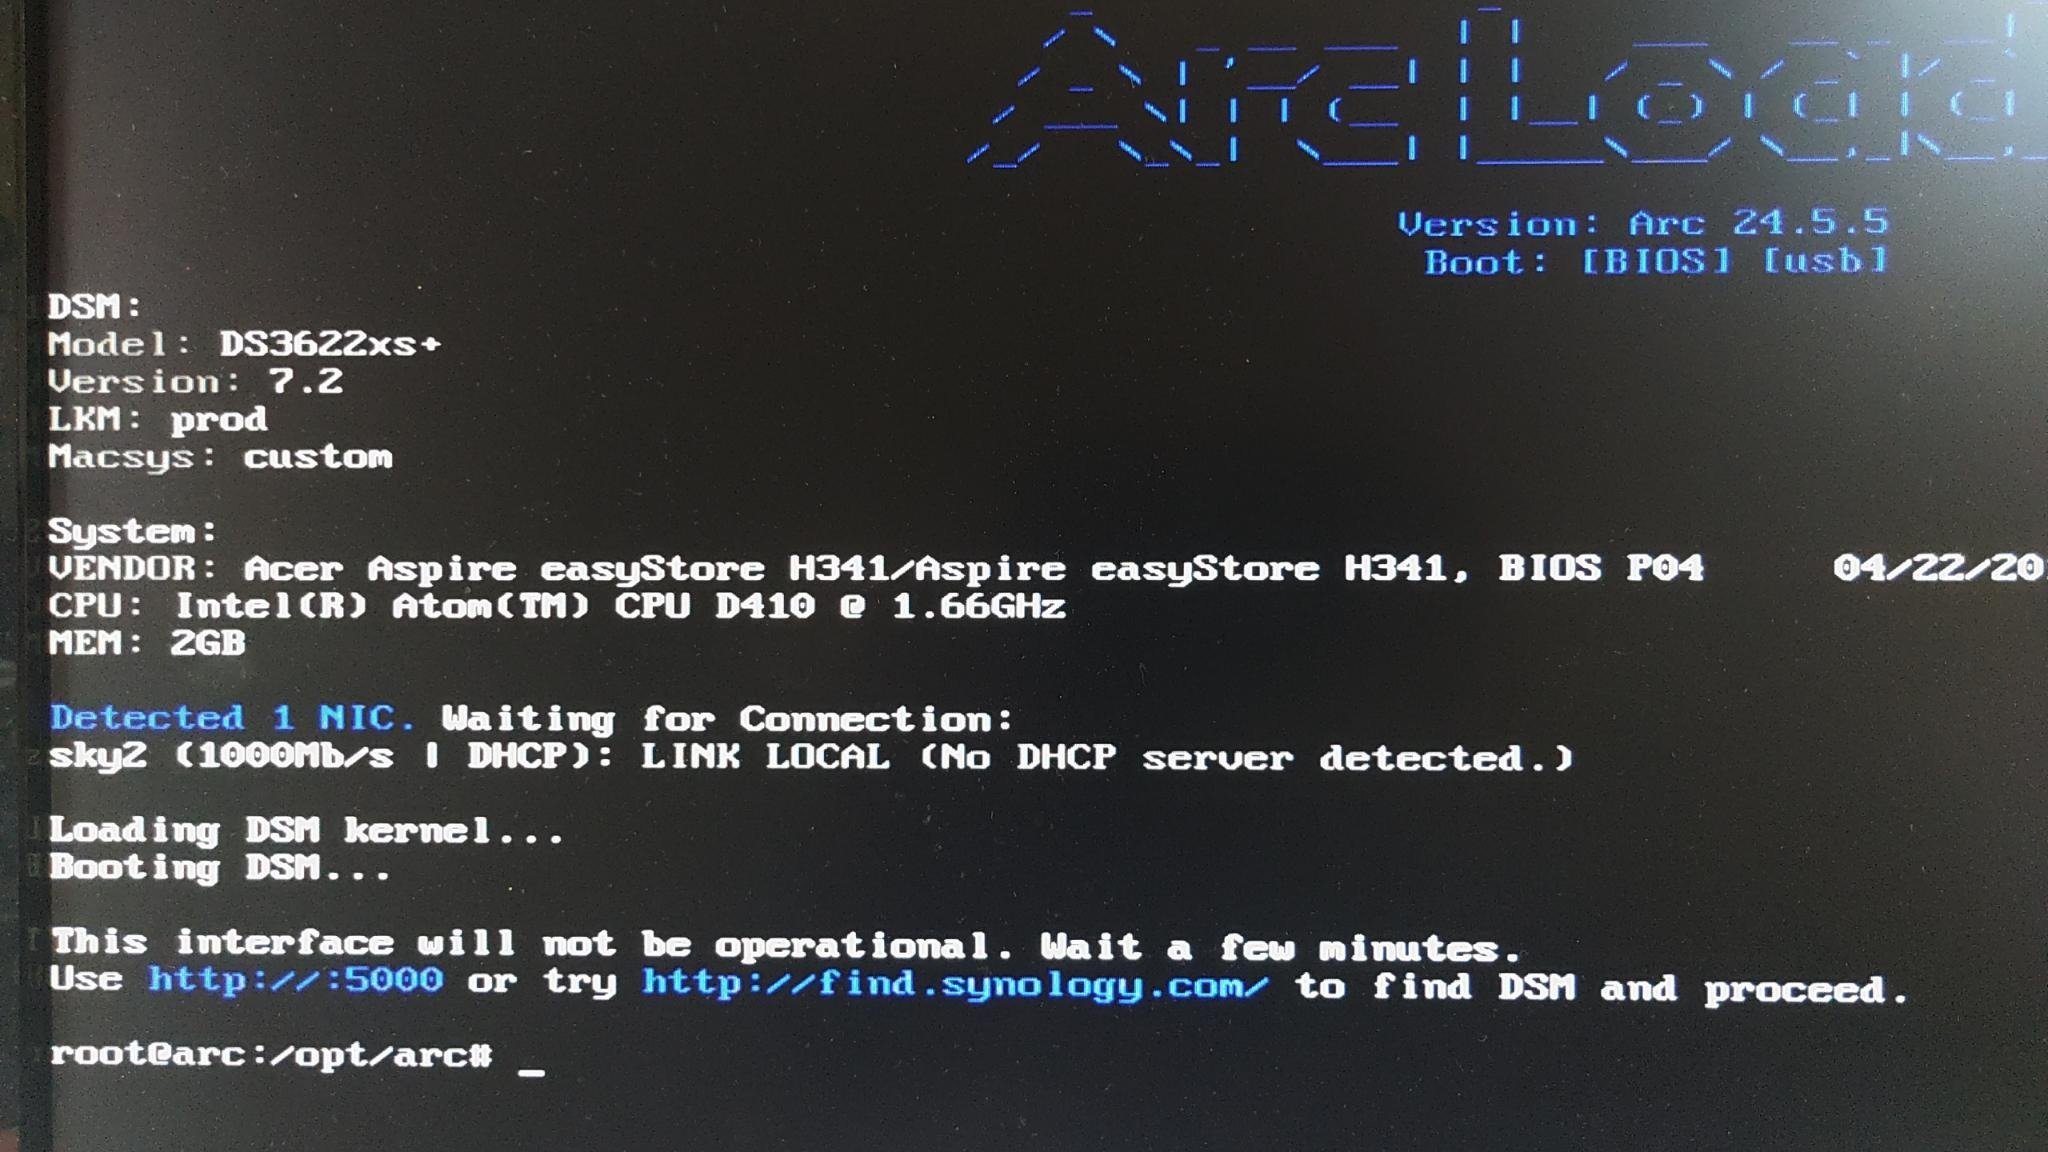
Hallo, Ich habe gestern den ARC-Loader 24.5.5 genutzt, um dsm 7.2 auf einen Acer H341 zu spielen. loader (arc-24.5.5.img) download - i.O. Loader installiert auf usb-stick - i.O H341 gestartet - i.O. userconfig.yaml auf IP statisch umgestellt - i.O dauerping laufen gehabt - i.O DSM patfile (DSM_DS3622xs+_69057.pat) per Webinterface hoch geladen - i.O dsm installiert - i.O der loader meint dann, er braucht einen reboot um im dsmmode zu starten. bei diesem reboot bekomme ich die meldung, "detecting Nic1 Waiting for Connection: sky2 (1000Mb/DHCP): link local no dhcp server detected" Interface will not be operational. Wait a few minutes. use http . . . Loading DSM Kernel Loading DSM... und ab hier reagiert auch die tastatur (VGA & PS2-Adapter) auch nicht mehr hat jemand ideen/Hilfestellungen?`wuerde mich sehr freuen.

-
hi, i've got the lspci -pp from ubuntu looking like this... " 00:1f.2 SATA controller: Intel Corporation C600/X79 series chipset 6-Port SATA AHCI Controller (rev 06) 00:1f.3 SMBus: Intel Corporation C600/X79 series chipset SMBus Host Controller (rev 06) 00:1f.6 Signal processing controller: Intel Corporation C600/X79 series chipset Thermal Management Controller (rev 06) 00:01.0/01:00.0 Serial Attached SCSI controller: Broadcom / LSI SAS3008 PCI-Express Fusion-MPT SAS-3 (rev 02) 00:02.0/02:00.0 PCI bridge: PLX Technology, Inc. PEX 8724 24-Lane, 6-Port PCI Express Gen 3 (8 GT/s) Switch, 19 x 19mm FCBGA (rev ca) 00:02.0/02:00.0/03:00.0 PCI bridge: PLX Technology, Inc. PEX 8724 24-Lane, 6-Port PCI Express Gen 3 (8 GT/s) Switch, 19 x 19mm FCBGA (rev ca) 00:02.0/02:00.0/03:08.0 PCI bridge: PLX Technology, Inc. PEX 8724 24-Lane, 6-Port PCI Express Gen 3 (8 GT/s) Switch, 19 x 19mm FCBGA (rev ca) 00:02.0/02:00.0/03:09.0 PCI bridge: PLX Technology, Inc. PEX 8724 24-Lane, 6-Port PCI Express Gen 3 (8 GT/s) Switch, 19 x 19mm FCBGA (rev ca) 00:02.0/02:00.0/03:00.0/04:00.0 Serial Attached SCSI controller: Broadcom / LSI SAS3008 PCI-Express Fusion-MPT SAS-3 (rev 02) 00:02.0/02:00.0/03:09.0/06:00.0 Serial Attached SCSI controller: Broadcom / LSI SAS3008 PCI-Express Fusion-MPT SAS-3 (rev 02) 00:03.0/07:00.0 Ethernet controller: Intel Corporation Ethernet Controller 10-Gigabit X540-AT2 (rev 01) 00:03.0/07:00.1 Ethernet controller: Intel Corporation Ethernet Controller 10-Gigabit X540-AT2 (rev 01) 00:11.0/09:00.0 Serial Attached SCSI controller: Intel Corporation C602 chipset 4-Port SATA Storage Control Unit (rev 06) " I do havy physical 2 HBAs in the system 00:01.0/01:00.0 Serial Attached SCSI controller: Broadcom / LSI SAS3008 PCI-Express Fusion-MPT SAS-3 (rev 02) > 9300-4i4e with ext SAS Expander (only external is connected) 00:02.0/02:00.0/03:00.0/04:00.0 Serial Attached SCSI controller: Broadcom / LSI SAS3008 PCI-Express Fusion-MPT SAS-3 (rev 02) 00:02.0/02:00.0/03:09.0/06:00.0 Serial Attached SCSI controller: Broadcom / LSI SAS3008 PCI-Express Fusion-MPT SAS-3 (rev 02) > 9300-16i with direct attaced drives with ls -al /sys/block /sd* i get this output, which shows 16 external connected and 14 internal connected drives to both HBAs lrwxrwxrwx 1 root root 0 May 6 2024 sdaa -> ../devices/pci0000:00/0000:00:02.0/0000:02:00.0/0000:03:09.0/0000:06:00.0/host10/port-10:1/end_device-10:1/target10:0:1/10:0:1:0/block/sdaa lrwxrwxrwx 1 root root 0 May 6 2024 sdab -> ../devices/pci0000:00/0000:00:02.0/0000:02:00.0/0000:03:09.0/0000:06:00.0/host10/port-10:2/end_device-10:2/target10:0:2/10:0:2:0/block/sdab lrwxrwxrwx 1 root root 0 May 6 2024 sdac -> ../devices/pci0000:00/0000:00:02.0/0000:02:00.0/0000:03:09.0/0000:06:00.0/host10/port-10:3/end_device-10:3/target10:0:3/10:0:3:0/block/sdac lrwxrwxrwx 1 root root 0 May 6 2024 sdad -> ../devices/pci0000:00/0000:00:02.0/0000:02:00.0/0000:03:09.0/0000:06:00.0/host10/port-10:4/end_device-10:4/target10:0:4/10:0:4:0/block/sdad lrwxrwxrwx 1 root root 0 May 6 2024 sdae -> ../devices/pci0000:00/0000:00:02.0/0000:02:00.0/0000:03:09.0/0000:06:00.0/host10/port-10:5/end_device-10:5/target10:0:5/10:0:5:0/block/sdae lrwxrwxrwx 1 root root 0 May 6 2024 sdaf -> ../devices/pci0000:00/0000:00:02.0/0000:02:00.0/0000:03:09.0/0000:06:00.0/host10/port-10:6/end_device-10:6/target10:0:6/10:0:6:0/block/sdaf lrwxrwxrwx 1 root root 0 May 6 2024 sdag -> ../devices/pci0000:00/0000:00:02.0/0000:02:00.0/0000:03:09.0/0000:06:00.0/host10/port-10:7/end_device-10:7/target10:0:7/10:0:7:0/block/sdag lrwxrwxrwx 1 root root 0 May 6 2024 sdb -> ../devices/pci0000:00/0000:00:01.0/0000:01:00.0/host1/port-1:0/expander-1:0/port-1:0:0/end_device-1:0:0/target1:0:0/1:0:0:0/block/sdb lrwxrwxrwx 1 root root 0 May 6 2024 sdc -> ../devices/pci0000:00/0000:00:01.0/0000:01:00.0/host1/port-1:0/expander-1:0/port-1:0:1/end_device-1:0:1/target1:0:1/1:0:1:0/block/sdc lrwxrwxrwx 1 root root 0 May 6 2024 sdd -> ../devices/pci0000:00/0000:00:01.0/0000:01:00.0/host1/port-1:0/expander-1:0/port-1:0:2/end_device-1:0:2/target1:0:2/1:0:2:0/block/sdd lrwxrwxrwx 1 root root 0 May 6 2024 sde -> ../devices/pci0000:00/0000:00:01.0/0000:01:00.0/host1/port-1:0/expander-1:0/port-1:0:3/end_device-1:0:3/target1:0:3/1:0:3:0/block/sde lrwxrwxrwx 1 root root 0 May 6 2024 sdf -> ../devices/pci0000:00/0000:00:01.0/0000:01:00.0/host1/port-1:0/expander-1:0/port-1:0:4/end_device-1:0:4/target1:0:4/1:0:4:0/block/sdf lrwxrwxrwx 1 root root 0 May 6 2024 sdg -> ../devices/pci0000:00/0000:00:01.0/0000:01:00.0/host1/port-1:0/expander-1:0/port-1:0:5/end_device-1:0:5/target1:0:5/1:0:5:0/block/sdg lrwxrwxrwx 1 root root 0 May 6 2024 sdh -> ../devices/pci0000:00/0000:00:01.0/0000:01:00.0/host1/port-1:0/expander-1:0/port-1:0:6/end_device-1:0:6/target1:0:6/1:0:6:0/block/sdh lrwxrwxrwx 1 root root 0 May 6 2024 sdi -> ../devices/pci0000:00/0000:00:01.0/0000:01:00.0/host1/port-1:0/expander-1:0/port-1:0:7/end_device-1:0:7/target1:0:7/1:0:7:0/block/sdi lrwxrwxrwx 1 root root 0 May 6 2024 sdj -> ../devices/pci0000:00/0000:00:01.0/0000:01:00.0/host1/port-1:0/expander-1:0/port-1:0:8/end_device-1:0:8/target1:0:8/1:0:8:0/block/sdj lrwxrwxrwx 1 root root 0 May 6 2024 sdk -> ../devices/pci0000:00/0000:00:01.0/0000:01:00.0/host1/port-1:0/expander-1:0/port-1:0:9/end_device-1:0:9/target1:0:9/1:0:9:0/block/sdk lrwxrwxrwx 1 root root 0 May 6 2024 sdl -> ../devices/pci0000:00/0000:00:01.0/0000:01:00.0/host1/port-1:0/expander-1:0/port-1:0:10/end_device-1:0:10/target1:0:10/1:0:10:0/block/sdl lrwxrwxrwx 1 root root 0 May 6 2024 sdm -> ../devices/pci0000:00/0000:00:01.0/0000:01:00.0/host1/port-1:0/expander-1:0/port-1:0:11/end_device-1:0:11/target1:0:11/1:0:11:0/block/sdm lrwxrwxrwx 1 root root 0 May 6 2024 sdn -> ../devices/pci0000:00/0000:00:01.0/0000:01:00.0/host1/port-1:0/expander-1:0/port-1:0:12/end_device-1:0:12/target1:0:12/1:0:12:0/block/sdn lrwxrwxrwx 1 root root 0 May 6 2024 sdo -> ../devices/pci0000:00/0000:00:01.0/0000:01:00.0/host1/port-1:0/expander-1:0/port-1:0:13/end_device-1:0:13/target1:0:13/1:0:13:0/block/sdo lrwxrwxrwx 1 root root 0 May 6 2024 sdp -> ../devices/pci0000:00/0000:00:01.0/0000:01:00.0/host1/port-1:0/expander-1:0/port-1:0:14/end_device-1:0:14/target1:0:14/1:0:14:0/block/sdp lrwxrwxrwx 1 root root 0 May 6 2024 sdq -> ../devices/pci0000:00/0000:00:01.0/0000:01:00.0/host1/port-1:0/expander-1:0/port-1:0:15/end_device-1:0:15/target1:0:15/1:0:15:0/block/sdq lrwxrwxrwx 1 root root 0 May 6 2024 sdr -> ../devices/pci0000:00/0000:00:1f.2/ata2/host2/target2:0:0/2:0:0:0/block/sdr lrwxrwxrwx 1 root root 0 May 6 2024 sds -> ../devices/pci0000:00/0000:00:02.0/0000:02:00.0/0000:03:00.0/0000:04:00.0/host9/port-9:0/end_device-9:0/target9:0:0/9:0:0:0/block/sds lrwxrwxrwx 1 root root 0 May 6 2024 sdt -> ../devices/pci0000:00/0000:00:02.0/0000:02:00.0/0000:03:00.0/0000:04:00.0/host9/port-9:1/end_device-9:1/target9:0:1/9:0:1:0/block/sdt lrwxrwxrwx 1 root root 0 May 6 2024 sdu -> ../devices/pci0000:00/0000:00:02.0/0000:02:00.0/0000:03:00.0/0000:04:00.0/host9/port-9:2/end_device-9:2/target9:0:2/9:0:2:0/block/sdu lrwxrwxrwx 1 root root 0 May 6 2024 sdv -> ../devices/pci0000:00/0000:00:02.0/0000:02:00.0/0000:03:00.0/0000:04:00.0/host9/port-9:4/end_device-9:4/target9:0:4/9:0:4:0/block/sdv lrwxrwxrwx 1 root root 0 May 6 2024 sdw -> ../devices/pci0000:00/0000:00:02.0/0000:02:00.0/0000:03:00.0/0000:04:00.0/host9/port-9:3/end_device-9:3/target9:0:3/9:0:3:0/block/sdw lrwxrwxrwx 1 root root 0 May 6 2024 sdx -> ../devices/pci0000:00/0000:00:02.0/0000:02:00.0/0000:03:00.0/0000:04:00.0/host9/port-9:5/end_device-9:5/target9:0:5/9:0:5:0/block/sdx lrwxrwxrwx 1 root root 0 May 6 2024 sdy -> ../devices/pci0000:00/0000:00:1d.0/usb1/1-1/1-1.1/1-1.1:1.0/host4/target4:0:0/4:0:0:0/block/sdy lrwxrwxrwx 1 root root 0 May 6 2024 sdz -> ../devices/pci0000:00/0000:00:02.0/0000:02:00.0/0000:03:09.0/0000:06:00.0/host10/port-10:0/end_device-10:0/target10:0:0/10:0:0:0/block/sdz the drives from HBA 9300-4i4e (0-15) are correctly addressed so far, it's only the internal HBA which right now pushes me to the cliff.... i've got 4 Dev_Bus addresses currently here (because of the pcie switch).... can you please show me your disk-settings and lspci -pp for them? so i can compare to my ones
-
- Outcome of the update: SUCCESSFUL - DSM version prior update: DSM 7.2 64570 Update 3 | ARPL 23.8.1 - Loader version and model: RR v24.5.1 | DS918+ - Using custom extra.lzma: NO - Installation type: Baremetal ASRock J3160DC-ITX, mini-pcie Intel 82574 (E1000e) ethernet card, 16 GB RAM, 4x SATA drives - Additional comments: 1. Created new USB boot disk, using RR v24.5.1.img 2. Configured via web interface 3. findsynology > Recover 4. Once back into DSM, performed update to U5 from the web console, reboot
-
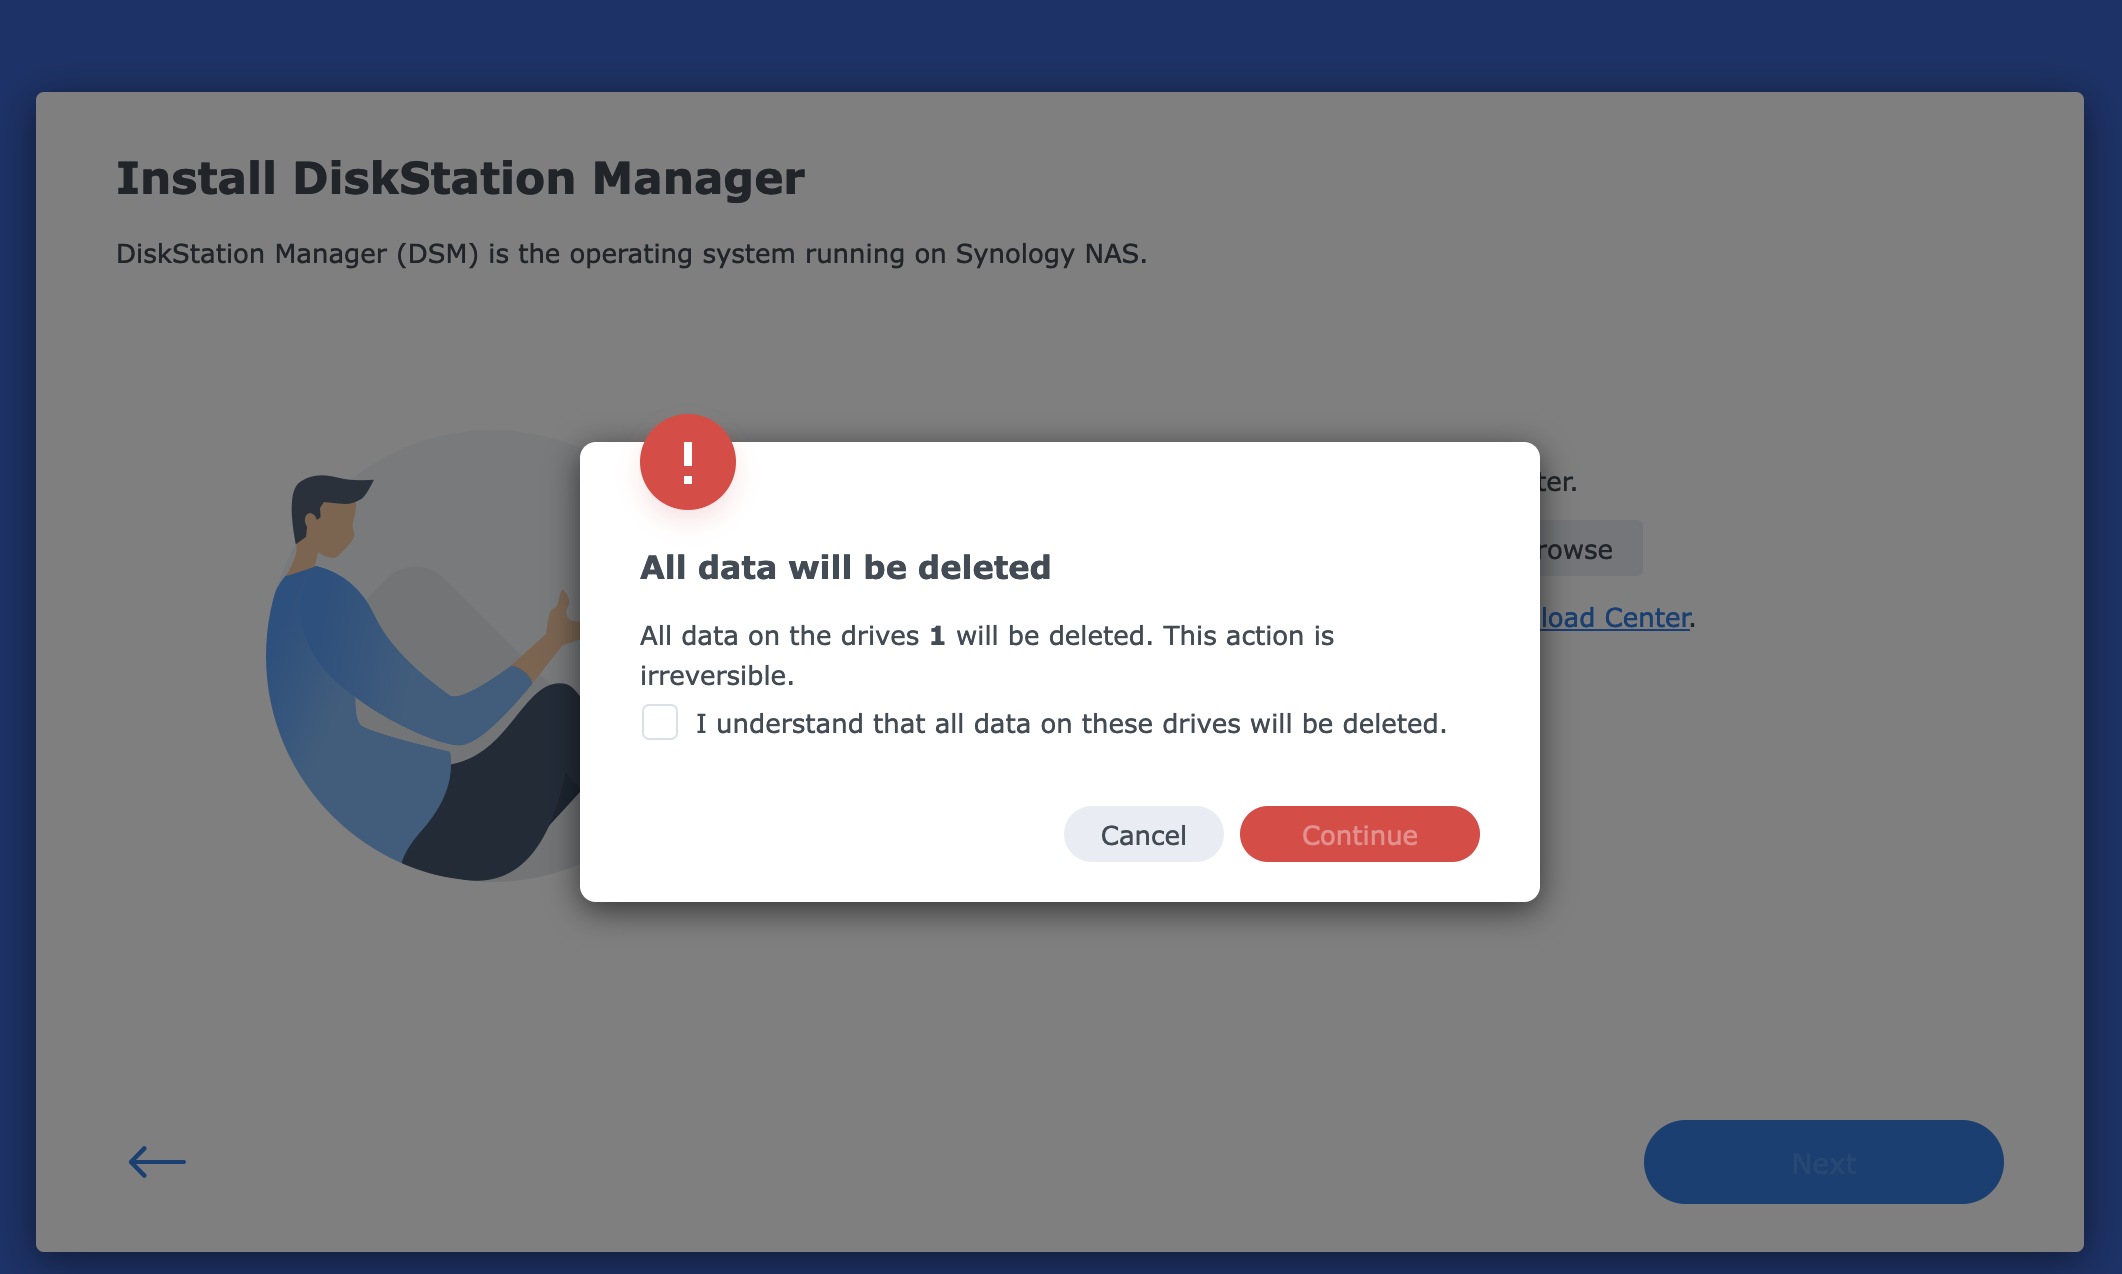
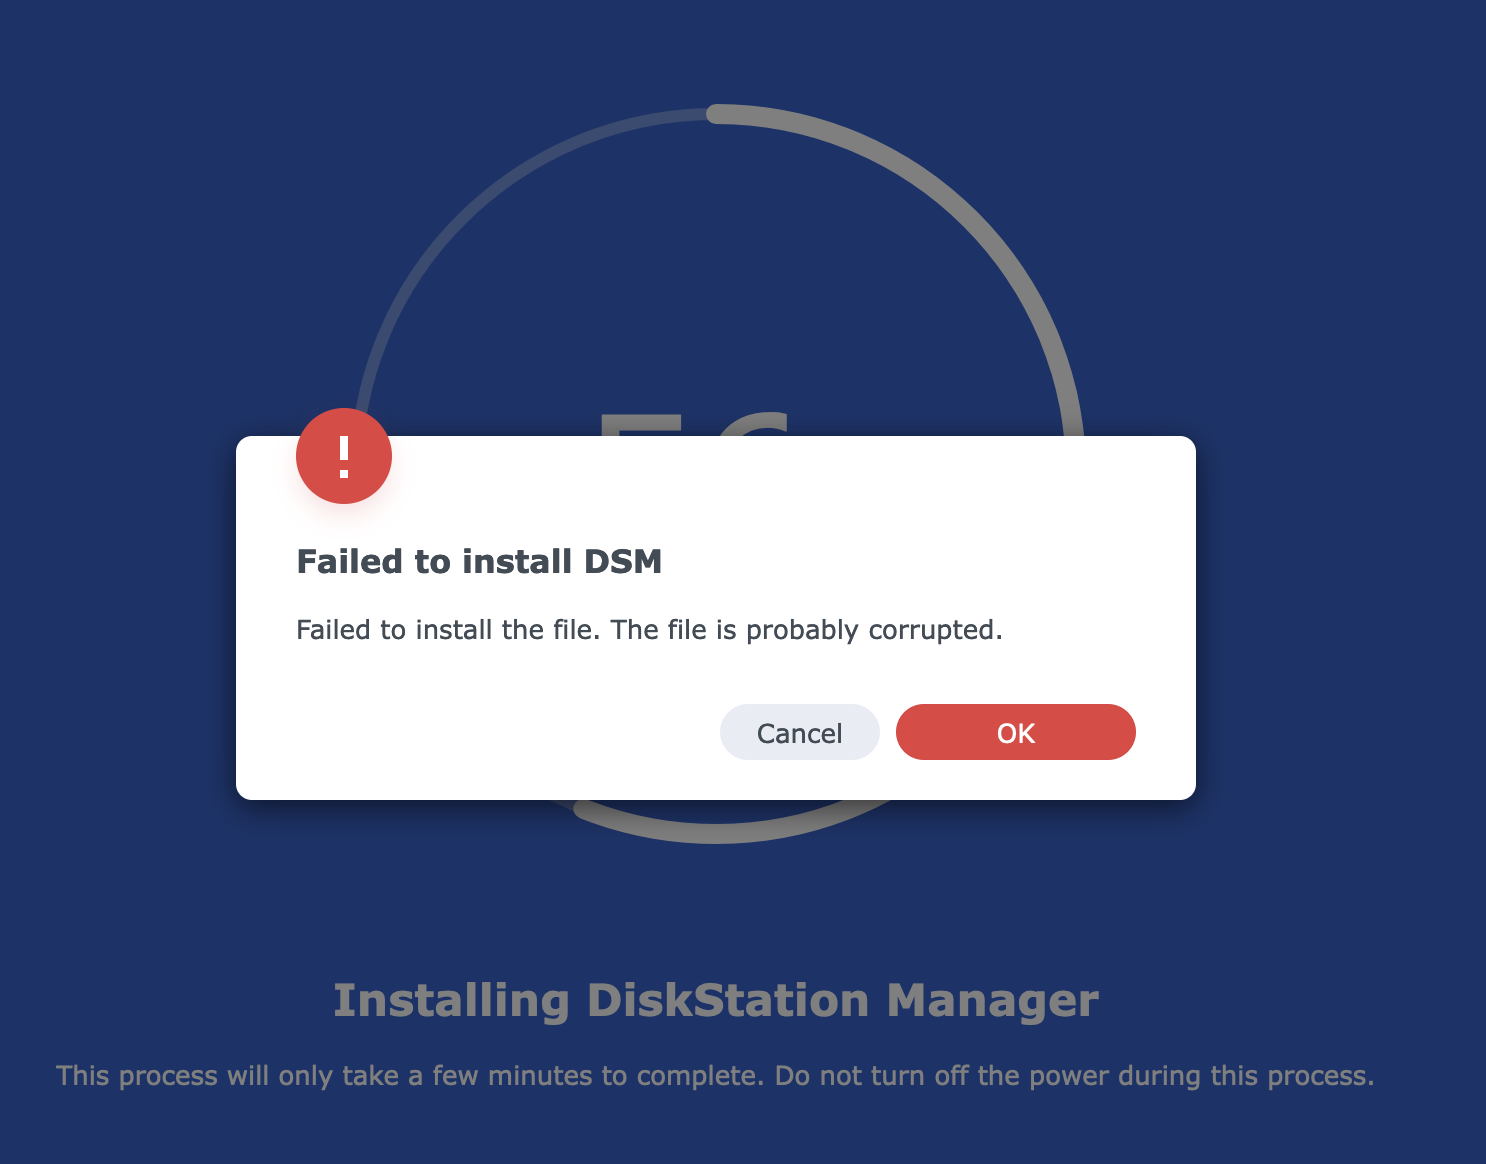
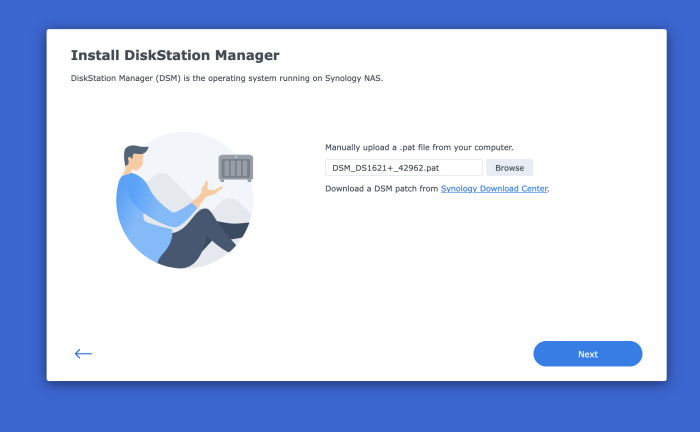
I need to install a fully functioning version of DSM (not the Virtual DSM available from Synology). Long story, but in short I need to restore an "Entire System" Hyper Backup from my RS1221+ in order to go through the postgres database of that backup. The Virtual DSM available from Synology does not allow to restore "Entire System". Through trial and error, I've been able to get close. I create a new vm in Synology VMM by importing the TCRP vmdk image and adding 3 more sata drives. The process breaks during the DSM Installation. Here below is a summary of the VM I create: Import a virtual machine Summary Item Value Storage HDD VM Storage Name vdsm5 CPU(s) 4 Memory 8 GB Video Card vga CPU Relative Weight Normal Description - Enable CPU compatibility mode Disabled Reserved CPU Threads - Virtual Disk 1 10 GB (SATA) Virtual Disk 2 100 GB (SATA) Virtual Disk 3 200 GB (SATA) Virtual Disk 4 300 GB (SATA) Auto Switch Disabled Network Default VM Network (e1000) Autostart No Keyboard Layout Default Virtual USB Controller Disabled Firmware Legacy BIOS ISO File Unmounted, Unmounted Users with permissions - Groups with permissions administrators I boot up the VM and ssh into TinyCore, then do the following: sudo ./rploader.sh update sudo ./rploader.sh fullupgrade sudo ./rploader.sh serialgen DS1621+ realmac sudo ./rploader.sh satamap sudo vi user_config.json <-- here I change the model and the version sudo ./rploader.sh listmods ds1621p-7.1.1-42962 sudo ./rploader.sh ext ds1621p-7.1.1-42962 add https://raw.githubusercontent.com/pocopico/rp-ext/master/e1000/rpext-index.json sudo ./rploader.sh ext ds1621p-7.1.1-42962 add https://raw.githubusercontent.com/pocopico/rp-ext/master/v9fs/rpext-index.json sudo ./rploader.sh build ds1621p-7.1.1-42962 sudo ./rploader.sh backup sudo vi user_config.json <-- just to make sure everything looks good sudo exitcheck.sh reboot During the above steps, when I do 'sudo ./rploader.sh satamap', I get a warning saying "Other drives are connected that will not be accessible!": tc@box:~$ sudo ./rploader.sh satamap Machine is VIRTUAL Hypervisor=KVM Found "00:1a.0 Intel Corporation 82801IR/IO/IH (ICH9R/DO/DH) 6 port SATA Controller [AHCI mode] (rev 02)" Detected 6 ports/4 drives. Mapping SATABOOT drive after maxdisks WARNING: Other drives are connected that will not be accessible! Computed settings: SataPortMap=1 DiskIdxMap=10 Should i update the user_config.json with these values ? [Yy/Nn] y Done. tc@box:~$ Here is what my user_config.json looks like. I changed the hashes, sn, and mac1. { "general": { "model": "DS1621+", "version": "7.1.1-42962", "smallfixnumber": "0", "zimghash": "XXXXXXX", "rdhash": "XXXXXXX", "usb_line": "earlyprintk syno_hw_version=DS1621+ console=ttyS0,115200n8 netif_num=1 synoboot2 pid=0xa4a5 earlycon=uart8250,io,0x3f8,115200n8 mac1=1234567890 sn=1234567890 SMBusHddDynamicPower= "sata_line": "earlyprintk syno_hw_version=DS1621+ console=ttyS0,115200n8 netif_num=1 synoboot2 pid=0xa4a5 earlycon=uart8250,io,0x3f8,115200n8 synoboot_satadom=2 mac1=1234567890 sn=1234567890 S "redpillmake": "prod", "friendautoupd": "true", "staticboot": "false", "hidesensitive": "false" }, "ipsettings": { "ipset": "", "ipaddr": "", "ipgw": "", "ipdns": "", "ipproxy": "" }, "extra_cmdline": { "pid": "0xa4a5", "vid": "0x0525", "sn": "1234567890", "mac1": "1234567890", "netif_num": "1", "SataPortMap": "1", "DiskIdxMap": "10" }, "synoinfo": { "internalportcfg": "0xffff", "maxdisks": "16", "support_bde_internal_10g": "no", "support_disk_compatibility": "no", "support_memory_compatibility": "no", "maxlanport": "8", "netif_seq": "0 1 2 3 4 5 6 7" }, "ramdisk_copy": {} } After I boot up, I select the 'RedPill DS1621+ 7.7.1-42962 (SATA, Verbose)' option. After this I go to https://find.synology.com/ and select the one that shows the IP address of the vm, accept the EULA, then I get the Synology NAS Welcome Screen, I click Install, then it asks me to Manually upload a .pat file from my computer, which I do as shown below. The file is downloaded from https://global.download.synology.com/download/DSM/release/7.1.1/42962/DSM_DS1621%2B_42962.pat When I click next, I get the following screen, showing the VM is recognizing all 4 drives: If I click the checkbox and continue, the installation begins, but it fails at around 56% and I get the following message saying the file is probably corrupted. I tried doing this whole same process with DSM 7.2 and got the same message with that different file. I doubt it's the file. After I click OK, it takes me back to the screen where it asks to manually upload .pat file from my computer. When I do that, however, there is a small change from before: It seems it's only recognizing 1 drive, not 4 like the previous attempt, as shown here: After clicking the checkbox and continue, the process fails once again at the same point and I get the same Fail screen: If I force reboot the VM, it doesn't boot up. What am I doing wrong? What do I need to do in order to go through with the installation properly? Thank you.


-
I have had Syno Nas's for decades but a few years back I thought I would try Qnap out and purchased a TS-h973ax. I finally had enough of their OS although their HW is very good, better than Synology on comparable offerings. To have the best of both worlds I put xpenology on it, would have liked to use Arc loader but the Qnap has no video output so used TCRP as it can be done by putty. I had no end of trouble getting any usb drive to be successfully identified until I decided to remove the Qnap dom from motherboard, then all worked well. I used the DS2422+ as the model due to being AMD processor and sata mapping being automatic based on fitted drives. I now have a rock solid Syno nas running on latest update for the model installed, good to be back home
-

TinyCore RedPill Loader Build Support Tool ( M-Shell )
midiman007 replied to Peter Suh's topic in Software Modding
Thanks for the reply. This is why I was asking before I started pulling my hair out and spending hours trying to resolve it but only to find out that the MSI board my no support it. The only thing I found strange is that I had a ds2422+ with @fbelavenuto REDPILL it powered off but not on then I used your REDPlILL to update to a ds1823xs+ and it worked for a few days. Then I was getting that network error so I used your REDPILL wiped the drives and rebuilt it to a clean ds1823xs+ now it only shuts down. Strange yes I know. I am not saying it's anything you are anyone did just that it is intermittent. -
TinyCore RedPill Loader Build Support Tool ( M-Shell )
midiman007 replied to Peter Suh's topic in Software Modding
Peter thanks for your reply. Again thank you for your hard work on the loader. After a complete rebuild the PC will shut down and not power on. Really strange. Yes I did notice that even though the error appeared the boxes were checked and the PC shutdown at night but will not power on in the morning. I will try removing the weekend task and just use the weekday and see if that is the issue. I don't know about a true Sysology NAS since all of my OEM NAS's are QNaps. -
I can also confirm full USB functionality and advanced speed via TCRP. My systems are not only used for testing purposes. As of a year ago, ARPL didn't work. It's also super easy and quick to migrate from internal RAID0 using a single Linux mdadm-command. If you have an external single drive, you should ideally place the parity disk of a RAID4 there. If you have a dual(or more)-case, it makes sense to place the mirror drives of the RAID10 (RAID0+1 with 2 near-copies) there. In general, the slow hard drive performance when writing in RAID 5/6 scenarios, with only 3-5 drives, is out of the question for me anyway. I can also imagine the long recovery times with the associated collapse in performance. We're not talking about a data center-sized installation where the penalty is almost negligible. Always remember that the higher the number of hard drives, the more likely (I love RAID4 there) it is that a hard drive will fail.