Search the Community
Showing results for 'Supermicro x7spa'.
-
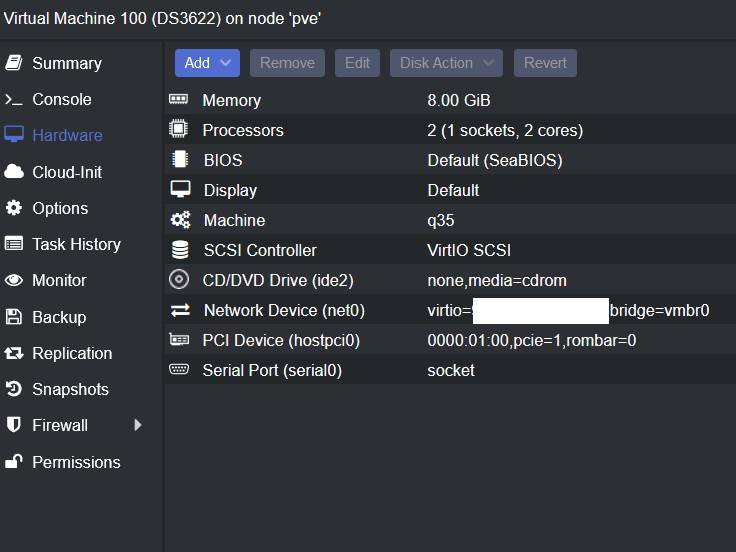
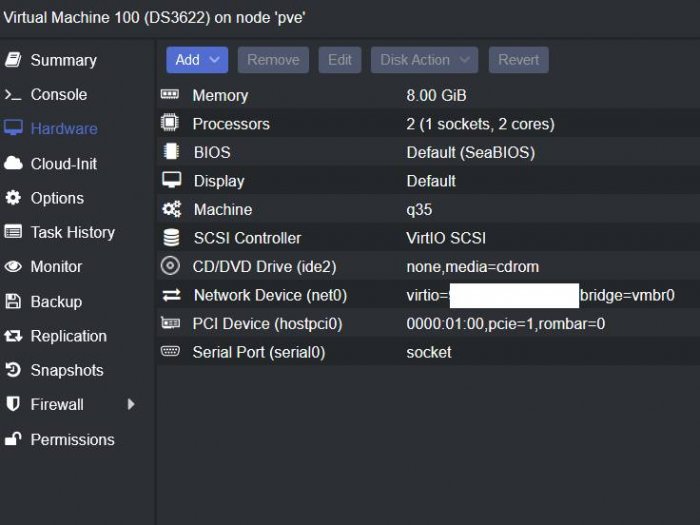
DS3622xs+ Motherboard: Supermicro X11SRM-VF CPU: 8core/8thread RAM: 128GB ECC HBA: LSI SAS3224 Network: connectx-3 I also tried ESXI with this guide VM boots and can install DSM with one virtual disk, but as soon as I add either one of the PCIE passthrough device (SAS3224 or connectx-3), it automatically shutdown. I see that during builds the ./rploader found driver for both devices. Here is my config: { "extra_cmdline": { "pid": "removed", "vid": "removed", "sn": "removed", "netif_num": "2", "mac1": "removed", "mac2": "removed", "SataPortMap": "11", "DiskIdxMap": "1000" }, "synoinfo": { "internalportcfg": "0xffff", "maxdisks": "16", "support_bde_internal_10g": "no", "support_disk_compatibility": "no", "support_memory_compatibility": "no" }, "ramdisk_copy": {} }
-
Thanks a lot for this tool. As said previously, I had issues getting TCRP working but I was able to upgrade from DS3615xs (jun mod) to DS3622xs+. Had some issues but overall using arpl was a breeze. Thanks again! Hardware info: Baremetal: SUPERMICRO MBD-X10SDV-TLN4F-O D-1541 (2 x 10 GbE LAN & 2 x Intel i350-AM2 GbE LAN) LSI HBA with 8 HDDs (onboard STA controllers disabled) (haven't tested 10GbE nics yet)
-
 Since we are hacking access to specific Synology platforms, for baremetal it always makes sense to me to try and match the platform configuration. So I am running DS918+ on an Asrock J4105 - virtually identical to the real DS918+ configuration. I am also running DS3622xs+ (originally DS3615xs) on a SuperMicro X11SSH-F board - also very close to the DS36xx hardware. But I test every platform on VM, and they all work one way or another, so if you are willing to put in the effort to learn how to use ESXi or Proxmox, it is very much achievable. Regarding the integrity of your data, a failed DSM install or upgrade doesn't put data at risk. A reckless upgrader may blow up the data partitions while they try unsavory things to get the system back up, but the worst that should happen is that data is inaccessible while you figure out how to get DSM back up and running. But as always, it is best to have a backup so that if YOU mess up, you can burn it down and build it back up without losing anything. I have a second copy (and for some data, a third) of everything. The tutorial gives you information on how to test a migration successfully. There are many success stories in the upgrade threads. That said there are a lot of little things that can go wrong migrating to or upgrading DSM 7. Even with extensive testing I still had a problem with the SuperMicro migration, and I had to rebuild DSM from scratch (but not my data).
 -
I have a motherboard Supermicro x9SRi-3F with a Xeon e31220, when i tried to install Tinycore redpill .. when inserting serial command there was no compatible serialloader, so i had to try another serialloader with another intel (I3) Also tried bootloaders for 6.1 and 6.2 none of them are loading, only happy hacking then nothing. Which bootloader (DSM six or seven) do work with the xeon e31220?
-
 1st post here. Tags or Magick words related to this issue: Failed to install DSM, Error trying to load PAT at 55%, Prior things done/check Install TinyCore Boot USB to TinyCore Build with DS3622xs+ USB Kingston (good compatibility) Supermicro Board (good compatibility) Boot correctly into DSM Loader Problem: After loading PAT file (proper version) you get the message "Failed to install the file. The file is probably corrupted" Analyzis: After finding the serial console provided by TinyCore on http://<yourip>:7681 (user/pass root/<blank>). If you check with cat/vi the log file linuxrescue.... cat /var/log/*rc* You will see some error messages like this ... Still waiting for boot device (waited 28 of 30 seconds) Still waiting for boot device (waited 29 of 30 seconds) Still waiting for boot device (waited 30 of 30 seconds) ERROR: Timeout waiting for /dev/synoboot device to appear. Most likely your vid/pid configuration is not correct, or you don't have drivers needed for your USB/SATA controller ... If this is the case.... maybe (but maybe) DSM Loader cant find the USB drive, despite from the fact that you correctly set the PID VID on the config. *You can check also running df -h or any other commando showing that the USB stick wasnt mounted/detected Cause: This could be caused by many things, but the one I found in this case is that the USB is connected in another port not used by DSM. I will be as simple as posible... DSM 7.1 on 3622xs+ looks at firsts BUS/PCI combination for the USB VID/PID provided, so bad luck on my trying to boot. My hardware has the USB port on BUS/Device: 2-3 (Reference photo) Solution: Here comes the good part.. How can we specify a new BUS/Device location on 3622? no idea.... xD But i've found that models DS920+ and DS1621+ have some .dts files on the redpill github. And they show at the very bottom the following curious info usb_slot@1 { vbus {syno_gpio = <0x2a 0x1>;}; usb2 {usb_port = "1-2";}; usb3 {usb_port = "2-2";}; }; usb_slot@2 { vbus {syno_gpio = <0xb 0x1>;}; usb2 {usb_port = "3-1";}; usb3 {usb_port = "4-1";}; }; usb_slot@3 { vbus {syno_gpio = <0xc 0x1>;}; usb2 {usb_port = "1-3";}; usb3 {usb_port = "2-3";}; }; }; I guess you've realized were we are going. the rploader.sh script updates ONLY the line for usb_slot@1 on this file with the proper PID/VID of your USB stick. So what I did was, after runing identifyusb, I've changed manually the usb_port for usb2 on usb_slot@1 with the proper BUS/Device info obtain from the lsusb command on tinycore (where my usb were connected) Bonus: You can use 1Gb USB Stick with no problem Bonus2: I guess this applies to all DSMs and Loaders Hope this helps, took me 1 day to figure out.
 -
Same issue for me with a Supermicro X10SDV-TLN4F except mine is currently on DSM 6.2.3. What loader did you use for 7.0.1?
-
I just tried on my supermicro X10SDV-6C+-TLN4F which has been running 3622 7.0.1 for a while built back about 3 months ago, not using TCRP, wanted to upgrade to 7.1 and used TCRP but can't find 10gb network card using 3622 so I used 3617 with that I can find network but can't find any drives , so I just plug back my old usb and still running 7.0.1 any suggestions
-
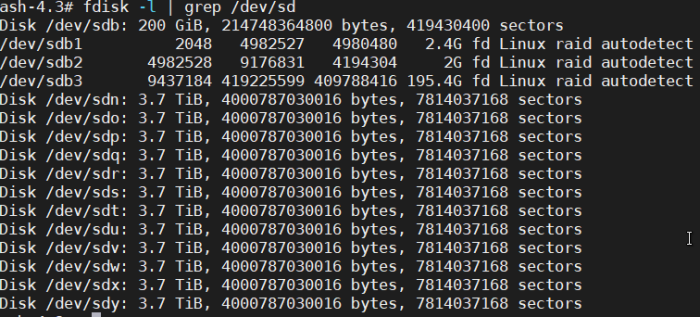
 Hardware: SUPERMICRO X10SDV-TLN4F D-1541 (2 x 10 GbE LAN & 2 x Intel i350-AM2 GbE LAN) LSI HBA with 8 HDDs (onboard STA controllers disabled) Previous attempts using TCRP & broadwellnk failed because I couldn't get a network connection (may be related to 10g NICs) Using TCRP & broadwell gets me further because the device is now discoverable in Synology Assistant, however, I keep getting "no drives" found. SataPortMap=8 DiskIdxMap=00 and SataPortMap=1 DiskIdxMap=00 tc@box:~$ ls -la /sys/class/ata_port total 0 tc@box:~$ lspci -tvnnq -+-[0000:ff]-+-0b.0 Intel Corporation Xeon E7 v4/Xeon E5 v4/Xeon E3 v4/Xeon D R3 QPI Link 0/1 [8086:6f81] | +-0b.1 Intel Corporation Xeon E7 v4/Xeon E5 v4/Xeon E3 v4/Xeon D R3 QPI Link 0/1 [8086:6f36] | +-0b.2 Intel Corporation Xeon E7 v4/Xeon E5 v4/Xeon E3 v4/Xeon D R3 QPI Link 0/1 [8086:6f37] | +-0b.3 Intel Corporation Xeon E7 v4/Xeon E5 v4/Xeon E3 v4/Xeon D R3 QPI Link Debug [8086:6f76] | +-0c.0 Intel Corporation Xeon E7 v4/Xeon E5 v4/Xeon E3 v4/Xeon D Caching Agent [8086:6fe0] | +-0c.1 Intel Corporation Xeon E7 v4/Xeon E5 v4/Xeon E3 v4/Xeon D Caching Agent [8086:6fe1] | +-0c.2 Intel Corporation Xeon E7 v4/Xeon E5 v4/Xeon E3 v4/Xeon D Caching Agent [8086:6fe2] | +-0c.3 Intel Corporation Xeon E7 v4/Xeon E5 v4/Xeon E3 v4/Xeon D Caching Agent [8086:6fe3] | +-0c.4 Intel Corporation Xeon E7 v4/Xeon E5 v4/Xeon E3 v4/Xeon D Caching Agent [8086:6fe4] | +-0c.5 Intel Corporation Xeon E7 v4/Xeon E5 v4/Xeon E3 v4/Xeon D Caching Agent [8086:6fe5] | +-0c.6 Intel Corporation Xeon E7 v4/Xeon E5 v4/Xeon E3 v4/Xeon D Caching Agent [8086:6fe6] | +-0c.7 Intel Corporation Xeon E7 v4/Xeon E5 v4/Xeon E3 v4/Xeon D Caching Agent [8086:6fe7] | +-0f.0 Intel Corporation Xeon E7 v4/Xeon E5 v4/Xeon E3 v4/Xeon D Caching Agent [8086:6ff8] | +-0f.4 Intel Corporation Xeon E7 v4/Xeon E5 v4/Xeon E3 v4/Xeon D Caching Agent [8086:6ffc] | +-0f.5 Intel Corporation Xeon E7 v4/Xeon E5 v4/Xeon E3 v4/Xeon D Caching Agent [8086:6ffd] | +-0f.6 Intel Corporation Xeon E7 v4/Xeon E5 v4/Xeon E3 v4/Xeon D Caching Agent [8086:6ffe] | +-10.0 Intel Corporation Xeon E7 v4/Xeon E5 v4/Xeon E3 v4/Xeon D R2PCIe Agent [8086:6f1d] | +-10.1 Intel Corporation Xeon E7 v4/Xeon E5 v4/Xeon E3 v4/Xeon D R2PCIe Agent [8086:6f34] | +-10.5 Intel Corporation Xeon E7 v4/Xeon E5 v4/Xeon E3 v4/Xeon D Ubox [8086:6f1e] | +-10.6 Intel Corporation Xeon E7 v4/Xeon E5 v4/Xeon E3 v4/Xeon D Ubox [8086:6f7d] | +-10.7 Intel Corporation Xeon E7 v4/Xeon E5 v4/Xeon E3 v4/Xeon D Ubox [8086:6f1f] | +-12.0 Intel Corporation Xeon E7 v4/Xeon E5 v4/Xeon E3 v4/Xeon D Home Agent 0 [8086:6fa0] | +-12.1 Intel Corporation Xeon E7 v4/Xeon E5 v4/Xeon E3 v4/Xeon D Home Agent 0 [8086:6f30] | +-13.0 Intel Corporation Xeon E7 v4/Xeon E5 v4/Xeon E3 v4/Xeon D Memory Controller 0 - Target Address/Thermal/RAS [8086:6fa8] | +-13.1 Intel Corporation Xeon E7 v4/Xeon E5 v4/Xeon E3 v4/Xeon D Memory Controller 0 - Target Address/Thermal/RAS [8086:6f71] | +-13.2 Intel Corporation Xeon E7 v4/Xeon E5 v4/Xeon E3 v4/Xeon D Memory Controller 0 - Channel Target Address Decoder [8086:6faa] | +-13.3 Intel Corporation Xeon E7 v4/Xeon E5 v4/Xeon E3 v4/Xeon D Memory Controller 0 - Channel Target Address Decoder [8086:6fab] | +-13.4 Intel Corporation Xeon E7 v4/Xeon E5 v4/Xeon E3 v4/Xeon D Memory Controller 0 - Channel Target Address Decoder [8086:6fac] | +-13.5 Intel Corporation Xeon E7 v4/Xeon E5 v4/Xeon E3 v4/Xeon D Memory Controller 0 - Channel Target Address Decoder [8086:6fad] | +-13.6 Intel Corporation Xeon E7 v4/Xeon E5 v4/Xeon E3 v4/Xeon D DDRIO Channel 0/1 Broadcast [8086:6fae] | +-13.7 Intel Corporation Xeon E7 v4/Xeon E5 v4/Xeon E3 v4/Xeon D DDRIO Global Broadcast [8086:6faf] | +-14.0 Intel Corporation Xeon E7 v4/Xeon E5 v4/Xeon E3 v4/Xeon D Memory Controller 0 - Channel 0 Thermal Control [8086:6fb0] | +-14.1 Intel Corporation Xeon E7 v4/Xeon E5 v4/Xeon E3 v4/Xeon D Memory Controller 0 - Channel 1 Thermal Control [8086:6fb1] | +-14.2 Intel Corporation Xeon E7 v4/Xeon E5 v4/Xeon E3 v4/Xeon D Memory Controller 0 - Channel 0 Error [8086:6fb2] | +-14.3 Intel Corporation Xeon E7 v4/Xeon E5 v4/Xeon E3 v4/Xeon D Memory Controller 0 - Channel 1 Error [8086:6fb3] | +-14.4 Intel Corporation Xeon E7 v4/Xeon E5 v4/Xeon E3 v4/Xeon D DDRIO Channel 0/1 Interface [8086:6fbc] | +-14.5 Intel Corporation Xeon E7 v4/Xeon E5 v4/Xeon E3 v4/Xeon D DDRIO Channel 0/1 Interface [8086:6fbd] | +-14.6 Intel Corporation Xeon E7 v4/Xeon E5 v4/Xeon E3 v4/Xeon D DDRIO Channel 0/1 Interface [8086:6fbe] | +-14.7 Intel Corporation Xeon E7 v4/Xeon E5 v4/Xeon E3 v4/Xeon D DDRIO Channel 0/1 Interface [8086:6fbf] | +-15.0 Intel Corporation Xeon E7 v4/Xeon E5 v4/Xeon E3 v4/Xeon D Memory Controller 0 - Channel 2 Thermal Control [8086:6fb4] | +-15.1 Intel Corporation Xeon E7 v4/Xeon E5 v4/Xeon E3 v4/Xeon D Memory Controller 0 - Channel 3 Thermal Control [8086:6fb5] | +-15.2 Intel Corporation Xeon E7 v4/Xeon E5 v4/Xeon E3 v4/Xeon D Memory Controller 0 - Channel 2 Error [8086:6fb6] | +-15.3 Intel Corporation Xeon E7 v4/Xeon E5 v4/Xeon E3 v4/Xeon D Memory Controller 0 - Channel 3 Error [8086:6fb7] | +-1e.0 Intel Corporation Xeon E7 v4/Xeon E5 v4/Xeon E3 v4/Xeon D Power Control Unit [8086:6f98] | +-1e.1 Intel Corporation Xeon E7 v4/Xeon E5 v4/Xeon E3 v4/Xeon D Power Control Unit [8086:6f99] | +-1e.2 Intel Corporation Xeon E7 v4/Xeon E5 v4/Xeon E3 v4/Xeon D Power Control Unit [8086:6f9a] | +-1e.3 Intel Corporation Xeon E7 v4/Xeon E5 v4/Xeon E3 v4/Xeon D Power Control Unit [8086:6fc0] | +-1e.4 Intel Corporation Xeon E7 v4/Xeon E5 v4/Xeon E3 v4/Xeon D Power Control Unit [8086:6f9c] | +-1f.0 Intel Corporation Xeon E7 v4/Xeon E5 v4/Xeon E3 v4/Xeon D Power Control Unit [8086:6f88] | \-1f.2 Intel Corporation Xeon E7 v4/Xeon E5 v4/Xeon E3 v4/Xeon D Power Control Unit [8086:6f8a] \-[0000:00]-+-00.0 Intel Corporation Xeon E7 v4/Xeon E5 v4/Xeon E3 v4/Xeon D DMI2 [8086:6f00] +-01.0-[01]-- +-02.0-[02]--+-00.0 Intel Corporation Xeon Processor D Family QuickData Technology Register DMA Channel 0 [8086:6f50] | +-00.1 Intel Corporation Xeon Processor D Family QuickData Technology Register DMA Channel 1 [8086:6f51] | +-00.2 Intel Corporation Xeon Processor D Family QuickData Technology Register DMA Channel 2 [8086:6f52] | \-00.3 Intel Corporation Xeon Processor D Family QuickData Technology Register DMA Channel 3 [8086:6f53] +-02.2-[03]--+-00.0 Intel Corporation Ethernet Connection X552/X557-AT 10GBASE-T [8086:15ad] | \-00.1 Intel Corporation Ethernet Connection X552/X557-AT 10GBASE-T [8086:15ad] +-03.0-[04]----00.0 LSI Logic / Symbios Logic SAS2008 PCI-Express Fusion-MPT SAS-2 [Falcon] [1000:0072] +-05.0 Intel Corporation Xeon E7 v4/Xeon E5 v4/Xeon E3 v4/Xeon D Map/VTd_Misc/System Management [8086:6f28] +-05.1 Intel Corporation Xeon E7 v4/Xeon E5 v4/Xeon E3 v4/Xeon D IIO Hot Plug [8086:6f29] +-05.2 Intel Corporation Xeon E7 v4/Xeon E5 v4/Xeon E3 v4/Xeon D IIO RAS/Control Status/Global Errors [8086:6f2a] +-14.0 Intel Corporation 8 Series/C220 Series Chipset Family USB xHCI [8086:8c31] +-16.0 Intel Corporation 8 Series/C220 Series Chipset Family MEI Controller #1 [8086:8c3a] +-16.1 Intel Corporation 8 Series/C220 Series Chipset Family MEI Controller #2 [8086:8c3b] +-1a.0 Intel Corporation 8 Series/C220 Series Chipset Family USB EHCI #2 [8086:8c2d] +-1c.0-[05]--+-00.0 Intel Corporation I350 Gigabit Network Connection [8086:1521] | \-00.1 Intel Corporation I350 Gigabit Network Connection [8086:1521] +-1c.4-[06-07]----00.0-[07]----00.0 ASPEED Technology, Inc. ASPEED Graphics Family [1a03:2000] +-1d.0 Intel Corporation 8 Series/C220 Series Chipset Family USB EHCI #1 [8086:8c26] +-1f.0 Intel Corporation C224 Series Chipset Family Server Standard SKU LPC Controller [8086:8c54] +-1f.3 Intel Corporation 8 Series/C220 Series Chipset Family SMBus Controller [8086:8c22] \-1f.6 Intel Corporation 8 Series Chipset Family Thermal Management Controller [8086:8c24]
 -
To be fair, the PN is this: MBD-X10SDV-TLN4F, the CPU is a D-1541. https://www.supermicro.com/products/Product_Naming_Convention/Naming_MBD_Intel_UP.cfm
-

No IP on baremetal (TCRP DS3622xs+)
Captainfingerbang replied to trublu's question in Answered Questions
MBD-X10SDV-TLN4F-O D-1541 I'm don't mean to be rude, in fact i may even sound "simple" saying this... But do you think Supermicro will ever stop adding #'s to their motherboard models? Like in 50 years how long will the model numbers be.... 1000 digits? -
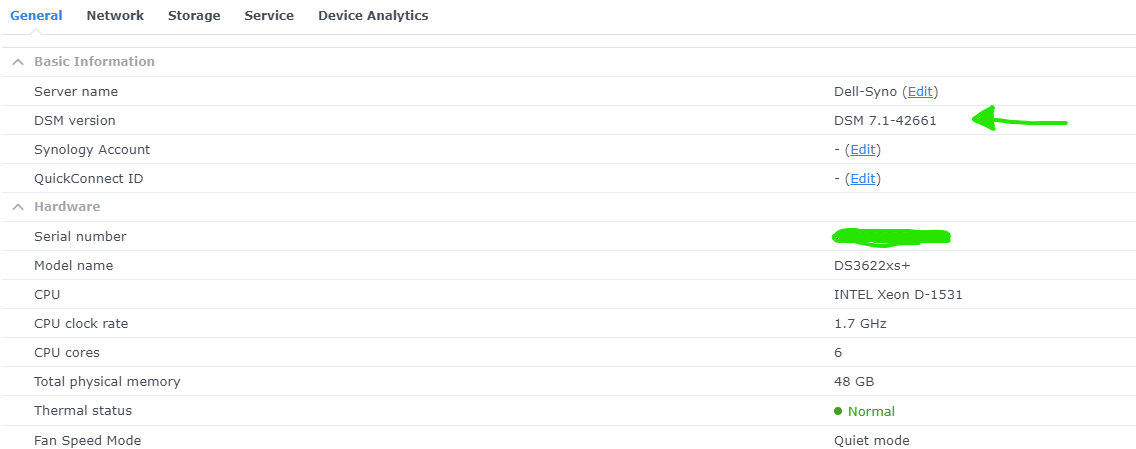
- Outcome of the update: SUCCESSFUL - DSM version prior update: DSM 6.2.3-25426 Update 2 ((Jun 1.03b loader) - Loader version and model: TinyCore 0.8.0 - DS3622xs+ - Using custom extra.lzma: No - Installation type: Proxmox 7.2-3 VM (i440fx and SeaBIOS) - Supermicro X10SL7-F - E3-1246 v3 - Storage Disks using LSI 2308 PCI Device Pass-through - Additional comments: Use dodo-dk rpext for ACPI to work properly inside VM. Restart and Shutdown VM from Proxmox GUI works fine. ./rploader.sh ext broadwellnk-7.1.0-42661 add https://raw.githubusercontent.com/dodo-dk/rp-ext/main/acpid/rpext-index.json
-
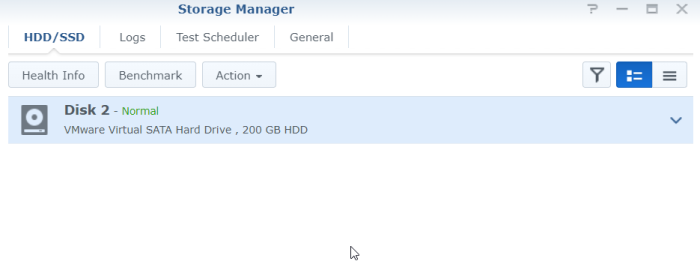
I'm running loader 1.03b under ESXI 6.5. Server is a Supermicro with LSI 9207 SAS HBA. HBA is passed through. I have setup using the various instructions that I have found on these forums. I can add virtual hard disks without any problem. However, none of the passed through drives are recognized by the GUI. There are 12 physical disks. The OS sees the drives, but none of the drives show up in the GUI. The card seems to be getting passed through correctly. If I boot a rescue disk on the VM, I can see the drives fine too. I have tried various versions of 6.2.X and none seem to work. I have tried setting it as a 3615 and 3617 I have searched these forums, but none of the suggestions have helped. Any ideas?
-
Serial console is always helpful to see what is going on. EDIT: your Supermicro probably supports serial redirection so you might be able to view the serial output from a Java console launched via the IPMI. Are you certain the loader is compiling without errors? If you have an Intel CT (e1000e) card you could drop that in temporarily see if you can find what is going wrong with the i350.
-
I've tried searching but can't seem to find any posts about a similar issue. Hardware: Motherboard with UEFi disabled: SUPERMICRO MBD-X10SDV-TLN4F-O D-1541 (2 x 10 GbE LAN & 2 x Intel i350-AM2 GbE LAN) LSI HBA with 8 HDDs (onboard STA controllers disabled) Used the above with Jun's mod for DSM 6.X with no issues. However, after booting up TCRP, everything looks fine except I can't get a network connection. The process I used is below: ./rploader.sh update now ./rploader.sh fullupgrade now ./rploader.sh identifyusb now ./rploader.sh serialgen DS3622xs+ realmac now At this point I edited user_config.json to add additional 3 NICs before continuing. ./rploader.sh satamap ./rploader.sh build broadwellnk-7.1.0-42661
-
Develop and refine the DS3622xs+ loader
trublu replied to yanjun's topic in Developer Discussion Room
Any chance of some insight into why my NICs don't show up after TCRP boot up? Motherboard which used with Jun's mod and had no issues.: SUPERMICRO MBD-X10SDV-TLN4F-O D-1541 (2 x 10 GbE LAN & 2 x Intel i350-AM2 GbE LAN) After booting up, everything looks fine except I can't get a network connection. The process I used is below: ./rploader.sh update now ./rploader.sh fullupgrade now ./rploader.sh identifyusb now ./rploader.sh serialgen DS3622xs+ realmac now At this point I edited user_config.json to add additional 3 NICs before continuing. ./rploader.sh satamap ./rploader.sh build broadwellnk-7.1.0-42661 -
@flyrideI have three servers to choose from. My newest is a self built Norco 24 case, supermicro x12spa-tf motherboard,Xeon 3rd gen silver processor, is has 240 gb ram, 4 nvme in vroc config on motherboard, with 12ssds, and 12 spinning disk, and 1 optane 905p, using with primo cache, as cache drive. I also have a HP Dl380 gen 9, dual processor e5-2670v3, 64 gig ram, 12-6tb sas 3 spinning drives, with 9305 16i LSI hba card.(This currently runs DSM 6.2.3) in a raid 10 configuration). Has been rock solid. And I also have a 24 bay supermicro server with dual processor x9 motherboard, with 192gb ram, 24-3tb Sas drives, currently running proxmox 7.2 with 2 tinycore redpill 3622xs vms instances, and a couple of server 2022 vms also. The first server mentioned uses some of the same hardware as the FS6400. I believe that with the hardware I have, I can achieve better performance with the software for the higher end synology boxes. Things like RDMA(SMB3+), which synology provides in their higher end hardware, that they dont provide in the lower end stuff like the 3622xs,etc. I have both 40Gbe and 10Gbe connectivity to these boxes. And yes all this is part of my home lab.
-
Baremetal installation Motherboard: Supermicro X11SCH-LN4F socket 1151 Processor: Intel Xeon E 2276G Coffee Lake RAM: 64Gb 4 Hhd Western Digital 4Tb EFRX 2 NVMe Samsung NVMe V-NAND SSD 670 Pro 512Gb Loader: found on the net already made for 918+ Hello everyone, yesterday I dreamed of updating DSM 7.01 up.2 working from January to up.4 manually, I downloaded the update from Synology 7.0.1-42218-4 (apollolake) site and started the update, after the update, however, the machine was never found; I thought I had everything busted but I tried to search for it with Synology web assistant (find.synology.com) and I realized that the machine is there (indeed it sees two), only that it has changed the IP addresses (I had assigned it an address static ip) with a very different range from mine, I use 192.168.1.1/254 while now he gives it to me with DHCP server and assigned ip addresses 169.254.63.90 to one machine and 169.254.58.122 to the other. Obviously my network can't see it can see hosts with that ip address renga, I tried with the Synology assistance program to change the addresses but it doesn't (it tells me that the machine is recoverable), how can I do ??? I had thought of changing the range of in to my lan (router and pc to possibly control the host) in 169.254.63.1/254 and see if I can enter the DSM and try to change the ip from the, can you do ?? ?? Or suggestions ???? Thanks
-
- Outcome of the update: SUCCESSFUL - DSM version prior update: NONE - fresh install - Loader version and model: redpill.v0.4.6.img DS3622xs+ DSM 7.1.0-42661u1 - Using custom extra.lzma: NO (added ext drivers manually) - Installation type: VM Proxmox v7.2: cpu: E3-1270v2 mobo: SuperMicro X9-SCM-F - Additional comments: Successful as Q35 and i440fx system. PCIe/PCI Pass Thru LSI HBA controller (Dell H710 flashed IT MODE ver P20) using ext MPT3SAS. Paravirtual nic using ext V9FS. ACPI working using ext https://raw.githubusercontent.com/dodo-dk/rp-ext/main/acpid/rpext-index.json
-
This motherboard is a Supermicro X9-SCM-F and has 6 sata ports, 2 sata 6 and 4 sata 3. (LINK TO MOBO) I never added anything to the vm except the hba card as a pass thru pci device, I am not sure if proxmox adds these controllers by default or what? Rebuilding loader will post results in a minute
-
Hello Everyone, I am fairly new to the forum here. Currently looking to setup a new Xpenology NAS to support my homelab with 1-3 Proxmox PVE servers. This appears to be a fun rabbit hole to travel down. Hopefully can get this working on my equipment. Happy to hear suggestions. Equipment: Network: Mikrotik CRS326-24S+2Q+RM 24-SFP+(10GB) 2-QSFP+(40GB) 1-Mgmt Mikrotik CRS326-24G-2S+RM 24-GBe 2-10GBe 1-Mgmt Planned NAS (all on hand except where noted) 24 Bay Hotswap Rackmount Case with SAS2 backplane Supermicro C7Z97MF Mainboard I7 4790k 32 GB 1600Mhz Ram 250 GB Samsung Sata SSD LSI 9205-8e SAS2 HBA PCIe 2.0 LSI 9207-8e SAS2 HBA PCIe 3.0 (on order will replace LSI 9205 when arrives) Chelsio T580-CR 40GBase 2 port PCIe 3.0 Intel X520-DA1 10GBase PCIe 2.0 Chenbro CK23601 24 port SAS2 expander Approximately 20 HDD various sizes Cheers Thaimichael Thailand
-
Ok, I am a little confused. I thought that way was wrong for usm a pve (proxmox) to do a dsm (vm)? I was under the impression you wanted the pve to pass thru the ports or pci card to dsm so dsm would have all the control over building and maintenance of the array. So dsm would get all the health/smart data to alert if drives fail, to rebuild raid, to use shr and expand arrays etc.. If you let pve (proxmox) virtually (emulate) thru the drives or even an array, all the maintenance would be handled on by pve or the card in question, isn't that wrong? I am still learning proxmox, and having some issues with this server board and its 2 nic ports. It has 2 nics + 1 ipmi console, and the 2 nics only 1 seems to get ipv4 and one gets ipv6, they switch, it seems like whichever gets the ipv4 first the other has to get ipv6? confusing. Plus the ipmi console works, but they (supermicro) stopped using admin/admin for ipmi login in 2020 and its not a unique password that should be a sticker on the motherboard and of course mine is not there.... I think its "simple" to pass the while pci device to a vm (dsm in this case), I also thought pve would pass thru individual ports of the onboard sata (5 of the 6 since 6 is its boot drive) but I am still trying to figure all that out. Anyway, your method above, the hba/sas card wouldnt matter if it was in it mode or not, since (if I am understanding you correctly) the drives would be handled by the controller card then passed to dsm, so all maintenance and would be done there. Even a raid would be pass over as 1 big voume...? again, to me that does not seem right or safe? (please correct me if I am wrong) Thank you @IG-88 for replying, you always take the time to explain things, where most people here simply post cryptic 1 line replies.
-

LSI SAS2008 - Make disk order follow enclosure places
phone guy replied to exodius's topic in Developer Discussion Room
Long story short, I bought a couple sas cards on ebay but I think I got the wrong ones. Dell H200 sas, I know that one is ok to flash and can be used as 8 sata ports without issue in it mode IBM M5015 unknown if it has an it mode firmware flash? I got confused with the M1015 🤪 Supermicro AOC-SAS2LP-H8IR also unknown? I dont know if an it mode firmware flash is available for this either? Does anyone have any details about these 2 cards? (AOC-SAS2LP-H8IR and M5015) I believe they are both raid only cards? But I did see a couple posts on google saying they can be crossed flashed, however the posts are ancient and download links are all dead.... then replies to posts say thats incorrect they can not be flashed... Obviously, I am a little confused... So any help and guidance would be most appreciated! Maybe some links to the software and firmware and sbr files? Many Thanks! -
 Hello, After searching a lot, and testing for hours, i've found something that doesn't seems to in this forum (if it is; sorry i haven't seen it) I've found 2 PERC H310 inside the bin, and saw the fabulous REDPILL LOADER, so i decide to give both a try. Got some usb stick and free disks, i first follow the classic H310 to 9211-8i IT firmware flash (google for it, it's pretty easy to do) Tryed the redpill loader with my new HBA SAS2008 : worked !!! BUT, the drives never show up in the correct order. Worse : the order changed uppon reboot. I found this great litterature to help me understand : S11209_v1.0_SAS-2EnclosureMapping.pdf There is a solution to switch those nice HBA from SAS address, to enclosure/slot mapping mode. Please note that my enclosure is a supermicro with a BPN-SAS-825TQ backplane, with SFF8084/sata breakout cables pluged between the backplane and the LSI SAS2008 card 2 counterbacks : - The order of the disks is reversed. Cable #1 for port A goes to disk 7, and cable #4 for port B goes to disk 0 - If there is a missing disk at boot, the card will bypass it, and it will allows report the disks in continuous order. ie. if disk 3 of 8 is missing at boot, then you will see that disk 8 is missing in DSM. Here is what i have done for this result : - Create my usb stick with redpill, and DSM - Plugged only the first disk in the enclosure, at the first position (important !) and then install DSM. If your NVRAM is not blank from a fresh flash, make a freedos USB stick with sas2flsh and launch sas2flsh -o -e 3 (this will erase the info from previous drives, and more config, becarefull) - Launch DSM7, got to ssh and : wget https://github.com/thomaslovell/LSIUtil/raw/master/Binaries/LSIutil_1.71_binaries/Linux/lsiutil.x86_64 chmod +x and sudo run ./lsiutil.x86_64 go into option 9, pagetype 1, pagenumber 8 modify offset 0x0c to 02 (bit 1 = Enclosure/Slot mapping mode) reboot and enjoy. Note that you can see the disk order with the LSIUTIL tool, using option 16 Fell free to make any comments or ask any questions
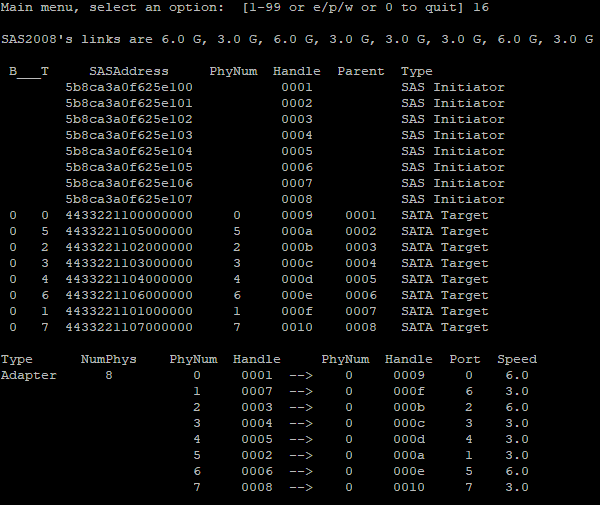
-
Thank you for the tip and explanation. I do not use a raid card, not on the SuperMicro or the Dell server for this test. I know you need it in IT mode, but the sata ports are fast enough, so I do use the build in sata controller. If the satamap is on 6, DSM does not see any drives and sata is off. But if I use 46 in the satamap and diskid 0000 as I mentioned before, all sata ports are active and I can use the drives.
-
Hi All, First of all, thank you @pocopico and @Peter Suh Here are my findings. Last week I was testing to install DSM 7.0.1-42218 on several machines. First I used a SuperMicro server with an Intel Xeon L5630 cpu and 24Gb of ram. So far so good, I could install version 7.0.1-42218 and installation is successfull. After reading a lot posts over here, I tried to upgrade from 7.0.1-42218 to 7.1.0-42661 and it failed using the instruction of @Peter Suh Even if I first installed 7.0.1-42218 complete and then upgrade, it failed, keeps nagging about corrupt file. When I tried to do a fresh install, samething, keeps nagging about corrupt file, even when I downloaded the file from the cache on TC, same thing. The following instructions was entered: Then after hours of trying I used the Dell R320 to give it a try. Installing DSM 7.0.1-42218, perfect it runs and see all the drives. The did a full wipe (so to have a clean installation, even drives where wiped). Entered the instructions as noted by @Peter Suh And it starts up to DSM 7.1, but just with one drive (no other sataport/drive where found). Again, started to TC, did a clean instruction and changed the satamap to the following: "SataPortMap": "46", "DiskIdxMap": "0000" rebuild everything again with ./rploader.sh build broadwellnk-7.1.0-42661 rebooted the server and started to DSM 7.1, did the installation steps en all drives where found. It looks like something about which components you use ? With every server I used, I have changed the mac adres to the mac adres from the nic's I have installed now DS918+ on an asrock motherbord with an Apollo Lake cpu on it running DSM 7.0.1-42218 Will try to do an upgrade to DSM 7.1.0-42661 next time and will write to outcome here. Thank you for reading this post Kind regards