Search the Community
Showing results for 'SataPortMap'.
-
Здравствуйте! Все мозги разбил на части, все извилины заплёл, но что-то упускаю. Перечитал уже за сотню страниц с разных сайтов, но рекомендации не помогли. Перебровал осознанно и местами нет десятки варинтов. Направьте в нужную сторону. Что есть: Ставлю через загрузчик redpill версию 7.1.0-42661 на asrock h570itx (4 sata + 2 M2)/i5-10400/16Gb/два старых диска подключенных к портам на плате sata3_0 и sata3_1. Диск на sata3_0 без разметки. Также есть SSD диск на М2_2. Все три диска видятся отлично в БИОЗ, жесткие диски с включенной опцией hot plug. Выставлен режим ACHI, быстрая загрузка отключена. Загрузчк: При сборке загрузчика всё хорошо, никаких ошибок нет, находит сетевой контроллер и sata контроллер. Что я вижу из консоли по железу прикрепил к этому сообщению. Что предлагает скрипт при определение портов сата: "SataPortMap": "6", "DiskIdxMap": "00", Кстати версия 7.0.1 предлагала "SataPortMap": "60", "DiskIdxMap": "0001", но ничего не помогло тоже, разве что я там сата_ремап не делал, об этом ниже. Что получаю: После загрузки по умолчанию Дисксташион выдаёт ошибку "...ошибка на дисках 1 и 2, порты отключены...". Какие выводы сделал сам: После изучения мануалов и опыта в интернете я пришёл к выводу, что согласно dsmeg САТА порты 0 и 1 не доступны для работы, а дисксташион пытается их считать или использовать. При этом меня смущает что SataPortMap он предлагет выставлять равным "6" или добавляя туда два порта M2 или учитывая ЮСБ порты (хотя их там больше, но юсб флешку монтирует как "sdc") Я пробовал разные комбинации SataPortMap и DiskIdxMap (если нужны кому-то сылки, то я тут целую энциклопедию собрал уже, погу поделиться), но ничего не помогло. Последняя мысль это сделать ремап САТА портов. Пробовал через загрузчик добавить ("e" при выборе пункта меню) как "sata_remap": "2\>0:3\>1", пробовал прописать сразу в user_config.json вот так: "sata_remap": "2\\>0:3\\>1". Ничего не помогло, кстати на синтакси выше не ругается. Я что-то явно упускаю, но голова забита и я тестами за неделю уже не знаю в какую сторону копать. Подскажите, в чём вам видится проблема и если решение в сата_ремап, то не упускаю ли я что-то? И в целом любые идеи будут полезны. Спасибо вам! dsmeg.txt fdisk-l.txt lshw-short.txt lshw-short-disk-storage-volume.txt lspci-nnq.txt lsscsi-Hv.txt
-
build a new loader 3622xs+ "SataPortMap": "68", "DiskIdxMap": "00060e" }, "synoinfo": { "internalportcfg": "0x3ffffff", "esataportcfg": "0x0000000000", "usbportcfg": "0xfffc0000000", "maxdisks": "30", "support_bde_internal_10g": "no", "support_disk_compatibility": "no", "support_memory_compatibility": "no" }, "ramdisk_copy": {} } 1111 1111 1111 1100 0000 0000 0000 0000 0000 0000 0000 ==> Usb ports (14 usb) FFFC0000000 0000 0000 0000 0011 1111 1111 1111 1111 1111 1111 1111 ==> Sata ports (30 drives) 3FFFFFFF 0000 0000 0000 0000 0000 0000 0000 0000 0000 0000 0000 ==> Sata ports (0 drives) 0 But all usb port working as internal and any usb disk connected as internal. where is the mistake?
-
 Yes, I've just turned it on. Does this feature need to be turned on before loader build or can be enabled after loader built? This is a test system so I just plug in only 1 physical disk in to SATA port 1. Below is my user_config.json. tc@box:~$ cat user_config.json { "extra_cmdline": { "pid": "0x1666", "vid": "0x0951", "sn": "1860PDN017381", "mac1": "001132B94EEB", "SataPortMap": "1", "DiskIdxMap": "00" }, "synoinfo": { "internalportcfg": "0xffff", "maxdisks": "16", "support_bde_internal_10g": "no", "support_disk_compatibility": "no", "support_memory_compatibility": "no" }, "ramdisk_copy": {} }
 -
Yes this is working exactly as desired. It is telling you 1) you are assigning ports that are more than maxdisks and 2) sataportmap cannot specify >9 disks so it is setting it to the max of 9. Manually edit user_config.json with new maxdisks and delete the "9" from "SataPortMap=689" and I think you will be ok
-
Generally you should add a sataportmap entry for each controller. The current TCRP code will recommend this. The only case not to do so is the >9 port card as you have described. This is dependent on a lot of factors, whether you are trying to use SATABOOT etc. Script enhancement should help folks move their configurations to a more predictable space. Testing across the various hypervisors is inconsistent, so there may be some work to do there.
-
So do not add any sataportmap for the last listed pci sata controller and it should use all available ports. Good to have that confirmed. I did exactly that in a vm build using a HBA (8 port) adapter in proxmox. However the disk ordering started at 2, I could never get the disk ordering to start at 1, even though the hba card is the only available sata controller which is being pci pass thru. It listed all the hdd but starting at 2 (not at 1)
-
The "16" in 616 is invalid. SataPortMap is only one digit with a maximum of "9" This is not good for LSI9201-16i obviously. However, SataPortMap = "1" should probably work for you to use 17 HDD. Specifically, if the last PCI controller (must be actually the highest PCI slot) has >9 ports, you can leave that entry on SataPortMap blank and it should use all the ports. I would advise maxdisks of 24 instead of 36 (internalportcfg must be modified accordingly).
-
Thank you!! I succeeded! Everything works, all disks are recognized. I need to set sataportmap to 6 because this motherboard defines disks 0,1,4,5 so in DSM it shows me Disk 1, DIsk 2, Disk 5, Disk 6 But it doesn't matter to me because I still know who is what.
-
Exactly. If you manage to install it with one drive, when you build loader again again with sataportmap 4 it will still boot from 1st drive into DSM, but you will see other drives. Make sure the other data in user_config.json stay the same. That's how I got it to work, hope you will to
-
Ok, I'll try but just to be sure what to do: I do the build loader with SataPortMap 1 if it works then continue installing DSM with only one drive then after installation and everything works with one drive then to try to build again with SataPortMap 4? And if I build again then it will not ask me to install DSM again?
-
Try This. Build a loader with SataPortMap 1, install with only one hdd on port0, When you install build loader again with sataportmap 4 and connect other drives.
-
hi, any try to add more than 16HDD? i successful install 3615 and add 17HDD - 1 on MB sata and 16 on LSI9201-16i edit user_config.json "SataPortMap": "616", "DiskIdxMap": "0001" "internalportcfg" : "0x3FFFFFFFF", "maxdisks" : "36", but USB HDDs connecting as internal
-
- Outcome of the update: SUCCESSFUL - DSM version prior update: new install - Loader version and model: Redpill Tinycore V0.4.6 DSM 7.1-42661 Update 1 (DS918+) - Using custom extra.lzma: NO - Installation type: HP ProDesk 600 G1 SFF - Additional comments: Only one HDD must be connected for install and use "SataPortMap": "1", after install you can connect other drives and change to "SataPortMap": "4"
-
Thanks you guys. You are great. I have decided to give DS918+ another try, or more like 10 tries to be correct. I finally manged to install DS918 with "SataPortMap": "1" and only one disk inside. I made a fresh install on a cleaned drive and will move my data around and configure stuff later on. Later I build a loader again with "SataPortMap": "4" and it boots now and detects other drives. I moved back the drive from DS920+ install with data on and it recovered the pool with no problems. Still one drive to move from DS3615xs later but I belive it will go without problems.
-
My favorite setup so far is to physically install only one disk in sata port 1 and set sataportmap=1 to succeed from dsm installation. After success, increase the disk and sataportmap. Have you tried this method?
-
https://dlcdnets.asus.com/pub/ASUS/mb/LGA1155/P8H61-I_LX_R2.0/E7989_P8H61-I_LX_R2.pdf If you look at page 31 of this manual, it says that hot plug and ahci are possible. Be sure to enable both options. This will help with disk not being found related to sataportmap.
-
First, make sure your SATA disks are set to AHCI in bios. While at GRUB select your boot option and press "e" then edit the sataportmap and diskidxmap to : sataportmap=888 and diskidxmap=00080F and press F10. Then login and execute fdisk -l again
-
Hello all, Hope someone can help me with the right DiskIdxMap and SataPortMap. I made a loader for a 3615xs and 3622xs+ and both show that no disks are found. TC suggests DiskIdxMap = 2 and SataPortMap = 22. The motherboard is an Asus P8H61-I-LX-R2 with an i5-2500. The codes for the drive controllers are 00:1f.2 (8086:1c00) and 00:1f.5 (8086:1c08). Tried a lot of combinations for the mapping, changed BIOS settings for sata like AHCI and IDE, but no luck. What can I do, any ideas ? Regards, Paul
-

LSI SAS2008 - Make disk order follow enclosure places
pocopico replied to exodius's topic in Developer Discussion Room
Its my impression that, on older platforms (DS3615/918/3617/32622/DVA3221), there is no way to configure the slot#. The disks are represented to the GUI by their device name. eg. sda will always be 1st drive. sde the fifth and so on. So the disks are getting their slot on a sequencial way. Here the SataPortMap, DiskidxMap and sata_remap comes to assist. So on my system with mptsas (LSI 3Gb/sas HBA) ls -l /sys/block/sd[a-z]/device lrwxrwxrwx 1 root root 0 May 12 03:13 /sys/block/sdc/device -> ../../../2:0:0:0 lrwxrwxrwx 1 root root 0 May 12 03:13 /sys/block/sdd/device -> ../../../2:0:1:0 lrwxrwxrwx 1 root root 0 May 12 03:13 /sys/block/sde/device -> ../../../2:0:2:0 lrwxrwxrwx 1 root root 0 May 12 03:13 /sys/block/sdf/device -> ../../../2:0:3:0 lrwxrwxrwx 1 root root 0 May 12 03:13 /sys/block/sdg/device -> ../../../2:0:4:0 lrwxrwxrwx 1 root root 0 May 12 03:13 /sys/block/sdh/device -> ../../../2:0:5:0 lrwxrwxrwx 1 root root 0 May 12 03:13 /sys/block/sdi/device -> ../../../2:0:6:0 lrwxrwxrwx 1 root root 0 May 12 03:13 /sys/block/sdj/device -> ../../../2:0:7:0 I need to test on my test VM to see if there is a way to fix that. On newer platforms with Device tree files the slot number is hardcoded into the model.dtb file and enforced into a specific place on the system. So every HBA port number will be represented on a specific port. -
The loader is running now and i'm able to start the installation. But now i get the Error Message "Failed to install the file. The file is probably corrupted" I used the following Settings: VM Configuration: CPU Mode: 4 CPUs (Host Passthrough) Memory: 4096 MB Machine: Q35-5.1 Bios: OVMF USB Controller 3.0 (qemu XHCI) 1st Disk: USB with tinycoe-redpill-uefo.v0.4.6.img 2nd Disk: SATA 1 TB Network: e1000 Commands: ./rploader.sh update now ./rploader.sh fullupgrade now ./rploader.sh serialgen DVA3221 ./rploader.sh satamap now ./rploader.sh identifyusb now ./rploader.sh ext denverton-7.1.0-42661 add https://raw.githubusercontent.com/pocopico/rp-ext/master/e1000/rpext-index.json ./rploader.sh build denverton-7.1.0-42661 manual user_config.json: { "extra_cmdline": { "pid": "0x0001", "vid": "0x46f4", "sn": "20C0SJRMZENMW", "mac1": "0011327C18F4", "SataPortMap": "66", "DiskIdxMap": "0006" }, "synoinfo": { "internalportcfg" : "0xffff", "maxdisks" : "16", "support_bde_internal_10g" : "no", "support_disk_compatibility" : "no", "support_memory_compatibility" : "no" }, "ramdisk_copy": { } }
-

LSI SAS2008 - Make disk order follow enclosure places
docop1 replied to exodius's topic in Developer Discussion Room
I try for about 3days to get a working install and finally get it done in manual with the post of today from poco, but while 3622 do work good, just not the 918. But on the sataMapping, i'm quite not sure how the previous vm was done 2 post above from Peter. I understand in proxmox if you boot via .img assign as usb boot, it will not show up in the listing.. while booting and <assigning> the bootloader to the vm it show up in the hdd position. But how to get a proper listing.. or is it; we don't care about the position of the drive ? i do have the LSA2008 not yet install, so need to confirm first the lineup of position as i will add like 2 virtual hdd. I got a readyload vm backup v7 42218 and there is no "SataPortMap" and neither "DiskIdxMap". Only the proper pid 0-vid 0x46f4 for proxmox, (written in one of the page in the redpill-loader github.) And this over a Proxmox having: sata0 as bootloader and sata1 as dsmlocalhdd. When i do a 3622xsp and set "SasIdxMap": "0", / "SataPortMap": "1", / "DiskIdxMap": "0" i can have half the hdd location for sata and scsi : if hdd add in mode Virtio hdd = not detected Scsi0 = show in position #8 Scsi1 = in posi #9 (with writeback-discard. option ssd not put) if scsi1 trsf in sata1 = show in posi #3 newhd in sata3 = show in posi#5 When set another (ds36)3622xsp vm with user_config set "SataPortMap=9", "DiskIdxMap=0" * vm: q35/seabios/virtioscsi ctrl/ sata0 = dsmlocal20g / sata1= redpillBootloader i got the sata0 in position #10. So i add another hdd as sata3 : it outside of the range as being as #13. Adding an hdd as Virtio block1 : it is not detected. Adding an hdd as Scsi1 = it show as posi #16 *also with option satamap at 9 i cannot install dsm, reboot with option -e , edit to put 1 instead; then dsm install is possible. On the build i did used EXT from pocopico: acpid and virtio, but acpid don't work to turn off the vm. when build it show as downloading from Jumkey github.. perhaps it's not updated or so. sudo ./rploader.sh ext broadwellnk-7.1.0-42661 add https://raw.githubusercontent.com/pocopico/redpill-load/develop/redpill-acpid/rpext-index.json sudo ./rploader.sh ext broadwellnk-7.1.0-42661 add https://raw.githubusercontent.com/pocopico/redpill-load/master/redpill-virtio/rpext-index.json i also read about v9s.. but never find out what is it.. is this a bundle of virtio and acpid especially for proxmox ? As mention briefly at page 124.. of the loader. Thanks in advance -
I have tested on VMware Workstation, i expect that to work on ESXi as well. The process is more or less the same as physical 1. Download the TCRP vmdk from REPO. 2. Create a Virtual machine with at least 2GB RAM 3. Attach the VMDK to SATA0:0 4. Data Disks to SATA1:0….X 5. Boot to tinycore 6. Perform a rploader.sh upgrade : ./rploader.sh update now 7. Perform a full upgrade : ./rploader.sh fullupgrade now 8. Generate a serial : ./rploader.sh serialgen DS920+ 9. Edit user_config.json : make sure SataPortMap=1 or leave default "58" 10. Check contents of user_config.json : cat user_config.json 11. Identify required modules and add extensions : ./rploader.sh listmods geminilake-7.1.0-42661 12. Build loader : ./rploader.sh build geminilake-7.1.0-42661
-

Установка XPEnology на PC
Peter Suh replied to w00t's topic in Аппаратное обеспечение и совместимость
Я просмотрел руководство по материнской плате на веб-сайте Asus, но, похоже, горячее подключение не поддерживается. Лучший способ найти диск — физически смонтировать диск только в порт Sata1, изменить SataportMap=1, DiskIdxMap=00 и попробовать установить DSM. После успешной установки DSM вы можете увеличить размер диска и изменить SataportMap=4. -

RedPill TinyCore Loader Installation Guide for DSM 7.1 BareMetal
-iliya- replied to Peter Suh's topic in Tutorials and Guides
hi, any try to add more than 16HDD? i successful install 3615 and add 17HDD - 1 on MD sata and 16 on LSI, edit user_config.json "SataPortMap": "616", "DiskIdxMap": "0001" "internalportcfg" : "0x3FFFFFFFF", "maxdisks" : "36", but USB HDDs connect as internal -
LSI SAS2008 - Make disk order follow enclosure places
Peter Suh replied to exodius's topic in Developer Discussion Room
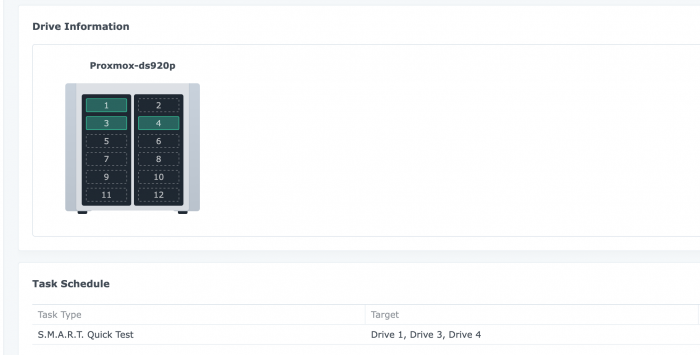
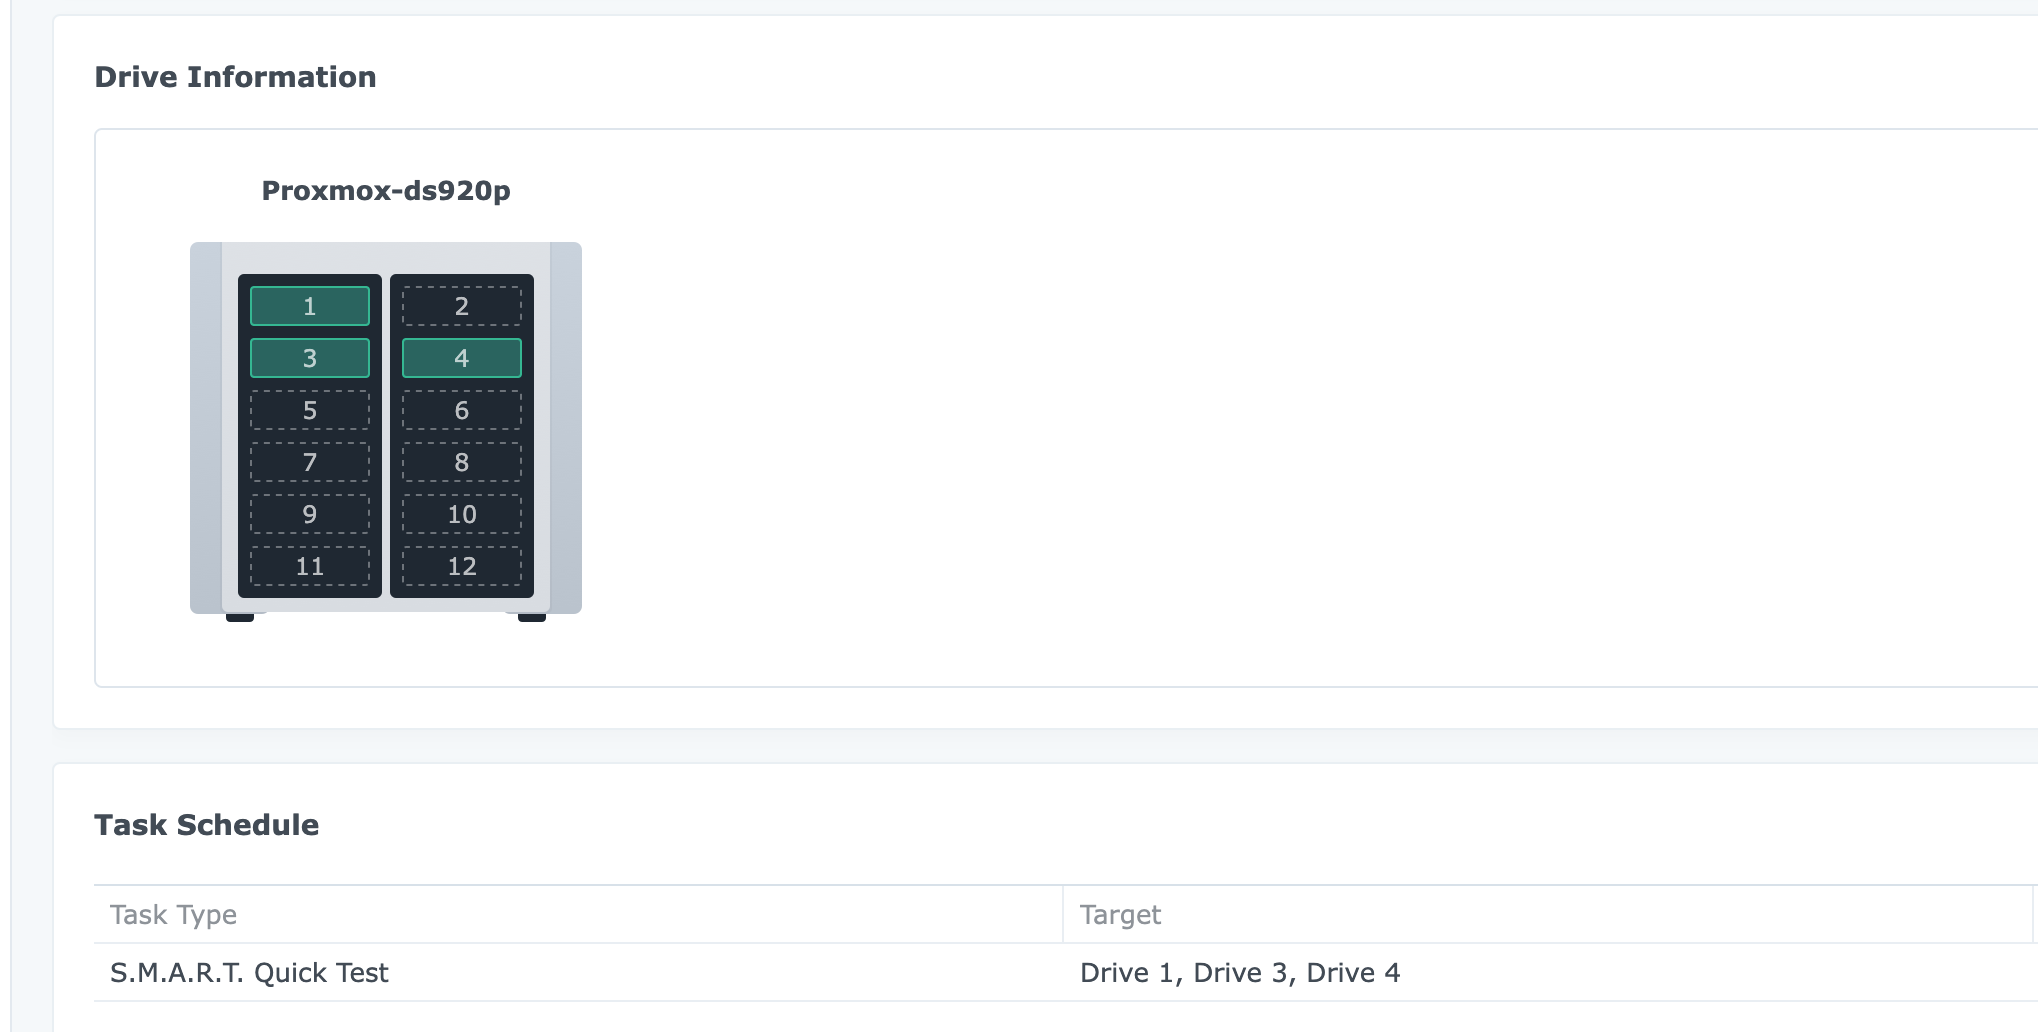
I changed it to DS3622xs+ like you. Since the DTC is not used, the SataPortMap was used again. User_config.json is set as below. "SataPortMap": "9", "DiskIdxMap": "00" However, during the migration, there was an error that disk 7,8,9 could not be found Temporarily edit the SataPortMap from 9 to 3 and lower it DSM re-installation of DS3622 was successful. As a result, slot #1 is filled, but slot #2 is empty. I will try to solve this part by changing the settings little by little.