phone guy
-
Posts
398 -
Joined
-
Last visited
-
Days Won
3
Everything posted by phone guy
-
 What size is your usb drive? did you format or clean it between attempts? looks like the usb is out of space to complete the build.
 -
Now that you gotten your TCRP loader up and working in proxmox vm. Here are a couple easy proxmox tips for a better experience. Issuing these commands on main PVE node shell, replaces subscription only repo (paid) to community driven repo (free). Removes the NO SUBSCRIPTION nag when logging into web gui portal and updates proxmox to most current version, amd even installs the cool Dark theme... super easy. # Disable Commercial Repo sed -i "s/^deb/\#deb/" /etc/apt/sources.list.d/pve-enterprise.list apt-get update # Add PVE Community Repo echo "deb http://download.proxmox.com/debian/pve $(grep "VERSION=" /etc/os-release | sed -n 's/.*(\(.*\)).*/\1/p') pve-no-subscription" > /etc/apt/sources.list.d/pve-no-enterprise.list apt-get update # Remove nag echo "DPkg::Post-Invoke { \"dpkg -V proxmox-widget-toolkit | grep -q '/proxmoxlib\.js$'; if [ \$? -eq 1 ]; then { echo 'Removing subscription nag from UI...'; sed -i '/data.status/{s/\!//;s/Active/NoMoreNagging/}' /usr/share/javascript/proxmox-widget-toolkit/proxmoxlib.js; }; fi\"; };" > /etc/apt/apt.conf.d/no-nag-script apt --reinstall install proxmox-widget-toolkit # Update proxmox pve to newest available version apt dist-upgrade -y # Alt update everything (has been warned against, I never had any issue so use at own risk) apt upgrade -y Here is the dark theme mod for the proxmox gui taken from this author # Install Dark Theme for Proxmox GUI bash <(curl -s https://raw.githubusercontent.com/Weilbyte/PVEDiscordDark/master/PVEDiscordDark.sh ) install Of course its good practice to reboot after installing updates or mods. ENJOY!
-
I just posted a tutorial guide with step by step instructions and pictures on how to setup and install on Proxmox. The thread is waiting for approval from the moderators. I actually did it side by side as I wrote it to verify each and every step. And it all worked 100%.. I will post the link, however I dont know how long it will be until its approved.
-
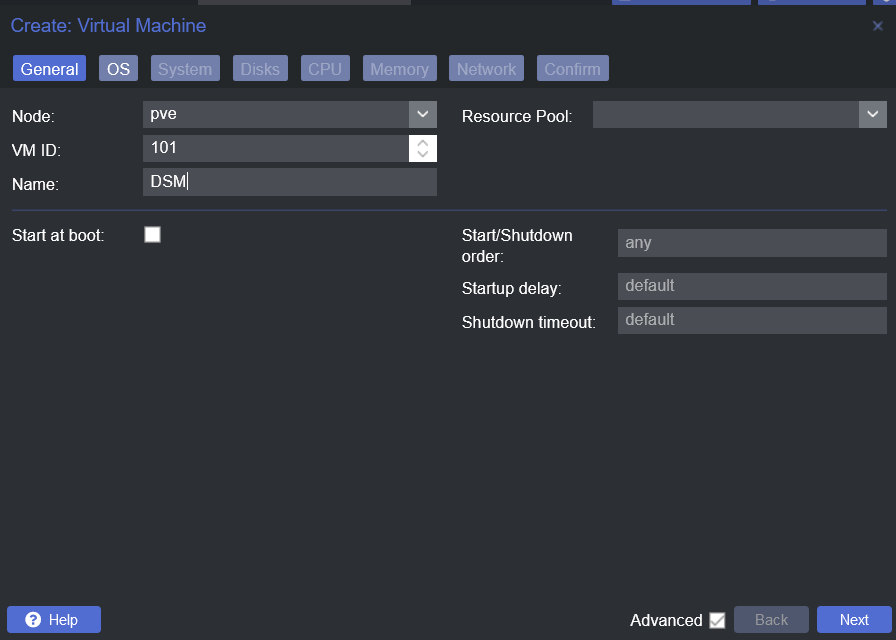
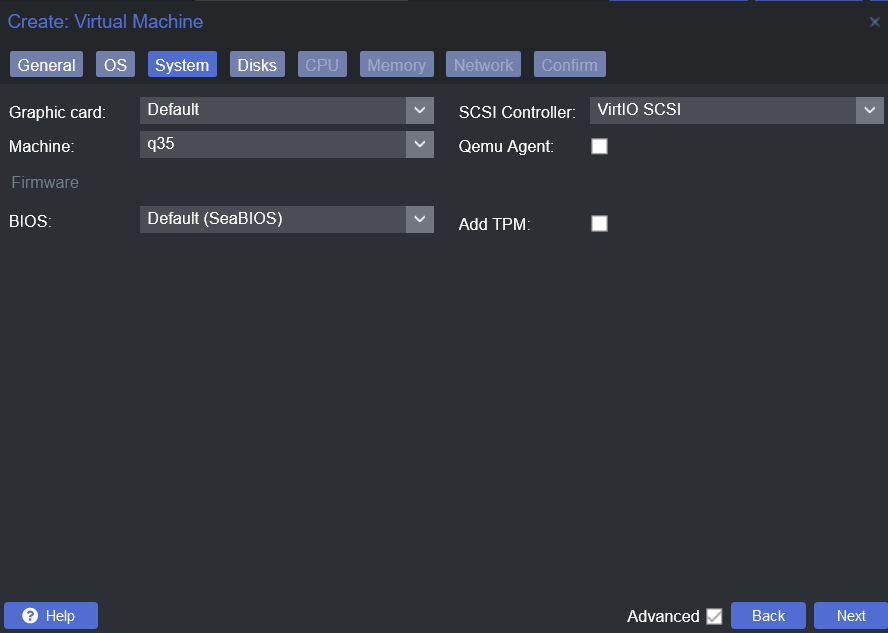
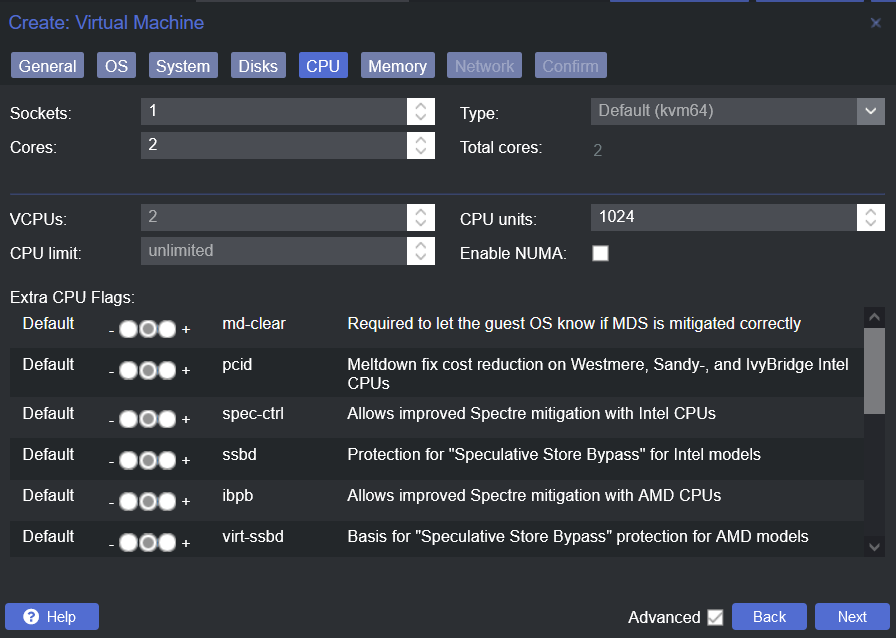
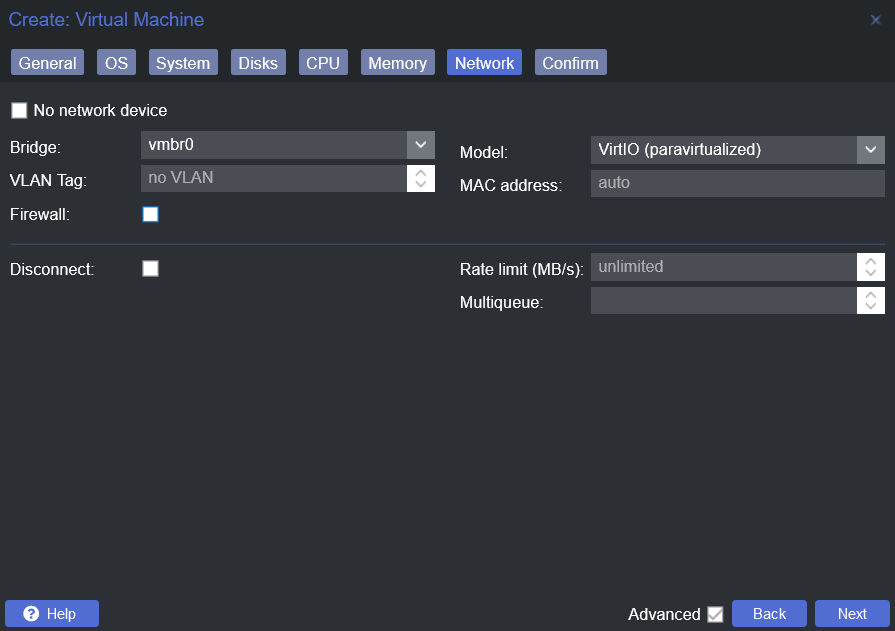
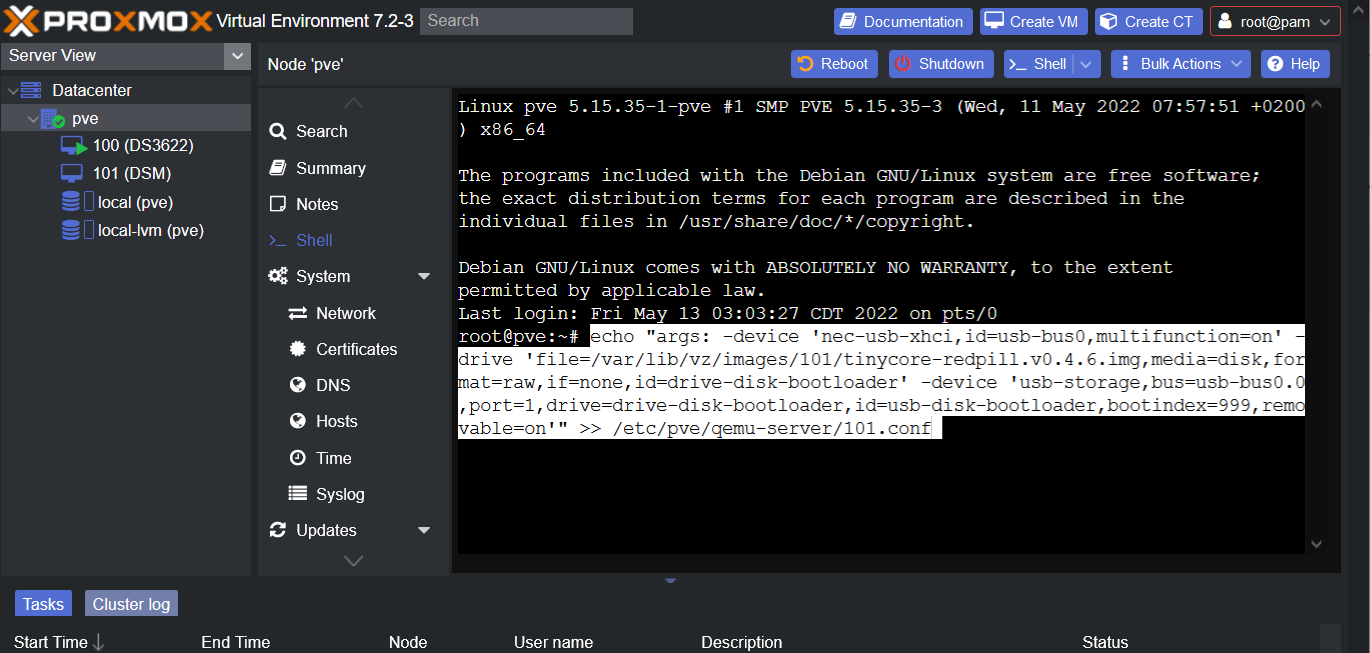
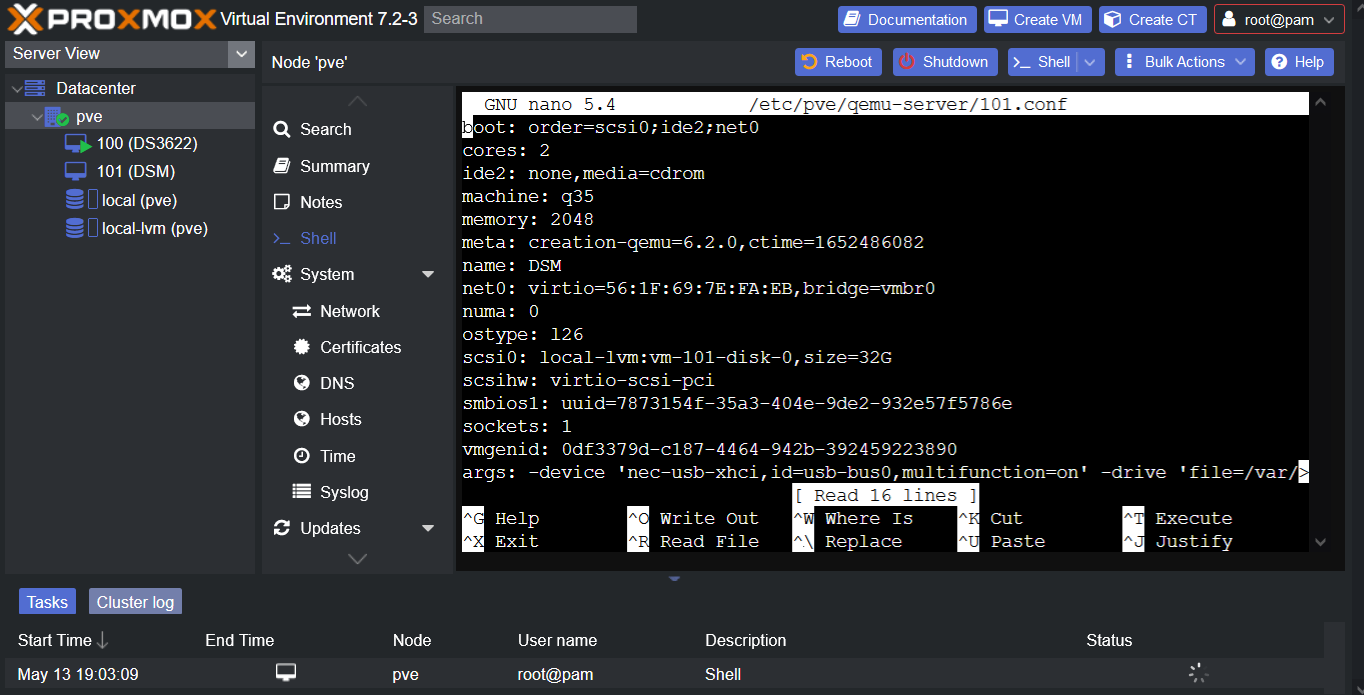
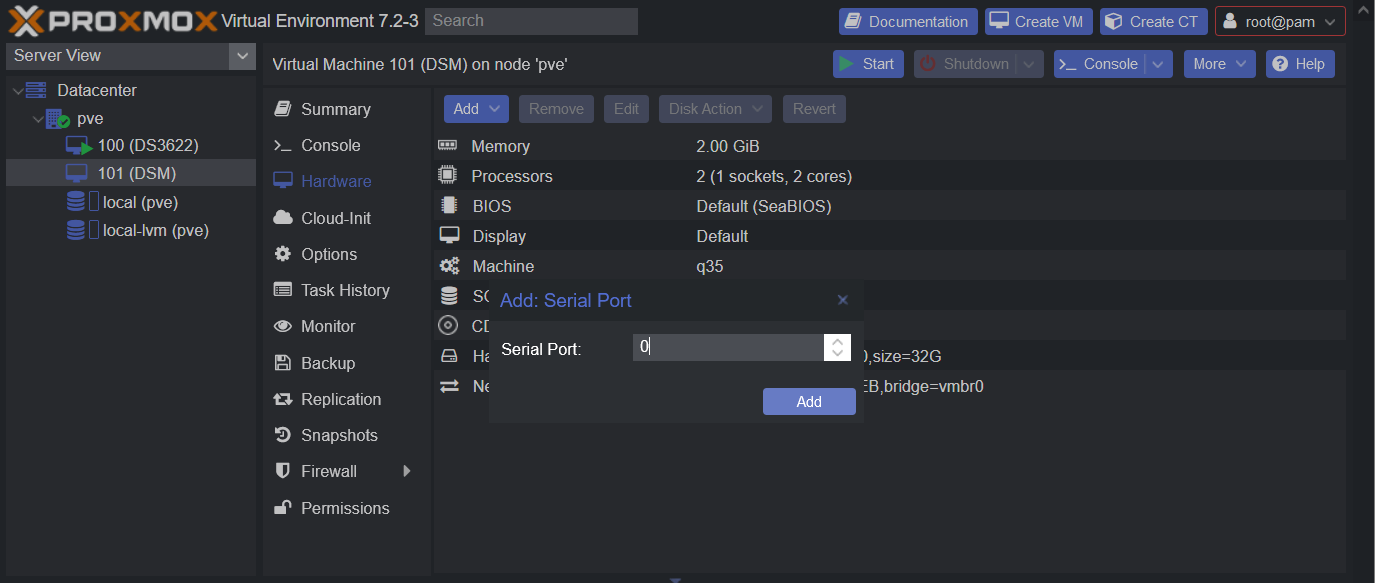
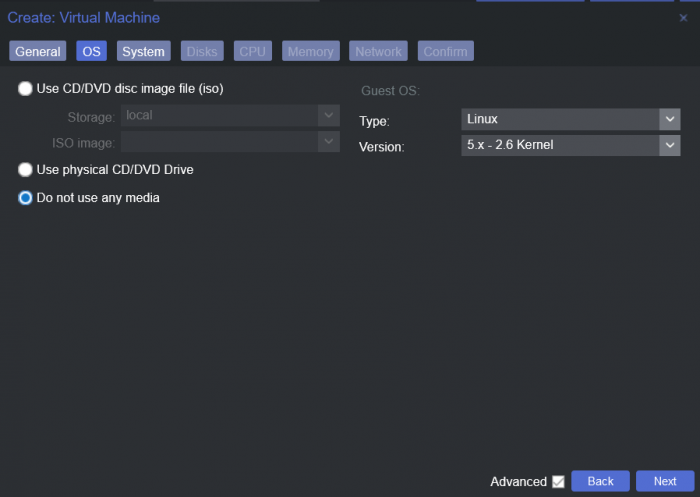
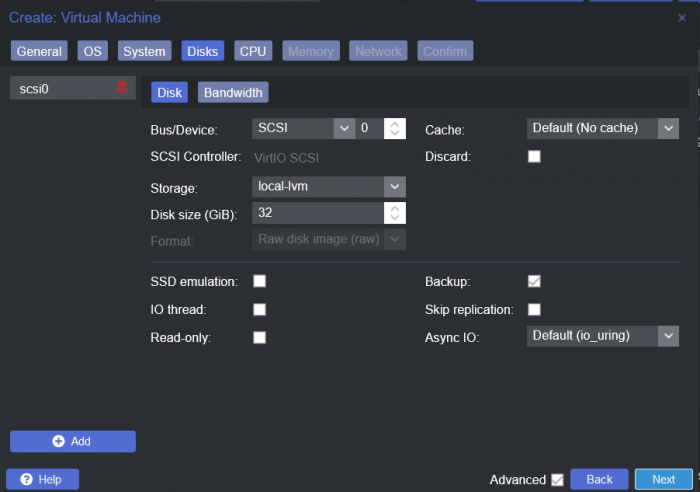
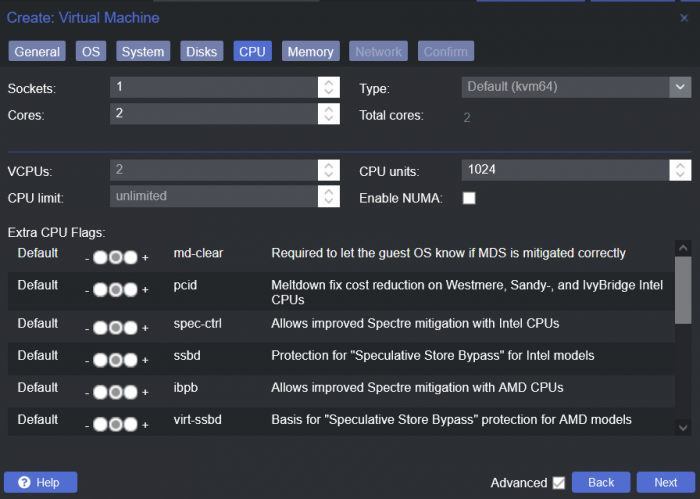
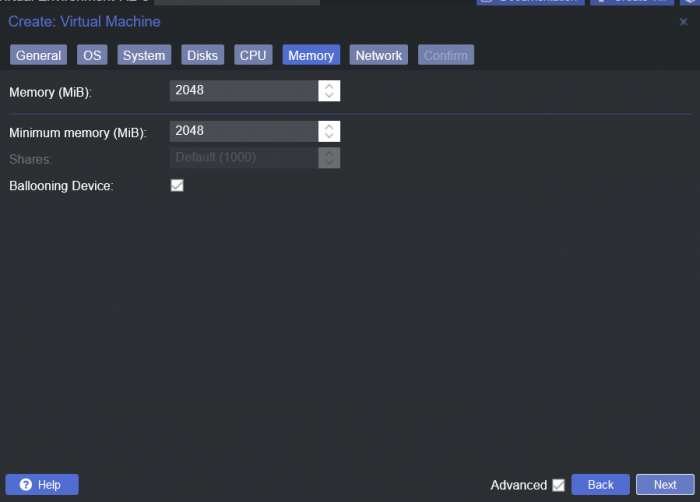
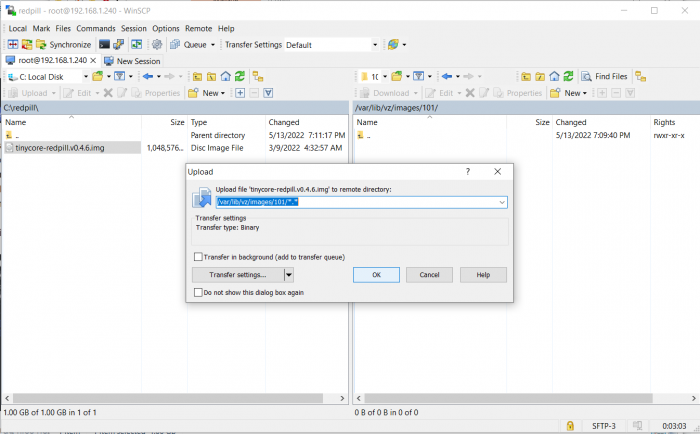
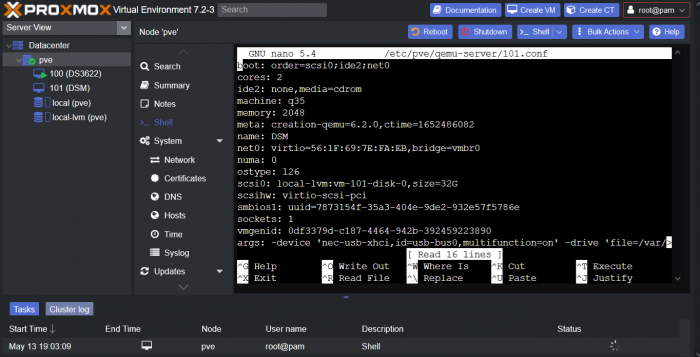
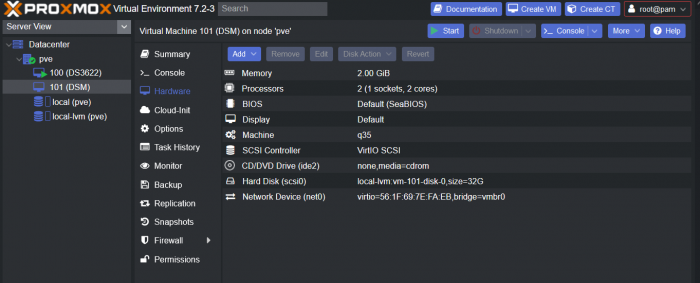
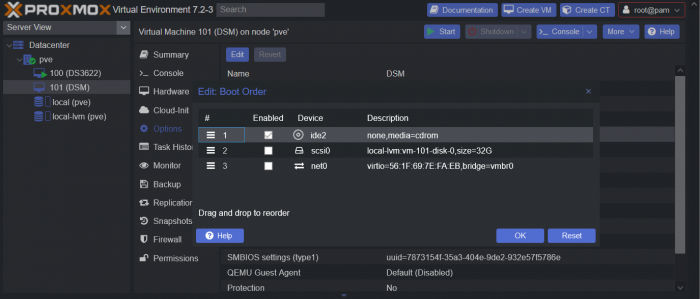
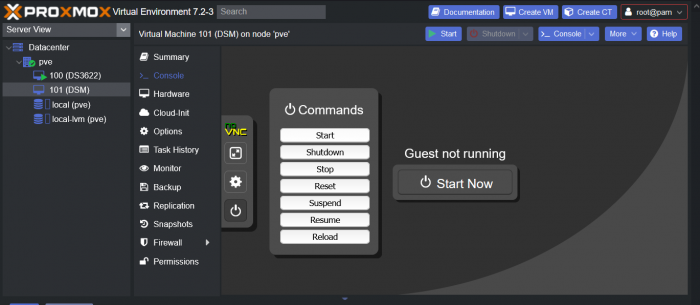
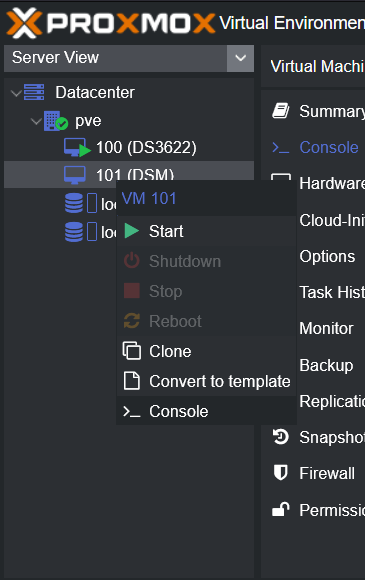
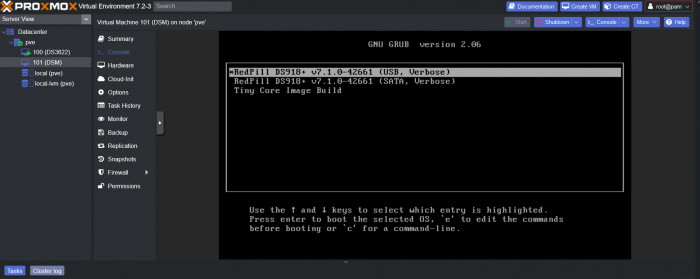
This is a simple guide and step by step tutorial on how I got tiny core red pill loader running and working on a proxmox server. This not the only way, just the way I do it and it seems to work. You will need a few things downloaded and ready to access on your local machine. The tiny core red pill image from @pocopico DOWNLOAD Putty for windows (or your mac equivalent) DOWNLOAD WinSCP for windows (or mac equivalent) DOWNLOAD and of course a working server with proxmox installed and running. DOWNLOAD The correct .pat dsm installation file downloaded directly from synology.com (you can handle this one on your own 😉) From proxmox create a VM. Most of the defaults work, change these according to your specific needs and requirements, I personally used: Q35, virtio nic, HDD is your choice, 2 cores and 2gb ram (again your choice). System Q35 is not required either, i440x works too, this is just what I used and it works. HDD is whatever you want, or pass thru complete drives or controllers.. again your choice based on your setup. Same for nic, cpu and ram. Just be sure to Use NO MEDIA in the OS section * REMEMBER THE VM ID # * you will need it later * Remember, do not use any media is selected here. Now, load WinSCP and connect to your proxmox server using your local ip and proxmox credentials. There on the right side, navigate to /var/lib/vz/images/ and create a folder/directory of whatever the vm number was you created, in these pictures its 101 so in this case it should be /var/lib/vz/images/101/ On the left side in WinSCP navigate to where you downloaded and extracted the tcrp image Copy the extracted tcrp img from your local machine to your proxmox vm directory Alternatively, you can enter a couple of command lines in the main pve node shell to download and extract the tcrp image without using winscp at all, but I do it the hard way. Either way works so its up to you. The alternative method is open the main pve node shell in proxmox and enter these commands (use copy and paste for each line) # set vm id to whatever it was at time of creation id=101 # create image directory, download and uncomporess mkdir -p /var/lib/vz/images/${id} curl --location https://github.com/pocopico/tinycore-redpill/raw/main/tinycore-redpill.v0.4.6.img.gz --output /var/lib/vz/images/${id}/tinycore-redpill.v0.4.6.img.gz gzip --decompress /var/lib/vz/images/${id}/tinycore-redpill.v0.4.6.img.gz --keep Now, at this point one way or another you should have a dir of your vm # in the correct location with the tcrp extracted image inside ready to issue the following commands, so now click your main pve node on the left panel and choose shell and paste this command there. (edit the 101 vm # with whatever your vm # is) echo "args: -device 'nec-usb-xhci,id=usb-bus0,multifunction=on' -drive 'file=/var/lib/vz/images/101/tinycore-redpill.v0.4.6.img,media=disk,format=raw,if=none,id=drive-disk-bootloader' -device 'usb-storage,bus=usb-bus0.0,port=1,drive=drive-disk-bootloader,id=usb-disk-bootloader,bootindex=999,removable=on'" >> /etc/pve/qemu-server/101.conf Now type nano and the last part of the above command (the directory part) to verify the entry into your vm .conf file so in this case nano /etc/pve/qemu-server/101.conf You easily verify the entry into the bottom of the .conf file of your vm, now press control x to exit. Now select your vm and choose hardware from the column Here using the Add button you should add a serial 0 console to monitor your dsm loader if needed (helpful for troubleshooting) and if you are adding hdd or using pass thru of hba controllers or sata controllers or any other specific hardware for your build add it here. Now select Options from the list column, and select only ide2 CD-ROM (uncheck all others) and make cd-rom priority #1 by dragging it to the top. Now you are ready to spin up your vm and build your loader. You can watch the process of booting by right clicking on the vm number/name and select >_ console a new window will open and you will see lines of code fly by, but only in this console monitor window. This is an optional step. At this point you should be booting tcrp and ready to build your loader... @Peter Suh has a great tutorial for that linked here. Follow his directions for building your loader. Use putty to SSH into tcrp to build the loader, The main thing when building if you used virtualized nic card, add the v9fs ext to get network port working, use this command before executing the redpill build command in putty. ./rploader.sh ext <build platform> add https://raw.githubusercontent.com/pocopico/rp-ext/master/v9fs/rpext-index.json After you successfully build your loader, and during the reboot, go back to proxmox gui and when you see the booting menu screen, press UP to select BOOT FROM USB, VERBOSE then press enter... that is very important. You only have to do this once, and it will save and retain that selection until you change it again. You do not want to boot from sata! At this point you load your browser, go to find.synology.com or use synology search application on your pc, or simply go to the ip of your new vm dsm and complete the process. If you had your console monitor opened from above, you should see sign in prompt, if you scroll up a little bit you will also see the ip of your dsm vm. If you successfully booted from usb, everything will work. If you did not change that during the first reboot, and you are booting from sata, you will most likely get a failure to install dsm. You will need to power down the vm, re-start the vm, and choose boot from usb verbose. If this guide helped you, please press the thanks button for me. 🖖😀 And remember to thank @pocopico and @Peter Suh Enjoy!


- 83 replies
-
- 15
-

-

-
I dont know. thats why I am anxious to see how people use this... are you saying you can issue this command is ssh shell ?
-
I am anxious to see some syntax usage of this by others. Like I said earlier, I am still relatively new here so it takes me a little time to get the hang of things, and honestly a lot of all this is confusing to me. I hope others will post syntax, usage and results for those of us confused. Thank you for the mod and all the continued effort @jumkey and @pocopico
-
This would also allow for adding ext drivers as needed/if needed without rebuilding the entire loader? adding drivers after the fact, so in a working system and the user adds a new network card, or hba card or whatever?
-
I am still new here so excuse me for my ignorance.... Isn't this a bad thing? I thought upgrading before checking in was a bad idea, and there are banners all over this forum that say so. I thought removing all instances of synology.com to prevent phoning home to check for updates was smart and required to prevent accidental upgrades? By using this, it allows network updates? Which could break something in the next release or a future release? am I wrong?
-
First THANKS! Second, why did SHR not work this time? This was not the first 3622 build I made, previous builds let me select SHR... This time only RAID modes??? BTW I had to change the .conf in both /etc and /etc.defaults.... I know this because I changed /etc first, reboot, and still no SHR... then I changed /etc.defaults and rebooted, and then I had SHR 🤗🖖
-
Sorry I am a little lost? What does this do?
-
LSI SAS2008 - Make disk order follow enclosure places
phone guy replied to exodius's topic in Developer Discussion Room
That must be because of the HBA? I have used tcrp on 2 baremetal nas boxes, a western digital nas box and a terramaster nas box, one with 4 bay slots and one with 5 bay slots, each is running dsm7.1. Those 2 baremetal boxes correctly identify disks inserted into the correct slot. In other words, when I put a drive in slot 3, it shows graphically in slot 3 of dsm. It does not group them together like it does on the HBA card. This is true on both systems. I guess in that sense, sata controllers work better? -
LSI SAS2008 - Make disk order follow enclosure places
phone guy replied to exodius's topic in Developer Discussion Room
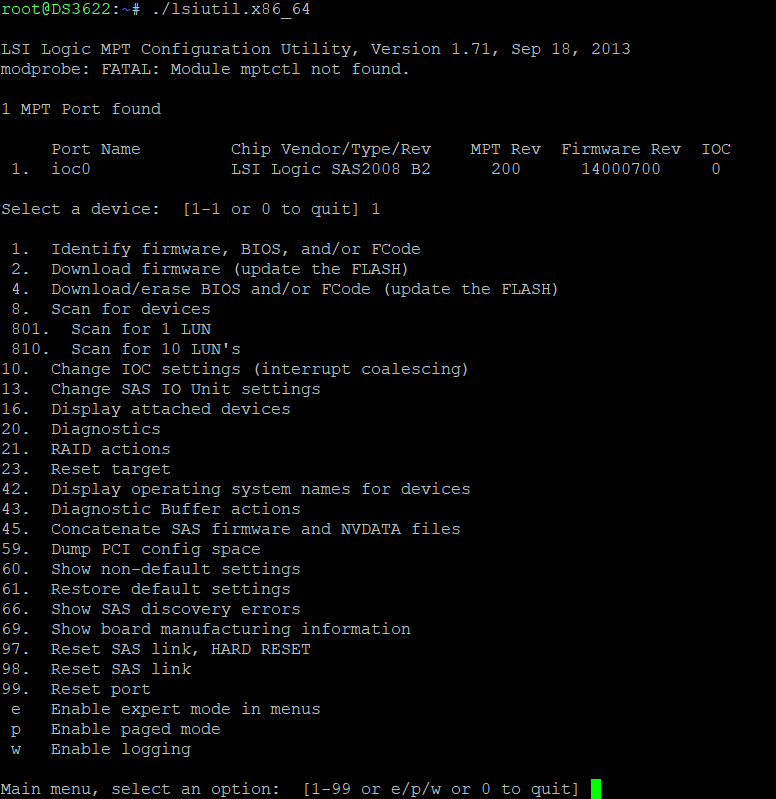
@exodius@pocopico@Peter Suh@IG-88 Can I verify something here, I have flashed a H200 as described in post 1, and again with many screen shots by me posted earlier on page 2 here... Creating vm in proxmox with pci pass thru. In the LSIutil and in pre-boot bios screens of LSI card, drives show as slot numbers... but always grouped together in dsm and linux live cd (no gaps). Has anyone been able to get true slot mode working where disks show inside dsm with gaps between disks if present? Like a real baremetal box would? so if I have disks connected as drive 0, 6 and 7 on the LSI card - dsm would show drives in slot #1 #7 and #8 (or whatever their respective numbers are) I always see them as disk #2 #3 and #4 (no gaps) no matter where they are connected on the card. The LSIutil and card bios clearly show slots, but dsm does not reflect this. Before I go crazy, is true slot mode even possible or not possible? -
How do I enable SHR raid on 3622 build? I am testing, but on new vm build I only get option to create raid pool, not shr?
-
LSI SAS2008 - Make disk order follow enclosure places
phone guy replied to exodius's topic in Developer Discussion Room
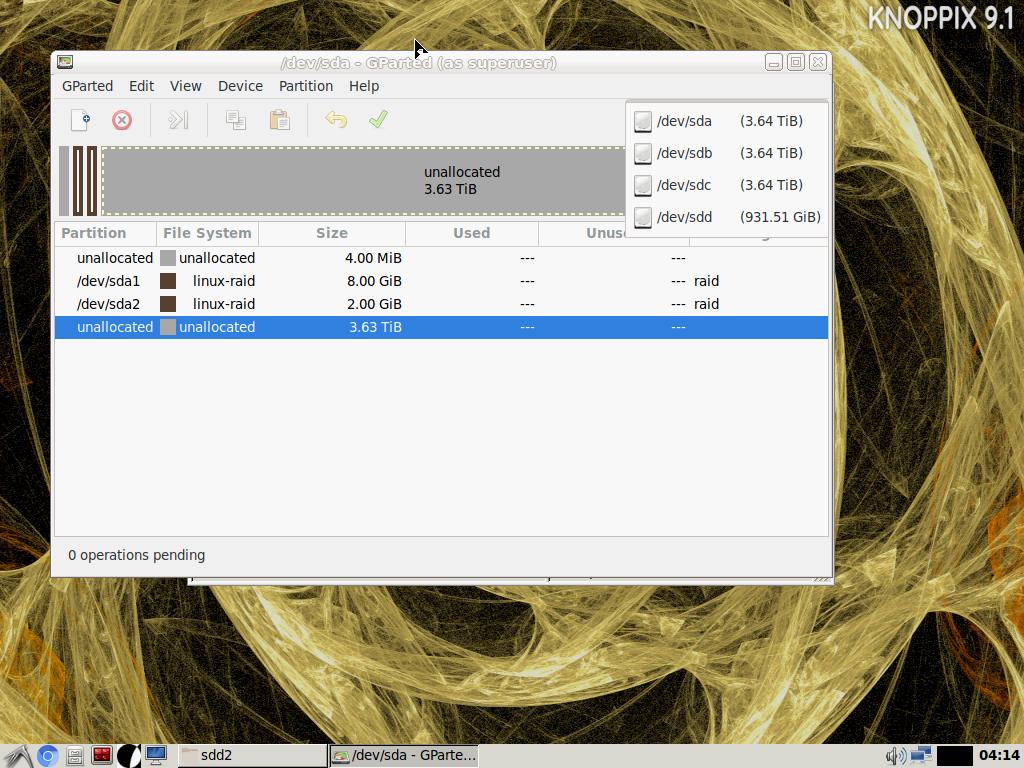
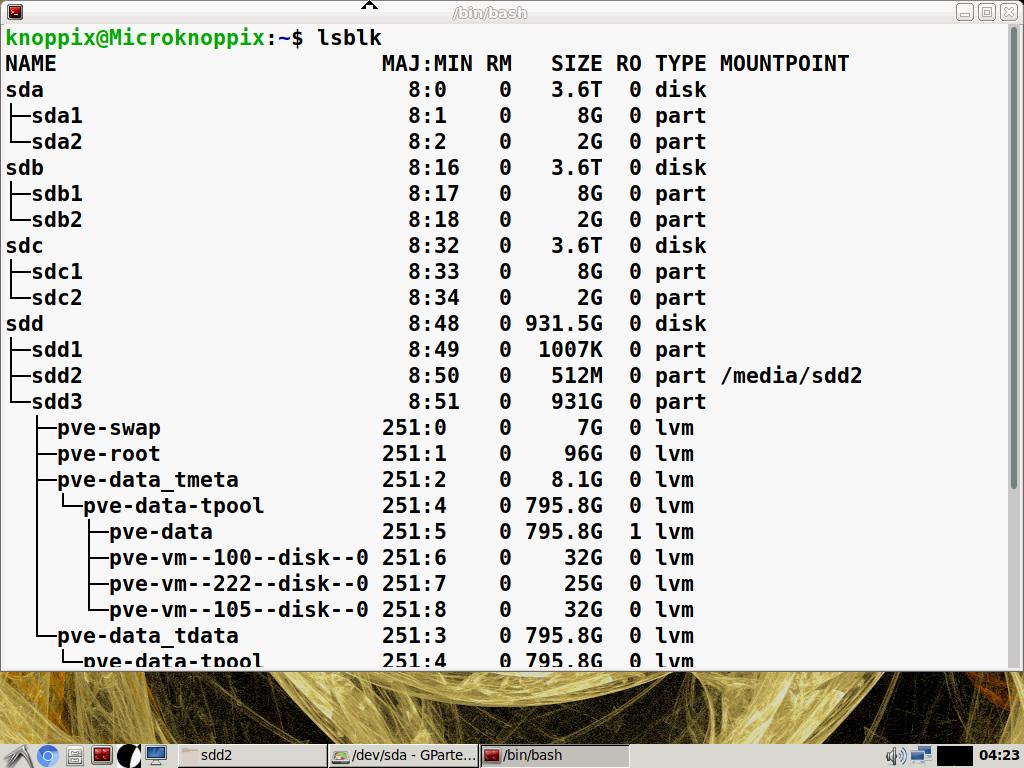
Attempting to see drive order like @IG-88 said, I booted a knoppix live cd thru ipmi on my server, loaded gparted to see available disks.... these 3 4tb drives are on hba. and the 1 single 1tb is the proxmox boot hdd on motherboard sata port 0 (#1) drives listed as sda sdb sdc sdd (sdd=1tb on motherboard sata 0) So, even this should show first disk in system is on hba, disk 1 2 3 are all on hba, though they should be 0 6 7 -- I am very confused.

-
LSI SAS2008 - Make disk order follow enclosure places
phone guy replied to exodius's topic in Developer Discussion Room
Ok, I just tried a new vm in proxmox. This one has pass thru pci hba card. no sata map command before build. 3 hdd connected to hba, again AP1, AP2 and BP1 (ports/cables) dsm see all 3 hdd, but as drive 2,3 and 4.... still shows no drive in slot #1. I did not issue a emu disk 1 in proxmox, so only 3 drives connected are via hba card So where is disk 1? Why can I not start at disk 1? @IG-88 said there would be no gaps, he is correct. As these drives are technically physical number 0, 6 and 7 registering in dsm as 2, 3 and 4. How do I get this to start at Disk #1 ?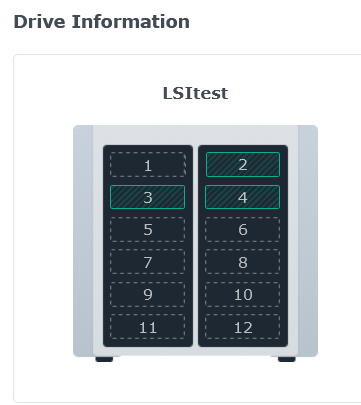
-
LSI SAS2008 - Make disk order follow enclosure places
phone guy replied to exodius's topic in Developer Discussion Room
OK Try that and let me know...I thought pci pass thru would be what is needed. I will be waiting to see your results -
LSI SAS2008 - Make disk order follow enclosure places
phone guy replied to exodius's topic in Developer Discussion Room
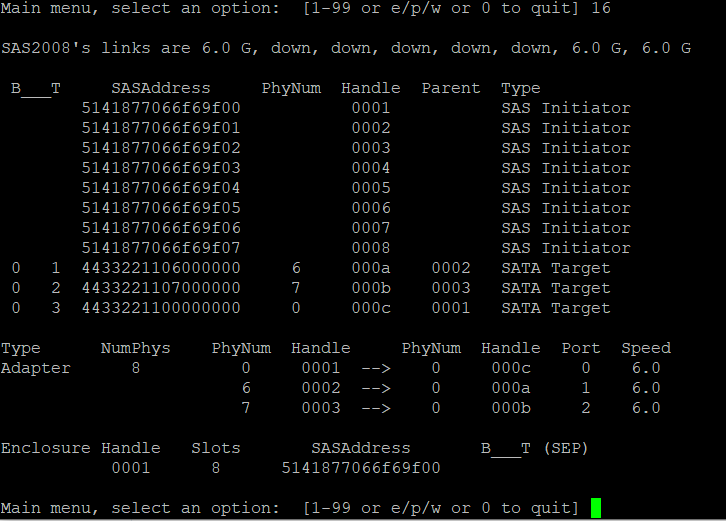
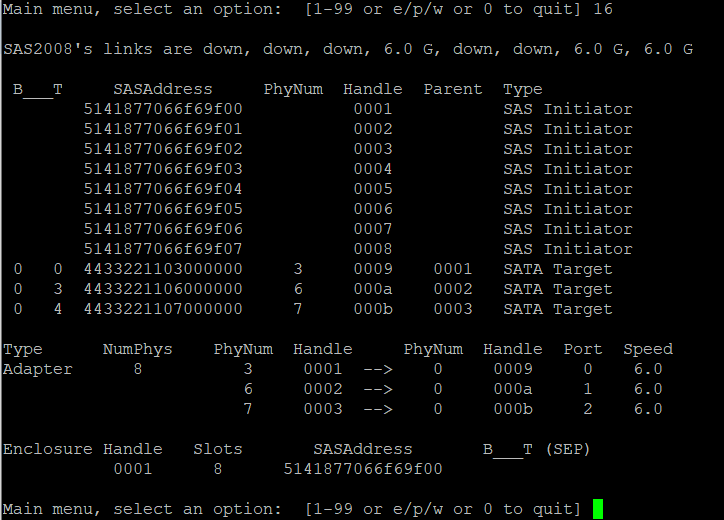
I am still not sure why the disk ordering starts at 7 inside the vm dsm? as technically there is no sata ports being mapped into the vm, only 1 qm emu disk as scsi1 = 32gb. This was the disk I used as a test to get the loader/dsm up and running... there is nothing from 1-6 and 8-14 so why did the emu disk start at 7 and the lsi card start at 15? these are the questions that need answering. @exodius when you look at lsiutil from ssh of dsm, and choose option 16 (show disk order) are yours in the same cable order as I showed twice in the pictures? -
LSI SAS2008 - Make disk order follow enclosure places
phone guy replied to exodius's topic in Developer Discussion Room
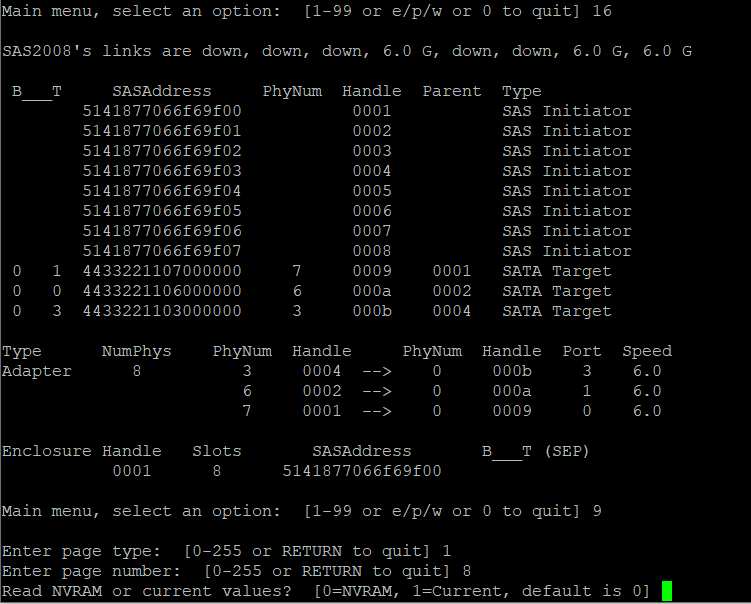
Remember, this is in proxmox vm, so yes there is a 6 port ahci on board, but its not pass thru to the vm, the vm node only has the 1 virtual qm emu hdd at 32gb set at slot #7, where the lsi card is pci pass thru to vm node and its starting at #15. I do know, look at the picture from the lsiutil program (I posted this above also) shows port b cable p1 = disk 0 (to the lsi) and port a cable p1 = 7 so, in this case according to the lsiutil to mapping is as follows A-P1=disk 7 A-P2=disk 6 A-P3=disk 5 A-P4=disk 4 B-P1=disk 0 B-P2=disk 1 B-P3=disk 2 B-P4=disk 3 Which why I asked @exodius if I set the mapping correct? This seems twisted wrong?
-
I am having a problem with an HBA card (Dell H200 in IT MODE). This build is in a proxmox vm, its a DS3622+ platform. The first disk (a test tiny 30gb emu disk issued by proxmox) shows as disk 7 the first disk starts in slot 7, then all the additional hdd connected the the LSI 9211 8i HBA card start at drive 15....? I tried to remove the satamap and diskid by pressing E during boot and editing grub (I just deleted/removed the satamap and diskid args) but no change... The 30gb drive (#7) was just what I used to start and test the system, as it was always supposed to get this HBA SAS2008 card for real HDDs in PCI card pass thru mode... so I can simply delete it (#7) from the proxmox gui. But the real drives are starting at 15? Can anyone help me get the drives to start at disk 1 and be in correct sequential order? Should I rebuild the loader with different satamap? Remove satamap and rebuild without satamap? I am really stuck.
-
LSI SAS2008 - Make disk order follow enclosure places
phone guy replied to exodius's topic in Developer Discussion Room
I will try this and report back... But another question is how do I get the disks to start showing from #1, I never had this issue on the baremetal builds I have done, they always started at disk 1... this one is show the vm emu disk at 7, and the drives connected to the lsi card start at 15 I think... the disk order is all over the place. -
LSI SAS2008 - Make disk order follow enclosure places
phone guy replied to exodius's topic in Developer Discussion Room
This card is a Dell H200 that has been flashed to IT MODE. I did not flash the preload bios part since I knew I would never use it. So you are saying to leave the drives just appear at random in whatever order they want to? This can not possibly be right... I know that dsm keeps track of the order, but even the original poster here made his drives populate in the correct order. So did you use any satamap args when you build the loader? or did you remove them completely? -
LSI SAS2008 - Make disk order follow enclosure places
phone guy replied to exodius's topic in Developer Discussion Room
Ok, after reboot (completely power cycle system) drives appear in this order in lsiutil. But show different order in dsm. In the picture you see I have 3 hdd connected as port A-P1, A-P2 and B-P1 and they show PhyNum as 0, 6 and 7. So port B cable P1 is slot 0 and port A cable P1 and P2 are slot 6 and 7, so kind of backwards? in this scenario port B would control drives 0-3 and port A would be 4-7 which would be fine but dsm isnt showing them in correct order, I even tried to remake vm, new build, adding mpt3sas ext, and removing satamap and diskid from user_config.json, and they showed up as disk 2,3,4. I am stuck.... please help
-
I need some help getting HBA card working properly
-
LSI SAS2008 - Make disk order follow enclosure places
phone guy replied to exodius's topic in Developer Discussion Room
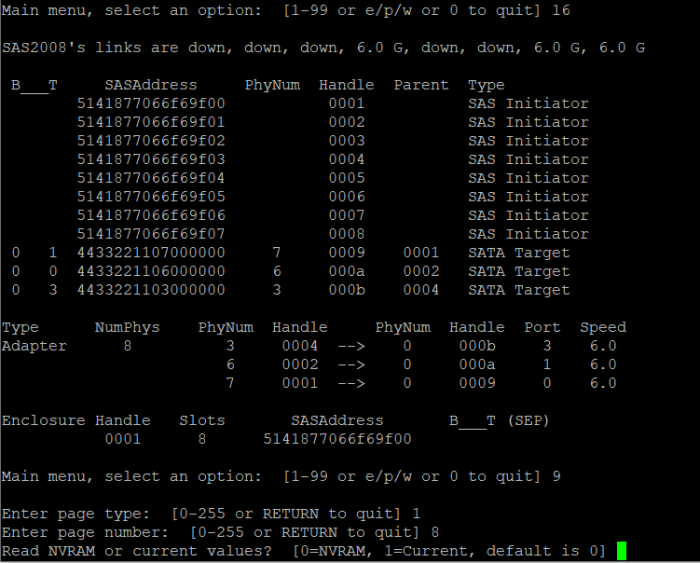
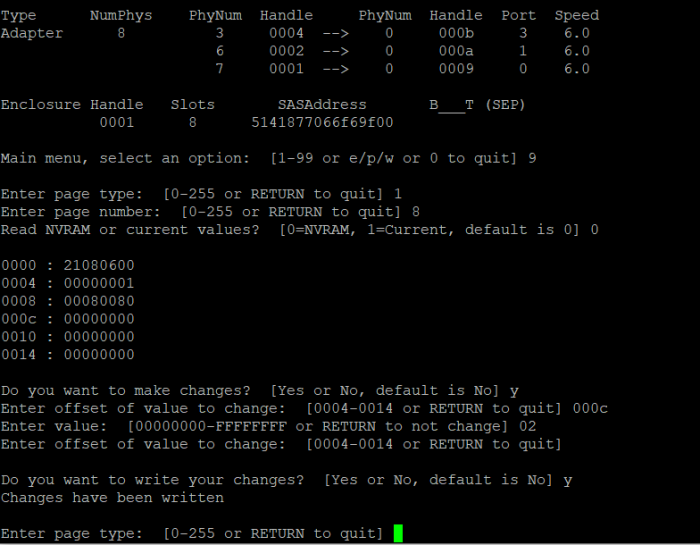
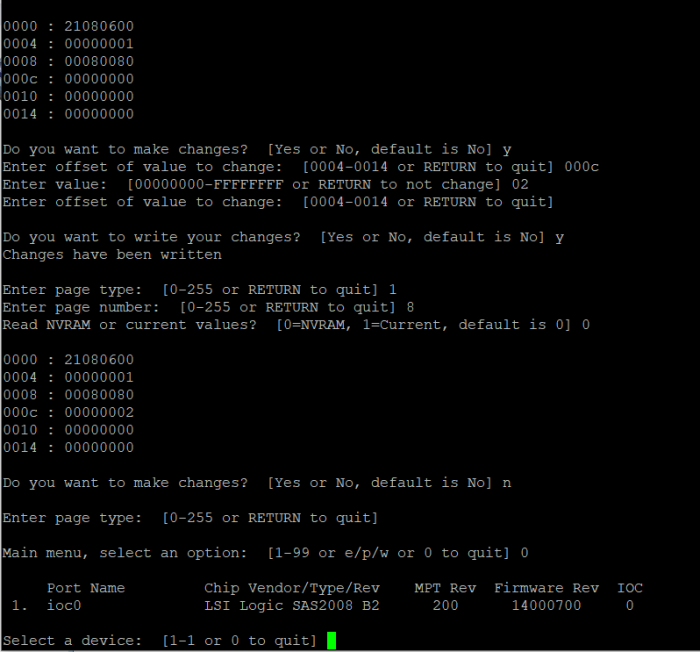
@exodius@IG-88@pocopico Ok, I have something wrong, I think... Need assistance... I have a DS3622+ build in vm in proxmox. The lsi hba card is pci pass thru to vm in proxmox. I flashed it mode firmware, I think I did all the steps @exodius mentions in first post, sas2flsh -o -e 3, then load lsiutil and do the following pictures attached.... I did get an error modprobe fatal modue mptctl not found <- I did not flash mptsas since I did not need the onboard bios control Here are my steps. (easy to follow along) I select my card #1 Here I have 3 hdd connected to test, port A cable p1 and p2 and port B cable p1.... here is option #16 (show drives) then I enter option 9, 1 then 8 Here I enter 0 for NVRAM, Y to make change, enter 000c and value 02, enter to write. Verify changes... Above shows 000c = 00000002 Drives are not showing up in slot order, just sequential order without gaps, so in this case hdd all grouped together, even though they on A-P1 A-P2 and B-P1 (should be slot 1, 2 and 5) During boot, I pressed E at screen to edit grub and removed satamap and diskid, no change.... this motherboard has 6 sata ports, plus the hba card being passed to dsm so 8 sata ports there. Do I need to change satamap=68 and diskid=0006 ? what do I have wrong? And now I only see 2 of the 3 drives, plus still see the first virtual drive (30g) when setting up vm test.... What is wrong?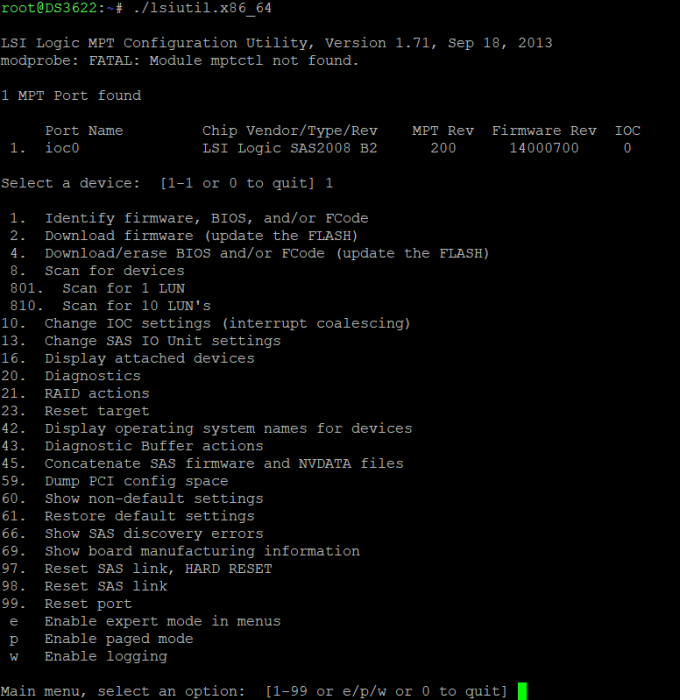

-
Last question... how can I edit the grub config on a working tcrp loader? I need to play with satamap on a working system, because I just installed hba sas card and I want my drives to show in the correct slot order. I remember seeing it, but I didnt write it down or save it. I know I have to do a mnt/sdb (?) and that mounts the dir the grub file is in...? The motherboard has 6 sata, and the hba card has 8... I think I need to change to satamap 68 and diskid 0060