Leaderboard


Popular Content
Showing content with the highest reputation on 08/05/2022 in all areas
-
You don't suppose after all this development that someone would have noticed a 90% speed decrease? There is some other problem, it's not 7.1 or RedPill.2 points
-
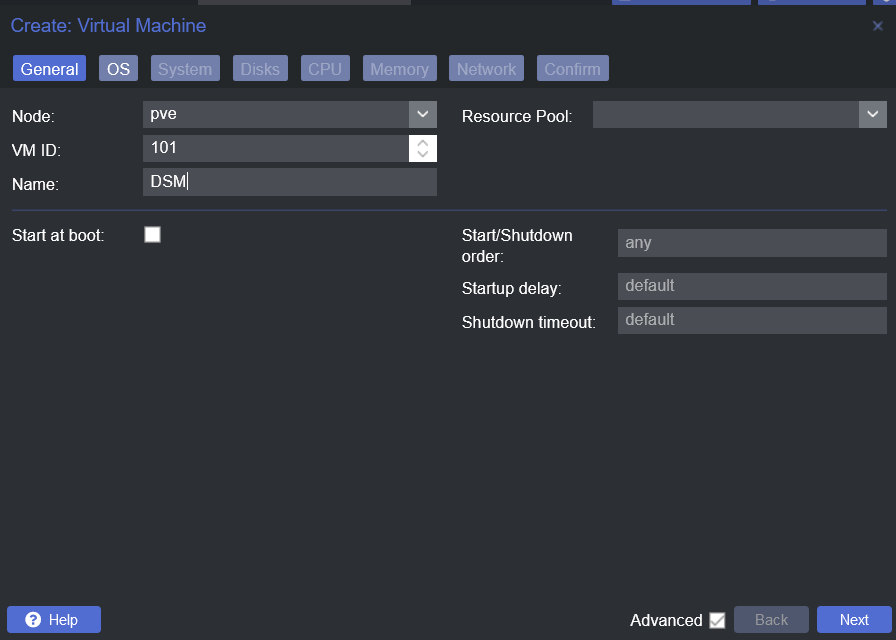
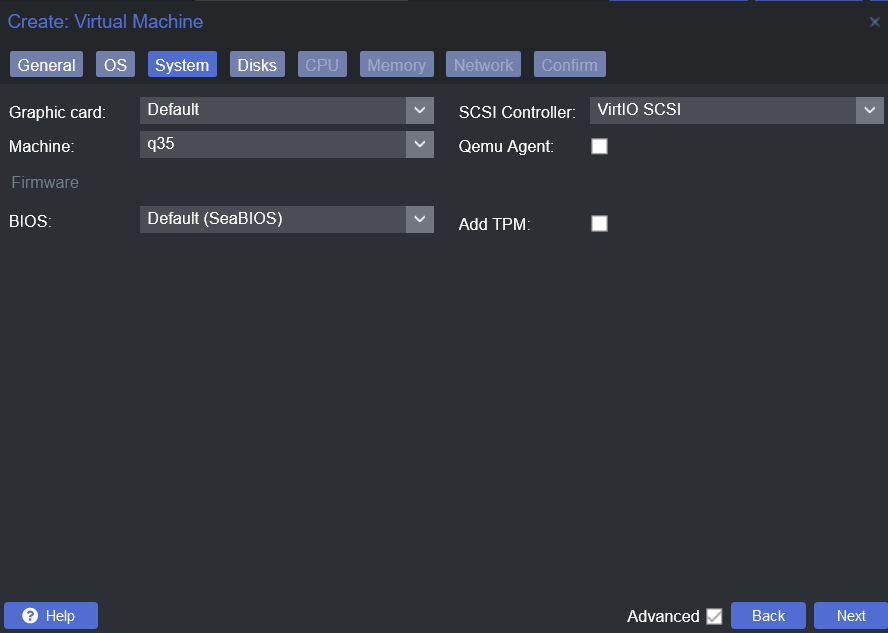
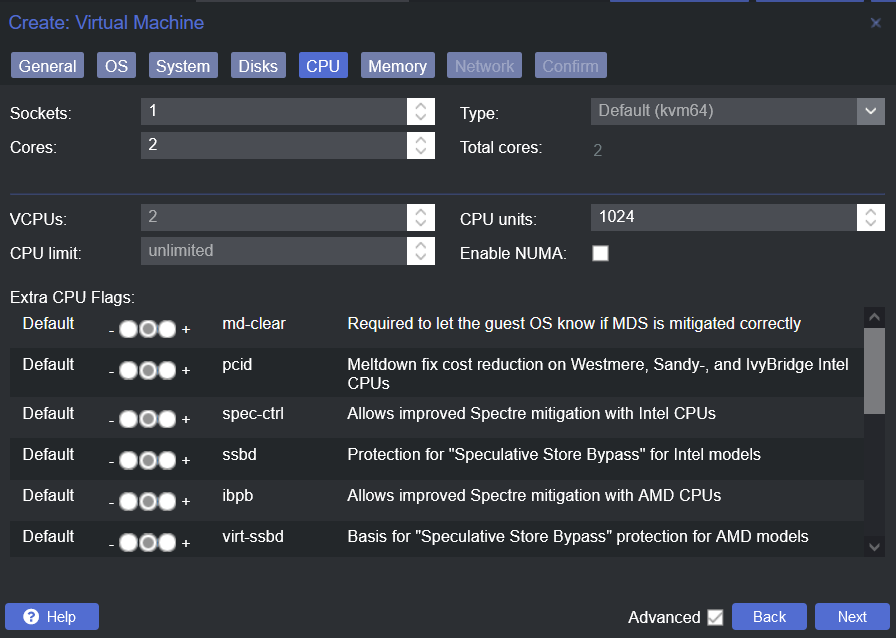
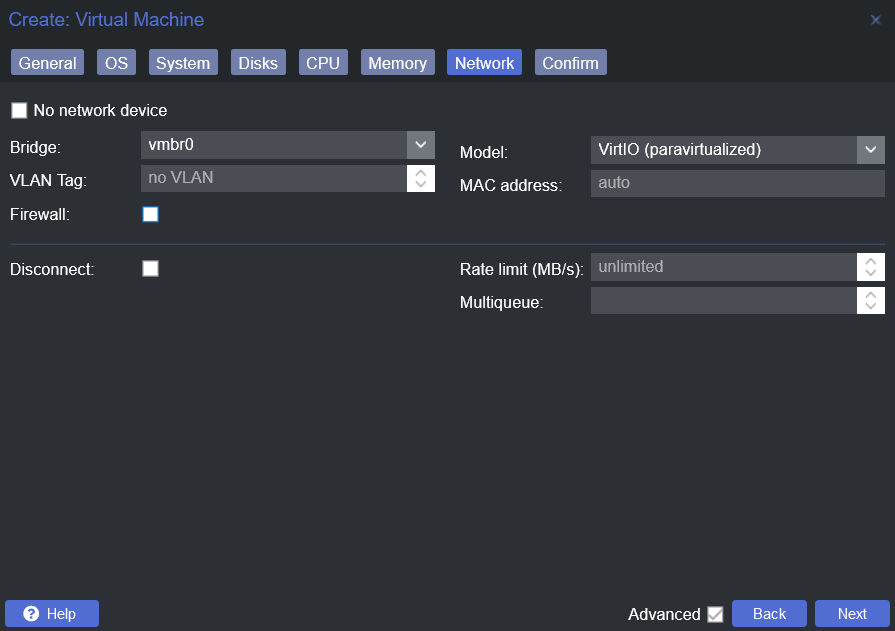
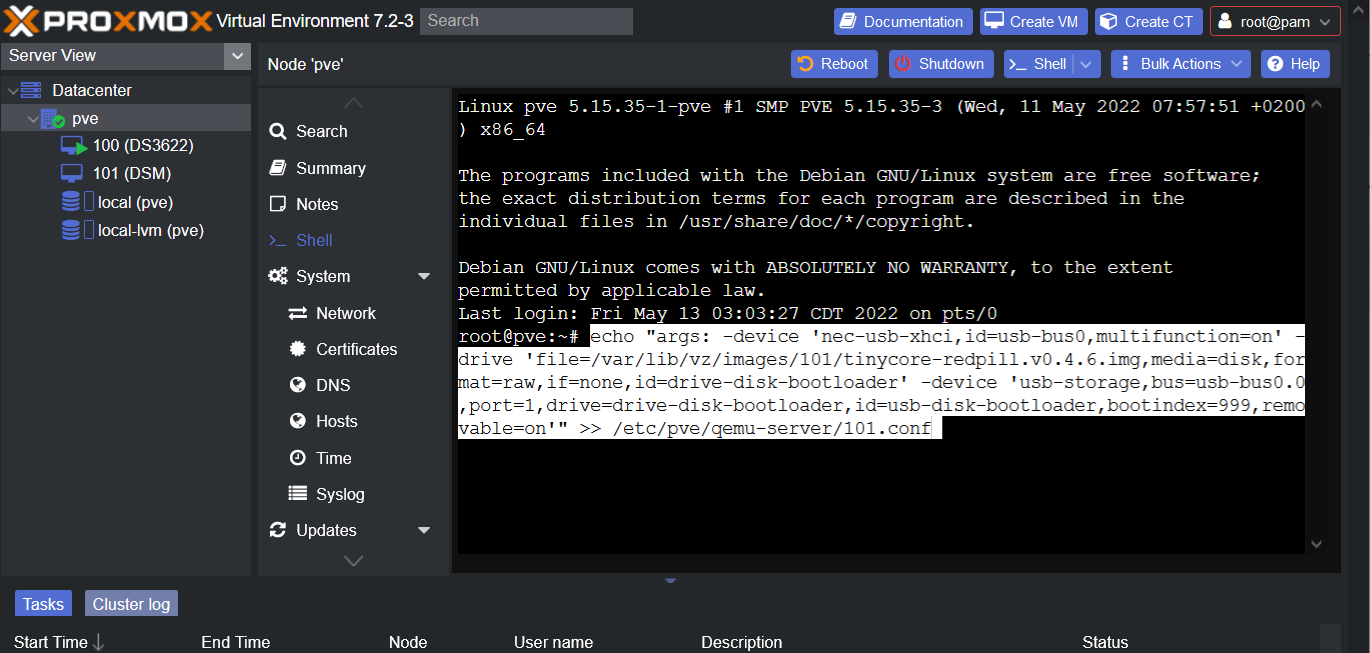
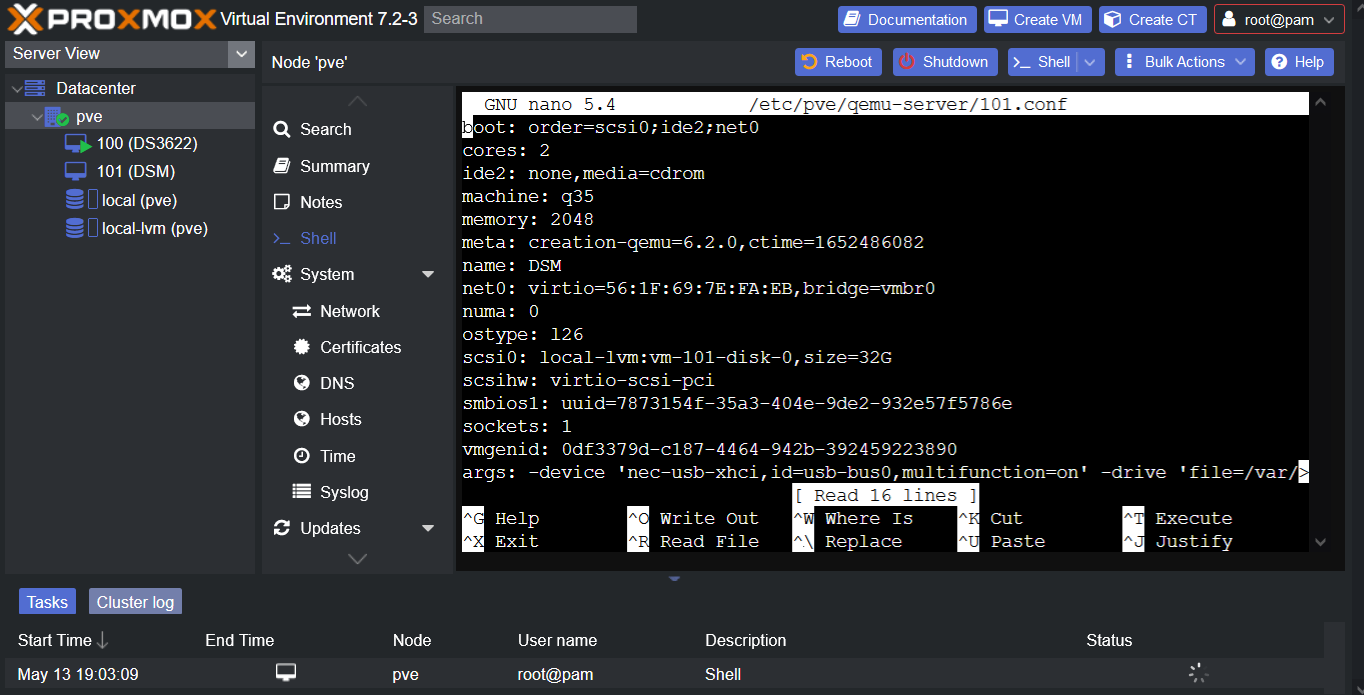
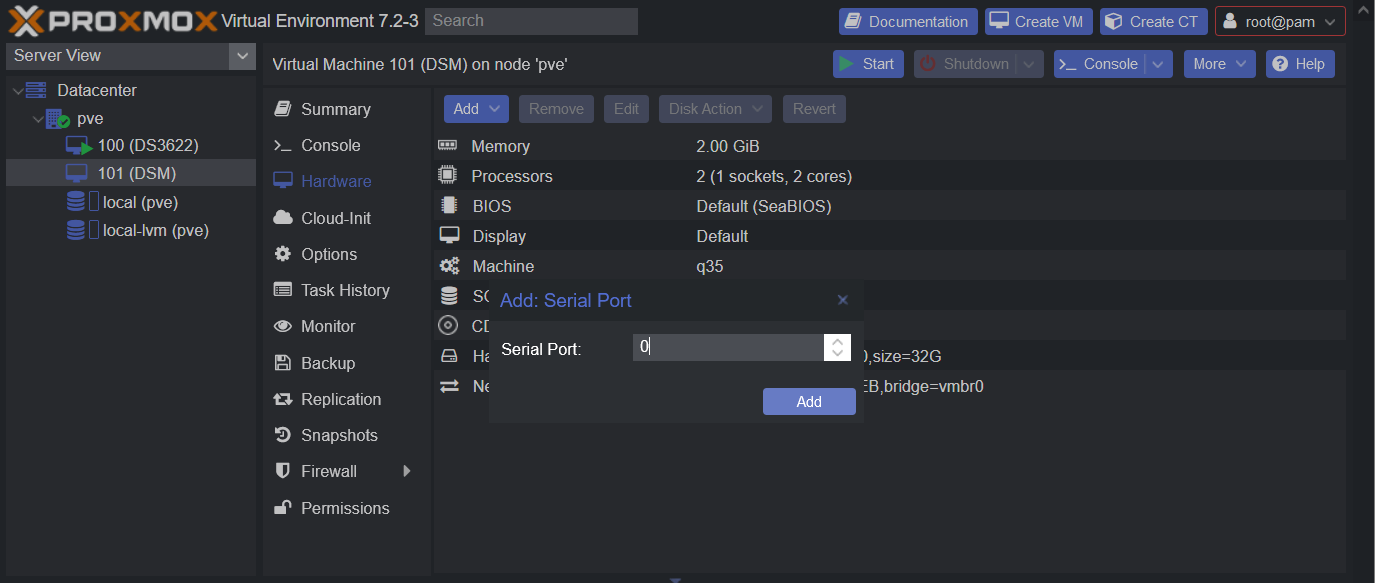
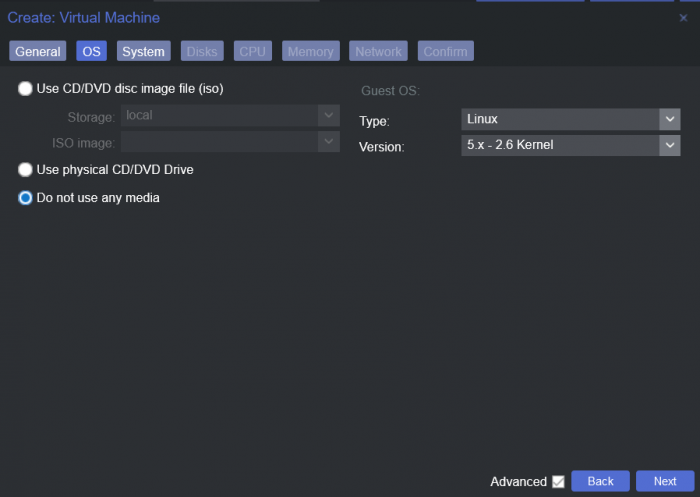
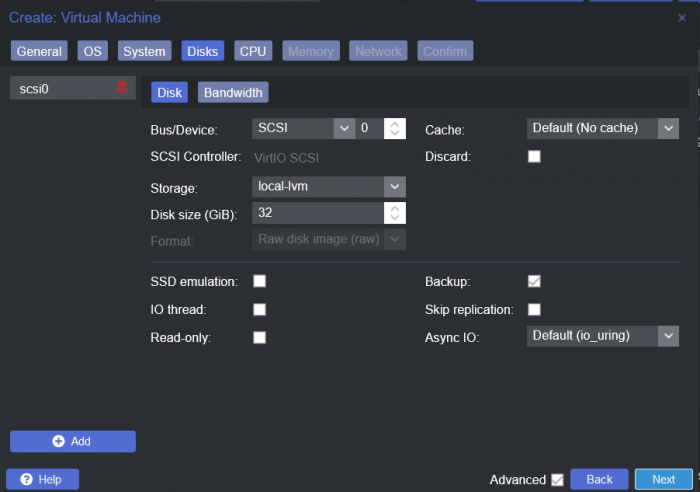
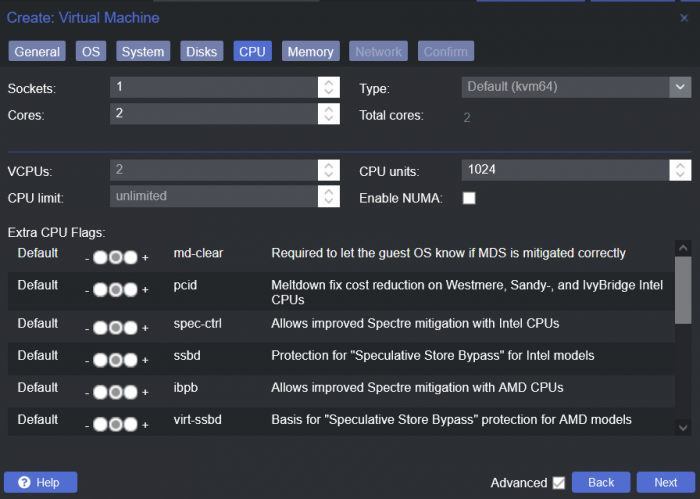
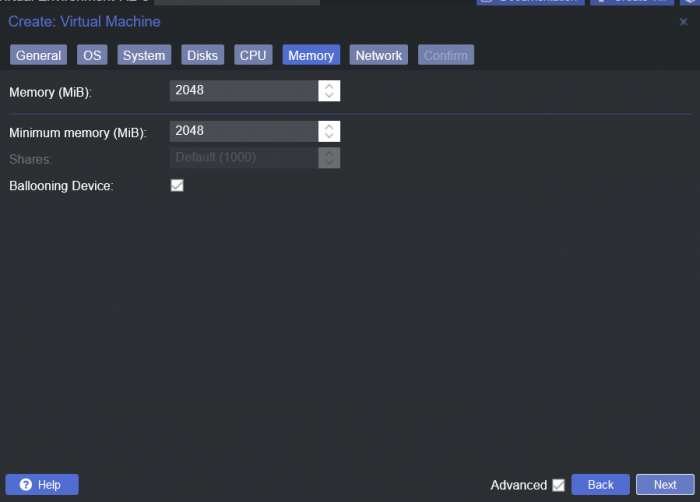
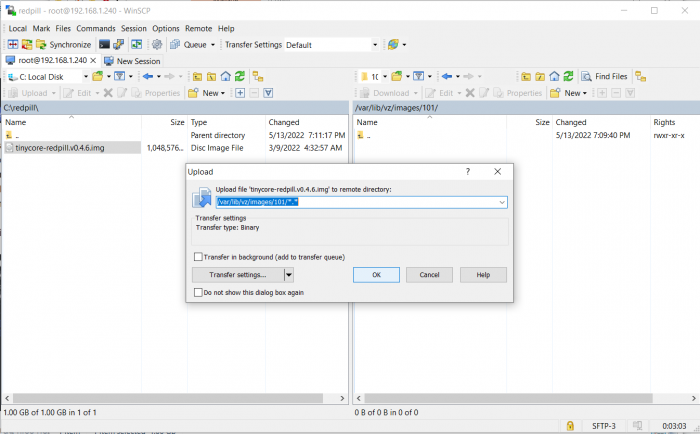
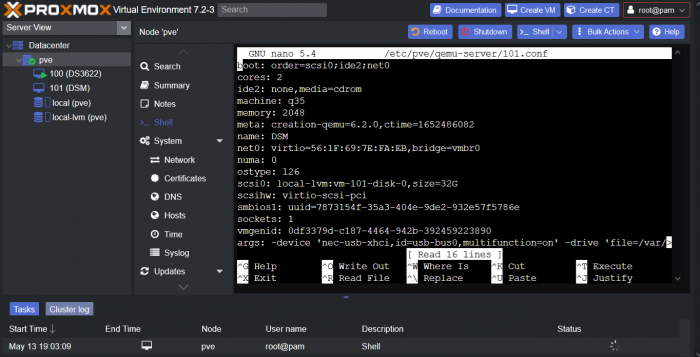
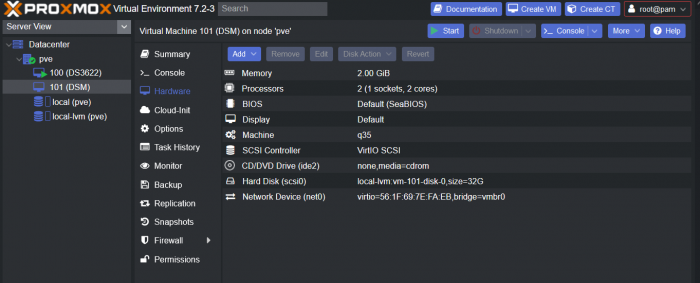
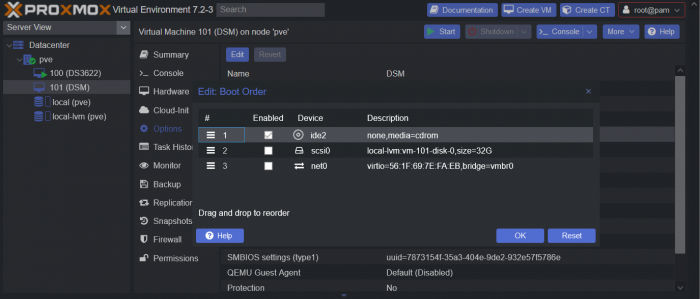
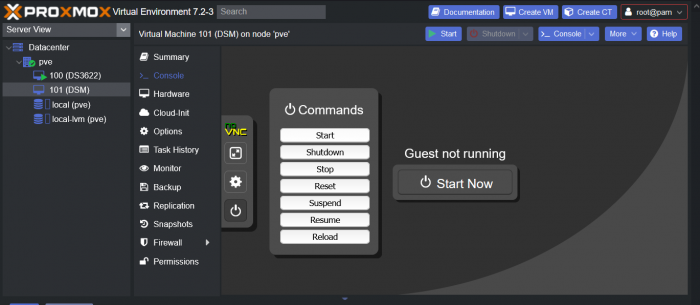
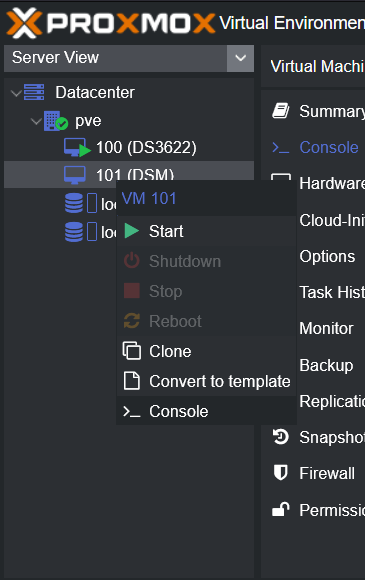
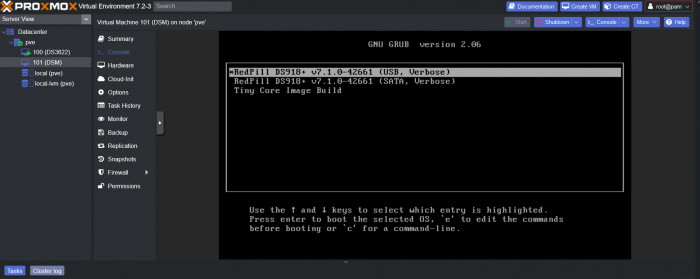
This is a simple guide and step by step tutorial on how I got tiny core red pill loader running and working on a proxmox server. This not the only way, just the way I do it and it seems to work. You will need a few things downloaded and ready to access on your local machine. The tiny core red pill image from @pocopico DOWNLOAD Putty for windows (or your mac equivalent) DOWNLOAD WinSCP for windows (or mac equivalent) DOWNLOAD and of course a working server with proxmox installed and running. DOWNLOAD The correct .pat dsm installation file downloaded directly from synology.com (you can handle this one on your own 😉) From proxmox create a VM. Most of the defaults work, change these according to your specific needs and requirements, I personally used: Q35, virtio nic, HDD is your choice, 2 cores and 2gb ram (again your choice). System Q35 is not required either, i440x works too, this is just what I used and it works. HDD is whatever you want, or pass thru complete drives or controllers.. again your choice based on your setup. Same for nic, cpu and ram. Just be sure to Use NO MEDIA in the OS section * REMEMBER THE VM ID # * you will need it later * Remember, do not use any media is selected here. Now, load WinSCP and connect to your proxmox server using your local ip and proxmox credentials. There on the right side, navigate to /var/lib/vz/images/ and create a folder/directory of whatever the vm number was you created, in these pictures its 101 so in this case it should be /var/lib/vz/images/101/ On the left side in WinSCP navigate to where you downloaded and extracted the tcrp image Copy the extracted tcrp img from your local machine to your proxmox vm directory Alternatively, you can enter a couple of command lines in the main pve node shell to download and extract the tcrp image without using winscp at all, but I do it the hard way. Either way works so its up to you. The alternative method is open the main pve node shell in proxmox and enter these commands (use copy and paste for each line) # set vm id to whatever it was at time of creation id=101 # create image directory, download and uncomporess mkdir -p /var/lib/vz/images/${id} curl --location https://github.com/pocopico/tinycore-redpill/raw/main/tinycore-redpill.v0.4.6.img.gz --output /var/lib/vz/images/${id}/tinycore-redpill.v0.4.6.img.gz gzip --decompress /var/lib/vz/images/${id}/tinycore-redpill.v0.4.6.img.gz --keep Now, at this point one way or another you should have a dir of your vm # in the correct location with the tcrp extracted image inside ready to issue the following commands, so now click your main pve node on the left panel and choose shell and paste this command there. (edit the 101 vm # with whatever your vm # is) echo "args: -device 'nec-usb-xhci,id=usb-bus0,multifunction=on' -drive 'file=/var/lib/vz/images/101/tinycore-redpill.v0.4.6.img,media=disk,format=raw,if=none,id=drive-disk-bootloader' -device 'usb-storage,bus=usb-bus0.0,port=1,drive=drive-disk-bootloader,id=usb-disk-bootloader,bootindex=999,removable=on'" >> /etc/pve/qemu-server/101.conf Now type nano and the last part of the above command (the directory part) to verify the entry into your vm .conf file so in this case nano /etc/pve/qemu-server/101.conf You easily verify the entry into the bottom of the .conf file of your vm, now press control x to exit. Now select your vm and choose hardware from the column Here using the Add button you should add a serial 0 console to monitor your dsm loader if needed (helpful for troubleshooting) and if you are adding hdd or using pass thru of hba controllers or sata controllers or any other specific hardware for your build add it here. Now select Options from the list column, and select only ide2 CD-ROM (uncheck all others) and make cd-rom priority #1 by dragging it to the top. Now you are ready to spin up your vm and build your loader. You can watch the process of booting by right clicking on the vm number/name and select >_ console a new window will open and you will see lines of code fly by, but only in this console monitor window. This is an optional step. At this point you should be booting tcrp and ready to build your loader... @Peter Suh has a great tutorial for that linked here. Follow his directions for building your loader. Use putty to SSH into tcrp to build the loader, The main thing when building if you used virtualized nic card, add the v9fs ext to get network port working, use this command before executing the redpill build command in putty. ./rploader.sh ext <build platform> add https://raw.githubusercontent.com/pocopico/rp-ext/master/v9fs/rpext-index.json After you successfully build your loader, and during the reboot, go back to proxmox gui and when you see the booting menu screen, press UP to select BOOT FROM USB, VERBOSE then press enter... that is very important. You only have to do this once, and it will save and retain that selection until you change it again. You do not want to boot from sata! At this point you load your browser, go to find.synology.com or use synology search application on your pc, or simply go to the ip of your new vm dsm and complete the process. If you had your console monitor opened from above, you should see sign in prompt, if you scroll up a little bit you will also see the ip of your dsm vm. If you successfully booted from usb, everything will work. If you did not change that during the first reboot, and you are booting from sata, you will most likely get a failure to install dsm. You will need to power down the vm, re-start the vm, and choose boot from usb verbose. If this guide helped you, please press the thanks button for me. 🖖😀 And remember to thank @pocopico and @Peter Suh Enjoy!


 1 point
 -
Download the archive : https://github.com/Trauma/cpufreq-userspace-scaler/archive/refs/heads/master.zip Extract the archive copy the files to your nas ssh to your nas cd path/to/cpufreq-userspace-scaler-master sudo ./install.sh1 point
-
I ran two virtual machines on one PC. AI works in both. i 5 7400 + 1650
 1 point
 -
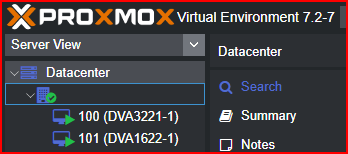
Можно. Я пока сделал на обычном загрузчике на 2 камеры. 5 виртуалок. Соединил все на один хардварный 418J c DSM 7.1-42661 Update 2 через CMS. В итоге получил полноценную последнюю версию, которая будет обновляться. Делал на сервере ProxMox 7. С созданием есть ньюансы. Нужно чтоб у всех виртуалок были разные серийные номера, иначе говорит, что "данный сервер уже добавлен". Серийник поменять очень просто. Нужно скачать у каждой виртуалки загрузочный диск и с помощью far manager редактировать его и в трех местах поменять одну цифру серийного номера, потом загрузить файл загрузчика обратно на сервер. Если нужно, то могу написать подробную инструкцию.

 1 point
 -
Okay I will do that. Tomorrow 8/5.. I am GMT -5 it is on a usb disk. Thank you again for for the info will test it out and give updates afterwards 🤞1 point
-
DS3615 is becoming outdated and DS3622xs+ installs on most hardware. Try a new build with a spare hard drive. If it’s successful on your hardware you can migrate the DS3615 to DS36221 point
-
Wanted to add some info here. I recently changed the motherboard in my proxmox server, where my DS3622xs+ redpill lives. Previously I had a motherboard and PCI HBA card (H710), the new motherboard has a build-in HBA (well, I flashed it to HBA). So after flashing the IT mode FW, and using LSIUTIL, with many thanks to @exodius for this great topic, I reconnected all 8 of my drives to the motherboard SFF HBA ports, and booted back to proxmox and my dsm instance. It originally came up showing all 8 drives, all green, but the serial number order was all off, but DSM didn't complain (which I thought was strange). So all my drives are labelled with serial numbers from Seagate (ironwolf's) and I labelled them with drive slot numbers (1-8). So after bootup drive 1 was now 3, 2 was now 8, etc, etc... but dsm said the array was healthy and no errors. (remember I changed motherboards, and now using built in HBA vs PCI card HBA before) I didn't like that since I had them labelled just because of this. So, I powered down, restarted DSM and it booted to a DSM desktop with no drives (I didn't think it would but it did), and I re-attached each drive from 1 thru 8 one drive at a time and they all re-appeared in the correct slot order and cable order, which was not the case when it powered up with all 8 attached on initial power up. So now all are serial correct, slot correct, numbered correct, and cable correct (drive 1 is SFF port A cable P1 and so on) I just wanted to thank the OP again for this trick, and share my experience as it may help someone in the future, if your drives end up out of order, disconnect them all and re-attached (insert) them 1 drive at a time from drive 1 and continue thru until the end, that should get them back in the correct order.1 point
-
Denverton https://mega.nz/file/qLIxHISA#jy3mNgxxo-kyYUoc5R0iIYqL1l0Rmyue0G5DXY0wxM8 Geminilake https://mega.nz/file/TapDCDjR#Ho8GGFLbQgvYpomTIn6bTm1ozHVl3xEH3Q52s6h5ZlA1 point
-
No major changes will be introduced in stable release. Only fixes. The dtcpatch by fbelavenuto should be included as a fix for 0.8. To upgrade your 0.8 to develop 0.9 image you may proceed with what @Peter Suh suggested. curl --location "https://github.com/pocopico/tinycore-redpill/raw/develop/rploader.sh" -O ./rploader.sh fullupgrade The automatic dtbpatch by fbelavenuto solves most of the issues we had with dtc patching in the past. Also dtc and dtbpatch binaries are copied during boot in runtime DSM for manual troubleshooting or for hotplug disk addition, if its required. CPP code is open and available at fbelavenuto repo. https://github.com/fbelavenuto/arpl-addons/blob/main/dtbpatch/src/main.cpp1 point
-
I added an option to download addons, to make it easier to add drivers. Please download alpha2: https://github.com/fbelavenuto/arpl/releases/download/v0.1-alpha2/arpl-0.1-alpha2.img.zip Oficial addons now are here: https://github.com/fbelavenuto/arpl-addons r8125 added1 point
-
real3x's extra.lzma i guess the problem is with the changes in kernel driver settings between 6.2.0 and 6.2.2, if you install 6.2.0 you should be ok, the trouble starts with using 6.2.1 or 6.2.2 there are different problems mixed up when a system does not show up in network after a 6.2.2 upgrade, in most cases its a not working network driver, in some cases it might be a crashing i915 driver and a missing /dev/dri might be s showstopper for some people too when wanting to use hardware transcoding maybe wait a few days, with the version 0.8 of my extra.lzma there will be a split into 2 version, one using synologys i915 driver (as it comes with dsm 6.2.2) and the other with jun's newer i915 driver, both will have new network drivers and the variety with the synology driver will also have additional i915 firmware matching the synology driver so it can use more devices then before that might not have showed the /dev/dri because of missing firmware files and for hard cases there will be also a recovery version that knocks out the i915 driver (in one case with a J1800 the driver prevented the system from booting)1 point
-
With ASRock J4205-itx too, but ASRockJ4105/5005-itx working fine.1 point
-
Maybe the problem is that there is no MCDP28x0 chip on the J3455B, but there is one on the J3455?1 point
-
Перед тем как что-то менять в своей работающей системе, настоятельно рекомендуется сделать резервные копии своих особо ценных данных, чтобы потом не жалеть об их безвозвратной потере. Все, что вы творите - это ваш страх и риск, никто не побуждает вас это делать. Самый простой и надежный способ безопасно попробовать - выключить хрень, отключить все диски и загрузочную флешку от действующей системы, взять чистый диск и другую флешку и попробовать установить новую версию загрузчика и системы, если прокатило, то делать уже на действующей системе. 1. Как установить (подготовительные работы описаны для компа с Windows): а) скачать образ загрузчика 1.04b (исходная тема тут), создать каталог в корне диска без символов на кириллице, например, c:/918/ и поместить туда образ загрузчика б) определить VID/PID флешки или картридера в который она вставлена (Панель управления - Диспетчер устройств - Контроллеры USB - Ваша флешка/ридер - Свойства - Сведения - ИД оборудования, нужно для того, чтобы система DSM опознала этот диск и не пыталась устанавливать себя на него, если неправильно определите и пропишите эти параметры, то система будет вылетать по ошибке 13 при установке в) скачать, установить и запустить программу OSFmount, смонтировать Partition 0 (15 Mb) из файла загрузчика, перед монтированием убрать галку Read-only drive г) скачать, установить и запустить программу Akelpad, открыть файл grub/grub.cfg на ранее смонтированном диске, правим, сохраняем: set vid=0xA234 #VID флешки/ридера set pid=0xB678 #PID флешки/ридера set sn=1780PDN123456 #sn set mac1=001132123456 #mac первой сетевой карты set mac1=001132123457 #mac второй сетевой карты, второй и последующий отличаются от первого на +1 в последнем разряде в шестнадцатеричной системе ... set netif_num=2 #количество сетевых карт ... set sata_args='SataPortMap=6' #контроллер sata, значения: 6 - 1 контроллер на 6 портов; 22 - 2 контроллера по 2 порта; 42 - 2 контроллера, первый на 4 порта, второй на 2 и т.п. Где брать sn и mac - ваша головная боль, гугл в помощь, система установится и будет работать с теми, которые изначально прописаны в загрузчике, но с ограничением функционирования некоторых сервисов и модулей, таких как: QC, пуш уведомления, активация кодеков для транскодинга, установка лицензий syno... Но для большинства и без них будет достаточно. На форуме писали, что прокатывало с sn и mac от других реальных моделей syno, но так не пробовал, поэтому утверждать не буду, кто хочет - дерзайте. д) размонтировать диск в OSFmount е) скачать, установить и запустить программу Rufus и записать ранее подготовленный образ на флешку з) вставить флешку в машину, на которой планируете запустить хрень, подключить диски, включить питание ж) отключить брандмауэр в антивирусе, в браузере набрать http://find.synology.com или установить Synology Assistant с сайта syno и найти вновь установленную хрень в вашей сети и) установить DSM установить хрень следуя инструкциям программы установки и приступить к настройке (как это делать здесь не описываю, ибо все ответы есть в базе знаний syno) Для ленивых есть утилита, где собраны основные проги для Windows x64 2. Если хрень не обнаружилась в сети, то скорее всего в загрузчике нет драйверов для ваших сетевых карт и/или для sata контроллеров. a) запустить программу OSFmount, смонтировать Partition 1 (30 Mb) из файла загрузчика, перед монтированием убрать галку Read-only drive б) скачать extra.lzma из этой темы и перезаписать в смонтированном диске в) размонтировать диск и перезаписать образ с добавленными драйверами на флешку г) попробовать запустить и найти хрень в сети, если не получилось, то увы и ах, либо просить, чтобы добавили дрова для ваших устройств в этой теме или самому их добавлять - теория тут 3. Транскодинг (нужны sn и mac от реальной железки) С наибольшей степени вероятности запустиnся на процессорах Intel начиная с 4го поколения (Haswell), но есть нюансы с моделями материнских плат и биосами. Проверяем следующим образом: hardware (hw) транскодинг - в корне системы должен быть каталог /dev/dri с тремя подкаталогами внутри, если его нет, но нет и hw транскодинга, чтобы проверить - ищем каталог в терминале/ssh командой cd /dev/dri. software (sw) транскодинг - должны подняться соответствующие кодеки, проверить можно командой в терминале/ssh cat /usr/syno/etc/codec/activation.conf Если результат такой, то он есть: {"success":true,"activated_codec":["hevc_dec","h264_dec","h264_enc","mpeg4part2_dec","ac3_dec","vc1_dec","vc1_enc","aac_dec","aac_enc","mpeg4part2_enc"],"token":"абракадабра"} Если ничего похожего нет, то нет и транскодинга. P.S. Просьба к админам прибить тему в шапке и дать мне доступ на редактирование первого поста этой темы, буду добавлять по мере поступления вопросов, ибо задолбали оленеводы, которые задают вопросы по установке, во всех подряд темах.1 point
-
Hi Jun, I am using AsRock motherboard J3455-ITX and installed DSM6.1.3 with your loader 1.2b, but I am confuse that when I upload big files to DSM NAS storage, it shows the speed of upload is not stable, lower speed only 700KB/S, higher is no more than 80MB/S, I tried to upgrade the DSM version to 6.1.7, but also shows the problem. So, could you please help to define the root casue the solve the problem. Thanks.
 1 point
 -
the board will work but you wont get hardware transcoding, the network performance will be a little sluggish and you may not be able to shut it down or reboot it without pressing the power/restart button. you're best of using the latest 3615 boot loader with 6.2 (not 6.2.1) because you're not gaining anything by using the 918+ loader except the ability to run 6.2.1 (which gives nothing new)1 point
-
first you need a valid SN for hardware transcoding with video station, second have a look at this https://github.com/SynoCommunity/spksrc/issues/29391 point