Search the Community
Showing results for 'detected that the hard drives'.
-
 Is there an in-depth tutorial on how DSM/Xpen responds to changes in SATA disks? (perhaps also covering USB). I ask because so far all I can find are forum responses "do this", "edit sataportmap/DiskIdxMap values", "I did this..." Do I have to reinstall/recover whenever I rearrange drives? I'm hoping for an in-depth planning guide that covers a lot of general info, AFTER INSTALL, on what happens / what-to-do when adding/rearranging SATA drives, controllers, swapping out drives (e.g. for single-disk volumes), covering all scenarios. And perhaps about attaching/removing USB dives too. Again, so all I've found are posts that address specific issues when somebody is migrating a drive, or adding a new drive... I'm hoping to find a broad tutorial that answers questions I don't have yet. More... Rather than one-time build a reasonably spec'd box, I'm using misc leftover hardware, so I expect to have a lot of sata drive changes over time (tho I expect that's not ideal, I'm just the type that will tweak-as-I-go.) My choice hardware is very limiting (Lenovo M900 tiny), and I know I should just use more suitable stuff, but... I'm still in discovery mode, and when I get far along then I'd like to avoid having to rebuild from scratch. So what's specifically eluding me is... Using ARC loader, I seem to need at least one Sata drive to install -- I can't install on NVMe? Even tho I thought I'm installing on the USB stick, is it really installing on a base sata drive? What happens if I wish to remove the 1st (only) sata drive at a later time to upgrade it? Does this 1st sata drive get used for core DSM apps, so it's required and can't be removed? Is rearranging SATA drives a matter of "edit config file and cross fingers"? No dynamic behavior by DSM? If I were to use a JBOD sata box (my sata port supports port-multiplier), and occasionally pop in a drive, or delete a volume and remove a drive, whether I'll have to edit the If I were to add an ASMedia or JMB585 secondary sata controller, then could I jockey sata drives on those? I've been monkeying with DS920+, which doesn't seem to have satamap command ... should I switch to DS3622xs+? So with this external sata JBOD 5-bay drive rack, if it's so much trouble to swap drives, I could instead connect it with a USB-SATA bridge (instead of attaching it to an add-on sata controller), and use via File Station(?) That would be quite limiting -- no software DSM-based RAID (I'm fine with that), but would I otherwise be able to share files via apps like Plex Server off of those USB-attached drives? Any links to tutorials that address these topics? Thanks!!!
 -
To restore the VERSION file, I would use a 2nd DSM installation. So remove all drives and reinstall a free/empty hard drive, may be an old laptop drive, in slot 1 (far left) with DSM. Then insert the first/leftmost of the removed hard drives into the 2nd slot during operation. Don't put together hard drives online or anything like that! Then make the system partition available via SSH/root via the point "/mnt": mount /dev/sdb1 /mnt cd /mnt/etc.defaults Copy a working VERSION here, from the new DSM or it's share, or repair it using the editor "vi". power off 1. Remove the spare hard drive form slot 1, 2.=>1 and switch it on again to test. The data volume will be missing, but if DSM boots up properly it will be there again with all disks when you restart.
-
Hello guys, noob here. Hope this questions not too stupid and greetings from Indonesia. I'm currently using DS112 and looking to upgrade it as it already quite slow for me. I just need a basic network storage functions, Download Station, Surveillance Station (for future, 1 cam only), access from outside the network (like quickconnect, I read that I can use the DDNS method), Docker (looking for PiHole or AdGuard for the network, 2 people only), adding more drive in future (going for 1 drive for starter, don't need RAID), and most important of all is the power consumption (for 24/7, mostly for media server and download station). Have a few questions as I still not decided between Xpenology or other NAS OS option for my needs. I found 2 HP ProDesk 400 G4 Mid Tower (500gigs HDD and 4GB DDR4 RAM, 3 SATA ports | 2x3.5" hard drive slot), the first one are using i3-6100 and the other i5-6500. Which one should I get? I read that i5-6500 not supporting ECC and the i3-6100 are supporting ECC, but I don't know about the motherboard whether it support or not. The ECC part aren't important if I read it right from this forum (for Xpenology), I think the power consumption part are the most important for me. As I'm looking for 1 drive starter and not looking for RAID (mirror or anything), can I just adding the drive when the Xpenology already running? I mean like on the computer, when the C drive already filled at 90% then I just have to buy more drive and add to the computer, or do I have to reconfigure the loader? I'm not familiar with how DSM works on the multibay, as I only have experience with the DS112. I'm looking for something like JBOD, as long as the new added drive are detected and I can use it. Basically, TLDR, I'm looking for much beefier than DS112 in terms of processing time (like managing the data inside, while running Download Station, as the DS112 are quite slow and makes me waiting a few times), space for more hard drive (I think I can live with 3 SATA ports on the HP Desktop), and the friendliness of DSM GUI while still have good power consumptions and off course cheaper hardware (than the Synology one). Any info or point to where I should be looking at are helping. Thank you in advance, and hope my English are understandable. EDIT: For the media server, I don't need transcoding as I'm using some Android TV box.
-
The sticks that you own or can see from family and friends. As I wrote in #247: You can use any USB stick if you have the manufacturer's software tool to change the VID/PID. I have a drawer full of them. to 1) There are two different situations here. For some the DOM is defective, for others they would like to upgrade the device to a different model. - Defect => new flash memory - Modding =>#242 to 2) hard drive to 3) It must be compatible with “Synology”, not “Adata”. The flash memory is only needed to start/stop the device or while installing firmware updates. Monsieur PIGNON did both. He changed the model some time ago and repaired it last week with USB sticks from me. So if we already know that the DOM will soon no longer be able to function due to the aging process, we should remove the still functioning DOM, put it in the drawer to be on the safe side and proactively go on with a new flash memory.
-
Hello Mr Pignon ☺️, So pas besoin de stick avec changement de VID PID ? Did you just follow these instructions above or did you do any additional steps please ? I had very hard time to have F400 stick and even I broke my windows with countless Alcore soft downloaded from grey Russian site... Really struggling a lot with this since I don't have any compatible stick. Thanks
-
"There is a hard lock on the tasks you can run with any GPU" - How to activate it?
-
You can use of of the loaders such as TCRP, ARPL or Peter Suh's M-Shell that is based on TCRP: https://xpenology.com/forum/topic/61839-tinycore-redpill-loader-build-support-tool-m-shell/ is the one I use. They all now allow you to build within a web interface that makes the process pretty simple with support for many newer models. The DS3615xs has lost support since it is one of the oldest models, so the DS3622xs+ would be a great upgrade for you. But if you do not have 12 disks in your system, for cosmetic reasons only, you can choose one of the models that hold 2.4 disks. The steps I would use is, get a new thumb drive and a spare hard drive that you can test builds with. Download the PAT file for the model you want to use, you will need it later. Remove you data disks from the system and put them in a safe place until the build is done. I would keep the disks in order for simplicity. Build say the DS920+ and see how you like it. If you are satisfied, power down the system, remove the test disk and install your data disks. Once booted, you will get a prompt to migrate. At this point you will get a prompt to re-install the OS. Choose manual and select the file you downloaded. Enjoy your new NAS.
-
Device Tree it's the way each model identifies the drives. It has nothing to do with BareMetal or a VM (my opinion).
-
 I would say that for a business that would also favor proper support in case of issues, it's better to go with a off-the-shelf product such as Synology, QNAP, or such. The reason being that they're a one stop shop for their own hardware. And you will be covered by some kind of warranty with an option to buy an extended one, or to sign a service contract. The downside of getting something like Synology now (as opposed to QNAP, Asustor, Thecus and so on), is that Synology is closing its garden somewhat - as in it's moving to require Synology certified Hard drives which will be the only ones to work with its NAS products. Currently its in effect in Synology Business and Enterprise products (which may or may not be the level of product you need) but it may also start to arrive at Home based products. Xpenology may (or may not) always have the option to use any Hard drive, and also mix between them, but it relies on self built hardware most of the time.
- 9 replies
-
- 1
-

-
- nas appliance
- nas solutions
- (and 2 more)
-

TinyCore RedPill Loader Build Support Tool ( M-Shell )
Peter Suh replied to Peter Suh's topic in Software Modding
Perhaps you want to take the loader.img file that was created in the middle. However, the method via loader.img is the old method. You need to apply a time machine to use older versions of redpill-load and tinycore-redpill, but this may not be easy. Your Netgear Pro4 NAS does not support USB booting? It seems to be a 4-bay product so you can use 4 disks. The following functions have been completed with the recently added functions to mshell. "Inject Bootloader to Syno Disk" I haven't uploaded a manual or guide yet. I was planning to upload it after completing more stability tests. Today, as stability has been verified to some extent, I will upload the manual. This method allows the bootloader to boot using only the hard disk. You will need at least 2 disks. Currently, the function of injecting with SHR diss alone has not been completed. At least one BASIC or JBOD type disk is required. How about completing the bootloader injection to these hard disks on a PC with USB bootloader enabled and then transferring these disks to the Netgear Pro4 NAS? -
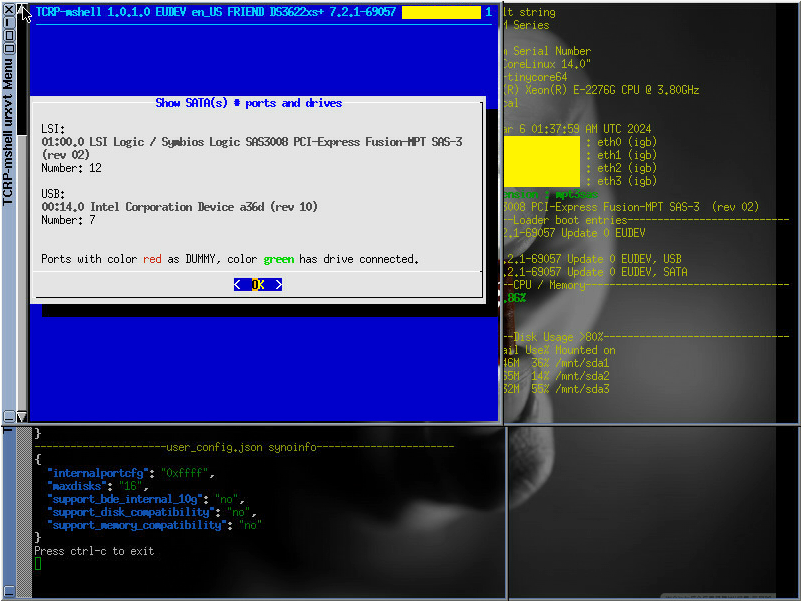
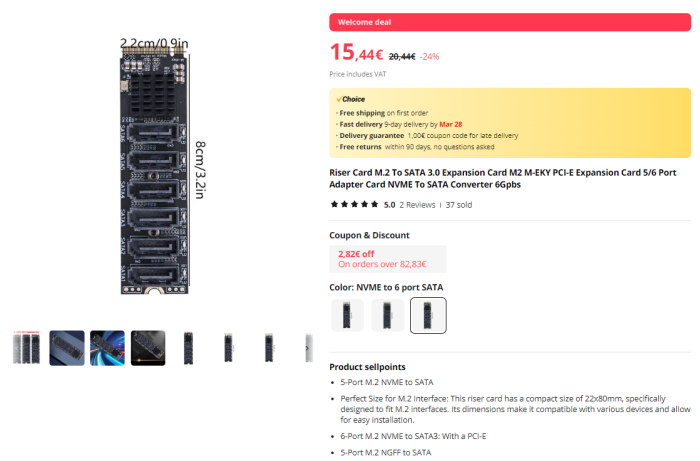
 Hello, After several attempts to get all my satas ports to work properly and to preserve my usb ports as an external drive, I decided to write here hoping to find some help ! I have a Xpenology 7.2 DS918+ running a SuperMicro X11SCL-IF motherboard with 4 physical sata ports and a total of 8 USB ports. I recently updated it to version 7.2 (Model DS918+) by following the tutorial => I then added a PCI-e 16x expansion card with 24 sata ports : TISHRIC TSR818 – ASM1812+1064 chip I also added an NVME M2 card with 6 sata ports : Riser - M.2 to SATA 3.0 This gives me a total of 34 satas ports (yes, I know it's a lot, but I wanted to be able to use all my old disks and not be limited in the future). As the DS918+ is limited to 16 disks by default, I made the modifications to support my 34 satas ports by rebooting on tinycore build. To do this, I modified the user_config.json to obtain the following properties: "synoinfo": { "internalportcfg": "0x3FFFFFFFF”, "maxdisks": "34", … "esataportcfg": "0x0", "usbportcfg": "0x3FC00000000" }, I then ran the command ./rploader.sh satamap I was surpised by what it displayed because it wasn't very consistent: For my motherboard with 4 physical ports Found "00:17.0 Intel Corporation Device a352 (rev 10)" Detected 6 ports/0 drives. Override # of ports or ENTER to accept <6> 6 ports found instead of 4 physical ports. No bad ports. So I declared 4 instead of 6. For my PCI-e x16 card with 24 physical ports Found "03:00.0 ASMedia Technology Inc. Device 1064 (rev 02)" Detected 24 ports/0 drives. Bad ports: -139 -138 -137 -136 -133 -132 -131 -130 -129 -128 -127 -126 -125 -124 -123 -122 -121 -120. Override # of ports or ENTER to accept <24> Found "04:00.0 ASMedia Technology Inc. Device 1064 (rev 02)" Detected 24 ports/1 drives. Bad ports: -115 -114 -113 -112 -109 -108 -107 -106 -105 -104 -103 -102 -101 -100 -99 -98 -97 -96. Override # of ports or ENTER to accept <24> Found "05:00.0 ASMedia Technology Inc. Device 1064 (rev 02)" Detected 24 ports/0 drives. Bad ports: -91 -90 -89 -88 -85 -84 -83 -82 -81 -80 -79 -78 -77 -76 -75 -74 -73 -72. Override # of ports or ENTER to accept <24> Found "06:00.0 ASMedia Technology Inc. Device 1064 (rev 02)" Detected 24 ports/0 drives. Bad ports: -67 -66 -65 -64 -61 -60 -59 -58 -57 -56 -55 -54 -53 -52 -51 -50 -49 -48. Override # of ports or ENTER to accept <24> Found "07:00.0 ASMedia Technology Inc. Device 1064 (rev 02)" Detected 24 ports/0 drives. Bad ports: -43 -42 -41 -40 -37 -36 -35 -34 -33 -32 -31 -30 -29 -28 -27 -26 -25 -24. Override # of ports or ENTER to accept <24> Found "08:00.0 ASMedia Technology Inc. Device 1064 (rev 02)" Detected 24 ports/0 drives. Bad ports: -19 -18 -17 -16 -13 -12 -11 -10 -9 -8 -7 -6 -5 -4 -3 -2 -1 0. Override # of ports or ENTER to accept <24> 6 times detected with 24 ports on each with 18 bad ports each time. Knowing that I only have one card with 24 physical ports. I divided 24 by 6 and declared 4 for each. For my M2 NVME board with 6 physical ports Found "0e:00.0 ASMedia Technology Inc. Device 1166 (rev 02)" Detected 32 ports/0 drives. Bad ports: 7 8. Override # of ports or ENTER to accept <32> 32 ports detected with 2 bad ports. Knowing that I only have 6 physical ports. I declared 6 instead of 32. At the end, I get a warning telling me that there are bad ports, but I apply my config anyway and I get this in my user_config.json. "extra_cmdline": { … "SataPortMap": "44444446", "DiskIdxMap": "0004080c1014181c" }, I boot my system and all my sata slots seem to work (modulo the order of the disk numbers which are not consistent). I've read that I can redefine the order with sata_remap in extra_cmdline, is this true? On the other hand, when I plug in an external usb disk, it's detected as an internal device with disk number 17 (whatever USB port I use, I have 8 in total). And that's the subject of my message. How can I preserve my usb ports so that it's considered an external and not an internal disk? It must surely be linked to the wrong ports, but how do I manage them correctly ? If anyone has the right procedure I'm a taker 🙂 Here's the output of my dmesg command dmesg.txt Thank you in advance for your contribution
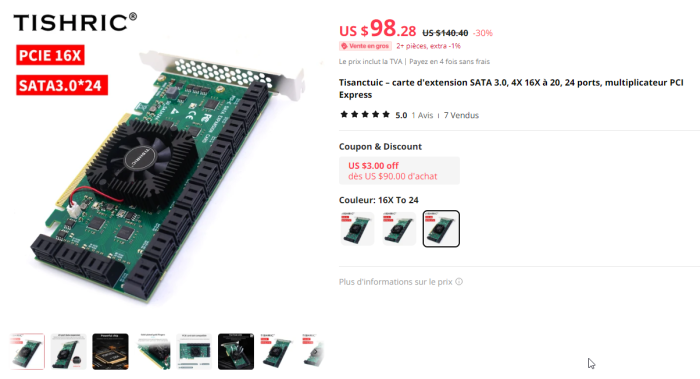
-
Why didn't you go to storage manager and select swap drive? You could have replaced them one at a time if you had RAID 1 without loosing any data. Its takes a while to copy things, but it could have been done in a couple days depending on how much data was stored on the original drives. Is there a reason you still use DSM 6.2.1 and have not upgraded to 7.2?
-
Hi: That could be an option, but the R320 is limited to four drives and i want more expansion capabilities. Regards.
-
Hi: First, thanks for your answer. Anserina your questions: -As i said, the scenario will be to replace the DX513 expansion unit and use in a xpenology as a backup for the DS716+II files. Also, i prefere VMM from synology, because it's much more user friendly, easier to schedule and manage snapshots than EXSi. Also current situation with vmware and QUALCOMM does not pleases me. Now, here the fault is mine. A simple typo gives this. The CPU is an E-2407v2, not the 2470v2 Also, the dell R320 has only space for 4 drives and 3 of them are in use. One with the boot drive and 2 with the storage SSD (2*1TB in RAID1). Regards.
-
Hi: First i would like to give an idea of what i have and what i want to do. I currently have a synology DS716+II with an expansion unit (DX510) used mainly to backup of the 716 files. I also have a Del R320 server where there are running about 7 VM (mainly ubuntu server machines) in vmware EXSi, with 48GB of RAM and 2*1TB SSD drives. It's not a bad system, but however i want to migrate this to a xpenology system, due to the fact that management is more easily performed in Synology VMM. Also, i'm trying to increase the processing power and reduce the consumption power. The Dell system has a Xeon E5-2470 v2 processor and has a constant power consumption around 56W (which is not bad). So the idea was to built a xpenology system that would replace the DX510 expansion unit and will all receive the 2 SSD from the Dell server to run the VM. The minimum requirements are: A faster CPU than the Xeon E5-2470v2, but more power efficient A motherboard capable of supporting at least 64GB RAM or more (the number of VM can increase in the future) A motherboard with at least 2 gigabit interfaces, so i can bundle them. More network interfaces, better. Above 1Gbps is not required, since my switch only supports gigabit speed. As an alternative, i can buy a 2 port pci-e network adapter. At least 6 SATA ports. There's no need to the motherboard be itx. It can be any size. I've already tried the topton N6005 board, but returned it. The processing power was not the expected and at the time there where some problems when running the VM (this could be my fault, because the exporting/import process of the VM did not go very well. I did not know that synology Active Backup for Bussiness could do all the work with a few steps). So, let the ideas come. Regards.
-
I should have tried it with a native hard drive from the beginning. I ended up wasting several days by testing in the VMWARE FUSION virtual environment for a more convenient test. The main purpose of Redpill bootloader hard disk porting is to port the bootloader to the hard disk without using a USB stick. In a virtual environment, it is sufficient to use a virtual Sata disk as a boot loader anyway, so the function of porting it to a disk seems unnecessary. Anyway, due to the nature of Redfill lkm, it synoboots the moment a Sata SSD is seen. A healthy disk disappears. Only those who have at least two BASIC or JOB type disks in Native can use it. I will improve the functionality, distribute it soon, and also upload a user guide.
-
 I have an old Lenovo ThinkCentre M720e, and I am wondering if the hardware in the machine can run Xpenology as it is. Here is a link for the specifications of the machine: https://psref.lenovo.com/syspool/Sys/PDF/ThinkCentre/ThinkCentre_M720e_SFF/ThinkCentre_M720e_SFF_Spec.pdf Key Features 2.9 GHz Intel Core i5-9400 Six-Core 8GB DDR4 2666 MHz DDR4 RAM Integrated Intel UHD Graphics 630 1TB 7200 rpm Hard Drive SuperMulti DVD Burner 1 x Gigabit Ethernet Port 4 x USB 3.1 Gen 1 | 2 x USB 2.0 | Serial Wired USB Keyboard & Mouse Included Trusted Platform Module Windows 10 Pro (64-Bit) (updated to Windows 11)
 -
However, the new method attempted by TTG, the Redpill development group, is not a USB loader. The development that enabled the use of the Sata DOM bootloader was hindered. Among Sata disks, the disk that exists first is always recognized as the bootloader. So, the BASIC type disk to which this boot loader has been transplanted also has to be partitioned by Synoboot, the boot loader. There is a phenomenon in which the front disk disappears. (The data is not damaged.) This is implemented on the lkm side, and can be viewed as a type of fake technology. A few days ago, I looked into the source code with the intention of recompiling lkm and improving it. It seems that when the TTG group first implemented this Sata DOM Fake feature, they thought it was crazy. However, I think they left a comment at the end saying that it has stabilized a lot and is usable now. https://github.com/PeterSuh-Q3/redpill-lkm/blob/master/shim/boot_dev/fake_sata_boot_shim.c /** * A crazy attempt to use SATA disks as proper boot devices on systems without SATA DOM support * * BACKGROUND * The syno-modifed SCSI driver (sd.c) contains support for so-called boot disks. It is a logical designation for drives * separated from normal data disks. Normally that designation is based on vendor & model of the drive. The native SATA * boot shim uses that fact to modify user-supplied drive to match that vendor-model and be considered bootable. * Likewise similar mechanism exists for USB boot media. Both are completely separate and work totally differently. * While both USB storage and SATA are SCSI-based systems they different in the ways devices are identified and pretty * much in almost everything else except the protocol. * * * HOW DOES IT WORK? * This shim performs a nearly surgical task of grabbing a SATA disk (similarly to native SATA boot shim) and modifying * its descriptors to look like a USB drive for a short while. The descriptors cannot be left in such state for too * long, and have to be reverted as soon as the disk type is determined by the "sd.c" driver. This is because other * processes actually need to read & probe the drive as a SATA one (as you cannot communicate with a SATA device like * you do with a USB stick). * In a birds-eye view the descriptors are modified just before the sd_probe() is called and removed when ida_pre_get() * is called by the sd_probe(). The ida_pre_get() is nearly guaranteed [even if the sd.c code changes] to be called * very early in the process as the ID allocation needs to be done for anything else to use structures created within. * * * HERE BE DRAGONS * This code is highly experimental and may explode at any moment. We previously thought we cannot do anything with * SATA boot due to lack of kernel support for it (and userland method being broken now). This crazy idea actually * worked and after many tests on multiple platforms it seems to be stable. However, we advise against using it if USB * is an option. Code here has many safety cheks and safeguards but we will never consider it bullet-proof. * * * References: * - https://www.kernel.org/doc/html/latest/core-api/idr.html (IDs assignment in the kernel) * - drivers/scsi/sd.c in syno kernel GPL sources (look at sd_probe() and syno_disk_type_get()) */ So, if it is possible to have a SATA disk at the front as a dummy, I am trying to do it like this. As a first test yesterday, I attempted to connect to the loop device with a dummy img and acquire /dev/sda first when the kernel is loaded as shown below. I tested it within the Friend kernel, and the script works as expected. However, it failed to obtain /dev/sda as a symbolic link first. https://github.com/PeterSuh-Q3/tcrpfriend/blob/main/buildroot/board/tcrpfriend/rootfs-overlay/etc/udev/rules.d/99-custom.rules https://github.com/PeterSuh-Q3/tcrpfriend/blob/main/buildroot/board/tcrpfriend/rootfs-overlay/root/load-sda-first.sh Now, as a second test, we excluded the Friend kernel and injected the above content into initrd-dsm as shown below to conduct the same test in Junior, which is the DSM kernel stage. https://github.com/PeterSuh-Q3/tinycore-redpill/commit/34ed365357820d7c54552ce2114208670805ff13 Do you think this method will be effective?
-
This project started about two weeks ago at the suggestion of @wjz304 . A guide that can be processed with Jun's loader in DSM 6 already exists as shown below. This method requires a lot of manual work through MS Windows. Redpil plans to create a simpler automatic script as a menu function. https://github.com/PeterSuh-Q3/tinycore-redpill/blob/main/menu_m.sh#L1688 The part where tcrp-mshell is slightly different from rr is tcrp, as its name suggests, is a redpill loader that uses tinycore Linux, so it includes one more kernel. The kernels used by rr and tcrp are as follows. 1. rr kernel (tcrp is friend kernel) 2. dsm kernel (same for tcrp) 3. tc kernel (tcrp only) rr contains all the functions that the tc kernel and friend kernel must perform in the rr kernel. This is why the menu starts directly with ./menu.sh in the rr kernel. The reason I explained these kernels is Ultimately, these kernel files (2 per kernel) must be ported to the hard drive. The existing DSM 6 Jun's loader had a kernel size of only 50M, so 100M of spare space at the end of the first hard drive was sufficient. However, Red Pill is equipped with various kernels, and the files for each kernel are close to 100M. 1. tc kernel (20M, mydata.tgz backup file is variable) 2. Friend kernel (61M fixed size) 3. dsm kernel (based on ds3622xs+ 7.2.1-69057, 82M initrd-dsm is variable [including driver modules and addons for each model]) The loader on the original USB stick is all in the 3rd partition with a lot of free space. It is impossible to store all of this in 100M on one hard drive. Give up less and only take items 2 and 3 and use 2 hard drives. Two hard drives created as Basic or JBOD type are required. Assuming that the structure of each hard drive on which the storage pool is created is of the above two types, It consists of system partition 8G + 2G and data partition (the entire remaining area). I thought there was only about 100M space behind the data partition. If you look closely, there is about 128M more free space between the system partition and data partition. You will see that the Start / End sectors are not connected and are empty. In the meantime, create an extended partition, sd#4, and create additional logical partitions where the bootloader partitions should exist. This capture shows bootloader partitions 1, 2, and 3 split into two hard drives. The first partition has 98M space. Contains the friend kernel from number 2 above. Because the location of the kernel changed, modifications were made to a separate grub.cfg. The existing boot loader searches for (hd0, msdos1) and includes the part where grub is set to boot. Use grub-install to readjust it to point to (hd0,msdos5) = /dev/sd#5. Activate /dev/sd#5, which corresponds to the first partition of the boot loader, to Active so that the hard drive can boot grub on its own. The second partition does not require a lot of space, but The important part contains rd.gz extracted from the original dsm pat file. When an update for SmallFixVersion is detected, it automatically assists in update processing through Ramdisk automatic patching. Currently, DSM 7.2.1-69057 is a file required to automatically update U0 to U4. In the 3rd partition The DSM kernel for each model is included. This is a kernel file that keeps changing and being regenerated every time you rebuild the loader. The intermediate file custom.gz (contains rd.gz and the driver) is also included. Because the size is not trivial, the final result, initrd-dsm, contains almost the same content. We have found a way to exclude it and have recently reflected it in the friend kernel version upgrade in advance. In the case of rr, the size of custom.gz and initrd-dsm contains too many modules (e.g. wifi module, etc.) compared to tcrp. As it is, only 2 hard drives are insufficient. I am not sure if wjz304 is well aware of this and is adjusting the kernel size related to this. With this preparation in place, you can boot with the bootloader implanted using only two BASIC type hard drives. For this purpose, remove the original bootloader, USB or SATA DOM bootloader. Up to this point, I have implemented the bootloader script and completed the first test. Following this topic, I would like to separately explain the problems and solutions I would like to consider.


-

new sata/ahci cards with more then 4 ports (and no sata multiplexer)
Kanst replied to IG-88's topic in Hardware Modding
ARC Wiki tell: "SataPortMap & SataRemap only necessary for nonDT Models". Linux documents tell, that DT is a part of Linux kernel (compiled text file) As I understand, for changing device tree I need kernel recompiling (loader's kernel or DSM's kernel? ) at least it's unavaliable for me yet. OK, let it be 1-12, 39-44, 71-76 drives numbers in DT-mode, generally they work well. -
Hi, using DSM7, with a set of HDD connected to motherboard. But i needed more SATA ports, so purchased an ASM1116 card. It is not detected. Anyone managed to make it work? Ty!
-
 Switched from DDSML to EUDEV Now no drives are detected.
-
new sata/ahci cards with more then 4 ports (and no sata multiplexer)
Kanst replied to IG-88's topic in Hardware Modding
Now I add 3rd ASM1166 card (PCIe4x) and has Discs 71-76 in DSM. As I understand without satamap configured it work in DT mode, but i has no search results on forum about device tree manual configure. How I can remap drives 39-44 to 13-18, 71-76 to 19-24 and disable all useless, if needed?
-

Develop and refine the DVA1622 loader
dyter replied to pocopico's topic in Developer Discussion Room
Yes I use my old mpcie ASM1062 x2 SATA (see my last post) with x1 SATA build-in PC and x1 msata build-in PC, but I use only 3 drives in SSD format. I just test with 3 tasks AI at this moment, and CPU up at 80% but stay at 2Ghz max, turbo doesn't seen to work. For people interested, you can buy this mini PC here: https://fr.aliexpress.com/item/1005006220488959.html (the msata slot is on the other side of motherboard, you have MSATA + MVE/M2 + MPCIE SLOTS !) -
Hi Tomte, how would you run two 2.5" drives? Run both in parallel on the 5V floppy disk output?