Search the Community
Showing results for 'detected that the hard drives'.
-
It seems there is still some missunderstanding with SataPortMap values. SataPortMap works with 1 digit matching a sata board. The number you assign limits the number or disks detected on each sata board. I you set : 12 : First sata board will only have one disk detected, and second sata board will detect only 2 disks. Your current settings limits your sataboard to 6 disks max, and 2nd Sata board is not configured at all, so default is used. In the beginning you should try to remove SataPortMap and DiskIdxMap and check how it is handled/detected. If with this (wrong) settings you only see 6 disks instead of the 7... maybe it means sata board are detected reversed, and your first sata is actually the 8 ports. So SataPortMap would be more like 86 (8 disks for first sata board and 6 disks for 2nd sata board). Regarding DiskIdxMap, it works with 2 digits for each sata board. and match the one digit from SataPortMap This parameter defines the start position of the first disk from each sata board. If you set DiskIdxMap = 1000 you actually say : First disk sata board 1 will begin in position 10. First disk sata board 2 will begin in position 0. As you already know, disks are labelled with letters starting from /dev/sda So position 0 is "a" and position 10 is like "k" So regarding DiskIdxMap=1000 you force first sata board disk 1 to begin at /dev/sdk, and you force first disk from sata board 2 to begin at /dev/sda and depending of the SataPortMap value you set earlier, you may limit available disks... If your sata controller has 8 ports but you limit SataPortMap single digit to 6, last 2 slots from your sata board won't be detected. You should never randomly take these values from a tutorial without understanding them. Most of the time there are not needed, they only help to "order" the disks in DSM GUI to make something cosy. Only some times you have to specify it to fix undetected sata controllers or disks when there is like 3 sata boards etc... As an example on Proxmox Q35 VM machines, there is a dummy Sata board controller unused. When you don't set SataPortMap / DiskIdxMap, the first disk shown in DSM GUI is always empty. So on Q35 VM machine, configuring it as "SataPortMap=18 DiskIdxMap=1000" you say there is only one disk on 1 sata bard controller, and move the first dummy sata controller board to /dev/sdk And you say there is 8 disks on sata controller board 2 (the real one used on the VM) and says the first disk start at /dev/sda But this is only to have something "pretty" on DSM GUI. You could let it without any settings, the first slot(s) would be empty in DSM, but it would work as usual.
-
 Hardware: SUPERMICRO X10SDV-TLN4F D-1541 (2 x 10 GbE LAN & 2 x Intel i350-AM2 GbE LAN) LSI HBA with 8 HDDs (onboard STA controllers disabled) Previous attempts using TCRP & broadwellnk failed because I couldn't get a network connection (may be related to 10g NICs) Using TCRP & broadwell gets me further because the device is now discoverable in Synology Assistant, however, I keep getting "no drives" found. SataPortMap=8 DiskIdxMap=00 and SataPortMap=1 DiskIdxMap=00 tc@box:~$ ls -la /sys/class/ata_port total 0 tc@box:~$ lspci -tvnnq -+-[0000:ff]-+-0b.0 Intel Corporation Xeon E7 v4/Xeon E5 v4/Xeon E3 v4/Xeon D R3 QPI Link 0/1 [8086:6f81] | +-0b.1 Intel Corporation Xeon E7 v4/Xeon E5 v4/Xeon E3 v4/Xeon D R3 QPI Link 0/1 [8086:6f36] | +-0b.2 Intel Corporation Xeon E7 v4/Xeon E5 v4/Xeon E3 v4/Xeon D R3 QPI Link 0/1 [8086:6f37] | +-0b.3 Intel Corporation Xeon E7 v4/Xeon E5 v4/Xeon E3 v4/Xeon D R3 QPI Link Debug [8086:6f76] | +-0c.0 Intel Corporation Xeon E7 v4/Xeon E5 v4/Xeon E3 v4/Xeon D Caching Agent [8086:6fe0] | +-0c.1 Intel Corporation Xeon E7 v4/Xeon E5 v4/Xeon E3 v4/Xeon D Caching Agent [8086:6fe1] | +-0c.2 Intel Corporation Xeon E7 v4/Xeon E5 v4/Xeon E3 v4/Xeon D Caching Agent [8086:6fe2] | +-0c.3 Intel Corporation Xeon E7 v4/Xeon E5 v4/Xeon E3 v4/Xeon D Caching Agent [8086:6fe3] | +-0c.4 Intel Corporation Xeon E7 v4/Xeon E5 v4/Xeon E3 v4/Xeon D Caching Agent [8086:6fe4] | +-0c.5 Intel Corporation Xeon E7 v4/Xeon E5 v4/Xeon E3 v4/Xeon D Caching Agent [8086:6fe5] | +-0c.6 Intel Corporation Xeon E7 v4/Xeon E5 v4/Xeon E3 v4/Xeon D Caching Agent [8086:6fe6] | +-0c.7 Intel Corporation Xeon E7 v4/Xeon E5 v4/Xeon E3 v4/Xeon D Caching Agent [8086:6fe7] | +-0f.0 Intel Corporation Xeon E7 v4/Xeon E5 v4/Xeon E3 v4/Xeon D Caching Agent [8086:6ff8] | +-0f.4 Intel Corporation Xeon E7 v4/Xeon E5 v4/Xeon E3 v4/Xeon D Caching Agent [8086:6ffc] | +-0f.5 Intel Corporation Xeon E7 v4/Xeon E5 v4/Xeon E3 v4/Xeon D Caching Agent [8086:6ffd] | +-0f.6 Intel Corporation Xeon E7 v4/Xeon E5 v4/Xeon E3 v4/Xeon D Caching Agent [8086:6ffe] | +-10.0 Intel Corporation Xeon E7 v4/Xeon E5 v4/Xeon E3 v4/Xeon D R2PCIe Agent [8086:6f1d] | +-10.1 Intel Corporation Xeon E7 v4/Xeon E5 v4/Xeon E3 v4/Xeon D R2PCIe Agent [8086:6f34] | +-10.5 Intel Corporation Xeon E7 v4/Xeon E5 v4/Xeon E3 v4/Xeon D Ubox [8086:6f1e] | +-10.6 Intel Corporation Xeon E7 v4/Xeon E5 v4/Xeon E3 v4/Xeon D Ubox [8086:6f7d] | +-10.7 Intel Corporation Xeon E7 v4/Xeon E5 v4/Xeon E3 v4/Xeon D Ubox [8086:6f1f] | +-12.0 Intel Corporation Xeon E7 v4/Xeon E5 v4/Xeon E3 v4/Xeon D Home Agent 0 [8086:6fa0] | +-12.1 Intel Corporation Xeon E7 v4/Xeon E5 v4/Xeon E3 v4/Xeon D Home Agent 0 [8086:6f30] | +-13.0 Intel Corporation Xeon E7 v4/Xeon E5 v4/Xeon E3 v4/Xeon D Memory Controller 0 - Target Address/Thermal/RAS [8086:6fa8] | +-13.1 Intel Corporation Xeon E7 v4/Xeon E5 v4/Xeon E3 v4/Xeon D Memory Controller 0 - Target Address/Thermal/RAS [8086:6f71] | +-13.2 Intel Corporation Xeon E7 v4/Xeon E5 v4/Xeon E3 v4/Xeon D Memory Controller 0 - Channel Target Address Decoder [8086:6faa] | +-13.3 Intel Corporation Xeon E7 v4/Xeon E5 v4/Xeon E3 v4/Xeon D Memory Controller 0 - Channel Target Address Decoder [8086:6fab] | +-13.4 Intel Corporation Xeon E7 v4/Xeon E5 v4/Xeon E3 v4/Xeon D Memory Controller 0 - Channel Target Address Decoder [8086:6fac] | +-13.5 Intel Corporation Xeon E7 v4/Xeon E5 v4/Xeon E3 v4/Xeon D Memory Controller 0 - Channel Target Address Decoder [8086:6fad] | +-13.6 Intel Corporation Xeon E7 v4/Xeon E5 v4/Xeon E3 v4/Xeon D DDRIO Channel 0/1 Broadcast [8086:6fae] | +-13.7 Intel Corporation Xeon E7 v4/Xeon E5 v4/Xeon E3 v4/Xeon D DDRIO Global Broadcast [8086:6faf] | +-14.0 Intel Corporation Xeon E7 v4/Xeon E5 v4/Xeon E3 v4/Xeon D Memory Controller 0 - Channel 0 Thermal Control [8086:6fb0] | +-14.1 Intel Corporation Xeon E7 v4/Xeon E5 v4/Xeon E3 v4/Xeon D Memory Controller 0 - Channel 1 Thermal Control [8086:6fb1] | +-14.2 Intel Corporation Xeon E7 v4/Xeon E5 v4/Xeon E3 v4/Xeon D Memory Controller 0 - Channel 0 Error [8086:6fb2] | +-14.3 Intel Corporation Xeon E7 v4/Xeon E5 v4/Xeon E3 v4/Xeon D Memory Controller 0 - Channel 1 Error [8086:6fb3] | +-14.4 Intel Corporation Xeon E7 v4/Xeon E5 v4/Xeon E3 v4/Xeon D DDRIO Channel 0/1 Interface [8086:6fbc] | +-14.5 Intel Corporation Xeon E7 v4/Xeon E5 v4/Xeon E3 v4/Xeon D DDRIO Channel 0/1 Interface [8086:6fbd] | +-14.6 Intel Corporation Xeon E7 v4/Xeon E5 v4/Xeon E3 v4/Xeon D DDRIO Channel 0/1 Interface [8086:6fbe] | +-14.7 Intel Corporation Xeon E7 v4/Xeon E5 v4/Xeon E3 v4/Xeon D DDRIO Channel 0/1 Interface [8086:6fbf] | +-15.0 Intel Corporation Xeon E7 v4/Xeon E5 v4/Xeon E3 v4/Xeon D Memory Controller 0 - Channel 2 Thermal Control [8086:6fb4] | +-15.1 Intel Corporation Xeon E7 v4/Xeon E5 v4/Xeon E3 v4/Xeon D Memory Controller 0 - Channel 3 Thermal Control [8086:6fb5] | +-15.2 Intel Corporation Xeon E7 v4/Xeon E5 v4/Xeon E3 v4/Xeon D Memory Controller 0 - Channel 2 Error [8086:6fb6] | +-15.3 Intel Corporation Xeon E7 v4/Xeon E5 v4/Xeon E3 v4/Xeon D Memory Controller 0 - Channel 3 Error [8086:6fb7] | +-1e.0 Intel Corporation Xeon E7 v4/Xeon E5 v4/Xeon E3 v4/Xeon D Power Control Unit [8086:6f98] | +-1e.1 Intel Corporation Xeon E7 v4/Xeon E5 v4/Xeon E3 v4/Xeon D Power Control Unit [8086:6f99] | +-1e.2 Intel Corporation Xeon E7 v4/Xeon E5 v4/Xeon E3 v4/Xeon D Power Control Unit [8086:6f9a] | +-1e.3 Intel Corporation Xeon E7 v4/Xeon E5 v4/Xeon E3 v4/Xeon D Power Control Unit [8086:6fc0] | +-1e.4 Intel Corporation Xeon E7 v4/Xeon E5 v4/Xeon E3 v4/Xeon D Power Control Unit [8086:6f9c] | +-1f.0 Intel Corporation Xeon E7 v4/Xeon E5 v4/Xeon E3 v4/Xeon D Power Control Unit [8086:6f88] | \-1f.2 Intel Corporation Xeon E7 v4/Xeon E5 v4/Xeon E3 v4/Xeon D Power Control Unit [8086:6f8a] \-[0000:00]-+-00.0 Intel Corporation Xeon E7 v4/Xeon E5 v4/Xeon E3 v4/Xeon D DMI2 [8086:6f00] +-01.0-[01]-- +-02.0-[02]--+-00.0 Intel Corporation Xeon Processor D Family QuickData Technology Register DMA Channel 0 [8086:6f50] | +-00.1 Intel Corporation Xeon Processor D Family QuickData Technology Register DMA Channel 1 [8086:6f51] | +-00.2 Intel Corporation Xeon Processor D Family QuickData Technology Register DMA Channel 2 [8086:6f52] | \-00.3 Intel Corporation Xeon Processor D Family QuickData Technology Register DMA Channel 3 [8086:6f53] +-02.2-[03]--+-00.0 Intel Corporation Ethernet Connection X552/X557-AT 10GBASE-T [8086:15ad] | \-00.1 Intel Corporation Ethernet Connection X552/X557-AT 10GBASE-T [8086:15ad] +-03.0-[04]----00.0 LSI Logic / Symbios Logic SAS2008 PCI-Express Fusion-MPT SAS-2 [Falcon] [1000:0072] +-05.0 Intel Corporation Xeon E7 v4/Xeon E5 v4/Xeon E3 v4/Xeon D Map/VTd_Misc/System Management [8086:6f28] +-05.1 Intel Corporation Xeon E7 v4/Xeon E5 v4/Xeon E3 v4/Xeon D IIO Hot Plug [8086:6f29] +-05.2 Intel Corporation Xeon E7 v4/Xeon E5 v4/Xeon E3 v4/Xeon D IIO RAS/Control Status/Global Errors [8086:6f2a] +-14.0 Intel Corporation 8 Series/C220 Series Chipset Family USB xHCI [8086:8c31] +-16.0 Intel Corporation 8 Series/C220 Series Chipset Family MEI Controller #1 [8086:8c3a] +-16.1 Intel Corporation 8 Series/C220 Series Chipset Family MEI Controller #2 [8086:8c3b] +-1a.0 Intel Corporation 8 Series/C220 Series Chipset Family USB EHCI #2 [8086:8c2d] +-1c.0-[05]--+-00.0 Intel Corporation I350 Gigabit Network Connection [8086:1521] | \-00.1 Intel Corporation I350 Gigabit Network Connection [8086:1521] +-1c.4-[06-07]----00.0-[07]----00.0 ASPEED Technology, Inc. ASPEED Graphics Family [1a03:2000] +-1d.0 Intel Corporation 8 Series/C220 Series Chipset Family USB EHCI #1 [8086:8c26] +-1f.0 Intel Corporation C224 Series Chipset Family Server Standard SKU LPC Controller [8086:8c54] +-1f.3 Intel Corporation 8 Series/C220 Series Chipset Family SMBus Controller [8086:8c22] \-1f.6 Intel Corporation 8 Series Chipset Family Thermal Management Controller [8086:8c24]
 -
Hello, 1. I bought it simply at Ebay. In Germany,, the prices seem to be lower. Look for Futro S920, it should show up. (when shipping to Estonia is an option) Don't buy the cheaper S720 or S520. 2. Correct, both SATA ports work at the same time. You can get a msata to sata adapter card from chine for lower than 5€. With DSM/Xpenology, the OS is installed on all available HDDs, no choice, as much as I know. 3. I am running a Raid 1 system with two 931.5 GB drives. I get 921GB Space, therfore, DSM took about 10GB. Regards, Tomte
-
Hello, I'm interested to build mini NAS based on Futro S920, so I have several questions. Because i am newbie in NAS building :)) 1. Where did you buy the thin client? I looked for it on Ebay, and the prices will more than 40 Euros. I am in Estonia. Can you give me the link for Futro S920? 2. As I understand, the mSATA SSD and SATA port for hard drive (storage) will work at the same time. So, I plan to install the operation system in mSATA, and use harв drive only for storage. 3. Do you use the XPEnology as the OS for NAS? I read that you have 8GB RAM on the Futro, and how much space in mSATA storage does operation system use? Best regards, Oleg
-

TinyCore RedPill Loader Build Support Tool ( M-Shell )
Peter Suh replied to Peter Suh's topic in Software Modding
At the very end of this log, you can see that a smallfixnumber mismatch has been detected. This is a completely normal detection. Now, normal ramdisk patching should proceed on the Friend kernel. It appears in yellow letters. Can you take a screenshot of this screen and show me? Sent from my iPhone using Tapatalk -

TinyCore RedPill Loader Build Support Tool ( M-Shell )
Tibag replied to Peter Suh's topic in Software Modding
Oh that I am 100% sure, I did something wrong at some point. I am always lost in the few options at our hands when it comes to upgrade. Last time I did jump to 7.1 I also spent hours to get it back to normal. Yes I still my old TCRP and I just tried it. I built DSM 7.2.0-64570 with all the disk in and it detected it as recoverable. The recovery process just started, let's see. 🤞 If it does recover, what do you suggest to move to 69057? -
2 x Intel Xeon L5630@2.13Ghz 24Gb DDR3 ECC memory Dell Perc 200I flashed to IT mode 4 QLOGIC BCM5709C onboard INTEL PRO 1000 2 port 1 gb card Had this working great in this server, turned it off for a week, switched it back on would not boot. I took out my 2 2tb iron wolves hdd's deleted partitions put them back in built a new image with same 4 gb flash drive. no drives detected when i build same image on same flash drive. Nothing has been done to system no changes etc. I swapped out the hdd's for a 320gb hdd still no hdd being detected. any ideas what could be wrong. TIA Guys
-
TinyCore RedPill Loader Build Support Tool ( M-Shell )
Tibag replied to Peter Suh's topic in Software Modding
I also tried ARPL just in case. Same error about disk space with all drives in, then with a single drive I get a new one (yay!): Also tried ARC, same result.
-
 No int 13 drives to support, No Bios Installed, No Logical Drives found - это приговор? Хренолоджи не увидит диски?
 -
 I have a gen8 microserver which is running well on 7.1.1. I have 4x3b HDDs in one SHR array, and a single 2tb as another volume. None of the drives ever spin down and I want to fix this. I am considering replacing the 2tb volume with a large 2tb SSD, and installing all the various DSM packages on it, including cloud station, surveillance station, docker etc. I will use the HDD array for storing files only. Will this allows the HDD array to spin down?
 -
I've just had a DS-1515+ fail on me. Likely due to the Atom 2000 bug. So, I'm intrigued by the idea of installing XPEnology on a mini PC that either has an eSATA connector on the motherboard, or, a USB-CTM connector with a USB-C to eSATA cable. This *should* allow me to plug an expander into the mini PC, and then hopefully, to hang another expander off the back of that. I'm looking at approx $150 to get a mini PC and a couple of hundred dollars to get another expander chassis for the drives in my DS-1515+. Sample PC chassis would be an HP Elitedesk 800 G3 Mini with: i5-7500T or possibly i5 8500T (max 35W) 256GB NVMe (for caching) 2.5" SSD for XPEnology a Thumb drive for booting 8GB RAM which I might upgrade to 16GB The documentation and guides I have seen here look great, however, I've not seen anything which talks about the kind of build I'm looking to do. Do y'all think that this would work? Would XPEnology recognize a DX-517 expander on a PCIe eSATA connection? How about one on a USB-C to eSATA cable? Also, I'm going to use the NAS as a media server (Jellyfin) which may be doing transcoding. Would the upgraded UHD 630 graphics chipset offer a noticeable advantage over the HD 630 chipset in the 7500T? I would expect to be serving up native 4K video files at 4K and down resolutions. Thanks for any info you can provide!
-

TinyCore RedPill Loader Build Support Tool ( M-Shell )
envision replied to Peter Suh's topic in Software Modding
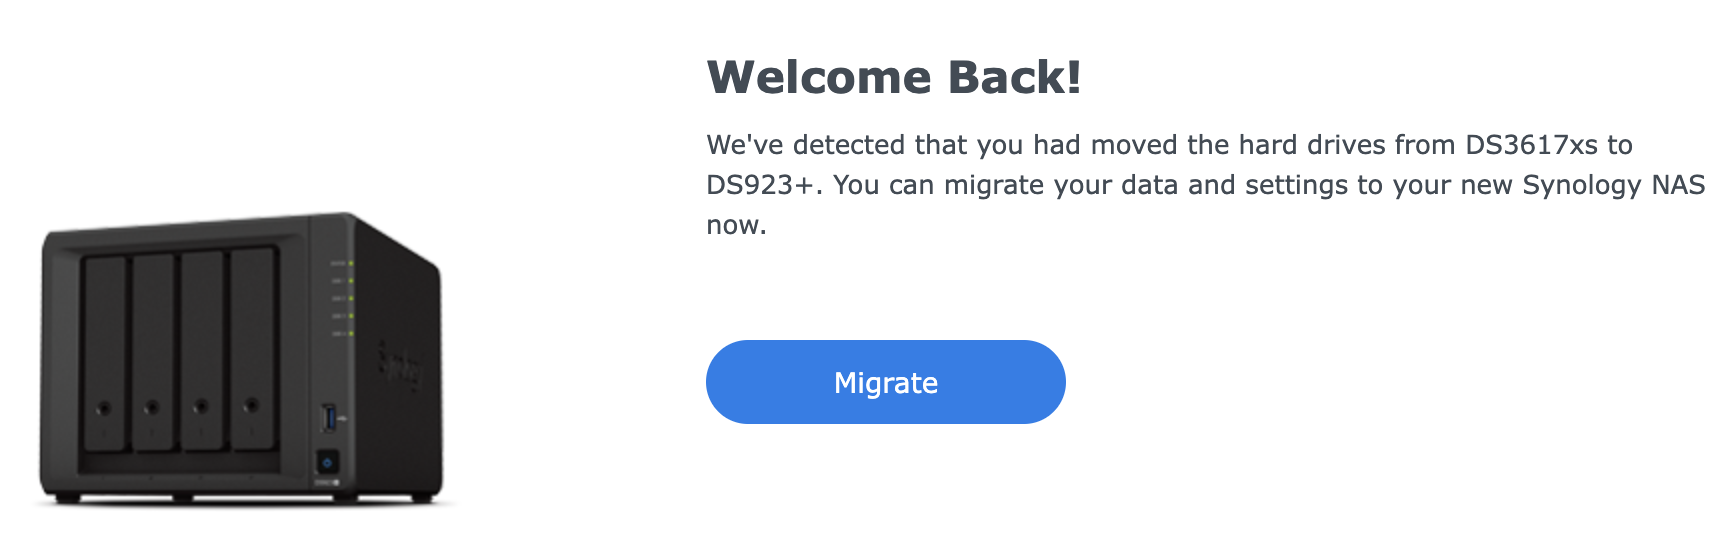
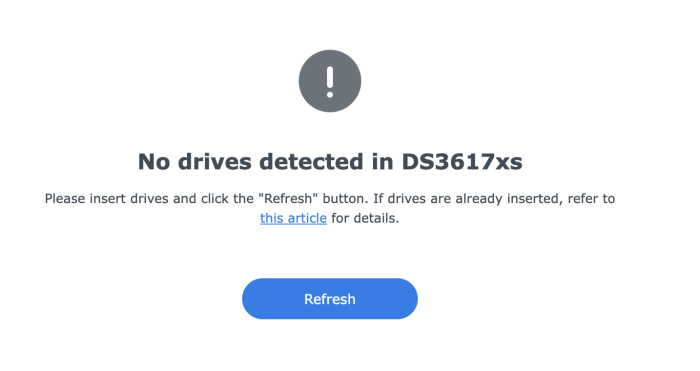
Hey Peter, pocopico, I think I just found out the issue. The tinycore-redpill seems to have a regression with DS3617xs when using newer builds. You can see in the screenshots, when using DS3617xs, we are told that no drives are detected - I created a new esxi VM to test this out and i get the same message. once i switch to the DS923+ then i can proceed with installation or migration if i connect my DS3617xs drive to it. I am not sure if it's safe to migrate my DS3617xs to DS923+
-
TinyCore RedPill Loader Build Support Tool ( M-Shell )
envision replied to Peter Suh's topic in Software Modding
Quick question. I am using peter-suh image with esxi (DS3617xs after software update) and i get: no drives detected. i am not sure how to debug this. is there a way to see if the drive was mounted properly in "image build" OS? i want to make sure my old content is there and that the correct drive is used. -

Dell R620 install with PERC H710 Mini Raid controller
vicrod74 posted a question in General Questions
Hello, I was wondering if anyone out there has been able to get the hard drives recognized with a Dell R620? I have a PERC H710 Mini Raid controller and I have flashed it to HBA IT Mode but DSM does not recognize disk array? Do I have to actually set the disk to some kind of Raid? -
 Hi colleagues! I had installed and working XPEnology XS3622xs+ (based on Proxmox) but it was clean and not really used. I tried to upgrade from 7.1.1 version to 7.2.x manually via GUI but didn't perform any task in loader. (Loader version was 0.8.5). The system was not started after rebuild I spent a lot of time in attempts to go back but no results obtained. So I tried to re-install XPEnology with manual. Loader version is now 10.0.0. Manual remains in previous state but some procedure is changed (but nothing critical with misunderstanding). The last version installing in loader (build) is 7.2.0 however Synology base is 7.2.1 already. Anyway I tried many times with different versions but I have now the remaining status "Recoverable": "We see you have moved your hard disks from other NAS to DS3622sx+. Please press Recover to restore your data and blablabla". After pressing Recover button something was tried to perform (visible on console) but just system restart is really done. After restart the status is the same and everything can be continued if you press again... I tried USB and SATA mode, "download latest SW" and put just link to downloaded file - no result. Now I used the same version as it is possible in loader = 64570 (built step by step as it was mentioned in manual). Probably something was not added to the loader to align the "motherboard loaded software" and "disk placed software?
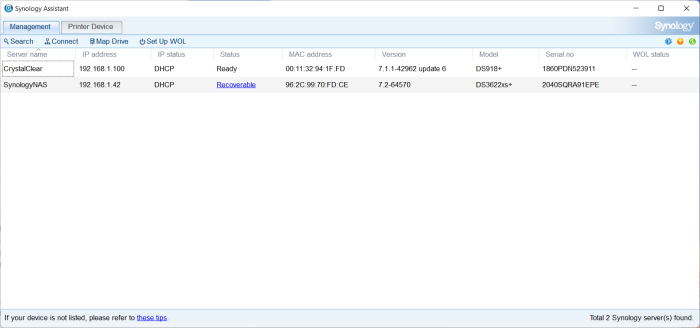
-
Dell R620 install with PERC H710 Mini Raid controller
vicrod74 replied to vicrod74's question in General Questions
Hello, Just a quick bump on the thread here. I had time to do some hacking today and I was able to use ARLP i18n (23.10.0.4) on the Dell R620. All drives and network card auto detected and I was able to load DSM 7.2.1 69057 update 1 with no issue. I'm using 3622xsp+ profile but for some reason the drives are not in the proper sequence. Any tips to fix the mapping in ARLP?
-
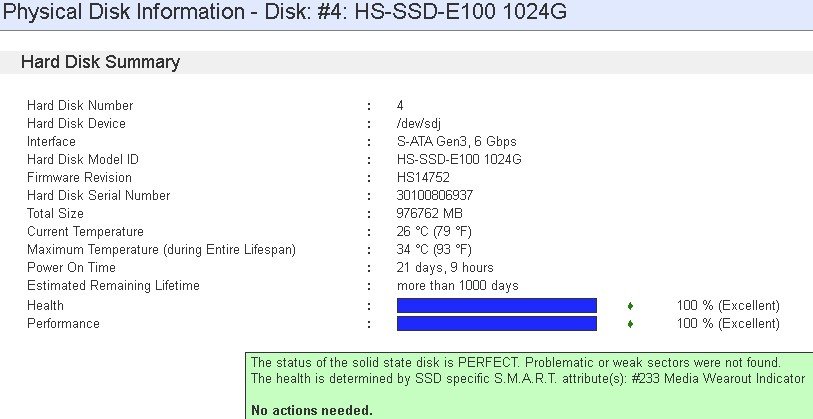
Поставил вчера голую версию, отключив предварительно винты с данными: всё нормально видится. Разметил SSD диск, накатали 7.2.1 - думал, что может быть проблема в том, что стояла винда, gtp и всё прочее. Потом опять загрузился со старой флешки - результат тот же самый, к сожалению. Самое смешное, что Hard Disk Sentinel, который стоит у меня на DSM - в отчёт этот диск включает, а вот если запустить утилиту, входящую в комплект arpl-i18n (hdddb.sh) то она SSD не видит. abyrvalg@DSM7:~$ sudo -i /usr/bin/hdddb.sh Synology_HDD_db v3.1.65 DS918+ DSM 7.1.1-42962-6 Using options: Running from: /usr/bin/hdddb.sh HDD/SSD models found: 2 WUH721414ALE6L4,LDGAW07G WUH721414ALE6L4,LDGNW240 No M.2 drives found No M.2 PCIe cards found No Expansion Units found Updated WUH721414ALE6L4 to ds918+_host_v7.db Updated WUH721414ALE6L4 to ds918+_host_v7.db.new Updated WUH721414ALE6L4 to ds918+_host_v7.db Updated WUH721414ALE6L4 to ds918+_host_v7.db.new Значит всё-таки надо мигрировать. Конфигурацию с пользователями / правами - да, забэкапил, плюс у меня есть валидная пара, в облако synology конфигурация тоже бэкапится. Docker забэкапил вместе с приложениями, надеюсь, что развернутся нормально (у меня qbittorrent с 800 позициями, очень не хочется по новой их вбивать). Что я мог ещё упустить забэкапить перед миграцией? @Vincent666 БП нормально себя показал с 10ю винтами 2-3 Гб (был такой зоопарк пока не купил б/у 14 Тб), максимальный аптайм был полгода, потом сервер тупо подвис, не знаю, что послужило причиной, потом больше месяца не было без перезагрузок.

-
 cat /etc/pve/qemu-server/110.conf agent: 0 args: -device 'nec-usb-xhci,id=usb-bus0,multifunction=on' -drive 'file=/var/lib/vz/images/110/arpl.img,media=disk,format=raw,if=none,id=drive-disk-bootloader' -device 'usb-storage,bus=usb-bus0.0,port=1,drive=drive-disk-bootloader,id=usb-disk-bootloader,bootindex=999,removable=on' balloon: 0 boot: order=ide2 cores: 2 hostpci0: 0000:0e:00,pcie=1 ide2: none,media=cdrom machine: q35 memory: 8192 meta: creation-qemu=7.2.0,ctime=1687268770 name: TaichiNAS net0: virtio=76:D3:41:E1:66:D3,bridge=vmbr0,firewall=1 numa: 1 onboot: 1 ostype: l26 sata0: taichi-zfs:vm-110-disk-0,cache=writeback,discard=on,size=21G,ssd=1 scsihw: virtio-scsi-single serial0: socket smbios1: uuid=9c052124-eb4b-4830-b9ce-a53c3441eb0e sockets: 1 startup: order=1 tablet: 0 usb0: host=0764:0501 vmgenid: **you'll get your own upon vm creation** hostpci0 = hard drives are on a Lenovo SA120 DAS and connected through an LSI card usb0 = backup UPS startup = I need my NAS to boot up first, because my other VMs rely on it. They have built-in delays.
 -
 This is a new Xpenology server running 6.1.7 bare metal on an Intel 4790T with an LSI HBA ( LSI 9300-16i )and 6 6TB HDDs in RAID Group 1 (Raid-6,Btrfs). Most drives are WDC Red Plus with 2 Seagates. I also have a RAID Group 2 (Raid-6,Btrfs) which is 5 500GB SSDs. That has been stable. I had an addition EXOS drive set up as Hot Spare on Raid Group 1 and when the System Partition Failed message happened, that drive dropped out of being hot spare. The logs look suspicious: 2023/03/03 02:52:35 Write error at internal disk [12] sector 2153552. 2023/03/03 02:52:35 Write error at internal disk [8] sector 2153552. 2023/03/03 02:52:35 Write error at internal disk [7] sector 2153552. 2023/03/03 02:52:34 Write error at internal disk [13] sector 2153552. 2023/03/03 02:52:26 Write error at internal disk [14] sector 2153552. How can all 5 drives fail on the same sector? Thx
 -
Hello, I wonder if someone could help me out. I can get the USB drives to act as internal drives in XPEnology DSM 6.2.3 by changing the /etc.defaults/synoinfo.conf and /etc/synoinfo.conf esataportcfg="0" internalportcfg="0xffffffffff" usbportcfg="0" maxdisks=24 but I can't do that in DSM 7, because every time it reboots it reset to default values, I tried both XPEnology DS3615xs and DS918+ and did not work. Thanks
-
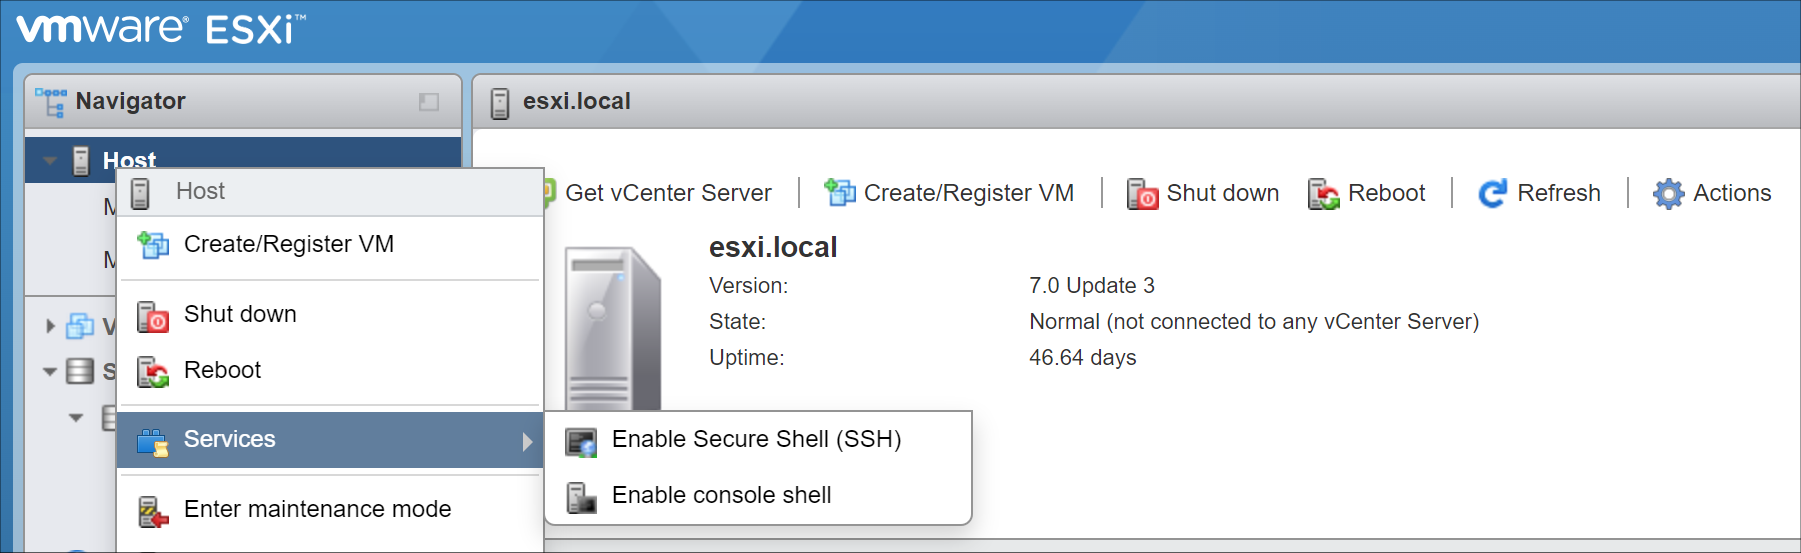
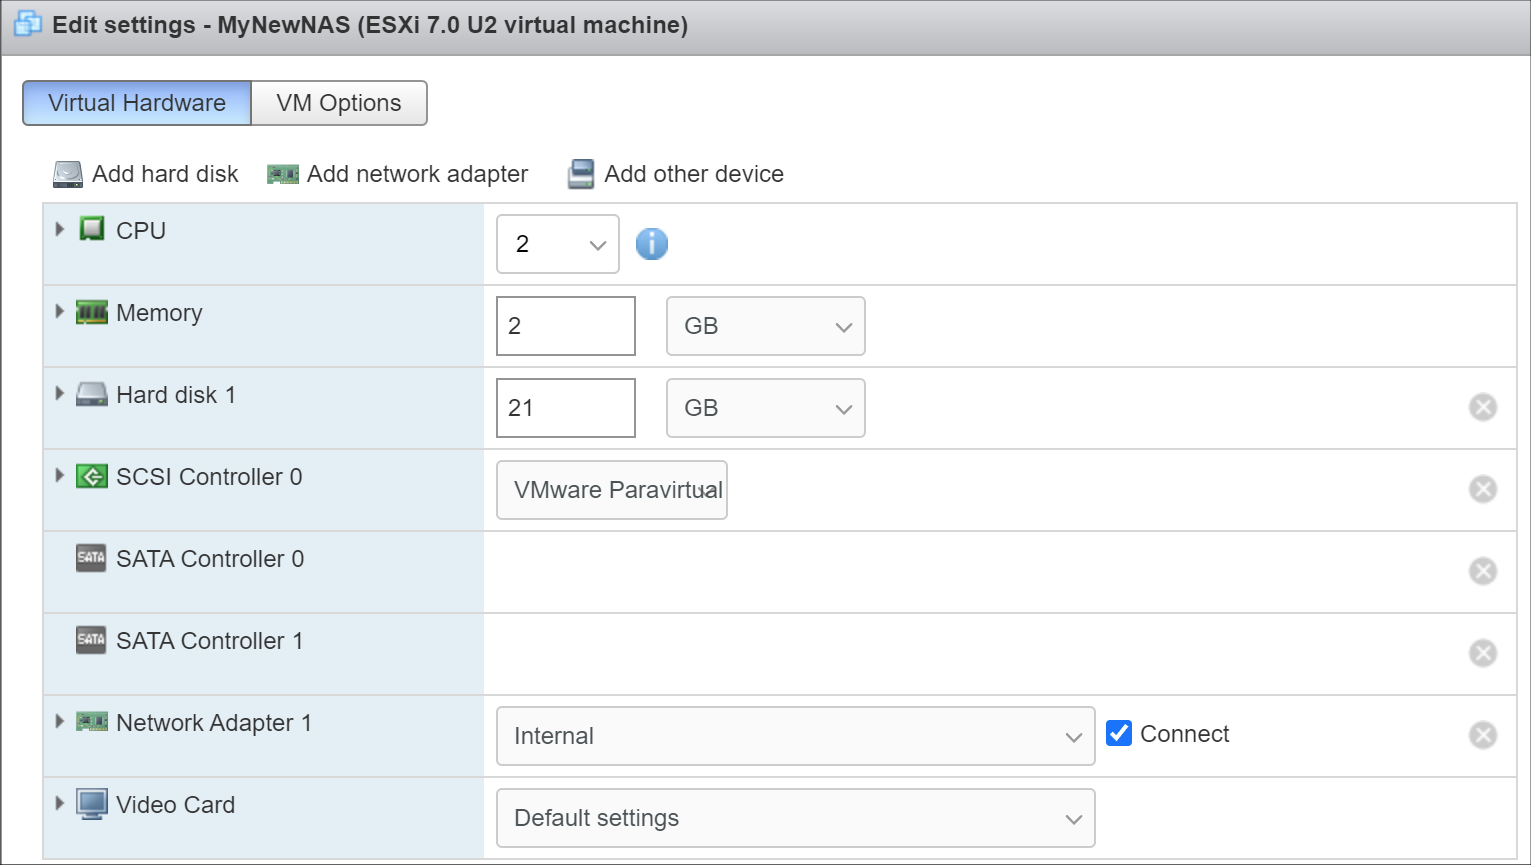
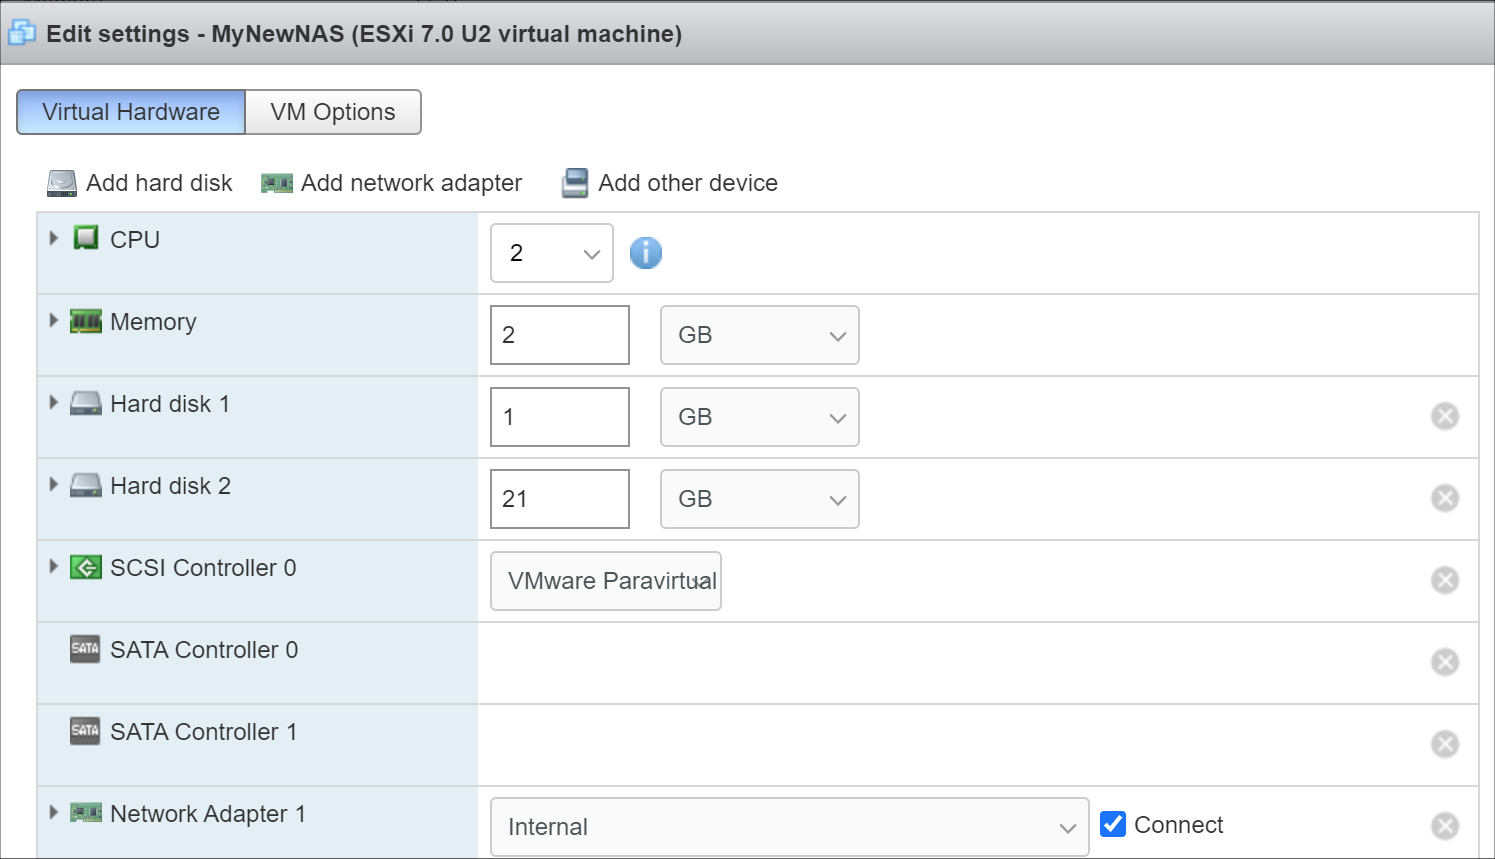
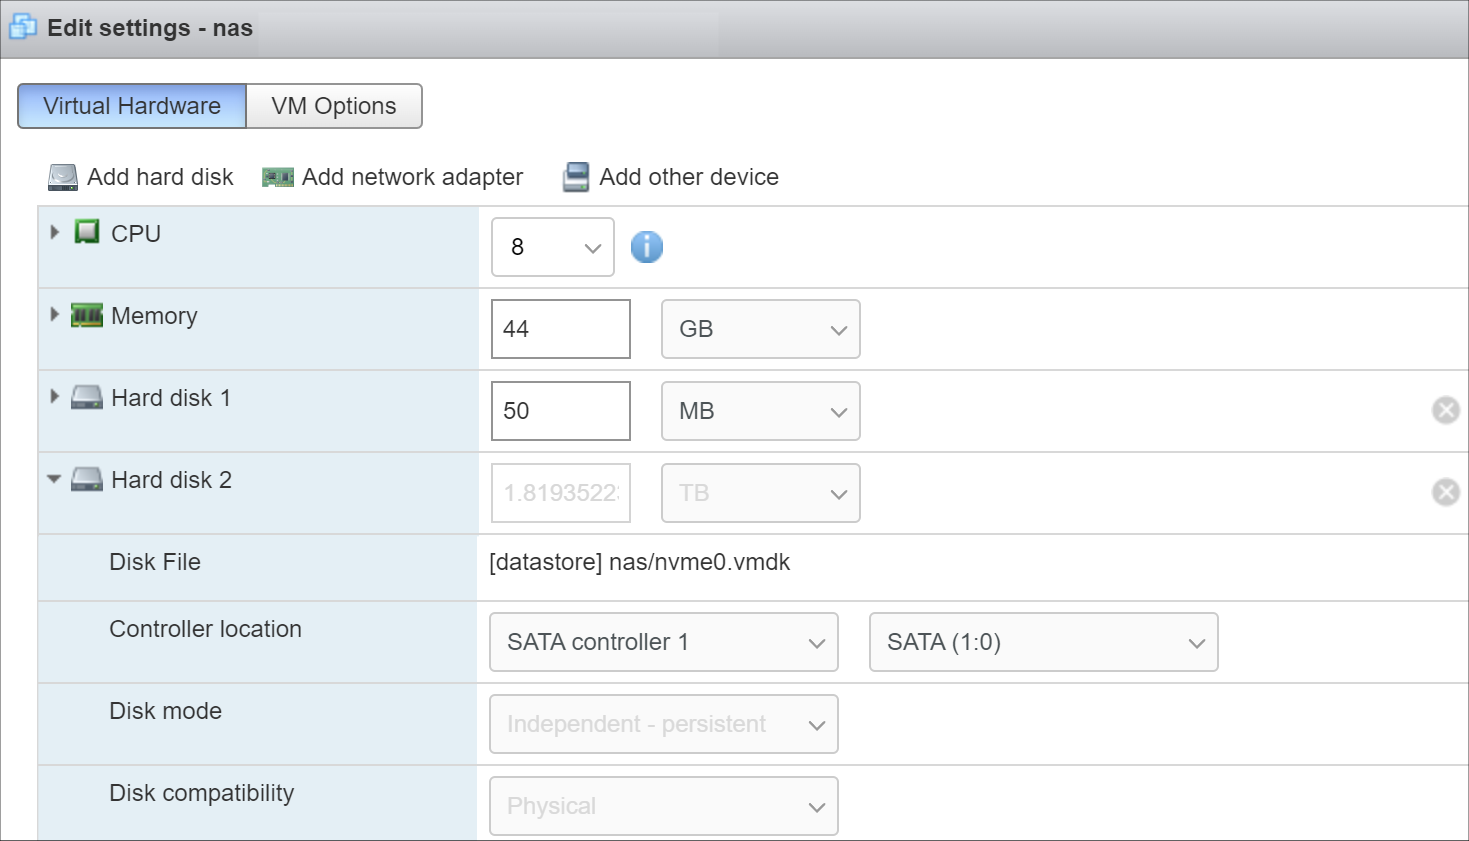
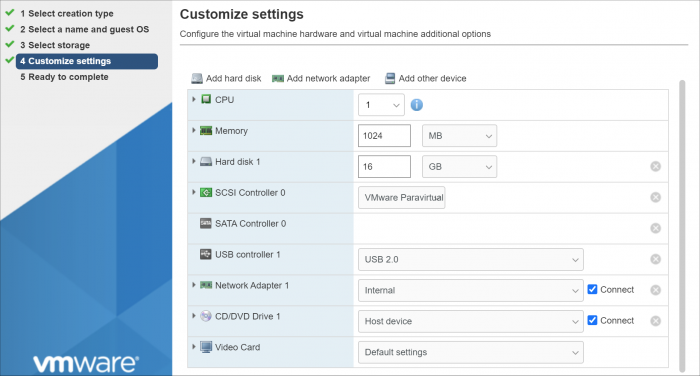
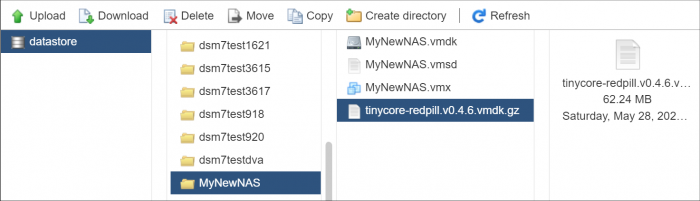
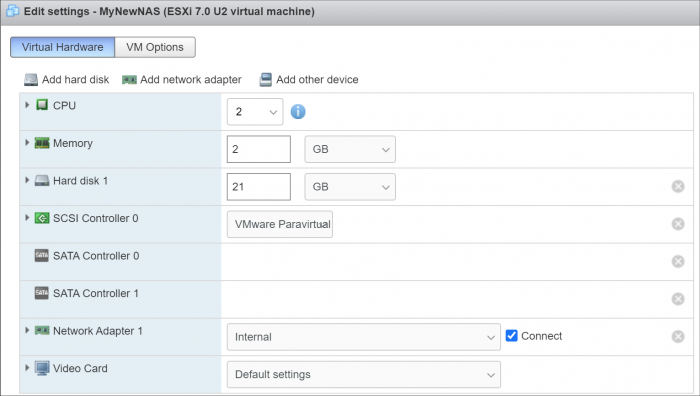
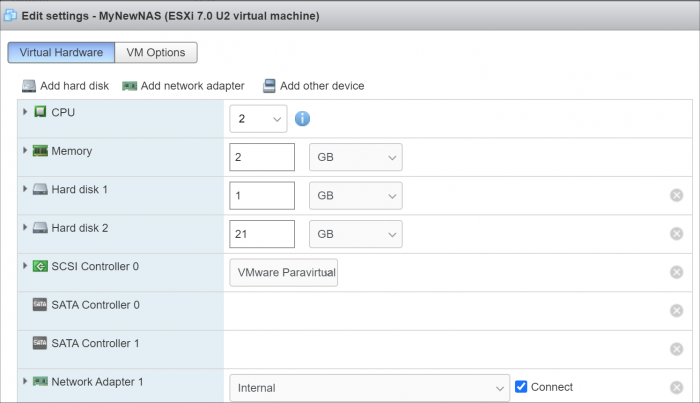
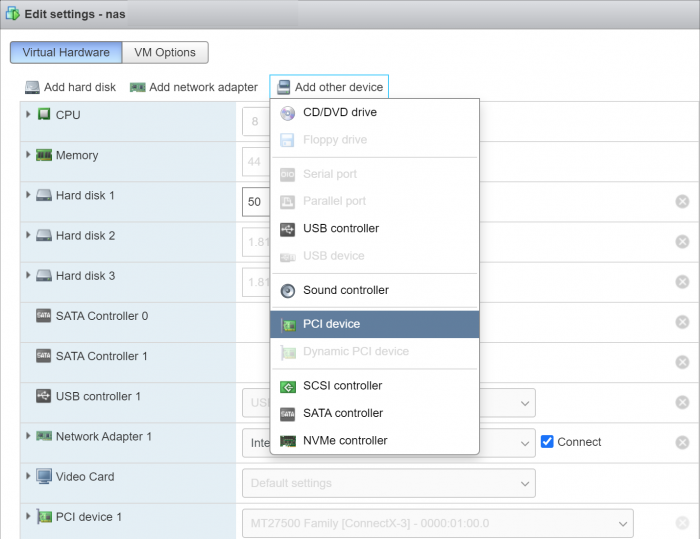
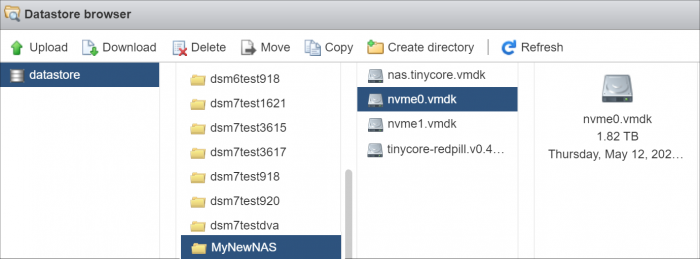
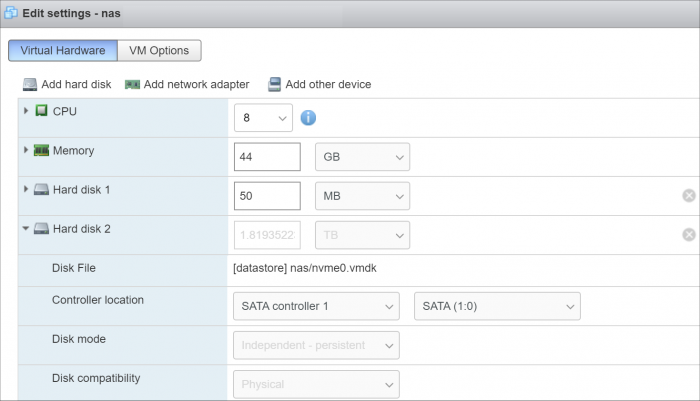
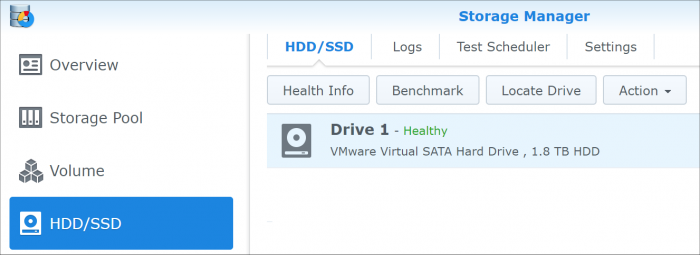
 Introduction This tutorial is a supplement to the main TCRP installation tutorial located here: https://xpenology.com/forum/topic/62221-tutorial-installmigrate-to-dsm-7x-with-tinycore-redpill-tcrp-loader/ You should be familiar with all the concepts and procedures in that tutorial, and general knowledge of VMware ESXi installation and virtual machine management. The focus here is on differences between installing on baremetal (with DSM as the only OS on the NAS), and as a virtual machine using VMware ESXi as the hypervisor. However, much of the conceptual information applies to other hypervisors. Some reasons to install DSM using a hypervisor: virtualize unsupported network card virtualize NVMe or other storage and present to DSM as SATA run other VMs in parallel on the same hardware (as an alternative to Synology VMM) share storage or network cards with other non-XPEnology VMs testing and rollback of updates About VMware ESXi ESXi (currently branded as the "VMware vSphere Hypervisor") is a stand-alone hypervisor that is part of the VMware enterprise computing platform. ESXi's strength includes robust testing and support, good compatibility with modern hardware platforms, and very flexible control over the hypervisor configuration. The core hypervisor is free to use, all that is needed is to sign up to receive a lifetime free license key. Key limitations of the free license are 8 vCPU's (8 threads, same as DS918+) and no serial port virtualization. To use the serial console, a physical connection is needed from the motherboard to your personal computer, or if the motherboard has IPMI features, intercepting the physical serial data with the IPMI remote access tools works as well. There is also a trial ESXi license that offers 256 vCPUs and serial port virtualization. ESXi and DSM Platform/Architecture All currently supported DSM platforms can run as virtual machines. As of this writing, the Device Tree platforms (DS920+ and DS1621+) are not supported by the TCRP device tree patcher when ESXi virtual SATA controllers are used. The problem is understood but currently the only way to make these platforms work is to manually patch the DTS. Transcoding platforms are supported with a compatible CPU, but actual transcoding requires a passthrough configuration of the VGA display adapter, which is somewhat complicated to set up, and beyond the scope of a basic tutorial. As DSM is run as a workload inside ESXi, there is an overhead tax, so the minimum requirements are somewhat higher: x86-64 CPU with two cores or more Hardware virtualization features enabled in the BIOS (Intel VT-x or AMD RVI) 4GB of RAM or more Dedicated 138GB or larger boot and storage device for ESXi system files, run-time files and datastore containing VM configuration files and virtual disks Block storage/controllers on ESXi's compatibility list OR compatible with DSM for passthrough Storage for use with DSM (either as backing storage for virtual disks, or passthrough devices) Creating a DSM Virtual Machine, Part 1 When we create a virtual machine we are defining its hardware characteristics. This machine must be compatible with DSM. For the purposes of the tutorial, we'll create a simple DSM VM with a 21GB virtual SATA drive. First the hardware profile must be selected. The recommended options are illustrated below. Other 3.x Linux (64-bit) is best even when installing a DSM platform with 4.x kernel. The selection here doesn't actually have anything to do with the OS being installed - it's just defining the behavior of the emulated hardware. Here's the initial complement of hardware created with Other 3.x Linux (64-bit): The pre-configured Network Adapter is VMware 10Gbe virtual vmxnet3 and is directly supported by TCRP. However, some changes need to be made to the virtual machine: Change the CPU vCore count to 2 or more Change the memory amount to 2048 or more Change the virtual hard disk size to 21GB or larger (see minimum spec here) If desired, open the drop-down menu and change the virtual disk type to Thin if the VM is only for testing Delete the USB controller Delete the CD/DVD Drive Add a second SATA controller - this will initially be called "New SATA Controller" Save the virtual machine. This creates a virtual machine folder on the datastore, and provisions the VM configuration file and virtual disk in that folder. It is not ready for use yet; some additional preparatory steps need to be completed. Preparing the TCRP Image ESXi VMs cannot boot virtualized USB flash drive images. A passthrough physical USB can be used, but is not recommended. Instead, a special version of the loader is used as a bootable virtual SATA drive. When the TCRP loader boots in this manner, it is called SATABOOT. Download the tinycore-redpill 7.x loader and save it to your personal computer. Then, open it with a zip manager to show the boot images: tinycore-redpill.vX.X.X.img.gz (for BIOS/CSM/Legacy boot from USB flash drive) tinycore-redpill-uefi.vX.X.X.img.gz (for UEFI/EFI boot from USB flash drive) tinycore-redpill.vX.X.X.vmdk.gz (for virtual machine SATABOOT from disk image) Save the vmdk gzip file to your personal computer. Then, upload it to the new virtual machine folder contained in the datastore: For the next step, ESXi console access is required. From the web GUI, enable both SSH and the console shell. SSH into the ESXi host and navigate to the new VM's folder: [root@esxi:] cd /vmfs/volumes [root@esxi:] cd <datastore> [root@esxi:] cd MyNewNAS [root@esxi:] ls -la total 65664 drwxr-xr-x 1 root root 73728 May 28 09:02 . drwxr-xr-t 1 root root 81920 May 28 08:58 .. -rw------- 1 root root 22548578304 May 28 08:58 MyNewNAS-flat.vmdk -rw------- 1 root root 474 May 28 08:58 MyNewNAS.vmdk -rw-r--r-- 1 root root 0 May 28 08:58 MyNewNAS.vmsd -rwxr-xr-x 1 root root 1941 May 28 08:58 MyNewNAS.vmx -rw-r--r-- 1 root root 65260813 May 28 09:02 tinycore-redpill.v0.4.6.vmdk.gz The TCRP SATABOOT image is provided compressed and in VMware Workstation format. These commands prepare it for use with ESXi: [root@esxi:] gunzip tinycore-redpill.v0.4.6.vmdk.gz [root@esxi:] vmkfstools -i tinycore-redpill.v0.4.6.vmdk MyNewNAS-TCRP.vmdk Destination disk format: VMFS zeroedthick Cloning disk 'tinycore-redpill.v0.4.6.vmdk'... Clone: 100% done. Creating a DSM Virtual Machine, Part 2 From the GUI console, select the DSM virtual machine and Edit. This is what things look like now: Now the SATABOOT loader must be added to the virtual machine. Select Add hard disk (existing hard disk) and choose the TCRP vmdk created in the previous step It will be displayed as "New hard disk" - expand the dropdown Change the controller to SATA Controller 0 The disk address should be SATA0:0 Save the changes to the VM The default for the Other 3.x Linux (64-bit) hardware profile is to create a SCSI virtual controller and attach all new virtual disks to it. DSM works better with the virtual SATA controller, so we need to move the DSM virtual data disk to it. Edit the virtual machine Expand the dropdown for Hard disk 1 (note that it is 21GB or whatever size we selected) Change the controller to SATA Controller 1 The disk address should be SATA1:0 Save the changes to the VM VMWare has an odd behavior in that it renumbers all the hard disks based on the last edit. This is cosmetic, and only affects the VM configuration screen. It does not change the disk addressing order in any way. The VM edit window now looks like this: Now that no disks are attached to the SCSI controller, we can (and should) delete it. The final configuration of controllers and disks is: SATA Controller 0: SATABOOT (SATA0:0) SATA Controller 1: DSM Data DIsk (SATA1:0) Any additional virtual DSM data disks should be added to SATA1 (i.e. SATA1:1, SATA1:2, etc). SATA0 should be reserved only for SATABOOT. The VM is now ready for the TinyCore boot (main tutorial, Step 3). System-Specific Parameters and SATABOOT ESXi requires minor adjustments to the basic tutorial configuration steps: The USB flash drive VID/PID configuration step (./rploader.sh identifyusb) is invalid and can be skipped when using SATABOOT. When using a virtual network adapter (such as VMXNET 3), its MAC address and the loader's MAC address setting must match. When a virtual machine is booted for the first time, a random address is assigned to each virtual adapter. Unless your primary network interface is a passthrough device, the serialgen configuration step requires the realmac argument to match the virtual NIC's random address to TCRP. Example: ./rploader.sh serialgen DS3622xs+ realmac The Drive Slot Mapping configuration step is the same, but the outcome is different when SATABOOT is in use. ./rploader.sh satamap will enforce the prohibition on data disks attached to SATA0 and warn if this configuration exists. SataPortMap and DiskIdxMap are configured to remove a blank slot between the SATA0 and SATA1 controllers. SCSI/SAS controllers or HBAs (either passthrough or virtual) ignore satamap functionality. When SATABOOT is also in use, there is an unavoidable blank slot between the last SATA controller and the first SCSI/SAS controller or HBA. Boot DSM with GRUB When the GRUB Menu is displayed: if necessary, use the arrow keys to ensure that SATA is selected and press ENTER. Advanced Configuration Examples: Passthrough and Raw Device Mapping (RDM)
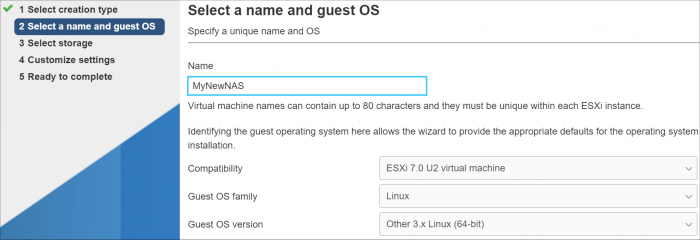


- 89 replies
-
- 11
-

-

-
- virtualization
- tcrp
- (and 2 more)
-
What brand disks are you using? Are they on the compatible drives list from Synology? Xpenology loaders overcome this with an edit in the userconfig.json to allow compatibility with (most) all drives. https://www.synology.com/en-us/compatibility?search_by=products&model=DS918%2B&category=hdds_no_ssd_trim There is also a shorter list of incompatible drives there.
-
 One final bother for you genius man.. Do you know if it's possible no matter what Synology device, if one can simply run nvme drives only? No Sata, no hdd etc. Not that I am interested in RAID 0 because I'm not, But I have a test machine I would love to try this with. Finally, if i were to raid or SHR nvme together, (nvme only) could one nvme drive be in an m.2 slot while the other is an adapter and a pcie x16 slot? Or 3 in m.2 and 3 in pcie x16? (ALL AS STORAGE NOT CACHE)?? sorry almost forgot to add that!
 -

Advanced Media Extension will not activate dsm7.1-42661
zehndi77 replied to phone guy's topic in Synology Packages
Hi there Thank you so much for this page, it did (after a lot of trial and error) solve my problem too. I am running DSM 7.2.1-69057 on Proxmox, virtualized in a VM, emulating a DS3622xs+ I figured I had to prepare as others described: Download Advanced Media Extensions, but do NOT open it yet. connect to your DSM Admin account via SSH and upload the two files (edit before!) First I used these files: however i got this error, not listing 7.2.1 69057-0 ash-4.4# ./codecpatch.sh -p Detected DSM version: 7.2.1 69057-0 Patch for DSM Version (7.2.1 69057-0) not found. Patch is available for versions: 6.0 7321-0 6.0 7321-1 6.0 7321-2 ......... ...etc... ......... 7.1 42661-4 7.1.1 42962-0 7.1.1 42962-1 7.1.1 42962-2 7.1.1 42962-3 7.1.1 42962-4 7.2 64570-1 therefore I added the following lines: (24) ["d316d5b2b080346b4bc197ad5ad7994ac043a15d"]="7.2.1-69057-0_7.2.1-69057-0" (195) "7.2.1 69057-0" then the codecpatch worked. ash-4.4# ./codecpatch.sh -p Detected DSM version: 7.2.1 69057-0 Patch for DSM Version (7.2.1 69057-0) AVAILABLE! Available binaries to patch/restore: 1) /usr/syno/bin/synocodectool 2) /volume1/@appstore/VideoStation/bin/synocodectool 3) /volume1/@appstore/CodecPack/bin/synocodectool 4) Quit Please choose which binary you want to patch/restore:3 Detected valid synocodectool. Creating backup.. Patching... Patched Creating spoofed activation.conf.. Spoofed activation.conf created successfully (edit: i first had to try 1) and 2) which did not work, but 3) did finally.. no idea why but there we go..) after that the amepatch worked: ash-4.4# python amepatch.py Patching MD5 match version AME 1.1.0-51005 date: 21/06/2023 Checking whether patch is successful... Successful, updating codecs... Done hope this helps some other folks out there! Happy new year! -
 There are multiple options. Option 1: Submit a support ticket to Synology You said "The original NAND is died (R.I.P.) on original DS220+". I assume you meant the DOM (Disk on Module). You may be able to get a replacement DOM from Synology. Not sure about the cost though. Option 2: Get a after market DOM If option 1 is too expensive or not available, you may get an aftermarket DOM on eBay. But this option requires a lot of technical skills: 1) The aftermarket DOM socket is regular size while the Synology DOM is mini size. You'll have to swap the socket on the DOM. If you're not good at soldering, this option is not recommended. 2) If you get the DOM and have the socket swapped, you may duplicate the original (OEM) DS220+ DOM image to the new DOM. Yes, I know that your original DOM is dead. You may be able to get help from other DS220 users. You'll have to update the serial number and MAC addresses in the DOM to reflect yours. Otherwise, there's a potential conflict with other users if both of you are trying to use Synology services(such as QuickConnect, etc.) Option 3: Use a USB stick 1) You need to flash the USB stick PID/VID to F400/F400. 2) You need to clone an OEM DOM (Synology bootloader) to the USB stick. 3) You need to remove the original DOM from the motherboard 4) You need to plug the USB stick to the front USB port (USB ports on the back won't work) Needless to say, you'll have to update SN and MAC like option 3. Now, to your original questions - "Is it possible to install Xpenology on to original Synology (e.g. DS220+)?" The short answer is "most likely not". I tried it on DS412+ with different loaders, such as APRL, TCRP-M Shell, Arc, etc. I got to the point where I could configure and build DSM loader. The newly built loader boots up properly and reflects the desired model in Web Assistant. But it cannot detect the HDDs, though it can detect the SATA controller. Based on my observation, the OEM loader (at least on my DS412+) had to send a command to the motherboard to turn on the HDDs. 3rd-party loaders (such as TCRP/Arc) doesn't have this command so the HDDs remain "powered off" and couldn't be detected. If someone can figure out the command and integrate it into the 3rd-party loaders, the answer to your question will be "Yes". I hope this helps!