Search the Community
Showing results for 'SataPortMap'.
-
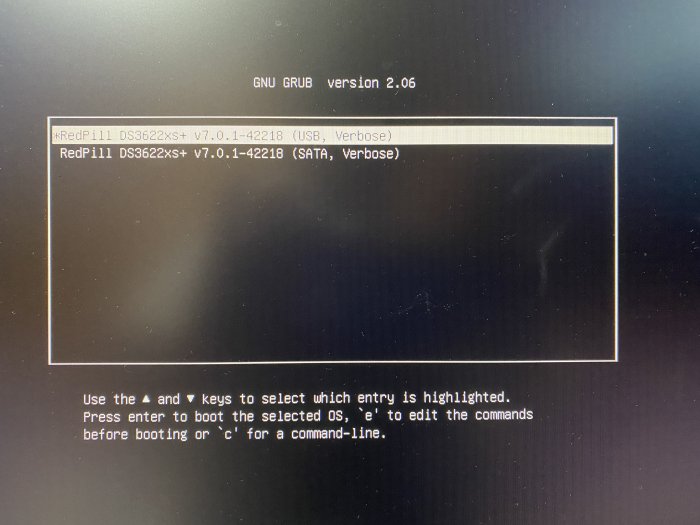
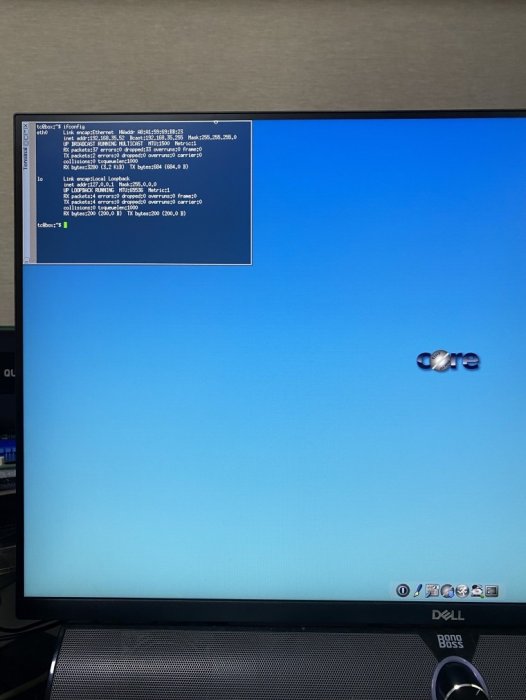
Hello. This guide is dedicated to installing DSM 7.0.1 BareMetal. It is a translation from Korean to English using a translator. Please understand if there is a slight misunderstanding. Existing RedPill, which has been released since last year, can generate IMG files directly through the bootloader compilation process only if Linux is available separately. This tinyCore RedPill provides a USB boot image with tinyCore Linux. It's much easier to work without having to install Linux separately. As usual, you can add the desired driver directly from the selection header and build it. Tinycore supports the following platforms (DS918+/DS3615xs/DS3617xs/DS3622xs+/DS1621+/DV3221/DS920+). You can continuously change the bootloader without re-creating the image (model/sn/mac, etc.) Tinycore supports both legacy versions for baremetal and virtual environments. 1. Prepare bootloader IMG file With the Download button in the middle of the GITHUB link below.Download the gz file. In it, 0.4.6 version img.You can unzip the gz file again and use the img file. (All files) https://github.com/pocopico/tinycore-redpill (for LEGACY) https://github.com/pocopico/tinycore-redpill/raw/main/tinycore-redpill.v0.4.6.img.gz (for UEFI) https://github.com/pocopico/tinycore-redpill/raw/main/tinycore-redpill-uefi.v0.4.6.img.gz (for VMWARE) https://github.com/pocopico/tinycore-redpill/raw/main/tinycore-redpill.v0.4.6.vmdk.gz 2. Bootloader IMG file USB recording Use the above tinycore-redpill.v0.4.6.img file to burn to USB with convenient image tools such as WinImage and Rufus. There is no need to pre-adjust the configuration file to modify the VID/PID/Serial/MAC/SATAPortMap like JUN loader. If you want to create a USB image on Mac or Linux, you can use the following DD command at the terminal. (Suppose the USB DEVICE ID identified by diskutil is disk4) sudo diskutil unmountDisk /dev/disk4 sudo dd if=/Users/MyAccount/Downloads/tinycore-redpill.v0.4.6.img of=/dev/disk4 bs=4m agree eject. 3.tinyCore Linux Boot USB boot by plugging into the PC you want to use as XPENOLOGY (you can start using UEFI 1 partition or USB CSM) Only TinyCore Linux menu appears and runs automatically Start the terminal app on the far right icon. Use the ifconfig command to verify the ip address where the en0 LAN card is automatically allocated. 4. CONFIG adjustment after SSH connection Connect ssh from another PC, such as putty. ( id:tc / pass : P@ssw0rd ) After connecting, update to the latest version with the following command. tc@box:~$ ./rploader.sh update now Tinycore Redpill is still in a stable state of stabilization. PocoPico, the developer of this program, will frequently fix bugs and announce rebuilding. There's a possibility that this rebuild will happen from time to time. Even if you use the first IMG file version of 0.4.6, you can continue to receive real-time updates of changes through the Internet. Therefore, before using it for the first time, please make sure to download the final patch status with the update option. If you've continued to migrate from JUN's XPhenology, tc@box:~$vi user_config.json The user_config.json file's VID/PID/Sn/Mac/SataPortMap, etc. are existing grub.Please refer to the cfg and insert it as it is. For new installers, perform serial GEN/USB VID, PID auto detect, SataPortMap auto detect, etc. as follows. The next process is DS3622xs+, which is currently undergoing the most stable session first. I will focus on explaining. tc@box:~$ ./rploader.sh serialgen DS3622xs+ tc@box:~$ ./rploader.sh identifyusb now tc@box:~$./rploader.sh satamap now (HBA card users are not required) You can see that the contents of user_config.json are changed automatically. Finally, it is common for existing users and new installers. tc@box:~$catuser_config.json, assuming there are 4 built-in sata ports. SataPortMap = "4", DiskIdxMap = "00" Please check if it is changed to the back. After find.synology.com, you may not be able to find the SATA HDD during DSM installation. The following is an example when a 6-port SATA expansion card is installed. SataPortMap = "46", DiskIdxMap = "0000" (For those who use cards such as H200, H310, H710, etc., exceptional, you do not need to erase the option of this SataPortMap and DiskIdxMap itself. Please erase the lines of the above two options in the vi editor and organize them well so that they don't end with Syntex errors. Of course. ./rploader.sh satamap now command is not required.) 5.BIOS built-in SATA port Hot Plug disable -> enable (important) To avoid temporarily reducing the SataPortMap value set above by the number of HDD physically connected by Sata cable during DSM installation, Be sure to turn on the Hot Plug function. This reduces the probability of encountering an error message saying that the HDD cannot be found because the number of SataPortMap automatically above is recognized as normal recognized. However, if M.2 and Sata ports are Muxed Sata ports that share Lane, it should be considered unusable. 6. Build bootloader after SSH connection When you have finished adding the above extension driver, you will finally build the bootloader. tc@box:~$ ./rploader.sh build broadwellnk-7.0.1-42218 The list of supported platforms can only be found in Help with the following commands: tc@box:~$ ./rploader.sh 7. backup and reboot for bootloader use After successfully completing the build, back up the configuration with the following command and restart the genology with USB. tc@box:~$ filetool.sh -b &&/usr/bin/exitcheck.sh Or tc@box:~$ ./rploader.sh backup now tc@box:~$ sudo reboot It has the same effect. The backed up settings and ext drivers remain the same. The next time TinyCore Linux starts for correction, the setting value will be restored from the mydata.tgz file. 8. Launch the Grub Menu BareMetal must select the first USB boot menu. The first USB menu will be automatically selected. The last selected menu will be stored and used for the next boot. 9. Installing DSM with find.synology.com On an XPhenology PC, There is a delay of about 1 to 2 minutes for IP allocation, so please wait a little longer. There is nothing more to do on this XPhenology PC once you have checked the Kernel boot message. Now look for XPhenology on another PC at find.synology.com. If found successfully, proceed with the initial installation of DSM or the expected migration DSM installation process.
-
Anyone tried setting up a vm in VMware workstation? Should that work/ is supported? im trying to setup a dsm 7.0.1 vm, all is good until redpill downloads the PAT file, starts unpacking it. At that point my vim basically stops responding, ping to vm’s iP stops after a minute or so. Perhaps a kernel panic in the background? I have to rest the vm every time. My sataportmap is set to 1, diskidmap set to 00, also tried 0A00, etc… the vm only has two disks. 0:0 is the red pill vmdk. I added second disk at sata 1:0 for data. any idea why it might be freezing? Thanks
-
@Dvalin21 Either disable the motherboard's internal SATA, or turn it on if you have Hot Plug or Hot Swap options. You can reduce the stress of finding the SataportMap value. (Except Muxed, where M.2 and Sata are shared.) I don't care about HBA and SataPortMap. I deleted the SataportMap and DiskIdxMap items from the user_config.json file or the grub.cfg file.
-
{ "extra_cmdline": { "pid": "0xa4a5", "vid": "0x0525", "sn": "SERIAL", "mac1": "MAC1", "SataPortMap": "58", "DiskIdxMap": "0A00" }, "synoinfo": { "internalportcfg" : "0xffff", "maxdisks" : "16", "support_bde_internal_10g" : "no", "support_disk_compatibility" : "no", "support_memory_compatibility" : "no" }, "ramdisk_copy": { } } The drive shows up in Tinycore without any issue sda 8:0 0 1G 0 disk |-sda1 8:1 0 48M 0 part |-sda2 8:2 0 75M 0 part `-sda3 8:3 0 900M 0 part /mnt/sda3 sdb 8:16 0 16G 0 disk |-sdb1 8:17 0 2.4G 0 part `-sdb2 8:18 0 2G 0 part sdc 8:32 0 14.6T 0 disk |-sdc1 8:33 0 2.4G 0 part |-sdc2 8:34 0 2G 0 part `-sdc3 8:35 0 14.5T 0 part sdd 8:48 0 14.6T 0 disk |-sdd1 8:49 0 2.4G 0 part |-sdd2 8:50 0 2G 0 part `-sdd3 8:51 0 14.5T 0 part sde 8:64 0 14.6T 0 disk |-sde1 8:65 0 2.4G 0 part |-sde2 8:66 0 2G 0 part `-sde3 8:67 0 14.5T 0 part sdf 8:80 0 14.6T 0 disk |-sdf1 8:81 0 2.4G 0 part |-sdf2 8:82 0 2G 0 part `-sdf3 8:83 0 14.5T 0 part sdg 8:96 0 14.6T 0 disk |-sdg1 8:97 0 2.4G 0 part |-sdg2 8:98 0 2G 0 part `-sdg3 8:99 0 14.5T 0 part sdh 8:112 0 14.6T 0 disk |-sdh1 8:113 0 2.4G 0 part |-sdh2 8:114 0 2G 0 part `-sdh3 8:115 0 14.5T 0 part sdi 8:128 0 14.6T 0 disk |-sdi1 8:129 0 2.4G 0 part |-sdi2 8:130 0 2G 0 part `-sdi3 8:131 0 14.5T 0 part sdj 8:144 0 14.6T 0 disk |-sdj1 8:145 0 2.4G 0 part |-sdj2 8:146 0 2G 0 part `-sdj3 8:147 0 14.5T 0 part sdk 8:160 0 14.6T 0 disk |-sdk1 8:161 0 2.4G 0 part |-sdk2 8:162 0 2G 0 part `-sdk3 8:163 0 14.5T 0 part sdl 8:176 0 14.6T 0 disk |-sdl1 8:177 0 2.4G 0 part |-sdl2 8:178 0 2G 0 part `-sdl3 8:179 0 14.5T 0 part sdm 8:192 0 7.3T 0 disk |-sdm1 8:193 0 2.4G 0 part |-sdm2 8:194 0 2G 0 part `-sdm3 8:195 0 7.3T 0 part zram0 252:0 0 15.7G 0 disk [SWAP] I would like all the drives on 1 sata controller instead of splitting them up into 2.
-
This is what I'm using and all my disks are showing as normal. Could it be an issue with that specific disk perhaps? { "extra_cmdline": { "pid": "0x5571", "vid": "0x0781", "sn": " ", "mac1": " ", "mac2": " ", "mac3": " ", "SataPortMap": "8", "netif_num": "3", "DiskIdxMap": "0F00" }, "synoinfo": { "internalportcfg" : "0xffff", "maxdisks" : "16", "support_bde_internal_10g" : "no", "support_disk_compatibility" : "no", "support_memory_compatibility" : "no" }, "ramdisk_copy": {
-
What are your current SataPortMap and DiskIdxMap settings ?
-
Hey everyone. Hopefully someone can help me out. Previous setup (worked flawlessly): Vmware 7 Jun loader DS3617XS DSM 6.2.3-blahblahblah SAS2 9210-8i - SAS2 backplane 10 drives raid 6 1 drive for backup (own volume) I now run: Vmware 7 redpill - tinycore .0.4.6 DS3622XS+ DSM 7.0.1-42218 SAS3 9305-24i to SAS2 backplane RDM attached drives from the backplane to the VM SATA 0:0 - Redpill boot SATA 1:1 - 16gb vmdk for OS and things SATA 1:2-7 - RDM drives SATA 2:0-3 - RDM drives I see only the 16gb OS and things and the 10 drives for raid 6. It boots and the synology array is happy. I cannot however see the other drive on SATA 2:3 RDM. I cannot get the drives to go in order or go past the SATA bus 1:8 no matter what I do. I played around with the diskIdxMap and SataPortMap but no luck. I have tried to decipher the disk and sata port mappings and I can quite understand the hex values. I can handle the internalconfigports, usbports, and the esataconfigports but it looks like dsm 7 doesn't really listen to those values.
-
Hey guys, I took the day to try to make this work. Now that DSM 7 is updated to the latest version, maybe it will be easier. and I know there are other with the same problem. Here it goes: I'm trying to make my 2nd NIC to work. either be the PCI 2.5GBe or USB 1Gbe. It seems that both modules and Drivers are installed after following @pocopico instructions. My USB NIC works on TinyCore menu, because it let me ssh into it if I umplug the onboard NIC cable. It is seen by DSM interface under Control panel > General, but is does not load as a LAN2. My PCI NIC seems to be installed but it also does not load as LAN2, on this one, there is no light activity when CAT6 or CAT7 cables are connected to it. I tried different cable and got same results. I tried adding the modules as instructed by @pocopico. but I might be doing something wrong. Im sure it is something simple that I just dont know the "howto" to make it work. Can anyone help me out with this? here are some outputs: ps... My config is as follows: { "extra_cmdline": { "pid": "0x1666", "vid": "0x0951", "sn": "************", "mac1": "************1", "mac2": "************2", "mac3": "************3", "SataPortMap": "64", "DiskIdxMap": "0004", "netif_num": "3" }, "synoinfo": { "internalportcfg" : "0xffff", "maxdisks" : "8", "support_bde_internal_10g" : "no", "support_disk_compatibility" : "no", "support_memory_compatibility" : "no" }, "ramdisk_copy": { } }
-
- Outcome of the update: Successful - DSM version prior update: Juns 1.04b Loader running 6.2.3-25426 up3 - Loader version and model: Tinycore-Redpill 0.4.6 - DS918+ - DSM 7.0.1-42218 update 3 - Using custom extra.lzma: No; extensions added for mlx4_core, e1000e and acpi2 - Installation type: BAREMETAL - Gigabyte H470M DS3H - Intel Core i3 10100 - 16GB DDR4, JMB585 Card 5x SATA3, MCX312B 10 GBe Mellanox ConnectX-3 dual - Additional comments: Onboard NIC (i219-V) works, Mellanox 10GBe works, Onboard 6x SATA3 & JMB585 5x SATA3 ports work ! DiskIdxMap=0005 SataPortMap=65 HW Transcoding doesnt work (no /dev/dri present - patched i915.ko 9BC8 results in kernel panic)
-
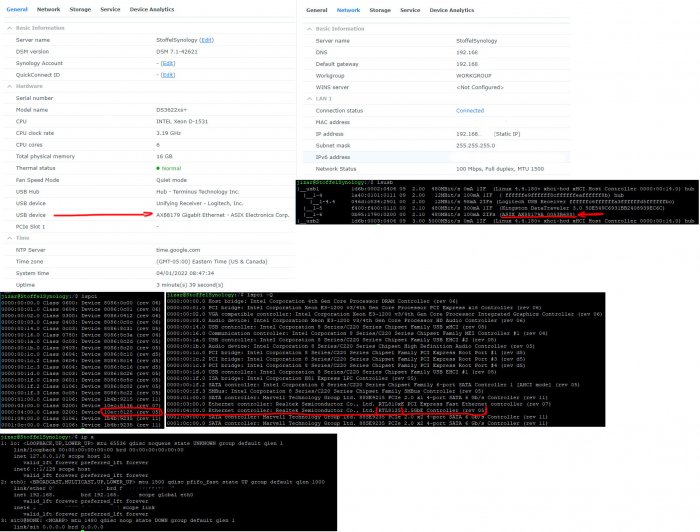
Thank you for your answer, So I cleaned all my three drives and USB and started from the scratch and after I put this commend sudo ./rploader.sh satamap now I got this: I am not quite sure if I can see any different beside of Found SCSI HBAs, We need to install the SCSI modules Don't run this as root. and in DSM 7.01 I am getting this: and My motherboard has got 4 SATA ports and I have got one SAS controller 9211 8i IT (I believe that supports 8 disks) I am not quite sure if these settings are correct: "SataPortMap": "40", "DiskIdxMap": "0001" My first HDD disk is connected to the first SATA AHCI motherboard controller and two others SSD disks are connected to SAS controller. root@DS3622xsp:~# lspci -nnq 0000:00:00.0 Host bridge [0600]: Intel Corporation Xeon E3-1200 v5/E3-1500 v5/6th Gen Core Processor Host Bridge/DRAM Registers [8086:191f] (rev 07) 0000:00:01.0 PCI bridge [0604]: Intel Corporation 6th-10th Gen Core Processor PCIe Controller (x16) [8086:1901] (rev 07) 0000:00:02.0 VGA compatible controller [0300]: Intel Corporation HD Graphics 530 [8086:1912] (rev 06) 0000:00:14.0 USB controller [0c03]: Intel Corporation 100 Series/C230 Series Chipset Family USB 3.0 xHCI Controller [8086:a12f] (rev 31) 0000:00:16.0 Communication controller [0780]: Intel Corporation 100 Series/C230 Series Chipset Family MEI Controller #1 [8086:a13a] (rev 31) 0000:00:17.0 SATA controller [0106]: Intel Corporation Q170/Q150/B150/H170/H110/Z170/CM236 Chipset SATA Controller [AHCI Mode] [8086:a102] (rev 31) 0000:00:1b.0 PCI bridge [0604]: Intel Corporation 100 Series/C230 Series Chipset Family PCI Express Root Port #17 [8086:a167] (rev f1) 0000:00:1c.0 PCI bridge [0604]: Intel Corporation 100 Series/C230 Series Chipset Family PCI Express Root Port #1 [8086:a110] (rev f1) 0000:00:1d.0 PCI bridge [0604]: Intel Corporation 100 Series/C230 Series Chipset Family PCI Express Root Port #9 [8086:a118] (rev f1) 0000:00:1d.1 PCI bridge [0604]: Intel Corporation 100 Series/C230 Series Chipset Family PCI Express Root Port #10 [8086:a119] (rev f1) 0000:00:1d.2 PCI bridge [0604]: Intel Corporation 100 Series/C230 Series Chipset Family PCI Express Root Port #11 [8086:a11a] (rev f1) 0000:00:1f.0 ISA bridge [0601]: Intel Corporation Z170 Chipset LPC/eSPI Controller [8086:a145] (rev 31) 0000:00:1f.2 Memory controller [0580]: Intel Corporation 100 Series/C230 Series Chipset Family Power Management Controller [8086:a121] (rev 31) 0000:00:1f.3 Audio device [0403]: Intel Corporation 100 Series/C230 Series Chipset Family HD Audio Controller [8086:a170] (rev 31) 0000:00:1f.4 SMBus [0c05]: Intel Corporation 100 Series/C230 Series Chipset Family SMBus [8086:a123] (rev 31) 0000:00:1f.6 Ethernet controller [0200]: Intel Corporation Ethernet Connection (2) I219-V [8086:15b8] (rev 31) 0000:01:00.0 Serial Attached SCSI controller [0107]: Broadcom / LSI SAS2008 PCI-Express Fusion-MPT SAS-2 [Falcon] [1000:0072] (rev 03) 0000:02:00.0 Non-Volatile memory controller [0108]: Samsung Electronics Co Ltd NVMe SSD Controller SM961/PM961/SM963 [144d:a804] 0000:06:00.0 USB controller [0c03]: ASMedia Technology Inc. ASM1142 USB 3.1 Host Controller [1b21:1242] 0001:09:00.0 SATA controller [0106]: Marvell Technology Group Ltd. 88SE9235 PCIe 2.0 x2 4-port SATA 6 Gb/s Controller [1b4b:9235] (rev 11) 0001:0c:00.0 SATA controller [0106]: Marvell Technology Group Ltd. 88SE9235 PCIe 2.0 x2 4-port SATA 6 Gb/s Controller [1b4b:9235] (rev 11) Some advice would be appreciated. Thank you,

-
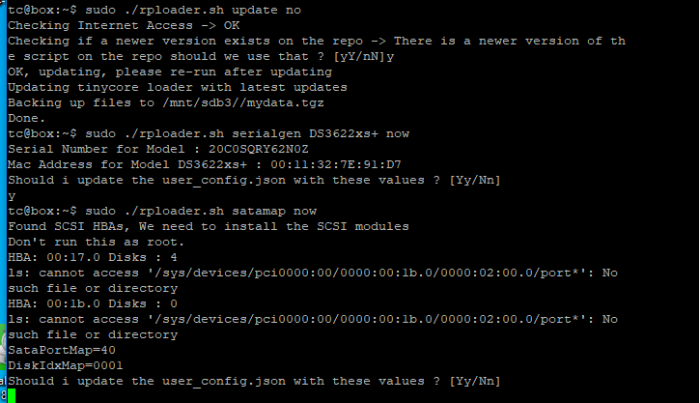
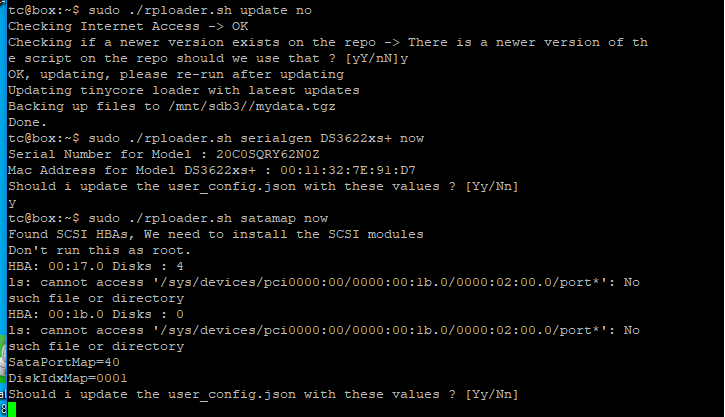
Hi, This is good idea to test, what MegaRaid driver do you use. During the installation 7.0.1-42218 after "satamap now" command I got this: tc@box:~$ sudo ./rploader.sh satamap now HBA: 00:17.0 Disks : 4 ls: cannot access '/sys/devices/pci0000:00/0000:00:1b.0/0000:02:00.0/port*': No such file or directory HBA: 00:1b.0 Disks : 0 ls: cannot access '/sys/devices/pci0000:00/0000:00:1b.0/0000:02:00.0/port*': No such file or directory SataPortMap=40 DiskIdxMap=0001 Should i update the user_config.json with these values ? [Yy/Nn] so my SataPortMap=40 and after that I used pocopico.mpt3sas extension. I saw on the forum that there are some update, so it may be that the problem has already been solved
-
hope someone can help me order the disks in my qnap 8bay HBA: 00:1f.2 Disks: 6 HBA: 00:1c.3 Disks: 2 HBA: 00:1c.4 Disks: 2 HBA: 00:1c.5 Disks: 2 SataPortMap=6222 DiskIdxMap=00020406 hdd1 is in slot7 hdd2 is in slot8 hdd3 is in slot5 hdd4 is in slot6 hdd5 is in slot3 hdd6 is in slot4 hdd7 is in slot2 hdd8 is in slot1 is there a way to match the hdd to the correct slots? thanks in advance. Sent from my Pixel 6 Pro using Tapatalk
-
SN, MAC, PID VID поставите свои. { "extra_cmdline": { "disable_mtrr_trim": "1", "pid": "0x5571", "vid": "0x0781", "netif_num": "2", "sn": "1330LWN8ххххх", "mac1": "b8ca3a111111", "mac2": "6805ca222222", "SataPortMap": "5", "DiskIdxMap": "0C" }, "synoinfo": { "internalportcfg" : "0xffff", "maxdisks" : "16", "maxlanport" : "2" }, "ramdisk_copy": { } }
-
i found out that the reported error hard disk drives are the numbers not working (1..9) so 1,2,3,6 broken means on controller 0..5 -> 0,1,2 and 5 are broken(not used/not connected) so 3&4 is connected and working so i switched the hdds to sata ports 0+1 and the error switched to error on hdd 3,4,5,6 so i changed the config manually to "SataPortMap": "2", "DiskIdxMap": "00" and now all hdds are detected as working is there a way to mask out ports 2-5 on controller to not use and have SataPortMap still set to 6?
-
Can you press e while at grub and try SataPortMap=58 and DiskIdxMap=0F00 ?
-
Hello, i have problems with the hard drive errors and sata ports being disabled aka satamapping problem the synology webpage reports hard drives 1,2,3,6 broken and disabled, i dont know why its 4 drives since there are only 2 hdds (2x8TB) and the usb inserted Loader results: sudo ./rploader.sh satamap now HBA: 00:1f.2 Disks : 6 SataPortMap=6 DiskIdxMap=00 so for me it looks ok -> 6 ports on 1st controller and mapping with no offset tc@box:~$ lsscsi -Hv [0] ahci dir: /sys/class/scsi_host//host0 device dir: /sys/devices/pci0000:00/0000:00:1f.2/ata1/host0 [1] ahci dir: /sys/class/scsi_host//host1 device dir: /sys/devices/pci0000:00/0000:00:1f.2/ata2/host1 [2] ahci dir: /sys/class/scsi_host//host2 device dir: /sys/devices/pci0000:00/0000:00:1f.2/ata3/host2 [3] ahci dir: /sys/class/scsi_host//host3 device dir: /sys/devices/pci0000:00/0000:00:1f.2/ata4/host3 [4] ahci dir: /sys/class/scsi_host//host4 device dir: /sys/devices/pci0000:00/0000:00:1f.2/ata5/host4 [5] ahci dir: /sys/class/scsi_host//host5 device dir: /sys/devices/pci0000:00/0000:00:1f.2/ata6/host5 [6] usb-storage dir: /sys/class/scsi_host//host6 device dir: /sys/devices/pci0000:00/0000:00:14.0/usb3/3-10/3-10:1.0/host6 but i see the hdds are connected to sata port 3+4 on mainboard (error -> hdd 1,2,3,6 broken) tc@box:~$ ls -ldtr /sys/class/scsi_host/host*/device/port* ls: cannot access '/sys/class/scsi_host/host*/device/port*': No such file or directory tc@box:~$ ls -ldtr /sys/class/scsi_host/host*/device/target* drwxr-xr-x 4 root root 0 Mar 28 08:22 /sys/class/scsi_host/host4/device/target4:0:0/ drwxr-xr-x 4 root root 0 Mar 28 08:22 /sys/class/scsi_host/host3/device/target3:0:0/ drwxr-xr-x 4 root root 0 Mar 28 08:22 /sys/class/scsi_host/host6/device/target6:0:0/ tc@box:~$ ls -ldtr /sys/class/scsi_host/host*/device/phy* ls: cannot access '/sys/class/scsi_host/host*/device/phy*': No such file or directory when i change hdds to sata port 0+1 (without changing config) i get error on hdd 3,4,5,6 DiskStation> ls -ldtr /sys/class/scsi_host/host*/device/target* drwxr-xr-x 4 root root 0 Jan 1 00:07 /sys/class/scsi_host/host6/device/target6:0:0 drwxr-xr-x 4 root root 0 Mar 28 2022 /sys/class/scsi_host/host1/device/target1:0:0 drwxr-xr-x 4 root root 0 Mar 28 2022 /sys/class/scsi_host/host0/device/target0:0:0 is it normal start it starts with index 6 and then counts down to 0 of the targets? does someone have some hints for me with the setting of SataPortMap and DiskIdxMap? some additional info outputs if maybe needed: here fdisk -l with skipped /dev/ram0-7 and /dev/loop0-51 tc@box:~$ fdisk -l Disk /dev/sda: 7.28 TiB, 8001563222016 bytes, 15628053168 sectors Disk model: TOSHIBA HDWG480 Units: sectors of 1 * 512 = 512 bytes Sector size (logical/physical): 512 bytes / 4096 bytes I/O size (minimum/optimal): 4096 bytes / 4096 bytes Disklabel type: gpt Disk identifier: xxx Device Start End Sectors Size Type /dev/sda1 2048 15628052479 15628050432 7.3T Microsoft basic data Disk /dev/sdb: 7.28 TiB, 8001563222016 bytes, 15628053168 sectors Disk model: TOSHIBA HDWG480 Units: sectors of 1 * 512 = 512 bytes Sector size (logical/physical): 512 bytes / 4096 bytes I/O size (minimum/optimal): 4096 bytes / 4096 bytes Disklabel type: gpt Disk identifier: xxx Device Start End Sectors Size Type /dev/sdb1 2048 15628052479 15628050432 7.3T Microsoft basic data Disk /dev/sdc: 29.3 GiB, 31457280000 bytes, 61440000 sectors Disk model: Flash Disk Units: sectors of 1 * 512 = 512 bytes Sector size (logical/physical): 512 bytes / 512 bytes I/O size (minimum/optimal): 512 bytes / 512 bytes Disklabel type: dos Disk identifier: xxx Device Boot Start End Sectors Size Id Type /dev/sdc1 * 2048 100351 98304 48M 83 Linux /dev/sdc2 100352 253951 153600 75M 83 Linux /dev/sdc3 253952 2097151 1843200 900M 83 Linux tc@box:~$ lspci -nnqk 00:00.0 Host bridge [0600]: Intel Corporation 4th Gen Core Processor DRAM Controller [8086:0c00] (rev 06) Subsystem: Fujitsu Technology Solutions Device [1734:11e7] Kernel driver in use: hsw_uncore 00:02.0 VGA compatible controller [0300]: Intel Corporation Xeon E3-1200 v3/4th Gen Core Processor Integrated Graphics Controller [8086:0412] (rev 06) Subsystem: Fujitsu Technology Solutions Device [1734:11e7] 00:03.0 Audio device [0403]: Intel Corporation Xeon E3-1200 v3/4th Gen Core Processor HD Audio Controller [8086:0c0c] (rev 06) Subsystem: Fujitsu Technology Solutions Device [1734:11e7] 00:14.0 USB controller [0c03]: Intel Corporation 8 Series/C220 Series Chipset Family USB xHCI [8086:8c31] (rev 04) Subsystem: Fujitsu Technology Solutions Device [1734:11ea] Kernel driver in use: xhci_hcd 00:16.0 Communication controller [0780]: Intel Corporation 8 Series/C220 Series Chipset Family MEI Controller #1 [8086:8c3a] (rev 04) Subsystem: Fujitsu Technology Solutions Device [1734:11ea] Kernel driver in use: mei_me 00:19.0 Ethernet controller [0200]: Intel Corporation Ethernet Connection I217-LM [8086:153a] (rev 04) Subsystem: Fujitsu Technology Solutions Device [1734:11ed] Kernel driver in use: e1000e 00:1a.0 USB controller [0c03]: Intel Corporation 8 Series/C220 Series Chipset Family USB EHCI #2 [8086:8c2d] (rev 04) Subsystem: Fujitsu Technology Solutions Device [1734:11ea] Kernel driver in use: ehci-pci 00:1b.0 Audio device [0403]: Intel Corporation 8 Series/C220 Series Chipset High Definition Audio Controller [8086:8c20] (rev 04) Subsystem: Fujitsu Technology Solutions Device [1734:11eb] 00:1c.0 PCI bridge [0604]: Intel Corporation 8 Series/C220 Series Chipset Family PCI Express Root Port #1 [8086:8c10] (rev d4) Kernel driver in use: pcieport 00:1c.1 PCI bridge [0604]: Intel Corporation 8 Series/C220 Series Chipset Family PCI Express Root Port #2 [8086:8c12] (rev d4) Kernel driver in use: pcieport 00:1d.0 USB controller [0c03]: Intel Corporation 8 Series/C220 Series Chipset Family USB EHCI #1 [8086:8c26] (rev 04) Subsystem: Fujitsu Technology Solutions Device [1734:11ea] Kernel driver in use: ehci-pci 00:1f.0 ISA bridge [0601]: Intel Corporation Q87 Express LPC Controller [8086:8c4e] (rev 04) Subsystem: Fujitsu Technology Solutions Device [1734:11ea] Kernel driver in use: lpc_ich 00:1f.2 SATA controller [0106]: Intel Corporation 8 Series/C220 Series Chipset Family 6-port SATA Controller 1 [AHCI mode] [8086:8c02] (rev 04) Subsystem: Fujitsu Technology Solutions Device [1734:11ea] Kernel driver in use: ahci 00:1f.3 SMBus [0c05]: Intel Corporation 8 Series/C220 Series Chipset Family SMBus Controller [8086:8c22] (rev 04) Subsystem: Fujitsu Technology Solutions Device [1734:11ea] 00:1f.6 Signal processing controller [1180]: Intel Corporation 8 Series Chipset Family Thermal Management Controller [8086:8c24] (rev 04) Subsystem: Fujitsu Technology Solutions Device [1734:11ea] Kernel driver in use: intel_pch_thermal 02:00.0 PCI bridge [0604]: Integrated Device Technology, Inc. [IDT] PES3T3 PCI Express Switch [111d:8039] (rev 0e) Kernel driver in use: pcieport 03:02.0 PCI bridge [0604]: Integrated Device Technology, Inc. [IDT] PES3T3 PCI Express Switch [111d:8039] (rev 0e) Kernel driver in use: pcieport 03:03.0 PCI bridge [0604]: Integrated Device Technology, Inc. [IDT] PES3T3 PCI Express Switch [111d:8039] (rev 0e) Kernel driver in use: pcieport 04:00.0 FireWire (IEEE 1394) [0c00]: LSI Corporation FW643 [TrueFire] PCIe 1394b Controller [11c1:5901] (rev 08) Subsystem: IOI Technology Corp FWB-PCIE1X2x [1546:0643] 05:00.0 FireWire (IEEE 1394) [0c00]: LSI Corporation FW643 [TrueFire] PCIe 1394b Controller [11c1:5901] (rev 08) Subsystem: IOI Technology Corp FWB-PCIE1X2x [1546:0643]
-
play with this settings in grub.cfg set sata_args='sata_uid=1 sata_pcislot=5 synoboot_satadom=1 DiskIdxMap=0C00 SataPortMap=1 SasIdxMap=0'
-

Переход на 7.X.X с помощью tinycore-redpill
XPEH replied to Olegin's topic in Програмное обеспечение
У меня с первого раза тоже неправильно определялся параметр Sataportmap и пр. Грузил опять с tinycore, изменял параметры и генерировал новый загрузчик, пока не получились все диски и с правильной нумерацией. -

Переход на 7.X.X с помощью tinycore-redpill
xibyt replied to Olegin's topic in Програмное обеспечение
Добрый день Получилось, спасибо! Три раздела подмонтировались, на первом надо было откорректировать параметр SataPortMap в файлике с настройками grub (файла user_config.json уже естественно нет на флешке, он использовался только для создания загрузчика) -
TinyCore Redpill only showing me 1 NIC/LAN port of my baremetal nas box. I do not know what is wrong? Please advise. OK, I was unable to figure out how to view or edit the grub.cfg file from ssh or anything while the nas box was up and running. So I powered down the NAS box and removed the usb stick. Following a tutorial about how to see the grub.cfg, I downloaded mini partition wizard free for win10. Launched the app as admin on win10 and inserted the usb (which an already built RP bootloader). Looked on the first partition and there was the grub.cfg which did show netif_num=1. Even though I had entered 2 unique mac# in user_config.json. So ok, IG-88 said something must have gone wrong or not done correctly. So I start again. Download pocopico tinycore-rp then I write that using win32diskimager to a cleaned usb, insert that back into the nas baremetal box and reboot. It boots into tinycore, using the hdmi out of the nas box, kb, mouse and monitor, I load terminal in tc and type ifconfig to get current ip of nas box. back to win10, use winscp to connect to tinycore RP ip with login credentials. then putty in to tinycore RP ip with credentials and issue the following commands ./rploader.sh update now (it downloads newest script) ./rploader.sh satamap now (it remapped sata port) ./rploader.sh identifyusb now (it identified pid/vid) I go back to winscp, and edit the user_config.json with notepad++ on win10, I enter a copy of my personal DS920+ (which is at another physical location and NOT on my LAN) serial and two mac#, based on the fact I saw netif_num=1 before, and another thread suggesting adding netif_num=2, I do that. So my user_config.json looks like this (I edited out the #s) { "extra_cmdline": { "pid": "0x1234", "vid": "0x0123", "sn": "2022ABCDE01FG", "mac1": "001234567A8", "mac2": "001234567A9", "SataPortMap": "222", "DiskIdxMap": "000204", "netif_num": "2" }, "synoinfo": { "internalportcfg" : "0xffff", "maxdisks" : "16", "support_bde_internal_10g" : "no", "support_disk_compatibility" : "no", "support_memory_compatibility" : "no" }, "ramdisk_copy": { } } Above you can see I added the "netif_num": "2" to the end of that section. I write this user_config.json thru winscp ip connection, refresh the directory and pull it back it for editing to verify the details are all there and written to the usb stick, they are. At this point I go back to putty and issue this command ./rploader.sh build apollolake-7.0.1-42218 The script executes and does whatever it is that it does. I see no red banners or text, only green text flowing up the screen. When its done, I pull the 918p.pat file it saves in cache to my local machine and I power down the nas box. I remove the newly created RP loader usb, and insert it into my win10 machine and using the partition wizard program, again I look for the grub.cfg (immediately after generating the RP loader). I look at the grub.cfg and now it DOES say netif_num=2 (which it DID NOT BEFORE) here is one of the lines from grub.cfg linux /zImage withefi earlyprintk syno_hw_version=DS918+ console=ttyS0,115200n8 netif_num=2 pid=0x5XXX earlycon=uart8250,io,0x3f8,115200n8 syno_port_thaw=1 mac2=xxxxxxxxxxx mac1=xxxxxxxxxxx sn=XXXXXXXXXXXXX vid=0x0XXX elevator=elevator loglevel=15 HddHotplug=0 DiskIdxMap=000204 syno_hdd_detect=0 vender_format_version=2 syno_hdd_powerup_seq=1 log_buf_len=32M root=/dev/md0 SataPortMap=222 So I reinsert the usb into the nas baremetal box and the nas reboots this time into the first of the 3 menu options, booting from usb.. I wait for a couple of minutes and on the win10 browser I enter the synoip and get the welcome screen and setup dsm7 (this is a freshly formatted ssd for testing). So I click browse to load dsm locally, point it to the 918p pat file I pulled off the RP USB. The installation works quickly, the nas box restarts (twice I think) and I login to a fresh install of dsm7 to see only 1 nic/lan port recognized in dsm. Control panel>network shows only 1 lan (even though 2 are physically on the box connected to my switch). I was trying to show exactly what I did, and with what I used, so I could get help figuring out what is wrong? The grub.cfg now shows netif_num=2, the user_config.json has 2 unique mac addresses, but still dsm only see's 1 NIC LAN port. Can anyone assist me? THANK YOU.
-
I couldnt find the grub.cfg file using redpill. I followed the redpill directions, I found on here, and the only thing that was editable was the user_config.json I verified user_config.json was correct (as posted/edited) before issuing build command for usb. { "extra_cmdline": { "pid": "0x2401", "vid": "0x3711", "sn": "12345ABCDE123", "mac1": "123ABC123482", "mac2": "123ABC123483", "SataPortMap": "2", "DiskIdxMap": "00" }, "synoinfo": { "internalportcfg" : "0xffff", "maxdisks" : "16", "support_bde_internal_10g" : "no", "support_disk_compatibility" : "no", "support_memory_compatibility" : "no" }, "ramdisk_copy": { } } When I used Jun's 1.04b loader, and dsm6.2.3, I was able to edit the grub.cfg on the usb (Jun 1.04b) before installing dsm6.2.3 which had basically the same information as the user_config.json file. I could not find the grub.cfg on redpill in dsm7.0.1. If its there I need help to find it. I never saw netif_num=2 anywhere in redpill. Where is grub.cfg on redpill?
-
So... here is what I did.... 1. Burned a new TinyCore USB Stick on a brand new Usb Stick. (saved my previous on just in case) 2. Ran the following codes: sudo ./rploader.sh update now sudo ./rploader.sh serialgen DS3622xs+ now (I used the same Serial I had before) sudo ./rploader.sh satamap now (result was 64/0004) sudo ./rploader.sh identifyusb now sudo ./rploader.sh ext broadwellnk-7.0.1-42218 auto added mac2 and mac3 to user_config.json (just so see if my NICs would pop up) sudo ./rploader.sh build broadwellnk-7.0.1-42218 sudo ./rploader.sh backup now (and downloaded the .pat from the cache folder) sudo reboot I let it boot normally to see if it would give me the infamous drive error. Oddly enough... it didn't , it went straight thru to the login page, didn't even asked to installation or restoration. So it seems that by using the same serial number from previous installation did the trick. If I would have gotten the drive error, I would've rebooted and pressed 'e' on loader menu and edit "SataPortMap" to 1 and "DiskIdxMap" to 00, just to reinstall the .pat So far, everything is working normally as before. Now I just need to figure it out how to get my NICs to work. And maybe mess arround with code to move the drives around to fill drives 3,4 instead of 9,10. PS... Synology Drive Server is not installing, keeps asking for a repair.
.thumb.jpg.35e915063ed8639967e6d9122e22e4d5.jpg)
-
I had that issue, I fixed it by reburning the iso to a different usb stick, removing one HHD from my machine, wiping all data out, putting it back on the machine, and running setup with Sataportmap:1 Diskidxmap:00. that got me thru the installation problems. but once installed.... Im still having problem to permanently change the satapormap to 64 and diskidxmap to 0004. to reflect my drives setup. it works fine if I do it thru pressing 'e' at loader menu and changing manually, but it resets every time there is a system reboot.
-
Thank you to this wonderful community, I have finally upgraded my setup to "Broadwellnk-7.0.1-42218 DS3622xs+" Intel(R) Core(TM) i5-2400 CPU @ 3.10GHz 32GB RAM 3 x SATA drives On-Board Nic = Tigon3 (BCM57788)* Used - tinycore-redpill.v0.4.6.img with SATA map port - "SataPortMap": "6", "DiskIdxMap": "00" (Note:-I also had issue of "Something went wrong and SATA ports have been disabled. The way I got around is by editing the grub prompt with "SataPortMap=1" which only detected one of my SATA disk + finished installation. After installation, I booted normally "keeping SAtaPortMap=6" which detected all 3 SATA disks) @pocopico Just want to bring to your notice that I am having issues using TG3 drivers. TinyCore Linux is able to detect the NIC and rploader build script was fetching TG3 driver from https://github.com/pocopico/rp-ext/blob/main/tg3/rpext-index.json. But unfortunately after reboot, no luck getting DHCP request. I tried mostly all other builds but encountered same issue. Bought a new PCIe Card which worked flawlessly for completing installation. Even now my setup is still not detecting On-Board Nic Tigon3 (BCM57788) and that was the reason I was not getting DHCP request initially. For your reference find below output for TG3 card initialization from ==================== tinycore-redpill Linux output ===================== root@box:/home/tc# dmesg | grep -i tg [ 1.399900] libphy: tg3 mdio bus: probed [ 1.414234] tg3 0000:03:00.0 eth1: Tigon3 [partno(BCM57788) rev 57780001] (PCI Express) MAC address d4:xx:xx:xx:xx:xx [ 1.414236] tg3 0000:03:00.0 eth1: RXcsums[1] LinkChgREG[0] MIirq[0] ASF[0] TSOcap[1] [ 1.414237] tg3 0000:03:00.0 eth1: dma_rwctrl[76180000] dma_mask[64-bit] ============================================== Broadwellnk-7.0.1-42218 DS3622xs+ (after finishing installation) ============================================== [ 4.669636] tg3.c:v3.137 (May 11, 2014) [ 4.671035] libphy: tg3 mdio bus: probed [ 4.671098] tg3 0000:03:00.0: No PHY devices [ 4.671200] tg3 0000:03:00.0: Problem fetching invariants of chip, aborting It sounds like tg3 driver is not getting loaded due to variation in chip!! Again, Thanks everyone!!
-

RedPill - the new loader for 6.2.4 - Discussion
Carl10 replied to ThorGroup's topic in Developer Discussion Room
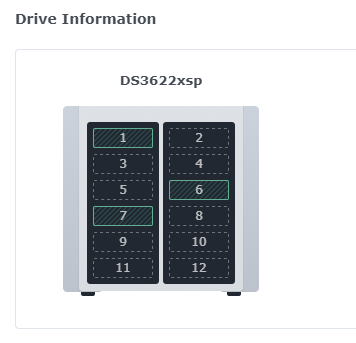
@Peter Suh@progressives, I got my 5th drive and wanted to give you my data on the "hot Swap" and muxed ports for my x99 chipset. I originally had drive install errors and then set my SataPortMap=2 (for my 2 drives) and DiskIdxMap=00 and my problems went away. I then added 2 more drives and I learned about/changed both the bios sata ports to "Hot Swappable" and I changed the SataPortMap=4. New drives added no problem. Today I added a 5th drive, and knowing ports 5&6 are muxed with the M.2 slot on my MB and reading Peter's summary of how the ports worked, I connected the 5th drive to port 7 (avoiding 5&6) and left SataPortMap=4 . The drive worked fine but the mapping moved the new drive attached to port 7 in position 1 and the original 4 drives were then moved to position 5,6,7,8. I changed SataPortMap=5 and the drives moved to 6,7,8,9 and setting SataPortMap=7 (why not try since the new drive was on port 7) kept the new drive on port 7 in position 1 and the original 4 were then on 8,9,10,11. Lastly I changed SataPortMap=1 and the port 7 drive stayed in position 1 and the original 4 are now in position 2,3,4,5. Conclusion: Hot Swap definitely resolved the drive installation/recognition issues. SataPortMap=1 and DiskIdxMap=00 solved the random disk placement. Port 7=disk 1 makes sense to me in that port 7 is the first port of the other sata controller (2 controllers on this MSI X99 SLI MB for 10 ports, or 8 ports if you use the M.2 slot) Hope this helps someone.


.jpg.7a296bdc922da8465bbc0bcc972e946c.jpg)
