Leaderboard


Popular Content
Showing content with the highest reputation on 05/16/2022 in all areas
-
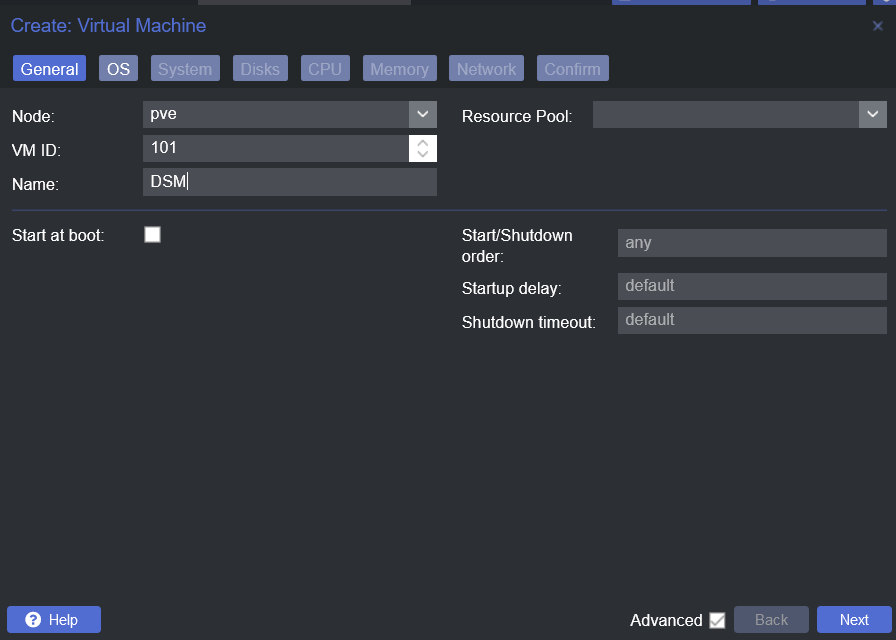
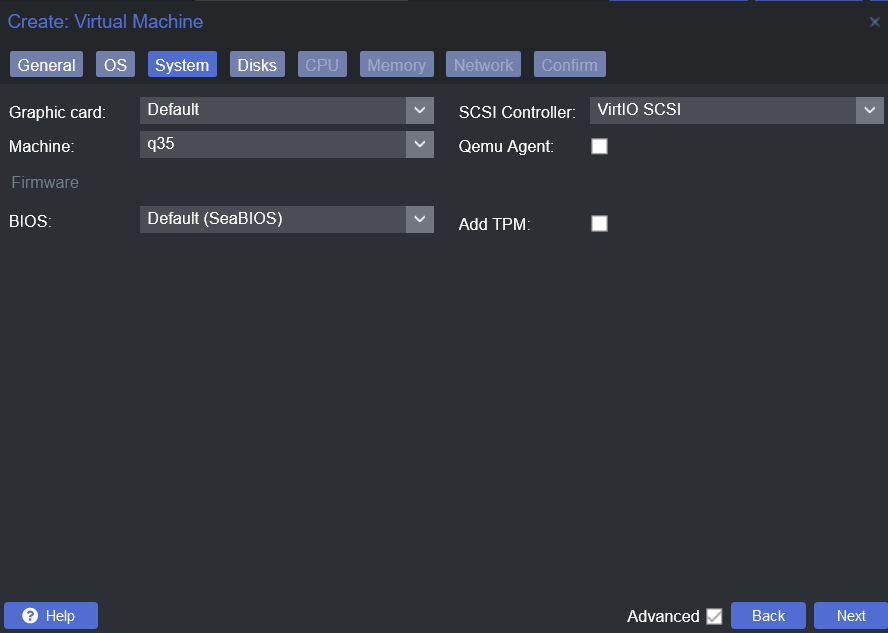
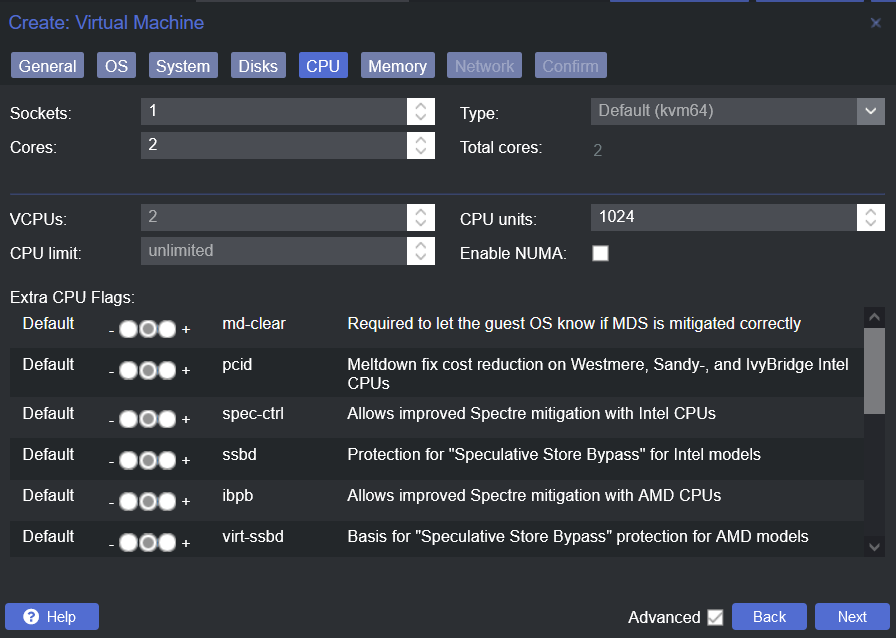
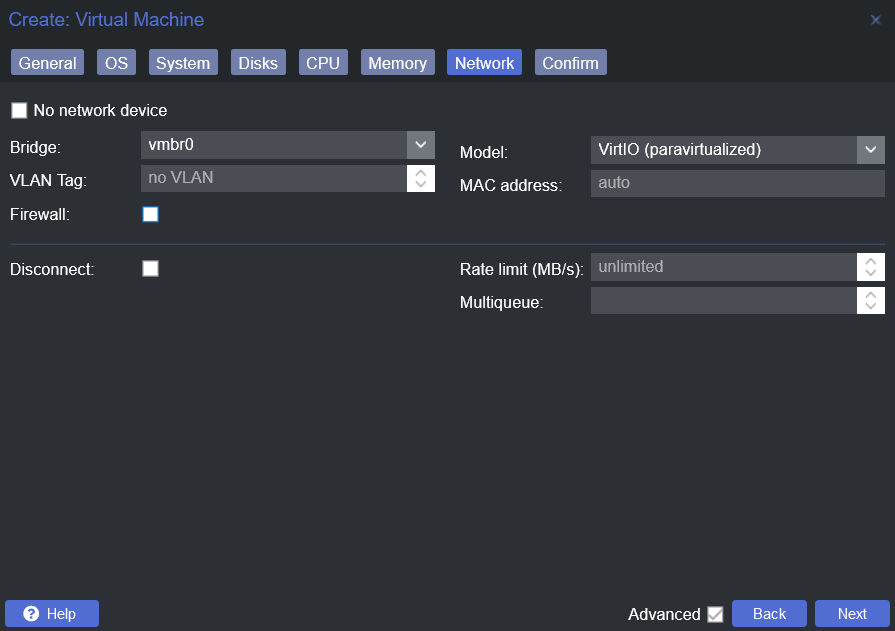
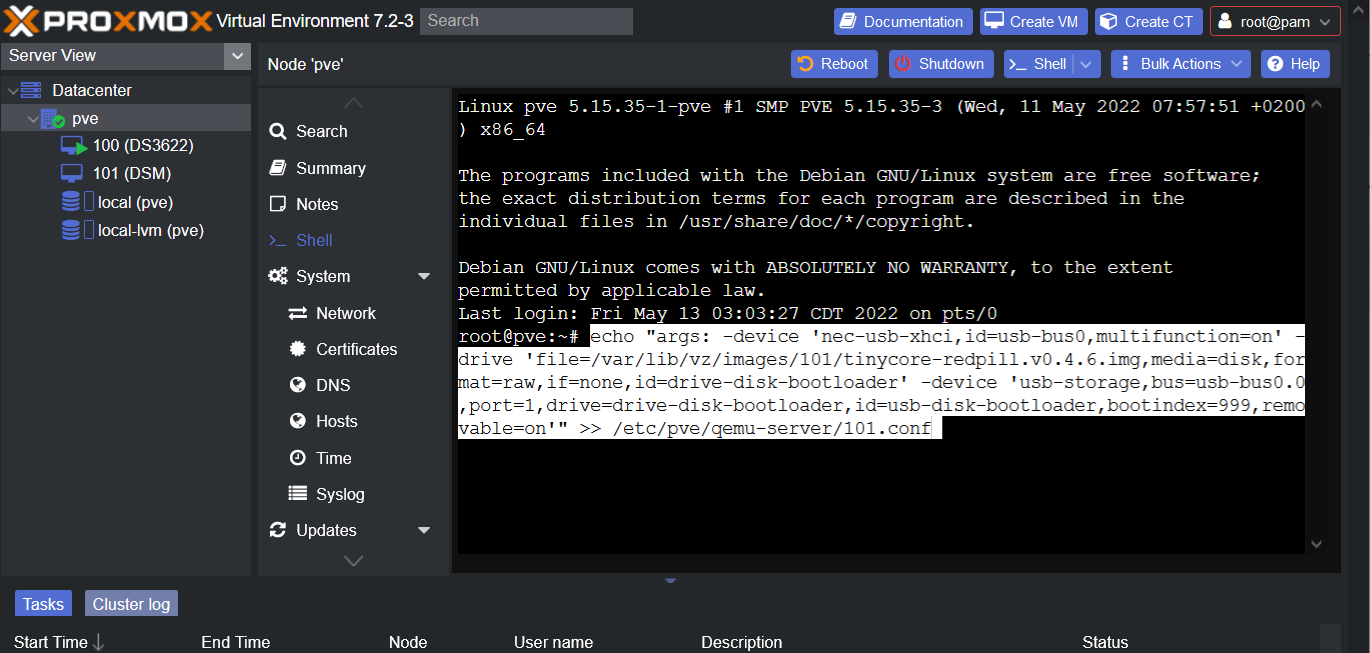
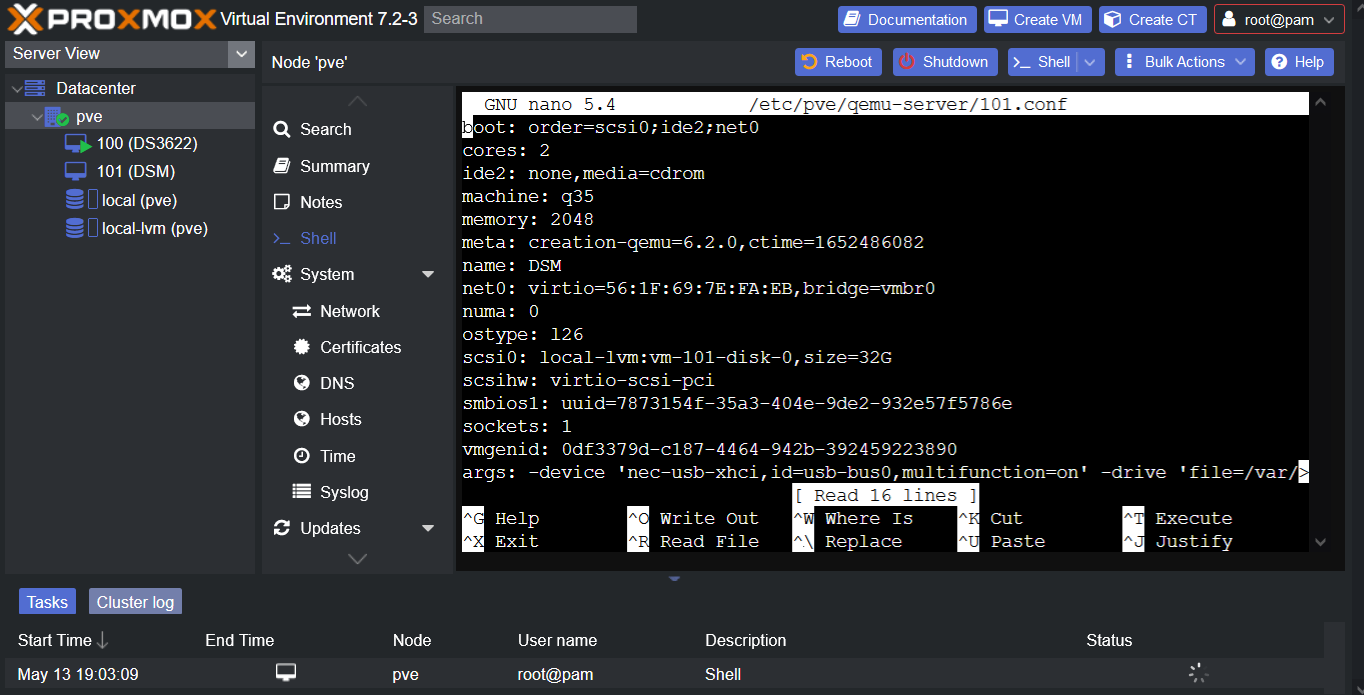
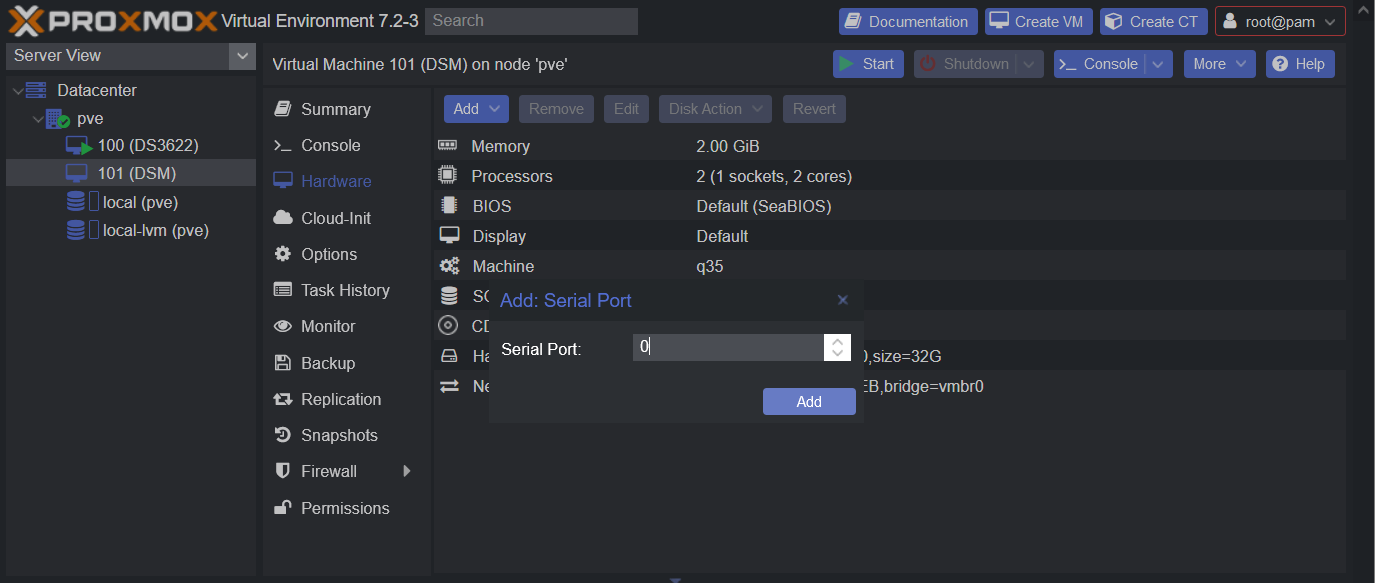
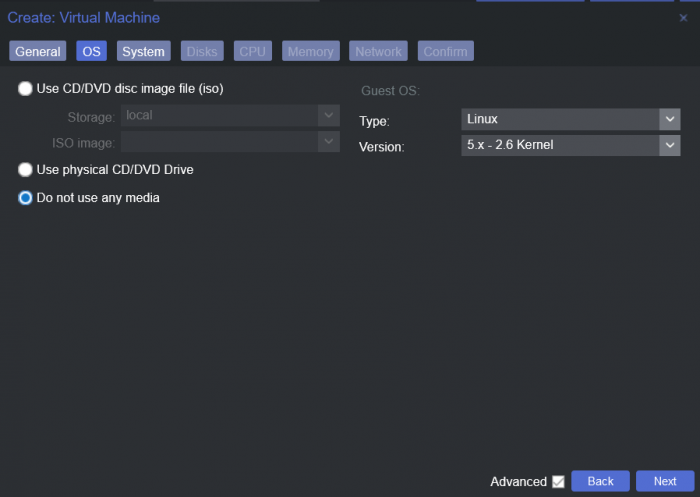
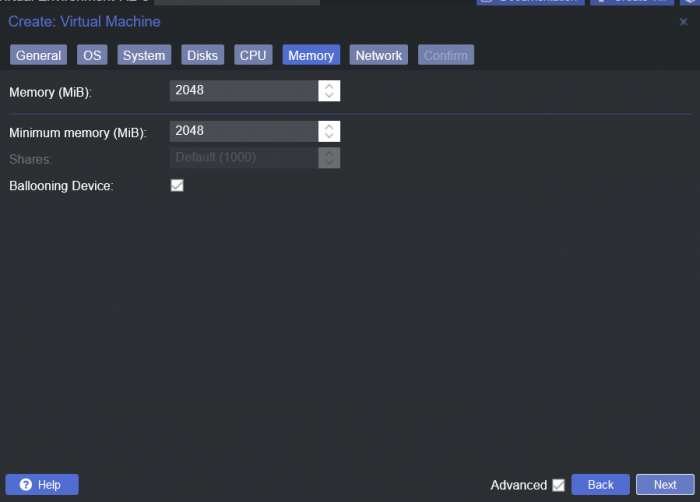
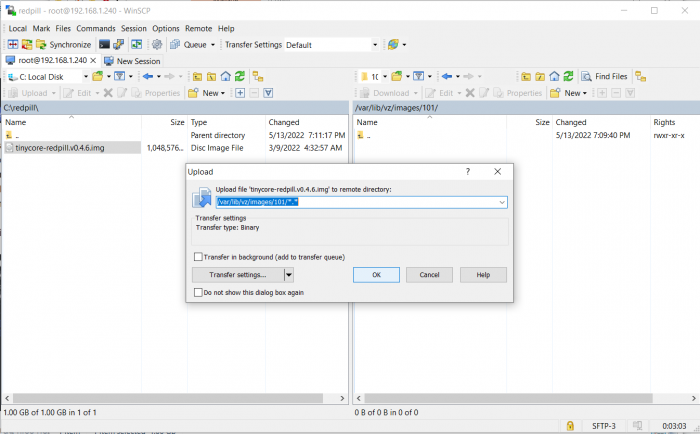
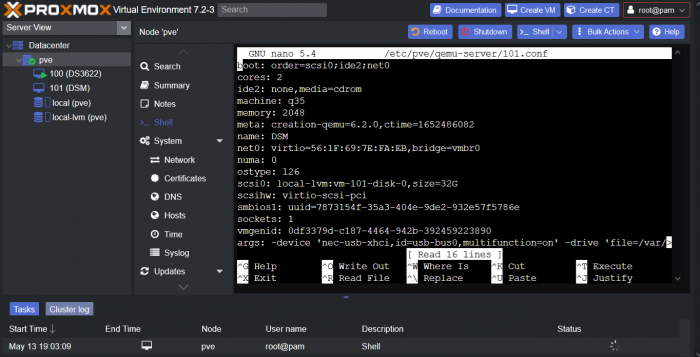
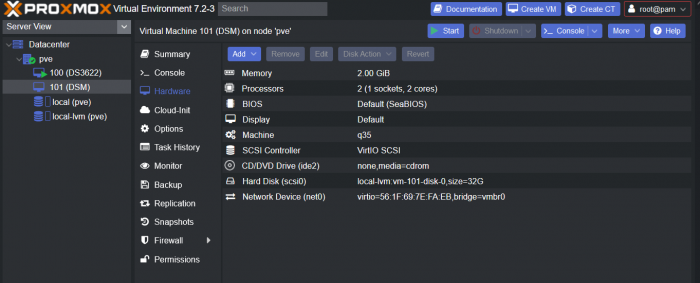
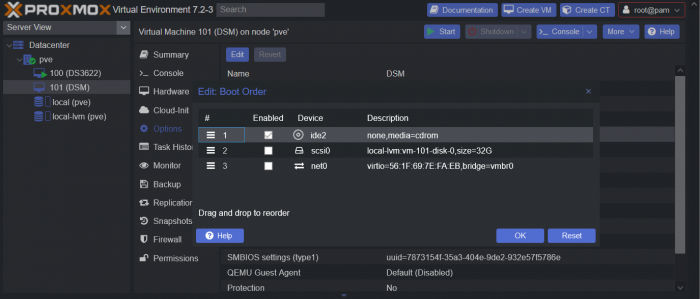
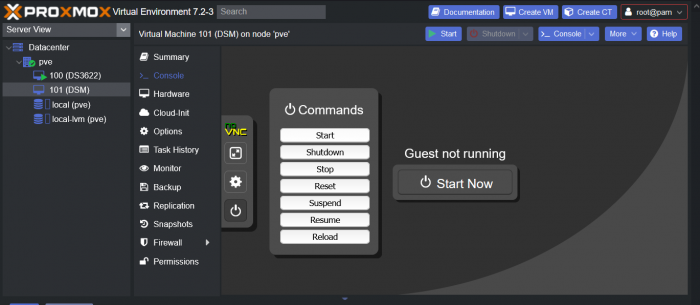
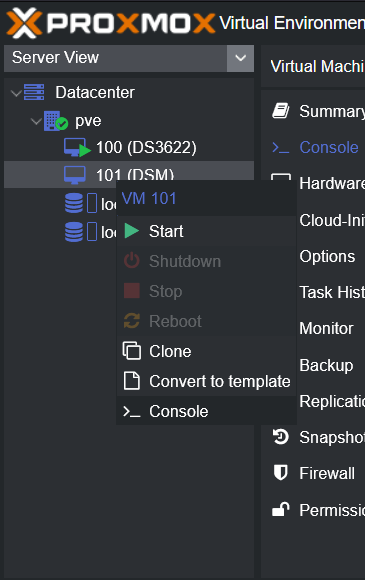
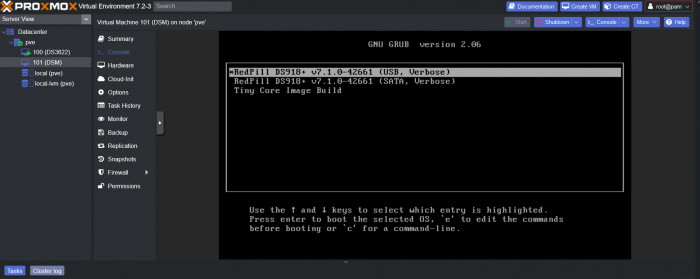
This is a simple guide and step by step tutorial on how I got tiny core red pill loader running and working on a proxmox server. This not the only way, just the way I do it and it seems to work. You will need a few things downloaded and ready to access on your local machine. The tiny core red pill image from @pocopico DOWNLOAD Putty for windows (or your mac equivalent) DOWNLOAD WinSCP for windows (or mac equivalent) DOWNLOAD and of course a working server with proxmox installed and running. DOWNLOAD The correct .pat dsm installation file downloaded directly from synology.com (you can handle this one on your own 😉) From proxmox create a VM. Most of the defaults work, change these according to your specific needs and requirements, I personally used: Q35, virtio nic, HDD is your choice, 2 cores and 2gb ram (again your choice). System Q35 is not required either, i440x works too, this is just what I used and it works. HDD is whatever you want, or pass thru complete drives or controllers.. again your choice based on your setup. Same for nic, cpu and ram. Just be sure to Use NO MEDIA in the OS section * REMEMBER THE VM ID # * you will need it later * Remember, do not use any media is selected here. Now, load WinSCP and connect to your proxmox server using your local ip and proxmox credentials. There on the right side, navigate to /var/lib/vz/images/ and create a folder/directory of whatever the vm number was you created, in these pictures its 101 so in this case it should be /var/lib/vz/images/101/ On the left side in WinSCP navigate to where you downloaded and extracted the tcrp image Copy the extracted tcrp img from your local machine to your proxmox vm directory Alternatively, you can enter a couple of command lines in the main pve node shell to download and extract the tcrp image without using winscp at all, but I do it the hard way. Either way works so its up to you. The alternative method is open the main pve node shell in proxmox and enter these commands (use copy and paste for each line) # set vm id to whatever it was at time of creation id=101 # create image directory, download and uncomporess mkdir -p /var/lib/vz/images/${id} curl --location https://github.com/pocopico/tinycore-redpill/raw/main/tinycore-redpill.v0.4.6.img.gz --output /var/lib/vz/images/${id}/tinycore-redpill.v0.4.6.img.gz gzip --decompress /var/lib/vz/images/${id}/tinycore-redpill.v0.4.6.img.gz --keep Now, at this point one way or another you should have a dir of your vm # in the correct location with the tcrp extracted image inside ready to issue the following commands, so now click your main pve node on the left panel and choose shell and paste this command there. (edit the 101 vm # with whatever your vm # is) echo "args: -device 'nec-usb-xhci,id=usb-bus0,multifunction=on' -drive 'file=/var/lib/vz/images/101/tinycore-redpill.v0.4.6.img,media=disk,format=raw,if=none,id=drive-disk-bootloader' -device 'usb-storage,bus=usb-bus0.0,port=1,drive=drive-disk-bootloader,id=usb-disk-bootloader,bootindex=999,removable=on'" >> /etc/pve/qemu-server/101.conf Now type nano and the last part of the above command (the directory part) to verify the entry into your vm .conf file so in this case nano /etc/pve/qemu-server/101.conf You easily verify the entry into the bottom of the .conf file of your vm, now press control x to exit. Now select your vm and choose hardware from the column Here using the Add button you should add a serial 0 console to monitor your dsm loader if needed (helpful for troubleshooting) and if you are adding hdd or using pass thru of hba controllers or sata controllers or any other specific hardware for your build add it here. Now select Options from the list column, and select only ide2 CD-ROM (uncheck all others) and make cd-rom priority #1 by dragging it to the top. Now you are ready to spin up your vm and build your loader. You can watch the process of booting by right clicking on the vm number/name and select >_ console a new window will open and you will see lines of code fly by, but only in this console monitor window. This is an optional step. At this point you should be booting tcrp and ready to build your loader... @Peter Suh has a great tutorial for that linked here. Follow his directions for building your loader. Use putty to SSH into tcrp to build the loader, The main thing when building if you used virtualized nic card, add the v9fs ext to get network port working, use this command before executing the redpill build command in putty. ./rploader.sh ext <build platform> add https://raw.githubusercontent.com/pocopico/rp-ext/master/v9fs/rpext-index.json After you successfully build your loader, and during the reboot, go back to proxmox gui and when you see the booting menu screen, press UP to select BOOT FROM USB, VERBOSE then press enter... that is very important. You only have to do this once, and it will save and retain that selection until you change it again. You do not want to boot from sata! At this point you load your browser, go to find.synology.com or use synology search application on your pc, or simply go to the ip of your new vm dsm and complete the process. If you had your console monitor opened from above, you should see sign in prompt, if you scroll up a little bit you will also see the ip of your dsm vm. If you successfully booted from usb, everything will work. If you did not change that during the first reboot, and you are booting from sata, you will most likely get a failure to install dsm. You will need to power down the vm, re-start the vm, and choose boot from usb verbose. If this guide helped you, please press the thanks button for me. 🖖😀 And remember to thank @pocopico and @Peter Suh Enjoy!


 5 points
 -
Before installing XPEnology using DSM 7.x, you must select a DSM platform and loader. XPEnology supports a variety of platforms that enable specific hardware and software features. All platforms support a minimum of 4 CPU cores, 64GB of RAM, 10Gbe network cards and 16 drives. Each can run "baremetal" as a stand-alone operating system OR as a virtual machine within a hypervisor. A few specific platforms are preferred for typical installs. Review the table and decision tree below to help you navigate the options. NOTE: DSM 6.x is still a viable system and is the best option for certain types of hardware. See this link for more information. DSM 7.x LOADERS ARE DIFFERENT: A loader allows DSM to install and run on non-Synology hardware. The loaders for DSM 5.x/6.x were monolithic; i.e. a single loader image was applicable to all installs. With DSM 7.x, a custom loader must be created for each DSM install. TinyCore RedPill (TCRP) is currently the most developed tool for building 7.x loaders. TCRP installs with two step-process. First, a Linux OS (TinyCore) boots and evaluates your hardware configuration. Then, an individualized loader (RedPill) is built and written to the loader device. After that, you can switch between starting DSM with RedPill, and booting back into TinyCore to adjust and rebuild as needed. TCRP's Linux boot image (indicated by the version; i.e. 0.8) changes only when a new DSM platform or version is introduced. However, you can and should update TCRP itself prior to each loader build, adding fixes, driver updates and new features contributed by many different developers. Because of this ongoing community development, TCRP capabilities change rapidly. Please post new or divergent results when encountered, so that this table may be updated. 7.x Loaders and Platforms as of 06-June-2022 Options Ranked 1a 1b 2a 2b 2c 3a 3b DSM Platform DS918+ DS3622xs+ DS920+ DS1621+ DS3617xs DVA3221 DS3615xs Architecture apollolake broadwellnk geminilake v1000 broadwell denverton bromolow DSM Versions 7.0.1-7.1.0-42661 7.0.1-7.1.0-42661 7.0.1-7.1.0-42661 7.0.1-7.1.0-42661 7.0.1-7.1.0-42661 7.0.1-7.1.0-42661 7.0.1-7.1.0-42661 Loader TCRP 0.8 TCRP 0.8 TCRP 0.8 TCRP 0.8 TCRP 0.8 TCRP 0.8 TCRP 0.8 Drive Slot Mapping sataportmap/ diskidxmap sataportmap/ diskidxmap device tree device tree sataportmap/ diskidxmap sataportmap/ diskidxmap sataportmap/ diskidxmap QuickSync Transcoding Yes No Yes No No No No NVMe Cache Support Yes Yes Yes Yes Yes (as of 7.0) Yes No RAIDF1 Support No Yes No No Yes No Yes Oldest CPU Supported Haswell * any x86-64 Haswell ** any x86-64 any x86-64 Haswell * any x86-64 Max CPU Threads 8 24 8 16 24 (as of 7.0) 16 16 Key Note currently best for most users best for very large installs see slot mapping topic below AMD Ryzen, see slot mapping topic obsolete use DS3622xs+ AI/Deep Learning nVIDIA GPU obsolete use DS3622xs+ * FMA3 instruction support required. All Haswell Core processors or later support it. Very few Pentiums/Celerons do (J-series CPUs are a notable exception). Piledriver is believed to be the minimum AMD CPU architecture equivalent to Intel Haswell. ** Based on history, DS920+ should require Haswell. There is anecdotal evidence gradually emerging that DS920+ will run on x86-64 hardware. NOT ALL HARDWARE IS SUITABLE: DSM 7 has a new requirement for the initial installation. If drive hotplug is supported by the motherboard or controller, all AHCI SATA ports visible to DSM must either be configured for hotplug or have an attached drive during initial install. Additionally, if the motherboard or controller chipset supports more ports than are physically implemented, DSM installation will fail unless they are mapped out of visibility. On some hardware, it may be impossible to install (particularly on baremetal) while retaining access to the physical ports. The installation tutorial has more detail on the causes of this problem, and possible workarounds. DRIVE SLOT MAPPING CONSIDERATIONS: On most platforms, DSM evaluates the boot-time Linux parameters SataPortMap and DiskIdxMap to map drive slots from disk controllers to a usable range for DSM. Much has been written about how to set up these parameters. TCRP's satamap command determines appropriate values based on the system state during the loader build. It is also simple to manually edit the configuration file if your hardware is unique or misidentified by the tool. On the DS920+ and DS1621+ platforms, DSM uses a Device Tree to identify the hardware and ignores SataPortMap and DiskIdxMap. The device tree hardcodes the SATA controller PCI devices and drive slots (and also NVMe slots and USB ports) prior to DSM installation. Therefore, an explicit device tree that matches your hardware must be configured and stored within the loader image. TCRP automatic device tree configuration is limited. For example, any disk ports left unpopulated at loader build time will not be accessible later. VMware ESXi is not currently supported. Host bus adapters (SCSI, SAS, or SATA RAID in IT mode) are not currently supported. Manually determining correct values and updating the device tree is complex. Device Tree support is being worked on and will improve, but presently you will generally be better served by choosing platforms that support SataPortMap and DiskIdxMap (see Tier 1 below). CURRENT PLATFORM RECOMMENDATIONS AND DECISION TREE: VIRTUALIZATION: All the supported platforms can be run as a virtual machine within a hypervisor. Some use case examples: virtualize unsupported network card virtualize SAS/NVMe storage and present to DSM as SATA run other VMs in parallel on the same hardware (as an alternative to Synology VMM) share 10GBe network card with other non-XPEnology VMs testing and rollback of updates Prerequisites: ESXi (requires a paid or free license) or open-source hypervisor (QEMU, Proxmox, XenServer). Hyper-V is NOT supported. Preferred Configurations: passthrough SATA controller and disks, and/or configure RDM/RAW disks This post will be updated as more documentation is available for the various TCRP implementations.3 points
-
So I migrated my xpenology server from DS918+ model to DS3622xs, and the nvme cache no longer works since the model number no longer exist in libsynonvme.so.1. I dig into the libsynonvme.so.1 and found it might check your pcie location to have the nvme drive works properly. After inspect the file, I found it just checks /etc.defaults/.extensionPorts and we just need to modify that. Here are the steps: 1. Check your nvme pci location(in my case it's 0000:00:01.0😞 udevadm info /dev/nvme0n1 P: /devices/pci0000:00/0000:00:01.0/0000:01:00.0/nvme/nvme0/nvme0n1 2. Modify /etc.defaults/.extensionPorts to have the port number match your nvme location. cat /etc.defaults/extensionPorts [pci] pci1="0000:00:01.0" 3. I did not even restart and the nvme cache drive already appears. Hope this helps anyone who is looking to solve this. Update: If you worry a system update will revert this modification, just add a startup script with root: sed -i 's/03.2/[your_pci_last_three_digs]/g' /etc.defaults/extensionPorts In this way, no matter what version you goes, this will always stay.

 3 points
 -
Hello~! I am xpenology user. And I am an IT engineer who creates shell scripts as hobbies. Please understand that it is written by a google translate site. because i’m korean who is not fluent in English. I created built Redpill Multi boot loader. Multiple DSMs can be used as one loader Requirement ============================================================= 1, Redpill-Multiloader_7.1-42661.img file Download Please understand that Google Drive is used because of its large capacity. There is a link below. 2. It is the same as using the existing Redpill Tinycore or a separately made loader. 3. ESXi Enviroment (Bootloader SATA1 (1:0), DataDisk SATA0 (0:0)) or Baremetal Enviroment (It can be used by making a USB with rufus or dd, etc.) How to RUN Redpill Multiloader ============================================================= 1. Redpill-Multiloader_7.1-42661.zip decompression 2. Modify /boot/grub/grub.cfg by mounting the first partition on OSFmount or TC #==================================================================================== ## User config - Your values Change #==================================================================================== set sn=1234SQRDD5678 set netif_num=1 set mac1=001122334455 set SataPortMap=9 set DiskIdxMap=0 set SasIdxMap=0 The USB or Boot oder part is an additional setting and does not necessarily need to be modified. 3. Convert Redpill-Multiloader_7.1-42661.img to Redpill-Multiloader_7.1-42661.vmdk, Redpill-Multiloader_7.1-42661-flat.vmdk 4. Register as boot disk in ESXi VM (default SATA1 (1:0)) 5. Enter GRUB and use the desired DSM version How to ADD Ext Driver (for Baremetal & ESXi, How to make USB Stick include) ============================================================= Additional notes ============================================================= 1. It is built by default for EXSi and can be modified after additional builds if necessary. (I'll update the method further.) 2. Due to variable processing for sn, mac, etc., it is temporarily modified in GRUB state and cannot be used. 3. The video has been processed only with the popular DS918+, DS920+, DS1621+, DS3622xs+, and DVA3221, and DS3615xs and DS3617xs are also available. 4. USB is handled as a submenu, and pressing ESC will return to the upper menu. 5. In the future, we plan to make Multiloader production possible directly on TC through tr_cb.sh. https://xpenology.com/forum/topic/60469-tinycore-redpill-create-boot-image-usb-tr_cb-v099-r01/ ## Update v2.0.0-r02- 2022.04.29 - Modification of efi classification conditional statement and redistribution of images - How to add Ext Driver Video production Attachement ============================================================= Download : (Google drive link - 400MB) - Please understand that Google Drive is used because of its large capacity https://drive.google.com/file/d/1t1cOPMmlSg3c65mXJBeI_44yor_sp9Xl/view?usp=sharing Finally comment ============================================================= I'm an ESXi user, so the Native test is lacking.(Check only basic bootability) Please note that there may be errors. If you tell me the test results and points for improvement, I'll reflect them. Have Nice Day!! Thank you~!!!1 point
-
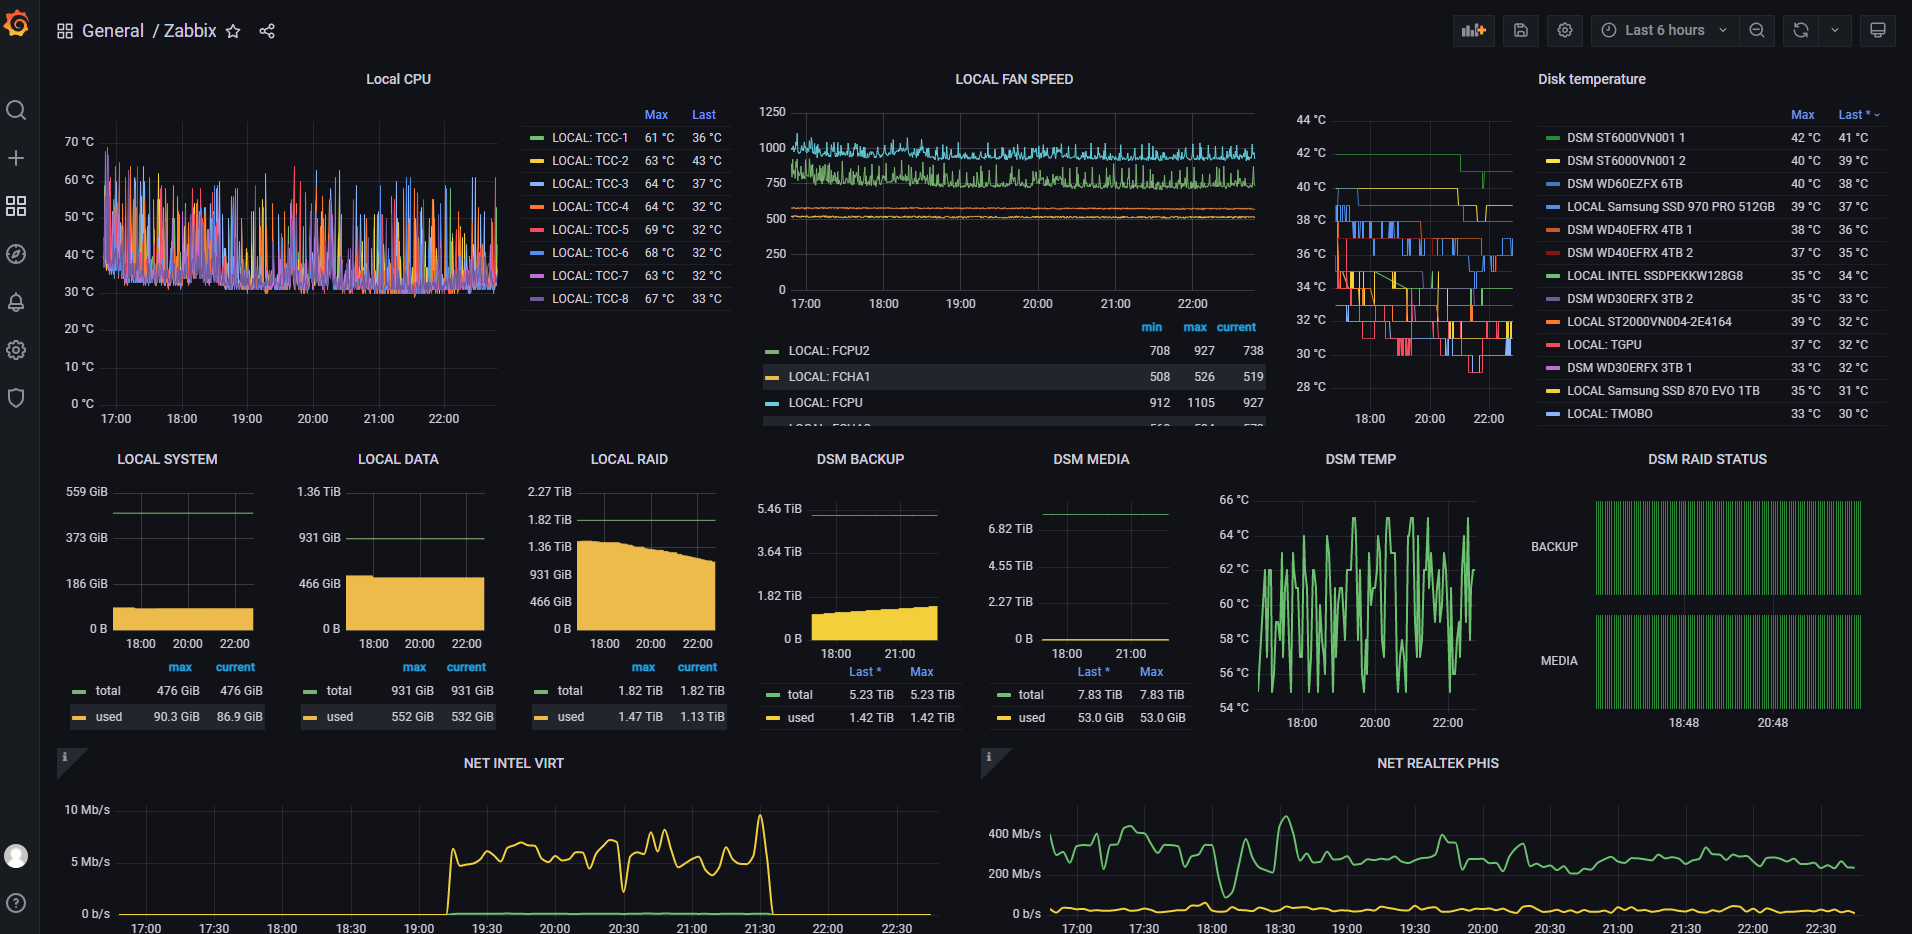
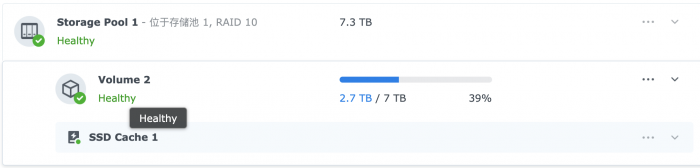
Hello guys! I'd like to discuss the way you monitor your NAS, may be we can choose the best and easiest way including soft, panels, type of the info you need to make your NAS healthy. If you are interested I could tell more particular of my own monitoring system to start with. I use Virtual ubuntu + zabbix + grafana + zabbix template = self hand-made panels. Info of my main system called LOCAL and my Xpenology NAS called DSM combined on the only screen. I watch: CPU temp FAN speed if any HDD and SSD temp Lan speed RAID health Volume usage It looks like this:
 1 point
 -
Well you could have started with that. But I'm not going to copy it from the image. You'll need to translate or switch your install to English.1 point
-
If you have a motherboard that supports Hot Plug or Hot Swap, please turn on the above option. Please provide the user_config.json information used and the number of physical disks used.1 point
-
You are still using jumkey develop repo1 point
-
Jumkey has modified his repo for Juns approach. Since TCRP is not currently on the same page, i changed the platforms to point to the pocopico develop branch in custom_config.json instead. I'm still testing and trying to find and resolve any remaining issues for the JUN approach with TCRP. Please standby. All build issues resulting to "no space left" are the side effect of pointing to Jumkey repo and TCRP not being ready yet.1 point
-
The environment information of your PC that you tried to install is insufficient. So you will set a basic information i would like you to fill in for me : VM or BareMetal : BareMetal Hardware (Motherboard/CPU) : Hot Plug/Hot Swap Applied : Network Interface 1 : RealTek r8169 Network Interface 2 : Intel e1000 Loader : TCRP 0.4.6 version of rploader.sh : 0.7.1.1 Platform (DS3622xsp/DS918+/DS920+/DVA3221/DS1621+/DS3615xs/DS3617xs) : Platform Version (6.2.4/7.0.1/7.1) : Platform Revision (42218/42661/42661-U1) : GRUB Boot selection : USB Installation Steps : Current Status : Boots to kernel Issue : Installation issue, cannot get IP Address.1 point
-
Looks like TCRP is using something from @jumkeythat has been updated? @pocopico need forking?1 point
-
@pocopico I Gathered information from your repo to fill in the missing version history. I would appreciate it if you use it.^^ [tinycore redpill version history] 0.7.0.0 Added build for version greater than 42218 0.7.0.1 Added required extension parsing adding and downloading 0.7.0.2 Added usb patch in patchdtc 0.7.0.3 Added portnumber on patchdtc 0.7.0.4 Make sure that local cache folder is created early in the process 0.7.0.5 Enabled interactive 0.7.0.6 Added save/restore session functions 0.7.0.7 Added a check date function 0.7.0.8 Added the ability to use local dtb file 0.7.0.9 Added flyride satamap review1 point
-
i've got 8gb of RAM in the PC i'm attempting to install on at the moment and still have this issue1 point
-
@pocopico modified TC 1 hour ago so that the user dts file I requested can be used. If you update now, the version will be upgraded to 0.7.1.0. Support for auto-compilation of custom dts files is the main feature of this version. thank you @pocopico The post below explains how to use it. And a function to view the version history has been added. But, where did the previous version history go? haha. tc@box:~$ ./rploader.sh version history 0.7.1.0 0.7.1.0 Added the history, version and enhanced patchdtc function1 point
-
These are the 2 ACPI drivers that have worked for me, if either of these platforms are your building choice, these should work for you also. For other models YMMV. DS3622+ acpi shutdown working (for me) was ./rploader.sh ext broadwellnk-7.1.0-42661 add https://raw.githubusercontent.com/dodo-dk/rp-ext/main/acpid/rpext-index.json DS918+ @pocopico acpi works ./rploader.sh ext apollolake-7.1.0-42661 add https://github.com/pocopico/redpill-load/raw/develop/redpill-acpid/rpext-index.json FYI: You can easily verify your acpi and status by opening the serial console of your vm dsm and watching the information there when you press the shutdown command on that vm. When it works, you will clearly see things "stopping" and "shutting down" etc...1 point
-
would this be a better package to use for virtio? https://github.com/pocopico/redpill-load/raw/develop/redpill-virtio/rpext-index.json Then again, looking through the v9fs files, it does mention the same modules and more: "kmods": { "virtio.ko": "", "virtio_ring.ko": "", "virtio_mmio.ko": "", "virtio_pci.ko": "", "virtio_blk.ko": "", "virtio_net.ko": "", "virtio_scsi.ko": "", "9pnet.ko": "", "9pnet_virtio.ko": "", "9p.ko": "" },1 point
-
Just a heads up, the step by step tutorial guide to getting TCRP working in Proxmox is now up and live. Complete with links, details and pictures to follow.1 point
-
Sounds familiar! Except there are a bunch of kids in my house, also watching Emby. 🤣1 point
-
wie man es nimmt, die sourcen für 7.0 (ohne updates) sind vorhanden aber aktuell ist 7.0.1 U3 und 7.1 U1 und dafür gibt es nichts an sourcen eigentlich müssten synology die sourcen mit jeder neuen version (auch updates) veröffentlichen aber da sie keiner zwingt/verklagt machen sie es einfach nicht ähnliche Situaution gibt es bei Bestandteilen des DSM Systems, da fallen mir auf anhieb hydrogen und diverse treiber ein (intel nic's, lsi sas, ...) manche treiber probleme sind schlicht den grobschlächtigen kernel anpassungen geschuldet die mitunter andere treiber im kernel (die synology selbst nicht benötigt) unbrauchbar macht und man müsste nachträglich den code anpassen um anzugleichen (möglich aber kaum einer findet sich der das macht, beispiel sind die ata und sata treiber für diverse controller sie seit 6.1 nicht mehr gehen) aber auch der zustand bei den (unsren) treibern (meine aber auch die von pocopico) ist nicht ausreichen dokumentiert oder mit source versehen (und den evtl. angewendeten patches), das sind häufig nur binär blobs und man muss dem maintainer blind vertrauen (ich sag mal "joshua" und werfe supply chain attack in den raum) verbogen/geändert ja aber das ist in den meisten fällen nicht das problem, ich schätze mal zu 80% sind es zu alte treiber oder das syno so selten den kernel aktualisiert und man mit neuer hardware gegen die wand läuft da manche treiber nur noch im kernel gepflegt werden (z.b. intel 2.G nic, treiber igc.ko), manchmal feht auch nur firmware die zu einem treiber gehört oder der treiber wurde bisher nicht hinzugefügt (jeder treiber muss einzel als extension hinzugefügt werden (und das kompressionsformat in dem die treiber im loader sind erschwert das hinzufügen erheblich da user selbst nicht einfach etwas hinzufügen können) generell ist es im fall von lsi sas controllern eher zu empfehlen den von syno gelieferten treiber zu nehmen (u.a. durch wahl des dsm typ's) und nur einen neueren treiber zu nutzen wo es unbedingt notwendig ist, da geht man einigen problemen aus dem weg (probleme bei nic's wären potentiell nicht so kritisch aber beim storage hört der spaß auf - da verweise ich mal auf die lsi sas probleme mit 6.x bei 918+, einer de gründe warum ich seit längerem bei xpenology genutzter hardware auf ahci setze und die zwei lsi sas controller in der kiste liegen)1 point
-
I just posted a tutorial guide with step by step instructions and pictures on how to setup and install on Proxmox. The thread is waiting for approval from the moderators. I actually did it side by side as I wrote it to verify each and every step. And it all worked 100%.. I will post the link, however I dont know how long it will be until its approved.1 point
-
- Outcome of the update: SUCCESSFUL - DSM version prior update: new install - Loader version and model: TCRP 0.4.6 DS918+ - Using custom extra.lzma: NO - Installation type: ESXi 7.0c VM on Intel Skylake Xeon - Outcome of the update: SUCCESSFUL - DSM version prior update: new install - Loader version and model: TCRP 0.4.6 DS3622xs+ - Using custom extra.lzma: NO - Installation type: ESXi 7.0c VM on Intel Skylake Xeon - Outcome of the update: SUCCESSFUL - DSM version prior update: new install - Loader version and model: TCRP 0.4.6 DVA3221 - Using custom extra.lzma: NO - Installation type: ESXi 7.0c VM on Intel Skylake Xeon - Outcome of the update: SUCCESSFUL - DSM version prior update: new install - Loader version and model: TCRP 0.4.6 DS3617xs - Using custom extra.lzma: NO - Installation type: ESXi 7.0c VM on Intel Skylake Xeon - Outcome of the update: SUCCESSFUL - DSM version prior update: new install - Loader version and model: TCRP 0.4.6 DS920+ - Using custom extra.lzma: NO - Installation type: ESXi 7.0c VM on Intel Skylake Xeon - Additional comments: manual editing of ds920p.dts and re-insertion into loader build required. TCRP cannot currently determine correct device tree values for ESXi virtual SATA controller ports due to how they are represented in the tinycore OS. This combination (ESXi and DS920+) is not ready for general use yet. - Outcome of the update: SUCCESSFUL - DSM version prior update: new install - Loader version and model: TCRP 0.4.6 DS1621+ - Using custom extra.lzma: NO - Installation type: ESXi 7.0c VM on Intel Skylake Xeon - Additional comments: manual editing of ds1621p.dts and re-insertion into loader build required. TCRP cannot currently determine correct device tree values for ESXi virtual SATA controller ports due to how they are represented in the tinycore OS. This combination (ESXi and DS1621+) is not ready for general use yet.1 point
-
wanted to know about DS3622xs+ and its core count. I see that the Xeon-D1531 supports 6/12T and the Xeon-D1541 supports 8/16T that family of cpu Xeon D-1571 supports 16/32T. Does anyone know what the Kernal supports in DS3622xs?1 point
-
- Outcome of the update: SUCCESSFUL - DSM version prior update: Jun's Loader v1.04b DS918+, DSM 6.2.3-25426 Update 3 (DS918+) - Loader version and model: Redpill Tinycore V0.4.6, DSM 7.1-42661 (DS918+) - Using custom extra.lzma: NO - Installation type: Baremetal ASRock J3160DC-ITX, mini-pcie Intel 82574 (E1000e) ethernet card, 16 GB RAM, 4x SATA drives - Additional comments: Use official Synology .pat file. Added E1000e and r8168 ext.1 point
-
All things you wanted to know about notifications but you were afraid to ask: You can set up both events in the Task Manager. 1) Notify via DSM UI notification, this will however not be pushed to the mobile app for xpenlogie: synodsmnotify @administrators System "System is shutting down" 2) For official DSM email delivery, create your own notification in Notifications\Advanced: https://www.beatificabytes.be/send-custom-notifications-from-scripts-running-on-a-synology-new/https://www.beatificabytes.be/send-custom-notifications-from-scripts-running-on-a-synology-new/ then send: /usr/syno/bin/synonotify Shutdown 3) For instant Pushbullet notification, set up notifycli package and run: /volume1/@appstore/nessentials/bin/notify-cli -c pushbullet -p <PushbulletAPIToken> -d <DeviceIden> -t "NAS Alert" -m "System shutdown" --sender <SourceDeviceIden> 4) To get literal audio notification ("System shutdown"), get a free TEXT to MP3 audio file, and play it via: /volume1/@appstore/AudioStation/bin/mplayer /folder/shuttdown.mp3 > /dev/null 2>&1 BONUS: you can have a script that parses all DSM emails, and plays according text via USB speaker 5) To send email without any configurations, no questions asked (if you're running MailServer): echo -e "From: NAS <nas@domain.tld>\nTo: nas@domain.tld\nSubject: NAS alert\n\nSystem shutdown" | ssmtp nas@domain.tld BONUS: you can automatically forward the email to your SMS if your telco provides such service1 point
-
Hi. Unfortunately no. It's not relevant for me right now. I left my home due to war((0 points