Search the Community
Showing results for 'SataPortMap'.
-

red pill 7.0 installation infinie
nicoueron replied to PlayZeka's topic in Compatibilité Hardware & Installation
Salut, certainement du à un mauvais paramétrage de SataportMap et DiskDxMap du fichier user_config.json et/ou un mauvais paramétrage du controleur de disques dans le BIOS (il faut bien être en AHCI). -
more one question and i hope dont need ask again in my esxi need add 3 nics for dsm see 2 nics should be like this "extra_cmdline": { "pid": "0x1666", "vid": "0x0951", "sn": "************", "mac1": "************1", "mac2": "************2", "mac3": "************3", "SataPortMap": "64", "DiskIdxMap": "0004", "netif_num": "3" hope you can answer please
-
 According to this manual, hot plug is mentioned twice I don't know if it means that the hot plug will work on its own even if it is kept as AHCI. https://download1.gigabyte.com/Files/Manual/mb_manual_ga-b75m-d3h_e.pdf First, modify the user_config.json file directly to SataportMap=1 Fix it with , physically install the HDD only in the Sata 1 port and proceed with the installation of ds3622xs+.
 -
For users who are new to XPENOLOGY, ds920+ using device-tree-compiler (dtc) may have difficulty. And in TC, sata port auto-mapping has not been stabilized yet. Manual mapping is possible, but this is more difficult. It's amazing that 2nd generation Intel can find IP using ds920+. Unlike JUN loader, is it possible to do red-pill? I recommends using the most stable ds3622xs+ for platforms that can be sufficient even in the 2nd generation of Intel. And can Hot Plug be turned on in the BIOS? This is one of the ways to make the drive recognized while taking advantage of the SataportMap figures more flexible.
-
Sataportmap and diskidx can't be used anyway, so it doesn't matter if you leave them. What is pulled forward without indent is the part that TC automatically adjusted. USB is also mapped by finding the exact port value of USB stick. This part is a process to prevent the USB boot_wait error There is nothing strange about it.
-
Apparently, there are 3 Sata Ports. I don't think the figure of 6 is necessary. Let's reduce it to 3 If possible, install only one disk in SataPort No 1. In the Grub Menu, temporarily reduce it to sataportmap = 11 with the e key, and then save F10 and proceed.
-
Here I introduce TSU build process of another method excluding DSM 7.0.1 loader build process. If you forcefully create an auxfiles folder for pat file processing and ignore the process of creating a custom-module link, an error occurs during 7.1 build. @pocopico decided to check this part further and improve it. Other platforms can be used in the same way. In particular, in the case of ds920+ and ds1621+, the dtc(device-tree-compiler) method is used instead of sataportmap, and tc automatically finds and maps the related setting values. In ds920+ and ds1621+, ignore sataportmap and don't care. [DS920+] ./rploader.sh update now ./rploader.sh fullupgrade now ./rploader.sh serialgen DS920+ ./rploader.sh identifyusb now (run if custom-module -> /mnt/sdb3/auxfiles is missing, Users who use TC for the first time do not originally have this directory and link.) mkdir /mnt/"$(mount | grep -i optional | grep cde | awk -F / '{print $3}' | uniq | cut -c 1-3)3"/auxfiles; sudo ln -s /mnt/"$(mount | grep -i optional | grep cde | awk -F / '{print $3}' | uniq | cut -c 1-3)3"/auxfiles /home/tc/custom-module; ./rploader.sh build geminilake-7.1.0-42661 rm -rf /home/tc/oldpat.tar.gz;./rploader.sh clean now; rm -rf /mnt/"$(mount | grep -i optional | grep cde | awk -F / '{print $3}' | uniq | cut -c 1-3)3"/auxfiles; rm -rf /home/tc/custom-module; ./rploader.sh backup now; ( I referenced the Pocopico script to dynamically find the third partition of the USB stick. )
-
I'm trying DS3622xs, no disk found with Disk /dev/sda: 465.76 GiB, 500107862016 bytes, 976773168 sectors Disk /dev/sdb: 447.13 GiB, 480103981056 bytes, 937703088 sectors Disk /dev/sdc: 238.47 GiB, 256060514304 bytes, 500118192 sectors SataPortMap=61 DiskIdxMap=0001 sorry for my english tc@box:~$ lspci -tvnnq -[0000:00]-+-00.0 Intel Corporation 4th Gen Core Processor DRAM Controller [808 6:0c00] +-01.0-[01]----00.0 Samsung Electronics Co Ltd XP941 PCIe SSD [144d: a800] +-02.0 Intel Corporation Xeon E3-1200 v3/4th Gen Core Processor Inte grated Graphics Controller [8086:0412] +-03.0 Intel Corporation Xeon E3-1200 v3/4th Gen Core Processor HD A udio Controller [8086:0c0c] +-14.0 Intel Corporation 8 Series/C220 Series Chipset Family USB xHC I [8086:8c31] +-16.0 Intel Corporation 8 Series/C220 Series Chipset Family MEI Con troller #1 [8086:8c3a] +-16.3 Intel Corporation 8 Series/C220 Series Chipset Family KT Cont roller [8086:8c3d] +-19.0 Intel Corporation Ethernet Connection I217-LM [8086:153a] +-1a.0 Intel Corporation 8 Series/C220 Series Chipset Family USB EHC I #2 [8086:8c2d] +-1b.0 Intel Corporation 8 Series/C220 Series Chipset High Definitio n Audio Controller [8086:8c20] +-1d.0 Intel Corporation 8 Series/C220 Series Chipset Family USB EHC I #1 [8086:8c26] +-1f.0 Intel Corporation Q87 Express LPC Controller [8086:8c4e] +-1f.2 Intel Corporation 8 Series/C220 Series Chipset Family 6-port SATA Controller 1 [AHCI mode] [8086:8c02] \-1f.3 Intel Corporation 8 Series/C220 Series Chipset Family SMBus C ontroller [8086:8c22]
-
Disk missing My values are: SataPortMap=61 DiskIdxMap=0001 SynologyNAS> fdisk -l Disk /dev/sdd: 466 GB, 500107862016 bytes, 976773168 sectors 60801 cylinders, 255 heads, 63 sectors/track Units: sectors of 1 * 512 = 512 bytes Device Boot StartCHS EndCHS StartLBA EndLBA Sectors Size Id Type Disk /dev/sdf: 447 GB, 480103981056 bytes, 937703088 sectors 58369 cylinders, 255 heads, 63 sectors/track Units: sectors of 1 * 512 = 512 bytes Device Boot StartCHS EndCHS StartLBA EndLBA Sectors Size Id Type Disk /dev/sdb: 238 GB, 256060514304 bytes, 500118192 sectors 31130 cylinders, 255 heads, 63 sectors/track Units: sectors of 1 * 512 = 512 bytes Device Boot StartCHS EndCHS StartLBA EndLBA Sectors Size Id Type Disk /dev/synoboot: 15 GB, 16078864384 bytes, 31404032 sectors 15334 cylinders, 64 heads, 32 sectors/track Units: sectors of 1 * 512 = 512 bytes Any ideas ?
-
Here I introduce TSU build process of another method excluding DSM 7.0.1 loader build process. If you forcefully create an auxfiles folder for pat file processing and ignore the process of creating a custom-module link, an error occurs during 7.1 build. @pocopico decided to check this part further and improve it. Other platforms can be used in the same way. In particular, in the case of ds920+ and ds1621+, the dtc(device-tree-compiler) method is used instead of sataportmap, and tc automatically finds and maps the related setting values. In ds920+ and ds1621+, ignore sataportmap and don't care. [DS920+] ./rploader.sh update now ./rploader.sh fullupgrade now ./rploader.sh serialgen DS920+ ./rploader.sh identifyusb now (run if custom-module -> /mnt/sdb3/auxfiles is missing, Users who use TC for the first time do not originally have this directory and link.) mkdir /mnt/sdb3/auxfiles; sudo ln -s /mnt/sdb3/auxfiles /home/tc/custom-module; ./rploader.sh build geminilake-7.1.0-42661 rm -rf /home/tc/oldpat.tar.gz;./rploader.sh clean now; rm -rf /mnt/sdb3/auxfiles; rm -rf /home/tc/custom-module; ./rploader.sh backup now;
-
Keep a backup of this usb stick and note your serial, mac address, sataportmap and diskidxmap. Also make sure you have a system configuration backup.
-
You can add this to user_config.json: { "extra_cmdline": { "pid": "0x4200", "vid": "0x13fe", "sn": "xxxxxxxxx", "mac1": "xxxxxxxx", "SataPortMap": "42", "DiskIdxMap": "0002", "disable_mtrr_trim": null } This worked on my N54L
-

Переход на 7.X.X с помощью tinycore-redpill
ELECTRO-NIC replied to Olegin's topic in Програмное обеспечение
Фух. Помогло обновление загрузчика. Очень выручила программа файл менеджер по ssh WinSCP(можно редактировать прямо через проводник). Добавьте в инструкцию(vi конечно хорошо но через gui мышкой мне удобнее)https://winscp.net/eng/docs/task_download . Остановился на конфиге "SataPortMap": "2", "DiskIdxMap": "00" -
Most of the problems that occur during DSM installation are affected by the SataportMap and DiskIdxMap values. In particular, I know that the dedicated environment has a greater impact on low values due to the controller, etc. For reference, ESXi is simple. SATAportMap=9 DiskIdxMap=0
-
It can be seen as a sample file for working internally with dtc (device-tree-compiler). TC copies this file to create a dtb file through actual dtc operations and automates all the processes of copying and using the file to a specific path. Although !dolbycat explained it above, dtc can be seen as a substitute for sataportmap.
-
Well, I will translate the opinion that @dolbycat posted on the Korean forum and post it. This is what I agree with. ds920+ has become more original with Jumkey's new PortMapping. 1. Connect pcie devices as directly as possible unlike before 2. Direct nvme cache and pcie slot values 3. Reduce virtualization as much as possible to make it work directly The most important thing is that you can change the hard bay slot freely, and you can also recognize nvme without any additional work. In addition, when updating dsm, the concern about nvme recognition disappeared every time. I no longer have to worry about Sataportmap, diskidxmap, and it recognizes and operates faster and more accurately. Internal_slot, which specifies HDD recognition and arrangement, allows users to edit, reduce, and reorder, and apply actual pcie values to work faster and avoid twisting in the middle. If you enter a pcie value in the nvme slot, it will automatically recognize it as genuine DS1621+. You no longer need to figure out and edit hexa values, and it's safe to update. pcie_slot@1 { pcie_root = "00:01.2"; This is the part where the pcie value of the slot inside the main board is applied. It's in the original DS1621+, so it's here too. The user edits and accurately captures the PCi card recognition. esata_port@1 { pcie_root = "00:01.5,00.0"; esata_port@2 { pcie_root = "00:01.6,00.0"; If the main board supports esata like the genuine DS1621+, you can support it like this. The DS920 supports H/W transcoding. DS1621+ is not supported and CPU transcoding was performed. Finally, let's compare ds3622 and ds1621 with lspci values, and DS918 and DS920 virtualization. < DS3622 > root@ds3622:~# lspci -tnnvq -+-[0001:0c]---00.0 Marvell Technology Group Ltd. 88SE9235 PCIe 2.0 x2 4-port SATA 6 Gb/s Controller [1b4b:9235] +-[0001:09]---00.0 Marvell Technology Group Ltd. 88SE9235 PCIe 2.0 x2 4-port SATA 6 Gb/s Controller [1b4b:9235] \-[0000:00]-+-00.0 Intel Corporation 8th Gen Core Processor Host Bridge/DRAM Registers [8086:3ec2] +-01.0-[01]----00.0 Realtek Semiconductor Co., Ltd. RTL8111/8168/8411 PCI Express Gigabit Ethernet Controller [10ec:8168] +-02.0 Intel Corporation CoffeeLake-S GT2 [UHD Graphics 630] [8086:3e92] +-12.0 Intel Corporation Cannon Lake PCH Thermal Controller [8086:a379] +-14.0 Intel Corporation Cannon Lake PCH USB 3.1 xHCI Host Controller [8086:a36d] +-14.2 Intel Corporation Cannon Lake PCH Shared SRAM [8086:a36f] +-16.0 Intel Corporation Cannon Lake PCH HECI Controller [8086:a360] +-17.0 Intel Corporation Cannon Lake PCH SATA AHCI Controller [8086:a352] +-1c.0-[02]----00.0 Intel Corporation I211 Gigabit Network Connection [8086:1539] +-1c.6-[03]----00.0 Intel Corporation Dual Band Wireless-AC 3168NGW [Stone Peak] [8086:24fb] +-1d.0-[04]----00.0 SK hynix Device [1c5c:1627] +-1f.0 Intel Corporation H370 Chipset LPC/eSPI Controller [8086:a304] +-1f.3 Intel Corporation Cannon Lake PCH cAVS [8086:a348] +-1f.4 Intel Corporation Cannon Lake PCH SMBus Controller [8086:a323] +-1f.5 Intel Corporation Cannon Lake PCH SPI Controller [8086:a324] \-1f.6 Intel Corporation Ethernet Connection (7) I219-V [8086:15bc] root@ds3622:~# DS3622 seems to recognize SATA ports by using two virtual Marvells that are not on the motherboard. < DS1621 > root@DS1621:~# lspci -tnnvq -[0000:00]-+-00.0 Intel Corporation 8th Gen Core Processor Host Bridge/DRAM Registers [8086:3ec2] +-01.0-[01]----00.0 Realtek Semiconductor Co., Ltd. RTL8111/8168/8411 PCI Express Gigabit Ethernet Controller [10ec:8168] +-02.0 Intel Corporation CoffeeLake-S GT2 [UHD Graphics 630] [8086:3e92] +-12.0 Intel Corporation Cannon Lake PCH Thermal Controller [8086:a379] +-14.0 Intel Corporation Cannon Lake PCH USB 3.1 xHCI Host Controller [8086:a36d] +-14.2 Intel Corporation Cannon Lake PCH Shared SRAM [8086:a36f] +-16.0 Intel Corporation Cannon Lake PCH HECI Controller [8086:a360] +-17.0 Intel Corporation Cannon Lake PCH SATA AHCI Controller [8086:a352] +-1c.0-[02]----00.0 Intel Corporation I211 Gigabit Network Connection [8086:1539] +-1c.6-[03]----00.0 Intel Corporation Dual Band Wireless-AC 3168NGW [Stone Peak] [8086:24fb] +-1d.0-[04]----00.0 SK hynix Device [1c5c:1627] +-1f.0 Intel Corporation H370 Chipset LPC/eSPI Controller [8086:a304] +-1f.3 Intel Corporation Cannon Lake PCH cAVS [8086:a348] +-1f.4 Intel Corporation Cannon Lake PCH SMBus Controller [8086:a323] +-1f.5 Intel Corporation Cannon Lake Pjumkey's new PortMappingCH SPI Controller [8086:a324] \-1f.6 Intel Corporation Ethernet Connection (7) I219-V [8086:15bc] root@DS1621:~# DS1621 does not have a virtual Marvell. Directly access the SATA port to PCIE. It's more concise and faster. The advantage of Jumkey's new PortMapping is that it's not easy to see. < DS918 > root@ds918:~# lspci -tnnvq -+-[0001:03]---00.0 Intel Corporation I211 Gigabit Network Connection [8086:1539] +-[0001:02]---00.0 Intel Corporation I211 Gigabit Network Connection [8086:1539] +-[0001:01]---00.0 Marvell Technology Group Ltd. 88SE9215 PCIe 2.0 x1 4-port SATA 6 Gb/s Controller [1b4b:9215] +-[0001:00]-+-12.0 Intel Corporation Celeron N3350/Pentium N4200/Atom E3900 Series SATA AHCI Controller [8086:5ae3] | +-13.0 Intel Corporation Celeron N3350/Pentium N4200/Atom E3900 Series PCI Express Port A #1 [8086:5ad8] | +-14.0 Intel Corporation Celeron N3350/Pentium N4200/Atom E3900 Series PCI Express Port B #1 [8086:5ad6] | +-15.0 Intel Corporation Celeron N3350/Pentium N4200/Atom E3900 Series USB xHCI [8086:5aa8] | +-16.0 Intel Corporation Celeron N3350/Pentium N4200/Atom E3900 Series I2C Controller #1 [8086:5aac] | +-18.0 Intel Corporation Celeron N3350/Pentium N4200/Atom E3900 Series HSUART Controller #1 [8086:5abc] | +-19.0 Intel Corporation Celeron N3350/Pentium N4200/Atom E3900 Series SPI Controller #3 [8086:5ac6] | +-19.2 Intel Corporation Celeron N3350/Pentium N4200/Atom E3900 Series SPI Controller #3 [8086:5ac6] | +-1f.0 Intel Corporation Celeron N3350/Pentium N4200/Atom E3900 Series SMBus Controller [8086:5ad4] | \-1f.1 Intel Corporation Celeron N3350/Pentium N4200/Atom E3900 Series SMBus Controller [8086:5ad4] \-[0000:00]-+-00.0 Intel Corporation 8th Gen Core Processor Host Bridge/DRAM Registers [8086:3ec2] +-01.0-[01]----00.0 Realtek Semiconductor Co., Ltd. RTL8111/8168/8411 PCI Express Gigabit Ethernet Controller [10ec:8168] +-02.0 Intel Corporation CoffeeLake-S GT2 [UHD Graphics 630] [8086:3e92] +-12.0 Intel Corporation Cannon Lake PCH Thermal Controller [8086:a379] +-14.0 Intel Corporation Cannon Lake PCH USB 3.1 xHCI Host Controller [8086:a36d] +-14.2 Intel Corporation Cannon Lake PCH Shared SRAM [8086:a36f] +-16.0 Intel Corporation Cannon Lake PCH HECI Controller [8086:a360] +-17.0 Intel Corporation Cannon Lake PCH SATA AHCI Controller [8086:a352] +-1c.0-[02]----00.0 Intel Corporation I211 Gigabit Network Connection [8086:1539] +-1c.6-[03]----00.0 Intel Corporation Dual Band Wireless-AC 3168NGW [Stone Peak] [8086:24fb] +-1d.0-[04]----00.0 SK hynix Device [1c5c:1627] +-1f.0 Intel Corporation H370 Chipset LPC/eSPI Controller [8086:a304] +-1f.3 Intel Corporation Cannon Lake PCH cAVS [8086:a348] +-1f.4 Intel Corporation Cannon Lake PCH SMBus Controller [8086:a323] +-1f.5 Intel Corporation Cannon Lake PCH SPI Controller [8086:a324] \-1f.6 Intel Corporation Ethernet Connection (7) I219-V [8086:15bc] root@ds918:~# DS918 is more complex. You virtualized it with the N3350/Pentium N4200/Atom E3900, as well as the virtual Marvell. < DS920 > root@DS920:~# lspci -tnnvq -+-[0001:01]---00.0 Marvell Technology Group Ltd. 88SE9235 PCIe 2.0 x2 4-port SATA 6 Gb/s Controller [1b4b:9235] \-[0000:00]-+-00.0 Intel Corporation 8th Gen Core Processor Host Bridge/DRAM Registers [8086:3ec2] +-01.0-[01]----00.0 Realtek Semiconductor Co., Ltd. RTL8111/8168/8411 PCI Express Gigabit Ethernet Controller [10ec:8168] +-02.0 Intel Corporation CoffeeLake-S GT2 [UHD Graphics 630] [8086:3e92] +-12.0 Intel Corporation Cannon Lake PCH Thermal Controller [8086:a379] +-14.0 Intel Corporation Cannon Lake PCH USB 3.1 xHCI Host Controller [8086:a36d] +-14.2 Intel Corporation Cannon Lake PCH Shared SRAM [8086:a36f] +-16.0 Intel Corporation Cannon Lake PCH HECI Controller [8086:a360] +-17.0 Intel Corporation Cannon Lake PCH SATA AHCI Controller [8086:a352] +-1c.0-[02]----00.0 Intel Corporation I211 Gigabit Network Connection [8086:1539] +-1c.6-[03]----00.0 Intel Corporation Dual Band Wireless-AC 3168NGW [Stone Peak] [8086:24fb] +-1d.0-[04]----00.0 SK hynix Device [1c5c:1627] +-1f.0 Intel Corporation H370 Chipset LPC/eSPI Controller [8086:a304] +-1f.3 Intel Corporation Cannon Lake PCH cAVS [8086:a348] +-1f.4 Intel Corporation Cannon Lake PCH SMBus Controller [8086:a323] +-1f.5 Intel Corporation Cannon Lake PCH SPI Controller [8086:a324] \-1f.6 Intel Corporation Ethernet Connection (7) I219-V [8086:15bc] root@DS920:~# It's very simple compared to DS918. If it's this simple, there's less twisting in the middle. With Jumkey's new PortMapping, it seems that Henol has become more stable and faster by reducing virtualization as much as possible.
-
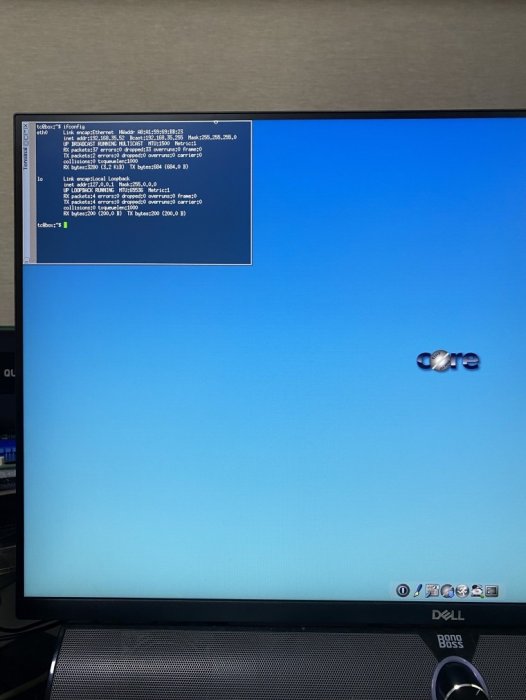
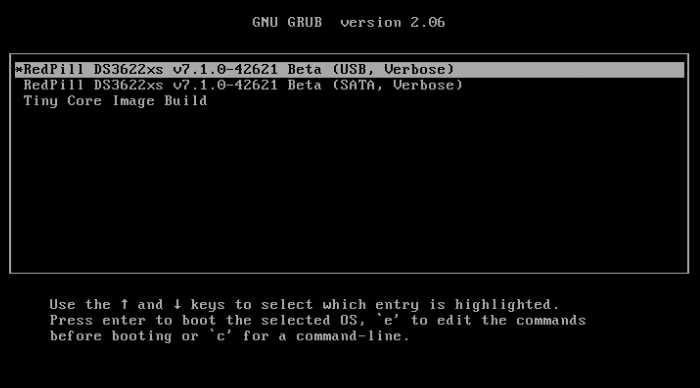
The approval of the new topic has been delayed so much that I share the full version 7.1 guide first. If you are using an existing 7.0.1 after the version of the Synology DSM was updated to 7.1, you may want to update to 7.1 or this is a guide for those who want to install 7.1 from the beginning. For those who are new to this article, I will share it with you by adding and subtracting it from the existing 7.0.1 guide. It is a translation from Korean to English using a translator. Please understand if there is a slight misunderstanding. Existing RedPill, released last year, can generate IMG files directly through the compilation process of the bootloader only if Linux is available separately In the case of tinyCore RedPill, it comes completely with tinyCore Linux in the form of a USB boot image It's much easier without having to install and prepare linux separately. You can add the drivers you want to build after you select them and add them directly. The latest version of tinycore supports a total of 7 models (DS3622xs+/DS918+/DS3615xs/DS3617xs/DS1621+/DS920+/DVA3221) You can continuously change the boot loader on your own without re-imaging it (model/sn/mac, etc.) Tinycore supports both img for native installation and vmdk for virtual environments. 1.Preparing Bootloader IMG Use the Download button in the middle of the beam link below.Download the gz file In it 0.4.6 version img.You can decompress the gz file one more time and use the img file. (Full File) https://github.com/pocopico/tinycore-redpill (for LEGACY / EFI) https://github.com/pocopico/tinycore-redpill/raw/main/tinycore-redpill.v0.4.6.img.gz (for VMWARE) https://github.com/pocopico/tinycore-redpill/raw/main/tinycore-redpill.v0.4.6.vmdk.gz 2. Bootloader IMG File USB Recording Use the above tinycore-redfill.v0.4.6.img file to burn it with USB with a convenient image tool such as WinImage or Rufus. You don't need to adjust the configuration file in advance to modify the VID/PID/Serial/MAC/SATAPortMap like the JUN loader. If you want to create a USB image on a Mac or Linux like me, you can use the DD command below in the terminal. (Assuming that the DEVICE ID of the USB verified by diskutil is disk4) sudo diskutil unmountDisk /dev/disk4 sudo dd if=/Users/MyAccount/Downloads/tinycore-redpill.v0.4.5.img of=/dev/disk4 bs=1m sudo diskutil eject /dev/disk4 3.Starting TinyCore Linux USB boot by plugging it into a PC for xpenology (UEFI 1 partition or USB CSM can be booted) The tinyCore Linux (tinyCore Image Build menu) is running and appears. Run the far right icon terminal app here. Check the ip address automatically assigned an en0 LAN card with ifconfig. [tinyCore Linux Screen] 4. Adjust CONFIG after SSH connection ( In fact, the command is executed in number 7 below, and this is a preliminary explanation. ) Ssh connection with putty etc. from PC other than xpenology. ( id:tc / pass : P@ssw0rd ) I'm connecting. Tinycore Redfill is stabilizing right now PocoPico, the original author of this program, fixes bugs from time to time and announces rebuilding. There's a possibility that this rebuild will happen from time to time Even with the final image version of 0.4.6, changes can still be updated in real time over the Internet. Sometimes the rploader.sh file itself changes if there is a bug. If you've migrated from JUN xpenology, at tc@box:~$user_config.json Existing grub such as VID/PID/Sn/Mac/SataPortMap in user_config.json file.Refer to the cfg and move it as it is. For new installers, perform serial GEN/USB VID, PID auto-detect, SataPortMap auto-detect, etc. as shown below. For the next process, I will share the command focusing on the platform that I have completed the most normal verification. tc@box:~$./rploader.sh serialgen (select one from DS3622x+/DS918+/DS3615xs/DS3617xs/DS1621+/DS920+/DV3221) tc@box:~$ ./rploader.sh identifyusb now tc@box:~$./rploader.sh satamap now (no HBA card user required) You can see that the contents of user_config.json have been changed automatically. Finally, the commonality of existing users and new installers is tc@box:~$catuser_config.json If you assume that there are 4 internal Sata ports, SataPortMap = "4", DiskIdxMap = "00" Please check if it's changed to the back. After find.synology.com, you may not be able to find SATA HDDs during DSM installation. The following is an example of a 6-port SATA additional expansion card. SataPortMap = "46", DiskIdxMap = "0000" (Except for those who use H200, H310, H710, etc. cards, you don't have to clear the options for this SataPortMap and DiskIdxMap itself and use it. Please erase the lines of the above two options with the vi editor and organize them well so that there are no Syntex errors. Of course. ./rploader.sh satamap now command is not required.) 5.BIOS Internal SATA Port Hot Plug disable -> enable Handling (Important) To avoid temporarily reducing the number of SATA PortMap maps set above by the number of HDDs physically connected by the Sata cable during the DSM installation process: Make sure to turn on the Hot Plug function. This reduces the probability of encountering an error message stating that the above automatically recognizes the number of SATAPortMaps and the HDD is not found. Please refer to the link below for the relevant details highlighted by TheSTREET. http://www.2cpu.co.kr/nas/37891 6.Add boot loader extension driver after SSH connection (optional) 7.Build Boot Loader After SSH Connection (Two Step Update - TSU) If you are done adding the above extension drivers, build the bootloader at the end. After 7.0.1 build, check if the custom-module -> /mnt/sdb3/auxfiles directory is created well with the ll command. Without this directory, the second 7.1.0 build will fail. If you do not see the custom-module -> /mnt/sdb3/auxfiles directory, Please do the 7.0.1 build again. [DS3622xs+] ./rploader.sh update now ./rploader.sh fullupgrade now ./rploader.sh serialgen DS3622xs+ ./rploader.sh identifyusb now ./rploader.sh satamap now ./rploader.sh build broadwellnk-7.0.1-42218 (run if custom-module -> /mnt/sdb3/auxfiles is missing) ll /mnt. (Check the 3rd partition in usb) sudo ln -s /mnt/sdb3/auxfiles /home/tc/custom-module ./rploader.sh clean now ./rploader.sh build broadwellnk-7.1.0-42661 ./rploader.sh clean now; rm -rf /mnt/sdb3/auxfiles; rm -rf /home/tc/custom-module; ./rploader.sh backup now; [DS918+] ./rploader.sh update now ./rploader.sh fullupgrade now ./rploader.sh serialgen DS918+ ./rploader.sh identifyusb now ./rploader.sh satamap now ./rploader.sh build apollolake-7.0.1-42218 (run if custom-module -> /mnt/sdb3/auxfiles is missing) ll /mnt. (Check the 3rd partition in usb) sudo ln -s /mnt/sdb3/auxfiles /home/tc/custom-module ./rploader.sh clean now ./rploader.sh build apollolake-7.1.0-42661 ./rploader.sh clean now; rm -rf /mnt/sdb3/auxfiles; rm -rf /home/tc/custom-module; ./rploader.sh backup now; [DS3615xs] ./rploader.sh update now ./rploader.sh fullupgrade now ./rploader.sh serialgen DS3615xs ./rploader.sh identifyusb now ./rploader.sh satamap now ./rploader.sh build bromolow-7.0.1-42218 (run if custom-module -> /mnt/sdb3/auxfiles is missing) ll /mnt. (Check the 3rd partition in usb) sudo ln -s /mnt/sdb3/auxfiles /home/tc/custom-module ./rploader.sh clean now ./rploader.sh build bromolow-7.1.0-42661 ./rploader.sh clean now; rm -rf /mnt/sdb3/auxfiles; rm -rf /home/tc/custom-module; ./rploader.sh backup now; [DVA3221] ./rploader.sh update now ./rploader.sh fullupgrade now ./rploader.sh serialgen DVA3221 ./rploader.sh identifyusb now ./rploader.sh satamap now ./rploader.sh build denverton-7.0.1-42218 (run if custom-module -> /mnt/sdb3/auxfiles is missing) ll /mnt. (Check the 3rd partition in usb) sudo ln -s /mnt/sdb3/auxfiles /home/tc/custom-module ./rploader.sh clean now ./rploader.sh build denverton-7.1.0-42661 ./rploader.sh clean now; rm -rf /mnt/sdb3/auxfiles; rm -rf /home/tc/custom-module; ./rploader.sh backup now; The last line doesn't get restored even if you reboot later It is the process of organizing the folders where the pat file exists and reducing the capacity and completing the backup. 8-1.Using the bootloader (update user) tc@box:~$ sudo poweroff Place the 7.1 bootloader on the bottom well In the existing 7.0.1 henol boot state, obtain the DSM 7.1.0-42661.pat file separately from the Sinology Download Center https://www.synology.com/ko-kr/support/download Click the Control Panel -> Update and Restore -> DSM Update -> Manual DSM Update button and proceed with the update to the prepared pat file above. If you are asked to wait 10 minutes after the update, use the telnet connection method that appears in the NAS column by searching for the title telnet I'll power off. -> using putty and telnet it using user=root without password. after you type root then enter, it will goes to linux prompt. By the way, if there are a lot of actual packages installed, it says that you have to wait 20 minutes. Very few packages appear to wait 10 minutes. If you don't want to let me go to the Wi-Telnet connection process, check the monitor to see if you want to power down when rebooting or when rebooting I think you can change it quickly to enter TC Linux. Replace the USB with the 7.1 boot loader prepared above and proceed with the boot You can use it. (There's nothing else I can do for you.) If you want to update from 7.0.1 to 7.1, Process 8-1 in the guide above, and if you're using it, boot from USB and enter Tinycore Linux again You can start from number 3. Tynicore Linux is the third menu, so you have to switch quickly in 4 seconds. This is a method that can be carried out without preparing one more USB memory, but the existing 7.0.1 boot loader may be erased You can use the new functions, backuploader now and restoreloader now action 8-2.Use bootloader (new installer) After successfully completing the build above, reboot the xpenology with USB using the command below. tc@box:~$ sudo reboot The settings or ext drivers that were backed up remain the same The setting values are restored from the mydata.tgz file and remain intact at the next Tiny Core Image Build boot for modification. (The default setting for automatic entry within 4 seconds is USB, Verbose at the top. If you don't touch it with your keyboard, it will automatically enter USB mode.) xpenology On-Screen After PC Boots In the case of the existing RedPill, you will be asked to find it at find.synology.com like the existing Jun loader For this tinyCore, Decompressing Linux... Parsing ELF... done. Booting the kernel. This is the message. There is a delay of 1 to 2 minutes from the IP allocation, so please wait a little bit. In this state, browse to find.synology.com on another PC and you will find the xpenology IP. After that, you can proceed with the installation process of the Synology DSM as you are working on the existing xpenology.
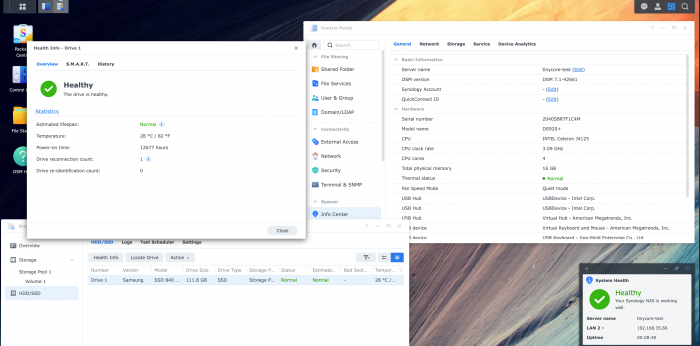
.png.50b0d36133540c283ba5be895a284d76.png)
-

Tinycore Redpill Support Tool (tr_st v2.9.0-r02)
pvlier replied to FOXBI's topic in Software Modding
HI, I'm trying to get a HPE Microserver Gen8 With a G1610T cpu running with DSM 7.1. I've set the internal raidcontroller to AHCI. There are 2 disks present and show at boot. I performed the named steps: - create usb from tinycore 0.46 - boot server to tinycore OS - open shell - run "sudo ./rploader.sh serialgen DS3622xs+ now" (save in configfile) - run "sudo ./rploader.sh identifyusb now" (save in configfile) - run "ifconfig" -> write macadresses to config file (as mac1 and mac2) - change "SataPortMap" to "9", "DiskIdxMap" to "0" in config file - download script : "wget https://github.com/FOXBI/tr_st/raw/main/tr_st.sh" - chmod 755 tr_st.sh - run script: ./tr_st.sh I confirm all steps according to the but it seems there are several downloads repeated and I get questions that aren't in the video or text description. I can see the disks as SDA and SDB when running "fdisk -l". At the end I reboot the server and boot the USB option from the grub menu. I can then load the webpage and view the setupscreen. I choose to install the .pat file but when it completes and reboot I get to the setupscreen again. Installing again files, I have to clear partitions on the disks to continue. (additionally, I get an error now at the setup screen that disks 7,8 and 9 have errors... I only have two disks....) -
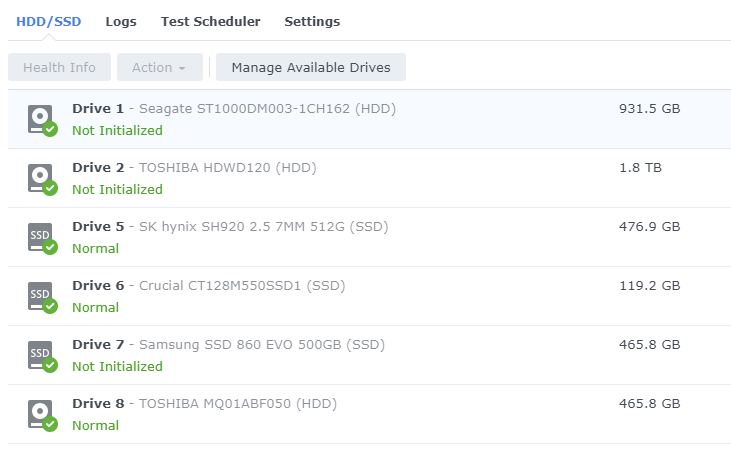
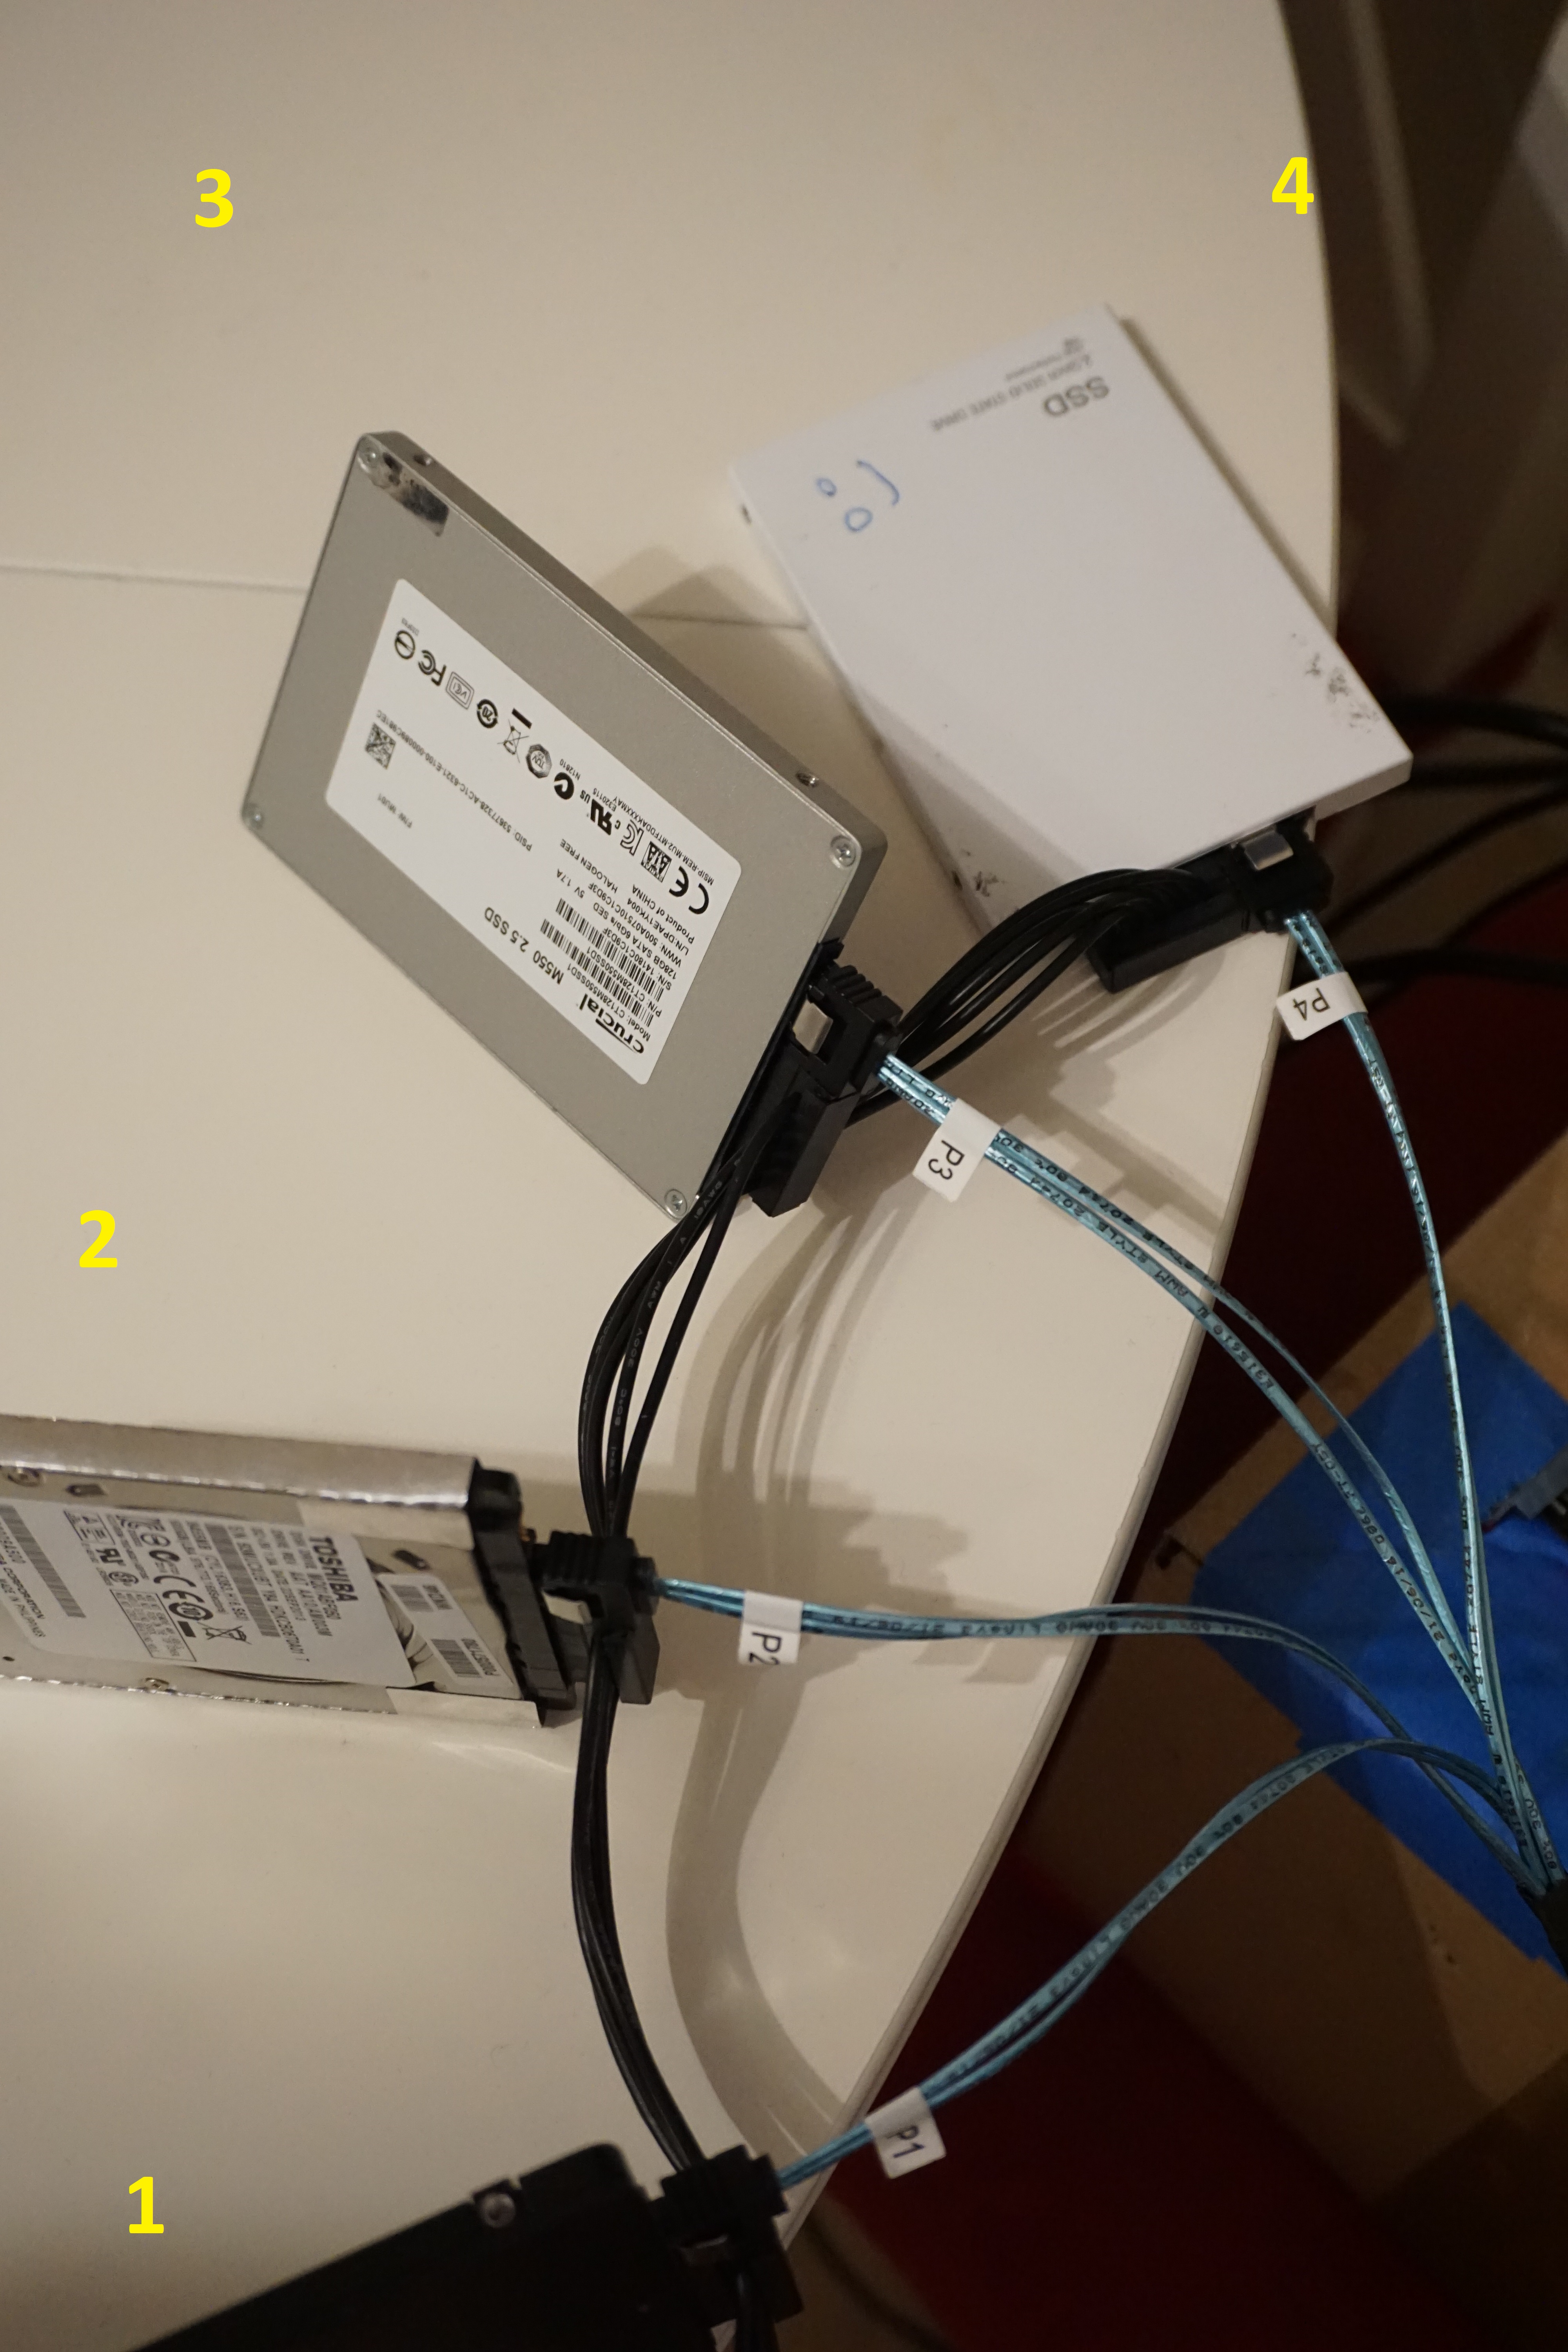
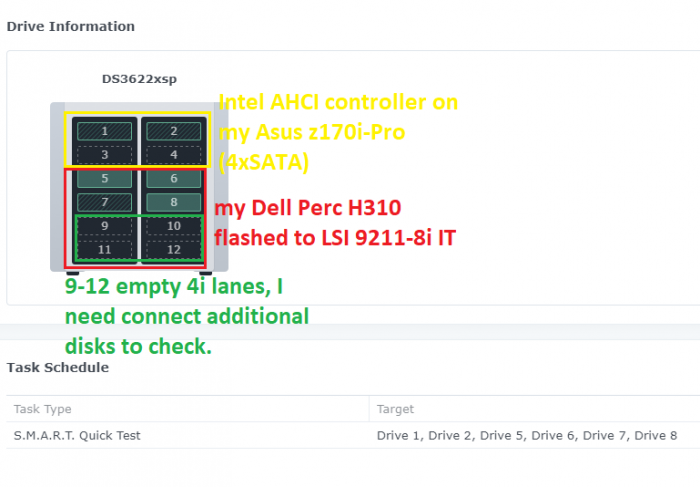
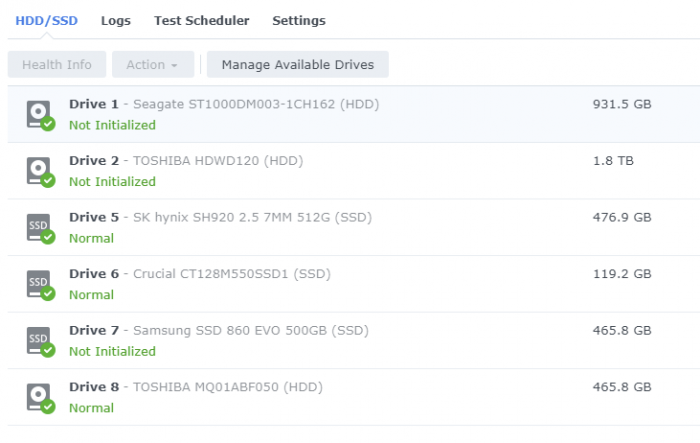
I think I found correct settings for my test build. I have got in total 6 disks, (3 HDD and 3 SSDs) 2 HDDs I connected to SATA1 and SATA2 ports on my motherboard, (still I have two empty ports) 3 SSDs and 1 HDD I connected to my SAS controller. I edited grub.cfg file SataPortMap 48 and DiskIdxMap 0005 and after reboot I can see that everything seems to be in order. The only minor problem is with (I think) SAS cable, Each individual disk cable has got own label form P1-P4. I am not quite sure why disk which is connected to P1 (I assume should be first) but is 3rd in my Storage Manager. Instead Drive 5 - SK hynix SH920 (connected to P4) I would expect Samsung 860 Evo (connected to P1) Similar situation is with Toshiba MQ001ABF050 and Crucial. Everything is swapped. I am not quite sure if this is big deal, or maybe controller recognizes disks in own order rather than cable labels.

-
- Outcome of the update: SUCCESSFUL - DSM version prior update: DSM 6.2.3-25426 Update 3 - Jun's 1.03b bootloader - Loader version and model: RedPill DS3615xs v7.0.1-42218 update 2 (TyniCore) - Using custom extra.lzma: NO - Installation type: BAREMETAL - ASRock Rack C2750D4I - Additional comments: I had to physically remove the Intel X520-DA2 10GbE SPF+ PCI-Express card. to succesfully install xpenology. After installation i could insert the Intel X520-DA2 again. Loaded the driver "ixgbe" for this. sudo ./rploader.sh satamap now HBA: 00:03.0 Disks : 2 HBA: 00:04.0 Disks : 10 HBA: 00:17.0 Disks : 2 HBA: 00:18.0 Disks : 2 SataPortMap=21022 DiskIdxMap=000A0C0E
-

Переход на 7.X.X с помощью tinycore-redpill
use-nas replied to Olegin's topic in Програмное обеспечение
SataPortMap=6 DiskIdxMap=00 попробуй или вообще удали а что на 1 сата? и выхлоп lsscsi -Hv lspci -nnq -

Переход на 7.X.X с помощью tinycore-redpill
AlexSoft_58 replied to Olegin's topic in Програмное обеспечение
Вот что выводит команда tc@box:~$ sudo ./rploader.sh satamap now HBA: 00:17.0 Disks : 6 HBA: 00:1b.3 Disks : 2 ls: cannot access '/sys/devices/pci0000:00/0000:00:1b.4/0000:04:00.0/port*': No such file or directory HBA: 00:1b.4 Disks : 0 ls: cannot access '/sys/devices/pci0000:00/0000:00:1b.4/0000:04:00.0/port*': No such file or directory ls: cannot access '/sys/devices/pci0000:00/0000:00:1d.0/0000:06:00.0/port*': No such file or directory HBA: 00:1d.0 Disks : 0 ls: cannot access '/sys/devices/pci0000:00/0000:00:1d.0/0000:06:00.0/port*': No such file or directory SataPortMap=6200 DiskIdxMap=00020304 -
@pocopico I had similar problem as @blindspot did.... I used the satamap command and got "sataportmap=2 and diskidxmap=00" and got similar error build 3622xs 7.1.0-42661. I changed sataportmap=1 and was able to see 1 hdd. I removed sataportmap line and was able to see 2 hdd. The board has 4 ports, couldn't get 3 and 4 to show a connected hdd. Was there ever a solution to this problem?