flyride
-
Posts
2,438 -
Joined
-
Last visited
-
Days Won
127
Everything posted by flyride
-
@leang521 This issue was fixed recently in script. PocoPico is correct but you may not want to do manually. if you run ./rploader.sh update now (to get the latest script) and ./rploader.sh satamap now it will fix it automatically.
-
KVM and SATAMAP testing with RedPill - discoveries
flyride replied to flyride's topic in Developer Discussion Room
Yes, that is also correct. It loaded the scsi module and displayed the scsi controller. We have determined that satamap/diskidxmap don't affect SCSI at all, so there is no point in asking you about it. -
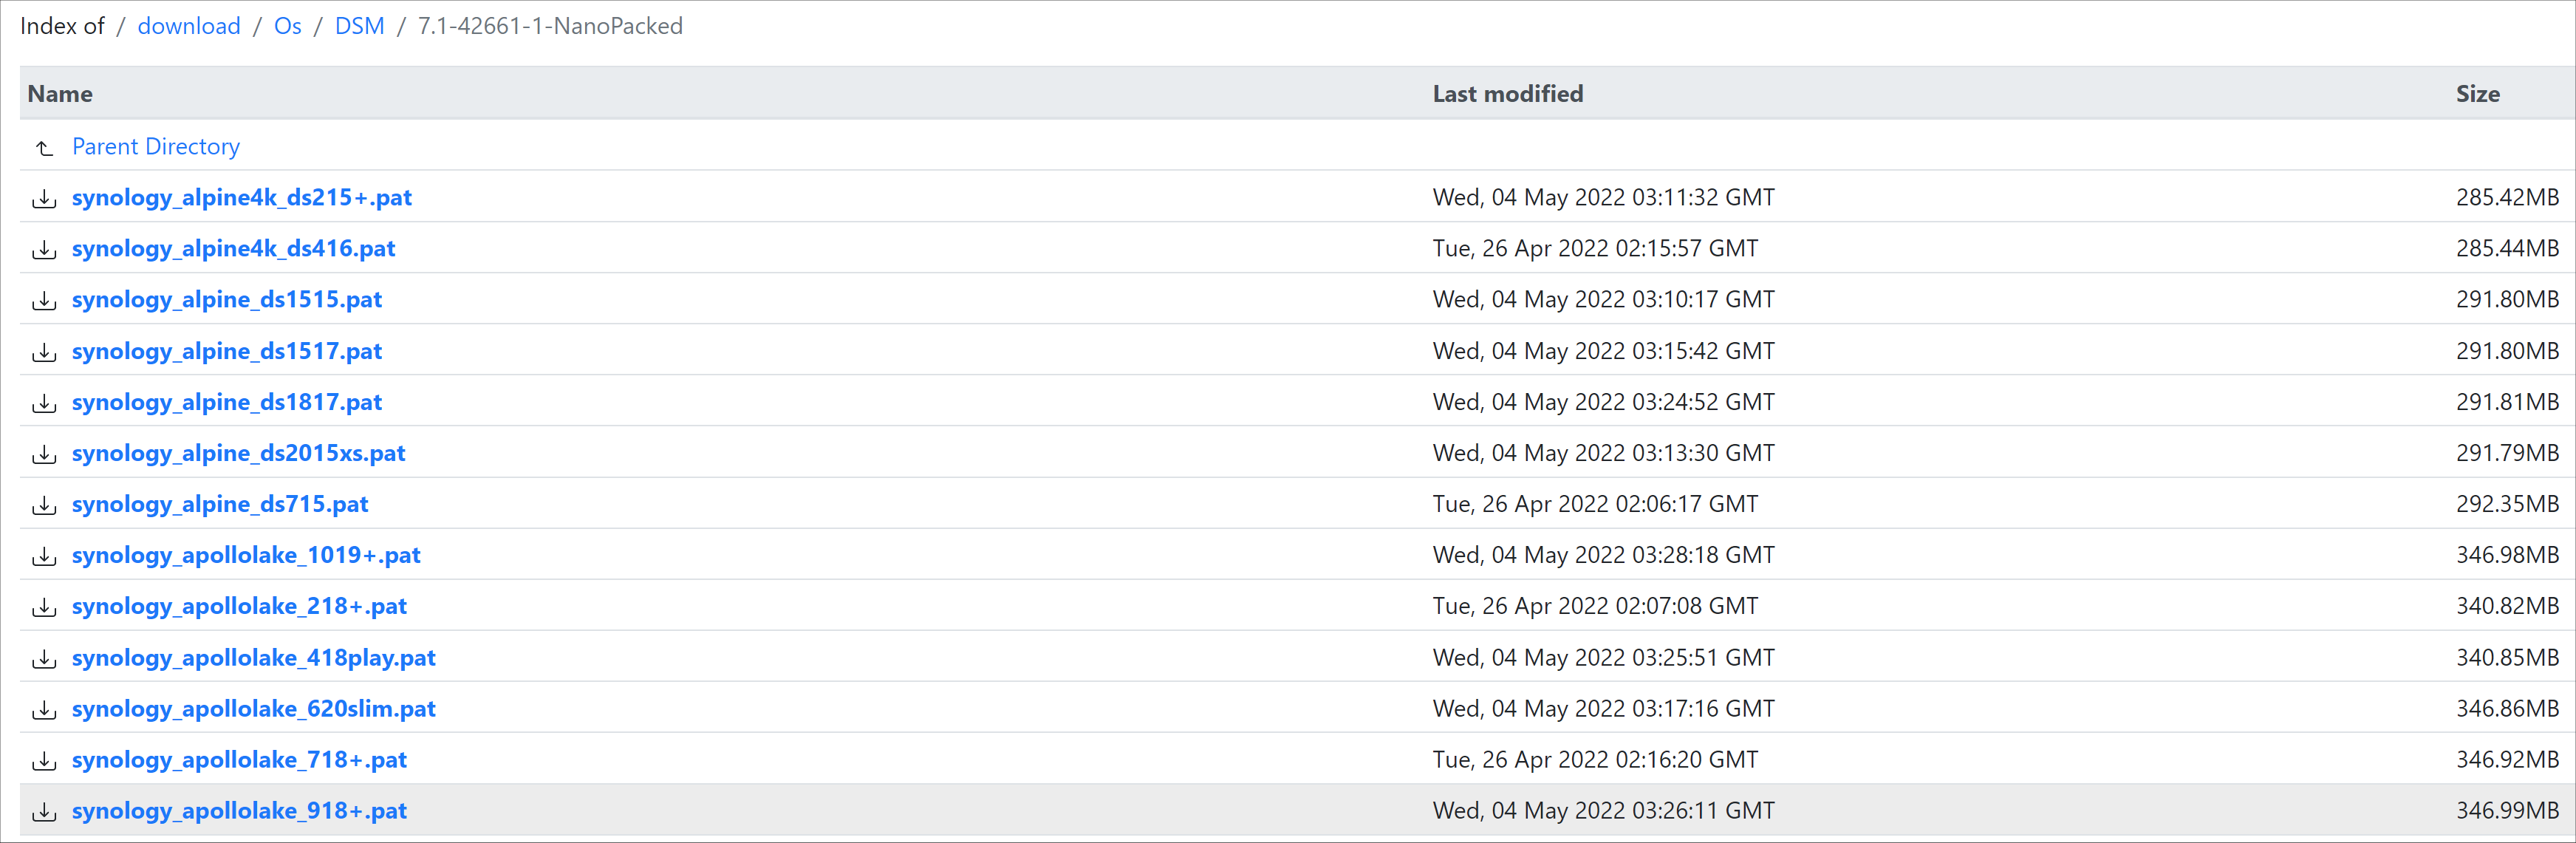
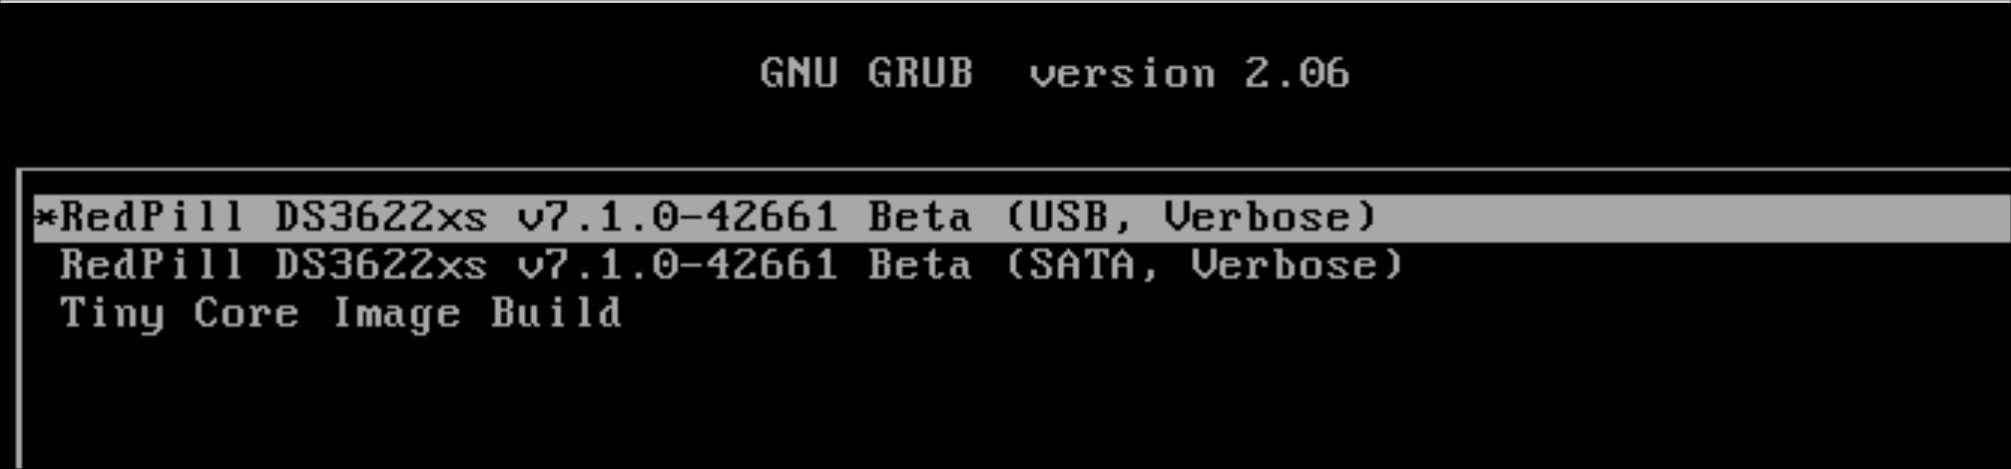
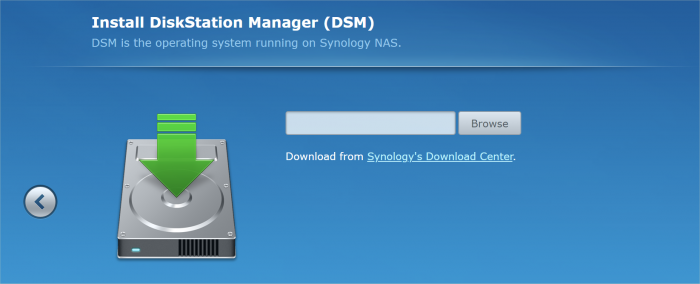
Loader Information and Background RedPill is the core technology that enables DSM 7.x to run on non-Synology hardware. This post is intended to serve as a definitive tutorial/reference for configuring @pocopico's TinyCore RedPill (TCRP) loader. It explains how to install TCRP on baremetal, i.e. with DSM as the only operating system on your NAS hardware. A tutorial to install TCRP using the ESXi hypervisor is located here. There are other hypervisor tutorials in the Tutorials and Guides forum. TCRP uses a two step-process. First, a Linux OS (TinyCore) boots and evaluates the NAS hardware configuration. Therefore, it is best to have the hardware you plan to use (disk controllers and network cards in particular) installed prior to starting the TCRP setup. Then, an individualized loader (RedPill) is created. This loader is used to install and run DSM. After that, you can switch between starting DSM with RedPill, and booting back into TinyCore to adjust and rebuild the loader as needed. Basic Linux command line skills are needed to complete the installation. The tutorial provides examples of the commands that are needed, but exact syntax and capitalization are critical. If unfamiliar, research and review the following minimal list of commands: ls show the files in the current directory cat <file> show the contents of the specified file pwd show the current directory name cd <directory path> change to the specified directory (same rules as Windows, except with forward slashes instead of backslashes). With no argument, it returns to the “home” TCRP directory vi <file> a file editor, for manual editing of configuration files if required Ongoing Development This tutorial is maintained for consistency with the pocopico stable repository. Since TCRP is completely open-sourced, anyone can fork their own repo and contribute to development, and pocopico now maintains a separate development repo. As the best features and ideas are fully vetted and tested, they may be incorporated into the stable repo over time. If you use a repo, script or shell other than the pocopico stable repo, the loader may behave quite differently and the instructions and troubleshooting steps in this tutorial might no longer apply. In an open-source community, you can use any development resource you want, but you add the additional responsibility of understanding, vetting and testing that code on your system. Migration Step 1. Choose a DSM Platform/Architecture Evaluate your intended NAS hardware and your the intended use of DSM, and select a platform that best meets your needs. Reference information here: https://xpenology.com/forum/topic/61634-dsm-7x-loaders-and-platforms/ Write down the selected platform (e.g. DS918+), the corresponding architecture (e.g. apollolake) and whether the platform uses SataPortMap/DiskIdxMap or Device Tree for slot mapping. This information will be needed later. Now, make sure the NAS hardware is compatible, and prepare it correctly: x86-64-compatible CPU with two cores or more Each platform have maximum threads support! Any threads in excess will be ignored For certain platforms, Intel CPUs must be 4th generation “Haswell” or newer with FMA3 instruction set The corresponding AMD CPU architecture is “Piledriver” or newer AMD-based systems may require deactivation of the C1E option in the BIOS 2GB of RAM or more 2GB or larger USB flash drive Configure the BIOS to boot from the USB flash drive ONLY SATA disk controllers are preferred, but SCSI/SAS are compatible IMPORTANT: All SATA controllers must be configured to AHCI mode SATA controllers with port multipliers are not compatible ATA controllers are not compatible (disable embedded ATA in BIOS if possible) At least one SATA/SCSI/SAS drive (HDD or SSD), minimum size 21GB IMPORTANT: Enable SATA port hotplug on each disk port, if hotplug is supported by the BIOS/controller IMPORTANT: Disable M.2 SATA ports that are not in use, if supported by the BIOS/controller NVMe drives are not usable except as dedicated cache devices Host Bus Adapters are not currently compatible with Device Tree platforms Install any NVMe drives intended as cache devices On Device Tree platforms, NVMe drives must be installed prior to loader installation in order for them to be recognized Step 2. Download TCRP and Write Image to the USB Flash Drive The latest pocopico stable loader code is always linked here: https://xpenology.com/forum/topic/7848-links-to-loaders/ Download the tinycore-redpill 7.x loader and save it to your personal computer. Then, open it with a zip manager to show the boot images: tinycore-redpill.vX.X.X.img.gz (for BIOS/CSM/Legacy boot from USB flash drive) tinycore-redpill-uefi.vX.X.X.img.gz (for UEFI/EFI boot from USB flash drive) tinycore-redpill.vX.X.X.vmdk.gz (for virtual machine SATABOOT from disk image) Select the boot image that matches the boot capability of the NAS motherboard. If unsure, choose BIOS/CSM/Legacy boot. Save the gzip file to your personal computer, then open it with a zip archive manager and save the uncompressed version. Write the uncompressed image to the USB flash drive using Win32DiskImager or other appropriate tool. The USB flash drive is used to store TinyCore and the RedPill loader that it generates. It is a permanent component of an operational XPEnology system. Do not remove it, even after the DSM installation is complete and the NAS is fully up and running. Step 3. Boot into TinyCore and Complete Pre-Configuration Updates Start your NAS with the USB flash drive installed and TinyCore will boot. Then, launch a command-line session with either of these methods: Click the Terminal icon at the bottom right of the TinyCore desktop to launch a console window Use a ssh client (e.g. PuTTY) on your computer to connect a network-based console Consult your DHCP server/router for the IP address assignment (TinyCore's host name is "box") Login credentials: tc/P@ssw0rd When the Linux command line prompt ($) is displayed, update the TCRP script ./rploader.sh update Checking Internet Access -> OK Checking if a newer version exists -> There is a newer version on the repo should we use that ? [yY/nN] Y OK, updating, please re-run after updating Updating tinycore loader with latest updates Backing up files to /mnt/sda3//mydata.tgz Then, update the TCRP support files ./rploader.sh fullupgrade <downloads snipped> Current /home/tc size is 114M , try to keep it less than 1GB as it might not fit into your image Should i update the sda with your current files [Yy/Nn] Y Backing up home files to sda : Backing up files to /mnt/sda3//mydata.tgz Finally, choose a DSM release number Each DSM build as provided by Synology has a release number. You can display the combinations of platforms and releases supported by TCRP by just running the script with no arguments ./rploader.sh <command help snipped> Available platform versions: ---------------------------------------------------------------------------------------- apollolake-7.0-41890 apollolake-7.0.1-42218 apollolake-7.1.0-42661 broadwell-7.0.1-42218 broadwell-7.1.0-42661 broadwellnk-7.0.1-42218 broadwellnk-7.1.0-42661 bromolow-7.0.1-42218 bromolow-7.1.0-42661 denverton-7.0.1-42218 denverton-7.1.0-42661 geminilake-7.0.1-42218 geminilake-7.1.0-42661 v1000-7.0.1-42218 v1000-7.1.0-42661 Step 4. Configure System-Specific Parameters Custom system parameters are stored in the user_config.json file. This can be manually edited, or TCRP can help determine appropriate values for the hardware. USB flash drive VID/PID: TCRP can query the USB flash drive for the hardware vid/pid values that DSM uses to identify the loader during bootup ./rploader.sh identifyusb Found: Superdisk Flash SerialNumber: 123456 Vendor ID: 0x1234 Product ID: 0x0001 Should i update the user_config.json with these values ? [Yy/Nn] Y Serial number/MAC: TCRP can automatically generate a serial number for the platform selected in step 1. Additionally, it will generate a random MAC address for the NAS network card. If you prefer to use the actual hardware MAC address instead, append "realmac" to the command. Example 1: random MAC address ./rploader.sh serialgen DS3622xs+ Serial Number for Model : 20C0SQRLR47QM Mac Address for Model DS3622xs+ : 00:11:32:80:B2:36 Should i update the user_config.json with these values ? [Yy/Nn] Y Example 2: real MAC address ./rploader.sh serialgen DS3622xs+ realmac Serial Number for Model : 2150SQRGS7N5T Mac Address for Model DS3622xs+ : 00:11:32:57:3A:9B Real Mac Address : 00:0C:24:62:3E:3D Notice : realmac option is requested, real mac will be used Should i update the user_config.json with these values ? [Yy/Nn] Y Drive Slot Mapping: TCRP can try to determine how to map the NAS disk controller ports to DSM slots. If the chosen platform uses SataPortMap/DiskIdxMap for port mapping, the command below will do this. If it uses Device Tree for slot mapping, the command may be skipped, as the Device Tree is configured automatically during the loader build. ./rploader.sh satamap Found "02:02.0 SATA AHCI controller" Detected 4 ports/2 drives. Override # of ports or ENTER to accept: <4> Recommended settings: SataPortMap=4 DiskIdxMap=00 Should I update the user_config with these values ? [Yy/Nn] Y If the port count is not what you expect, it may be due to the motherboard design servicing physical ports with multiple controllers, or because of M.2 SATA slot support. If necessary, the port count can be overridden with whatever you like. NOTE: If you see a WARNING message, it is certain that either some of your drives are inaccessible or the DSM install will encounter problems. Evaluate and investigate the issue. The satamap command can be rerun as many times as needed to understand the system. Manual Review: With prior loaders (such as Jun's), the configuration of these parameters was completely manual. There is no single setup that works for all hardware. Even after using the tools above, please review and verify the parameters, understand what they do, and manually edit if needed. Whatever changes rploader.sh makes to the user_config.json file can be reviewed by displaying the file contents cat user_config.json and overridden by editing the file vi user_config.json You can also add a simpler editor, nano tce-load -iw nano nano user_config.json And there is also a graphical editor accessible from the TinyCore desktop Step 5. Optional: Manually Add Driver Extensions While TCRP can automatically add drivers based on the detected NAS hardware, it isn’t foolproof. You might want to build a loader for a device you don’t actually have yet. And there are features that are "opt-in" only. So, a process exists to manually add drivers and other functionality. Extensions are stored in repositories hosted on the web. All the extensions in the main repository are viewable here: https://github.com/pocopico/rp-ext To list all the extensions recommended by TCRP's hardware detection algorithm, use ./rploader.sh listmods <architecture>-<version>-<DSMreleasenumber> ./rploader.sh listmods apollolake-7.1.0-42661 To add a specific extension, choose from the list and reference the architecture from Step 1. ./rploader.sh ext <architecture>-<version>-<DSMreleasenumber> <extensionurl> ./rploader.sh ext apollolake-7.1.0-42661 add https://raw.githubusercontent.com/pocopico/rp-ext/master/redpill-acpid/rpext-index.json ./rploader.sh ext denverton-7.1.0-42661 add https://raw.githubusercontent.com/pocopico/rp-ext/master/v9fs/rpext-index.json The examples illustrate adding ACPI and VIRTIO support. These are often chosen enhancements to a basic installation. Step 6. Build the Loader When all preparation steps are complete, build the loader using the command structure ./rploader.sh build <architecture>-<version>-<DSMreleasenumber> Example #1: DS3622xs+, auto detect hardware ./rploader.sh build broadwellnk-7.1.0-42661 Example #2: DS918+, use preselected drivers ./rploader.sh build apollolake-7.1.0-42661 manual TCRP will download resources from the Internet to complete the complex process of the loader build. When finished, it will write it to the USB flash drive and add new items to the GRUB boot menu. Review the output for any errors and make corrections if necessary. Step 7. Optional Backup Tasks Save the TinyCore configuration state as the default, so that the next boot of TInyCore starts with all your settings ./rploader.sh backup Back up the generated RedPill loader partition to available space on the USB flash drive ./rploader.sh backuploader Step 8: Restart and Boot DSM Using the Grub USB Option Cleanly shutdown and reboot with the TinyCore command exitcheck.sh reboot First, the GRUB Menu is displayed. If necessary, use the arrow keys to ensure that USB is selected and press ENTER. The loader will show some initialization information and silently boot DSM. Nothing else will be displayed unless a serial console is attached (see the Troubleshooting section below). Wait a few minutes, then launch either https://find.synology.com or the Synology Assistant desktop utility. If the loader is working properly, a new "SynologyNAS" will be displayed as Not installed (for a new build) or the name of your existing Migratable NAS (if upgrading from a previous version). Use your browser to connect to the NAS. If "Something went wrong" is displayed, jump to the Basic Troubleshooting section below. Otherwise, browse to the Synology Download Center and download the DSM install PAT file that matches the platform and release number specified in the loader build. Do not use the PAT file stored in TinyCore. It has modifications that are incompatible with DSM installation. However, its name may help identify the correct PAT file to download below. There can be several files that appear to be candidates. PAT files marked VirtualDSM will not work. Also there can be patch PAT files with the same numbering. These will not work and will usually be smaller than 50MB. The correct PAT file is 300MB or larger. Once the correct DSM PAT file is saved to your personal computer, upload it to the NAS. Follow the prompts to complete the installation. FOR UPGRADES ONLY: If Synology Assistant shows Not installed, or if prompted to erase the disks during the upgrade, STOP! Some or all of your array disks are not visible to DSM. This must be resolved via troubleshooting and reconfiguration before installing DSM 7.x. IMPORTANT: During the install, always select DSM manual updates. If a new install completes normally, but then fails after the reboot, it may be that DSM has attempted to auto-update itself with incompatible code. Basic Troubleshooting Where to Post for Help It’s easy for requests for installation help to get lost in various unrelated forum threads. Post requests for help as a new topic in the DSM Installation Forum. At a minimum, state the hardware configuration, selected platform, DSM version, user_config.json information (delete or redact the serial number and configured MAC address) and any information from debugging analysis that you have done. DON’T post general requests for help on this thread. Please DON’T post general requests for help on TCRP or RedPill development threads unless providing feedback on a dev issue.


- 156 replies
-
- 40
-

-

-
This isn't a troubleshooting request, it should not have this issue regardless of the environment. But I am using DS3622xs+ VM SATA boot in this case.
-
KVM and SATAMAP testing with RedPill - discoveries
flyride replied to flyride's topic in Developer Discussion Room
tc@box:~$ ./rploader.sh satamap now Machine is VIRTUAL Hypervisor=KVM Found "00:1f.2 Intel Corporation 82801IR/IO/IH (ICH9R/DO/DH) 6 port SATA Controller [AHCI mode] (rev 02)" 0 drive(s) connected. Reserving and disabling KVM q35 hardware model bogus controller Recommended settings: SataPortMap=1 DiskIdxMap=10 Should i update the user_config.json with these values ? [Yy/Nn] y This is exactly as expected as the bogus controller must have a satamap port assignment in order not to kernel panic. -
That is why I want to add the satamap query for disk controller ports to the dts computation. I also am interested in whether this can be a universal solution across all disk controllers. But that should be easy to test.
-
@pocopico @jumkey Tried a clean test install with DS3622xs+ with the TCRP 7.0.1-42218-JUN build and that works fine. Upgrading to 7.1.0-42661 results in a Recoverable system which won't move out of that state. Cannot install 7.0.1-42218-JUN directly to 42661 as it also results in Migratable, then Recoverable. Trying to refine the installation guidance around this development as I think pocopico wants it to be mainstream.
-
KVM and SATAMAP testing with RedPill - discoveries
flyride replied to flyride's topic in Developer Discussion Room
0.7.1.6 version of rploader.sh script (obtainable by ./rploader.sh update now) has implemented these enhancements. -
https://www.amazon.com/dp/B01B96248O https://www.asrockrack.com/general/productdetail.asp?Model=ROMED4ID-2T#Specifications https://www.newegg.com/p/pl?N=100007629 600009028 A lot more options with Micro ATX but you can find something from the above
-
RedPill TinyCore Loader Installation Guide for DSM 7.1 BareMetal
flyride replied to Peter Suh's topic in Tutorials and Guides
https://xpenology.com/forum/topic/61634-dsm-7x-loaders-and-platforms/ -
You said that you want silent, low power and cheap. SSD caching is overrated, but it's your system. Do some searches around here and elsewhere to see exactly how much value caching has. I actually have a J4105-ITX and have a PCIe to NVMe adapter in mine (there is a single PCIe 2.0 x1 slot) so that I can run NVMe cache. It's purely for testing purposes; it does absolutely nothing for performance, particularly considering my practical purpose for this system, which is data archive only.
-
That's a KP very early in the boot. Have you run DS918+ or DS920+ on this host? If not, what CPU is in the host? EDIT: found it a few posts back. Your E3-1270v2 is too old to run DV3221, DS918+ or DS920+
-
The AsRock J-series ITX motherboards are very close in spec to the DS9xx+ products.
-
Ivy Lake is "older" - it can run anything not marked Haswell Skylake is not. From an architecture perspective - it can run anything. You didn't mention what platform you are running now. But you may choose DS3617xs or DS3622xs+ interchangeably at this point. Regardless, you will be asked for a Migration Install and data and DSM configurations should be preserved. Always have a backup of your data. Any 6.x can upgrade directly to 7.0.1 or 7.1 with no issues. r8168 and e1000e are usually part of the core DSM support drivers. There is a library of drivers in TCRP; selections can be manually added or you can ask the build process to try and identify your hardware "./rploader.sh build <arch-version-release> auto" and add them as needed.
-
It does - I had no unusual issues installing with ESXi. Console does cut off as you state. If you are using KVM/q35 and a single virtual disk, configure the virtual disk to SATA, and try SataPortMap=11 and DiskIdxMap=1000. Also, the disk needs to be AT LEAST 21GB for the post-installation to complete and still create a shared folder.
-
KVM and SATAMAP testing with RedPill - discoveries
flyride replied to flyride's topic in Developer Discussion Room
Given your specific configuration with i440fx hardware emulation, I think you can put anything in SataPortMap and DiskIdxMap and it won't matter. TCRP will be updated to omit SCSI HBAs from device scanning to determine these values in the future. I would not worry about testing for performance. It makes sense there would be a difference. But whether that difference is meaningful? Hardware and CPU cycles are cheap. -
KVM and SATAMAP testing with RedPill - discoveries
flyride replied to flyride's topic in Developer Discussion Room
There are a lot of posts on the topic. I found this one that seems to answer my question. I'll amend my first post to indicate that passthrough system performance is a differentiator. https://altechnative.net/virtualized-windows-10-i440fx-vs-q35/#:~:text=For a long time%2C Q35,be PCI rather than PCIe. -
KVM and SATAMAP testing with RedPill - discoveries
flyride replied to flyride's topic in Developer Discussion Room
Are you passing through the entire HBA or are you mapping the HBA drives into the VirtIO controller? I was under the impression that a PCIe device passthrough wasn't functional since there is no PCIe bus in i440fx. -
It boots and the Surveillance Station suite loads without a graphics card. I don't know if there is full functionality however.
-
I don't think SasIdxMap is implemented on any of our platforms on any current DSM version. I do realize there is a very old Jun reference where it was purported to work, but I've never seen it used since. And, the definitive technical reference here does not refer to it at all.
-
I was away from the forum today while testing but check my post above - your results are identical to mine. Hopefully the writeup helps you a bit, and the rploader will improve to help provide functional configurations for these types of installs shortly.
-
-
I've been trying to sort out oddities reported in the TinyCore RedPill thread, and have completed some fairly exhaustive testing with the DS3622xs+ platform using ProxMox VE 7.2 (although I expect that these results would be consistent across all distributions of KVM code). Complaint: cannot get rid of a blank disk slot in Storage Manager while using LSI SCSI HBA. The issue was brought up by someone using a passthrough LSI SCSI HBA exclusively with no other disk controllers. But it isn't actually an LSI or even a KVM problem. It appears that all SCSI HBA's, whether physical or virtual, ignore the SataPortMap/DiskIdxMap logic, and add in at (total ports + 1) after all SATA controllers have been processed. When this happens, a status field is added to the device host in /sys/class: config SYNO_TRANS_HOST_TO_DISK bool "Transfer scsi host number to disk name and export to sysfs" default y help <DSM> #35892 Add an interface in sysfs to show disk name transfered from scsi host. usage: cat /sys/class/scsi_host/host*/syno_diskname_trans This behavior is confirmed on baremetal and ESXi as well. Most of the time, the ports line up and there isn't any apparent issue. Because of some idiosyncrasies with KVM (to be detailed below), it was very obvious in the single SCSI controller use case described above. I expect it's true for all non-SATA controllers/HBAs regardless of type. There is probably no simple fix, but we can partially mitigate it. Discovery: KVM seems to support SATABOOT / General SATABOOT discussion SATABOOT (i.e. booting from a disk image instead of a USB image) came along because ESXi cannot boot from a virtual USB key. So it is standard and required for ESXi installs on both RedPill and Jun loaders. I was able to confirm that RedPill SATABOOT was functional with KVM VM's. This is more diagnostic than practical, again for reasons you will see below. SATABOOT must be configured on a SATA controller (SCSI HBAs do not work). When RedPill encounters its loader as the boot device on a SATA controller, it "vanishes" that sd and replaces it with synoboot devices. With Jun's loader, the sd device continued to exist and was just unlinked in /dev and replaced with equivalent synoboot devices on the fly (a.k.a. in "userland"). This required a special DiskIdxMap after the MaxDisks limit so that the physical device wasn't accessible. That also meant that any other devices that were on that SATA controller were not mapped to usable ports. With RedPill, it's technically possible to use disks attached to the same controller as the SATABOOT device, but there will be a blank slot where RedPill vanished the SATABOOT sd. Since this leads to questions among some, it is best if no other devices are present on that SATA controller unless using a platform with Device Tree slot assignment (this is attempted to be enforced by rploader satamap via DiskIdxMap). Using SATABOOT and a SCSI controller (passthrough or virtual) will result in a "slot gap" as initially described because the SATABOOT device adds to total ports even if it is vanished. Since the SCSI controller often follows a SATA controller, the gap may not be obvious. Discovery: KVM hardware model behaviors: i440fx and q35 When you create a VM in any hypervisor, you must specify a virtual hardware template. In KVM, there are just two - i440fx and q35 i440fx is late 1990's era hardware emulation, but it does support ACPI so it is technically suitable for RedPill and DSM. Device passthrough is supported, but PCIe is emulated into PCI (since the chipset only supports PCI) which has some performance overhead. An Intel ACPI compliant SATA controller with 6 ports is emulated. Additional SATA controllers cannot be added. But the default controller for all disk types is VIrtIO SCSI as it is purported to be the most performant. It can be run in "single" mode where an individual controller is reserved for every disk, or a default mode supporting up to 14 disks on the one controller. q35 is circa-2007 hardware emulation supporting ACPI and modern PCIe virtual bus. It has somewhat better passthrough device performance. It has a quirk in that the hardware model ALWAYS includes an effectively broken SATA controller connected to an IDE bridge. It is not possible to connect devices to this controller. We should be able to ignore it except that both DSM and RedPill misbehave in its presence. Even though no disks can be attached to it, if we fail to specify an active port for it with SataPortMap, DSM will kernel panic during boot. We CAN do the Jun map trick to make sure the port mapping doesn't affect the rest of our devices. The same virtual SATA and SCSI disk controllers available on i440fx are available to q35. This allows us to run up to 6 disks on the virtual SATA controller, and 14 disks on the virtual SCSI controller, plus any passthrough physical devices. If we use q35 and a SCSI controller of any kind, we will experience a slot gap, because the required broken SATA controller port reservation adds to the total ports. If we also use SATABOOT, this will 1) preclude the use of virtual SATA disks and 2) create a second port gap prior to SCSI controllers. Summary of Findings: - Any KVM-based VM can use virtual SATA or passthrough SATA controllers, and they will work with no slot gap. - An i440fx VM can be used with a standard USB image and there will be no port gap regardless of the controller type. - rploader satamap needs to be updated to handle the q35 port reservation issue and some tweaks from the postscript below. Postscript Observation: apparent disk controller processing order (EDIT: this is conjecture, unable to create test conditions yet) If SATABOOT is active, that controller is processed first on DSM boot. Therefore we need to update satamap to query for vid/pid to see if we are trying to SATABOOT. This controller MUST be first in SataPortMap/DiskIdxMap, but it might not be the lowest ordered/"first" PCIe device. Otherwise I believe that SataPortMap/DiskIdxMap processes exclusively using low to high ordered PCIe addresses.
-
Yeah, except with that example they were "active" enough to display the PCI 106 SATA class, and on all my test systems they don't. I eventually dismissed them as they have no kernel modules active. I don't know that much about QEMU/Proxmox/KVM but it seems to have a thing for creating a lot of controllers, including one it mislabels as IDE but doesn't connect any devices to. ESXi has its warts but it seems to have so much more control over the hardware. Doing some experimentation now...
-
Real SN/MAC request
flyride replied to yanjun's topic in General Installation Questions/Discussions (non-hardware specific)
Sorry, but I believe this is in contravention to the terms of use: https://xpenology.com/forum/terms/