Jseinfeld
-
Posts
44 -
Joined
-
Last visited
Everything posted by Jseinfeld
-
- Outcome of the update: SUCCESSFUL - DSM version prior update: DSM 6.2.1-23824 Update 6 - Loader version and model: Jun's Loader v1.04b DS918+ - Using custom extra.lzma: Yes, v0.13.3 for 6.2.3 by IG-88 - https://xpenology.com/forum/topic/28321-driver-extension-jun-103b104b-for-dsm623-for-918-3615xs-3617xs/ - Installation type: BAREMETAL - J4105-ITX + 8GB RAM - Notes Updated the "extra.lzma & extra2.lzma" by SSH'ing in and mounting /dev/synoboot2. Replaced the old ones with the new "extra.lzma & extra2.lzma" files and unmounted the USB from DSM. After that it was just a manual install by uploading the .PAT file. Rebooted normally and the "/dev/dri/" was working the first time.
-
I think you'd need these extra files -
-
Yup, HW transcoding was buggy and would freeze. Removing that file, fixed it up
-
Thanks, that fix works for me too!
-
The script is designed to be automatic and only needs one small change initally. Change the "Highload" value to 65. More on why that needs to match the "midload" value below. - Save it to your home folder - Make it executable - `chmod +x <scriptname.sh>` - e.g: - `chmod +x scaling.sh` - Run the script (in background) - `./<scriptname.sh> &` - e.g: - `./scaling.sh &` - By default the script is set to do this ---- Set CPU Speed to lowest value, it can support, at below 50% load ---- Set CPU Speed to 50% value, it can support, above 50% & below 65% load ---- Set CPU Speed to 100% value, it can support, at above 85% load. (This needs to match midload i.e 65%, as the script will not change CPU between mid & highload) - Before you go changing any values, I would suggest trying the script out first. See if the machine seems "fast" enough. If not, then change those "lowload", "midload" & "highload" values. => For example, if you want it to be "snappy", set the "lowload" value to say 5% load, "midload" to say 50% and "highload" to say 50%. This will keep your CPU at lowest below 5% CPU usage, at 50% speed till 50% load and at 100% speed above 50% load => If you want it extra "snappy" - set the "lowload" value to say 5% load, "midload" to say 15% and "highload" to say 15%. This will keep your CPU at lowest below 5% CPU usage, at 50% speed till 15% load and at 100% speed above 15% load NOTE: - CPU Speed is gathered from the CPU supported values, so it auto-adjusts to your CPU - The script will do NOTHING when CPU is between "midload" & "highload". Thus they need to be set to the SAME VALUE.
-
I would be more than happy to volunteer my J4105-ITX & time to to this, if you have any ideas. I tried the exact instructions as in the signature of real3x, but on 6.2.1-23824 it doesn't appear to work. I lose the "/dev/dri" folders if I replace the stock "extra.lzma"
-
So wait do we need to copy some files from Fedora to get transcoding working? The extra.lzma in your signature has NO i915 files at all
-
It was never an issue
-
Nope, even all of that is wrong. Somehow the more aggressive I get with my changes, the lesser things work. I reverted everything back to stock and started going through the "/var/log/messages" files. It seems that the "/usr/syno/bin/spacetool" is the culprit and at every other boot will output a line like this 2019-09-15T02:40:43-07:00 pi-hole spacetool.shared: space_unused_block_device_clean.c:50 Remove [/dev/vg3] If this above line is not present, then further down I'll see confirmation of the "volume" mounting 2019-09-15T02:43:39-07:00 pi-hole synocheckshare: synocheckshare_vol_mount.c:47 Export Share [INTERNAL] [/dev/vg3/volume_1] [/volume1] Attaching my complete "/var/log/messages" file for the last 2 days, incase that helps troubleshoot. How do I fix this? So that it doesn't do random behaviour?? messages.txt.zip
-
Nope, that ^^ is not the solution either. Even after the "migration", my volumes vanished, when I rebooted some 2-3 hours later. At this point, I had checked the "s00_synocheckfstab" and it was back to hosing (removing the volume 1/volume2 entries) the "fstab" file This time, I replaced the "s00_synocheckfstab" file(symlink) with my own BASH script (see post above) and that seems to survive extended reboots. Rebooted some 9 hours later and the volumes 1 & 2 came back just fine. ---------------------------------------------------------------------------------------- GUIDE on how to make use of the "unused" space in a Synology setup ---------------------------------------------------------------------------------------- Incase anyone reading this is wondering how to make use of the "unused" space as shown by the Synology Raid Calculator, here are the steps - - Create a partition on the disk with unused space. I used fdisk as I am most comfortable with that program. Set the partition type to - 8e fdisk /dev/sda - Create a RAID0 array with the new partition mdadm --create --raid 1 --force --level linear /dev/md5 /dev/sda3 - Create a Physical Volume pvcreate /dev/md5 - Create a Volume Group vgcreate vg3 /dev/md5 - Create a LV lvcreate --name volume_1 --extents 100%FREE vg3 !!!! Now Reboot !!!! - Very Important step - Post bootup, DSM should pickup the newly created Logical Volume as a Crashed Disk, as we left the LV unformatted. - Using the Storage Manager, delete this crashed Volume & create the volumes on the Unused space as you wish. In my case, as I had ~1.8TB of unused space and so, I created 2 volumes of 1T & ~800GB. Formatted them in "ext4", just to keep things simple and to avoid the Docker BTRFS bug (fills up the disk with old sub-volumes) - At this point, everything should be perfect. The newly created volumes should be working, and DSM should be saying it's all GOOD. - But wait, not so fast, as the next reboot will hose the "fstab" files, and DSM will be ignoring your newly created Volumes. To avoid this, what we need to do is replace the "s00_synocheckfstab" file with our own script. - To do this open a SSH session and navigate to "/usr/syno/cfgen/ " - Rename the "s00_synocheckfstab" to any other name(or delete it). Here is what I ran sudo mv /usr/syno/cfgen/s00_synocheckfstab /usr/syno/cfgen/DISABLED-s00_synocheckfstab - Now to convert your "fstab" into a script. First, echo out the "fstab" file, when all the volumes are being detected. It should look something like this none /proc proc defaults 0 0 /dev/root / ext4 defaults 1 1 /dev/vg3/volume_1 /volume1 ext4 usrjquota=aquota.user,grpjquota=aquota.group,jqfmt=vfsv0,synoacl,relatime 0 0 /dev/vg3/volume_2 /volume2 ext4 usrjquota=aquota.user,grpjquota=aquota.group,jqfmt=vfsv0,synoacl,relatime 0 0 /dev/vg2/volume_4 /volume4 btrfs auto_reclaim_space,synoacl,relatime 0 0 - Copy this to a text-editor and make these modifications - --- add "#!/bin/bash" as the first line of the script file --- add "rw" to the "ext4" entries --- remove line breaks and replace them with "\n" --- Start this above line with - echo -e " - and end it with - " > /etc/fstab - (the qoutation marks are needed) - Now to create the "s00_synocheckfstab" file. Copy paste the script you made above, into this file. The final script should look like this #!/bin/bash echo -e "none /proc proc defaults 0 0\n/dev/root / ext4 defaults 1 1\n/dev/vg3/volume_1 /volume1 ext4 rw,usrjquota=aquota.user,grpjquota=aquota.group,jqfmt=vfsv0,synoacl,relatime 0 0\n/dev/vg3/volume_2 /volume2 ext4 rw,usrjquota=aquota.user,grpjquota=aquota.group,jqfmt=vfsv0,synoacl,relatime 0 0\n/dev/vg2/volume_4 /volume4 btrfs auto_reclaim_space,synoacl,relatime 0 0" > /etc/fstab - Mark your new script executable sudo chmod +x /usr/syno/cfgen/s00_synocheckfstab and that's it. The custom "s00_synocheckfstab" will probably need to be replaced on system updates, but apart from that the extra volumes should work as normal DSM Volumes and be manageable via the Web UI. Enjoy!!
-
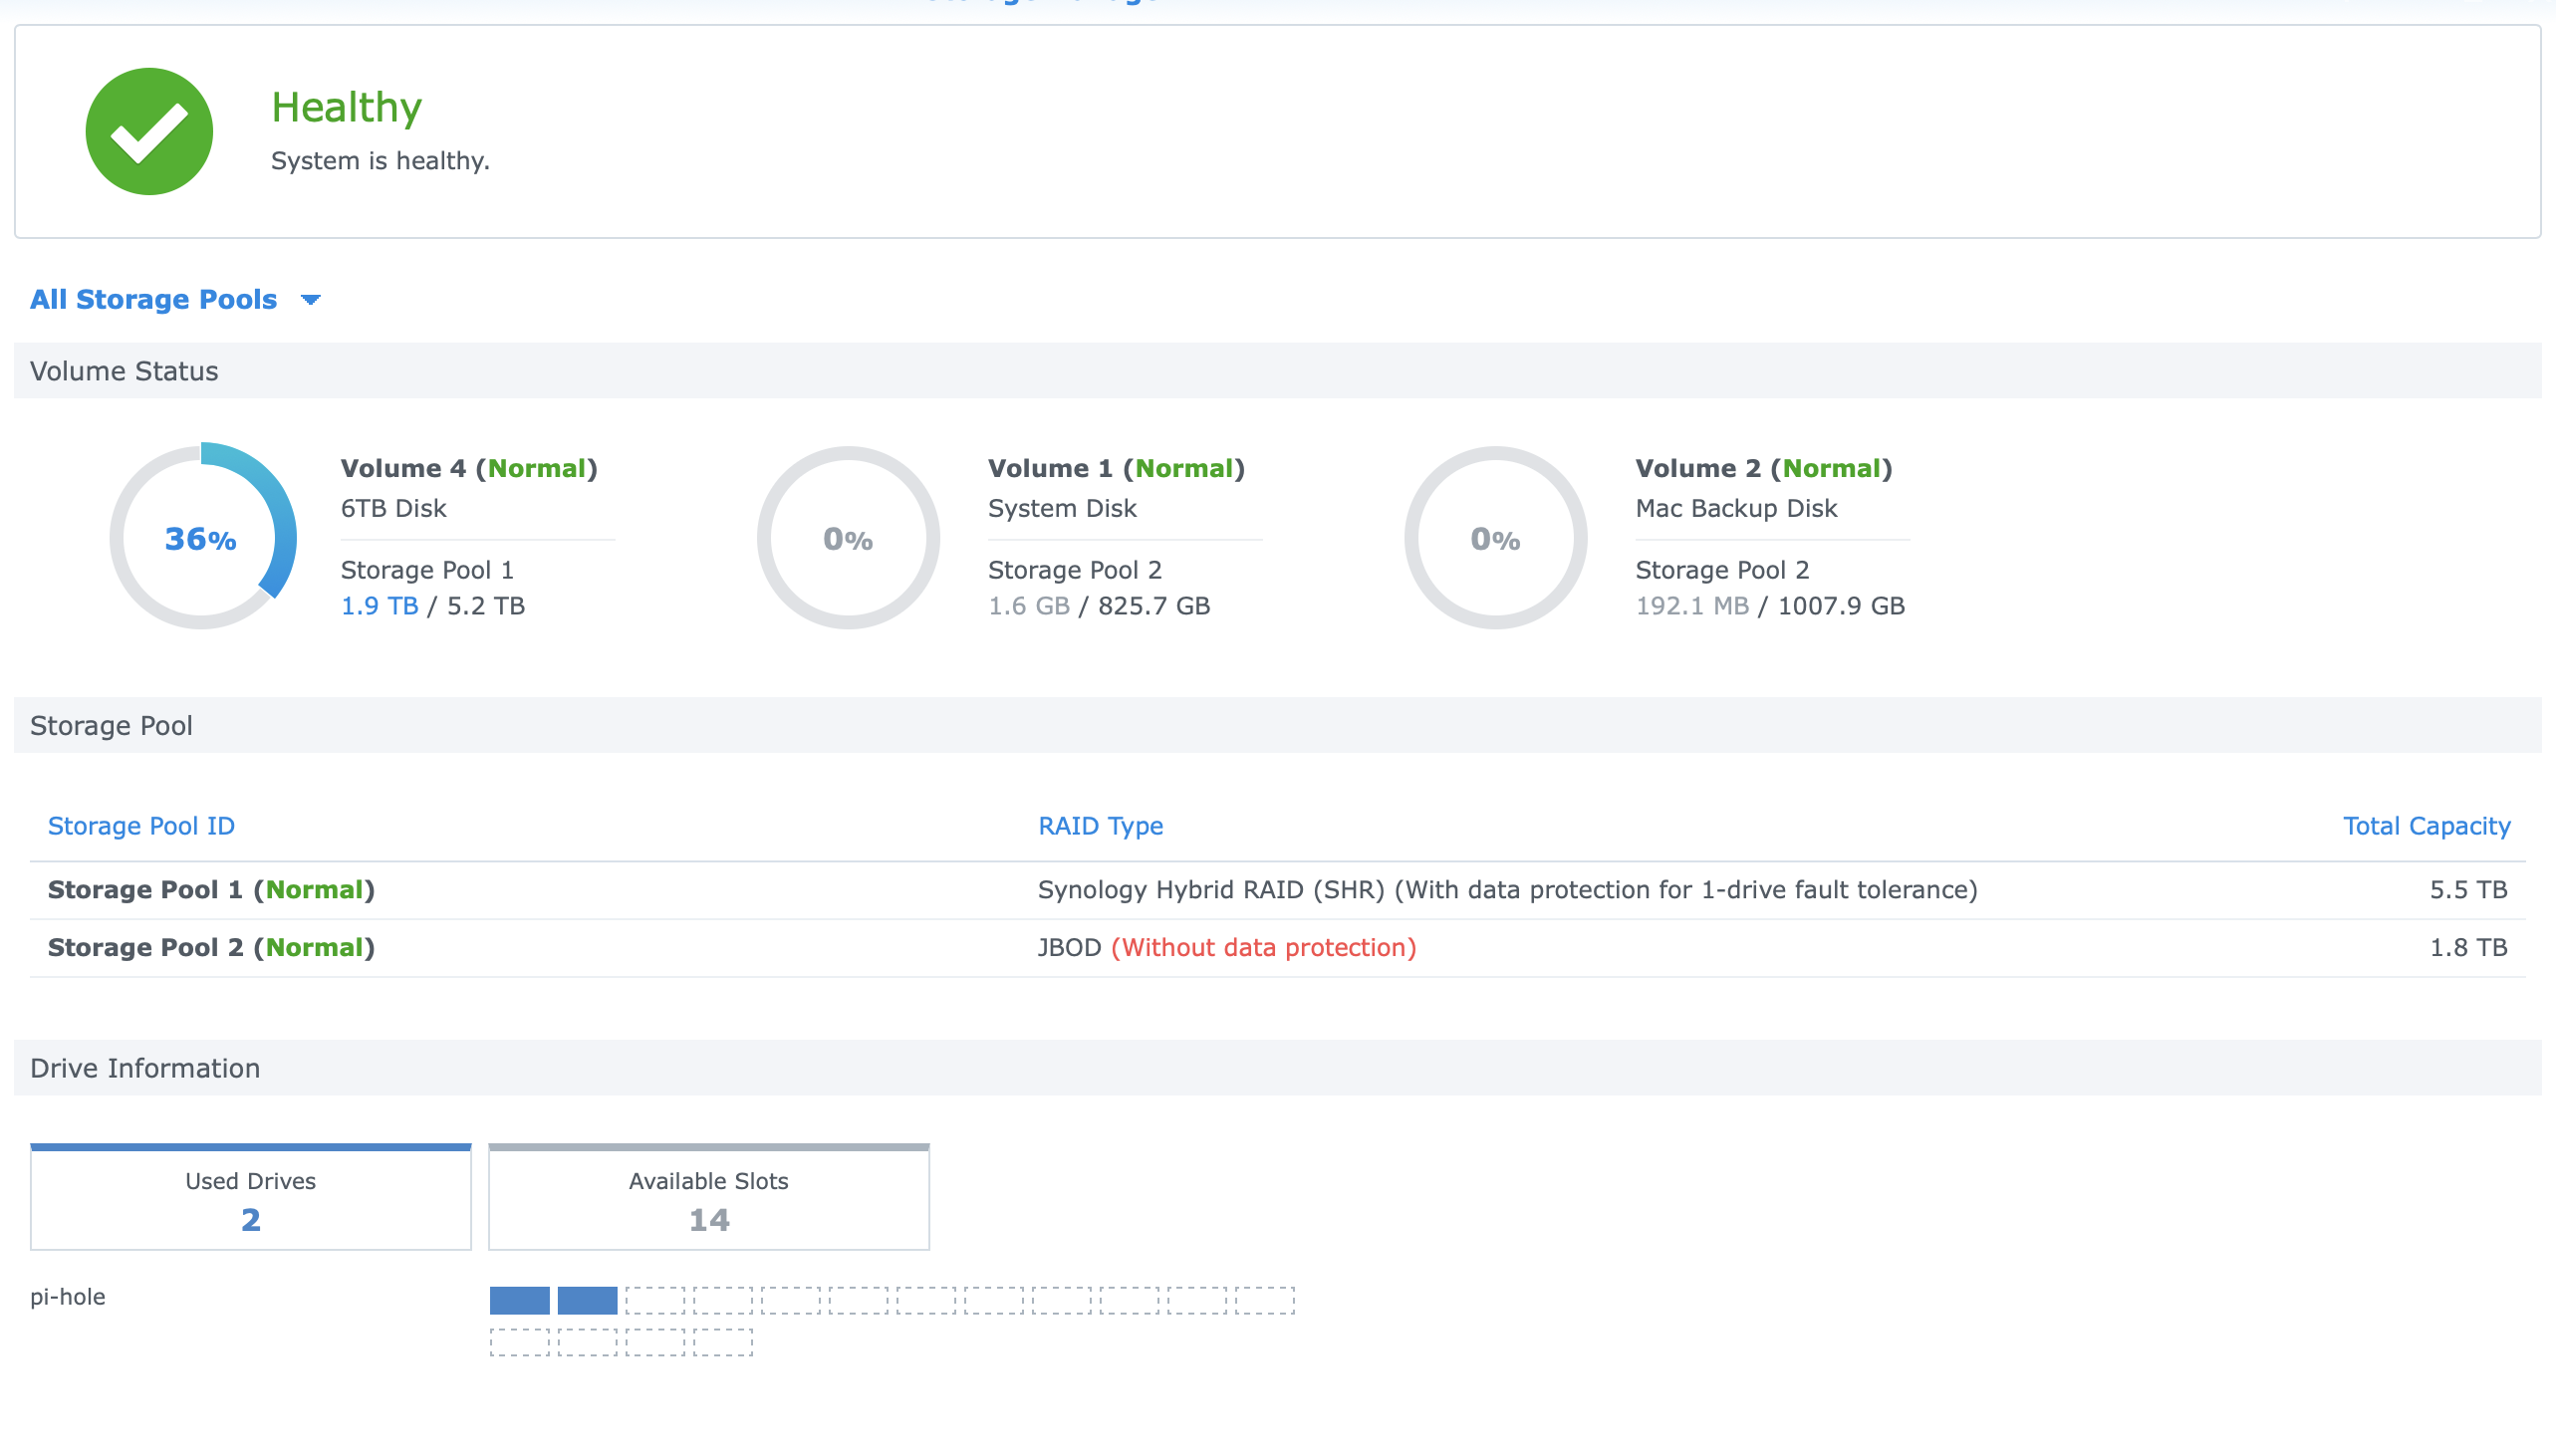
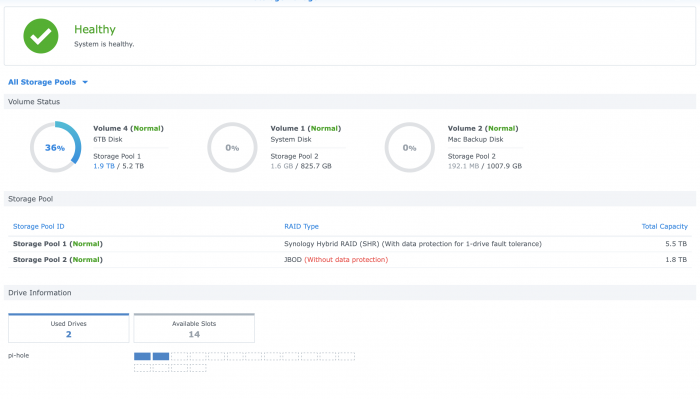
Ok, so I did some more digging in the "/etc.defaults/rc" file and find that "/usr/syno/cfgen/s00_synocheckfstab" is the process wiping my fstab. Check further and that "s00_synocheckfstab" along with all the other "sXX_XXXXXXXXXX" files are all just links to "/usr/syno/bin/synocfgen" So I wipe that "/usr/syno/bin/synocfgen" and replace it with the script, I had written above. As you may have guessed, this hosed my DSM. On reboot I was getting "Permission Denied" errors on SSH & "You are not authorized to use this service." on the Web Console. Re-installed it via the bootloader, and selected "Migration" and gave it the latest PAT file. That seems to have corrected something somewhere. My volumes now show up on boot and running "/usr/syno/cfgen/s00_synocheckfstab" no longer hoses the "/etc/fstab" file. Screenshot of my Storage Manager TL;DR - Have weird issues with volumes not being auto mounted and detected, at times, due to custom mdadm/etc config? Hose your DSM, by deleting the "/usr/syno/bin/synocfgen" file and then select re-install via the bootloader. That does some mumbo-jumbo that fixes things ..... hopefully
-
I have a solution and I do not know why it works or how reliable it is, but for the past 3 reboots, my disks have come back up. I have found that re-writing to the fstab with the correct ext4 entries, ensures the volumes are auto mounted correctly. Made a lil script for this, and set it to run at boot. #!/bin/bash #Echo into fstab echo -e "none /proc proc defaults 0 0\n/dev/root / ext4 defaults 1 1\n/dev/vg3/volume_1 /volume1 ext4 usrjquota=aquota.user,grpjquota=aquota.group,jqfmt=vfsv0,synoacl,relatime 0 0\n/dev/vg3/volume_2 /volume2 ext4 usrjquota=aquota.user,grpjquota=aquota.group,jqfmt=vfsv0,synoacl,relatime 0 0\n/dev/vg2/volume_4 /volume4 btrfs auto_reclaim_space,synoacl,relatime 0 0" > /etc/fstab #Log when the script runs echo $(date) >> /volume1/log-fstab.log My guess is that the "/etc.defaults/rc.volume" doesn't expect to find my volumes, as Synology allows a HDD to be part of only 1 SHR/LV, while my 8TB HDD is part of 2. But when the previous fstab has entries for the volumes, it loads em up just fine. The only difference being that when that script re-writes the fstab at boot, it ignores the fstab on next boot. With this script simulating a manual rewrite, the changes stick for the next boot. I assume it has something to do with overlay-fs. EDIT: Nope, volumes still disappear. Any help or ideas would be appreciated
-
I am using 2 Disks on my NAS - 8TB & 6TB - with SHR RAID-1 setup on them. Using the standard process, I created a 6TB BTRFS Volume, which is now mirrored & managed by DSM. This however leaves 2 TB of space unused on the disk. Wanting to make use of this unused space, I used "fdisk", "mdadm", "vgcreate" & "lvcreate" to create a partition, raid array, volume group & logical volume on this unused space manually. Then by leaving it unformatted, I was able to get DSM to pick it up as a Crashed Volume. Now using Storage Manager, I deleted my manually created volume & re-made it using the Synology tools. At this point, I have SHR + SHR Storage pools on the same disk, being picked up by DSM & Storage Manager. However, the second SHR Pool is not reliable and sometimes vanishes between reboots. Sometime DSM picks it up and mounts my extra volumes normally, sometimes not. How do I fix this? What is the best way to ensure DSM picks up all my volumes? Can I force the boot detection process to pick them up?
-
Thanks. Works great on my Asrock J4105 with the 918+ image.
-
This is a pretty cool script. I really like the fact that it is made to auto-figure out variables. Seems to work well on machine and scales the CPU as needed. While playing around with the files in "/sys/devices/system/cpu/cpu0/cpufreq/scaling_available_frequencies". I noticed that my J4105 only shows frequencies uptil 1501MHz, but not the boost frequency of 2500MHz. Not that I need the boost, but I wonder if the kernel restricts it
-
Nope, I had the "/dev/dri" device in the previous DSM - 6.2.1-23824, but not there post upgrade. I was thinking of trying the unmodified 1.04b bootloader, with a VGA display connected. Someone mentioned that works. If that's the case, then the resistor hack should work. Used to do this same thing in Hackintosh and Intel Cards.
-
- Outcome of the update: SUCCESSFUL - DSM version prior update: DSM 6.2.1-23824 - Loader version and model: JUN'S LOADER v1.04b - DS918+ - Using custom extra.lzma: Yes - real3x's extra.lzma - Installation type: BAREMETAL - ASRock J4105-ITX - Additional comment: Didn't need to delete "extra2.lzma" as mentioned in the instructions. Also can confirm onboard NIC, RTL8111H, still works great after the update. My DSM had the "/dev/dri" device before update. Missing post-update. Confirmed legit SN & MAC. Not that I use it for transcoding anyway.
-
I took the plunge and I can confirm with this extra.lzma + not deleting extra2.lzma, 6.2.2-24922U3 works very well on my ASRock J4105-ITX. The Realtek Lan works great too!
-
Is the onboard LAN on the ASRock J4105-ITX functional after the update?