Leaderboard
Popular Content
Showing content with the highest reputation on 07/31/2019 in all areas
-
Which DSM version shall I use? This is an oft-repeated question, complicated by the fact that different loaders support different DSM versions AND hardware platforms. In simple terms, DS3615/DS3617 has the widest support for hardware and packages, and DS916/DS918 has support for newer, low-cost CPU's, transcoding and NVMe cache (DS918 only). But the real questions are, what hardware do you have? What hardware do you want to buy in order to support what you want to do? And how does a DSM loader and platform support this? In order to answer, it's useful to understand what hardware is natively supported by DSM. Each DSM version is different as Synology does not need to support many types of hardware, as they build up a specific DSM for each hardware platform they sell. Fortunately, the base Linux kernel has much broader support for hardware than they intend. Most of us guessed at the hardware requirements and made (hopefully) intelligent selections on DSM versus hardware. Some build systems and then are distressed when the hardware isn't fully supported by the DSM platform they choose. Unfortunately, Synology hardware knowledge is often imperfect, as the main boards are custom designed. Refer to the example below for DS918: DS918 Reference Hardware: CPU: Intel J3455 (Apollo Lake) GPU: Intel HD Graphics 500/505 Chipset: Intel SOC 2x1Gb Ethernet: Intel i211 SATA: 88SE9215 PCIe SATA 6.0 Gb/s controller With even this information, we can make some good guesses on what hardware might be supported. Wouldn't it be great if we knew ALL the different drivers that are natively supported? Unfortunately this is a fairly difficult process if you are not a Linux guru (and a bit laborious even if you are). There are "user-reported" hardware compatibility threads out there, but many don't understand that those reports are both DSM version and platform specific. Furthermore, with the way hardware manufacturers reissue hardware with the same name but new PCI device number (such as the Intel PHYs on desktop motherboards), often not enough information is reported to confirm whether a specific piece of hardware is suitable for use. If you aren't sure if your hardware is supported, this post and the complementary DS3615 driver guide aims to help you. Download the attached Excel spreadsheet to see key driver support in the DS918 6.2.1 Synology custom kernel, and via loadable modules supplied with DSM. Hopefully it will help you select the best DSM platform for your purposes, and possibly inform your hardware purchases. Certain popular drivers missing from this platform, or newer driver versions that support the latest silicon may be available by installing additional compiled modules. 2021-Sep update: Now that folks are testing RedPill loader, they are finding that drivers working in 6.2.3 and earlier are missing in 6.2.4 or 7.0. This is because many of the drivers are part of the Jun loader and not truly native to DSM. Yes, the title of this post says NATIVE but for the purposes of the analysis, Jun's injected drivers are considered along with the actual embedded native drivers. DSM 6.2.1 DS918 V1.0 2018-Feb-03.xls1 point
-
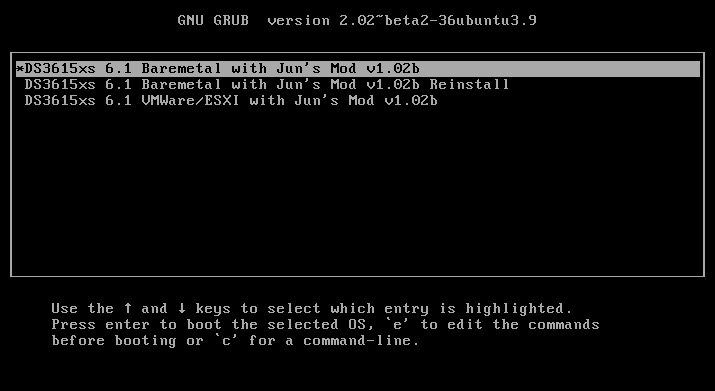
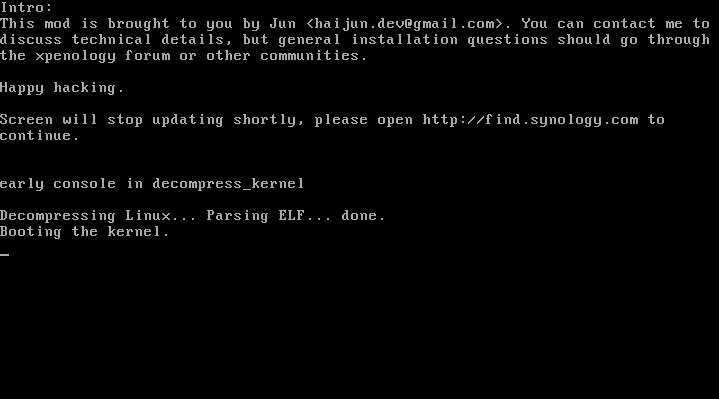
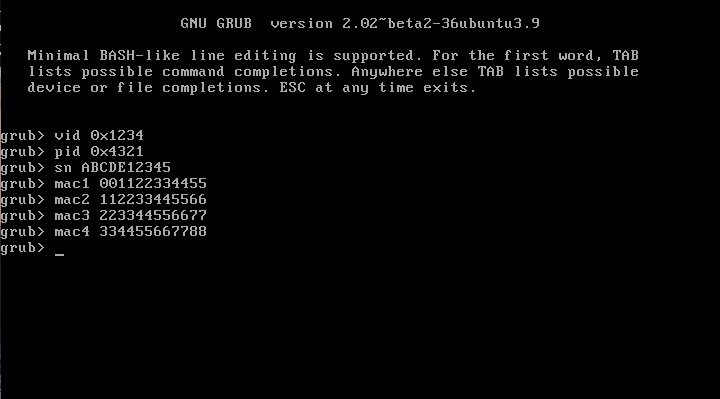
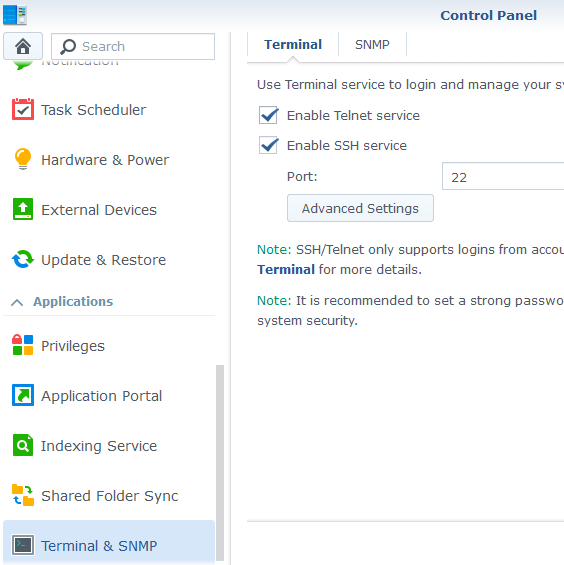
This is an updated tutorial version from the one I made last year. It will enable you to migrate from DSM 5.2 to DSM 6.1.7 directly without the need to upgrade to DSM 6.0.2 first. If for some reason you want to upgrade to DSM 6.0.2 first or simply you do not want to upgrade to DSM 6.1.7 but only to DSM 6.0.2 then use the link above. To upgrade from DSM 6.0.2 to DSM 6.1.7 read here. As most of you know by now Jun was able to find a way to install DSM 6 on non Synology boxes. Here is the thread that I recommend reading. At least make an effort and read the OP: https://xpenology.com/forum/topic/6253-dsm-6xx-loader/ Below is what you need for the operation. I will assume you are doing all this under Windows 10, 8, 7 or XP. If you are on a MAC computer have a look at this post I made on how to burn the image to a USB drive and then mounting the USB drive for editing the content. The rest of the tutorial still applies. If you are currently using DSM 5.1 or below first update to DSM 5.2. If you are doing a fresh install of DSM 6.1 then carry on with the tutorial and omit references to DSM 5.2. - Win32 Disk Imager to make a bootable USB drive; - A 4GB (or any size really) USB drive (flash drive) to install the loader. Not that this is necessary but use preferably a brand name (Kingston, SanDisk...); - A way to read your USB drive VID/PID. Here is a how-to >>> VID and PID; - A good text editor: Notepad++ I really don't recommend using Windows's Notepad; - DSM 6.1.7 PAT file. Chose the one you need: DS3615sx or DS3617sx or DS916+. Download the ".pat" file not the ".pat.md5" - Jun's official v1.02b loader (mirror). This is a hybrid UEFI/BIOS loader so it should work in most machines which are capable or reading GUID partition table (GPT). For older machines that can only read MBR the above loader will simply not boot. If that is your case then use @Genesys's v1.02b loader rebuilt image which is MBR based. Note: Jun's loader supports Intel CPUs. For AMD CPUs Jun has stated that the loader needs some work but it has been reported by many users using HP machines that it actually works. The C1E function in the bios (in some HP machines) needs to be deactivated. I am unsure for other motherboards brands therefore if you have an AMD machine that is not an HP you might be out of luck. Try looking in the bios configuration and play around. - Custom extra.lzma ramdisk. This ramdisk is optional and should only be used if the default ramdisk included in the loader is not detecting your hardware. I am just providing it for those who are having issues with network detection or unrecognised HDD controllers. This custom ramdisk contains additional and updated modules & firmwares. Credits go to @IG-88 for compiling the modules against the latest DSM 6.1.3 source code. I do not warranty they all work but I think most do. If you chose to use this ramdisk, you will need to replace (or rename, so you can revert) the default extra.lzma ramdisk from Jun's loader with this one. If you a have question specific to the custom ramdisk please post it in the topic of IG-88, not here. - If you are doing a fresh install make sure your drives are plugged in direct succession starting from the 1st SATA port. Usually the first port is described as SATA0 on motherboards. Check with your MoBo manufacturer for exact nomenclature. - OSFMount to modify the grub.cfg file within the loader's image and if necessary to replace the extra.lzma ramdisk with the custom one. This is not strictly necessary as Jun has made it possible to configure what needs to be modified via the Grub Boot Menu. If you prefer using Jun's Grub Boot Menu configuration method, simply skip Point 4, read Note 4 instead and pick up at Point 5. PLEASE READ EVERYTHING PRIOR ATTEMPTING ANYTHING Use this loader at your own risk. I wont be held responsible for any loss of data or black smokes that may result in the use of this loader. Please note that this loader has a limited amount of modules (drivers) included. If it is fundamental for you to have a NAS operating as quick as possible I recommend you look at the included drivers very carefully at the bottom of this tutorial before attempting an upgrade. If they are not there you will have to compile your own modules/firmwares or use the custom ramdisk provided above. Don't ask me to compile modules for you. I wont do it. One last thing: DO NOT UPDATE DSM BEYOND VERSION 6.1.7 with loader v1.02b. IN OTHER WORDS DO NOT UPDATE TO DSM 6.2 You have been warned. Here we go: 1 - BACKUP your data and save your configuration prior any attempts to migrate from DMS 5.2 to DSM 6.1. I can't stress this enough. JUST DO IT, as Nike likes to say. Also, print this tutorial if you can. It will make your life easier. 2 - Turn off your NAS and unplug the USB drive you are currently using with DSM 5.2. I recommend you put this USB drive aside in case migration to DSM 6.1 doesn’t go as expected and you need to revert to DSM 5.2. It will just make your life easier. 3 - Now go to your workstation/PC, plug a new USB drive (or the old one if you really don’t have any spare USB drives). Use the link I provided earlier to check your USB drive VID/PID. Write down the info somewhere as we will need it later. 4 - Now launch OSFMount. Select Mount New, then select the image file you downloaded earlier (i.e. .img extension file) to open. Now select partition 0 (the one that is 15 MB). Click Ok. Then at the bottom of the window make sure to un-tick the "Read only drive". Click Ok. The partition should now be mounted in file explorer. At this point you can navigate to the /grub directory and edit the grub.cfg file. If you need to replace the extra.lzma ramdisk with the custom ramdisk provided above then you will also need to mount partition 1 (the one that is 30 MB). Below is what you will see in the grub.cfg file. I am only showing below the portion of the code that is relevant for the purpose of this tutorial [...] set extra_initrd="extra.lzma" set info="info.txt" set vid=0x058f set pid=0x6387 set sn=C7LWN09761 set mac1=0011322CA785 set rootdev=/dev/md0 set netif_num=1 set extra_args_3615='' set common_args_3615='syno_hdd_powerup_seq=0 HddHotplug=0 syno_hw_version=DS3615xs vender_format_version=2 console=ttyS0,115200n8 withefi elevator=elevator quiet' set sata_args='sata_uid=1 sata_pcislot=5 synoboot_satadom=1 DiskIdxMap=0C SataPortMap=1 SasIdxMap=0' set default='0' set timeout='1' set fallback='1' [...] You want to modify the following: Change vid=0x090C to vid=0x[your usb drive vid] Change pid=0x1000 to pid=0x[your usb drive pid] Change sn=C7LWN09761 to sn=generate your sn here with DS3615xs or DS 3617xs or DS916+ model (this will depend on which loader you chose) Change mac1=0011322CA785 to mac1=[your NIC MAC address #1]. You can also add set mac2=[your NIC MAC address #2] and so on until mac4 if you have multiple NICs. However, this is not necessary. Recommended: Change set timeout='1' to set timeout='4' - This will allow you more time to make a selection in the Grub Boot Menu when it appears on screen. Once you are done editing the grub.cfg file, save it and close your text editor. Now in OSFMount click on Dismount all & Exit. You are now ready to burn the image to your USB drive. 5 - Now use Win32 Disk Imager to burn the image file onto the USB drive. This will also make the USB drive bootable. 6 - Eject and unplug the USB drive from your workstation. Plug it in your NAS (avoid USB 3.0 ports. Use USB 2.0 port if available). Boot your NAS and before doing anything fancy, access your BIOS so to make your USB drive the 1st boot drive if it's not the case. The Jun official loader can boot in UEFI or in legacy BIOS, so you chose what suits you best. Also, make sure your HDDs are booting in AHCI mode and not in IDE. Finally, if disabled, also enable the serial port in BIOS. Some BIOS don't have this option so don't get too cranky on this if you can't find it. Save changes to the BIOS and REBOOT the NAS. 7 - Once rebooted, if you have a monitor connected to your NAS you will see the following Grub Boot Menu: ADVICE: even before you see the Grub Boot Menu press the up/down key. This will stop the countdown so you will be able to select the desired line. You won’t see much other than the following after you press enter: If you booted the USB drive in EFI mode then you will see the same text without the last 3 lines but that's ok. 8 - Now go back to your workstation, and launch Synology Assitant or go to http://find.synology.com. Within one minute or so you should normally be able to see your NAS on your local network (it took ~55 seconds on a test I did on a VM). Just follow the instructions and either chose "Install" if you wish to have a clean install or chose “Migration” if you are coming from DMS 5.2 and wish to update while retaining your data. You will be asked to provide the .PAT file you downloaded earlier (DSM_DS3615xs_15217.pat or DSM_DS3617xs_15217.pat or DSM_DS916+_15217.pat). 9 - When the migration is finished you will most probably have to update some of your packages. You can then proceed and update DSM 6.1.7 up to DSM 6.1.7 critical update 3. It is possible you might either need to hard reboot or re-image your usb drive. Make sure to deactivate auto-updates within DSM. Link to individual files (DSM and critical updates) can be found here: https://xpenology.com/forum/topic/7294-links-to-dsm-and-critical-updates/. DO NOT UPDATE TO DSM 6.2. The loader is not compatible. 10 - You are done. If you have questions, first search the forum and/or Google then leave a comment if nothing helps. Please provide your hardware specifications (motherboard model, LAN controller, driver controller etc). Failure to prove such information will lead to the post being deleted or not answered. -------------- Note 1: If after following the tutorial you can’t find your NAS through http://find.synology.com ou Synology Assistant it is highly possible that the drivers of your NIC are not included in the ramdisk of the loader. Make an effort and use Google to know what modules your NIC and HDD controller are using, then check if those modules are included in the custom extra.lzma ramdisk. If yes then use the custom ramdisk. Don't ask me to look for you. If nothing works then ask your question. Note 2: Synology increased security since the introduction of DSM 6. Root access through SSH is no longer possible out of the box. You can however use your admin account and elevate permissions with the following command if you need root permissions: sudo -i Note 3: Please check you have the right VID/PID prior proceeding. If you get the following error ”Failed to install the file. The file is probably corrupted. (13)" it most certainly means your VID and/or PID is/are wrong. If you still have the same error message after verifying the VID/PID then try another USB drive. Note 4: Configuration added to the grub.cfg file can also be done directly during the Grub Boot Menu, so technically you can skip Point 4 and burn the image on the USB drive without editing anything (read Point 5 onward first). If you wish to do the changes from the Grub Boot Menu directly you need to press the letter 'C' when you see the Boot Menu. You will literally only have one second, so be fast. Once you press 'C' you will be in a Grub command line environment. To change your VID enter the following: vid 0xYOUR 4 DIGITS USB DRIVE VID Do the same for pid, sn and mac1. Press enter at each command. The commands are: pid 0xYOUR 4 DIGITS USB DRIVE PID sn YOUR NAS SERIAL NUMBER mac1 YOUR NAS MAC1 ADDRESS If you have multiple NICs you can also issue mac2, mac3 and mac4 as commands. Maximum is mac4. See below: mac2 YOUR NAS MAC2 ADDRESS mac3 YOUR NAS MAC3 ADDRESS mac4 YOUR NAS MAC4 ADDRESS If you think you made a mistake in the numbers simply re-issue the command. When you are done press esc and select the appropriate menu entry. Below is an example (fake numbers) of how it looks under the Grub command line environment : Note 5: If you encounter the error "We've detected errors on your hard drives [drive number] and the SATA ports have also been disabled" during installation, then you have to fallback to adding SataPortMap to the grub environment. Press the letter 'C' at the Grub Boot Menu and then add the following: append SataPortMap=XX where XX is the number of drives. Don’t forget to update this parameter if you add additional drives to your machine. If you use Reinstall, don't forget to re-select the first line of the Boot Menu once the NAS has rebooted after the installation else the Loader will re-select Reinstall and you will be faced with some issues so please beware of this. @@@@@@@@ What does SataPortMap mean? @@@@@@@ @@@@@@@@@@@@@@@@@@@@@@@@@@@@@@@@@ ############## Know issues ##################### - When running on a slow single core machine, there is a race condition that causes the patcher to load too late. The most obvious sign is that console is not working properly. - Some ethernet drivers crash when set MTU above about 4096 (Jumbo frame). ############# Included default modules & firmwares in Jun's Loader ############# ############## Tutorial UPDATES ##################1 point
-
No attack so far, but I remember a time when I could see those many bots knock at the door and be blocked in real time thanks to the DSM notifications, it was very frightening. Now I try to be less naive, there's surely room for improvement but here's what I did. - admin account is disabled - I changed the default 5000/5001 DSM ports - disabled http access outside my local network, it's https only with let's encrypt certificate. - added two-factor authentication to all accounts - enabled auto block after 2 failed attempts within 20 minutes (well, this one is a bit excessive...) - allowed DSM access to my own country only in DSM firewall. Good luck guys!1 point
-
1 point
-
1 point
-
Sorry I didn't see this before. I am creating an announcement right away to inform people about this.1 point
-
to be honest sir , I was looking for synology drive i see this version have synology drive so I don"t wanna try 6.2, now the NAS check the drive , it ill be a long process but I will have more questions for you guys i wanna acces the NAs over the web , put a plex server and so on but step by step1 point
-
Hi Everyone! Aldo here, wanted to thank you for the awesome work on Xpenology! Did not yet start my first box, but lots of useful infos to read.. thanks anyone!1 point
-
- Outcome of the update: SUCCESSFUL - DSM version prior update: DSM 6.2.2-24922-1 - Loader version and model: JUN'S LOADER v1.03b - DS918+ - Using custom extra.lzma: NO - Installation type: BAREMETAL - i7-3770k, MSI MPower Max z87 Motherboard. - Additional comments: Reboot Required1 point
-
Outcome of the update: SUCCESSFUL - DSM version prior update: 6.2.2-24922 - Loader version and model: Jun's Loader v1.04b - DS918+ -Using custom extra.lzma: NO - Installation type: BAREMETAL - Additional comments: Ensure your PID/VID is right before you do this or you end up in a world of pain.1 point
-
- Outcome of the update: SUCCESSFUL - DSM version prior update: DSM 6.2.2-24922-1 - Loader version and model: JUN'S LOADER v1.03b - DS3617xs - Using custom extra.lzma: NO - Installation type: VM - ESXI 6.7u2 - Additional comments: E1000e nic, 2 sata adapters, removed usb 2 adapter - Outcome of the update: SUCCESSFUL - DSM version prior update: DSM 6.2.2-24922-1 - Loader version and model: JUN'S LOADER v1.03b - DS3615xs - Using custom extra.lzma: NO - Installation type: VM - ESXI 6.7u2 - Additional comments: E1000e nic, 2 sata adapters, RDM Disks, USB 3 passthrough1 point


