Search the Community
Showing results for tags 'proxmox'.
-
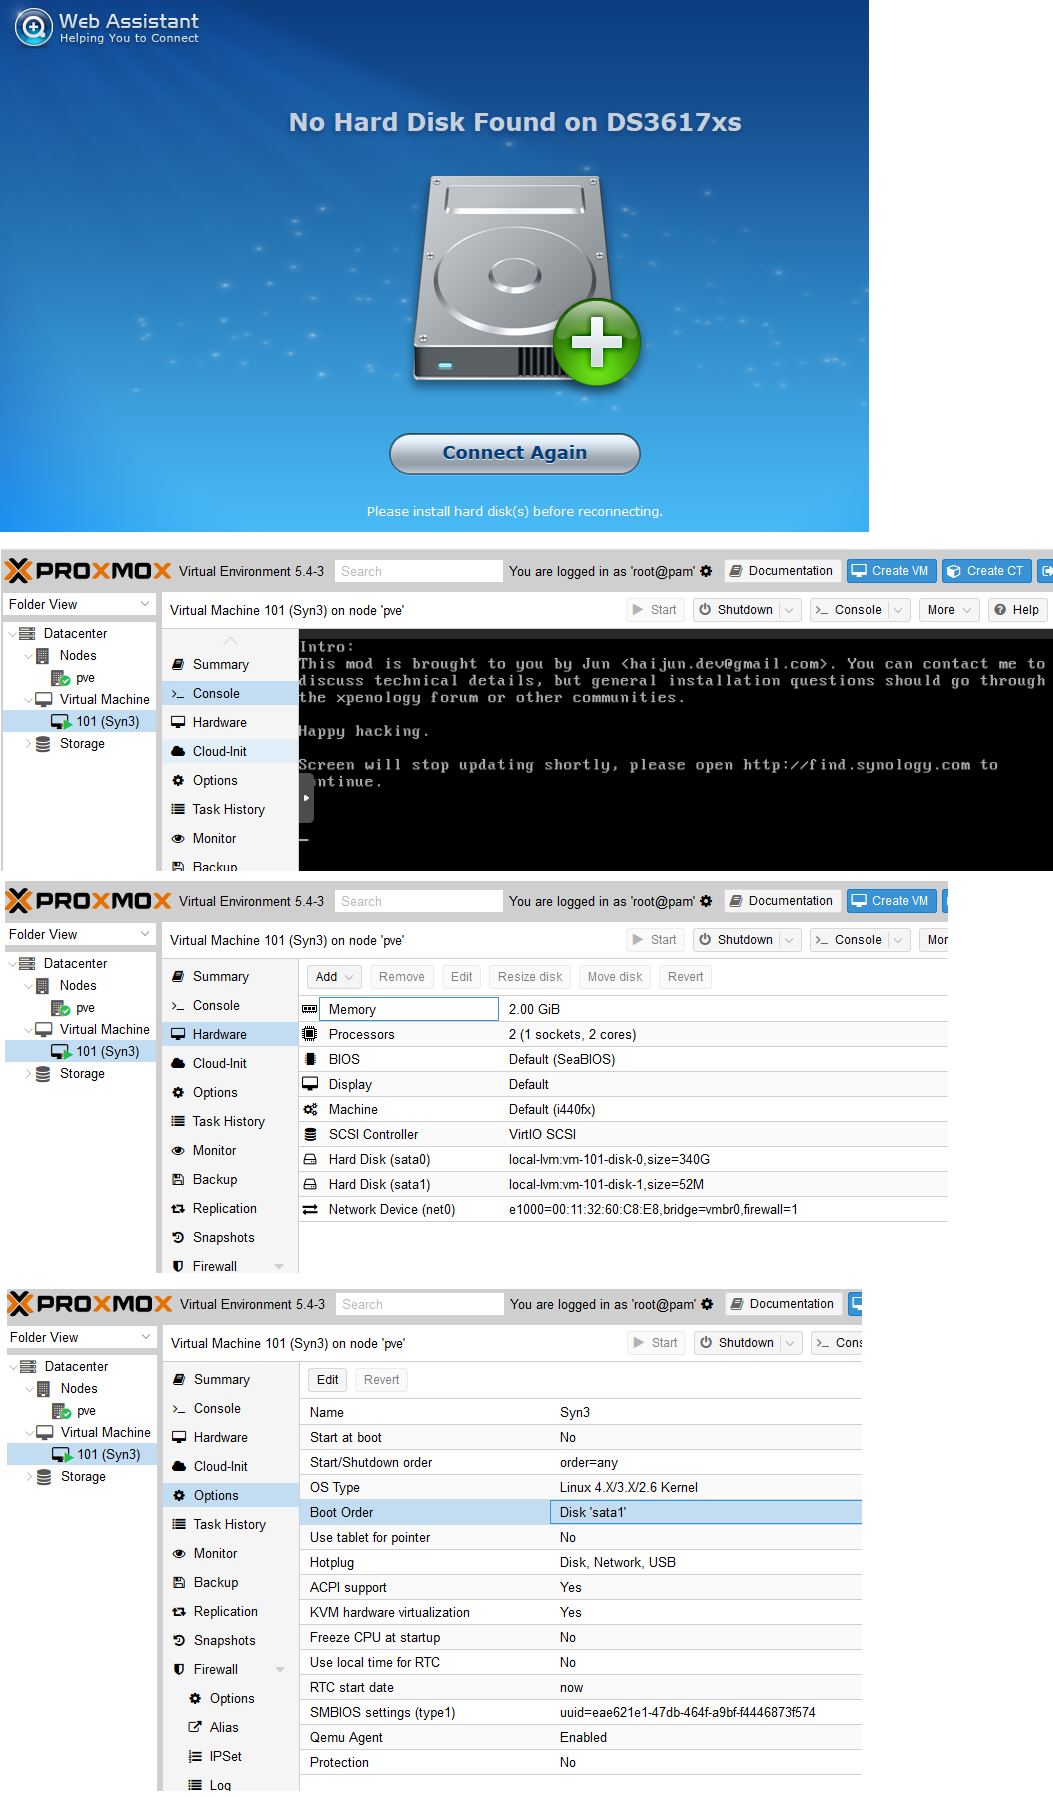
Dear Community, I am new to PVE or KVM, but I did install xpenology on ESXi with success. However, after I install xpenology on PVE, the web assistant shows “No Hard Disk Found on DS3617xs” error. The mod I use is "with Jun's Mod v1.03b". I have changed the SATA port from 0 to 1. I also changed SATA to SCSI or IDE with no luck. I have attached the settings on PVE as the screenshot below. Is it not possible to install 6.2 on PVE? What's the lastest version that PVE supports? Please help!

-
I'm thinking about upgrading my hardware and moving from VMware to Proxmox. It'll be a good exercise which I'll probably am going to regret when I'm half way the upgrade I'm looking for some help in the migration steps; Current setup: Hardware: i3 6100 8Gb 250Gb SSD + 4x3TB + 3x5TB+2x8TB VMWare ESXi 6.7.0 XpenologyA: Jun's Loader v1.04b - DS918 RDM 4x3TB - Photos, backups and document storage (The important stuff) XpenologyB: Jun's Loader v1.04b - DS918 RDM 3x5TB + 2x8TB - Home media server (The not so important stuff) XpenologyC: Jun's Loader v1.04b - DS918 No disks, upgrade/test purposes. I'd like to move to a Ryzen 7 1700 with the Asus Prime X370-PRO with 16Gb running ProxMox Installing Proxmox and Xpenology should not be a big problem. However, how am I going to migrate my data to the new installation without having to buy a sh*tload of drives? I know DSM allows you to migrate a set drives from one server to another. But, how does this work/apply (if at all) when you have a virtualized instance RDM and you want to change from VMWare to Proxmox?
-
Hi, I've just got an XPEnology install up and running with Jun's loader under a Proxmox hypervisor. Everything seems to be working fine, persisting across reboots etc, but I'm just wondering where the DSM configuration data is stored? I have 4 SATA disks configured for direct passthrough and a RAID5 volume placed on them, and I boot the system using the synoboot.img from the loader. But where is all the DSM data stored? I can't see the synoboot.img changing and I don't know where else it would go.
-
Hi, Im looking for a nas setup as cheap as possible i dont need a case or drives (got those coverd). What i need is motherboard, cpu and ram which can run xpenology with plex (i need 2 transcoded streams) Bonus woud be to run proxmox. If possible i'd like to get this stuff from ebay (best case woud be ebay germany). thx 4 reading. -Sammy Edit: Putting a steam libary on it shoudent be a problem right? i have a ssd here i coud use as a cache but is that even posible?
-
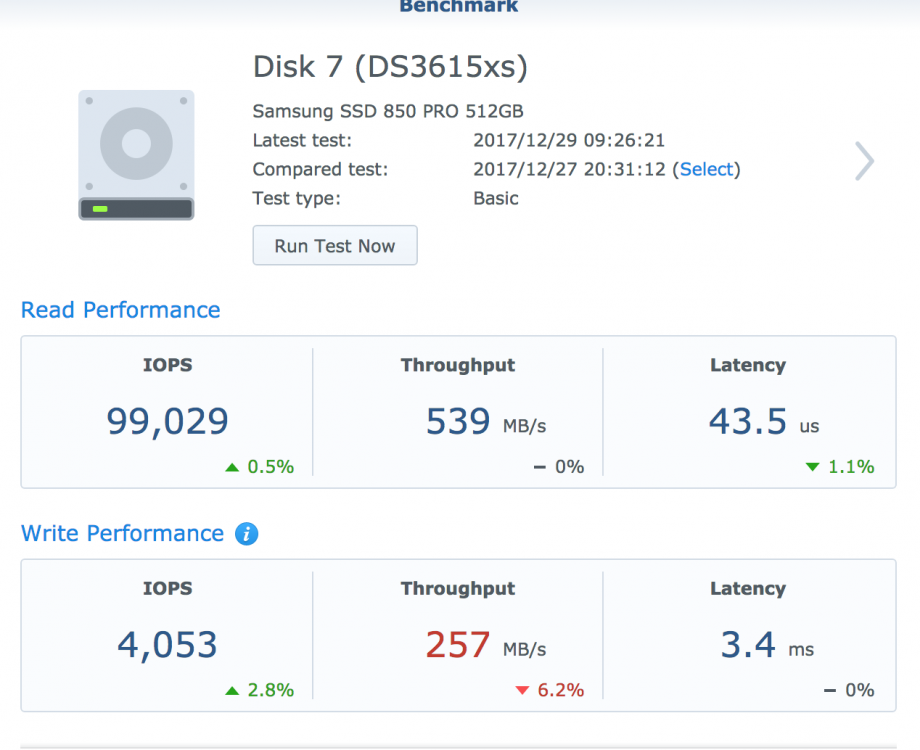
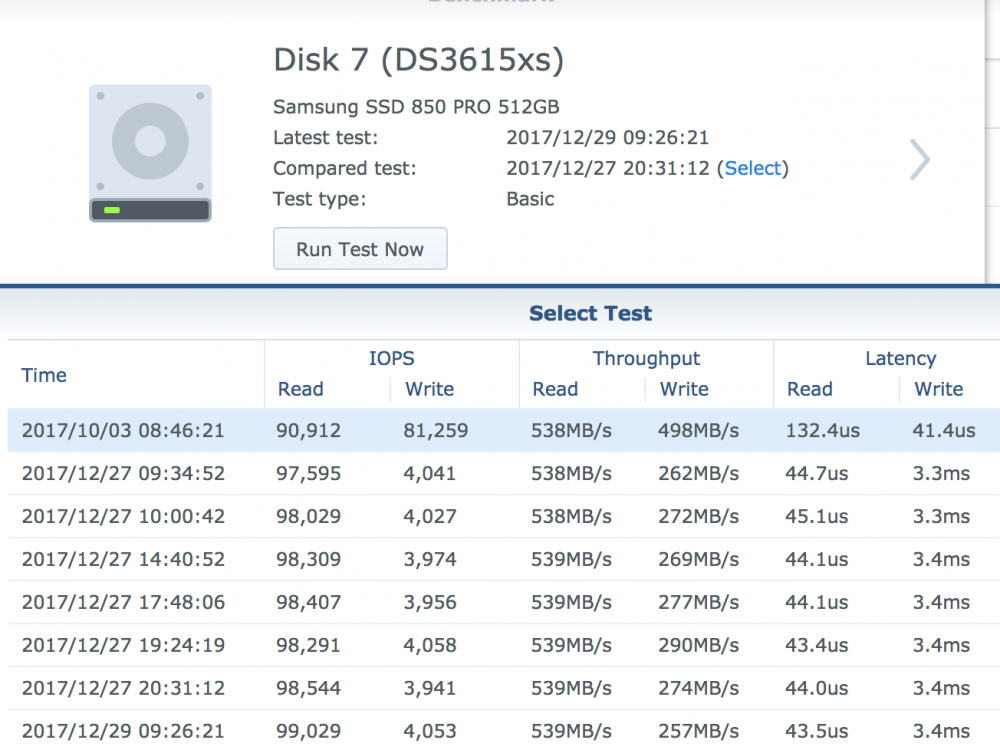
I have Proxmox 5.1. Xpenology 1.02b loader; DSM6.1.4 Update 5. Intel onbard (AHCI) SATA controller passthrough. I have 3 SSD in RAID0 mode. What I notice is, the write performance on SSD is terrible. I've try to tweak Proxmox, and the Xpeno VM, but nothing seems to help. My VM config: args: -device 'piix3-usb-uhci,addr=0x18' -drive 'id=synoboot,file=/var/lib/vz/images/100/synoboot_jun2b_virtIO.img,if=none,format=raw' -device 'usb-storage,id=synoboot,drive=synoboot' bios: ovmf boot: 4 cores: 4 hostpci0: 00:17.0,pcie=1 machine: q35 memory: 6144 name: DSM6.x net0: virtio=00:11:32:xxxxxxx,bridge=vmbr0 net1: virtio=00:11:32:xxxxxxx,bridge=vmbr1 numa: 1 ostype: l26 scsihw: virtio-scsi-pci serial0: socket smbios1: uuid=7fda6843-8411-473f-91a5-xxxxxxxxx sockets: 1 I've tried to passthrough the VM without q35 machine type, and without PCE=1. Write performance is the same. What's strange is, the write performance was really good back in October, when I was still on Proxmox 5.0. So I want to ask everyone, how's your SATA passthrough performance?
-
Hola, He adquirido el servidor HP Microserver G8 recientemente....llevo 2 semanas con el y de momento aún me faltan cosas por aprender Os comento.... El NAS lleva instalado el sistema Xpenology desde un pendrive usb.... y me gustaria saber si es posible cambiar el sistema operativo por PROXMOX sin perder la configuración ni los datos que tengo en los HDD, seria virtualizar lo que tengo montado ahora. Sabeis si se podria realizar? y como? :S Gracias
-
 Plop all, J'ai pas mal écumé ce forum il y a quelques semaines (en plusieurs langues) et je n'ai pas à trouvé de post avec un ModOp assez simple pour moi. Alors voilà le mien : Préparation du bootloader Télécharger la version officielle de DSM voulue : https://usdl.synology.com/download/DSM/release/ Ce tuto a été réalisé avec DSM 6.1 sur DS3615xs => https://usdl.synology.com/download/DSM/release/6.1/15047/DSM_DS3615xs_15047.pat DSM_DS3615xs_15047.pat Télécharger l'archive contenant le bootloader de June : https://mega.nz/#F!BtFQ2DgC!JgomNP3X8V9EuwxL4TXbng Source => Topic "officiel" Transférer le bootloader au format .img choisit sur le noeud Proxmox Renommer simplement le fichier en .raw mv synoboot.img synoboot.raw Ici testé avec synoboot-DS3615xs-6.1-V1.02-alpha Création de la VM Les choix non décrits ci-dessous sont à laisser par défaut : Général - Choisir un ID et un nom OS Other OS types CD/DVD Do not use any media Hard Disk Bus/Device : virtIO (Au choix mais meilleurs perfs) Storage : local (ou autre) Disk Size : 1 Go Format : RAW disk image CPU Sockets : 1 Core : 2 Type : Default (kvm64) Memory Automatically allocate memory within this range Min 512 Max 2048 Network Bridged : vmbr2 (en fonction de votre infra) Model : Intel E1000 Mac Auto Configuration de la VM Remplacer le disk de boot par le bootloader au format raw mv synoboot.raw /var/lib/vz/images/[VMID]/vm-[VMID]-disk-1.raw Créer un second disque Bus/Device : SATA Storage : local (ou autre) Disk Size : Au choix (minimum ?) Format : QCow2 Démarrer la vm depuis l'interface de Proxmox ou avec : qm start [VMID] Lancer la console VNC et laisser le choix de Grub par défaut (Baremetal) Télécharger le logiciel "Synology Assistant" sur le site officiel Une fois lancé cliquer sur Recherche Il peut être nécessaire de lancer une seconde recherche si la première ne détecte rien Une fois le DiskStation trouvé une fenetre de navigateur va s'ouvrir automatiquement, sinon sélectionner la ligne du DiskStation puis cliquer sur connecter /!\ Avant de passer à la suite, bien noté l'@ MAC affichée dans l'interface du "Synology Assistant" /!\ Eteindre la VM depuis l'interface de Proxmox ou avec : qm stop [VMID] Dans l'interface de Proxmox, modifier les paramètres de la carte réseau de la VM et remplacer l'@ MAC par celle notée plus précédemment Relancer la VM Se connecter à nouveau avec "Synology Assistant" Puis dans le navigateur Web, choisir installation manuelle et sélectionner le DSM_DS3615xs_15047.pat Voilà ça fonctionne très bien sur mon serveur dédié en Proxmox 4 et 5 et il y a peut être des nouvelles versions des bootloader et de DSM, je n'ai pas regardé, mais cela devrait être compatible. D'ailleurs étant sur un dédié je ne peux pas faire de passthrough sur les disques, j'ai donc tenté d'allouer de l'espace libre de VG pve directement à un volume LVM (sans Thin) depuis Proxmox puis de l'utiliser comme 3e disque en RAW. Le but était d'impacter le moins possible les perfs en évitant l'empilage de FS. Mais ça n'a pas l'air d'être une bonne idée puisque je ne vois pas de nouveaux disques dans DSM ... Je continue mes tests mais si quelqu'un a des avis sur la meilleur combinaison pour la configuration du type de stockage entre hyperviseur => VM => DSM ... ou des liens utiles ... ça m'intéresse.
 -
After fiddling with it for a day, and getting it to work, I thought it would be nice to share the knowledge, especially since "officially" only ESXi is supported, and ESXi is picky about supporting stuff... The main reason for me to move to a hypervisor was because Synology has not yet introduced NVMe support AT ALL. And even with a kernel driver, the Storage Manager will not see it as an SSD, as an HDD, or anything. Synology is silent about this, even though some have requested it on their forums (although they do not have a model with M.2 NVMe connector yet, they have some models with full sized x16 or x4 PCIe ports, which can be used with an adapter card for NVMe). So I decided to try with a hypervisor. On one hand it makes installation easier, upgrading also, and I don't need a display connected (since most hypervisors provide a VNC connection to the guest OS). On the other hand, I can install the measly 2-3GB hypervisor and all the tools on the NVMe SSD, and have the rest mounted as a VMDK (or any other virtual disk file). The rest of the hard drives would use passthrough of course. I fiddled around with multiple options. XenServer simply refused to boot in UEFI mode, ESXi does not support my network adapter, or my built-in SATA controller (B250 chipset), Microsoft's Hyper-V server has issues if you do not have a domain server on the network, also as soon as the display output goes off, the device drops network connection. It left me with Proxmox. Never used it, and during installation I had some issues with the bootloader (both on 4.4 release and 5.0 beta). Luckily there's a workaround, since it is based on Debian, one can use the Debian netinst image, create a very basic system, and install Proxmox on top. I won't bore you with the details, there are enough guides about installing it to make me think twice before I write an (n+1)th version. So let's begin! Requirements: A working install of Proxmox 5.0 - it can be 4.4 too, but I only tested this on 5.0. Follow the guide to create the bridged network interface! The loader you wish to use. I recommend Jun's Loader, specifically 1.02a2 at the time of the writing of this guide. Steps: 0. Edit the loader (if needed) to your liking - MAC address, serial number, etc. This is especially important if you have multiple XPE systems on the same network. 1. Create a new VM in Proxmox. 1.1 Set the name, and make sure to note down the VM ID (if it is your first VM, it should be 100). I'll be using {VM_ID} as a placeholder from now on. 1.2 OS type should be "Linux 4.x/3.x/2.6 Kernel". 1.3 Set the CD/DVD to "Do not use media" (we will remove the virtual disk drive any way later on). 1.4 For the HDD, you should create a new virtual disk with the format of your liking (qcow2, vmdk or raw), this will be the initial drive. I made sure that it uses nearly the whole storage of the OS drive it was installed on (in my case it was a 256GB NVMe SSD, which, after setup and partitioning, resulted in a 226GiB root drive, of which I had 211GB free, so I set the virtual disk's size to 200GB). You can set it to any kind of bus, EXCEPT VirtIO. With VirtIO I had performance issues, so I went with SCSI (it supports up to 12 devices any way, so it is better). This is for the virtual disk only, VirtIO works just fine with passthrough devices. So apart from the bus, size and format, you don't need to touch a thing. 1.5 For CPU, set kvm64 with as many cores as your host has (incl. virtual cores if you're on a HyperThreading supported CPU!). In my case with the Intel G4560 this is 4. 1.6 For RAM, you should leave some slack for the host OS, I went with 7.5GB from the 8GB I have. Ballooning is not required. 1.7 Networking. This is where many things can go wrong. The VirtIO paravirtualized network adapter should work, but to be safe I went with the Intel E1000. On the left select Bridged Mode, with the previously created bridge as the first choice. You can also enable Firewall if you do not trust Syno's own. Leave the rest of the settings as default. 1.8 On the Confirm page, confirm your settings and create the VM. 2. After the VM is created, first thing to do is to remove the virtual disk drive (IDE 2, if everything went right). Then comes the hard part. 3. You have to add each and every HDD to the config file that you want to use for passthrough. The command is simple: qm set {VM_ID} -[protocol][port] /dev/disk/by-id/[disk-id] The {VM_ID} part is obvious, but what about the rest? [protocol] is the connection protocol you want to use. This can be sata, ide, scsi or virtio. I'm using SATA here, but you can use anything (IDE is not IDEal for us). SATA supports up to 6 devices (port indexes 0-6), scsi supports up to 12 devices, and virtio does not have a limitation to my knowledge. [port] is the first unused port of said protocol. E.g. if you set the initial disk during setup to SATA0, and you want to use SATA further here, you have to start numbering from 1. [disk-id] is the unique identifier of your HDD. Go to /dev/disk/by-id/ and list the disks you see. For most SATA devices, you'll see entries like "ata-[MANUFACTURER]_[MODEL]_[sERIAL]". So let's say I have 4 disks, with the disk-id's ata-1, ata-2, ata-3, and ata-4 (yours will be a lot longer, but don't worry, you can use the bash autocomplete with the tab key). For this to work I execute the following commands: qm set 100 -sata1 /dev/disk/by-id/ata-1 qm set 100 -sata2 /dev/disk/by-id/ata-2 qm set 100 -sata3 /dev/disk/by-id/ata-3 qm set 100 -sata4 /dev/disk/by-id/ata-4 Of course later on you can add further HDDs to a VM config by using the same command, just keep in mind the limitations of the protocols. 4. Now comes the hard part, we'll have to add the bootloader image file to the config. The config file is located under /etc/pve/qemu-server/, and is named {VM_ID}.conf. Open it with nano. This config file defines everything about the VM. Disks to mount, which device to use for booting, RAM amount, CPU cores, name of the VM, et cetera. Don't touch anything else than the lines you see here! Copy the synoboot.img to somewhere on your server. If you want to be consistent with the Proxmox setup, copy it under /var/lib/vz/images/{VM_ID}/ - you'll need root for that. After that, come back to the conf file, and open it again. You'll enter a few things here, make sure you pay attention! Enter the following line into the conf file, and make sure you replace the parts in the path! args: -device 'piix3-usb-uhci,addr=0x18' -drive 'id=synoboot,file=/var/lib/vz/images/{VM_ID}/synoboot.img,if=none,format=raw' -device 'usb-storage,id=synoboot,drive=synoboot' Make sure to replace the path to the synoboot.img with your own! One more thing to edit here, the boot device. Find the line that begins with "boot: " and replace it so it looks like this: boot: synoboot Save the file, then start the VM. It should start up without an issue, and you'll be able to use find.synology.com to find your server and install it.