Search the Community
Showing results for 'detected that the hard drives'.
-

Develop and refine the DVA1622 loader
dyter replied to pocopico's topic in Developer Discussion Room
For foodies I also found this for less $20, you can up to 7 SATA drives on ALI mini PC ! https://fr.aliexpress.com/item/1005005653706057.html -
I am stuck. I built my first xpenology server from a udemy course about 5 years ago. It was DSM 5.2. It ran great until... The flash drive that the operating system was on accidentally was bent and no longer works. So now I have these hard drives with all my data and I have no way to access them. The udemy course taught me how to set up the files needed for DSM 5.2. Would anyone happen to have those files so I can set up a new USB flash drive? I really an inexperienced. And need help.
-
Hi nemesis122, I have to admit, I haven't touched the server since this last post. Divorce and my busy work schedule got in the way. I am wondering if you would still be will to a teamviewer session to get my server back to functionality. Just a reminder but full post above, "The flash drive that the operating system was on accidentally was bent and no longer works. So now I have these hard drives with all my data and I have no way to access them." I really would appreciate any help you could give and I would definitely send you a gift card to your favorite spot. -me
-

TinyCore RedPill Loader Build Support Tool ( M-Shell )
Tibag replied to Peter Suh's topic in Software Modding
So I actually tried to boot with the latest loader by just keeping my disk 0 (SATA 1:0, meant to be that volume 1) without any disk. When I try to recover it I get the "No drives detected in DS3622xs+". I feel like this is the source of all my issues. Does anyone know how to solve? In Junior UI I can see from dmesg: and I am just no sure a re-install would work. -
Firstly, appologies, I know I've read about this somewhere previously, but a search didn't find me anything... I've been running my HP Microserver N54L (I think that is gen7?) for a while with 4 drives, and I want to stick a 5th in. I believe that can be done by fitting it to the optical bay, but some kind of BIOS settings / mod are required to do so? Does anyone have a handy link to where / how to do this please? The few I've located elsewhere all seem to have expired (I know, I'm a bit late to this particular party... ) TIA!
-
Converting ds1515+ into ds1517+ DSM 7.2
Synology_Service replied to K4L0's topic in Hardware Modding
I'm gonna try to get a formula to do it. Now I happen to be lucky and have many BIOS versions of the DS1515+.Read right off the chips. I use them when restoring corrupted ones. I can say. The bios update when you install DSM it is in the DSM.pat file update. Mainly on the later DSM 7.x Pat files. So Synology is placing the bios update in the pat file. What I am worried about is one thing I tested with the script above. This works perfect on the latest release of DSM 7.2. But I suspect it will brick the system when DSM7.3 comes out. As a rewrite will happen to the bios. Synology has been getting tricky with this. Mainly to support their drive compatibility. So only you can use their drives in the system for the future. On newer models. Not on older units as much. But it still makes changes to the bios when you update past DSM 7.2x or higher. As they are released. Now faking the bios as a DSM 7.3, and doing the pat file as 7.3. The system bricked on my test side. It booted. But the drive array was lost. And all bay lights lit solid. So I had to reinstall the old bios that had DSM 6.2.4. And it came back. ANd now is normal again. The fake DSM7.3 did something weird to the drive array. All bay lights lit up, and no drive detected. So make sure you have a backup of your old bios just in case. The chip is a N25Q064A 3v. Now I was also thinking. Why not keep the old DSM. And just never do anything inside the NAS. But change the app to install in your NAS. Like take a DS1517+ app you might like. And change a few things on it. And it install it on your 1515+. Much to research and try. Also a quick note. When it comes to updating to DSM 7.x.x We never recommend to update past DSM 6.2.4. As you end up losing so much. Photostation gone. To a rinky thing called Photos. Below is a copy and paste of my Reddit post about this topic. Something to read if you have time. ---------------------------------------------------------------------------------------------------- Please note to admins of Xepenology. Let me know if I ever wrote anything wrong her to remove. Will do ASAP. r/Synology_Service: TO UPDATE TO DSM7, OR NOT TO UPDATE. THAT IS THE QUESTION Alot of NAS owners, and even my own customers always debate this one topic, and even ask me about it if it is recommended. You won't believe it. But I always say NO. Don't update your NAS. Lets look at the pro and cons. First the pro's. DSM7 has a all new look. Feature rich, and has the latest updates to bug fixes and security flaws. Its kinda like going from Windows 10 to Windows 11. And that's pretty much where the story ends with DSM7. DSM 6 has all the same features. And also has its own updates. Like the recent update 7 added to DSM6. So you end up with DSM 6.2.4 Update 7. Like Windows that do security updates and feature packs. You're probably wondering why I said don't update? For 1. You can never go back that's for sure. Unless you know how to reprogram the Daughter board on the NAS. eDOM. You are on DSM7 forever. SO some of the bad in updating. DSM7 added some white lists for drives. And makes drive compatibility a issue. It doesn't carry support for WIFI dongle use. Surveillance Station comes with a loss in license counts. Photostation is gone to a rinky dink app called Photos. Doesn't work with the app anymore. The list is endless. And at your loss. Why I say. Never update unless you know you really have to. And need it. Why DSM6 is the best robust OS Synology made. Even though my real favorite is the older DSM 5.2. I personally think that was the best they ever made. During their heyday. It was tops. But 6.2.4 is the overall, all NAS best DSM ever made. Last of the good ones. Alot of owners really need to ask themselves. Do I need this update? Is my NAS doing ok where I am? If there's something in the latest update that applies to you. Then do it. Forget the security flaws. Nobody ever gets hacked in NAS history. Ever saw a post on one? NO!. Hackers want PC's. Not disk stations. Besides. What's to hack on so many of these. Your videos? Or pictures. What good is that stuff to hackers? Hackers want stuff that gets them into your emails and money. Like your PayPal account. Not your movies or pics. These are just Synology's way of getting you to update, so they can slowly migrate you over to the new "get our drives only and apps route" in my opinion. Yea that ever shrinking drive compatibility list. And yes. the future for Synology will be to use their drives only. No 3rd party drives like WD and Seagate. They are working on their own drives now as I write. And now even the current DSM7 omits many drives. So you can't use them like on the older DSM's. Also the apps. A Lot of this started as licensing for apps were expiring from Synology to 3rd party developers. Like surveillance station. Synology didn't want to pay for another license. But on the old DSM. You can still use it. This is just one app affected. There are more. Plus. Updates can be a issue. They are known to crash NAS's if something gets corrupted. I see it alot. Imagine you are sleeping during an automatic update, and or even there. Just to see a blue blinking power light forever. DSM and even app updates are like doing PC bios updates. If just one bit is off, and the checksum is not correct. Its a fail. you now lost your NAS, and anything else it can do. Has to go for service. And if you are out of warranty. Synology won't fix it. Their support centers are only RMA work under warranty. They aren't going to solder a new Bios or Daughter board on your NAS. Nope. Ends up here where we do that kind of work. Board level repairs. Chip changes. Bioses, you name it. So look at where you station is today. Is it doing its job like it always has? Then don't touch was isn't broken. Or decide. Do I really need this update to DSM7 from my old 6.2.4? Most likely not, and like 95% of the NAS owners out there. You don't need it. We also started to see this on the resale side. Where older Synology NAS's selling used. Have gone up alot in price. Even from the ones I sell. Like $400-$600 for a DS1512+. Same price as a 1817+ or newer. I also get many requests for NAS's only on DSM 6.2.4 or earlier. They don't want DSM 7 or higher. If its on DSM7. This kinda hinders sales for these. As only a select group of new comers usually get them. Not die hard Synology fans. No they don't want DSM7 if you truly know your NAS. And use the apps alot. Make sure you turn off automatic updates on your NAS. And take control. Don't let Synology do the update. You decide what needs updating if need be. If its working leave it. Forget the security update crap from Synology in my opinion. 99% chance it doesn't apply to you anyways. Today! I get many that come here who want downgrades. That too is rising. -
I recently installed Xpenology on a Terramaster F4-220 I picked up during the holiday sales that were going on. I noticed the hard drives were consistently operating at a very high temperature (50+ C while idle) so I decided to investigate how to control the fans. I had read elsewhere there is some BIOS option to drive the fans faster, but lacking the VGA dongle to get into the BIOS I figured I'd investigate how to control them from Linux. So I discovered the hardware contains an IT8772E chip for which Google helpfully brings up this datasheet: https://master-chip.ru/files/e0ec6325-b20e-079c-f0ce-275a3ec60f51/IT8772E-ITE.pdf I noticed that there is already a kernel driver for this chip, but since I only needed very limited capabilities (just the ability to write the fan PWMs) I decided to just write a custom script to do this. I'm sharing it here so others can take advantage of it. I'm guessing it wouldn't be hard to also drive the LEDs to the right colors as well but I haven't spent time on that since I never look at the LEDs anyway. The basic flow of the code is: Initialize the IT8772E chip Write a default PWM value for the fans Read the max hard drive temperature and use a PID loop to calculate a new PWM value to drive the max hard drive temperature to some setpoint After playing with the PID values for a few days I concluded that just using a P value was sufficient to give decent behavior so I just left kp = 1, ki = kd = 0. I just modified the script to make all of these things overridable in case someone wants to play around with it further without having to recompile. With defaults I find it settles to reasonable values in about 30 minutes. By default the script uses a setpoint of 37 C but again this can be overridden. I chose this after looking at various suggestions online, it seems 30-40 C is the safest range to maintain for average temps in terms of drive failure rate, so 37 C should give some buffer in case of sudden spikes in utilization that PID doesn't react to quickly enough. My argument parsing is really simple, you can use ./fancontrol -h to see how to use the script. Here are some sample uses: ./fancontrol (default behavior) ./fancontrol -h (print out usage info) ./fancontrol 1 40 (enable debug logging, setpoint = 40) ./fancontrol 0 37 255 (use the maximum PWM value initially before entering the PID loop) ./fancontrol 0 37 150 10 50 80 0 0 0 0 (use PWM value 150 initially and disable PID by setting all coefficients to 0, this would be like hard-coding the PWM to 150 forever) Anyway, I hope other Terramaster users find this useful. I suspect this will also work on similar Terramaster NASes that use the same chip for fan control but I have only tested on the F4-220 since that's what I own. I've attached the cpp source and a binary built for x86_64 running DSM 6.2 using Synology's build environment (ds.x64-6.2). Some side notes: The synostorage daemon already reads drive temperatures and reports them in /var/run/synostorage/disks/sd[abcd]. I initially used these to drive my code but later realized these values may be updated very infrequently (as in many minutes) so I decided to poll via smartctl. I still rely on the disks listed in /var/run/synostorage to know which drives to query. I don't read the CPU temp (or any other sensors). I think keeping the drives at 40 C or below will likely be a stronger constraint on fan speed than CPU usage, but if you expect heavy CPU usage at times when there isn't heavy storage utilization (unlikely for a NAS) then this may not be what you want. I chose an MIT license for the source I don't really intend to maintain this long term except for myself but if people have suggestions let me know and I can try to tackle them. You can run this at boot time using "Task Scheduler" fancontrol fancontrol.cpp
-
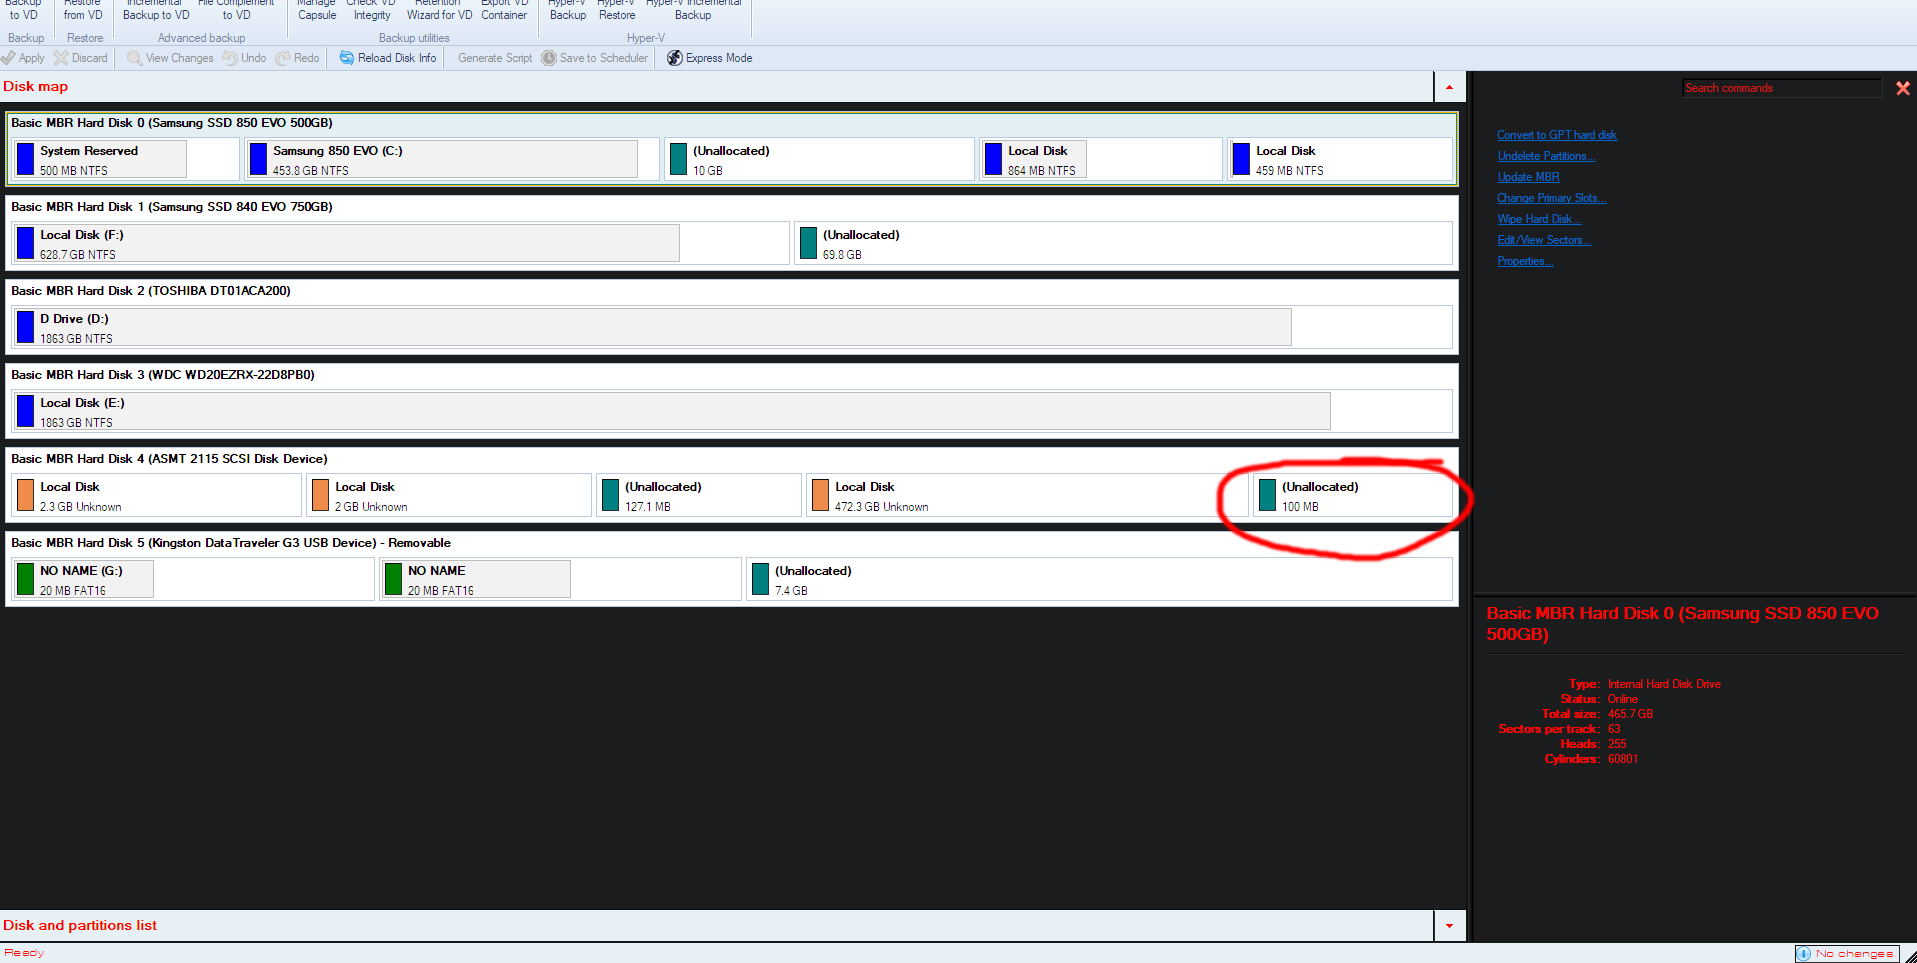
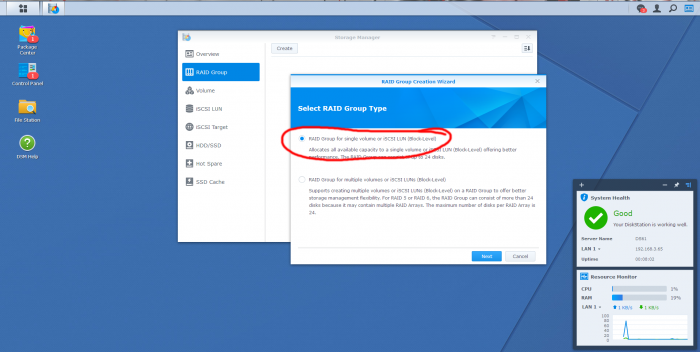
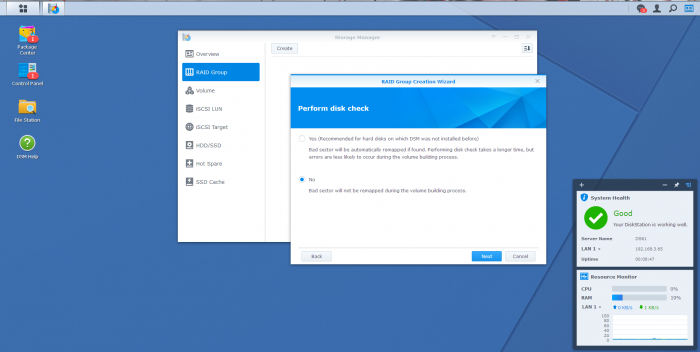
 In this tutorial we are going to place the bootloader alongside the DSM OS and the remaining storage Keep in mind that i use DSM 6.1 and not 6.2! What you need: Win32DiskImager Jun's loader v1.02b DS3615xs with MBR partition DSM 6.1 (15047) grub2 (i used grub2-for-windows) partition/hard disk manager (i used Paragon Hard Disk Manager 15) USB stick for the bootloader empty SSD First we are going to put the bootloader on a USB stick using Win32DiskImager Then we are going to install DSM normally After the installation of DSM and configuring your device name, username, etc goto the Storage Manager and create a RAID Group for only the SSD in Basic then click Apply and goto Volume and create one (doesn't matter what File system you used, but i use ext4) then click OK and shutdown the server Now we are going to do some fun things with the SSD drive where DSM and the storage are installed on put the SSD drive and the USB stick with the bootloader on it (we need some files later) out of the DiskStation machine and put them in your main PC Start up your partition/hard disk manager and look for the SSD that you installed DSM on it should look like this: Look at the last Unallocated partition, it should be 100MB big thats plenty for the loader so we are going to make a new partition (50MB is enough) and make sure you put it at the very end of the drive dont forget to put the drive as Active and assign a drive letter to it Now we are going to install grub2 on that 50MB partition i used this website to make one (because i use Windows) After you have install grub2 on that partition that we need to copy all the files from the 2nd partition of the usb drive and place them in the root directory of the 50MB partition don't forget to place the grub.cfg (from the 1st partition) in the /grub folder of 50MB partition Now unplug the SSD from your PC and place it in your DiskStation pc and boot it up (you dont need to edit anything just let it boot) you can use Synology Assistant to find your DiskStation pc and you should see a normal welcome page were you can login After you have logged in you should see an error message, that is because of the small FAT16 partition you will get that everytime you startup that machine Storage Manager should say that your system is healthy. Thats it, you can now use it normally without an USB bootloader also you can update to the latest 6.1 version if you want (make sure you don't install 6.2, haven't tested that one)
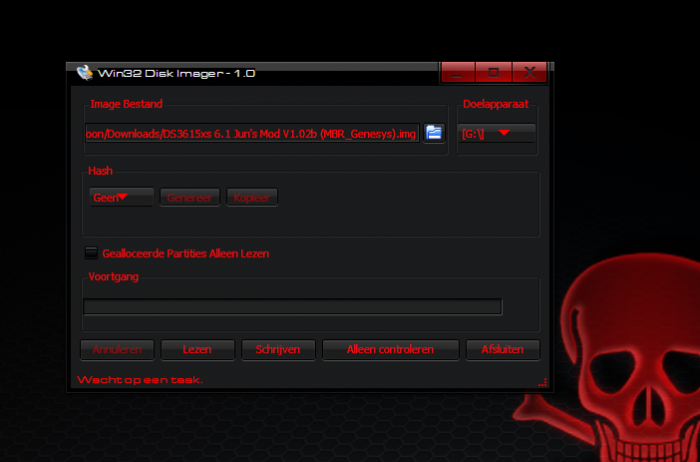


-
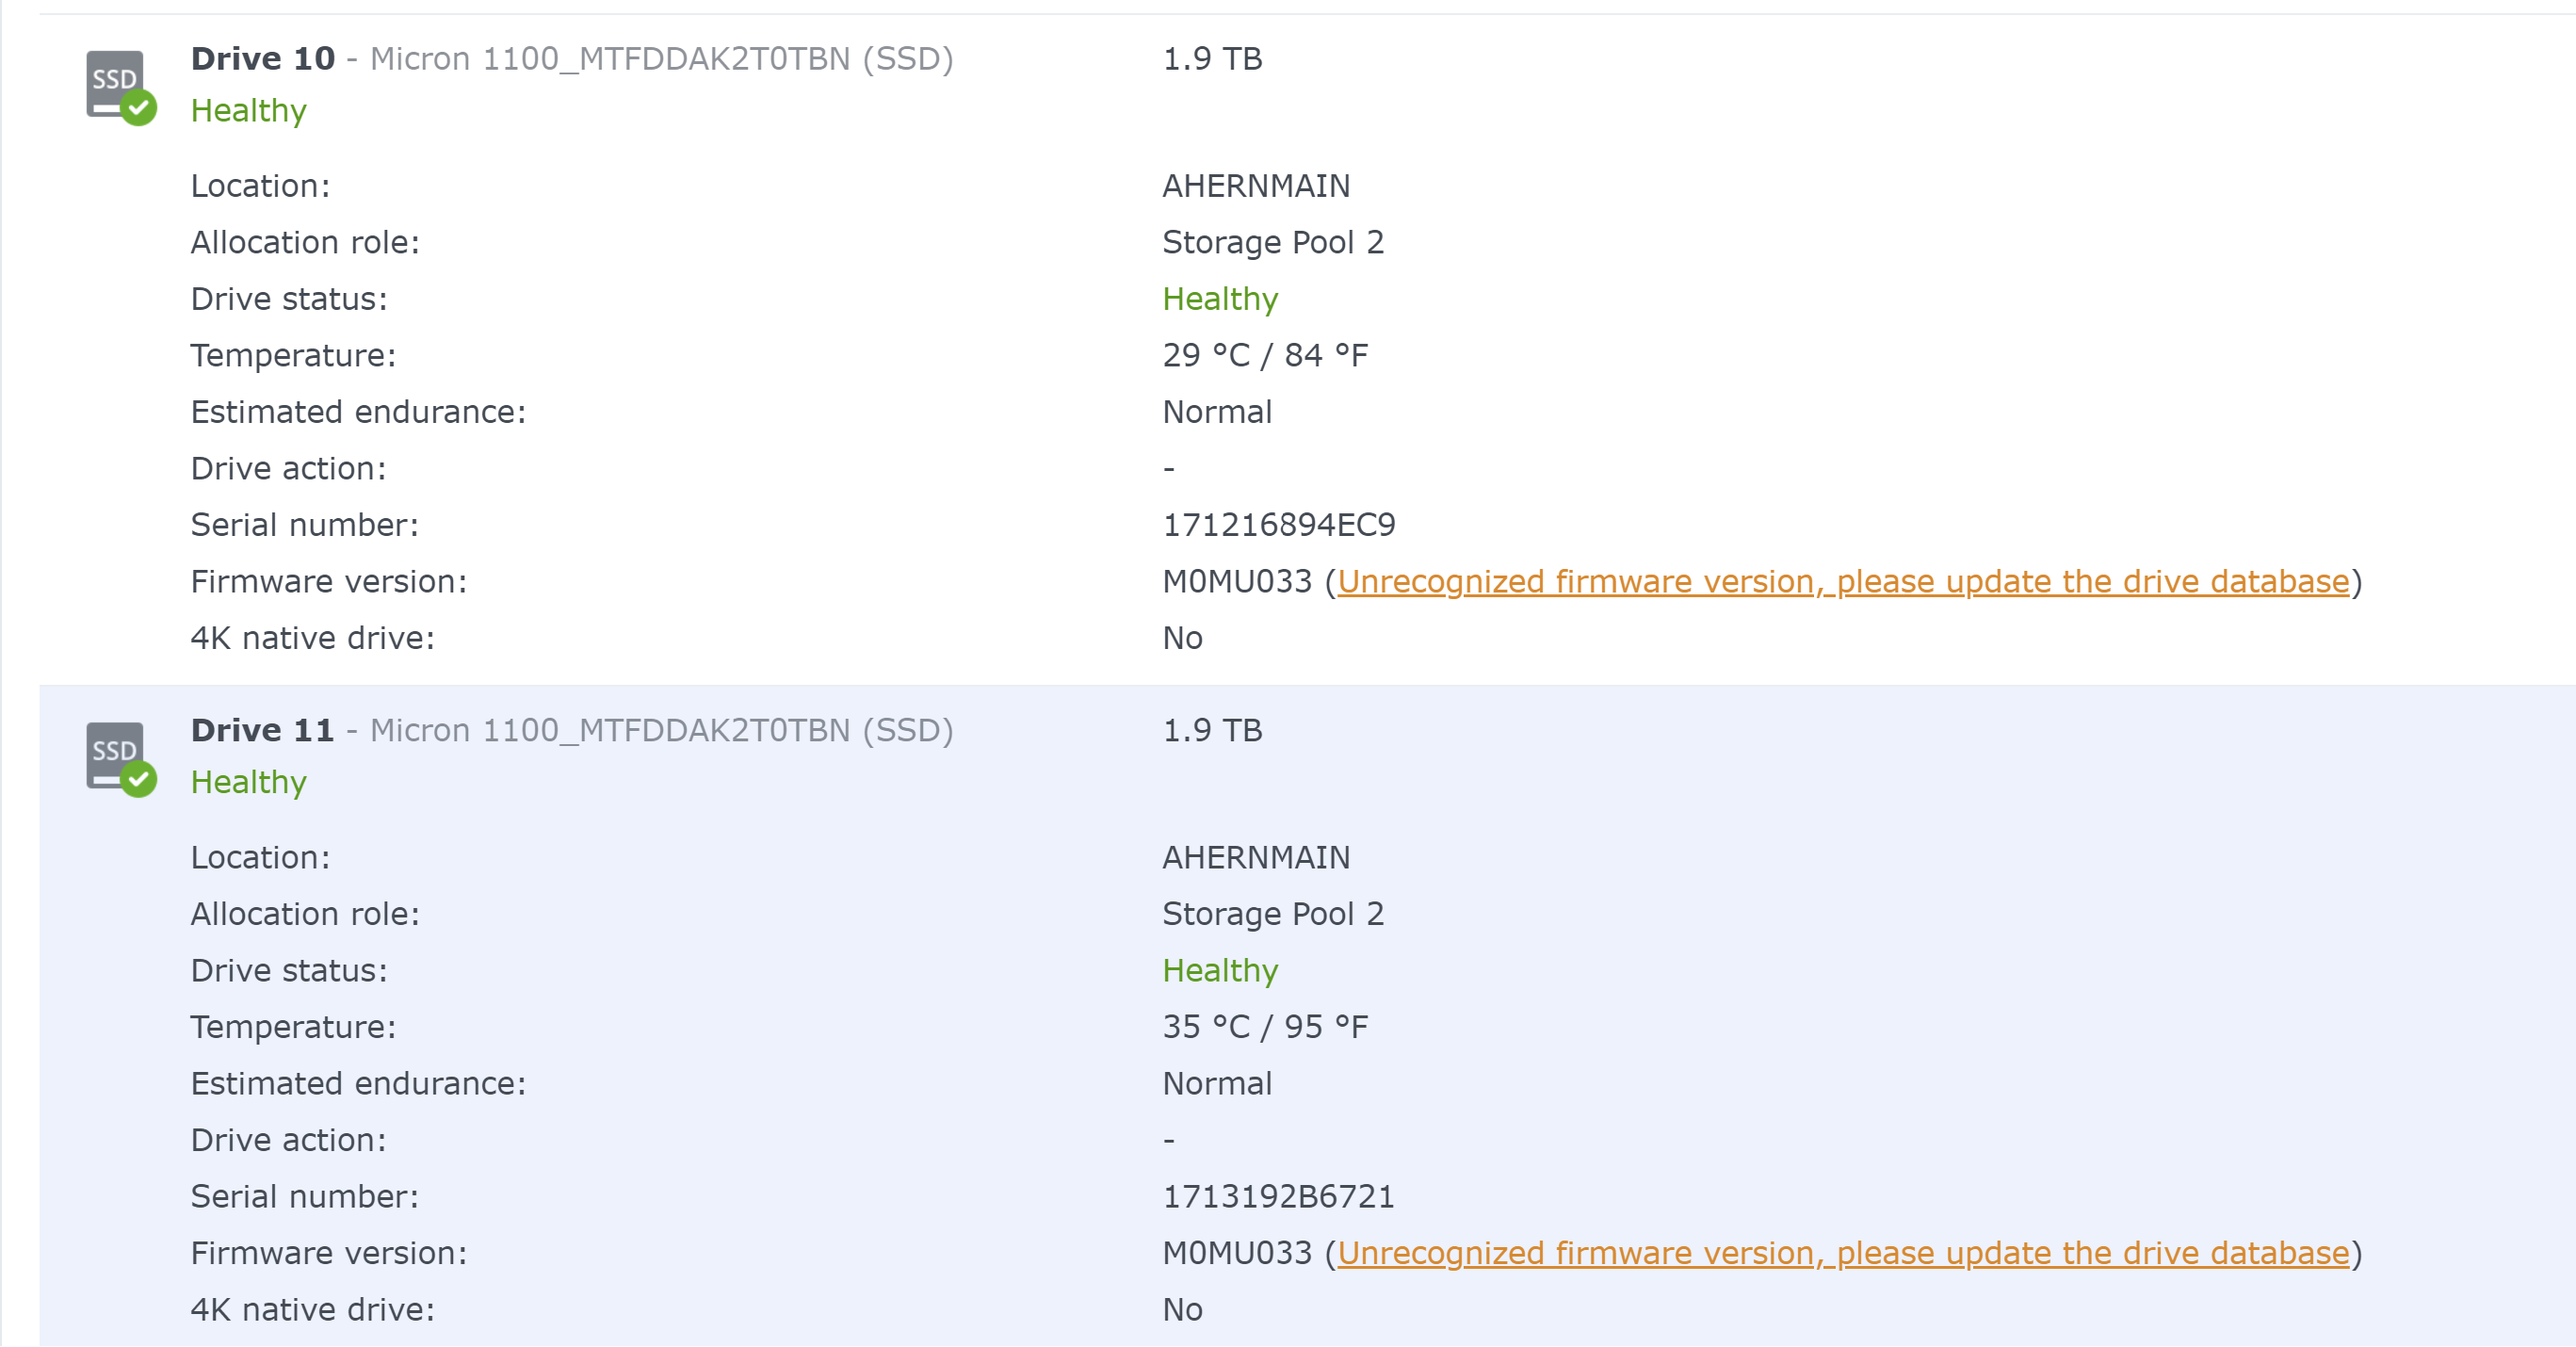
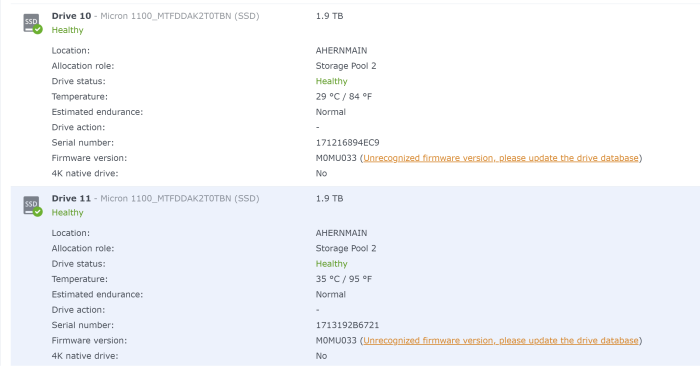
 So my Micron 1100 problem is back Mr. Peter. On DS918+ SHR using TCRP "Friend". But this time the problem is even worse, now BOTH micron 1100 drives are seeming incompatible.! Plus something happened to where it like reinstalled the OS or similar. I have yet to actually click the yellow messages, do you think i should click them? i will after this last repair i am trying. I've been putting the micron 1100s in and out of ds918 all morning trying to get them to take. One of them I've finally got to 67% repairing storage pool. But they have been failing earlier this morning when i tried. I've tested these drives in MANY programs such as Hard Disk Sentinel, Crystaldiskinfo, windows progs, and MiniTool partition. Zero Bad Sectors, ran long tests w/nothing bad resulting, i've FULLY wiped and erased the drives, not helping for DSM. Everything says they are like 95% healthy. What should i do peter? Am i the only one with this issue? Could it be because of 7.2.1-69057 Update 1 ? Should i roll back? Is there a fix yet? Anyone?
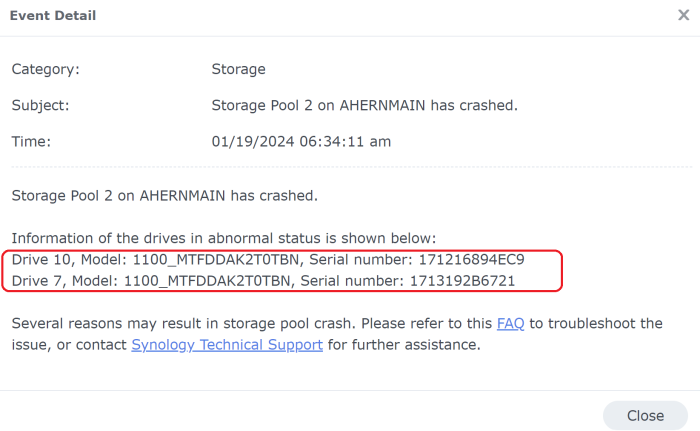
-
 I installed xpenology arc redpill 23.8.30 in 4TB hard drive. 2 days later I install new 2 hard drive that show on bios screen but they not found in xpenology. How to fix it ? Thanks
-
 Hello Everyone, Okay so the situation is this. My NAS shows up in the Synology Assistant. The drives are mapped, I can access in Windows File Explorer. It seems everything is working in the background. BUT I can no longer get into the NAS from my browser. I get this error "Sorry, the page you are looking for is not found." I spent a few hours searching the internet and this forum to see if I can fix it myself. I did not see any info. I've rebooted my router, tried other computers and browsers. I also rebooted the NAS few times. Hardware is bare metal. I am updated on the NAS to DSM 7.2.1-69057 Update 4 This problem came up when I shutdown the NAS and moved a drive from one of the sata ports. I was adding an SSD cache drive. After I rebooted, I can no longer get into the NAS from a web browser. I looked at Tiny loader on boot and it says up to date with 0.0.6 What do I do? I am awaiting your response before I do anything else. I was going to try recreating my Tiny USB boot drive but I will wait for you before I touch anything. THANKS!
 -
UPDATE- This is for someone else in the future should they run into this issue. This was EASY. I used the ARC method. I got my system up and running in 10 minutes. It's currently rebuilding my 3rd drive probably because I moved the location of the SATA connection on my motherboard from 3 to 4th. I went to GitHub link, and downloaded the xxx.img.zip. I unzipped and then burned the image to USB3 (16gb drive). Booted the computer/NAS and followed the directions. It was EASY. I picked some options/boxes such as marking the disk check healthy option (don't recall the exact name but you will see it...Synology now gives a warning for Seagate Ironwolf and other drives. That option removes the error from the NAS when you are running). I also picked the Photo station patch option. It did not work the first time, it went to the end of the 10 minutes and then said something went wrong. I reran the ARC/USB stick and picked FORCED REINSTALL and that worked. I'm currently rebuilding my 3rd drive because I originally moved where it was connected to the SATA port from 3rd to 4th position on the motherboard (if that made a difference hence the rebuild). IMPORTANT - WAIT WAIT and WAIT - Arc runs slow, just WAIT...it will eventually get to the end showing the root info saying ARC and telling you to log into your NAS. THANKS! I will try to follow what you said. YOU ARE RIGHT, I forgot what to do, haven't updated in a while. I did save my notes and original manual. I thought Tiny Loader updated itself whenever it reboots. Funny you mentioned ARC as I saw a youtube video few days ago. I'll look more into it.
-
Oh! Well, yes, you can ask me only here! 🤣 A brief history of bootloaders for DSM 7 (in my understanding I'm sorry if I make a mistake somewhere) TCRP by @pocopico | +---> ARPL by @fbelavenuto, It is no longer developing) ==> arpl-i18n renamed to ==> arpl-rr by @wjz304, due to some disagreements, the project is developing with some limitations, but it works | +---> M Shell for TCRP by @Peter Suh | +---> Arc Loader by Christian, who could not be identified on this forum (?) I would like to take this opportunity to express my deep gratitude to all the listed authors for their hard work!
-
Your unit is using the Intel Atom® Processor 230 (Diamondville), released in 2008 and was the 1st Generation of Atom and does support x86/x64. It does only have 1 Core and 2 Threads.... supports Max 2GB RAM, 4 Drives. What I don't know, is if the motherboard itself can be configured to boot from an attached USB, instead of it's default method, and even if DSM 5.x/6.x would support the rest of the integrated hardware (chipset, ethernet, etc.), I am not as well versed like some of the other long time experienced senior users/contributors to the DSM DIY would know. I'm lazy, impatient and don't really have a lot of time to fight with a litany of possible technical issues, so I followed K.I.S.S. (Keep It Super Simple). 🤠 I would say, IF it would work, your most likely best choice would the the DS3615xs... Ultimately, not to be Mr. Downer, it probably would be a better use of your time/effort, to find a newer, 2013 or better Intel system, that you can stuff several drives into and take the plunge with DSM 7.x instead. There are if I am not mistaken, several packages that are now also not supporting updates for DSM 6.x which might be limiting, depending on your use case. Here is the software tool you were looking for, I still had it buried in some archived folders on my NAS. Once you unzip it, you have all of the separate software tools that the XPENology Tool would download for you. I am sure several of them have been updated since that tool was created. I did update the version of Rufus in it's folder, to the latest and greatest. https://drive.google.com/file/d/1KSPvs8EZ3E3E6I6ZaljG9XRKfP7McVUj/view?usp=sharing Since DSM 5.x/6.x have been retired, their respective installers have been archived, so you'll also need this link to get all of that older stuff... https://web.archive.org/web/20230117045449/https://archive.synology.com/download/Os/DSM This is the best I can do for you!
-

TinyCore RedPill Loader Build Support Tool ( M-Shell )
Peter Suh replied to Peter Suh's topic in Software Modding
Assemble args: -u 0074c5b5:808d4c6e:3017a5a8:c86610be /dev/sda1 /dev/sdc1 /dev/sdd1 /dev/sde1 mdadm: /dev/md0 has been started with 3 drives (out of 12). Partition Version=8 Checking ext4 rootfs on /dev/md0 return value: 0 sdc, part of md0, has obsolete partition layout 8. Detected data partition on sda. Must not be fresh installation. ForceNewestLayout: Skipped Mounting /dev/md0 /tmpRoot I saw the log you provided. Are there only 4 discs in total? It is also strange that disk mdadm started on only 3 of the 12 disks. The sdc that is part of md0 has the deprecated partition layout 8. Data partition detected by SDA. Do not do a fresh install. It looks like the system partitions between disks are mixed up. If DS3622xs+ does not recognize all disks In order to recognize all disks, it would be a good idea to first complete the DSM version upgrade to the Device-Tree-based DS920+. After the system partition's mdadm is stabilized, it would not be a bad idea to change the model again and migrate. -
Since there have been some reports of a few complaints about performance on the new 1.04b - 6.2.1 loader - I thought I'd look into a simple benchmark for Synology.. There are other threads using movie conversions (and another one that uses dd for file transfer benchmark) but I wanted something quick and easy for a CPU test - with no installation.. Turns out you can use DD to do both.. Connect to the Synology using SSH, and run the following.. CPU.. dd if=/dev/zero bs=1M count=1024 | md5sum (it basically gives it a CPU intensive task to do - good enough for a rough guide) Question I have, if anyone's familiar, which disk does the dev/zero reside on? Is it in RAM or is it any and all of the disks in my machine as the system partition is synched to each disk? If it happens to use a HDD, rather than a SSD, what difference does that make and can we specify a different location (if disk is a bottleneck for this test)? DISK.. (I needed to use Sudo for this) sudo dd bs=1M count=256 if=/dev/zero of=/volumeX/share/testx conv=fdatasync Where volumeX/share is the volume and share you want to copy the file to.. It's case sensitive.. Be careful! Not sure if it tests using all cores (the second VM tested had 4 CPUs as opposed to 2) Now, the 1st of these machines is under load (web cams) but it gives a rough idea! For two bare metal machines I have.. 1.. J3455-ITX on DSM 6.2.1 DS918+ . 12GB. CPU = 217MB/s average (its under load, slightly) Disk = 146MB/s to HDD, 347MB/s to SSD. 2.. i3 4130 on Asus H87i-plus DSM 6.2U2 DS3617. 8GB CPU = 663 MB/s Disks later 2 Syno 'test' VMs running on ESXi.. 3. ESXi with i7 3770s on ASus P8z77v-pro DSM 6.21 DS3617. 16GB Both had CPU = 630MB/s Disks later but a quick test showed me I had an issue with one of my drives..
-
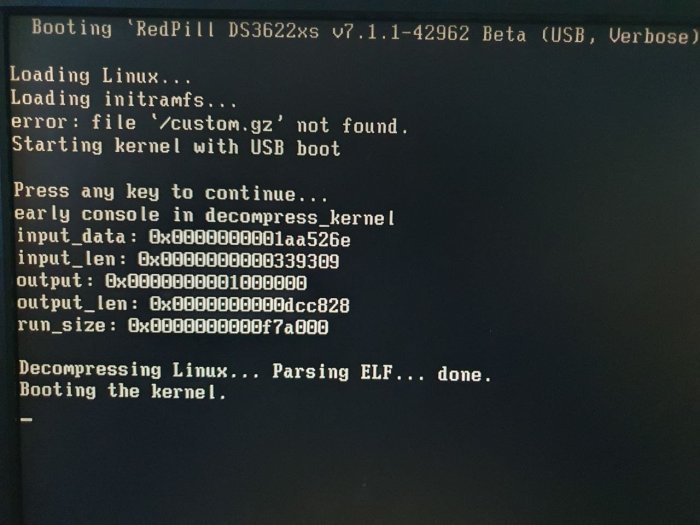
Hi all, I have been using a HP G7 N54L Microserver with the standard 4 drives (4x 2TB Seagate SATA NASware, ancient but still working) and embedded NIC, and a SanDisk 16GB USB3.0 flashdrive running DSM5.0 that was setup by a friend around 10 years ago and it has worked flawlessly but given the age of the software I figured it was time to upgrade to DSM7.1.1. I'm a noob to xpenology myself so please be gentle. I've read up a fair bit but I've still got a ways to go. I've been following the well written upgrade guide here https://tomvanveen.eu/installing-synology-dsm-7-x-on-a-hp-n54l-in-2022/ in combination with the excellent post by flyride here: Many people have had success with it but I've run into a problem during the build in TinyCore. First I flashed the BIOS successfully using Kamzata's ROM (https://www.bios-mods.com/forum/showthread.php?pid=75965#pid75965). I didn't realise this reset the BIOS clock which I thought might be the issue but I've since updated it and the issue persists. I've also disabled the C1E Support setting so it's not that. I'm using older TC v0.9.3.0 as recommended in the guide for N54Ls, with the BIOS/CSM/Legacy boot from USB flash drive image. I can run through all the commands successfully but when I boot into RedPill USB option in the GRUB menu I get this "error: file './custom.gz' not found" (pic attached) and my router is not assigning an IP address so I can't find Synology in Synology Assistant (checked the ports/cables so issue is not router related). I noticed these issues following the build command in the TinyCore terminal: menuentry 'RedPill DS3622xs v7.1.1-42962 Beta (USB, Verbose)' { menuentry 'RedPill DS3622xs v7.1.1-42962 Beta (SATA, Verbose)' { Updated user_config with USB Command Line : withefi earlyprintk syno_hw_version=DS3622xs+ console=ttyS0,115200n8 netif_num=1 pid=0x5580 earlycon=uart8250,io,0x3f8,115200n8 syno_port_thaw=1 mac1=9CB65407E0C3 sn=2030SQRH8LJAM vid=0x0781 elevator=elevator loglevel=15 HddHotplug=0 DiskIdxMap=00 syno_hdd_detect=0 vender_format_version=2 syno_hdd_powerup_seq=0 log_buf_len=32M root=/dev/md0 SataPortMap=6 Updated user_config with SATA Command Line : withefi earlyprintk syno_hw_version=DS3622xs+ console=ttyS0,115200n8 netif_num=1 pid=0x5580 earlycon=uart8250,io,0x3f8,115200n8 synoboot_satadom=1 syno_port_thaw=1 mac1=9CB65407E0C3 sn=2030SQRH8LJAM vid=0x0781 elevator=elevator loglevel=15 HddHotplug=0 DiskIdxMap=00 syno_hdd_detect=0 vender_format_version=2 syno_hdd_powerup_seq=0 log_buf_len=32M root=/dev/md0 SataPortMap=6 Generating GRUB entries for model :ds3622xsp_42962 in /home/tc ./rploader.sh: line 2260: /home/tc/include/grubmgr.sh: No such file or directory Failed to generate grub.cfg ./rploader.sh: line 2261: /home/tc/include/grubmgr.sh: No such file or directory Failed to add USB entry ./rploader.sh: line 2262: /home/tc/include/grubmgr.sh: No such file or directory Failed to add SATA entry ./rploader.sh: line 2263: /home/tc/include/grubmgr.sh: No such file or directory Failed to add SATA entry ./rploader.sh: line 2264: /home/tc/include/grubmgr.sh: No such file or directory Failed to add SATA entry cp: cannot create regular file '/home/tc/redpill-load/part1/boot/grub/grub.cfg': Permission denied grep: /home/tc/grub.cfg: No such file or directory Copying grub file /home/tc/grub.cfg to /home/tc/redpill-load/localdiskp1/boot/grub/grub.cfg cp: cannot stat '/home/tc/grub.cfg': No such file or directory menuentry 'RedPill DS3622xs v7.1.1-42962 Beta (USB, Verbose)' { menuentry 'RedPill DS3622xs v7.1.1-42962 Beta (SATA, Verbose)' { Setting next grub entry Setting next grub entry to Friend : sudo: /usr/local/bin/grub-editenv: command not found sudo: /usr/local/bin/grub-editenv: command not found Grub entry has been set to : Ramdisk in not compressed 48778 blocks 42649 blocks 91425 blocks Cleaning up files Caching files for future use No adequate space on TCRP loader partition /mnt/sde3 to cache pat file Found /mnt/sde3/auxfiles/ds3622xsp_42962.pat file Removing older cached pat files to cache current Found /home/tc/redpill-load/cache/ds3622xsp_42962.pat, copying to cache directory : /mnt/sde3/auxfiles Saving user session for future use. Saving current extensions -> OK ! Saving current user_config.json -> OK ! Also worth noting (I think) is that when I attempt to boot into RedPill in the GRUB menu, the TinyCore option is no longer present, which it seems to be on successful installs. Apologies for the long first post. In my rookie status I'm stumped so any advice on what I can look into in order to proceed will be greatly appreciated. If any additional info or part of the command logs will be useful I can include it.
-

TinyCore RedPill Loader Build Support Tool ( M-Shell )
sam juan replied to Peter Suh's topic in Software Modding
sorry if this has been asked before, but can you use the nvme alone as storage pool? i had install DS923+ m-shell to thinkcentre m715q with 1tb nvme and 256 ssd; DSM 7.2.1-69057 Update 4 detected both SSD and nvme, installed syno_enable_m2_volume.sh and was able to add nvme to storage pool; is there a way to use the nvme alone? when i tried to remove the ssd, it did not work; appreciate your help. thanks. -
Thank you for reply and guides. I didn't upgrade cuz don't want to lose any data or cause any trouble to upgrade newer version unless it got trouble. I will buy some used Intel 4th gen cpu and MB to build new one. If I put back old boot usb and 6x 6TB drives back, it won't work? If new hardware build, can I just install new DSM 7.1 with new usb loader TCRP 0.8, or I need to go back dsm5.2 first then upgrade to dsm 6 then 7? Thanks
-

Is there a maximum number of drives DS918+ can detect?
rafoloru posted a question in General Questions
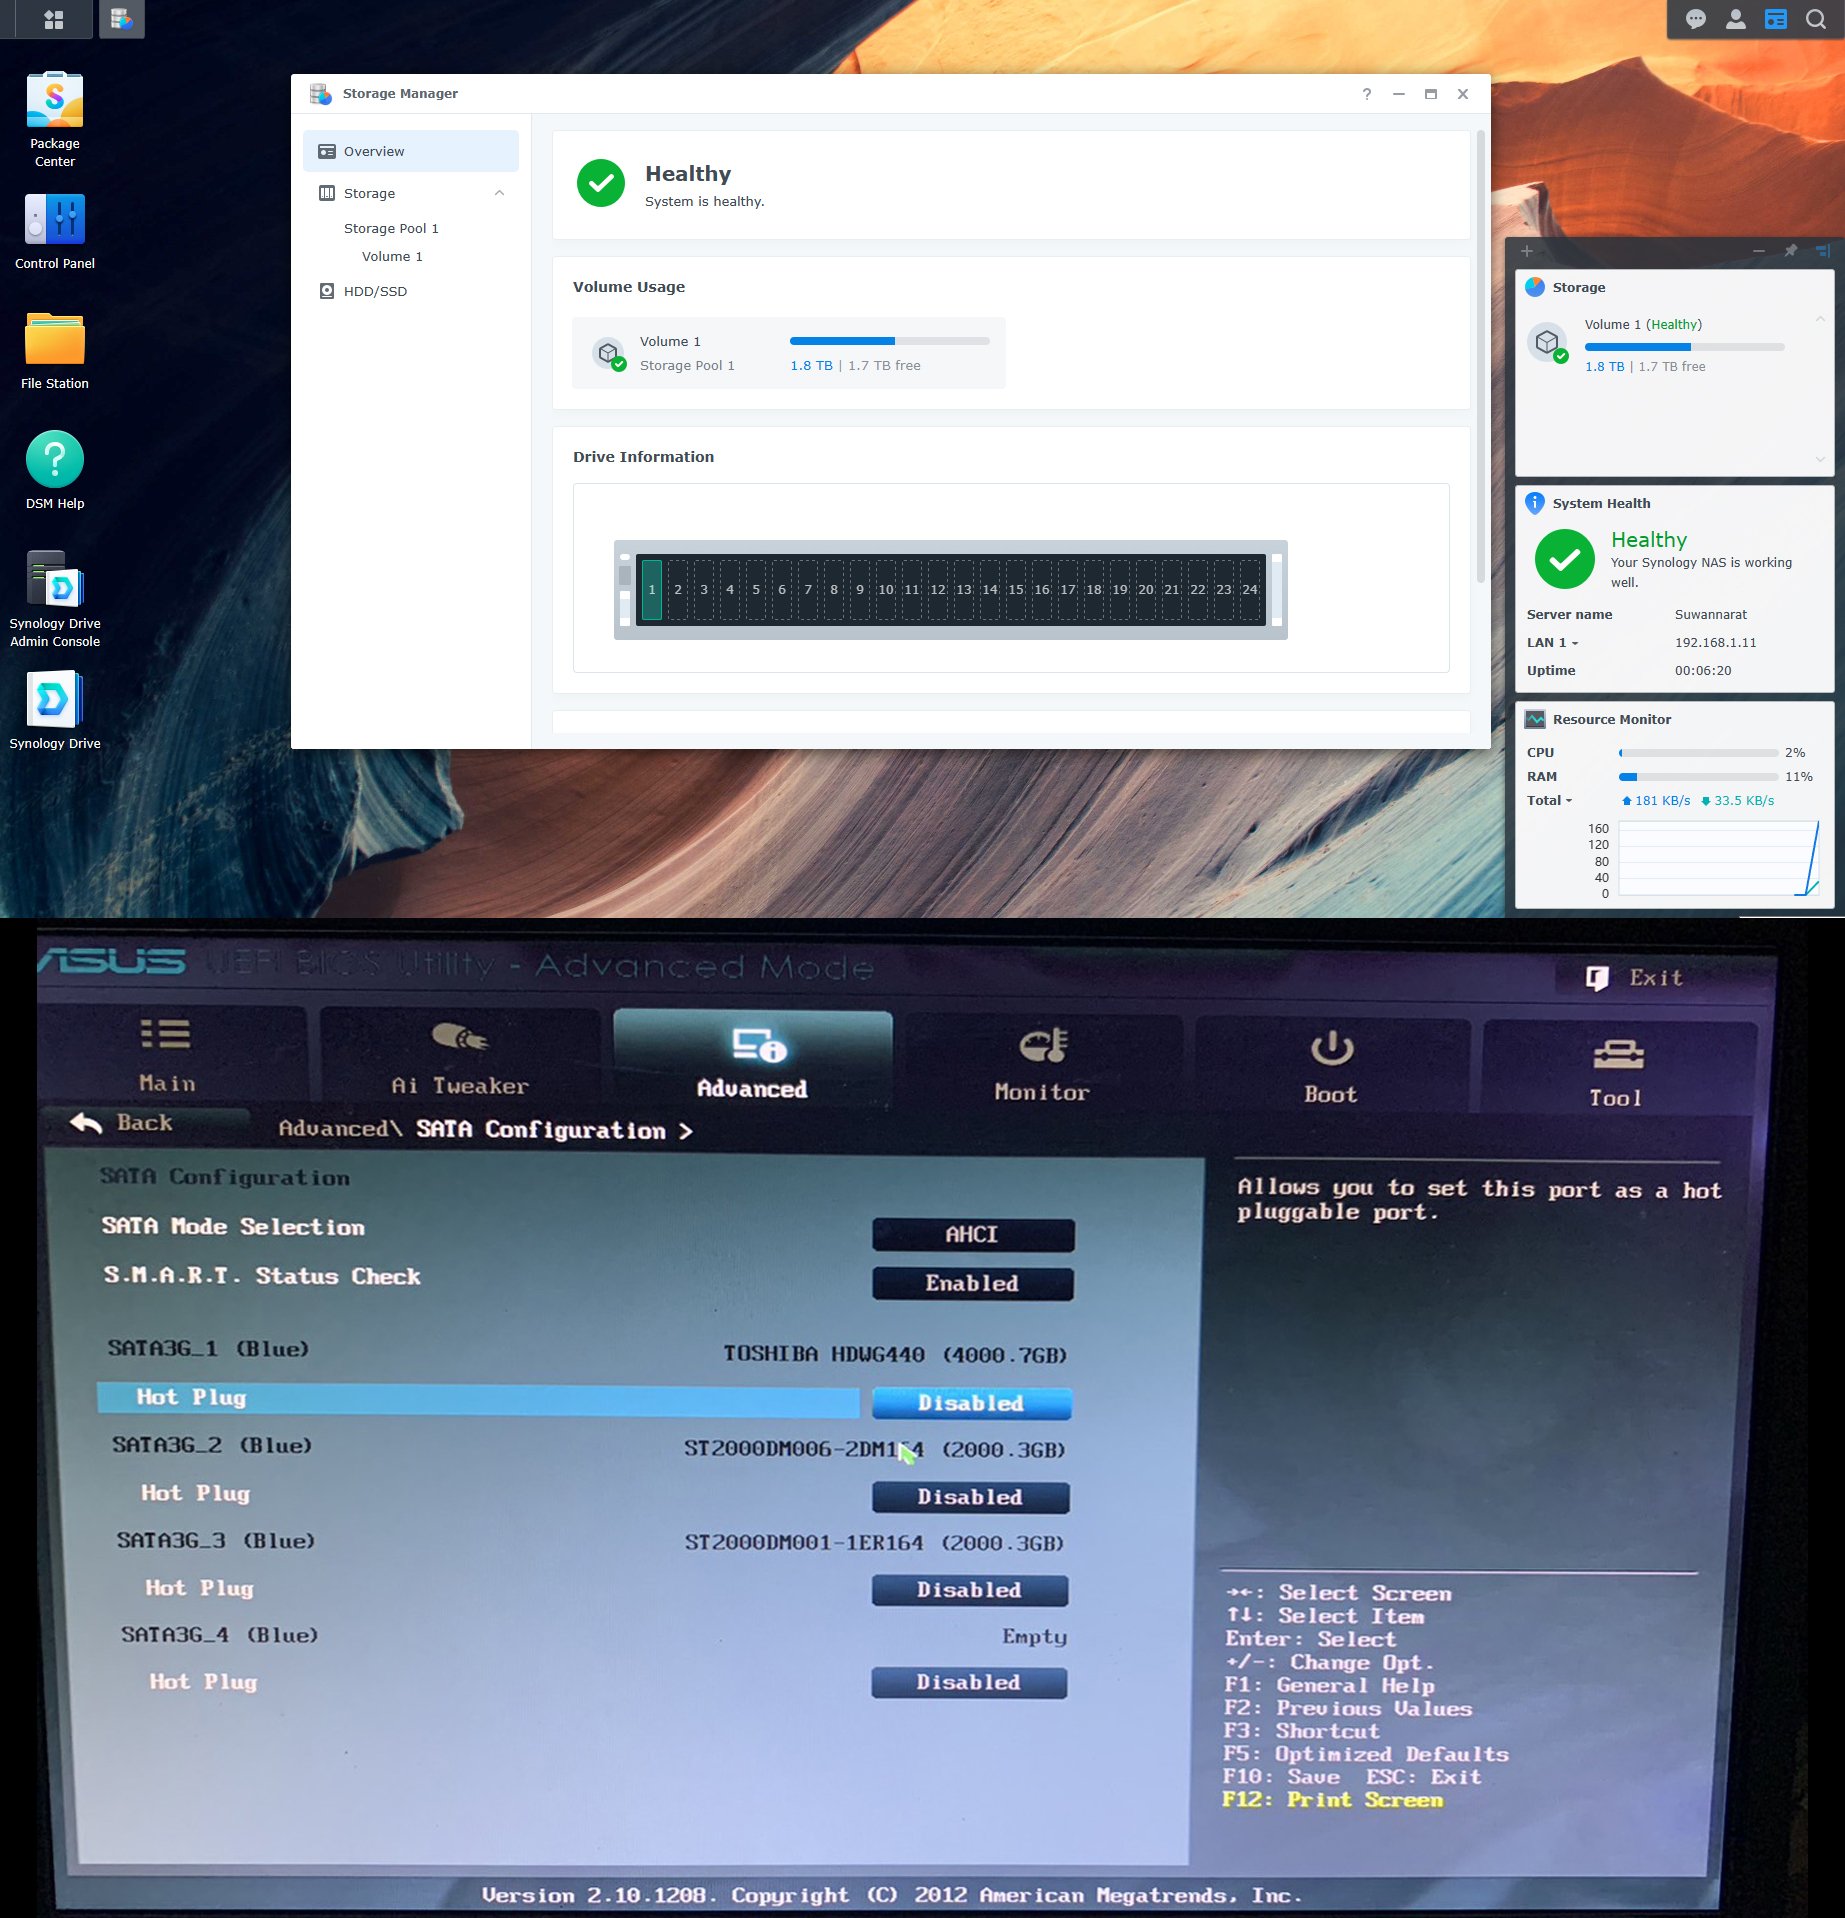
Hi, I'm building a new NAS with arpl-i18n and everythings goes well, except that I want to add 8 drives but the system only detect 6 of them (yes the two drive's works, I took them from an old Synology setup ) - I have 4 integrated SATA port on my motherboard and I added a PCI-e card of 4 additional SATA port. - My SATA PCI-e card (https://www.amazon.ca/-/fr/gp/product/B07T66ZXMT/ref=ppx_yo_dt_b_search_asin_title?ie=UTF8&psc=1) - DSM 7.2-64570 Update 1 Is there a limit the DS918+ can detect? Thanks -
Develop and refine the DVA1622 loader
dyter replied to pocopico's topic in Developer Discussion Room
I don't need M2 or msata, only mPCI slot is usefull for me, because I use 3x SATA SSD drives And finally I order the J5040 because J4125 is out of stock -

Develop and refine the DVA1622 loader
dimakv2014 replied to pocopico's topic in Developer Discussion Room
Thats mSATA adapter on image and not m.2. Moreover if miniPC has m.2 slot it must clearly state whether it supports m.2 sata or only pci-e nvme drives or both. You can't put m.2 sata (M+B Key) ssd into m.2 pci-e slot it will not work... Its basically same thing as trying to put DDR3 memory into DDR4 slot or vise versa
-
 I have an R720xd running RS4021 using Arpl-i18n-27.3.4 and flashed the H710 mini into IT mode using Fohdeesha's helpful process. Server bios doesn't recognize presence of hard drives and neither does ARPL in the course of building the loader. So while DSM sees the drives, I haven't been able to use sata_remap to get them in a sensible order. Minor incovenience at worst. Does anyone know whether there is a module or driver that can be loaded in the course of ARPL building the loader that would enable it to enumerate the harddrives?
 -
Develop and refine the DVA1622 loader
dimakv2014 replied to pocopico's topic in Developer Discussion Room
Nvme = pci-e, minipci-e. So like I said only 2 sata (regular or msata) means 2 drives in DVA1622 -
Develop and refine the DVA1622 loader
dimakv2014 replied to pocopico's topic in Developer Discussion Room
Not really, you will still have 2 drives since DVA1622 doesn't support nvme drives as a Storage, only for Cache. And its not loader problem its Synology DSM. There are however other than DVA models that do support nvme drives for storage but only as secondary drive so DSM cannot be installed on them.