Search the Community
Showing results for 'SataPortMap'.
-
@pocopico I had similar problem as @blindspot did.... I used the satamap command and got "sataportmap=2 and diskidxmap=00" and got similar error build 3622xs 7.1.0-42661. I changed sataportmap=1 and was able to see 1 hdd. I removed sataportmap line and was able to see 2 hdd. The board has 4 ports, couldn't get 3 and 4 to show a connected hdd. Was there ever a solution to this problem?
-
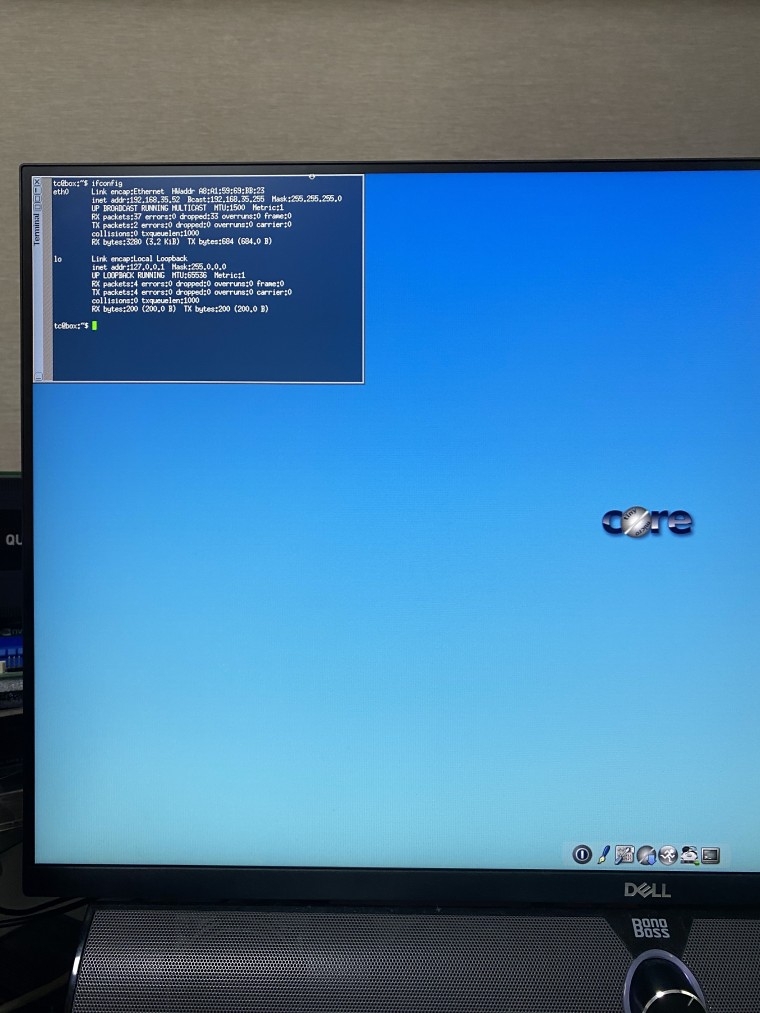
Hello, I downloaded and burn tinycore-redpill.v0.4.6 to my USB drive and boot it to my HP Microserver Gen 8 with 4 disks. However, I cannot make it work. Commands shown below. My questions: My system is using Intel(R) Celeron(R) CPU G1610T @ 2.30GHz with 2GB RAM. Is the DS3615xs / bromolow-7.0.1-42218 a good choice? There is no modules.alias.3.json.gz modules.alias.4.json.gz latestrploader.sh on my drive. Is it normal? There are SSL certificate problem: certificate is not yet valid errors. Are they expected? Do I need the pciid 8086d00001c02 and pciid 102bd00000533 extensions? If yes, how can I locate and include them? Many thanks! tc@box:~$ sudo ./rploader.sh update now Checking Internet Access -> OK Checking if a newer version exists on the repo -> gzip: modules.alias.3.json.gz: No such file or directory gzip: modules.alias.4.json.gz: No such file or directory sha256sum: latestrploader.sh: No such file or directory There is a newer version of the script on the repo should we use that ? [yY/nN]Y OK, updating, please re-run after updating cp: cannot stat '/home/tc/latestrploader.sh': No such file or directory Updating tinycore loader with latest updates Backing up files to /mnt/sde3//mydata.tgz Done. tc@box:~$ tc@box:~$ sudo ./rploader.sh serialgen DS3615xs now Serial Number for Model : 1330LWN027197 Mac Address for Model DS3615xs : 00:11:32:C4:8A:21 Should i update the user_config.json with these values ? [Yy/Nn] Y tc@box:~$ tc@box:~$ sudo ./rploader.sh satamap now HBA: 00:1f.2 Disks : 6 SataPortMap=6 DiskIdxMap=00 Should i update the user_config.json with these values ? [Yy/Nn] Y tc@box:~$ tc@box:~$ sudo ./rploader.sh identifyusb now Found USB SanDisk SerialNumber: 00003615093021102742 Vendor ID : 0x0781 Product ID : 0x5583 Should i update the user_config.json with these values ? [Yy/Nn] Y tc@box:~$ tc@box:~$ sudo ./rploader.sh build bromolow-7.0.1-42218 now Loader source : https://github.com/jumkey/redpill-load.git Loader Branch : develop Redpill module source : https://github.com/RedPill-TTG/redpill-lkm.git : Redpill module branch : master Extensions : Extensions URL : TOOLKIT_URL : https://sourceforge.net/projects/dsgpl/files/toolkit/DSM7.0/ds.bromolow-7.0.dev.txz/download TOOLKIT_SHA : a5fbc3019ae8787988c2e64191549bfc665a5a9a4cdddb5ee44c10a48ff96cdd SYNOKERNEL_URL : https://sourceforge.net/projects/dsgpl/files/Synology%20NAS%20GPL%20Source/25426branch/bromolow-source/linux-3.10.x.txz/download SYNOKERNEL_SHA : 18aecead760526d652a731121d5b8eae5d6e45087efede0da057413af0b489ed COMPILE_METHOD : toolkit_dev TARGET_PLATFORM : bromolow TARGET_VERSION : 7.0.1 TARGET_REVISION : 42218 REDPILL_LKM_MAKE_TARGET : dev-v7 KERNEL_MAJOR : 3 MODULE_ALIAS_FILE= modules.alias.3.json Checking Internet Access -> OK Checking if a newer version exists on the repo -> gzip: modules.alias.3.json.gz: No such file or directory gzip: modules.alias.4.json.gz: No such file or directory sha256sum: latestrploader.sh: No such file or directory There is a newer version of the script on the repo should we use that ? [yY/nN]Y OK, updating, please re-run after updating cp: cannot stat '/home/tc/latestrploader.sh': No such file or directory Updating tinycore loader with latest updates Backing up files to /mnt/sde3//mydata.tgz Done. tc@box:~$ tc@box:~$ sudo ./rploader.sh ext bromolow-7.0.1-42218 auto Loader source : https://github.com/jumkey/redpill-load.git Loader Branch : develop Redpill module source : https://github.com/RedPill-TTG/redpill-lkm.git : Redpill module branch : master Extensions : Extensions URL : TOOLKIT_URL : https://sourceforge.net/projects/dsgpl/files/toolkit/DSM7.0/ds.bromolow-7.0.dev.txz/download TOOLKIT_SHA : a5fbc3019ae8787988c2e64191549bfc665a5a9a4cdddb5ee44c10a48ff96cdd SYNOKERNEL_URL : https://sourceforge.net/projects/dsgpl/files/Synology%20NAS%20GPL%20Source/25426branch/bromolow-source/linux-3.10.x.txz/download SYNOKERNEL_SHA : 18aecead760526d652a731121d5b8eae5d6e45087efede0da057413af0b489ed COMPILE_METHOD : toolkit_dev TARGET_PLATFORM : bromolow TARGET_VERSION : 7.0.1 TARGET_REVISION : 42218 REDPILL_LKM_MAKE_TARGET : dev-v7 KERNEL_MAJOR : 3 MODULE_ALIAS_FILE= modules.alias.3.json Checking Internet Access -> OK Cloning into 'redpill-lkm'... fatal: unable to access 'https://github.com/RedPill-TTG/redpill-lkm.git/': SSL certificate problem: certificate is not yet valid Cloning into 'redpill-load'... fatal: unable to access 'https://github.com/jumkey/redpill-load.git/': SSL certificate problem: certificate is not yet valid Testing modules.alias.3.json -> File OK ------------------------------------------------------------------------------------------------ It looks that you will need the following modules : Found SATA Controller : pciid 8086d00001c02 Required Extension : No matching extension Found VGA Controller : pciid 102bd00000533 Required Extension : No matching extension Found Ethernet Interface : pciid 14e4d0000165f Required Extension : tg3.ko Searching for matching extension for tg3.ko Found Ethernet Interface : pciid 14e4d0000165f Required Extension : tg3.ko Searching for matching extension for tg3.ko ------------------------------------------------------------------------------------------------ tc@box:~$
-
shall i do like this ./rploader.sh update now ./rploader.sh fullupgrade now ./rploader.sh clean now ./rploader.sh serialgen DS3622xs+ ./rploader.sh satamap broadwellnk-7.1.0-42661 ./rploader.sh backup now ./rploader.sh build broadwellnk-7.1.0-42661 auto because i get this ( '>') /) TC (\ Core is distributed with ABSOLUTELY NO WARRANTY. (/-_--_-\) www.tinycorelinux.net tc@box:~$ sudo su root@box:/home/tc# ./rploader.sh update now Checking Internet Access -> OK Checking if a newer version exists on the repo -> There is a newer version of the script on the repo should we use that ? [yY/nN]y OK, updating, please re-run after updating Updating tinycore loader with latest updates Backing up files to /mnt/sda3//mydata.tgz Done. root@box:/home/tc# ./rploader.sh fullupgrade now Performing a full TCRP upgrade Warning some of your local files will be moved to /home/tc/old/xxxx.2022-Apr-13-21-10 Updating custom_config.json % Total % Received % Xferd Average Speed Time Time Time Current Dload Upload Total Spent Left Speed 100 149 100 149 0 0 631 0 --:--:-- --:--:-- --:--:-- 634 100 33840 100 33840 0 0 80380 0 --:--:-- --:--:-- --:--:-- 80380 Updating global_config.json % Total % Received % Xferd Average Speed Time Time Time Current Dload Upload Total Spent Left Speed 100 149 100 149 0 0 598 0 --:--:-- --:--:-- --:--:-- 598 100 5692 100 5692 0 0 13456 0 --:--:-- --:--:-- --:--:-- 5558k Updating modules.alias.3.json.gz mv: cannot stat 'modules.alias.3.json.gz': No such file or directory % Total % Received % Xferd Average Speed Time Time Time Current Dload Upload Total Spent Left Speed 100 154 100 154 0 0 626 0 --:--:-- --:--:-- --:--:-- 626 100 5591 100 5591 0 0 20257 0 --:--:-- --:--:-- --:--:-- 20257 Updating modules.alias.4.json.gz mv: cannot stat 'modules.alias.4.json.gz': No such file or directory % Total % Received % Xferd Average Speed Time Time Time Current Dload Upload Total Spent Left Speed 100 154 100 154 0 0 652 0 --:--:-- --:--:-- --:--:-- 652 100 89007 100 89007 0 0 319k 0 --:--:-- --:--:-- --:--:-- 319k Updating rpext-index.json % Total % Received % Xferd Average Speed Time Time Time Current Dload Upload Total Spent Left Speed 100 147 100 147 0 0 620 0 --:--:-- --:--:-- --:--:-- 620 100 192k 100 192k 0 0 311k 0 --:--:-- --:--:-- --:--:-- 1073k Updating user_config.json % Total % Received % Xferd Average Speed Time Time Time Current Dload Upload Total Spent Left Speed 100 147 100 147 0 0 650 0 --:--:-- --:--:-- --:--:-- 650 100 431 100 431 0 0 1036 0 --:--:-- --:--:-- --:--:-- 1036 Updating dtc mv: cannot stat 'dtc': No such file or directory % Total % Received % Xferd Average Speed Time Time Time Current Dload Upload Total Spent Left Speed 100 134 100 134 0 0 592 0 --:--:-- --:--:-- --:--:-- 592 100 146k 100 146k 0 0 258k 0 --:--:-- --:--:-- --:--:-- 1055k Updating rploader.sh % Total % Received % Xferd Average Speed Time Time Time Current Dload Upload Total Spent Left Speed 100 142 100 142 0 0 601 0 --:--:-- --:--:-- --:--:-- 601 100 75085 100 75085 0 0 278k 0 --:--:-- --:--:-- --:--:-- 278k Updating ds1621p.dts mv: cannot stat 'ds1621p.dts': No such file or directory % Total % Received % Xferd Average Speed Time Time Time Current Dload Upload Total Spent Left Speed 100 142 100 142 0 0 550 0 --:--:-- --:--:-- --:--:-- 550 100 3026 100 3026 0 0 6452 0 --:--:-- --:--:-- --:--:-- 369k Updating ds920p.dts mv: cannot stat 'ds920p.dts': No such file or directory % Total % Received % Xferd Average Speed Time Time Time Current Dload Upload Total Spent Left Speed 100 141 100 141 0 0 613 0 --:--:-- --:--:-- --:--:-- 613 100 2423 100 2423 0 0 4965 0 --:--:-- --:--:-- --:--:-- 4965 Please make sure you are using the latest 1GB img before using backup option Current /home/tc size is 2.4M , try to keep it less than 1GB as it might not fit into your image Should i update the sda with your current files [Yy/Nn] y Backing up home files to sda : Backing up files to /mnt/sda3//mydata.tgz Done. root@box:/home/tc# ./rploader.sh clean now Clearing local redpill files root@box:/home/tc# ./rploader.sh serialgen DS3622xs+ Serial Number for Model : 20C0SQRATV8CE Mac Address for Model DS3622xs+ : 00:11:32:95:45:C2 Should i update the user_config.json with these values ? [Yy/Nn] y root@box:/home/tc# ./rploader.sh satamap broadwellnk-7.1.0-42661 Machine is VIRTUAL Hypervisor=VMware Running on VMware, Possible working solution, SataPortMap=1 DiskIdxMap=00 root@box:/home/tc# ./rploader.sh backup now Please make sure you are using the latest 1GB img before using backup option Current /home/tc size is 2.4M , try to keep it less than 1GB as it might not fit into your image Should i update the sda with your current files [Yy/Nn] y Backing up home files to sda : Backing up files to /mnt/sda3//mydata.tgz Done. root@box:/home/tc# ./rploader.sh build broadwellnk-7.1.0-42661 auto Rploader Version : 0.7.0.1 Loader source : https://github.com/pocopico/redpill-load.git Loader Branch : develop Redpill module source : https://github.com/dogodefi/redpill-lkm.git : Redpill module branch : develop Extensions : redpill-misc Extensions URL : "https://github.com/pocopico/redpill-load/raw/master/redpill-misc/rpext-index.json" TOOLKIT_URL : https://sourceforge.net/projects/dsgpl/files/toolkit/DSM7.0/ds.broadwellnk-7.0.dev.txz/download TOOLKIT_SHA : 0d9edca67d9e7e14c2529bbb58341b623936124d5264f71f1e4acbacf3ea202d SYNOKERNEL_URL : https://sourceforge.net/projects/dsgpl/files/Synology NAS GPL Source/25426branch/broadwellnk-source/linux-4.4.x.txz/download SYNOKERNEL_SHA : d3e85eb80f16a83244fcae6016ab6783cd8ac55e3af2b4240455261396e1e1be COMPILE_METHOD : toolkit_dev TARGET_PLATFORM : broadwellnk TARGET_VERSION : 7.1.0 TARGET_REVISION : 42661 REDPILL_LKM_MAKE_TARGET : dev-v7 KERNEL_MAJOR : 4 MODULE_ALIAS_FILE : modules.alias.4.json SYNOMODEL : ds3622xsp_42661 MODEL : DS3622xs+ Checking Internet Access -> OK Checking if a newer version exists on the repo -> Version is current Cloning into 'redpill-lkm'... remote: Enumerating objects: 1219, done. remote: Counting objects: 100% (1219/1219), done. remote: Compressing objects: 100% (579/579), done. remote: Total 1219 (delta 850), reused 1000 (delta 633), pack-reused 0 Receiving objects: 100% (1219/1219), 479.21 KiB | 4.99 MiB/s, done. Resolving deltas: 100% (850/850), done. Cloning into 'redpill-load'... remote: Enumerating objects: 1702, done. remote: Counting objects: 100% (820/820), done. remote: Compressing objects: 100% (406/406), done. remote: Total 1702 (delta 561), reused 601 (delta 404), pack-reused 882 Receiving objects: 100% (1702/1702), 28.44 MiB | 23.79 MiB/s, done. Resolving deltas: 100% (830/830), done. No extra build option specified, using default <static> Using static compiled redpill extension Removing any old redpill.ko modules Looking for redpill for : ds3622xsp_42661 Getting file https://raw.githubusercontent.com/pocopico/rp-ext/master/redpill/releases/redpill-4.4.180plus-broadwellnk.tgz Extracting module Getting file https://raw.githubusercontent.com/pocopico/rp-ext/master/redpill/src/check-redpill.sh Got redpill-linux-v4.4.180+.ko Testing modules.alias.4.json -> File OK ------------------------------------------------------------------------------------------------ It looks that you will need the following modules : Found IDE Controller : pciid 8086d00007111 Required Extension : No matching extension Found VGA Controller : pciid 15add00000405 Required Extension : vmwgfx Searching for matching extension for vmwgfx Found SATA Controller : pciid 15add000007e0 Required Extension : No matching extension Found SATA Controller : pciid 15add000007e0 Required Extension : No matching extension [#] Checking runtime for required tools... [OK] [#] Adding new extension from https://raw.githubusercontent.com/pocopico/rp-ext/master/vmxnet3/rpext-index.json... [#] Downloading remote file https://raw.githubusercontent.com/pocopico/rp-ext/master/vmxnet3/rpext-index.json to /home/tc/redpill-load/custom/extensions/_new_ext_index.tmp_json ######################################################################## 100.0% [OK] [#] ========================================== pocopico.vmxnet3 ========================================== [#] Extension name: vmxnet3 [#] Description: Adds VMware vmxnet3 virtual NIC driver Support [#] To get help visit: <todo> [#] Extension preparer/packer: https://github.com/pocopico/rp-ext/tree/main/vmxnet3 [#] Software author: https://github.com/pocopico [#] Update URL: https://raw.githubusercontent.com/pocopico/rp-ext/master/vmxnet3/rpext-index.json [#] Platforms supported: ds1621p_42218 ds918p_41890 dva3221_42661 ds3617xs_42621 ds3617xs_42218 ds920p_42661 ds918p_42661 ds1621p_42661 ds918p_25556 dva3221_42218 ds3615xs_42661 ds3622xsp_42661 ds3622xsp_42218 dva3221_42621 ds3615xs_41222 ds918p_42621 ds3617xs_42661 ds3615xs_25556 ds920p_42621 ds918p_42218 ds1621p_42621 ds3615xs_42621 ds3615xs_42218 ds3622xsp_42621 [#] ======================================================================================= Found Ethernet Interface : pciid 15add000007b0 Required Extension : vmxnet3 Searching for matching extension for vmxnet3 Found matching extension : "https://raw.githubusercontent.com/pocopico/rp-ext/master/vmxnet3/rpext-index.json" ------------------------------------------------------------------------------------------------ Starting loader creation Checking user_config.json : Done Entering redpill-load directory Removing bundled exts directories Cache directory OK Found build request for revision greater than 42218 Getting required extraction tool ------------------------------------------------------------------ Checking tinycore cache folder Creating temp folder /tmp/synoesp % Total % Received % Xferd Average Speed Time Time Time Current Dload Upload Total Spent Left Speed 100 345M 100 345M 0 0 77.6M 0 0:00:04 0:00:04 --:--:-- 81.7M Entering synoesp extract rd.gz finish 42506 blocks Copying required files to local cache folder for future use Copying usr/lib/libcurl.so.4 to /mnt/sda3/auxfiles cp: cannot stat 'usr/lib/libcurl.so.4': No such file or directory Copying usr/lib/libmbedcrypto.so.5 to /mnt/sda3/auxfiles cp: cannot stat 'usr/lib/libmbedcrypto.so.5': No such file or directory Copying usr/lib/libmbedtls.so.13 to /mnt/sda3/auxfiles cp: cannot stat 'usr/lib/libmbedtls.so.13': No such file or directory Copying usr/lib/libmbedx509.so.1 to /mnt/sda3/auxfiles cp: cannot stat 'usr/lib/libmbedx509.so.1': No such file or directory Copying usr/lib/libmsgpackc.so.2 to /mnt/sda3/auxfiles cp: cannot stat 'usr/lib/libmsgpackc.so.2': No such file or directory Copying usr/lib/libsodium.so to /mnt/sda3/auxfiles cp: cannot stat 'usr/lib/libsodium.so': No such file or directory Copying usr/lib/libsynocodesign-ng-virtual-junior-wins.so.7 to /mnt/sda3/auxfiles cp: cannot stat 'usr/lib/libsynocodesign-ng-virtual-junior-wins.so.7': No such file or directory Copying usr/syno/bin/scemd to /mnt/sda3/auxfiles cp: cannot stat 'usr/syno/bin/scemd': No such file or directory Copying required libraries to local lib directory cp: cannot stat '/mnt/sda3/auxfiles/extractor/lib*': No such file or directory Linking lib to lib64 Copying executable cp: cannot stat '/mnt/sda3/auxfiles/extractor/scemd': No such file or directory Removing temp folder /tmp/synoesp Checking if tools is accessible ./rploader.sh: line 103: /bin/syno_extract_system_patch: No such file or directory Cound not execute Creating temp folder /tmp/pat Checking for cached pat file Found tinycore cache folder, linking to home/tc/custom-module Could not find pat file locally cached Configdir : /home/tc/redpill-load/config/DS3622xs+/7.1.0-42661 Configfile: /home/tc/redpill-load/config/DS3622xs+/7.1.0-42661/config.json Pat URL : https://global.download.synology.com/download/DSM/release/7.1/42661/DSM_DS3622xs%2B_42661.pat Downloading pat file from URL : https://global.download.synology.com/download/DSM/release/7.1/42661/DSM_DS3622xs%2B_42661.pat % Total % Received % Xferd Average Speed Time Time Time Current Dload Upload Total Spent Left Speed 100 348M 100 348M 0 0 60.5M 0 0:00:05 0:00:05 --:--:-- 60.8M File //mnt/sda3/auxfiles/ds3622xsp_42661.pat, is encrypted File //mnt/sda3/auxfiles/ds3622xsp_42661.pat, has been cached but its encrypted, re-running decrypting process Checking for cached pat file Found tinycore cache folder, linking to home/tc/custom-module Found locally cached pat file /home/tc/custom-module/ds3622xsp_42661.pat File /home/tc/custom-module/ds3622xsp_42661.pat, is encrypted Extracting encrypted pat file : /home/tc/custom-module/ds3622xsp_42661.pat to /tmp/pat sudo: /bin/syno_extract_system_patch: command not found extract latest pat Creating unecrypted pat file ds3622xsp_42661.pat to /home/tc/redpill-load/cache folder tar: ./VERSION: Not found in archive tar: Exiting with failure status due to previous errors Pat file sha256sum is : 427265d4e451b11e2f33ab5eac960da60ff2454f23363b86885419730cb00df1 Checking config file existence -> No config file found, please use the proper repo, clean and download again root@box:/home/tc# ./rploader.sh rploader.sh Version : 0.7.0.1 ---------------------------------------------------------------------------------------- Usage: ./rploader.sh <action> <platform version> <static or compile module> [extension manager arguments] Actions: build, ext, download, clean, update, listmod, serialgen, identifyusb, satamap, mountshare - build: Build the 💊 RedPill LKM and update the loader image for the specified platform version and update current loader. - ext: Manage extensions, options go after platform (add/force_add/info/remove/update/cleanup/auto) example: rploader.sh ext apollolake-7.0.1-42218 add https://raw.githubusercontent.com/pocopico/rp-ext/master/e1000/rpext-index.json or for auto detect use rploader.sh ext apollolake-7.0.1-42218 auto - download: Download redpill sources only - clean: Removes all cached files and starts over - update: Checks github repo for latest version of rploader - listmods: Tries to figure out required extensions - serialgen: Generates a serial number and mac address for the following platforms DS3615xs DS3617xs DS916+ DS918+ DS920+ DS3622xs+ FS6400 DVA3219 DVA3221 DS1621+ - identifyusb: Tries to identify your loader usb stick VID:PID and updates the user_config.json file - patchdtc: Tries to identify and patch your dtc model for your disk and nvme devices. - satamap: Tries to identify your SataPortMap and DiskIdxMap values and updates the user_config.json file - backup: Backup and make changes /home/tc changed permanent to your loader disk - backuploader: Backup current loader partitions to your TCRP partition - restoreloader:Restore current loader partitions from your TCRP partition - mountdsmroot: Mount DSM root for manual intervention on DSM root partition - postupdate: Runs a postupdate process to recreate your rd.gz, zImage and custom.gz for junior to match root - mountshare: Mounts a remote CIFS working directory Version : 0.7.0.1 ---------------------------------------------------------------------------------------- Available platform versions: ---------------------------------------------------------------------------------------- apollolake-6.2.4-25556 apollolake-7.0-41890 apollolake-7.0.1-42218 apollolake-7.1.0-42621 apollolake-7.1.0-42661 broadwell-7.0.1-42218 broadwell-7.1.0-42621 broadwell-7.1.0-42661 broadwellnk-7.0.1-42218 broadwellnk-7.1.0-42621 broadwellnk-7.1.0-42661 bromolow-6.2.4-25556 bromolow-7.0-41222 bromolow-7.0.1-42218 bromolow-7.1.0-42621 bromolow-7.1.0-42661 denverton-7.0.1-42218 denverton-7.1.0-42621 denverton-7.1.0-42661 geminilake-7.0.1-42218 geminilake-7.1.0-42621 geminilake-7.1.0-42661 v1000-7.0.1-42218 v1000-7.1.0-42621 v1000-7.1.0-42661 ---------------------------------------------------------------------------------------- Check global_settings.json for settings. root@box:/home/tc# hope i don t take your time is this right can you help please
-
I'm hitting a wall for the last couple days and have tried and read everything possible and could really use some help please. Host: ESXi 7.0u3 VM: Sata Controller 0 - Attach TinyCore VMDK to this controller at 0:0 PCI Passthrough: - LSI9211-8i (Currently only have 4 disks attached out of 8 possible) I do everything to get the build (broadwellnk-7.1.0-42661) up and running. Once DSM starts, it is showing my drives as 2,3,4,5 instead of 1,2,3,4. SataPortMap: "1" DiskIdxMap: "0F" I have tried adding SasIdxMap: 0 and doesn't change anything. I have tried changing the DiskIdxMap and it doesn't change it either. Whatever number I put in the SataPortMap, then an equal number of starting drives are taken. Example, if I change it to 2, then Disk 1 and 2 are empty and my Disks start at 3. If I remove SataPortMap or put it = 0, then my DSM won't load. Goal: My Drives passed through on my LSI9211-8i to be disks 1-8 and the loader to be hidden. I know this is probably something simple but I am hitting my head against a wall trying to solve this for my OCD brain. Any help will be appreciated. Thanks in advance.
-
Heu... What do you mean by "mount the usb"? I found 😉 @djvas335, what is your configuration for SataPortMap and DiskIdxMap ? I don't find the correct parameters. It's ok, I found.
-
Outcome of the update: SUCCESSFUL - DSM version prior update: DSM 6.2.3-25426 Update 3 - Loader version and model: Tinycore-Redpill 0.4.6 DS918+ - Using custom extra.lzma: NO - Installation type: BAREMETAL – Celeron G4900; Asrock H310M-HDV; 4GB DDR4, 3 disks, onboard NIC RTL8111H - Additional comments: Upgrade went without any issues. SataPortMap=4; DiskIdxMap=00; BIOS: C1E disabled, AHCI mode ON; Hot Plug enabled for all 4 SATA ports.
-
Physical SataPortMap=1 DiskIdxMap=00
-
Is this virtual or physical ? Also what is your SataPortMap
-
You're right and I have done it. Have you the same thing than me? with disk 12 and 13? Maybe, I should delete the lines with SataPortMap et DiskIdxMap...
-

Переход на 7.X.X с помощью tinycore-redpill
use-nas replied to Olegin's topic in Програмное обеспечение
В GRUB нажимаешь e правишь SataPortMap=1 потом F10 // диск должен быть подкл. к 1(0) сата ... -
Same sde DiskStation> fdisk -l Disk /dev/sde: 932 GB, 1000204886016 bytes, 1953525168 sectors Device Boot StartCHS EndCHS StartLBA EndLBA Sectors Size Id Type /dev/sde1 0,0,2 1023,255,63 1 4294967295 4294967295 2047G ee EFI GPT Disk /dev/synoboot: 3700 MB, 3879731200 bytes, 7577600 sectors Device Boot StartCHS EndCHS StartLBA EndLBA Sectors Size Id Type /dev/synoboot1 * 0,32,33 6,62,56 2048 100351 98304 48.0M 83 Linux /dev/synoboot2 6,62,57 15,205,62 100352 253951 153600 75.0M 83 Linux /dev/synoboot3 15,205,63 130,138,8 253952 2097151 1843200 900M 83 Linux this is usb config linux /zImage withefi earlyprintk syno_hw_version=DS3617xs console=ttyS0,115200n8 netif_num=1 pid=0x4100 earlycon=uart8250,io,0x3f8,115200n8 syno_port_thaw=1 mac1=XXX sn=XXX vid=0x13fe elevator=elevator loglevel=15 HddHotplug=0 DiskIdxMap=00 syno_hdd_detect=0 vender_format_version=2 syno_hdd_powerup_seq=0 log_buf_len=32M root=/dev/md0 SataPortMap=5 Sata_Remap="5>0"
-
OK, can you please change to SataPortMap=5 and add sata_remap="5>0" and send me the output of fdisk again ?
-
@pocopico , @blindspot Hey Guys, do you remember me reporting on ds3617xs above and asking if it is dsm 7.1 or dsm 7.0.1? Perhaps there is something wrong with sataportmap working on dsm 7.1 ds3617xs. When I went to install dsm 7.1 on ds3617xs, I was looking forward to the migration, but I saw that there was no installation The dsm does not seem to recognize the disk already installed. Shouldn't we check this part first? If dsm 7.0.1 is attempted, I can go back to dsm 7.0.1 and proceed with the same test.
-
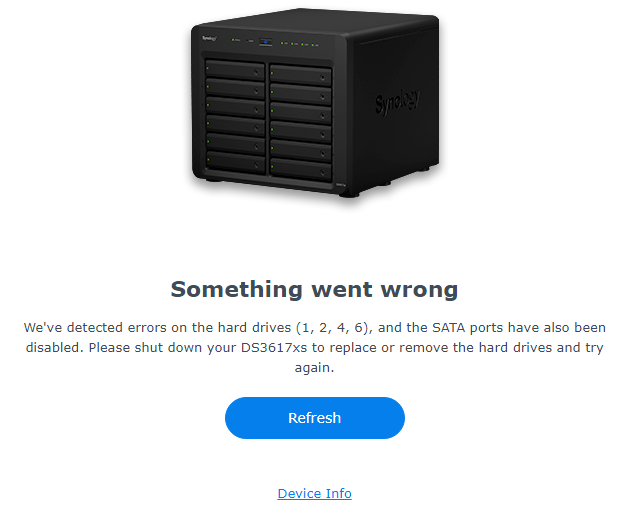
We have detected errors on the hard 1,2,4 drives and the SATA ports have also been disabled. Please shut down your DS3617xs to replace or remove the hard drives and try again. DiskStation> fdisk -l Disk /dev/sde: 932 GB, 1000204886016 bytes, 1953525168 sectors Device Boot StartCHS EndCHS StartLBA EndLBA Sectors Size Id Type /dev/sde1 0,0,2 1023,255,63 1 4294967295 4294967295 2047G ee EFI GPT Disk /dev/synoboot: 3700 MB, 3879731200 bytes, 7577600 sectors Device Boot StartCHS EndCHS StartLBA EndLBA Sectors Size Id Type /dev/synoboot1 * 0,32,33 6,62,56 2048 100351 98304 48.0M 83 Linux /dev/synoboot2 6,62,57 15,205,62 100352 253951 153600 75.0M 83 Linux /dev/synoboot3 15,205,63 130,138,8 253952 2097151 1843200 900M 83 Linux same as SataPortMap=5 and DiskIdsMap=00
-
Ok with no SataPortMap ?
-
SataPortMap=15 and DiskIdsMap=00 DiskStation> fdisk -l Device Boot StartCHS EndCHS StartLBA EndLBA Sectors Size Id Type /dev/synoboot1 * 0,32,33 6,62,56 2048 100351 98304 48.0M 83 Linux /dev/synoboot2 6,62,57 15,205,62 100352 253951 153600 75.0M 83 Linux /dev/synoboot3 15,205,63 130,138,8 253952 2097151 1843200 900M 83 Linux DiskStation> It doesn't find any disk
-
So here is your answer about low numbers. DVD is the third device (2) and DISK is the fifth (4) [0] ahci dir: /sys/class/scsi_host//host0 device dir: /sys/devices/pci0000:00/0000:00:1f.2/ata1/host0 [1] ahci dir: /sys/class/scsi_host//host1 device dir: /sys/devices/pci0000:00/0000:00:1f.2/ata2/host1 [2] ahci cd/dvd Slimtype DVD A DA8A6SH GAA2 /dev/sr0 dir: /sys/class/scsi_host//host2 device dir: /sys/devices/pci0000:00/0000:00:1f.2/ata3/host2 [3] ahci dir: /sys/class/scsi_host//host3 device dir: /sys/devices/pci0000:00/0000:00:1f.2/ata4/host3 [4] ahci disk ATA HGST HTS721010A9 A3J0 /dev/sda dir: /sys/class/scsi_host//host4 device dir: /sys/devices/pci0000:00/0000:00:1f.2/ata5/host4 [5] usb-storage disk USB DISK 2.0 PMAP /dev/sdb dir: /sys/class/scsi_host//host5 device dir: /sys/devices/pci0000:00/0000:00:14.0/usb1/1-3/1-3:1.0/host5 If you limit to 1/2/3/4 you leave the fifth device out. Can you try SataPortMap=15 ? search telnet on this topic, you will find numerous posts.
-
SataPortMap removed and DiskIdsMap=00

-
Can you please remove the SataPortMap from the linux line ?
-
on these settings, no hdd found. there is a sata odd connected. i've tried SataPortMap=1 and DiskIdsMap=00 SataPortMap=1 and DiskIdsMap=01 SataPortMap=1 and DiskIdsMap=02 SataPortMap=4 and DiskIdsMap=00 SataPortMap=3 and DiskIdsMap=00 SataPortMap=2 and DiskIdsMap=04 SataPortMap=3 and DiskIdsMap=00 no hdd found
-
Can't I physically point to SataportMap = 1 leaving only one SSD or HDD? Do you happen to have a Sata CD-ROM drive?
-
Dont have hotplug in bios settings. satamap now finds SataPortMap=5 and DiskIdsMap=00 but message says errors on hdd 1,2,4 00:1f.2 SATA controller: Intel Corporation 8 Series/C220 Series Chipset Family 6-port SATA Controller 1 [AHCI mode] (rev 05) (prog-if 01 [AHCI 1.0]) Kernel driver in use: ahci
-
Hello, I have a ASUS X550J laptop and can't figure out sata map. It has 2 sata ports, one for hdd and one for odd, but the lspci says it has a 6-port sata controller. The pic bellow is with sataportmap=6 and diskidxmap=00. If I set sataportmap=2 and diskidxmap=00 it says no hdd found. Any ideea? Thanks
-
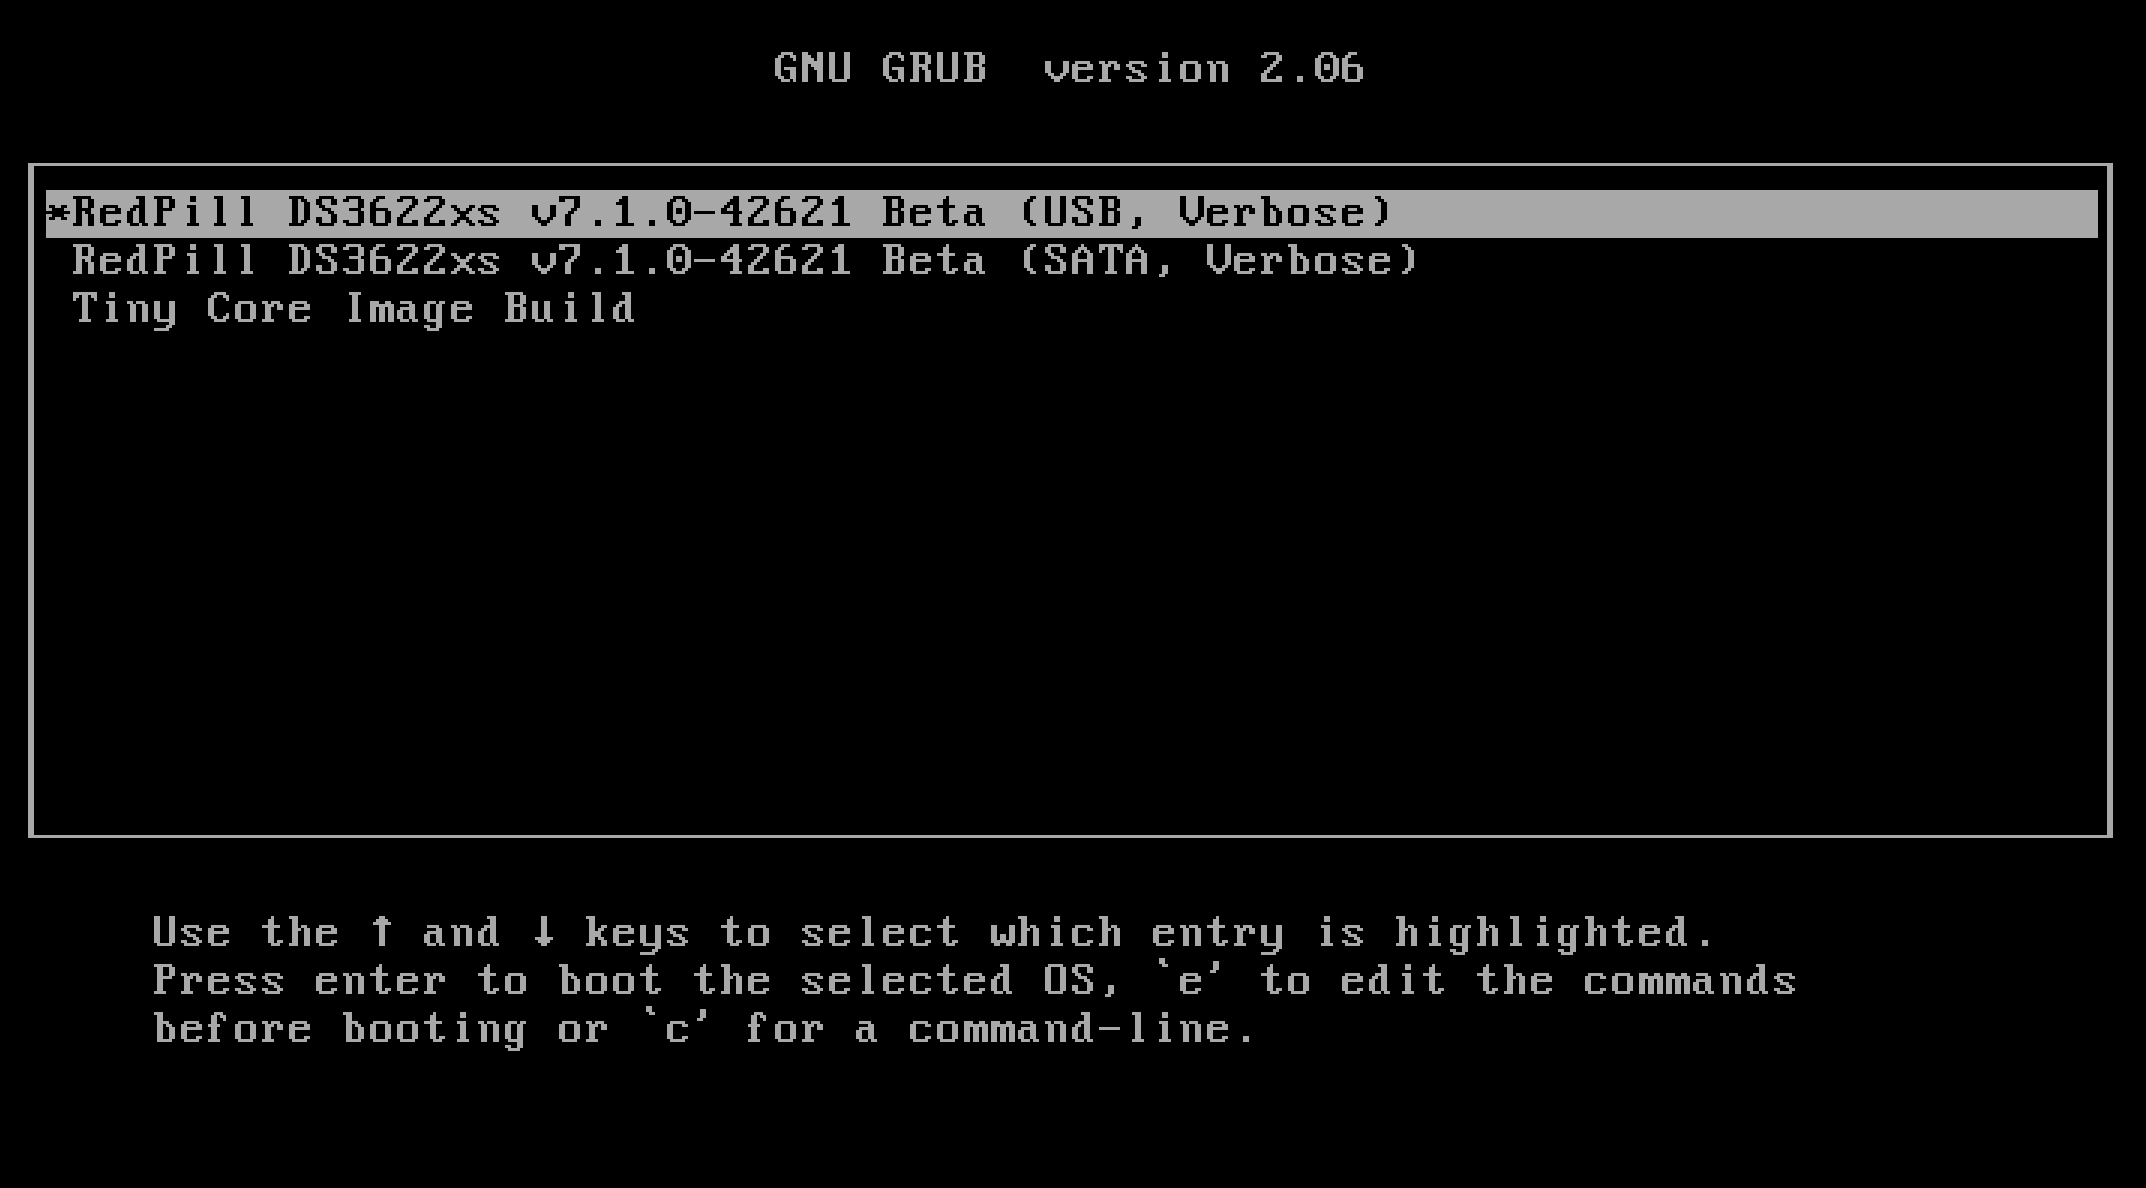
 Hello. If you are using an existing 7.0.1 after the version of the Synology DSM was updated to 7.1, you may want to update to 7.1 or this is a guide for those who want to install 7.1 from the beginning. For those who are new to this article, I will share it with you by adding and subtracting it from the existing 7.0.1 guide. It is a translation from Korean to English using a translator. Please understand if there is a slight misunderstanding. Existing RedPill, released last year, can generate IMG files directly through the compilation process of the bootloader only if Linux is available separately In the case of tinyCore RedPill, it comes completely with tinyCore Linux in the form of a USB boot image It's much easier without having to install and prepare linux separately. You can add the drivers you want to build after you select them and add them directly. The latest version of tinycore supports a total of 7 models (DS3622xs+/DS918+/DS3615xs/DS3617xs/DS1621+/DS920+/DVA3221) You can continuously change the boot loader on your own without re-imaging it (model/sn/mac, etc.) Tinycore supports both img for native installation and vmdk for virtual environments. 1.Preparing Bootloader IMG Use the Download button in the middle of the beam link below.Download the gz file In it 0.4.6 version img.You can decompress the gz file one more time and use the img file. (Full File) https://github.com/pocopico/tinycore-redpill (for LEGACY / EFI) https://github.com/pocopico/tinycore-redpill/raw/main/tinycore-redpill.v0.4.6.img.gz (for VMWARE) https://github.com/pocopico/tinycore-redpill/raw/main/tinycore-redpill.v0.4.6.vmdk.gz 2. Bootloader IMG File USB Recording Use the above tinycore-redfill.v0.4.6.img file to burn it with USB with a convenient image tool such as WinImage or Rufus. You don't need to adjust the configuration file in advance to modify the VID/PID/Serial/MAC/SATAPortMap like the JUN loader. If you want to create a USB image on a Mac or Linux like me, you can use the DD command below in the terminal. (Assuming that the DEVICE ID of the USB verified by diskutil is disk4) sudo diskutil unmountDisk /dev/disk4 sudo dd if=/Users/MyAccount/Downloads/tinycore-redpill.v0.4.5.img of=/dev/disk4 bs=1m sudo diskutil eject /dev/disk4 3.Starting TinyCore Linux USB boot by plugging it into a PC for xpenology (UEFI 1 partition or USB CSM can be booted) The tinyCore Linux (tinyCore Image Build menu) is running and appears. Run the far right icon terminal app here. Check the ip address automatically assigned an en0 LAN card with ifconfig. [tinyCore Linux Screen] 4. Adjust CONFIG after SSH connection Ssh connection with putty etc. from PC other than xpenology. ( id:tc / pass : P@ssw0rd ) I'm connecting. Tinycore Redfill is stabilizing right now PocoPico, the original author of this program, fixes bugs from time to time and announces rebuilding. There's a possibility that this rebuild will happen from time to time Even with the final image version of 0.4.6, changes can still be updated in real time over the Internet. Sometimes the rploader.sh file itself changes if there is a bug. If you've migrated from JUN xpenology, at tc@box:~$user_config.json Existing grub such as VID/PID/Sn/Mac/SataPortMap in user_config.json file.Refer to the cfg and move it as it is. For new installers, perform serial GEN/USB VID, PID auto-detect, SataPortMap auto-detect, etc. as shown below. For the next process, I will share the command focusing on the platform that I have completed the most normal verification. tc@box:~$./rploader.sh serialgen (select one from DS3622x+/DS918+/DS3615xs/DS3617xs/DS1621+/DS920+/DV3221) tc@box:~$ ./rploader.sh identifyusb now tc@box:~$./rploader.sh satamap now (no HBA card user required) You can see that the contents of user_config.json have been changed automatically. Finally, the commonality of existing users and new installers is tc@box:~$catuser_config.json If you assume that there are 4 internal Sata ports, SataPortMap = "4", DiskIdxMap = "00" Please check if it's changed to the back. After find.synology.com, you may not be able to find SATA HDDs during DSM installation. The following is an example of a 6-port SATA additional expansion card. SataPortMap = "46", DiskIdxMap = "0000" (Except for those who use H200, H310, H710, etc. cards, you don't have to clear the options for this SataPortMap and DiskIdxMap itself and use it. Please erase the lines of the above two options with the vi editor and organize them well so that there are no Syntex errors. Of course. ./rploader.sh satamap now command is not required.) 5.BIOS Internal SATA Port Hot Plug disable -> enable Handling (Important) To avoid temporarily reducing the number of SATA PortMap maps set above by the number of HDDs physically connected by the Sata cable during the DSM installation process: Make sure to turn on the Hot Plug function. This reduces the probability of encountering an error message stating that the above automatically recognizes the number of SATAPortMaps and the HDD is not found. Please refer to the link below for the relevant details highlighted by TheSTREET. http://www.2cpu.co.kr/nas/37891 6.Add boot loader extension driver after SSH connection (optional) (You can skip this part. The required expansion driver is automatically discovered and received during BUILD 6 process.) A detailed list of extension drivers can be found below. https://github.com/pocopico/rp-ext The supported platforms are as follows: DS918 apollake, DS3615xs bromolow, DS3617xs broodwell, and ds3622xs+broadwellnk. In my case, I added three types of extension drivers: Realtech, Intel LAN, and DELL PERC as follows. tc@box:~$ ./rploader.sh ext broadwellnk-7.0.1-42218 add https://raw.githubusercontent.com/pocopico/rp-ext/master/r8101/rpext-index.json tc@box:~$ ./rploader.sh ext broadwellnk-7.0.1-42218 add https://raw.githubusercontent.com/pocopico/rp-ext/master/r8125/rpext-index.json tc@box:~$ ./rploader.sh ext broadwellnk-7.0.1-42218 add https://raw.githubusercontent.com/pocopico/rp-ext/master/r8152/rpext-index.json tc@box:~$ ./rploader.sh ext broadwellnk-7.0.1-42218 add https://raw.githubusercontent.com/pocopico/rp-ext/master/r8168/rpext-index.json tc@box:~$ ./rploader.sh ext broadwellnk-7.0.1-42218 add https://raw.githubusercontent.com/pocopico/rp-ext/master/r8169/rpext-index.json tc@box:~$ ./rploader.sh ext broadwellnk-7.0.1-42218 add https://raw.githubusercontent.com/pocopico/rp-ext/master/igp/rpext-index.json tc@box:~$ ./rploader.sh ext broadwellnk-7.0.1-42218 add https://raw.githubusercontent.com/pocopico/rp-ext/master/e1000/rpext-index.json tc@box:~$ ./rploader.sh ext broadwellnk-7.0.1-42218 add https://raw.githubusercontent.com/pocopico/rp-ext/master/e1000e/rpext-index.json tc@box:~$ ./rploader.sh ext broadwellnk-7.0.1-42218 add https://raw.githubusercontent.com/pocopico/rp-ext/master/mpt3sas/rpext-index.json 7.Build Boot Loader After SSH Connection (Two Step Update - TSU) If you are done adding the above extension drivers, build the bootloader at the end. After 7.0.1 build, check if the custom-module -> /mnt/sdb3/auxfiles directory is created well with the ll command. Without this directory, the second 7.1.0 build will fail. If you do not see the custom-module -> /mnt/sdb3/auxfiles directory, Please do the 7.0.1 build again. [DS3622xs+] ./rploader.sh update now ./rploader.sh fullupgrade now ./rploader.sh serialgen DS3622xs+ ./rploader.sh identifyusb now ./rploader.sh satamap now ./rploader.sh build broadwellnk-7.0.1-42218 ./rploader.sh clean now ./rploader.sh build broadwellnk-7.1.0-42661 ./rploader.sh clean now; rm -rf /mnt/sdb3/auxfiles; rm -rf /home/tc/custom-module; ./rploader.sh backup now; [DS918+] ./rploader.sh update now ./rploader.sh fullupgrade now ./rploader.sh serialgen DS918+ ./rploader.sh identifyusb now ./rploader.sh satamap now ./rploader.sh build apollolake-7.0.1-42218 ./rploader.sh clean now ./rploader.sh build apollolake-7.1.0-42661 ./rploader.sh clean now; rm -rf /mnt/sdb3/auxfiles; rm -rf /home/tc/custom-module; ./rploader.sh backup now; [DS3615xs] ./rploader.sh update now ./rploader.sh fullupgrade now ./rploader.sh serialgen DS3615xs ./rploader.sh identifyusb now ./rploader.sh satamap now ./rploader.sh build bromolow-7.0.1-42218 ./rploader.sh clean now ./rploader.sh build bromolow-7.1.0-42661 ./rploader.sh clean now; rm -rf /mnt/sdb3/auxfiles; rm -rf /home/tc/custom-module; ./rploader.sh backup now; The last line doesn't get restored even if you reboot later It is the process of organizing the folders where the pat file exists and reducing the capacity and completing the backup. 8-1.Using the bootloader (update user) tc@box:~$ sudo poweroff Place the 7.1 bootloader on the bottom well In the existing 7.0.1 henol boot state, obtain the DSM 7.1.0-42661.pat file separately from the Sinology Download Center https://www.synology.com/ko-kr/support/download Click the Control Panel -> Update and Restore -> DSM Update -> Manual DSM Update button and proceed with the update to the prepared pat file above. If you are asked to wait 10 minutes after the update, use the telnet connection method that appears in the NAS column by searching for the title telnet I'll power off. -> using putty and telnet it using user=root without password. after you type root then enter, it will goes to linux prompt. By the way, if there are a lot of actual packages installed, it says that you have to wait 20 minutes. Very few packages appear to wait 10 minutes. If you don't want to let me go to the Wi-Telnet connection process, check the monitor to see if you want to power down when rebooting or when rebooting I think you can change it quickly to enter TC Linux. Replace the USB with the 7.1 boot loader prepared above and proceed with the boot You can use it. (There's nothing else I can do for you.) If you want to update from 7.0.1 to 7.1, Process 8-1 in the guide above, and if you're using it, boot from USB and enter Tinycore Linux again You can start from number 3. Tynicore Linux is the third menu, so you have to switch quickly in 4 seconds. This is a method that can be carried out without preparing one more USB memory, but the existing 7.0.1 boot loader may be erased You can use the new functions, backuploader now and restoreloader now action 8-2.Use bootloader (new installer) After successfully completing the build above, reboot the xpenology with USB using the command below. tc@box:~$ sudo reboot The settings or ext drivers that were backed up remain the same The setting values are restored from the mydata.tgz file and remain intact at the next Tiny Core Image Build boot for modification. (The default setting for automatic entry within 4 seconds is USB, Verbose at the top. If you don't touch it with your keyboard, it will automatically enter USB mode.) xpenology On-Screen After PC Boots In the case of the existing RedPill, you will be asked to find it at find.synology.com like the existing Jun loader For this tinyCore: Decompressing Linux... Parsing ELF... done. Booting the kernel. This is the message. There is a delay of 1 to 2 minutes from the IP allocation, so please wait a little bit. In this state, browse to find.synology.com on another PC and you will find the xpenology IP. After that, you can proceed with the installation process of the Synology DSM as you are working on the existing xpenology.

-
Please remember SataPortMap is actually there to limit the number of available disk ports per controller. Controllers are enumerated as listed in lsscsi -Hv in that order. If you want no limits for a controller leave this open. E.g. no SataPortMap. The DiskIdxMap has to do with the disk numbers and how the disks will be represented to the system. Its a two digit hex value per controller. If you set DiskIdxMap=00 the first controller port/disk will start at 00. If you set DiskIdxMap=0008 the first controller will start at 00 and the second controller will start at 08.