

urundai
-
Posts
33 -
Joined
-
Last visited
Posts posted by urundai
-
-
On 6/15/2022 at 10:46 PM, flyride said:
What you have described suggests that you have set the SATA1 controller up with two ports - i.e. SataPortMap=12 and DiskIdxMap=1000 (or 100002)
With RedPill, there will always be a gap from the last SATA controller to the first HBA device. You could delete your SATA1:0 controller and attached virtual disks(s) and then rebuild the loader with SataPortMap=1 - then your HBA would start at port 2. That's the best on ESXi unless you want to passthrough a real USB flash drive and boot from that.
@flyride, does this mean that the 21GB disk is now attached SATA 0 controller - as Sata 0:1? I have this exact setup and trying to understand what deleting SATA 1 controller means
")
-
On 12/4/2021 at 5:12 AM, forests_gump said:
is Sata boot only for VM install (proxmox or ESXI etc) ?
I would like to know if redpill support does sata boot (eg SATA DOM) on bare metal as well. Thanks
I am not sure what specific use case is driving this need for bare metal. As I noted in my previous response, You will be allocating the entire disk only for use of the 1GB redpill image. Even then, TTG created this SATA boot option specifically for VM installations which can't be booted from USB. I also read there is some slim size hard coding (maybe less than 1G disk size?).
It can be a great POC to see if it works or not, but I am failing understand the real need. Can you elaborate on the specific situation for this kind of a boot model for bare metal?
-
On 9/22/2021 at 3:10 PM, apriliars3 said:
For test DS315xs with VMWare I add to global_config.json this lines:
{
            "id": "bromolow-7.0.1-42214",
            "platform_version": "bromolow-7.0.1-42214",
            "user_config_json": "bromolow_user_config.json",
            "docker_base_image": "debian:8-slim",
            "compile_with": "toolkit_dev",
            "redpill_lkm_make_target": "prod-v7",
            "downloads": {
                "kernel": {
                    "url": "https://sourceforge.net/projects/dsgpl/files/Synology%20NAS%20GPL%20Source/25426branch/bromolow-source/linux-4.4.x.txz/download",
                    "sha256": "af815ee065775d2e569fd7176e25c8ba7ee17a03361557975c8e5a4b64230c5b"
                },
                "toolkit_dev": {
                    "url": "https://sourceforge.net/projects/dsgpl/files/toolkit/DSM7.0/ds.bromolow-7.0.dev.txz/download",
                    "sha256": "a5fbc3019ae8787988c2e64191549bfc665a5a9a4cdddb5ee44c10a48ff96cdd"
                }
            },
            "redpill_lkm": {
                "source_url": "https://github.com/RedPill-TTG/redpill-lkm.git",
                "branch": "master"
            },
            "redpill_load": {
                "source_url": "https://github.com/jumkey/redpill-load.git",
                "branch": "develop"
            }
        },
For Apollolake need to add this lines:
It's very fast and easy make a build an .img for test, only need linux (In my case use Terminal on Ubuntu):
1. Install Docker
sudo apt-get update
sudo apt install docker.io
2. install jq & curl:
sudo apt install jq
sudo apt install curl
3. download redpill-tool-chain_x86_64_v0.10 https://xpenology.com/forum/applications/core/interface/file/attachment.php?id=13072
4. Go to folder and permissions to .sh
cd redpill-tool-chain_x86_64_v0.10
chmod +x redpill_tool_chain.sh
5. If you want edit vid,pid,sn,mac:
#edit apollolake
vi apollolake_user_config.json

#edit bromolow
vi bromolow_user_config.json
6. build img
#for apollolake
./redpill_tool_chain.sh build apollolake-7.0.1-42214 && ./redpill_tool_chain.sh auto apollolake-7.0.1-42214

#for bromolow
./redpill_tool_chain.sh build bromolow-7.0.1-42214 && ./redpill_tool_chain.sh auto bromolow-7.0.1-42214
then the file was in redpill-tool-chain_x86_64_v0.10/images
7. For VMWare I convert .img to .vmdk with StarWind V2V Converter, and then add to Virtual Machine like sata. Also, change ethernet0.VirtualDeb = "e1000" to "e1000e on file .vmx
Thanks ThorGroup for the great work
For anyone looking for a tutorial, I point you to this post from @apriliars3. This is the closest your will get on a step by step and helps you setup the linux build machine (what libraries and packages are needed).
There are multiple GH forks of the main repo from @ThorGroup. I am a fairly experienced developer (having done coding for better part of 20+ years including messing around heavily with docker and several other framework). In spite of that, I couldn't get any of the forks to work and spent better part of 2 weeks to recover everything without data loss (had a backup but still took it as a challenge to recover without reinstalling everything). I finally had success with @tossp's fork. It worked perfectly for me in the end.
But, throwing the above in here as caution - this project is not ready yet for someone who is not willing to roll up the sleeves and also go through some kind of exploring the unknowns if things don't go well (including reinstalling if needed)
In the post I quoted above, just change the repo fork that you are using in the (such as changing "https://github.com/jumkey/redpill-load.git" to "https://github.com/tossp/redpill-load.git if you decide to use tossp's fork instead of jumkey's ). Please also change the branch to match the fork (tossp doesn't have develop branch but instead of 42218-20211021 etc).
I used @tossp's tool chain as well (https://github.com/tossp/redpill-tool-chain), though any tool chain for building should work.
As everyone has remarked, you need to be fairly familiar with concepts of linux vms, command lines and git repo concepts in general). This is meant for a reasonable comfortable dev at the moment as we have seen so many nuances and unique problems so far.
-
 5
5
-
-
1 hour ago, WiteWulf said:
There is no further screen output once the “booting kernel” message appears. This is expected behaviour. All further output is sent to the serial console (if you have a serial port).
Not finding the server with Assistant suggests it hasn’t acquired a DHCP lease, probably due to the network not being brought up. It’s likely your NIC is not supported by the default image.
Exactly what hardware and DSM version are you trying to install on? Please give as much detail as possible.
Another option is to check your router o see if IP was issued. That was the case for me - assistant couldn’t find but I was able to get to it through the IP address (IP:5000).
-
12 hours ago, Rikk said:
Hello, I am trying to build the image for bromolow-7.0.1-42218 , following the advise below. Unfortunatly, it is not working as expected: the error message received is in red below :
....
[#] Checking runtime for required tools... [OK]
[#] Adding new extension from https://github.com/jumkey/redpill-load/raw/develop/redpill-boot-wait/rpext-index.json...
[#] Downloading remote file https://github.com/jumkey/redpill-load/raw/develop/redpill-boot-wait/rpext-index.json to /opt/redpill-load/custom/extensions/_new_ext_index.tmp_json
######################################################################## 100.0%
curl: (7) Failed to connect to raw.githubusercontent.com port 443: Connection refused
[!] Failed to download https://github.com/jumkey/redpill-load/raw/develop/redpill-boot-wait/rpext-index.json to /opt/redpill-load/custom/extensions/_new_ext_index.tmp_json*** Process will exit ***
[!] Failed to add "https://github.com/jumkey/redpill-load/raw/develop/redpill-boot-wait/rpext-index.json" as an extension:
,*** Process will exit ***
[!] Failed to install thethorgroup.boot-wait bundled extension - see errors above*** Process will exit ***
Makefile:30: recipe for target 'build_redpill_load' failedI am using a Mac Book with big sur 11.6.
Someone already encountered this error ?
Thanks,
Rikk
are you building it natively in Mac or a VMware / virtual box linux image running on Mac?
To my knowledge, there are some other linux packages needed to build with the tool chain and I don't think it can be built natively on Mac.
Specifically on this error, you can look at Stack overflow. Seems more to do with GitHub is not reachable (on that stack overflow, recommendation is to use the google DNS server but it's likely that your ISP or DNS provider is blocking access to git?)
-
1 hour ago, akh1 said:
not valid sn. just generated, and random mac. 2 nic.
i can't understand you error
Same situation and works for me as well.
@havast, can you translate your error to english? What does it actually complain about?
-
On 11/6/2021 at 6:32 AM, IG-88 said:
???, was there something like that before?
i guess a better indicator might be the availability of the github repository's, if there are legal actions thats usually one of the 1st signs as synology would send a removal request to github directly
last update on github was 31th Oct., just 6 says ago
You are right, last time, I think the repo was taken down.
Last commit on the GitHub repo by TTG was more than a month ago (shared by @WiteWulf). But, given that the repo is still there, it's unlikely due to legal action. Maybe due to some personal issues with TTG and I do hope they aren't severely impacted with anything. Wish them the best to resolve those issues quickly.
-
2
-
-
Given almost a week since this thread started and no response from @ThorGroup, I am worried if Synology again silenced them. That will be be tragic.
hope they answer soon at least to update their status.
-
2
-
-
Sata option is typically meant for VM install (proxmox or ESXI etc). It will be a lot of wasted disk if you want to boot like that on bare metal. Nothing else can be on that SATA disk.
Not sure if RAID of the boot disk is even worth it - you can just backup the image and start from a new USB drive or dis, if the current one fails. Actual data and synology system partition will already be part of your data disks (should be RAID, to sustain disk failures) and it will boot up with nothing lost with the new USB.
-
 3
3
-
-
2 hours ago, seanone said:
I use this custom_config.json to build.
and bromolow_user_config.json is below:
{
  "extra_cmdline": {
    "vid": "0x46f4",
    "pid": "0x0001",
    "sn": "xxxxxxxxxxxxxxx",
    "mac1": "xxxxxxxxxxxxxx",
    "DiskIdxMap": "0400",
    "SataPortMap": "44",
    "SasIdxMap": "0"
  },
  "synoinfo": {},
  "ramdisk_copy": {}
}
in DSM serial0 console, sdh(256G nvme SSD passthrough from unraid) is exist
DiskStation> fdisk -l
Disk /dev/sdh: 238 GB, 256060514304 bytes, 500118192 sectors
31130 cylinders, 255 heads, 63 sectors/track
Units: sectors of 1 * 512 = 512 bytes

Device  Boot StartCHS    EndCHS        StartLBA     EndLBA    Sectors  Size Id Type
/dev/sdh1    0,32,33     310,37,47         2048    4982527    4980480 2431M fd Linux raid autodetect
/dev/sdh2    310,37,48   571,58,63      4982528    9176831    4194304 2048M fd Linux raid autodetect
/dev/sdh3    587,111,37  1023,254,63    9437184  499913375  490476192  233G fd Linux raid autodetect
Disk /dev/md1: 2047 MB, 2147418112 bytes, 4194176 sectors
524272 cylinders, 2 heads, 4 sectors/track
Units: sectors of 1 * 512 = 512 bytes

Disk /dev/md1 doesn't contain a valid partition table
Disk /dev/sdu: 128 MB, 134217728 bytes, 262144 sectors
1008 cylinders, 5 heads, 52 sectors/track
Units: sectors of 1 * 512 = 512 bytes

Device  Boot StartCHS    EndCHS        StartLBA     EndLBA    Sectors  Size Id Type
/dev/sdu1    0,32,33     6,62,56           2048     100351      98304 48.0M 83 Linux
Partition 1 has different physical/logical start (non-Linux?):
     phys=(0,32,33) logical=(7,4,21)
Partition 1 has different physical/logical end:
     phys=(6,62,56) logical=(385,4,44)
/dev/sdu2    6,62,57     15,205,62       100352     253951     153600 75.0M 83 Linux
Partition 2 has different physical/logical start (non-Linux?):
     phys=(6,62,57) logical=(385,4,45)
Partition 2 has different physical/logical end:
     phys=(15,205,62) logical=(976,3,36)
/dev/sdu3    15,205,63   16,81,1         253952     262143       8192 4096K 83 Linux
Partition 3 has different physical/logical start (non-Linux?):
     phys=(15,205,63) logical=(976,3,37)
Partition 3 has different physical/logical end:
     phys=(16,81,1) logical=(1008,1,12)
But after install and reboot, DSM install web assistant show again, seen that can't find the disk.
With another bootloader from someone, it can start normally.
Can you give some idea? Thank you.
Can you try with DiskIdxMap of 1000 and SataPortMap of 1?
-
1 hour ago, titoum said:
and as bad marriage sometime something breaks off
so i went further and no errors on my drive BUT after plugin directly on hdd and playing with cables. i can see that i can login and access storage manager before it reboots.
so imo, cables are culprit. i will give it a try again on thursday when getting my new one.
cheers.
Cables can go bad but that's still a rare case. Just to rule out any other issues - if you connect the WD drive to the same broken cable, are you still having issues?
Or the other way around, connecting Seagate to good cable and making sure it work?
-
6 hours ago, titoum said:
imo, the psu should be fine as it is a 360w seasonic.
the setup is working fine since May.
so i dont know if update through redpill broke something along the line...who knows...may be will try to erase all and see if it works again as the raid seems to be broken anway with a unresponsive hdd and a crashed one 😤
i am testing the first drive with seagate tool so far all went through so i decided to start the long generic test.
If your PSU is newer, it shouldn’t be a problem. If it is older (5+ years), you would be surprised how their output drops and not enough depending on the number of things you have going on.
you mention about the upgrade. How did you go about upgrading redpill? Did you build a new image or upgraded from synology control panel?
-
10 hours ago, chrram said:
Hello, maybe someone can give me a template for proxmox dsm7, a finished image or can help me get the DSM7 on proxmox, also via DM, thank you
@chrram, there are reasons why nobody can share images. This is also very early development oriented project at the moment - meaning, meant for developers as you need to comfortable building and messing around with the config files etc and being able to debug any issues you will run into.
If you are up for it, everything you need was shared just couple posted earlier by @r27 (I have quoted his post below for you). This is all that you should need and since it's meant for devs, there aren't many detailed tutorials - things are still trial and error, based on ones unique hardware setting etc.
If you aren't passing pci-e card, add a second SATA controller in the VM settings and attach your hard disks to that controller (image on controller 1 and all disks in controller 2). Due to a bug, Disk 1 is not visible within synology. So, attach your disks from 2nd position onwards on the 2nd controller. That should be it hopefully.
On 10/30/2021 at 12:44 PM, r27 said:Finally upgraded Proxmox based 6.2 install to 7.0-41222. It took me good 3-4 hours to figure out how the new boot loader works, so hopefully information bellow will help others:
1. I am using LSI SAS 2008 flashed in IT mode to passthrough HDDs (4x4TB)
2. Also passing 82579LM ethernet card for dedicated network.
3. Booting VM from USB (couldn't get SATA boot to work properly).
4. Used this repo to build loader with mptsas and mpt2sas drivers
5. bromolow_user_config.json
{
    "extra_cmdline": {
        "pid": "0x6387",
        "vid": "0x058f",
        "sn": "xxxxxx",
        "mac1": "xxxxxxx",
        "netif_num": 1,
        "DiskIdxMap": "0C",
        "SataPortMap": "1",
        "SasIdxMap": "0"
    },
    "synoinfo": {},
    "ramdisk_copy": {},
    "extensions": []
}
PS. I have RS18017xs+ and DS1817+ for production. This VM used for backup and test purposes.


-
1
-
-
4 hours ago, r27 said:
Finally upgraded Proxmox based 6.2 install to 7.0-41222. It took me good 3-4 hours to figure out how the new boot loader works, so hopefully information bellow will help others:
1. I am using LSI SAS 2008 flashed in IT mode to passthrough HDDs (4x4TB)
2. Also passing 82579LM ethernet card for dedicated network.
3. Booting VM from USB (couldn't get SATA boot to work properly).
4. Used this repo to build loader with mptsas and mpt2sas drivers
5. bromolow_user_config.json
{
    "extra_cmdline": {
        "pid": "0x6387",
        "vid": "0x058f",
        "sn": "xxxxxx",
        "mac1": "xxxxxxx",
        "netif_num": 1,
        "DiskIdxMap": "0C",
        "SataPortMap": "1",
        "SasIdxMap": "0"
    },
    "synoinfo": {},
    "ramdisk_copy": {},
    "extensions": []
}
PS. I have RS18017xs+ and DS1817+ for production. This VM used for backup and test purposes.
Thank you @r27. I had been struggling all along (several weeks, multiple failures - learnt to repair Btrfs etc along the way - not all lost) and I was able to get going with your instructions. I was able to upgrade my 6 raid 6.2 ESXI install to 7.0.1.
Everything is fine except my system is showing volume degraded because it's not detecting Drive 1 (same as your case). Regardless of what we do, looks like DiskIdxMap is not handled by the redpill loader ( @Orphée has a ticket open to that effect). For now, I will try to move my Sata cables around, so my drive 1 becomes drive 7 which I don't use :).
Thank you for your help. This is awesome.
-
wasn't there a break between their previous post (when they answered a lot of questions) and the one before?
I am hoping this is due to @ThorGroup being occupied with other things.
-
1
-
-
1 hour ago, mounsif said:
SAS disks
I am not familiar with SaS, hope someone that tried redpill with Sas disks before can help you further.
I also noticed that you included both bromolow and apollo configs. Which one are you building? I notice both mac1 and serial are xxxxxx... wanted to make sure that because you masked it for uploading and you have updated the default files with the actual serial number and mac in your local copy that you are using for building.
-
2 hours ago, mounsif said:
srv: dell poweredge t420
Os: vmware esxi 7.0.3
compile loder : redpill v0.11
Raid 1 = 4 hard disk sas
Thank you. Global config is generic but can you also share the bromolow or Apollo user config as well? (please take out the serial number).
Also, can you explain the Sas part of the comment? Are these SATA disks or Sas ?
-
26 minutes ago, mounsif said:
the formatting and the installation is going successfully but when restarted it back first page 'setup'
Can you share some additional details? Is this for passthrough of HBA card or you have individual disks? What's your json config for the build?
On PCI-E Passthrough, I had the same problem and gave up after trying multiple things. I was able to telnet and fdisk -l showed all the disks being there. I couldn't figure out why (even with help from experts on this forum). Hopefully, your situation is different but bit more details will help provide some options to explore.
-
1
-
-
4 minutes ago, Orphée said:
@urundai
what are you disk size ?On github we have a report disks bigger than 2Tb can't be used currently.
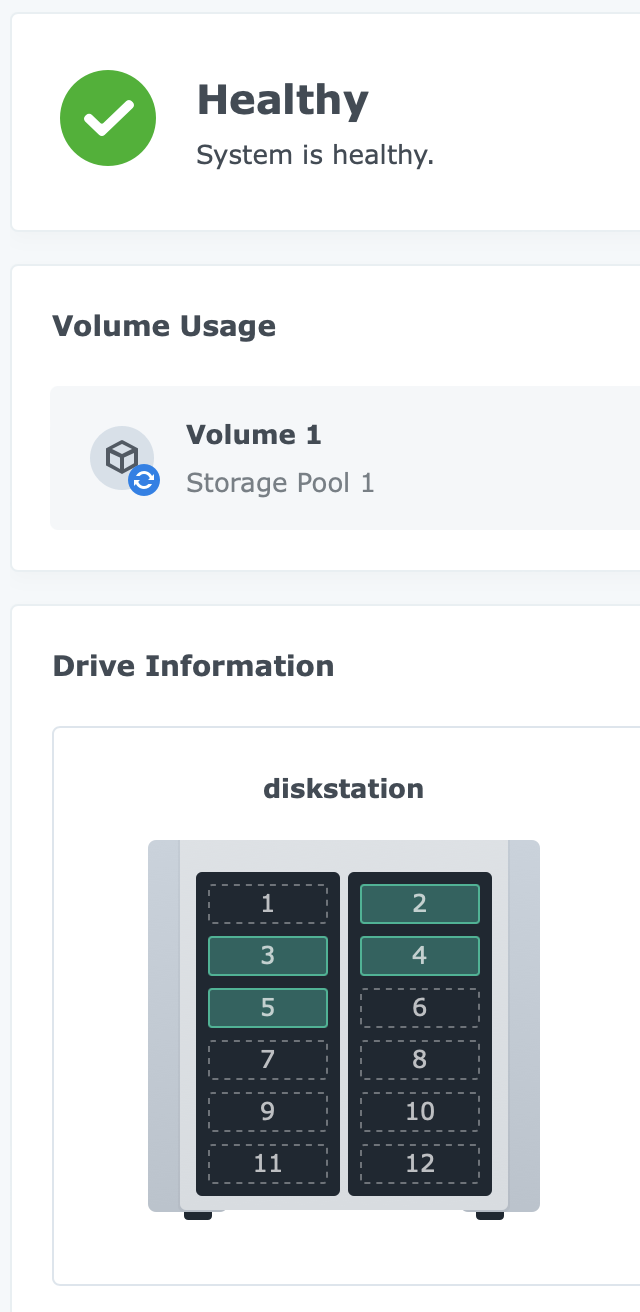
My disks are 2TB each. I have 6 disks.
Forgot to mention - I was running these in 6.2.3 Jun's loader before, in a raid config.
-
10 hours ago, pigr8 said:
does dmesg | grep sas from terminal show the hba loaded? if yes as @Orphée said check with fdisk -l if the disks show up.
Here is the fdisk -l output. All disks showing up but not sure why the disks are showing sde, sdf etc:
Disk /dev/synoboot: 128 MB, 134217728 bytes, 262144 sectors
16 cylinders, 255 heads, 63 sectors/track
Units: sectors of 1 * 512 = 512 bytes

Device       Boot StartCHS    EndCHS        StartLBA     EndLBA    Sectors  Size Id Type
/dev/synoboot1    0,32,33     6,62,56           2048     100351      98304 48.0M 83 Linux
/dev/synoboot2    6,62,57     15,205,62       100352     253951     153600 75.0M 83 Linux
/dev/synoboot3    15,205,63   16,81,1         253952     262143       8192 4096K 83 Linux
Disk /dev/sde: 1863 GB, 2000398934016 bytes, 3907029168 sectors
243201 cylinders, 255 heads, 63 sectors/track
Units: sectors of 1 * 512 = 512 bytes

Device  Boot StartCHS    EndCHS        StartLBA     EndLBA    Sectors  Size Id Type
/dev/sde1    0,32,33     310,37,47         2048    4982527    4980480 2431M fd Linux raid autodetect
/dev/sde2    310,37,48   571,58,63      4982528    9176831    4194304 2048M fd Linux raid autodetect
/dev/sde3    587,111,37  1023,254,63    9437184 3907015007 3897577824 1858G  f Win95 Ext'd (LBA)
/dev/sde5    588,112,5   1023,254,63    9453280 3906822239 3897368960 1858G fd Linux raid autodetect
Disk /dev/sdf: 1863 GB, 2000398934016 bytes, 3907029168 sectors
243201 cylinders, 255 heads, 63 sectors/track
Units: sectors of 1 * 512 = 512 bytes

Device  Boot StartCHS    EndCHS        StartLBA     EndLBA    Sectors  Size Id Type
/dev/sdf1    0,32,33     310,37,47         2048    4982527    4980480 2431M fd Linux raid autodetect
/dev/sdf2    310,37,48   571,58,63      4982528    9176831    4194304 2048M fd Linux raid autodetect
/dev/sdf3    587,111,37  1023,254,63    9437184 3907015007 3897577824 1858G  f Win95 Ext'd (LBA)
/dev/sdf5    588,112,5   1023,254,63    9453280 3906822239 3897368960 1858G fd Linux raid autodetect
Disk /dev/sdg: 1863 GB, 2000398934016 bytes, 3907029168 sectors
243201 cylinders, 255 heads, 63 sectors/track
Units: sectors of 1 * 512 = 512 bytes

Device  Boot StartCHS    EndCHS        StartLBA     EndLBA    Sectors  Size Id Type
/dev/sdg1    0,32,33     310,37,47         2048    4982527    4980480 2431M fd Linux raid autodetect
/dev/sdg2    310,37,48   571,58,63      4982528    9176831    4194304 2048M fd Linux raid autodetect
/dev/sdg3    587,111,37  1023,254,63    9437184 3907015007 3897577824 1858G  f Win95 Ext'd (LBA)
/dev/sdg5    588,112,5   1023,254,63    9453280 3906822239 3897368960 1858G fd Linux raid autodetect
Disk /dev/sdh: 1863 GB, 2000398934016 bytes, 3907029168 sectors
243201 cylinders, 255 heads, 63 sectors/track
Units: sectors of 1 * 512 = 512 bytes

Device  Boot StartCHS    EndCHS        StartLBA     EndLBA    Sectors  Size Id Type
/dev/sdh1    0,32,33     310,37,47         2048    4982527    4980480 2431M fd Linux raid autodetect
/dev/sdh2    310,37,48   571,58,63      4982528    9176831    4194304 2048M fd Linux raid autodetect
/dev/sdh3    587,111,37  1023,254,63    9437184 3907015007 3897577824 1858G  f Win95 Ext'd (LBA)
/dev/sdh5    588,112,5   1023,254,63    9453280 3906822239 3897368960 1858G fd Linux raid autodetect
Disk /dev/sdi: 224 GB, 240057409536 bytes, 468862128 sectors
29185 cylinders, 255 heads, 63 sectors/track
Units: sectors of 1 * 512 = 512 bytes

Device  Boot StartCHS    EndCHS        StartLBA     EndLBA    Sectors  Size Id Type
/dev/sdi1    0,32,33     1023,254,63       2048  468857024  468854977  223G fd Linux raid autodetect
Disk /dev/sdj: 93 GB, 100030242816 bytes, 195371568 sectors
12161 cylinders, 255 heads, 63 sectors/track
Units: sectors of 1 * 512 = 512 bytes

Device  Boot StartCHS    EndCHS        StartLBA     EndLBA    Sectors  Size Id Type
/dev/sdj1    0,32,33     1023,254,63       2048  195366464  195364417 93.1G fd Linux raid autodetect
Disk /dev/sdk: 1863 GB, 2000398934016 bytes, 3907029168 sectors
243201 cylinders, 255 heads, 63 sectors/track
Units: sectors of 1 * 512 = 512 bytes

Device  Boot StartCHS    EndCHS        StartLBA     EndLBA    Sectors  Size Id Type
/dev/sdk1    0,32,33     310,37,47         2048    4982527    4980480 2431M fd Linux raid autodetect
/dev/sdk2    310,37,48   571,58,63      4982528    9176831    4194304 2048M fd Linux raid autodetect
/dev/sdk3    587,111,37  1023,254,63    9437184 3907015007 3897577824 1858G  f Win95 Ext'd (LBA)
/dev/sdk5    588,112,5   1023,254,63    9453280 3906822239 3897368960 1858G fd Linux raid autodetect
Disk /dev/sdl: 1863 GB, 2000398934016 bytes, 3907029168 sectors
243201 cylinders, 255 heads, 63 sectors/track
Units: sectors of 1 * 512 = 512 bytes

Device  Boot StartCHS    EndCHS        StartLBA     EndLBA    Sectors  Size Id Type
/dev/sdl1    0,32,33     310,37,47         2048    4982527    4980480 2431M fd Linux raid autodetect
/dev/sdl2    310,37,48   571,58,63      4982528    9176831    4194304 2048M fd Linux raid autodetect
/dev/sdl3    587,111,37  1023,254,63    9437184 3907015007 3897577824 1858G  f Win95 Ext'd (LBA)
/dev/sdl5    588,112,5   1023,254,63    9453280 3906822239 3897368960 1858G fd Linux raid autodetect
dmesg | grep sas output:
[    1.318327] <redpill/intercept_execve.c:57> Filename /tmpData/upd@te/sas_fw_upgrade_tool will be blocked from execution
[    2.390160] mpt2sas version 20.00.00.00 loaded
[    2.392635] mpt2sas0: 64 BIT PCI BUS DMA ADDRESSING SUPPORTED, total mem (8152752 kB)
[    2.465986] mpt2sas0: MSI-X vectors supported: 1, no of cores: 4, max_msix_vectors: -1
[    2.466973] mpt2sas 0000:03:00.0: irq 73 for MSI/MSI-X
[    2.468960] mpt2sas0-msix0: PCI-MSI-X enabled: IRQ 73
[    2.469954] mpt2sas0: iomem(0x00000000fd4fc000), mapped(0xffffc90000018000), size(16384)
[    2.470951] mpt2sas0: ioport(0x0000000000004000), size(256)
[    2.596914] mpt2sas0: Allocated physical memory: size(7445 kB)
[    2.597912] mpt2sas0: Current Controller Queue Depth(3305), Max Controller Queue Depth(3432)
[    2.598910] mpt2sas0: Scatter Gather Elements per IO(128)
[    2.658630] mpt2sas0: LSISAS2008: FWVersion(20.00.07.00), ChipRevision(0x03), BiosVersion(07.27.01.00)
[    2.658901] mpt2sas0: 0x1F4E: Vendor(0x1000), Device(0x0072), SSVID(0x1028), SSDID(0x1F4E)
[    2.659902] mpt2sas0: Protocol=(Initiator,Target), Capabilities=(TLR,EEDP,Snapshot Buffer,Diag Trace Buffer,Task Set Full,NCQ)
[    2.663103] mpt2sas0: sending port enable !!
[    2.669634] mpt2sas0: host_add: handle(0x0001), sas_addr(0x500605b006bea440), phys(8)
[    2.674918] mpt2sas0: port enable: SUCCESS
[    2.679023] scsi 4:0:0:0: SATA: handle(0x000c), sas_addr(0x4433221103000000), phy(3), device_name(0x50014ee0ae347ea7)
[    2.709273] scsi 4:0:1:0: SATA: handle(0x0009), sas_addr(0x4433221100000000), phy(0), device_name(0x500003993c40037e)
[   18.513653] scsi 4:0:2:0: SATA: handle(0x000a), sas_addr(0x4433221101000000), phy(1), device_name(0x50014ee2b1b4bb32)
[   33.610139] scsi 4:0:3:0: SATA: handle(0x000b), sas_addr(0x4433221102000000), phy(2), device_name(0x50000397dbd81f98)
[   48.893537] scsi 4:0:4:0: SATA: handle(0x000d), sas_addr(0x4433221104000000), phy(4), device_name(0x50015178f366abf7)
[   64.002050] scsi 4:0:5:0: SATA: handle(0x000e), sas_addr(0x4433221105000000), phy(5), device_name(0x55cd2e400033064c)
[   79.102315] scsi 4:0:6:0: SATA: handle(0x000f), sas_addr(0x4433221106000000), phy(6), device_name(0x50000398bd101889)
[   94.173073] scsi 4:0:7:0: SATA: handle(0x0010), sas_addr(0x4433221107000000), phy(7), device_name(0x50014ee60331902f)
I changed SataPortMap to 4 as suggested. I notice that all my disks are being picked up but I still end up with no drives detected message.
-
Thank you @Orphée. I have removed those lines. The problem still remains the same.
With both sas_activator and without that, I continue to get 'No Drives Detected'. With @pocopico extensions, I am able to get to the install but after completion, it continues to prompt 'Not Installed' with directions to install pat again.
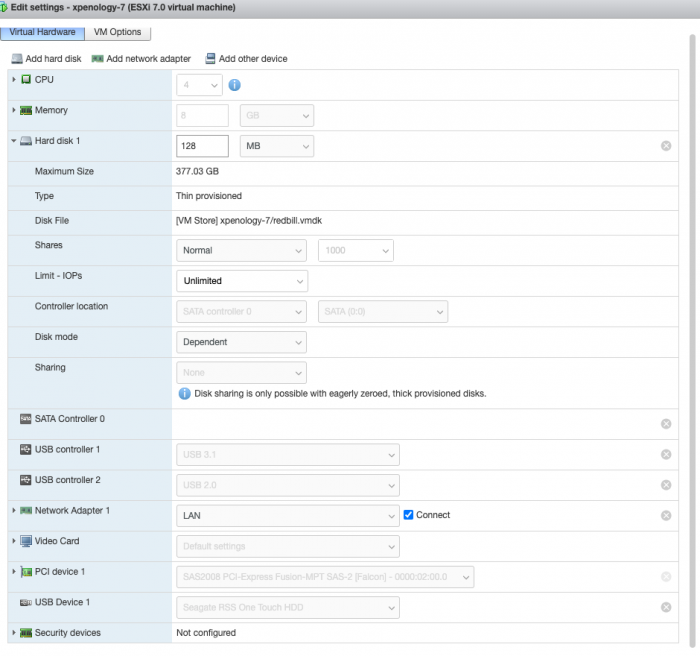
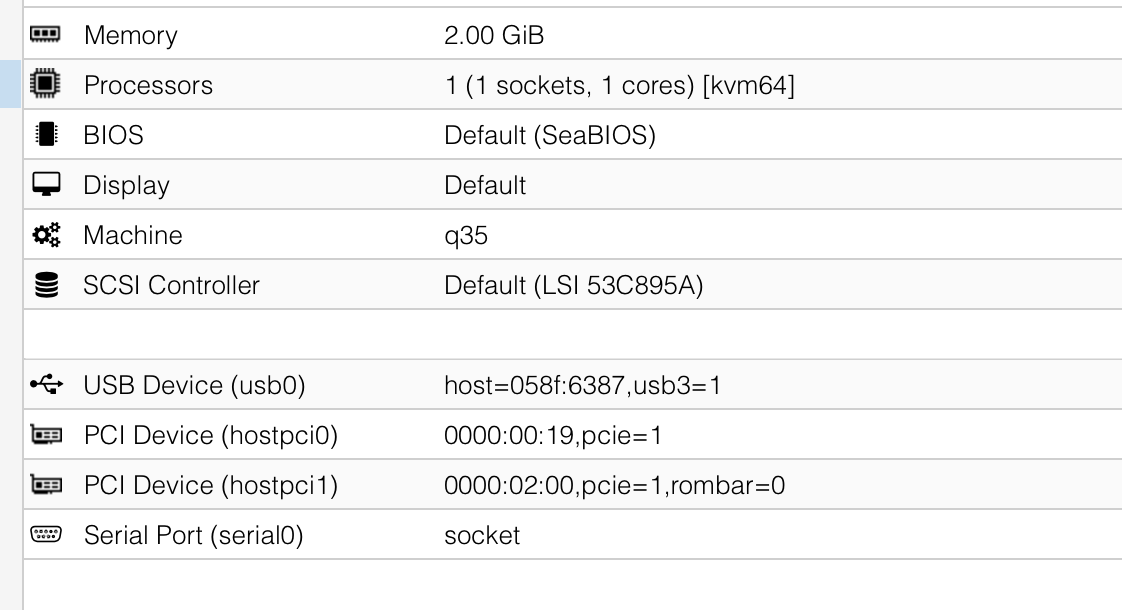
I have attached my vm config - don't think it's any different what I had for jun's loader before.
-
1 hour ago, pigr8 said:
try not to add either sas-activator nor pocopico extension, add this in user config and rebuild redpill again and report the attempt
  "synoinfo": {
    "supportsas": "yes"
  },
Thank you @pigr8. That results in 'No Drives Detected in DS3615xs' message. Here is my user config:
{
  "extra_cmdline": {
    "pid": "0x6300",
    "vid": "0x13fe",
    "sn": "xxx",
    "mac1": "324D220C3CD1",
    "sata_uid" : "1",
    "sata_pcislot" : "5",
    "synoboot_satadom" : "1",
    "DiskIdxMap" : "0C00",
    "SataPortMap" : "18",
    "SasIdxMap" : "0"
  },
  "synoinfo": {
     "supportsas": "yes"
  },
  "ramdisk_copy": {}
}
Let me know if I messed any of the bromolow config

-
I was able to successfully compile on ESXI V7. I am using LSI SaS controller.
If I use the sas_activator from thorgroup, I end up with no disks found.
With @pocopico's extensions, it finds the disks and I was able to install the pat. It goes to 100% completion and ends with the 'Restarting Synology' with the count down timer for 10 minutes.
But, after that, when I go to the IP address (ip:5000), it still presents 'Not installed' and prompts me to go through the pat installation again. I have attempted this few times and it ends up this way - it's almost like the install is not recognized. I tried with the latest LKM (with the SAS->SATA mapping) as well. Nothing obvious in the logs either.
Any thoughts or guidance from the experts will greatly help.
-
quick question: Per the loader documentation, one can remove vid and pid if they are using SATA based boot. Unfortunately, when I do that, my build fails with 'unbound parameter extra_cmdline('vid')'.
For now, I am still leaving vid/pid in there for my esxi but not sure why the build fails. Any thoughts?


Tutorial: Install DSM 7.x with TinyCore RedPill (TCRP) Loader on ESXi
in Tutorials and Guides
Posted
Thank you @flyride. I had my DSM installed on the HBA disks and I was little confused by the tutorial as well. I wasn't sure if there were particular benefits to installing on VMDK vs directly using the devices.
I have decided to go back to my original model and deleted SATA 1 controller and the vmdk. I am all good now.
Thanks for the great tutorial, it was spot on and helped me immensely.