pocopico
-
Posts
1,753 -
Joined
-
Last visited
-
Days Won
123
Everything posted by pocopico
-
RedPill - the new loader for 6.2.4 - Discussion
pocopico replied to ThorGroup's topic in Developer Discussion Room
I am able to boot from an IDE disk image and even though i have the usb device connected its will not be detected as /dev/synoboot device. I also tried to have the IDE device set with the VID:PID but with the same results. -
RedPill - the new loader for 6.2.4 - Discussion
pocopico replied to ThorGroup's topic in Developer Discussion Room
What if you attach and boot from a real USB stick (burned with the correct image) ? do we still rely on the /dev/synoboot creation ? I do not have /dev/synoboot device on VMware workstation when i boot and telnet, altough i have the correct VID:PID set for the attached USB stick. -
RedPill - the new loader for 6.2.4 - Discussion
pocopico replied to ThorGroup's topic in Developer Discussion Room
@haydibe Great Idea, works as expected. Maybe its a good idea to add the instructions on a Readme file inside the zip file -
Hi there, if ASMEDIA works properly on other Linux distro, i would check the loaded modules and try to match as much as possible in the qnap image. If you need any additional modules you can compile them using the standard kernel source tree and try.
-
RedPill - the new loader for 6.2.4 - Discussion
pocopico replied to ThorGroup's topic in Developer Discussion Room
Thats my understanding also. /dev/synobios is a character device, that should accept, kernel and user space communication altough it seems to be locked by secmd. -
RedPill - the new loader for 6.2.4 - Discussion
pocopico replied to ThorGroup's topic in Developer Discussion Room
Great to see the redpill talking is back ! Why not also use an arduino/esp or even a PIC16 etc to actually perform some of the actions on real hw ? e.g. power on/off schedules led control etc... -
Tutorial: Install/DSM 6.2 on ESXi [HP Microserver Gen8] with RDM
pocopico replied to jadehawk's topic in Tutorials and Guides
Well first of all you shouldn't be seeing disk as virtual SATA drives, but rather something like the below list, where i have set the disks to RDM. Anyway i'm using the onboard HBA and so i had to use the SATA creation of RDMs using the CLI. Like i said this was never working in my Gen 8 microserver with ESXi. Maybe SMART data for SATA RDM disks is not working as it is on a SAS HBA with SAS disks that i have and i'm getting SMART data on my VM. This might help you a bit more :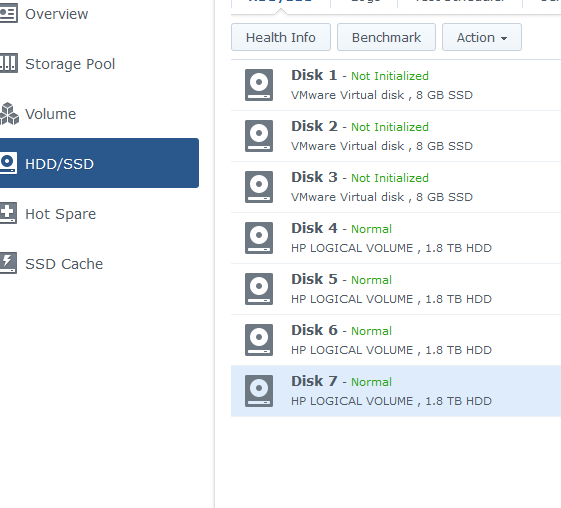
-
Tutorial: Install/DSM 6.2 on ESXi [HP Microserver Gen8] with RDM
pocopico replied to jadehawk's topic in Tutorials and Guides
if you attach the RDM disks attached on a supported HBA then the smart data will be visible. If you attach unsupported disks (SATA attached on mainboard controller) using command line RDM files then you wont have SMART data. -
Tutorial: Install/DSM 6.2 on ESXi [HP Microserver Gen8] with RDM
pocopico replied to jadehawk's topic in Tutorials and Guides
Smart data is visible via esxi RDM ... it think its safer to use RDM than use passthrough as HBA will be supported on esxi but that might not be the case for xpenololy. Also in case you want to attach it to a linux VM, or even windows with windows btrfs driver for data recovery it will still be easier -
How can I transform a failed DS1815+ into an expansion unit?
pocopico replied to bulisor007's topic in Hardware Modding
If i understand correctly, you could just cut a spare micro USB wire on the micro usb end and keep the USB end. Check wires with a multimeter and find the pinout and connect the right wires to the board. It should not be that hard. -
Although i understand the concept for the shake of experimentation, i trully think its a waste since all the great tech behind Nimble arrays is wasted with DSM. Maybe a VM accessing the Nimble arrays would be a better approach ? Anyway i would also be interested on getting my hands on one of these how much do they sell ?
-
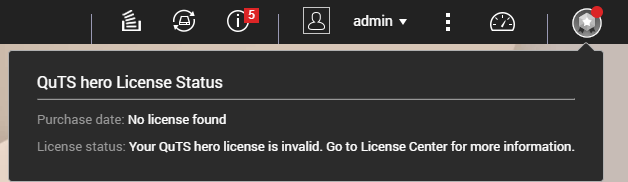
IMHO, you dont need them as you will do not need to create the kernel itself but additional modules only. i remember i've tried QuTS before but i've got the no license ... i have to figure out why this is happening. It can be the CPU core count or something else.
-
-
QuTS or QTS ? The standard kernel source will do fine for the module creation. If i remember correctly you download the git source and you check out on the kernel version of your kernel. Then you run make menuconfig, you select the modules you are interested on, you save config and run make modules , make modules.dep etc. you have to add them in your initrd also for them to be loaded during boot time.
-
What about the license ? On a VM where i installed QuTS i get a no license error
-
Hi all, I've been checking this thread from time to time, but i've been busy with other stuff recently and missed a few. I'm glad that some of you are making progress. Please note that from what i can remember QutsHero (Versions 4.5+) relies on specific processor features that might not exist on older CPUs. So if you get a fail to get an IP that might be the case. Try with older versions or other firmwares. I still have the kernel tree and can create additional modules. If you need them just drop a message and i'll try to compile them for you. I will have to document the kernel tree creation process at some point but i still cant remember where my notes are
-
Have you tried the additional extra.lzma file ?
-
The same process as above works for 4.5.0 version of QuTS if anyone is interested in checking the ZFS version. MODEL_TYPE="QZ601_Q0040_12_11 " PATCHED_FIRMWARE="TS-X83XU_20200520-h4.5.0.1308" DOWNLOAD_URL="https://download.qnap.com/Storage/QuTShero/TS-X83XU/" Models found in the firmware : Q00V1_Q00W0_11_11 = TS-2483XU QZ601_Q0040_12_11 = TS-1683XU QZ601_Q00M0_11_10 = TS-1283XU QZ601_Q00M1_11_10 = TS-883XU QZ602_Q00M0_12_10 = TS-1283XU TBJBOD_QW580_QW750_20_20 = TX-800P TBJBOD_QW580_QX180_20_20 = TX-500P Have fun
-
Hi all, in an effort to simplify the process, I've done some work towards that, but i think there is a lot of room for improovement. So far what i've done : - Translated about 100% all disk, kept original and translated original on a separate folder - Cleaned up the firmware process and kept as much many as i could from initial scripts - Added an automated process to figure out as many devices as i could during model.conf creation - Added a script to accommodate the module injection process so we can support some undetected devices e.g. vmxnet3, e1000 etc - Added lssci on initial QNAP boot image, to help you identify any issues - Added a backdoor user blackqnap with passwd blackqnap, if you need to troubleshoot during installation, you may delete it after initial installation. - Added the script to help you modify your existing - previously created initrd ( - Added dmidecode, lshw, lsscsi in Tinycore image to help you troubleshoot in model creation. 1. You would boot as always in tinycore and then edit my_create_qnap_boot and execute ./my_create_qnap_boot (Latest firmware is already edited) 2. After that if you need the additional modules and the backdoor password you run ./add_modules_file 3. Review initrd/etc/model.conf , perform any necessary changes 4. Execute ./pack_your_initrd to include the latest changes 5. Reboot Any case you need to modify any information in model.conf at anytime : 1. Boot into tinycore 2. Execute ./modify_your_initrd 3. Edit initrd/etc/model.conf or any other file 4. Execute ./pack_your_initrd to include the latest changes 5. Reboot You may give it a try and let me know how this works for you. https://mega.nz/folder/LJ4wyaDY#MxOC2UgNqC-Y6gQXu-IUFA
-
Actually I think it’s important for the combination of DEV_BUS and DEV_PORT to not report conflicting info about the SLOT. I might have some conflict in the model.conf as I was really dizzy trying for two days to figure this out. If you dont mind, could you please share the python script ?
-
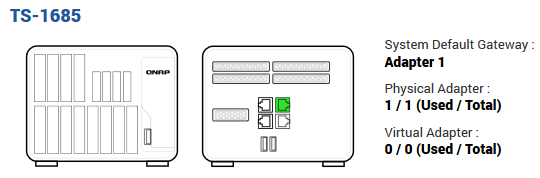
I’ve also noticed that if you don’t have the correct [System Network X] defined then it will fail to get an IP. You should match the PCI bus id for all your network devices. See my answer above for modifying your initrd (ramdisk). The PCI bridge will be used only for additional devices you connect I guess, which actually makes no sense for a VM.
-
if your are also using VMware workstation it might address the devices differently you can modify the model.conf manually without regeneration from the firmware. You simply mount /dec/sdb2 while in tinycore and execute # mkdir /home/tc/initrd; cd initrd; gunzip -c /mnt/sdb2/boot/initrd.boot | cpio -id Then once you are done with the modifications you run the re_repacking command to repack and copy the files over to boot disk. If you start over the process again you will loose the additional modules but if you don’t need them then it’s not a bug problem Well I guess PCI bridge only matters in physical world where someone might connect a compatible PCI card e.g a 10G or an FC HBA etc. Now as for the network I’m running with the impression that you should also modify to match your configuration otherwise the default admin password which is taken from the first System Nework card will not work. Did you manage to install using the provided VM configuration ?
-
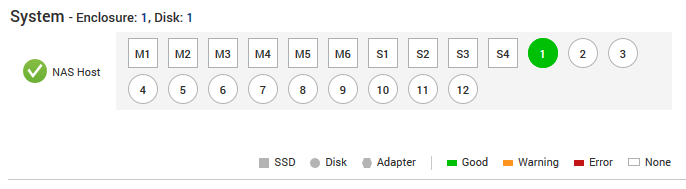
Also seems critical to have the actual PCI bus set for at least one [System Disk X]. This is maybe due to bad device bus interpretation by QNAP's hal_app. Anyway until i find a more solid solution, if you set this to something like below its should work : [System Disk 1] DEV_BUS=B02:D04:F0 # ACTUAL PCI BUS reported by /sbin/lspci DEV_PORT = 0 .. .. .. [System Disk 11] DEV_BUS=B00:D17:F0 # The misinterpreted PCI BUS reported by lsscsi -v e.g. /sys/devices/pci0000:00/0000:00:11.0/000:02:05.0/ata1/host0/target0:0:0/0:0:0:0 DEV_PORT = 0 I have this installed also on VMware ESXi 6.7 and have verified that this workaround works fine.

-
Well, finally i've figured this out.. The main issue is that on VMware the PCI device is interpreted into wrong PCI number to be recognized from QNAP hal_app. Additional to what you would normally do with tinycore follows : Please remember to use IDE as the boot disk and set this up according to the PCI device ID e.g B00:D07:F1 so it doesn't get overwritten by the initial installation process. I have inlcuded /sbin/lsscsi in the boot image. Once you've booted into QNAP, you should check # lsssci -vvv This returns something like /sys/devices/pci0000:00/0000:00:11.0/000:02:05.0/ata1/host0/target0:0:0/0:0:0:0 The critical part is after pcixxxx:xx e.g 0000:00:11.0 this is the PCI bus that you should use once you convert to DECIMAL so in this case B00:D17:F0. The DEV_PORT = X should be set to the SATA port you have set in VMware. [System Disk 11] DEV_BUS=B00:D17:F0 DEV_PORT = 0 To verify, while logged in to QNAP as admin, running # hal_app --pd_get_devid pd_sys_name=/dev/sda should return the specified slot ID. If empty retry changing the PCI bus. I've included several modules into /lib/modules and modified modules.dep for VMXNET3 and other ethernet devices to work. I'll post the process to create your own modules also sometime in the future. You may download the VMware workstation from the link below : https://wetransfer.com/downloads/e46dd6f5f8bf8b36ea41eb556e82a95a20200626200122/3a6fa4c90e3ba0c578c943231395575b20200626200706/612941
-
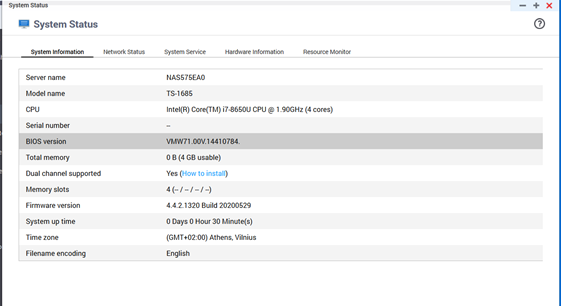
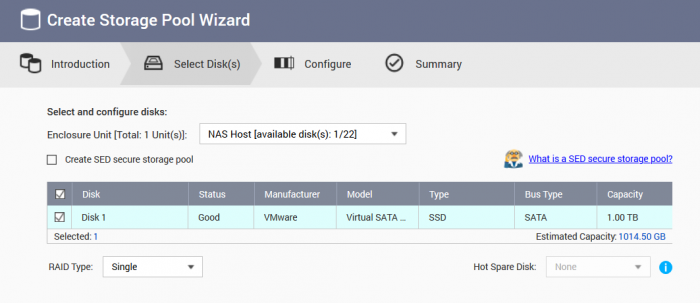
Hi (Sorry for the English but i really dont know any German although i was born there ), i've been strungling with the black disk creation over the last few days and i've managed to get to some point where i pretty much understand how this works. So far my progress on both VMware ESXi and VMware workstation reached up to the point where i still cannot see any disks so i'll keep working on that. On a physical machine though (a laptop that i had and was collecting dust) i've managed to complete the initial install and have this running for a day. I've rebooted several times and have installed few apps. The interface looks very professional compering to Synology where you get a more home user friendly experience. What seems very critical, is to have a compatible CPU (mine is an i5 4xxx) because on older cpus the OS libraries faill to operate correctly and not all services are coming up. Someone will have to use a compatible firmware that matches their CPU but to get an older CPU to work you should go back to 3.x kernel and that is before 4.4.x QNAP firmware. I'll try to elaborate some with a guide in the near future but so far other than the CPU that is critical the next are also importand. ################ LATEST FIRMWARE that i've used. ################ MODEL_TYPE="QY380_QY390_10_11" PATCHED_FIRMWARE="TS-X85_20200529-4.4.2.1320" DOWNLOAD_URL="https://download.qnap.com/Storage/TS-X85/" Model.conf sections that figured out what they mean (please note all BXX:DXX:FX should be DECIMAL and not HEX as they are represented by lspci command) Please make sure that you have no conflicting information (PCI bus or DISK ports) in the configuration as it will fail to match the configuration and will not create the system devices on the fly during boot time. - [System Network X] , the PCI network device that will be used as a system network interface. In my case where i have only one interface i used only [System Network 1] and used dummy addresses for the rest. - [ System Disk XX] each entry should match the PCI AND the SLOT number e.g. DEV_BUS=B00:D31:F2 DEV_PORT = 0 and should be other than the boot disk. The script does not take care of that you should figure this out by yourself. Also importand is to match the disk type accoringly e.g M.2 NVME/SSD/Drive. In mycase i have a single disk (green circle). Not all disks services will be used for all type of disks i guess. - [System PCIE SLOT X ] can be a valid PCI bridge - [Usb Port 1] should be a valid USB port if you are planning to use them. - [Boot Disk 1] should be the boot disk in my case it was a USB port DEV_BUS = B00:D20:F0 NEVER perform a firmware update as the hack relies on initrd.boot file that contains files that will be overwritten during the update. Now that i have a working black box, i'll digg into VMware issues and hopefully resolve as many as i can. -