Leaderboard


Popular Content
Showing content with the highest reputation on 10/17/2022 in all areas
-
Ждать и терпеть больше не смог и пользуясь праздничным выходным таки перешел на семерку. 😂 Для тех кто хочет повторить, настоятельно рекомендую отключить рабочие диски, взять чистые диск и флешку для загрузчика и попробовать перед переводом рабочей хрени. Я ни к чему не призываю, сами решаете делать вам это или нет. Первоисточник тут. Порядок действий (можно делать и по другому, но мне так привычнее): 1. Качаем образ для создания загрузчика по ссылкам в первоисточнике tinycore-redpill.XXXXXXXXX.img.gz 2. Разархивируем и записываем образ на флешку, я предпочитаю Rufus. Размер образа для создания загрузчика чуть больше гигабайта, я использовал флешку на 2 Гб. 3. Вставляем флешку в хрень, устанавливаем в биосе загрузку с нее, загружаемся. 4. Если есть монитор, клавиатура и мышь, то заходим в терминал из GUI, если нет, то ищем устройство в подключениях роутера или другими удобными вам способами, заходим по ssh и вводим: login: tc pass: P@ssw0rd Далее действия производятся в терминале/ssh, при необходимости не забываем подтверждать их. 5. Обновляем загрузчик до последней версии. ./rploader.sh update now ./rploader.sh fullupgrade now п.п.6-8 можно пропустить и самостоятельно поправить все в конфиге п.9. 6. Считываем и подставляем в конфиг VID и PID флешки. ./rploader.sh identifyusb now 7. Считываем и подставляем в конфиг структуру сата контроллеров. ./rploader.sh satamap now 8. Генерируем и подставляем в конфиг случайные sn и mac (если есть предпочтения по ним, то переходим к п.9). ./rploader.sh serialgen DS918+ now 9. Проверяем, что записалось в конфиг, при необходимости правим. vi /home/tc/user_config.json Переход в режим правки Insert, выход из режима правки Esc. Выход из vi без записи. :q! Выход из vi с записью изменений. :wq 10. Запускаем генерацию загрузчика. ./rploader.sh build apollolake-7.0.1-42218 ИЛИ ./rploader.sh build apollolake-7.1.0-42661 Внимательно! смотрим, что пишется в терминале, если скрипты на гите обновятся, то делаем то, что написано в терминале! 11. По желанию бэкапим созданную конфигурацию. ./rploader.sh backup 12. Перезагружаем хрень. exitcheck.sh reboot 13. Для установки/миграции скачиваем на комп pat нужной версии для соответствующей модели DSM отсюда. 14. Отключаем на время установки хрени доступ в интернет!!! Иначе, весьма вероятно, получите ошибку 13 при установке pat. 15. Далее все как и ранее...находим, ВРУЧНУЮ!!! устанавливаем скачанный pat файл для инсталляции/миграции и наслаждаемся семеркой. Если нужны другие версии, то: - в п. 8 вместо DS918+ подставляем DS3615xs или DS3617xs - в п.10 вместо apollolake подставляем bromolow или broadwell соответственно. Вроде все работает, по ощущениям загрузка и выключение происходят в разы быстрее. P.S. Я решил начать все с чистого листа, поэтому при переходе выбрал только сохранение данных, без миграции настроек и приложений. P.P.S. У кого виртуалки, образ VMDK тут. Порядок действий, думаю сами знаете. 😉 Следим за изменениями в первоисточнике, ссылки для скачивания образов могут поменяться. UPD 05.04.2022 В первоисточнике в скрипты добавлена возможность компиляции загрузчика под 7.1.0-42661 Кто хочет перейти на 7.1 нужно будет перекомпилировать загрузчик и подсунуть pat 7.1. UPD 27.06.2022 Для обновления до 7.1. Update2 выполняем по этой ссылке. UPD 29.06.2022 Если кто-то хочет побаловаться с DVA1622, который еще даже не продается, то качаем загрузчик из dev ветки, а далее все как обычно с новыми кодами, которые я добавил в список выше. Ограничения - не более 2х дисков, нет кодеков для HEVC, и видимо необходимо наличие Intel UHD Graphics 600. Из плюсов: AI раборает на GPU, т.е. видеокарта не нужна, 8 лицензий на камеры и SS выводится на подключенный к хрени монитор (пробовал HDMI и VGA).1 point
-
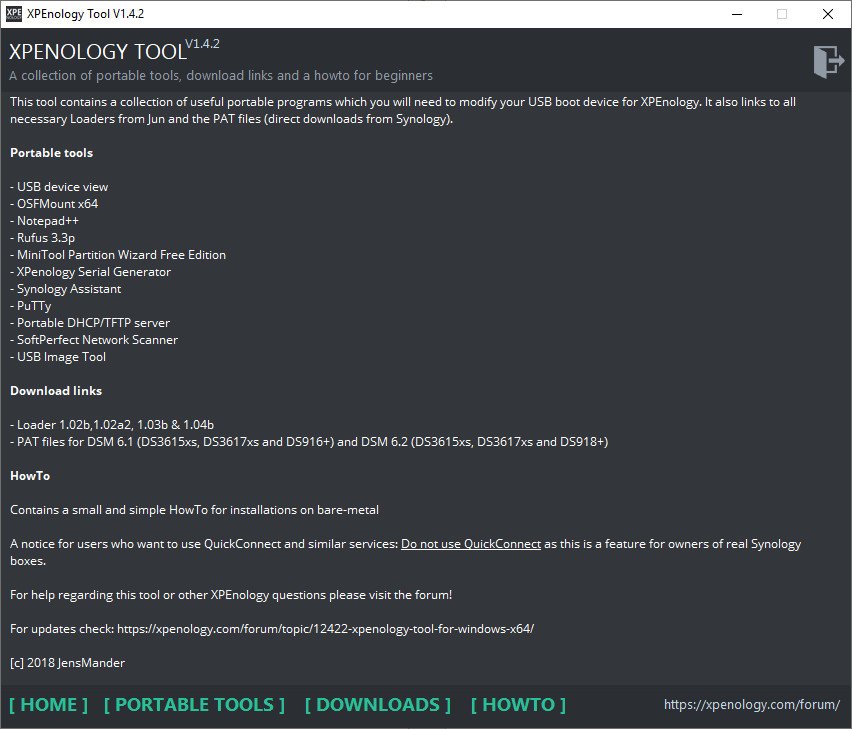
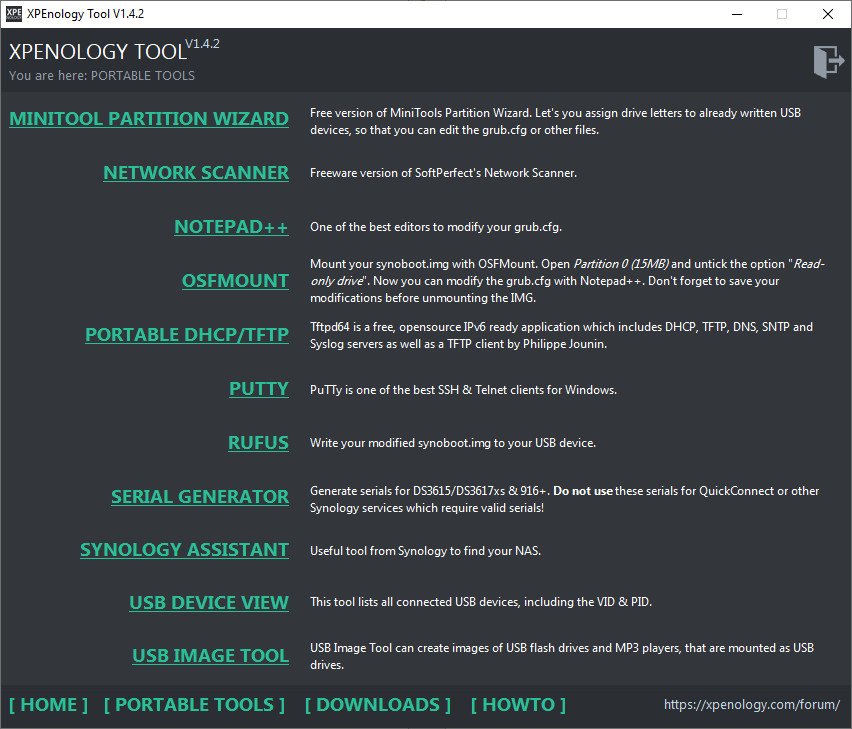
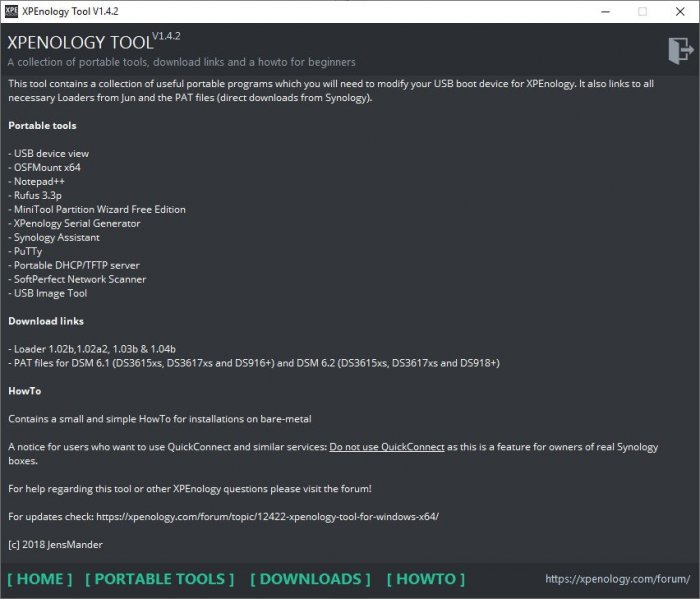
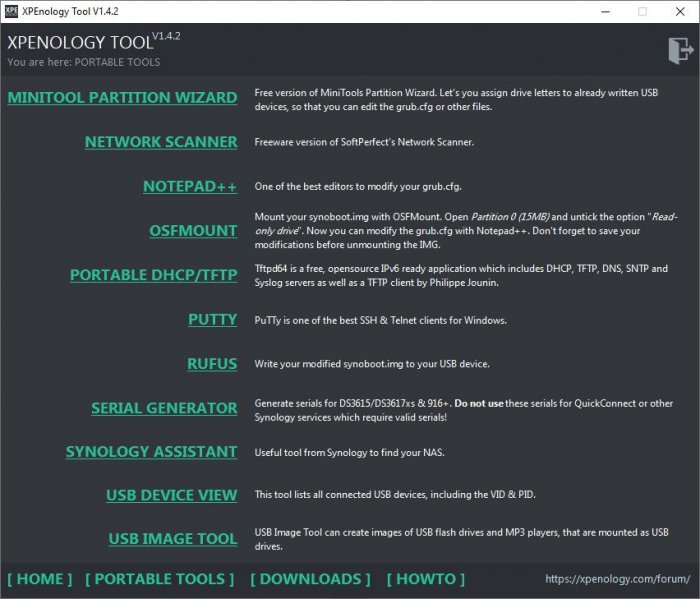
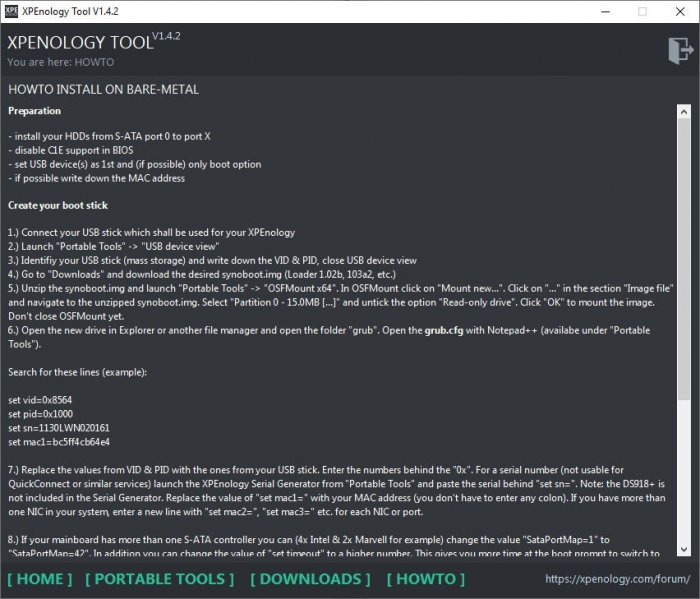
Hi! I made a little tool which can help you to get your XPEnology up & running without installing any software. It contains (as portable versions): - Nirsoft's USB device view (helps to identify the VID & PID of your USB boot media) - V2.76 - XPEnology Serial Generator for DS3615XS, DS3617XS and DS916+ (a converted version of the HTML site) - Win32 DiskImager (to write your modified synoboot.img to your USB boot media) - V1.0 (only available in V1.4.1) - OSFMount x64 (to mount the synoboot.img and modifiy it) - V1.5 - Notepad++ (best editor for changing values inside grub.cfg) - V7.5.3 - Synology Assistant (useful tool from Synology to find your XPEnology and install DSM) - V6.2-23733 - TFTP/DHCP portable (a small TFTP, DHCP and Syslog server by Ph. Jounin) - V4.6.2 - MiniTool Partition Wizard 10 (helps assigning already formatted/written USB devices to modify existing grub.cfg) - V10.3 - SoftPerfect Network Scanner - V6.2.1 - USB Image Tool - V1.75 - New: Rufus - V3.3 In the section "Downloads" all links open corresponding websites to download the files. For beginners I added a small HowTo for bare-metal installation. Update New link for download: https://mega.nz/#F!BtViHIJA!uNXJtEtXIWR0LNYUEpBuiA The download link/folder also contains @IG-88's extra.lzma (V0.6) for the DS918+. You'll have to run it "As Administrator" because some of these tools (like Win32 DiskImager) need to be executed with higher rights. It's possible that the SmartScreen filter will give you a warning, because the EXE isn't signed. Bug reports and comments are welcome Cheers Current version: V1.4.2 (2018-11-19)

 1 point
 -
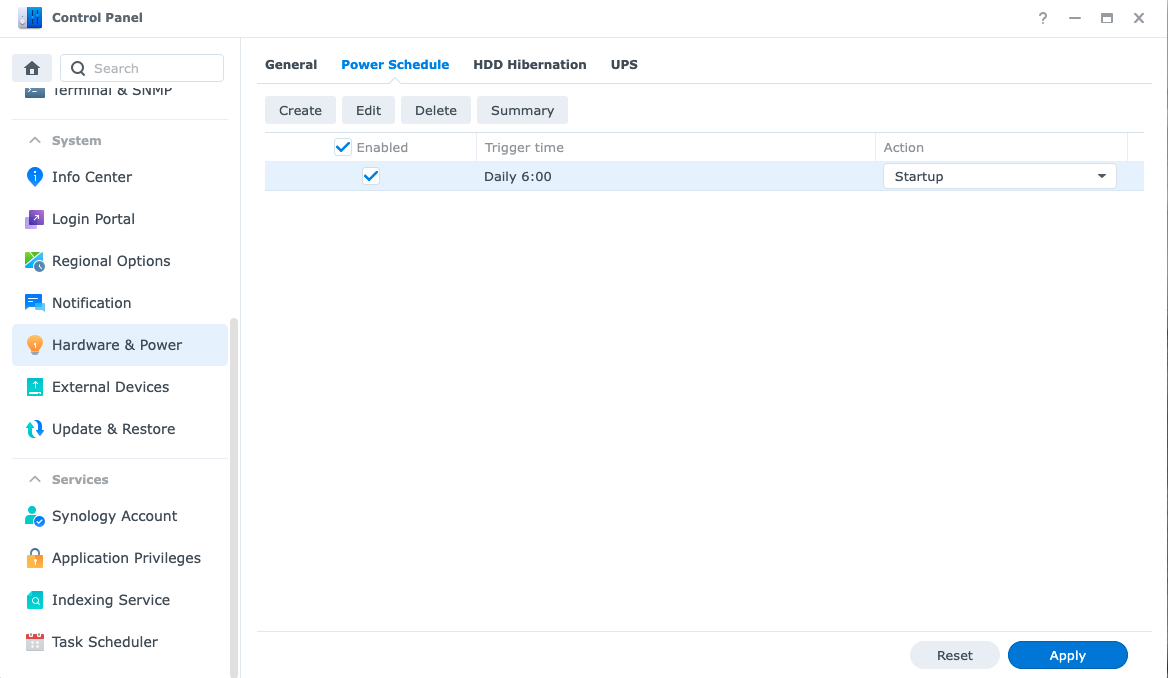
Below is the result of collecting the operation status for TCRP users. DS3617xs (Operation OK) DS3615xs (Operation OK) DS3622xs+ (Operation OK) DVA3221 (Operation OK) DVA1622 (Operation OK) DS918+ (Operation Not OK) DS920+ (Operation Not OK) DS1621+ (Operation Not OK) DS2422+ (Operation Not OK) DS1520+ (Operation Not OK) GeminiLake (DS920+, DS1520+, etc.), known as a DTC-only model and V1000 (DS1621+, DS2422+, etc.), this function does not work, and DS918+ also does not work. Monitoring equipment DVA3221, DVA1622 (based on DTC) is OK. Jun Mode and Jot Mode seem to be a common phenomenon without any distinction. ACPI ext is related to the power button and has nothing to do with this power schedule reservation. Is there any way to solve this problem?
 1 point
 -
Simply update loader, modules, etc. from grub's update menu.1 point
-
The question(s) in this topic have been answered and/or the topic author has resolved their issue. This topic is now closed. If you have other questions, please open a new topic.1 point
-
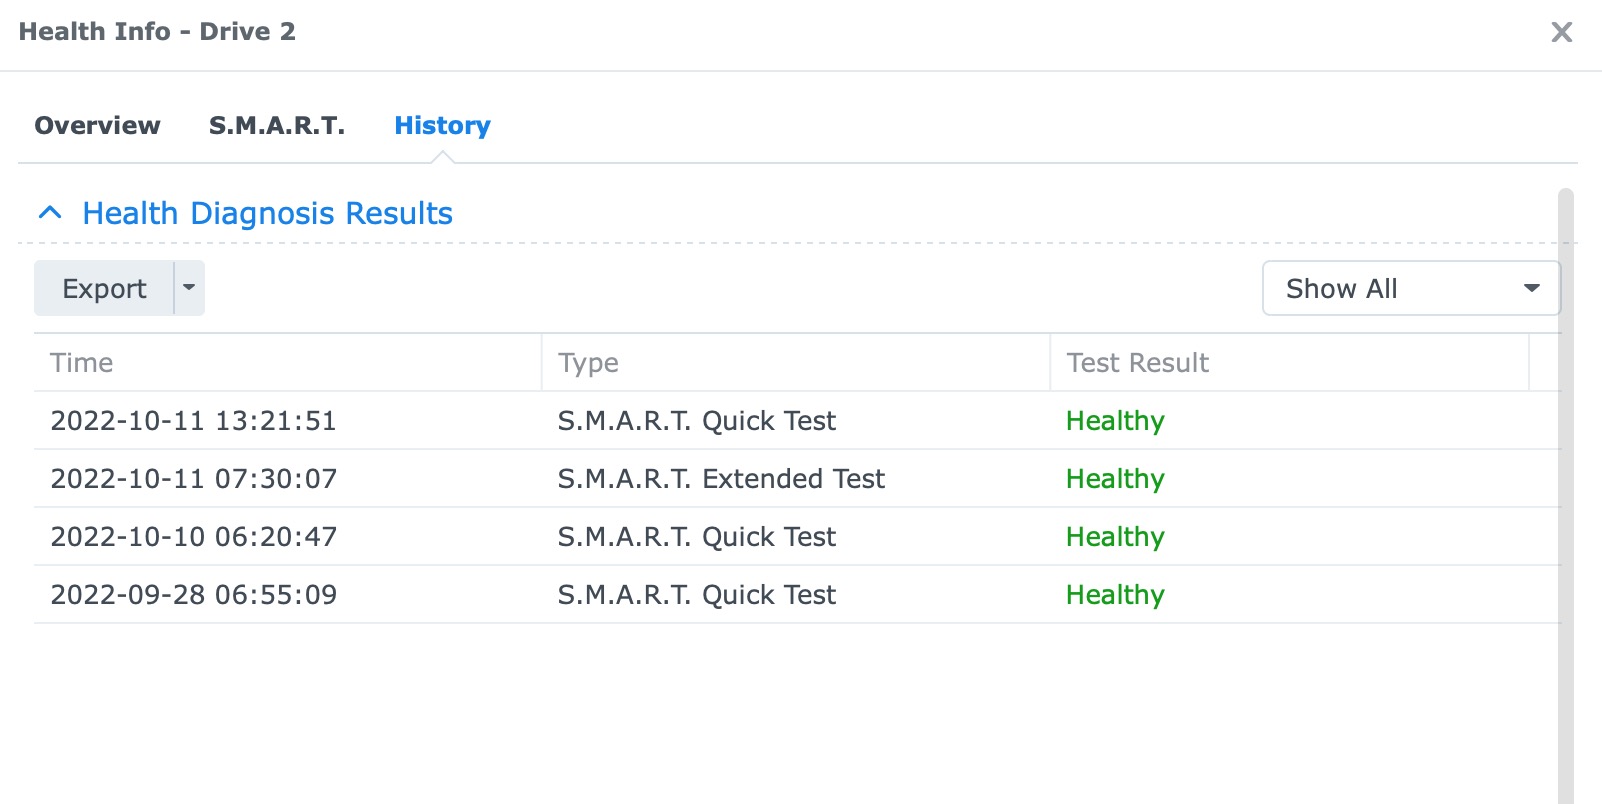
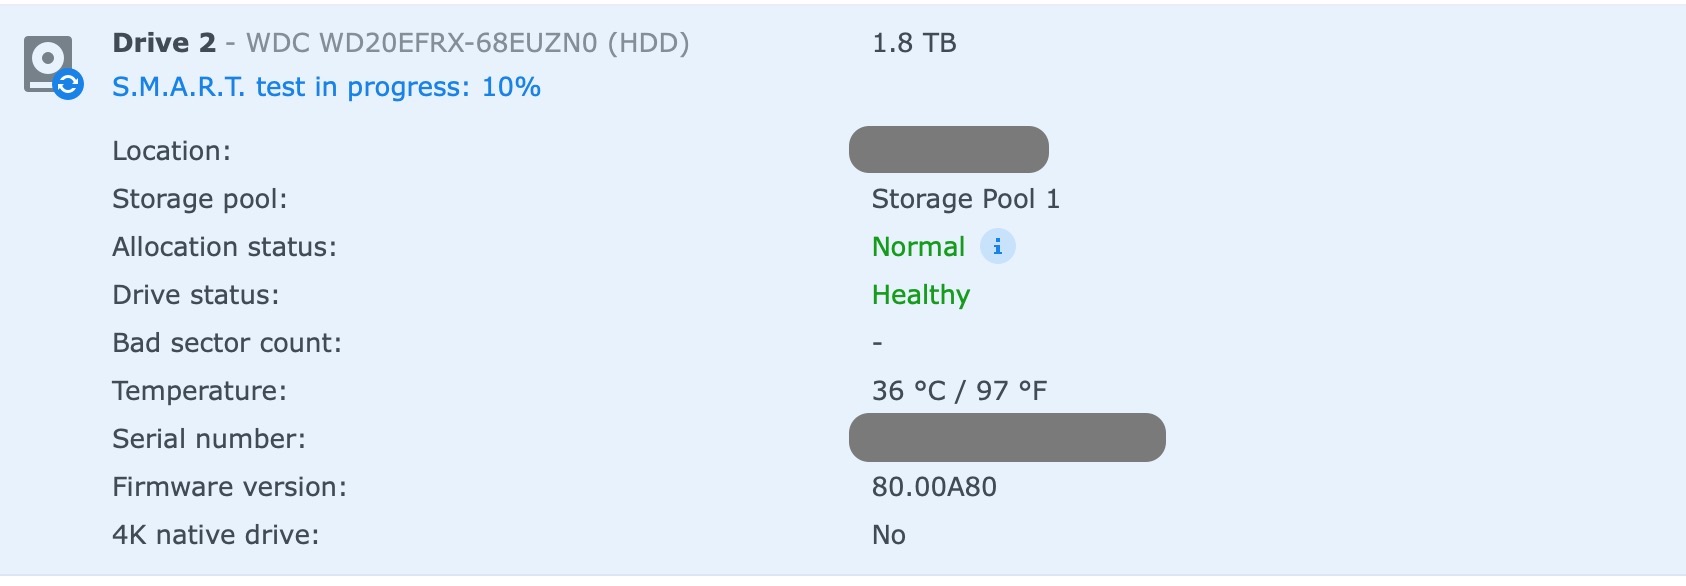
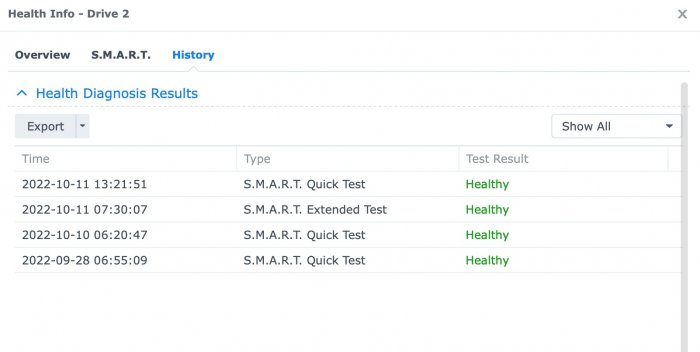
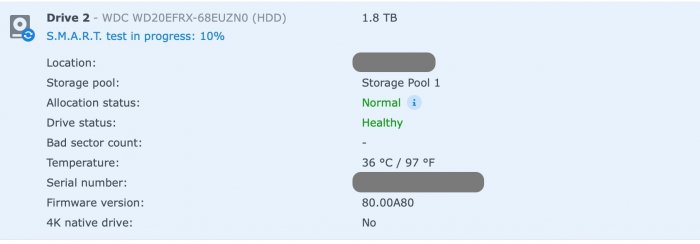
Ok it was a success. So I ended up editing 2 databases but without deleting all the entries relating to my drive serial number. I only deleted the entries that showed an error. I initially tried the normal .dump command with sqlite but ended up with some encrypted database 🤷♂️ so I went animalistic and simply copied over the databases to my Mac, opened them with 'DB Browser for SQlite' and deleted the entries that were offending me. I then copied over the database back to their original location in the NAS. Needless to say I obviously kept the original databases as backup in case my little stunt wouldn't work. .SYNODISKTESTDB: contains what type of test was done (quick or extended or was aborted) .SYNODISKDB: shows the status of the disk (warning, critical etc) the third one: SYNODISKHEALTHDB: contains the disks error count. I didn't see the need to edit this database since all disks are showing 0 errors. Now, running an extended SMART test for good measure. As if it had never happened 😁 Problem solved!
 1 point
 -
One annoyance when running DSM under ESXi is that virtual disks can't properly handle its SMART interrogations. This is because Synology embedded a custom version of the smartctl binary into its own libraries and utilities, ignoring standard config files that could generate compatible queries or suppress them. The result is spurious error messages logged to /var/log/messages every few seconds, wasting disk space and SSD lifecycle, and making it hard to see what's happening. If you use virtual disks and are not familiar with this, monitor the messages logfile with the command below to see how frequently DSM tries (and fails) to query the drives. # tail -f /var/log/messages The problem has been around for a long time and is well-documented here. An indirect fix was discovered when the virtual disks were attached to the LSI Logic SAS dialect of the ESXi virtual SCSI controller, but this solution worked reliably only under 6.1.x. On 6.2.x, the virtual SCSI controller tends to result in corrupted (but recoverable) arrays. I recently migrated my 6.1.7 system to 6.2.3, so I had to convert my virtual SCSI controller to SATA, and of course, the logfile chatter was back. I don't really care about SMART on virtual disks (and you probably don't either) so I decided to get rid of the log messages once and for all. Syslog-ng has a lot of capability to manage the log message stream, so I knew it was possible. The results follow: We need to install two files, first a syslog-ng filter: # ESXiSmart.conf # edit the [bracket values] with drive slots where SMART should be suppressed # in this example /dev/sda through /dev/sdl are suppressed filter fs_disks { match("/sd[a-l]" value("MESSAGE")); }; filter fs_badsec { match("/exc_bad_sec_ct$" value("MESSAGE")); }; filter fs_errcnt { match("disk_monitor\.c:.*Failed\ to\ check" value("MESSAGE")); }; filter fs_tmpget { match("disk/disk_temperature_get\.c:" value("MESSAGE")); }; filter fs_health { match("disk/disk_current_health_get\.c:" value("MESSAGE")); }; filter fs_sdread { match("SmartDataRead.*read\ value\ /dev/.*fail$" value("MESSAGE")); }; filter fs_stests { match("SmartSelfTestExecutionStatusGet.*read\ value\ /dev/.*fail$" value("MESSAGE")); }; filter fs_tstget { match("smartctl/smartctl_test_status_get\.c:" value("MESSAGE")); }; filter fs_allmsgs { filter(fs_badsec) or filter(fs_errcnt) or filter(fs_tmpget) or filter(fs_health) or filter(fs_sdread) or filter(fs_stests) or filter(fs_tstget); }; filter f_smart { filter(fs_disks) and filter(fs_allmsgs); }; log { source(src); filter(f_smart); }; Save this to /usr/local/etc/syslog-ng/patterndb.d/ESXiSmart.conf You will need to edit the string inside the brackets on the first "fs_disks" line to refer to those disks that should be SMART suppressed. If you want all SMART errors suppressed, just leave it as is. In my system, I have both virtual and passthrough disks, and the passthrough disks SMART correctly. So as an example, I have [ab] selected for the virtuals/dev/sda and /dev/sdb, leaving SMART log messages intact for the passthrough disks. Please note that the file is extremely sensitive to syntax. A missing semicolon, slash or backslash error, or an extra space will cause syslog-ng to fail completely and you will have no logging. To make sure it doesn't suppress valid log messages, this filter matches SMART-related error messages with references to the selected disks. However, it cannot actually remove them from the log file because there is a superseding match command embedded in DSM's syslog-ng configuration. The second file adds our filter to a dynamic exclusion list that DSM's syslog-ng configuration compiles from a special folder. There is only one line: and not filter(f_smart) Save it to /usr/local/etc/syslog-ng/patterndb.d/include/not2msg/ESXiSmart Reboot to activate the new configuration, or just restart syslog-ng with this command: # synoservice --restart syslog-ng If you want to make sure that your syslog-ng service is working correctly, generate a test log: # logger -t "test" -p error "test" And then check /var/log/messages as above. If you have made no mistakes in the filter files, you should see the test log entry and the bogus SMART messages should stop. As this solution only modifies extensible structures under /usr/local, it should survive an upgrade as long as there is no major change to message syntax.1 point