Leaderboard


Popular Content
Showing content with the highest reputation on 02/22/2022 in all areas
-
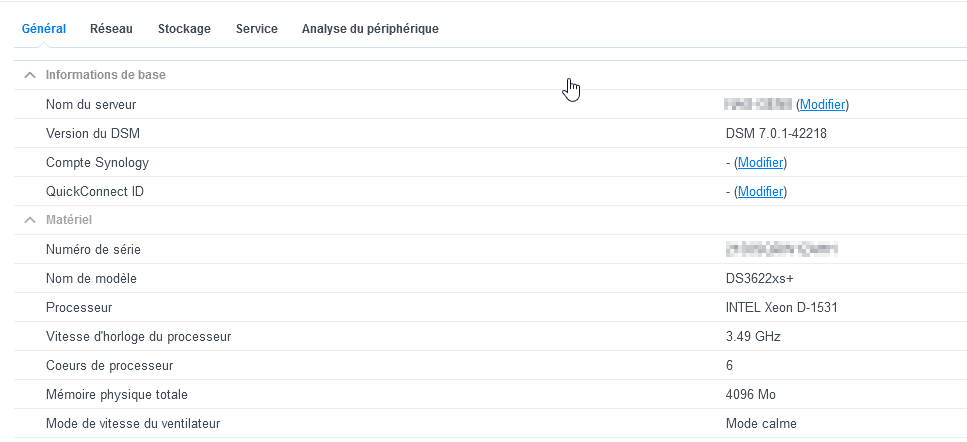
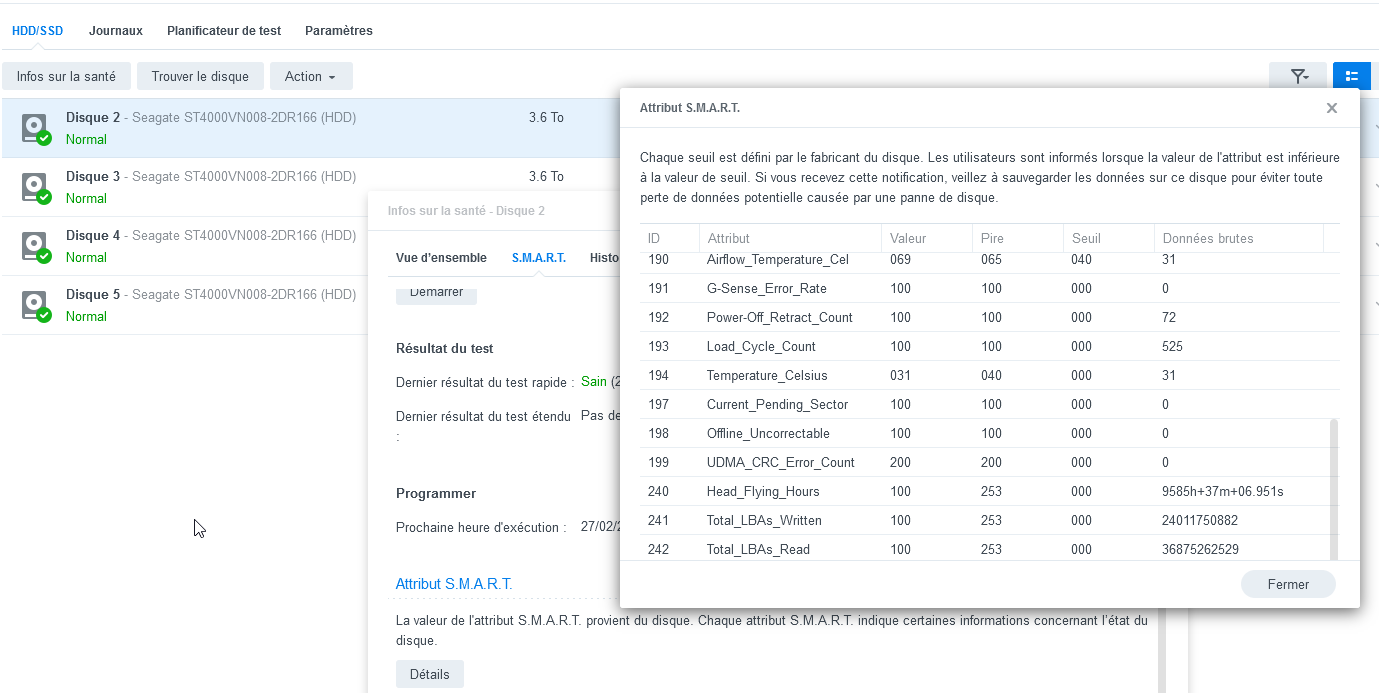
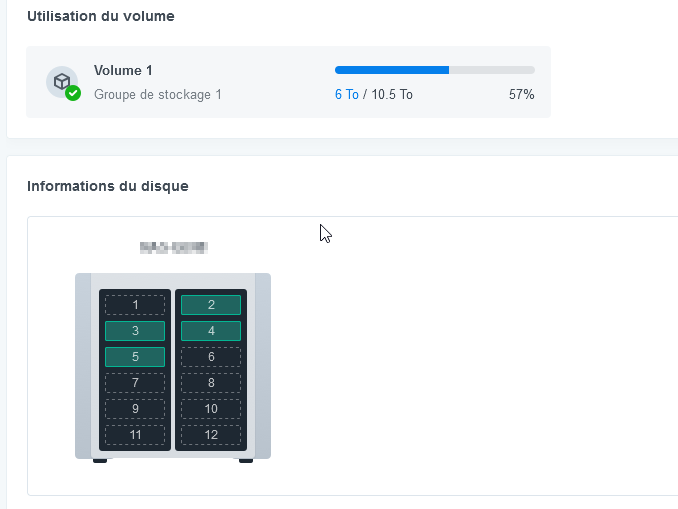
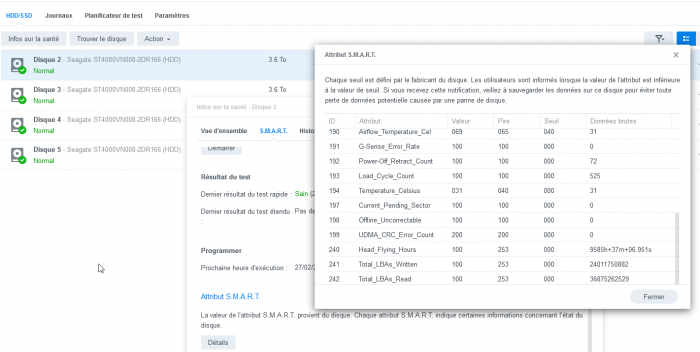
Hi All, So I finally made the big jump. I migrated my prod ESXi DS3615xs 6.2.3 jun's to ESXi DS3622xs+ 7.0.1 RP. All went very smooth, all apps were migrated successfully, only those not available on DSM7 were "stopped/incompatible" All my shares are here, docker migrated without any manual action. As I reminder i'm using a LSI HBA IT card to passthrough my 4x4Tb disks All good exept disk starting in position 2 (strange behavior with LSI HBA passthrough) All my SMART info are there : Synology Moments migrated to Synology Photos and is currently indexing all photos. A big thanks to @pocopico @yanjun @haydibe @IG-88 and all others I probably forget too. tagging @scoobdriver for info
 3 points
 -
Just to let you know that I have updated my xpenology on docker for redpill loader compatibility (and still works with jun's loader). I have tested it against DS3615xs bootloaders and it seems to works pretty well. This is not mean to be used as a production system but it's pretty good for testing things and fast to deploy with an docker image of 67MB only. For example: - You can quickly test your newly build bootloader - You can test an ugrade or another risky thing ... by doing a snapshot before and if everything goes wrong, restore the snapshot or destroy container - Etc. Quickly deploy as follow (check github for more options): # On docker host # Create a macvlan matching your local network $ docker network create -d macvlan \ --subnet=192.168.0.0/24 \ --gateway=192.168.0.1 \ -o parent=eth0 \ macvlan0 # Run xpenology docker with ip 192.168.0.50 $ docker run --name="xpenodock" --hostname="xpenodock"\ --privileged --cap-add=NET_ADMIN \ --device=/dev/net/tun --device=/dev/kvm \ --network macvlan0 --ip=192.168.0.50 \ -e BOOTLOADER_URL="http://myurl/synoboot.tgz" \ -e GRUBCFG_SN="1234ABC012345" \ -e GRUBCFG_DISKIDXMAP="00" -e GRUBCFG_SATAPORTMAP="2" \ -v /host_dir/kvm:/xpy/diskvm \ uxora/xpenology Open web on 192.168.0.50:5000 and enjoy! # Some snapshot commands $ docker exec xpenodock vm-snap-create SnapB4Upd $ docker exec xpenodock vm-snap-restore SnapB4Upd $ docker exec xpenodock vm-snap-delete SnapB4Upd # Poweroff $ docker exec xpenodock vm-power-down Source: - https://github.com/uxora-com/xpenology-docker -1 point
-
@Aigor I guess the how to is there : I did not disable internet access during the migration (I have a real SN/MAC)1 point
-
Le raid SHR est une combinaison de raid logiciel (périphériques /dev/mdX) et de LVM (gestion de volumes logiques). Le LVM permet d'accroître dynamiquement la taille d'un disque (et optimise donc l'usage de ceux-ci en minimisant la place perdue) et le Raid permet d'assurer la redondance des données au niveau inférieur pour la sécurité. Donc ça ne pose aucun problème de fonctionnement, puisque DSM 6 le gère sans soucis, mais ça complique un peu l'accès aux données si le volume est réparti sur plusieurs disques. Pour pouvoir accéder aux données depuis un système externe, il faut monter le raid et éventuellement le volume (le DSM par exemple est éclaté en raid sur tous les disques mais n'utilise pas de LVM) pour accéder aux données (en principe en SHR, le LVM est systématique pour les volumes DATA créés avec de la redondance). Pour changer un paramètre (et donc modifier le contenu d'un fichier de configuration), il faut pouvoir accéder aux données du DSM, donc monter le raid (le premier trouvé en principe) en accédant depuis un autre système d'exploitation. Autre possibilité, installer un seul disque dans un PC capable de lire et écrire sur le système de fichiers utilisé pour le DSM (en principe ext4, ce qui implique un OS Linux ou un drivers spécifique sous Windows) et modifier les fichiers, puis n'utiliser que ce disque pour redémarrer le NAS (le volume de DATA passera en faute, mais si on ne formate rien lors de la réinstallation du DSM, on le retrouvera en remettant tous les disques une fois l'installation terminée et le DSM réparé. Dernière option possible que je vois, réinstaller tout le DSM et restaurer ensuite une sauvegarde de la configuration précédente (puis adapter les options qui ne sont pas sauvegardées et il peut y en avoir pas mal). Attends confirmation d'autres personnes sur ce forum pour la marche à suivre et tiens nous au courant de la méthode utilisée et du résultat. Jacques1 point
-
Все проще: протоколы доступа к разным ресурсам в ОС ТВ реализованы по-разному.1 point
-
Когда вы подключаете флешку она становится как бы частью памяти телека а нас на расстоянии с него поток идёт по другому принципу и всё это работает по другому и ваш телек не может мотать и запоминать места. Как то так...1 point
-
the file that i upload was patched 03->01 you need find postison and change 01->00 00 System 01 Nano 02 SecurityJson 03 Spk 08 /var/packages/syno_dev_token 0A Small Patch
 1 point
 -
Bonjour, En principe, si aucune action de formatage n'a été faite durant la migration, les données sont toujours accessibles et intactes au niveau disque. Maintenant, revenir à une version plus ancienne est un procédé déjà décrit dans le forum mais nécessite (de mémoire) de modifier la valeur de la version dans un fichier. On en revient à un accès au NAS. Je te conseille d'attendre la réponse d'autres personnes plus au fait que moi de ces procédures, mais pour récupérer un accès SSH (et modifier le fichier), il me parait possible de booter sur une clef contenant un Linux (SystemRescueCD est un outil que j'aime beaucoup car à peu près tout ce dont on peut avoir besoin dans ce genre de cas est directement présent au boot), de rechercher le raid et de le monter (voir le site de Synology pour la procédure de récupération des données). Pour le DSM, il est installé dans /dev/md0 ce qui dans le cas d'une réparation sera probablement /dev/md127 car le raid n'est pas configuré pour cette machine. Ensuite, réactiver le SSH devrait pouvoir se faire en éditant le fichier /etc.defaults/synoinfo.conf et modifier la valeur de supportssh à "yes". root@Maison:/etc.defaults# grep ssh /etc.defaults/synoinfo.conf supportssh="yes" Maintenant, reste le problème de l'authentification en espérant que les mots de passes sont restés intacts. Sinon, il faudra réitérer la procédure de boot pour installer des clefs de chiffrement permettant une authentification directe (et modifier le fichier /etc/ssh/sshd_config - et probablement aussi celui dans /etc.defaults/ssh - pour valider la connexion de root et les clefs). Pas d'autres pistes pour le moment, mais je ne peux que déconseiller les migrations à 2h du matin, pour avoir migré plus d'une centaine de système la nuit, il vaut mieux commencer plus tôt et se faire surveiller par quelqu'un passé une certaine heure... les erreurs sont trop faciles avec la fatigue. Jacques1 point
-
yes no need patch1 point
-
this is already patched file for extra small update like synology_broadwell_3617xs.pat1 point
-
patch synoarchive then /usr/syno/sbin/synoarchive -vxf synology_broadwell_3617xs.pat -C . native /usr/syno/sbin/synoarchive -vxf aaa.spk -C .1 point
-
В штатных гнёздах видны клавиатура и мышь. UPS виден только в дополнительном USB3. Принтер не пробовал. Нет необходимости.1 point
-
i switched back as test to juns loader with DSM6.. only had to Switch USB Stick and re-install the right pat file1 point
-
cool thx ! so then i can confirm that my Test migration from DS3617xs to DS3622xs+ was successfully (Baremetal) i used 1 HDD with some Test Data and everything was still available. Steps i did 1. block internet to DS3617xs 2 turn off the DS 3 switch the Loader (USB Stick) 4 Boot up and wait until the DS come up and reachable in the Network (ping) 5 use the pat file from the tinyloader and start migration, i used the Option dont keep settings( 2.Option), maybe someone can use NR1 as test 6 wait until the migration process has reached 100%, then the DS should rest as usual, 7 wait until the DS is back online and you can process with DSM7 Wizard to complet.1 point
-
https://xpenology.club/install-dsm-7-on-baremetal-or-vm/1 point
-
Hi, @dodo-dk Exact ! Be carreful do not update ds3617xs to DSM 7.0.1-42218 Update 1 or 2 without reading this more, There is a new zimage and rd, you can see the pat size is more weight than ds3615xs or 918+ synology_broadwell_3617xs.pat 26.98MB synology_bromolow_3615xs.pat 10.10MB synology_apollolake_918+.pat 10.53MB And there is a problem (a problem for futur ?!) A priori, the new pat file on synology download site are no longer gz type archive! And so they are no longer usable by our current scripts. It is possible that all pat files will be distributed in this new format. I have prepared the bsp for update 2, you can up to update 2 without going through update 1. But to be able to use it, you will have to produce a PAT file yourself! WHAT ?! 😢 And this as long as we do not have a tool allowing extraction of these pat files with a script. I cannot provide you the PAT file i made, because it contains proprietary data. In order to produce your PAT file, here is a procedure to follow: Prerequisites You must have a machine with a ds3617xs 701 already install, on the LAN, and with a serial connection capability. (A virtual machine is the best choice) And another machine to receive the PAT file (with ssh server un this procedure). Launch a manual migration to update 2 from GUI DSM 7.0.1. After the reboot which will fail! Connect to the serial port You can see why it didn't work... DiskStation> cat /var/log/junior_reason Exit on error [7] root not matched with junior... Which means that your bootloader is no longer usable with the current version. DiskStation> mkdir /root/tmproot DiskStation> mount /dev/md0 /root/tmproot/ DiskStation> mount /dev /root/tmproot/dev DiskStation> chroot /root/tmproot /bin/bash DiskStation> chroot /root/tmproot /bin/bash bash-4.4# cd /.syno/patch bash-4.4# tar -zcvf mypat.pat * bash-4.4# scp mypat.pat yourlogin@ipremotemachine:~ Here you have your PAT file ! In this tutorial I work with the rp-helper tool but you can use what you prefer. Put your PAT file in the cache download directory so that it can be used without downloading synology's one, or host your file on a server and modify the pat_url! Add in your global_config.json ... { "id": "broadwell-7.0.1-42218u2-test", "platform_version": "broadwell-7.0.1-42218u2", "user_config_json": "USERCONFIG.json", "docker_base_image": "debian:9-slim", "redpill_lkm_make_target": "test-v7", "compile_with": "toolkit_dev", "downloads": { "kernel": { "url": "https://cdn.kernel.org/pub/linux/kernel/v4.x/linux-4.4.180.tar.gz", "sha256": "519ff74ceaa52462d6b9a8452d90ba5cd009807830134de5e1df269b44dd380b" }, "toolkit_dev": { "url": "https://sourceforge.net/projects/dsgpl/files/toolkit/DSM7.0/ds.broadwell-7.0.dev.txz/download", "sha256": "e050987fbbab0c246aff2af935b1d8a4140ce490915aa4c92f3c8d163eea970c" } }, "redpill_lkm": { "source_url": "https://github.com/jimmyGALLAND/redpill-lkm.git", "branch": "develop" }, "redpill_load": { "source_url": "https://github.com/jimmyGALLAND/redpill-load.git", "branch": "develop" } } .... I advise you to clone develop branch https://github.com/jimmyGALLAND/redpill-lkm.git in a directory and modify global_config.json to set "local_rp_load_use" to true in order to be able to use a modify config.json file ... "docker": { "use_buildkit": "true", "image_name": "redpill-tool-chain", "download_folder": "docker/downloads", "local_rp_lkm_use": "false", "local_rp_lkm_path": "./redpill-lkm", "local_rp_load_use": "true", "local_rp_load_path": "./redpill-load", ... In redpill-load edit config.json file under config/DS3617xs/7.0.1-42218u2/config.json ... { "os": { "id": "ds3617xs_42218u2", "pat_url": "https://global.download.synology.com/download/DSM/criticalupdate/update_pack/42218-2/synology_broadwell_3617xs.pat", "sha256": "XXXXXXXXXXXXXXXXXXX" put here the sha256sum of your PAT file }, .... In order to use virtio or redpill-boot-wait for ds3617xs_42218u2 You can use https://github.com/jimmyGALLAND/redpill-ext I will update the @pocopico ext repo coming days. Good night people
 1 point