Search the Community
Showing results for 'detected that the hard drives'.
-
Hi Tomte, how would you run two 2.5" drives? Run both in parallel on the 5V floppy disk output?
-
 So I rebuilt my TCRP bootloader. I now have Bays 2-12 populated and one of my drives is now being detected as an external drive...
 -
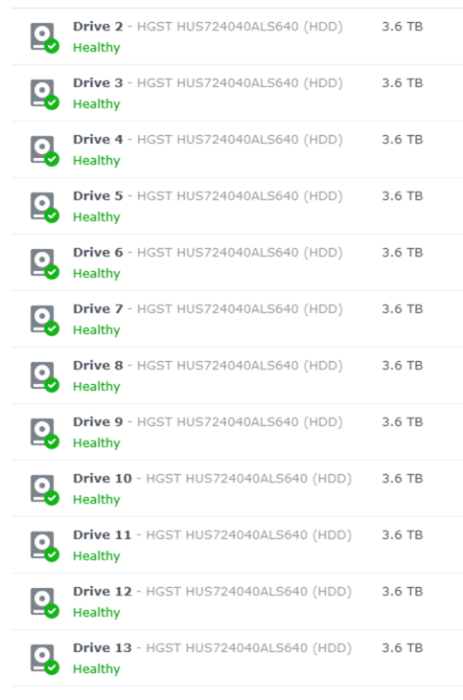
Hi all, I know this is a well-worn topic, but I have not been able to find a specific answer on my situation. I understand how and why the SataPortMap & DiskIdxMap fields are used, (well, I think I understand it enough...) But my questions is: How does one go about determining what these values should be? I am currently running a: · TinyCore RedPill Loader with M-Shell (Latest as of 20240305) · Asus P11C-M4L with all SATA controllers turned off in the BIOS · ASUS PIKE II 3008 8-port SAS HBA card · 12GB/s SGPIO Expander hot-swap backplane that the connects back to the PIKE II card via 2 MiniHD Cables · 12 SAS disks attached to the this backplane · All 12 disks are being presented to Xpenology as individual disk. With: SataPortMap: 1 DiskIdxMap: 00 I end with DSM detecting all 12 disks, but the disk count starts at 02 and goes through to 13. Like other users I am trying to configure my system to use ports 01-12 I have read some comments suggesting that SAS configurations do not utilise the SataPort Map setting, however I find if I manipulate these settings, does affect the disk layout in DSM. As I have disabled my onboard SATA controllers I believe the PIKE Card is the first control which holds 8 ports, evern though via the SAS backplane it has 12 disks attached. As SataPortMap only uses 1 digit to configure the ports, I assume I need to use: SataPortMap: 8 SataPortMap: 1 DiskIdxMap: 00 Assigns my 12 disks from: sdb through to sdm and SataPortMap: 8 DiskIdxMap: 00 Assigns my 12 disks from: sdd through to sdo So these values are affecting my DSM configuration, what I do not understand is how to calculate the HEX values for the DiskIdxMap. I believe setting DiskIdxMap: 00 means that the first disk detected should be assigned to sda. Ssh-ing into the DSM, there is no sda listed, so I don’t believe there are any other disk controllers at play here. Have I misunderstood a concept here? Is there any glaringly obvious I have missed or misunderstood? Cheers, Leon

-

new sata/ahci cards with more then 4 ports (and no sata multiplexer)
Kanst replied to IG-88's topic in Hardware Modding
I'm build a test device on 6xSATA m/b + 2x 6ports NVME 1166 3622xs+. It work. With blank ("SataPortMap" : "" and "DiskIdxMap" : "") DSM7.2.1 see drives 1-12 and 39-44. I tried sata_remap in user_config and sata comandline (39\\>13...44\\>18, 39\>13...44\>18, 39>13:13>39...), but in all this cases DSM can see only drive 39. What about a right sintacs? Or its useless in DSM7? How can I remap them and set other ports as dummy? -

Develop and refine the DVA1622 loader
dyter replied to pocopico's topic in Developer Discussion Room
For foodies I also found this for less $20, you can up to 7 SATA drives on ALI mini PC ! https://fr.aliexpress.com/item/1005005653706057.html -
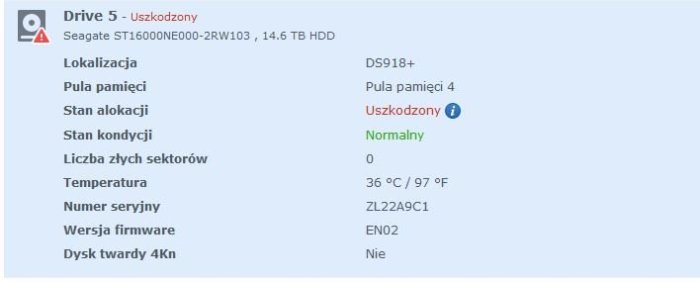
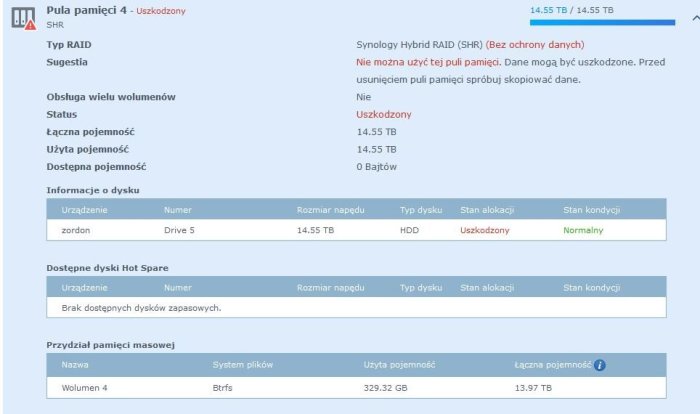
Hello everyone, I am using DSM 6.2.2-24922 update 6 system on my Dell Vostro 3900 MT i5-4460 computer, with four storage pools (Synology Hybrid RAID SHR without data protection) of sizes 2x 926 GB, 1x 3.63 TB and 1x 14.55 TB. Two days ago, one of the 14.55 TB disks had a failure and in the "Storage Manager" module, I received a message saying "Cannot use this storage pool. Data may be damaged. Try copying data before removing the storage pool." The status field shows "Damaged" while the "Health Status" field shows "Normal." Unfortunately, I am not sure what could be causing this issue. In the "HDD/SSD" module, I found the information that "This disk has been removed from the storage pool by the system. Please replace the disk and go to the Storage Pool tab to select the pool that needs repair, then click Actions > Repair" - unfortunately, after following these steps, the "Repair" option is greyed out and cannot be clicked. Using "File Station", I was able to access some of the directories stored on this disk and managed to transfer some of the necessary data - however, I have also lost system applications such as VPN server and others that were installed on this disk. I kindly ask for help from the esteemed members of this forum in solving this challenge - any advice or suggestions would be greatly appreciated. PS Sorry if I raised this topic in a wrong place - if so, please point me where I should post it.


-
 1) Which version of DSM would be compatible? With the hardware you have, most platforms would work for you. The DS918+ or 920+ would be great choices, but you can use others. Read through this post to choose a platform for your build: https://xpenology.com/forum/topic/61634-dsm-7x-loaders-and-platforms/ Read through this post for a better understanding of how things work with TCRP: https://xpenology.com/forum/topic/62221-tutorial-installmigrate-to-dsm-7x-with-tinycore-redpill-tcrp-loader/ If you want to go the easy route without and command line, look at this tread: https://xpenology.com/forum/topic/65408-automated-redpill-loader-arpl/ and this thread https://xpenology.com/forum/topic/61839-tinycore-redpill-loader-build-support-tool-m-shell/ 3) Where is the dsm file installed? (Ssd?) Its installed on your hard drives. You do need a USB thumb drive for the boot loader. All of your other questions can be answered with a quick Google search.
 -
 UPDATE- This is for someone else in the future should they run into this issue. This was EASY. I used the ARC method. I got my system up and running in 10 minutes. It's currently rebuilding my 3rd drive probably because I moved the location of the SATA connection on my motherboard from 3 to 4th. I went to GitHub link, and downloaded the xxx.img.zip. I unzipped and then burned the image to USB3 (16gb drive). Booted the computer/NAS and followed the directions. It was EASY. I picked some options/boxes such as marking the disk check healthy option (don't recall the exact name but you will see it...Synology now gives a warning for Seagate Ironwolf and other drives. That option removes the error from the NAS when you are running). I also picked the Photo station patch option. It did not work the first time, it went to the end of the 10 minutes and then said something went wrong. I reran the ARC/USB stick and picked FORCED REINSTALL and that worked. I'm currently rebuilding my 3rd drive because I originally moved where it was connected to the SATA port from 3rd to 4th position on the motherboard (if that made a difference hence the rebuild). IMPORTANT - WAIT WAIT and WAIT - Arc runs slow, just WAIT...it will eventually get to the end showing the root info saying ARC and telling you to log into your NAS. THANKS! I will try to follow what you said. YOU ARE RIGHT, I forgot what to do, haven't updated in a while. I did save my notes and original manual. I thought Tiny Loader updated itself whenever it reboots. Funny you mentioned ARC as I saw a youtube video few days ago. I'll look more into it.
 -
Oh! Well, yes, you can ask me only here! 🤣 A brief history of bootloaders for DSM 7 (in my understanding I'm sorry if I make a mistake somewhere) TCRP by @pocopico | +---> ARPL by @fbelavenuto, It is no longer developing) ==> arpl-i18n renamed to ==> arpl-rr by @wjz304, due to some disagreements, the project is developing with some limitations, but it works | +---> M Shell for TCRP by @Peter Suh | +---> Arc Loader by Christian, who could not be identified on this forum (?) I would like to take this opportunity to express my deep gratitude to all the listed authors for their hard work!
-
Your unit is using the Intel Atom® Processor 230 (Diamondville), released in 2008 and was the 1st Generation of Atom and does support x86/x64. It does only have 1 Core and 2 Threads.... supports Max 2GB RAM, 4 Drives. What I don't know, is if the motherboard itself can be configured to boot from an attached USB, instead of it's default method, and even if DSM 5.x/6.x would support the rest of the integrated hardware (chipset, ethernet, etc.), I am not as well versed like some of the other long time experienced senior users/contributors to the DSM DIY would know. I'm lazy, impatient and don't really have a lot of time to fight with a litany of possible technical issues, so I followed K.I.S.S. (Keep It Super Simple). 🤠 I would say, IF it would work, your most likely best choice would the the DS3615xs... Ultimately, not to be Mr. Downer, it probably would be a better use of your time/effort, to find a newer, 2013 or better Intel system, that you can stuff several drives into and take the plunge with DSM 7.x instead. There are if I am not mistaken, several packages that are now also not supporting updates for DSM 6.x which might be limiting, depending on your use case. Here is the software tool you were looking for, I still had it buried in some archived folders on my NAS. Once you unzip it, you have all of the separate software tools that the XPENology Tool would download for you. I am sure several of them have been updated since that tool was created. I did update the version of Rufus in it's folder, to the latest and greatest. https://drive.google.com/file/d/1KSPvs8EZ3E3E6I6ZaljG9XRKfP7McVUj/view?usp=sharing Since DSM 5.x/6.x have been retired, their respective installers have been archived, so you'll also need this link to get all of that older stuff... https://web.archive.org/web/20230117045449/https://archive.synology.com/download/Os/DSM This is the best I can do for you!
-
Hello Everyone, Okay so the situation is this. My NAS shows up in the Synology Assistant. The drives are mapped, I can access in Windows File Explorer. It seems everything is working in the background. BUT I can no longer get into the NAS from my browser. I get this error "Sorry, the page you are looking for is not found." I spent a few hours searching the internet and this forum to see if I can fix it myself. I did not see any info. I've rebooted my router, tried other computers and browsers. I also rebooted the NAS few times. Hardware is bare metal. I am updated on the NAS to DSM 7.2.1-69057 Update 4 This problem came up when I shutdown the NAS and moved a drive from one of the sata ports. I was adding an SSD cache drive. After I rebooted, I can no longer get into the NAS from a web browser. I looked at Tiny loader on boot and it says up to date with 0.0.6 What do I do? I am awaiting your response before I do anything else. I was going to try recreating my Tiny USB boot drive but I will wait for you before I touch anything. THANKS!
-

TinyCore RedPill Loader Build Support Tool ( M-Shell )
sam juan replied to Peter Suh's topic in Software Modding
sorry if this has been asked before, but can you use the nvme alone as storage pool? i had install DS923+ m-shell to thinkcentre m715q with 1tb nvme and 256 ssd; DSM 7.2.1-69057 Update 4 detected both SSD and nvme, installed syno_enable_m2_volume.sh and was able to add nvme to storage pool; is there a way to use the nvme alone? when i tried to remove the ssd, it did not work; appreciate your help. thanks. -
Thank you for reply and guides. I didn't upgrade cuz don't want to lose any data or cause any trouble to upgrade newer version unless it got trouble. I will buy some used Intel 4th gen cpu and MB to build new one. If I put back old boot usb and 6x 6TB drives back, it won't work? If new hardware build, can I just install new DSM 7.1 with new usb loader TCRP 0.8, or I need to go back dsm5.2 first then upgrade to dsm 6 then 7? Thanks
-
Hi, I have DSM5.2-5644 update5 on old my ASUS AMD E350M1-I motherboard dead today, cannot turn on. I can't find same motherboard to replace, so can I build a new intel or amd hardware then put back my six hard drives and boot XPEnoboot usb without lost my data? Any suggestion? Thanks
-
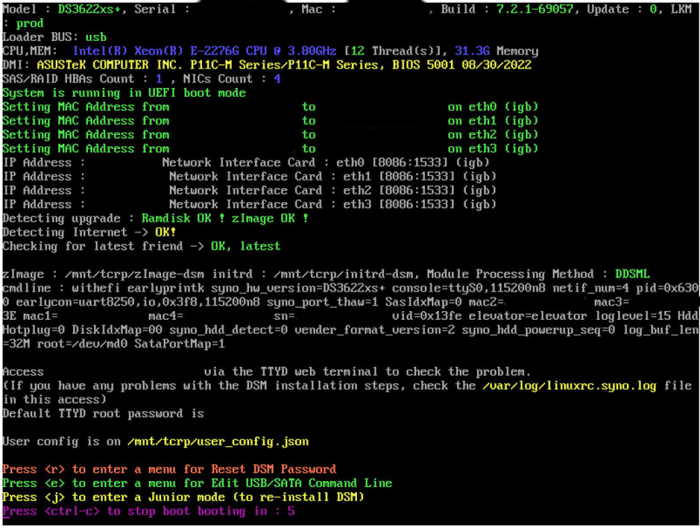
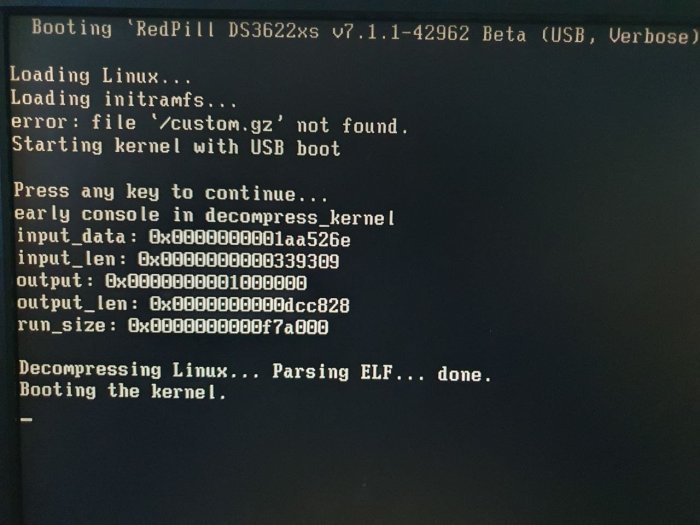
Hi all, I have been using a HP G7 N54L Microserver with the standard 4 drives (4x 2TB Seagate SATA NASware, ancient but still working) and embedded NIC, and a SanDisk 16GB USB3.0 flashdrive running DSM5.0 that was setup by a friend around 10 years ago and it has worked flawlessly but given the age of the software I figured it was time to upgrade to DSM7.1.1. I'm a noob to xpenology myself so please be gentle. I've read up a fair bit but I've still got a ways to go. I've been following the well written upgrade guide here https://tomvanveen.eu/installing-synology-dsm-7-x-on-a-hp-n54l-in-2022/ in combination with the excellent post by flyride here: Many people have had success with it but I've run into a problem during the build in TinyCore. First I flashed the BIOS successfully using Kamzata's ROM (https://www.bios-mods.com/forum/showthread.php?pid=75965#pid75965). I didn't realise this reset the BIOS clock which I thought might be the issue but I've since updated it and the issue persists. I've also disabled the C1E Support setting so it's not that. I'm using older TC v0.9.3.0 as recommended in the guide for N54Ls, with the BIOS/CSM/Legacy boot from USB flash drive image. I can run through all the commands successfully but when I boot into RedPill USB option in the GRUB menu I get this "error: file './custom.gz' not found" (pic attached) and my router is not assigning an IP address so I can't find Synology in Synology Assistant (checked the ports/cables so issue is not router related). I noticed these issues following the build command in the TinyCore terminal: menuentry 'RedPill DS3622xs v7.1.1-42962 Beta (USB, Verbose)' { menuentry 'RedPill DS3622xs v7.1.1-42962 Beta (SATA, Verbose)' { Updated user_config with USB Command Line : withefi earlyprintk syno_hw_version=DS3622xs+ console=ttyS0,115200n8 netif_num=1 pid=0x5580 earlycon=uart8250,io,0x3f8,115200n8 syno_port_thaw=1 mac1=9CB65407E0C3 sn=2030SQRH8LJAM vid=0x0781 elevator=elevator loglevel=15 HddHotplug=0 DiskIdxMap=00 syno_hdd_detect=0 vender_format_version=2 syno_hdd_powerup_seq=0 log_buf_len=32M root=/dev/md0 SataPortMap=6 Updated user_config with SATA Command Line : withefi earlyprintk syno_hw_version=DS3622xs+ console=ttyS0,115200n8 netif_num=1 pid=0x5580 earlycon=uart8250,io,0x3f8,115200n8 synoboot_satadom=1 syno_port_thaw=1 mac1=9CB65407E0C3 sn=2030SQRH8LJAM vid=0x0781 elevator=elevator loglevel=15 HddHotplug=0 DiskIdxMap=00 syno_hdd_detect=0 vender_format_version=2 syno_hdd_powerup_seq=0 log_buf_len=32M root=/dev/md0 SataPortMap=6 Generating GRUB entries for model :ds3622xsp_42962 in /home/tc ./rploader.sh: line 2260: /home/tc/include/grubmgr.sh: No such file or directory Failed to generate grub.cfg ./rploader.sh: line 2261: /home/tc/include/grubmgr.sh: No such file or directory Failed to add USB entry ./rploader.sh: line 2262: /home/tc/include/grubmgr.sh: No such file or directory Failed to add SATA entry ./rploader.sh: line 2263: /home/tc/include/grubmgr.sh: No such file or directory Failed to add SATA entry ./rploader.sh: line 2264: /home/tc/include/grubmgr.sh: No such file or directory Failed to add SATA entry cp: cannot create regular file '/home/tc/redpill-load/part1/boot/grub/grub.cfg': Permission denied grep: /home/tc/grub.cfg: No such file or directory Copying grub file /home/tc/grub.cfg to /home/tc/redpill-load/localdiskp1/boot/grub/grub.cfg cp: cannot stat '/home/tc/grub.cfg': No such file or directory menuentry 'RedPill DS3622xs v7.1.1-42962 Beta (USB, Verbose)' { menuentry 'RedPill DS3622xs v7.1.1-42962 Beta (SATA, Verbose)' { Setting next grub entry Setting next grub entry to Friend : sudo: /usr/local/bin/grub-editenv: command not found sudo: /usr/local/bin/grub-editenv: command not found Grub entry has been set to : Ramdisk in not compressed 48778 blocks 42649 blocks 91425 blocks Cleaning up files Caching files for future use No adequate space on TCRP loader partition /mnt/sde3 to cache pat file Found /mnt/sde3/auxfiles/ds3622xsp_42962.pat file Removing older cached pat files to cache current Found /home/tc/redpill-load/cache/ds3622xsp_42962.pat, copying to cache directory : /mnt/sde3/auxfiles Saving user session for future use. Saving current extensions -> OK ! Saving current user_config.json -> OK ! Also worth noting (I think) is that when I attempt to boot into RedPill in the GRUB menu, the TinyCore option is no longer present, which it seems to be on successful installs. Apologies for the long first post. In my rookie status I'm stumped so any advice on what I can look into in order to proceed will be greatly appreciated. If any additional info or part of the command logs will be useful I can include it.
-
Develop and refine the DVA1622 loader
dyter replied to pocopico's topic in Developer Discussion Room
I don't need M2 or msata, only mPCI slot is usefull for me, because I use 3x SATA SSD drives And finally I order the J5040 because J4125 is out of stock -

Develop and refine the DVA1622 loader
dimakv2014 replied to pocopico's topic in Developer Discussion Room
Thats mSATA adapter on image and not m.2. Moreover if miniPC has m.2 slot it must clearly state whether it supports m.2 sata or only pci-e nvme drives or both. You can't put m.2 sata (M+B Key) ssd into m.2 pci-e slot it will not work... Its basically same thing as trying to put DDR3 memory into DDR4 slot or vise versa
-
Develop and refine the DVA1622 loader
dimakv2014 replied to pocopico's topic in Developer Discussion Room
Nvme = pci-e, minipci-e. So like I said only 2 sata (regular or msata) means 2 drives in DVA1622 -
Develop and refine the DVA1622 loader
dimakv2014 replied to pocopico's topic in Developer Discussion Room
Not really, you will still have 2 drives since DVA1622 doesn't support nvme drives as a Storage, only for Cache. And its not loader problem its Synology DSM. There are however other than DVA models that do support nvme drives for storage but only as secondary drive so DSM cannot be installed on them. -
Develop and refine the DVA1622 loader
dyter replied to pocopico's topic in Developer Discussion Room
I found lot of mini PC on ALIEXPRESS with 13th generation N100, J6426 ... I hesitate with a J5040 (the best of 14nm CPU Geminilake), but I finaly chose this miniPC for better compatibility : I remove everytime the miniPCIe Wifi and replace them with a miniPCIe SATA x2 controller that give to me a total of 4x drives. -
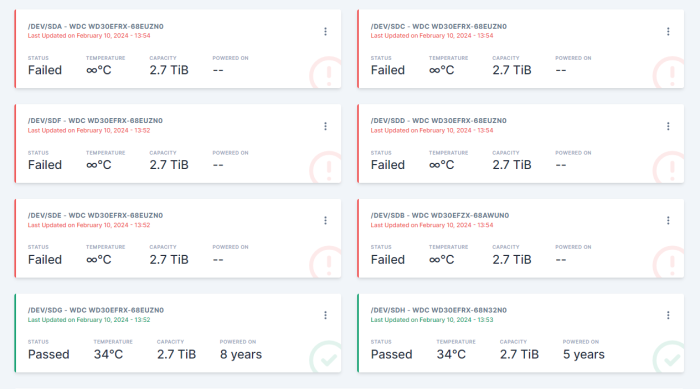
Hello everyone, I previously had a functional NAS on other hardware in DSM 6.1. Now I want to create a new one on other hardware so I can use DSM 7, but I have tried everything. I'll try to summarize it here. My hardware: -Asus P8H61-M LE R2.0 (last update of bios) c1e enabled, hot plug enabled, ahci mode.. -Intel i5 2320 CPU -8gb ram -3tb HDD (1 + 1 + 1) 3 Sata Disks. I have tried 2 ways, tynycore redpill and "rr ARPL". With RR, I haven't even been able to see the nas in Find.synology. With Tinycore, I have gone further but with several problems; -I find the nas, but with problems on disks 2,3 and 4. Now I don't get this problem, but no DSM can be installed. I leave video proof. I'm a noob at this, I haven't used Linux much, I've been looking at hundreds of forum posts for 1 week but I can't get it to work, I hope someone can help me! Thank you. @Peter Suh video: pd: I don't understand why many nas appear when I have formatted the USB drive and the hard drive.
-
Still, is it compatible? Before I used a q6600 in dsm 6.1.. I follow this tutorial: https://xpenology.com/forum/topic/62221-tutorial-installmigrate-to-dsm-7x-with-tinycore-redpill-tcrp-loader/ When I put "./rploader.sh build broadwellnk-7.1.0-42661" I get this: (I'm trying to install Ds3622xs+) tc@box:~$ ./rploader.sh build broadwellnk-7.1.0-42661 Error: Platform not found: rploader.sh Version: 0.10.0.0 -------------------------------------------------- -------------------------------------- Usage: ./rploader.sh <action> <platform version> <static or compile module> [extension manager arguments] Actions: build, ext, download, clean, update, listmods, serialgen, identifyusb, patchdtc, satamap, backup, backuploader, restoreloader, restoresession, mountdsmroot, postupdate, mountshare, version, monitor, bringfriend, downloadupgradepat, help - build <platform> <option> : Build the 💊 RedPill LKM and update the loader image for the specified platform version and update currentloader. Valid Options: static/compile/manual/junmod/withfriend** (default: withfriend) ** withfriend add the TCRP friend and a boot option for auto patching - ext <platform> <option> <URL> Manage extensions using redpill extension manager. Valid Options: add/force_add/info/remove/update/cleanup/auto . Options after platform Example: rploader.sh ext apollolake-7.0.1-42218 add https://raw.githubusercontent.com/pocopico/rp-ext/master/e1000/rpext-index.json or for auto detect use rploader.sh ext apollolake-7.0.1-42218 auto - download <platform> : Download redpill sources only -clean: Removes all cached and downloaded files and starts over clean -update: Checks github repo for latest version of rploader, and prompts you download and overwrite - fullupgrade: Performs a full upgrade of the local files to the latest available on the repo. It will backup the current filed under /home/tc/old - listmods <platform>: Tries to figure out any required extensions. This usually are device modules - serialgen <synomodel> <option> : Generates a serial number and mac address for the following platforms DS3615xs DS3617xs DS916+ DS918+ DS920+ DS3622xs+ FS6400 DVA3219 DVA3221 DS1621+ DVA1622 DS2422+ RS4021xs+ DS923+ DS1522+ SA6400 FS2500 RS3413xs+ DS1019+ DS1520+ DS 1621xs+ DS723+ Valid Options : realmac , keeps the real mac of interface eth0 - identifyusb : Tries to identify your loader usb stick VID:PID and updates the user_config.json file - patchdtc : Tries to identify and patch your dtc model for your disk and nvme devices. If you want to have your manually edited dts file used convert it to dtb and place it under /home/tc/custom-modules - satamap : Tries to identify your SataPortMap and DiskIdxMap values and updates the user_config.json file - backup: Backup and make changes /home/tc changed permanent to your loader disk. Next time you boot, your /home will be restored to the current state. -backuploader: Backup current loader partitions to your TCRP partition - restoreloader: Restore current loader partitions from your TCRP partition - restoresession : Restore last user session files. (extensions and user_config.json) - mountdsmroot : Mount DSM root for manual intervention on DSM root partition - postupdate: Runs a postupdate process to recreate your rd.gz, zImage and custom.gz for junior to match root - mountshare : Mounts a remote CIFS working directory - version <option>: Prints rploader version and if the history option is passed then the version history is listed. Valid Options: history, shows rploader release history. - monitor : Prints system statistics related to TCRP loader - getgrubconf : Checks your user_config.json file variables against current grub.cfg variables and updates your user_config.json accordingly - bring friend Downloads TCRP friend and makes it the default boot option. TCRP Friend is here to assist with automated patching after an upgrade. No postupgrade actions will be required anymore, if TCRP friend is left as the default boot option. - downloadupgradepat Downloads a specific upgrade pat that can be used for various troubleshooting purposes - removefriend Reverse bringfriend actions and remove TCRP from your loader - help: Show this page -------------------------------------------------- -------------------------------------- Version: 0.10.0.0 tc@box:~$ --------------- Then the sataport map also fails: tc@box:~$ ./rploader.sh satamap Found "00:1f.2 Intel Corporation 6 Series/C200 Series Chipset Family SATA AHCI Controller (rev 05)" Detected 6 ports/1 drives. Bad ports: 2 3 4. Override # of ports or ENTER to accept <6> Computed settings: SataPortMap=6 DiskIdxMap=00 WARNING: Bad ports are mapped. The DSM installation will fail! Should I update the user_config.json with these values ? [Yy/Nn] and Donate. tc@box:~$
-
I ran into the exact problem when upgrading from DSM 7.1.x to 7.2.y. I only found 1 thing talking about it. (See Link) https://hedichaibi.com/fix-xpenology-problems-viewing-internal-hard-drives-as-esata-hard-drives/ My /etc/synoinfo.conf and /etc.defaults/synoinfo.conf had a problem with the esataportcfg setting. Original: esataportcfg="0xff000" internalportcfg="0x3fff" usbportcfg="0x8700" Changed to: esataportcfg="0x00" internalportcfg="0xffff" usbportcfg="0x00" I think I had to make the changes in both conf files. The USB one maybe a problem later but that should be easier to fix now that I know the problem. Note: These can be 32 bit values (32 drives... or maybe even 64-bit and 64 drives... but definitely at least 32) so up to: "0xffffffff" I'm really glad I got this figured out. I hope this helps people. PREngineer on this link had some other interesting changes for configuring the drives. These would make my drive ordering look better. (But my system is working so maybe I won't mess with this.) https://xpenology.com/forum/topic/52094-how-to-config-sataportmap-sata_remap-and-diskidxmap/
-
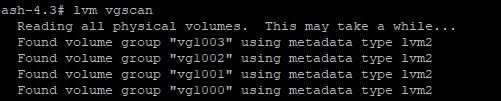
Hello! I created a docker container Scrutiny. Not one attribute is not read from disks connected to the motherboard. Everything is OK from the disks connected to the LSI controller. I found differences in the container logs. For drives on the motherboard device_protocol`="SCSI",device_type`="scsi", for drives on LSI device_protocol`="ATA",device_type`="scsi". It looks like the protocol is not defined correctly.
-
Sorry if in the wrong area, as I need your help and support I have been running DS918+ 6.2.1/6.2 baremetal with Jun's mod v1.04b on GNU GRUB v2.02 for 5 years, today I logged in to the DS software first time in 5 yrs and it said update available to I think it said 7.1.2 you gest it I pressed it and now I cant access anything apart from seeing the boot loader. Please can any one help to fix the issue, I am not that technically good with this, but can follow step by step guild as I cant afford to loose what is on the drives Please except my thanks now for any support you can give Running on a old 64 bit pc