

flyride
-
Posts
2,438 -
Joined
-
Last visited
-
Days Won
127
Everything posted by flyride
-
Also, just out of curiosity, is your volume back since there was a reboot?
-
# mdadm --zero-superblock /dev/sdr5 # mdadm --manage /dev/md2 --add /dev/sdr5 # cat /proc/mdstat Post result, monitor resync and post again when done. Not sure why it failed the first sync, but this is a slightly bigger hammer.
-
# mdadm --detail /dev/md2 # mdadm --examine /dev/sd[bcdefklmnpoqr]5 # dmesg | fgrep "md:"
-
System Partition error is just if there are missing members of /dev/md0 (root) or /dev/md1 (swap). Those are RAID1 arrays and you have lots of copies of those, which is why we don't really care too much about them right now. I'm not sure what the problem is with sdp5 yet, and sdr5 seems to be missing, will look at it when resync is complete.
-
/dev/md2 has a drive with an error state so do a mdadm --detail for each array when it's done, along with the /proc/mdstat. We aren't out of the woods yet. If everything is healthy, it probably doesn't matter. The point of booting to Ubuntu is when there is a boot problem on DSM - you can get to the files to fix whatever's wrong with DSM. I haven't ever heard of someone transporting a broken array over to Ubuntu for the purposes of fixing it. Not sure how that would be better than working with the same MDRAID in DSM.
-
Minus 1/13 average parity chunks, so 93 x 64K perhaps. But odds are also that the same chunks were rewritten or retried during the failure several times, so probably less. That is the dirty secret of most filesystems, is that corruption may happen and nobody will ever know. Syno btrfs implementation is pretty darn good in that way. You might find this an interesting article in that regard. It will make you a btrfs believer if you weren't already. In Storage Manager under HDD/SDD panel, there is a neat Action drop down to deactivate a drive. I have never bothered to try it, but I guess it works. If I wanted to fail out a drive I always just mdadm /dev/md -f /dev/sd
-
15 - What is RAIDF1 and why would I want to use it? RAIDF1 a modification of RAID5, implemented with a customization of MDRAID (the disk array manager used by DSM). It is specifically tuned to minimize the likelihood of SSDs wearing out at the same time. SSDs have a finite lifespan based on the number of times they are written. This information is usually presented as a "wear indicator" or "life remaining" number from 100 (new) counting down to 0 (end of service life). Most operating systems, including DSM, monitor SSD health using SMART and will alert when devices near the end of their service lives, and prior to failure. An array of brand new SSDs are consumed evenly because of how RAID5 intentionally distributes workloads evenly to the array members. Eventually, the SSDs all wear out together, which can result in multiple, simultaneous drive failures and subsequent data loss. How does RAIDF1 work? RAIDF1 attempts to avoid this by biasing writes to a specific drive in the array. To understand this, consider how the DSM btrfs and ext4 filesystems store data. By default, DSM filesystems save data in 4K blocks. Even a 1-byte file uses 4K as a minimum amount of space. Modern HDDs/SSDs also store data in 4K sectors. When a byte must be changed, all the other bytes within the sector are read, then rewritten at the same time. This read/write requirement is called write amplification and it affects the performance of all parts of the storage ecosystem, from HDDs and SSDs to filesystems to RAID arrays. MDRAID also works with blocks, but they are called chunks to differentiate them from filesystem blocks. The default chunk size for DSM RAID5/6/10 is 64K. A stripe is the logical grouping of adjacent chunks spanning the array members horizontally. Using the example of a RAID5 with three drives, two of the chunks in the stripe contain data and the third chunk is parity. When DSM performs data scrubbing, it reads all three chunks, then validates all the data and parity in each stripe for mathematical consistency (and corrects if necessary). Each stripe rotates the position of the parity block successively through the array members. In the three-drive example, stripe 1's parity chunk is on drive 1, stripe 2's parity chunk is on drive 2, stripe 3's parity chunk is on drive 3, stripe 4's parity chunk is back on drive 1, and so on... This results in an even distribution of data and parity across all array members. Note that many files (filesystem blocks) may be stored in one chunk. The highest density case is 16 files of 4K or smaller in a single chunk. Consider that when one of those files change, only two of the three chunks in the stripe must be rewritten: first, the chunk containing the block containing the file, and then the parity chunk (since the parity calculation must be updated). RAIDF1 subtly modifies the RAID5 implementation by picking one of the array members (let's call it the F1-drive), and sequencing two consecutive stripes in the stripe parity rotation for it. This is NOT additional parity (each stripe still only has one parity chunk), so there is no loss of space or read/write performance. The table below compares parity distribution (how much of the total parity is stored on specific array members) between RAID5 and RAIDF1: Array configuration Drive #1 parity Drive #2 parity Drive #3 parity Drive #4 parity Drive #5 parity 3-drive RAID5 33.33% 33.33% 33.33% 4-drive RAID5 25% 25% 25% 25% 3-drive RAIDF1 25% 25% 50% (F1-drive) 4-drive RAIDF1 20% 20% 20% 40% (F1-drive) 5-drive RAIDF1 16.66% 16.66% 16.66% 16.66% 33.33% (F1-drive) With RAIDF1, anytime a full stripe is written, I/O is evenly distributed among the drives, just like RAID5. When a small file or file fragment (one that does not span a stripe) is written, on average the F1-drive will be used about twice as often as the other drives. Thus, the F1-drive will experience accelerated wear and will reach its life limit first. Then it can be replaced with minimal risk of one of the remaining members failing at the same time. Upon replacement, DSM selects the SSD that is closest to being worn out and designates it as the new F1-drive. The array sync then rewrites the array to achieve the desired RAIDF1 parity distribution. Note that the total number of write events are not increased with RAIDF1. "Total cost of ownership" does not change, as the extra writes to the F1-drive are avoided with the other array members, so they last longer. Caveats and other notable issues As a RAID5 variant, RAIDF1 creates arrays based on the smallest member device. For best results, all the drives should all be the same size and type (a larger drive can be used but extra space will be ignored). RAIDF1 can theoretically be “defeated” by installing dissimilar drives, with one drive having significantly higher capacity and/or a high DWPD (drive writes per day) rating. If this drive was then selected as the F1-drive, it may have enough write capacity to outlast the other array members, which could then fail together. Always using identical SSDs for the array will avoid this freak occurrence. SHR (Synology Hybrid RAID) allows drives of different sizes to be used in a redundant array while maximizing space available. This is done by creating a series of arrays, including a small one compatible with the smallest drive, and a large one using the available space common to the largest drives, and possibly some in between depending upon the makeup and complexity of the SHR. The arrays are then concatenated into a single logical volume (using LVM) available for use within DSM. For redundancy, the large SHR drives must be members of all the arrays. The small SHR drives contain only one array and not much of the overall data, and are accessed much less frequently than the larger drives. For RAIDF1’s algorithm to produce expected results, array write patterns must be simple and predictable. In summary, RAIDF1 and SHR array behaviors are not compatible with each other, which is reflected in the Synology DiskStation product lines. The Synology models that support RAIDF1 are the same as those that do not officially support SHR. This includes the XPEnology-enabled DS3615xs+ and DS3617xs+ platforms. Note that SHR can be enabled on these platforms by modifying /etc.defaults/synoinfo.conf, with no impact to RAIDF1 functionality. The MDRAID modifications that enable RAIDF1 are compiled into the DSM kernel. The consumer-oriented DSM platforms do not contain those changes, including the XPEnology-enabled DS916+ and DS918+ platforms. Creation and maintenance of a RAIDF1 is not possible on those systems. However, just like SHR, an established RAIDF1 array is completely functional and behaves like any other RAID5 array when migrated to a platform that does not support it. Brilliant! TRIM helps minimize the impact of write amplification on SSDs. Because the F1-drive is written to more frequently, it will be affected by write amplification more severely than the other array members, and performance of both the drive and the array will degrade over time unless TRIM support is enabled. Finally, there is no RAID6-based, SSD-optimized choice yet. Perhaps RAIDF2 will be an option in DSM 7.0. References If you want to install RAIDF1 on XPEnology, you will find a simple tutorial here https://en.wikipedia.org/wiki/Standard_RAID_levels https://global.download.synology.com/download/Document/Software/WhitePaper/Firmware/DSM/All/enu/Synology_RAID_F1_WP.pdf http://wiki.linuxquestions.org/wiki/Block_devices_and_block_sizes https://raid.wiki.kernel.org/index.php/RAID_setup#Chunk_sizes https://raid.wiki.kernel.org/index.php/A_guide_to_mdadm https://www.synology.com/en-sg/knowledgebase/DSM/tutorial/Storage/Which_Synology_NAS_models_support_RAID_F1 https://www.synology.com/en-us/knowledgebase/DSM/tutorial/Storage/Which_models_have_limited_support_for_Synology_Hybrid_RAID_SHR https://en.wikipedia.org/wiki/Trim_(computing)
-
From one PC to another, USB xpenology to ESXI VM USB?
flyride replied to radly's question in General Questions
I've migrated a working system from baremetal to VM and back without issues. But you better test (the loader/network in ESXi), test (the migration strategy), test (the passthrough strategy, which needs to include the SAS controllers). You won't get anything useful from moving the USB key and passthrough, just install the ESXi loader image and it should boot right up. You can prove that to yourself now by making a brand new clean USB loader, it should not try to migrate. -
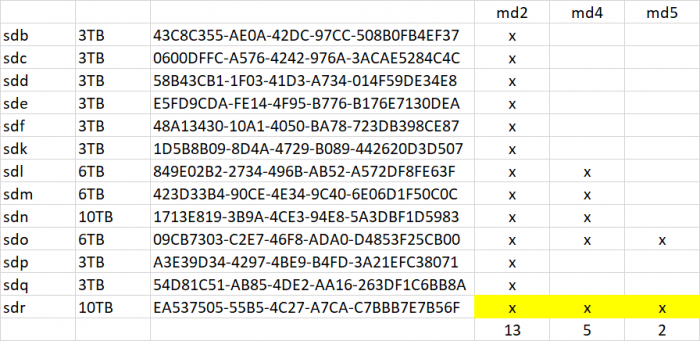
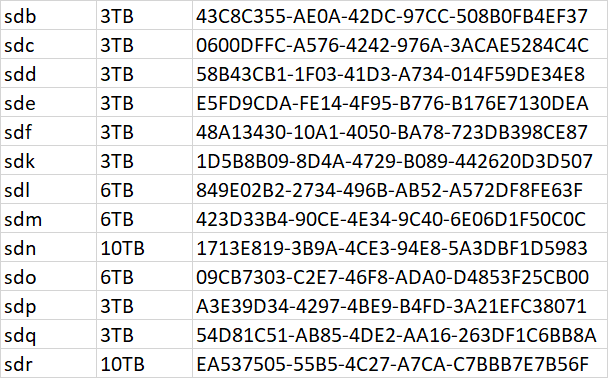
All the devices got remapped three times, first with the Ubuntu mount, then with the migration install, and then with the change to the bitmask in synoinfo.conf. mdraid tried to initialize the broken array three different ways and I don't know how or if it affects the metadata. Also I was not sure how the drive deactivation would affect metadata either. Once all drives were online, mdstat showed degraded but clean /dev/md4 and /dev/md5 so I focused on /dev/md2 only. SHR always has a smallest partition array on every drive and that was /dev/md2, so it made inventory simple (just look for any missing device, cross-reference device list and fdisk, try to make sense of mdadm --detail, don't count the SSD cache). But I got confused about the total number of disks, and so after forcing sdq into the array, starts still did not work. This made me worried about crosslinked disk device pointers, not sure if that could happen with all the device thrashing. But finally I made up the UUID list to be sure, and also its easy to map to the arrays then: Now everything matches up to create confidence that we had the right inventory to start /dev/md2 in degraded mode. There might be data loss from /dev/sdq5 but we have to accept it in order to do anything at all, so that is the best outcome. If btrfs is in use it will probably checksum report any affected files as corrupted and unrecoverable. If the filesystem is ext4 then affected files will just be garbage data with no error report. I don't know if I answered your question, but this was how I was trying to figure out the missing devices. Also we still aren't done yet until LVM does its thing, but better to have our redundancy back first.
-
You might want to do this: # echo 1000000 >/proc/sys/dev/raid/speed_limit_min # echo 1000000 >/proc/sys/dev/raid/speed_limit_max
-
Things are promising, yes. All three arrays are set to repair. Don't do anything from Storage Manager. You can monitor progress with cat /proc/mdstat. Post another mdstat when it's all done. It might be awhile.
-
Ok, the above from your very first post is what threw me. We are where we ought to be. Now, let's add your 10TB drive back in: # mdadm --manage /dev/md2 --add /dev/sdr5 # mdadm --manage /dev/md4 --add /dev/sdr6 # mdadm --manage /dev/md5 --add /dev/sdr7 # cat /proc/mdstat
-
Ignoring the cache drive /dev/sda now, you have 13 drives in the system, and they all have unique uuid's. Please advise.
-
Something isn't quite right. Do you have 13 drives plus a cache drive, or 12 plus cache? Which drive is your cache drive now? Please post fdisk -l
-
Ok, let me explain what's happening just a bit. According to mdstat, all the arrays that comprise your SHR are degraded but intact, except for /dev/md2, which is the small array that spans every one of your disks. When you had two concurrently crashed drives, this is what took your SHR down (since a RAID5 needs all but one device to be working). Once all the disks were online and addressable, we examined them in detail. All array members have an event ID associated with the I/O of the array. 10 (EDIT: 11, actually) of the drives were in sync, 1 was "just" out of sync, and 1 was a bit more out of sync. So the first --force command attempted to start the array, omitting the worst out of sync drive. A force command will cause the array to make irreversible changes to itself, so we want to do so very sparingly. I don't want to start the "bad" /dev/sdr5 with the array yet, and we are struggling with the exact syntax to do so. And it is erroring out on the "just" out of sync drive so despite our first "force," the view of that drive is not fully consistent throughout the array. Basically we are trying to start it in a degraded state, but not to force if not safe to do so. So.... let's first try: # mdadm --assemble --run /dev/md2 /dev/sd[bcdefklmnopq]5 # cat /proc/mdstat
-
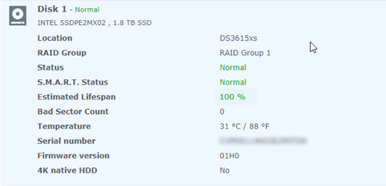
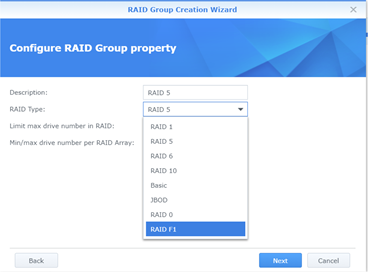
RAIDF1 on XPEnology RAIDF1 is a SSD (Solid State Drive) array optimization in DSM. Please consider this a strong recommendation to review the FAQ prior to implementing RAIDF1. You will learn some technical theory about RAIDF1, how it works, its pros and cons, and how it may be useful to your application. Configuring RAIDF1 Deploying RAIDF1 on XPEnology is simple, just address these prerequisites: 1. Install the DS3615xs+ or DS3617xs+ DSM platform DS916+ and DS918+ do not have kernel support for RAIDF1. 2. Install at least three SSDs, preferably the same type and size RAIDF1 is a variant of RAID5, so a minimum of three drives are required. 3. Validate SMART functionality on the SSDs RAIDF1’s algorithms are dependent upon functional SMART data available to DSM. This may preclude the use of virtualized or RDM-enabled SSDs in ESXi. If you can see the Estimated Lifespan statistic in Storage Manager, SMART is working. 4. Create a Storage Group dedicated to RAIDF1 As long as the prerequisites are met, the RAIDF1 option should be displayed in the dropdown.
-
Ok, let's do this instead: # mdadm --assemble /dev/md2 --uuid 43699871:217306be:dc16f5e8:dcbe1b0d # cat /proc/mdstat
-
Arg, well that wasn't helpful. Sorry. Let's do this: # mdadm --assemble --scan /dev/md2 # cat /proc/mdstat
-
I meant that the assemble command deliberately omitted /dev/sdr5
-
Just to make totally sure we are not making a mistake, let's do this one more time. # mdadm --detail /dev/md2
-
Ok good. Here comes a critical part. Note that the assemble command does NOT have the "r" in it. # mdadm --stop /dev/md2 Then # mdadm --assemble --force /dev/md2 /dev/sd[bcdefklmnopq]5 Then # cat /proc/mdstat and post the result.
-
Don't worry about that, it's not important. This is a better state than before. First, let's grab all the critical information about the broken array: # mdadm --examine /dev/sd[bcdefklmnopqr]5 >>/tmp/raid.status Then, # mdadm --examine /dev/sd[bcdefklmnopqr]5 | egrep 'Event|/dev/sd' and post the result.
-
Got it, thanks for the clarification. It's unfortunate that a migration installation occurred, but as long as it doesn't keep happening we can continue. According to the mdstat you posted, the root filesystem is NOT in read-only mode (in fact I don't think DSM will boot successfully if it is in read-only mode). So you should be able to edit /etc.defaults/synoinfo.conf and restore your disk mask configuration. Are you editing as sudo? Once you can boot DSM "normally" with no migration installation and your disks are back in the layout they were at the beginning, please come back and post these again: cat /proc/mdstat Using each of the arrays returned by mdstat: mdadm --detail /dev/<array> ls /dev/sd* ls /dev/md* Don't be concerned about disks and volumes being crashed for now, let's just get the disks addressable in the way they were at the beginning.
-
There isn't enough information to render an opinion. Specifically, you don't say what CPU you are using ("i3" can mean a hundred different CPUs) or which DSM platform you are using. These two pieces of information are important in advising you, or better yet you making your own decision with the summary/tutorial information available. In general terms, if you can run loader 1.02a, you can probably run 1.02b on the same DSM platform and upgrade to any 6.1.x version. The 6.2.x loaders may or may not be a problem depending upon your hardware.
-
I am getting lost in your explanation. If your arrays are crashed, they will be read-only or unavailable, so that can be expected. You keep saying "pop the xpe usb back." I'm assuming you did that only once and it is still installed. Right? So is the following true? 1. You tried to boot up DSM and it asked to migrate. 2. You decided to perform the migration installation 3. The system then booted up to the state you post above 4. You don't remove the boot loader USB, it stays in place Please confirm whether the above list is true. And when you reboot, does it try to migrate again or come back to the state you posted?
