Leaderboard


Popular Content
Showing content with the highest reputation on 03/03/2023 in all areas
-
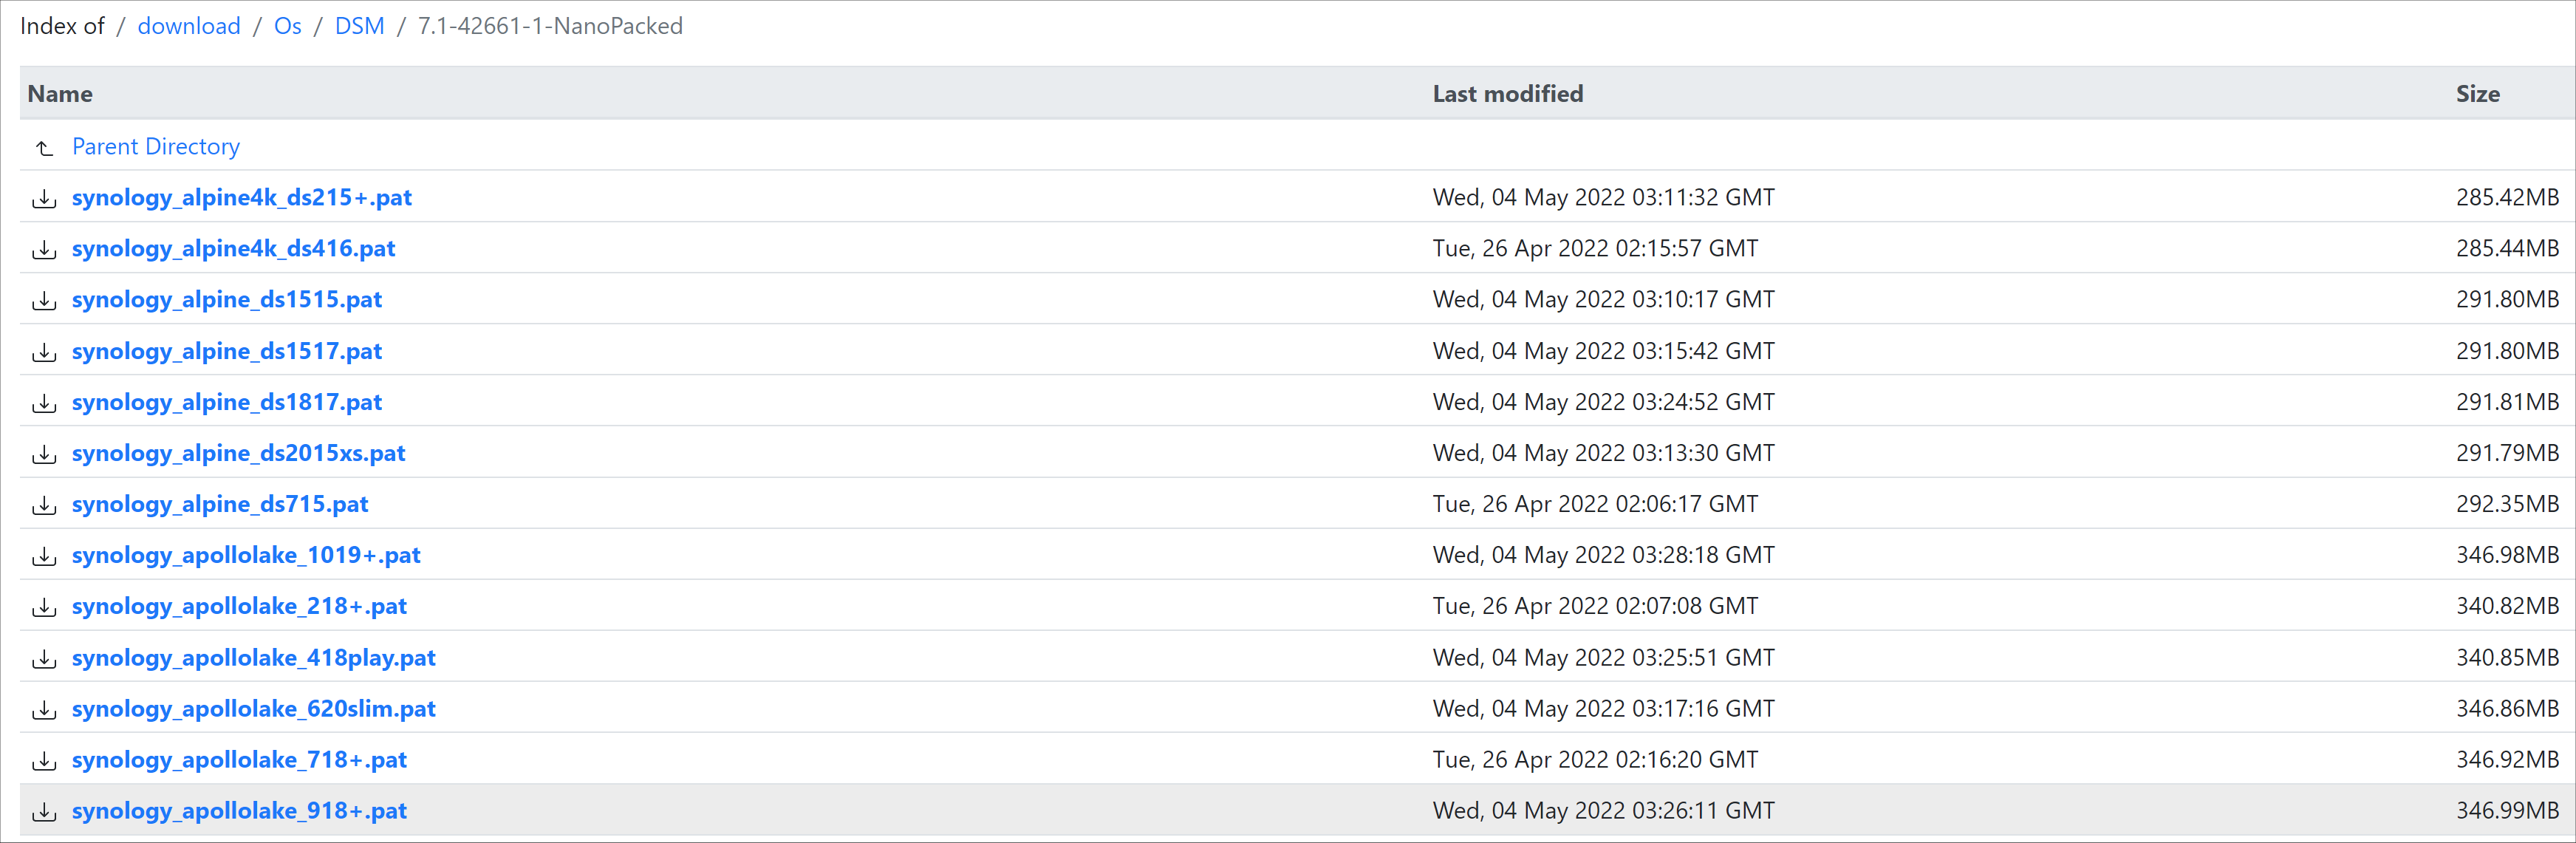
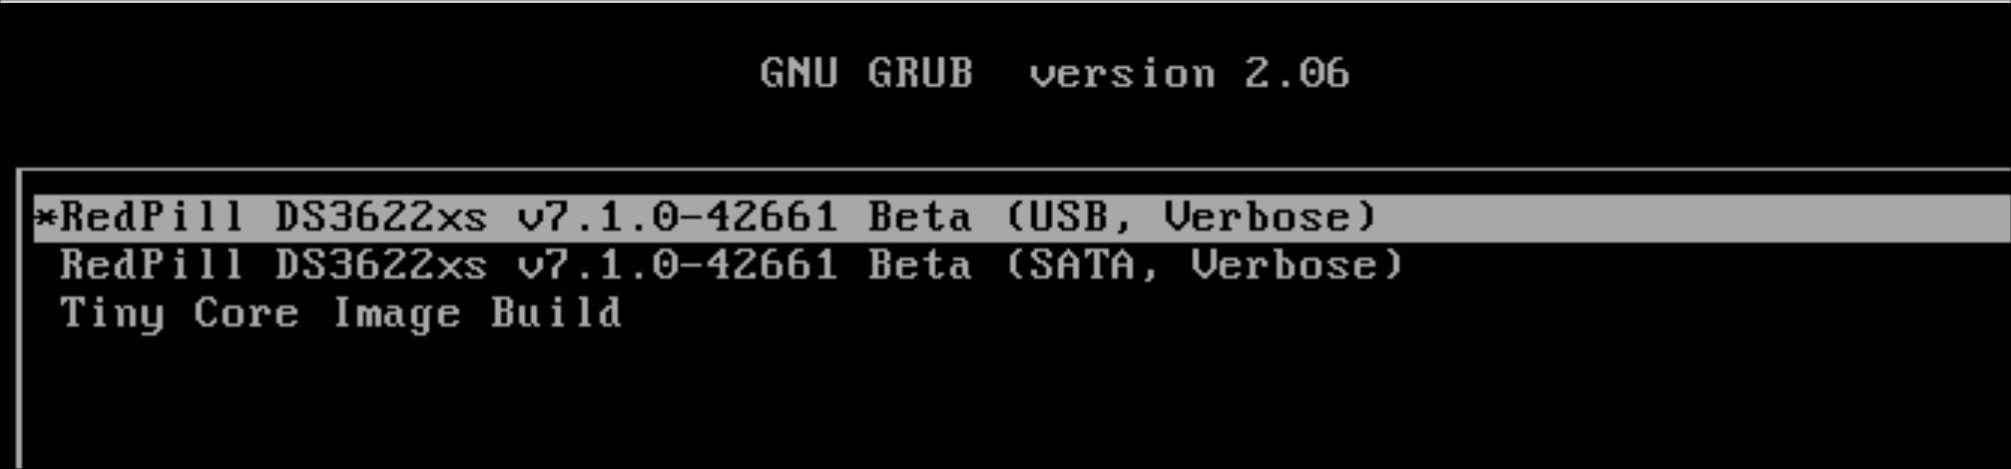
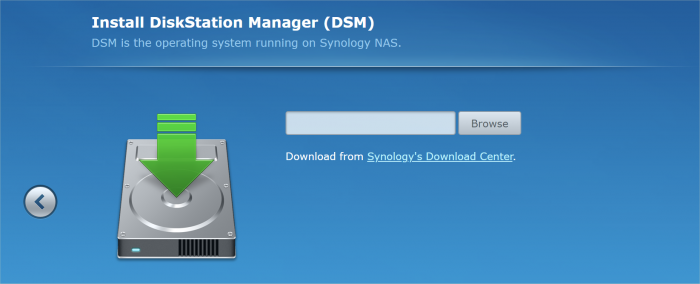
Loader Information and Background RedPill is the core technology that enables DSM 7.x to run on non-Synology hardware. This post is intended to serve as a definitive tutorial/reference for configuring @pocopico's TinyCore RedPill (TCRP) loader. It explains how to install TCRP on baremetal, i.e. with DSM as the only operating system on your NAS hardware. A tutorial to install TCRP using the ESXi hypervisor is located here. There are other hypervisor tutorials in the Tutorials and Guides forum. TCRP uses a two step-process. First, a Linux OS (TinyCore) boots and evaluates the NAS hardware configuration. Therefore, it is best to have the hardware you plan to use (disk controllers and network cards in particular) installed prior to starting the TCRP setup. Then, an individualized loader (RedPill) is created. This loader is used to install and run DSM. After that, you can switch between starting DSM with RedPill, and booting back into TinyCore to adjust and rebuild the loader as needed. Basic Linux command line skills are needed to complete the installation. The tutorial provides examples of the commands that are needed, but exact syntax and capitalization are critical. If unfamiliar, research and review the following minimal list of commands: ls show the files in the current directory cat <file> show the contents of the specified file pwd show the current directory name cd <directory path> change to the specified directory (same rules as Windows, except with forward slashes instead of backslashes). With no argument, it returns to the “home” TCRP directory vi <file> a file editor, for manual editing of configuration files if required Ongoing Development This tutorial is maintained for consistency with the pocopico stable repository. Since TCRP is completely open-sourced, anyone can fork their own repo and contribute to development, and pocopico now maintains a separate development repo. As the best features and ideas are fully vetted and tested, they may be incorporated into the stable repo over time. If you use a repo, script or shell other than the pocopico stable repo, the loader may behave quite differently and the instructions and troubleshooting steps in this tutorial might no longer apply. In an open-source community, you can use any development resource you want, but you add the additional responsibility of understanding, vetting and testing that code on your system. Migration Step 1. Choose a DSM Platform/Architecture Evaluate your intended NAS hardware and your the intended use of DSM, and select a platform that best meets your needs. Reference information here: https://xpenology.com/forum/topic/61634-dsm-7x-loaders-and-platforms/ Write down the selected platform (e.g. DS918+), the corresponding architecture (e.g. apollolake) and whether the platform uses SataPortMap/DiskIdxMap or Device Tree for slot mapping. This information will be needed later. Now, make sure the NAS hardware is compatible, and prepare it correctly: x86-64-compatible CPU with two cores or more Each platform have maximum threads support! Any threads in excess will be ignored For certain platforms, Intel CPUs must be 4th generation “Haswell” or newer with FMA3 instruction set The corresponding AMD CPU architecture is “Piledriver” or newer AMD-based systems may require deactivation of the C1E option in the BIOS 2GB of RAM or more 2GB or larger USB flash drive Configure the BIOS to boot from the USB flash drive ONLY SATA disk controllers are preferred, but SCSI/SAS are compatible IMPORTANT: All SATA controllers must be configured to AHCI mode SATA controllers with port multipliers are not compatible ATA controllers are not compatible (disable embedded ATA in BIOS if possible) At least one SATA/SCSI/SAS drive (HDD or SSD), minimum size 21GB IMPORTANT: Enable SATA port hotplug on each disk port, if hotplug is supported by the BIOS/controller IMPORTANT: Disable M.2 SATA ports that are not in use, if supported by the BIOS/controller NVMe drives are not usable except as dedicated cache devices Host Bus Adapters are not currently compatible with Device Tree platforms Install any NVMe drives intended as cache devices On Device Tree platforms, NVMe drives must be installed prior to loader installation in order for them to be recognized Step 2. Download TCRP and Write Image to the USB Flash Drive The latest pocopico stable loader code is always linked here: https://xpenology.com/forum/topic/7848-links-to-loaders/ Download the tinycore-redpill 7.x loader and save it to your personal computer. Then, open it with a zip manager to show the boot images: tinycore-redpill.vX.X.X.img.gz (for BIOS/CSM/Legacy boot from USB flash drive) tinycore-redpill-uefi.vX.X.X.img.gz (for UEFI/EFI boot from USB flash drive) tinycore-redpill.vX.X.X.vmdk.gz (for virtual machine SATABOOT from disk image) Select the boot image that matches the boot capability of the NAS motherboard. If unsure, choose BIOS/CSM/Legacy boot. Save the gzip file to your personal computer, then open it with a zip archive manager and save the uncompressed version. Write the uncompressed image to the USB flash drive using Win32DiskImager or other appropriate tool. The USB flash drive is used to store TinyCore and the RedPill loader that it generates. It is a permanent component of an operational XPEnology system. Do not remove it, even after the DSM installation is complete and the NAS is fully up and running. Step 3. Boot into TinyCore and Complete Pre-Configuration Updates Start your NAS with the USB flash drive installed and TinyCore will boot. Then, launch a command-line session with either of these methods: Click the Terminal icon at the bottom right of the TinyCore desktop to launch a console window Use a ssh client (e.g. PuTTY) on your computer to connect a network-based console Consult your DHCP server/router for the IP address assignment (TinyCore's host name is "box") Login credentials: tc/P@ssw0rd When the Linux command line prompt ($) is displayed, update the TCRP script ./rploader.sh update Checking Internet Access -> OK Checking if a newer version exists -> There is a newer version on the repo should we use that ? [yY/nN] Y OK, updating, please re-run after updating Updating tinycore loader with latest updates Backing up files to /mnt/sda3//mydata.tgz Then, update the TCRP support files ./rploader.sh fullupgrade <downloads snipped> Current /home/tc size is 114M , try to keep it less than 1GB as it might not fit into your image Should i update the sda with your current files [Yy/Nn] Y Backing up home files to sda : Backing up files to /mnt/sda3//mydata.tgz Finally, choose a DSM release number Each DSM build as provided by Synology has a release number. You can display the combinations of platforms and releases supported by TCRP by just running the script with no arguments ./rploader.sh <command help snipped> Available platform versions: ---------------------------------------------------------------------------------------- apollolake-7.0-41890 apollolake-7.0.1-42218 apollolake-7.1.0-42661 broadwell-7.0.1-42218 broadwell-7.1.0-42661 broadwellnk-7.0.1-42218 broadwellnk-7.1.0-42661 bromolow-7.0.1-42218 bromolow-7.1.0-42661 denverton-7.0.1-42218 denverton-7.1.0-42661 geminilake-7.0.1-42218 geminilake-7.1.0-42661 v1000-7.0.1-42218 v1000-7.1.0-42661 Step 4. Configure System-Specific Parameters Custom system parameters are stored in the user_config.json file. This can be manually edited, or TCRP can help determine appropriate values for the hardware. USB flash drive VID/PID: TCRP can query the USB flash drive for the hardware vid/pid values that DSM uses to identify the loader during bootup ./rploader.sh identifyusb Found: Superdisk Flash SerialNumber: 123456 Vendor ID: 0x1234 Product ID: 0x0001 Should i update the user_config.json with these values ? [Yy/Nn] Y Serial number/MAC: TCRP can automatically generate a serial number for the platform selected in step 1. Additionally, it will generate a random MAC address for the NAS network card. If you prefer to use the actual hardware MAC address instead, append "realmac" to the command. Example 1: random MAC address ./rploader.sh serialgen DS3622xs+ Serial Number for Model : 20C0SQRLR47QM Mac Address for Model DS3622xs+ : 00:11:32:80:B2:36 Should i update the user_config.json with these values ? [Yy/Nn] Y Example 2: real MAC address ./rploader.sh serialgen DS3622xs+ realmac Serial Number for Model : 2150SQRGS7N5T Mac Address for Model DS3622xs+ : 00:11:32:57:3A:9B Real Mac Address : 00:0C:24:62:3E:3D Notice : realmac option is requested, real mac will be used Should i update the user_config.json with these values ? [Yy/Nn] Y Drive Slot Mapping: TCRP can try to determine how to map the NAS disk controller ports to DSM slots. If the chosen platform uses SataPortMap/DiskIdxMap for port mapping, the command below will do this. If it uses Device Tree for slot mapping, the command may be skipped, as the Device Tree is configured automatically during the loader build. ./rploader.sh satamap Found "02:02.0 SATA AHCI controller" Detected 4 ports/2 drives. Override # of ports or ENTER to accept: <4> Recommended settings: SataPortMap=4 DiskIdxMap=00 Should I update the user_config with these values ? [Yy/Nn] Y If the port count is not what you expect, it may be due to the motherboard design servicing physical ports with multiple controllers, or because of M.2 SATA slot support. If necessary, the port count can be overridden with whatever you like. NOTE: If you see a WARNING message, it is certain that either some of your drives are inaccessible or the DSM install will encounter problems. Evaluate and investigate the issue. The satamap command can be rerun as many times as needed to understand the system. Manual Review: With prior loaders (such as Jun's), the configuration of these parameters was completely manual. There is no single setup that works for all hardware. Even after using the tools above, please review and verify the parameters, understand what they do, and manually edit if needed. Whatever changes rploader.sh makes to the user_config.json file can be reviewed by displaying the file contents cat user_config.json and overridden by editing the file vi user_config.json You can also add a simpler editor, nano tce-load -iw nano nano user_config.json And there is also a graphical editor accessible from the TinyCore desktop Step 5. Optional: Manually Add Driver Extensions While TCRP can automatically add drivers based on the detected NAS hardware, it isn’t foolproof. You might want to build a loader for a device you don’t actually have yet. And there are features that are "opt-in" only. So, a process exists to manually add drivers and other functionality. Extensions are stored in repositories hosted on the web. All the extensions in the main repository are viewable here: https://github.com/pocopico/rp-ext To list all the extensions recommended by TCRP's hardware detection algorithm, use ./rploader.sh listmods <architecture>-<version>-<DSMreleasenumber> ./rploader.sh listmods apollolake-7.1.0-42661 To add a specific extension, choose from the list and reference the architecture from Step 1. ./rploader.sh ext <architecture>-<version>-<DSMreleasenumber> <extensionurl> ./rploader.sh ext apollolake-7.1.0-42661 add https://raw.githubusercontent.com/pocopico/rp-ext/master/redpill-acpid/rpext-index.json ./rploader.sh ext denverton-7.1.0-42661 add https://raw.githubusercontent.com/pocopico/rp-ext/master/v9fs/rpext-index.json The examples illustrate adding ACPI and VIRTIO support. These are often chosen enhancements to a basic installation. Step 6. Build the Loader When all preparation steps are complete, build the loader using the command structure ./rploader.sh build <architecture>-<version>-<DSMreleasenumber> Example #1: DS3622xs+, auto detect hardware ./rploader.sh build broadwellnk-7.1.0-42661 Example #2: DS918+, use preselected drivers ./rploader.sh build apollolake-7.1.0-42661 manual TCRP will download resources from the Internet to complete the complex process of the loader build. When finished, it will write it to the USB flash drive and add new items to the GRUB boot menu. Review the output for any errors and make corrections if necessary. Step 7. Optional Backup Tasks Save the TinyCore configuration state as the default, so that the next boot of TInyCore starts with all your settings ./rploader.sh backup Back up the generated RedPill loader partition to available space on the USB flash drive ./rploader.sh backuploader Step 8: Restart and Boot DSM Using the Grub USB Option Cleanly shutdown and reboot with the TinyCore command exitcheck.sh reboot First, the GRUB Menu is displayed. If necessary, use the arrow keys to ensure that USB is selected and press ENTER. The loader will show some initialization information and silently boot DSM. Nothing else will be displayed unless a serial console is attached (see the Troubleshooting section below). Wait a few minutes, then launch either https://find.synology.com or the Synology Assistant desktop utility. If the loader is working properly, a new "SynologyNAS" will be displayed as Not installed (for a new build) or the name of your existing Migratable NAS (if upgrading from a previous version). Use your browser to connect to the NAS. If "Something went wrong" is displayed, jump to the Basic Troubleshooting section below. Otherwise, browse to the Synology Download Center and download the DSM install PAT file that matches the platform and release number specified in the loader build. Do not use the PAT file stored in TinyCore. It has modifications that are incompatible with DSM installation. However, its name may help identify the correct PAT file to download below. There can be several files that appear to be candidates. PAT files marked VirtualDSM will not work. Also there can be patch PAT files with the same numbering. These will not work and will usually be smaller than 50MB. The correct PAT file is 300MB or larger. Once the correct DSM PAT file is saved to your personal computer, upload it to the NAS. Follow the prompts to complete the installation. FOR UPGRADES ONLY: If Synology Assistant shows Not installed, or if prompted to erase the disks during the upgrade, STOP! Some or all of your array disks are not visible to DSM. This must be resolved via troubleshooting and reconfiguration before installing DSM 7.x. IMPORTANT: During the install, always select DSM manual updates. If a new install completes normally, but then fails after the reboot, it may be that DSM has attempted to auto-update itself with incompatible code. Basic Troubleshooting Where to Post for Help It’s easy for requests for installation help to get lost in various unrelated forum threads. Post requests for help as a new topic in the DSM Installation Forum. At a minimum, state the hardware configuration, selected platform, DSM version, user_config.json information (delete or redact the serial number and configured MAC address) and any information from debugging analysis that you have done. DON’T post general requests for help on this thread. Please DON’T post general requests for help on TCRP or RedPill development threads unless providing feedback on a dev issue.


 1 point
 -
Hi Orphee, no progress!! I gave up for now.1 point
-
Why do you want to "tweak" things with high chances of issues when the loader itself is powerfull, secure, and the easiest way to apply the change ? Launch "configure loader" enable the missing module (don't remember wich one), build the loader, boot the loader. Unless you already manipulated/tweaked the loader manually, it should be straight forward.1 point
-
You need to enable the module while configuring the loader, then build it, then boot it, then turn the system off. Then plug the USB into another computer, you'll find it there.1 point
-
The latest update is 6.2.4-25556-6 Has anyone had a previous update successfully installed, maybe u1 or 2?1 point
-
Похоже не все так плохо.
 1 point
 -
You have done a very useful job. Respect! It would be nice if you continued it. Many of my friends have non-PCIe motherboards with only PCI ports and two SATA ports. I would like to help them. It seems that you are very close to victory!1 point
-
Добрый день В этом архиве можно скачать любые версии всех приложений Ссылка на станцию наблюдения SurveillanceStation-x86_64-9.0.2-10061.spk1 point
-
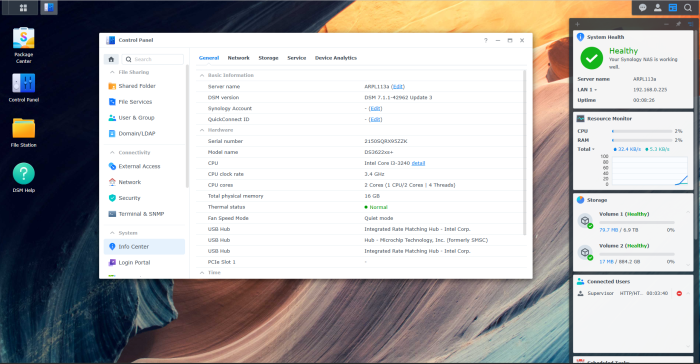
@Peter Suh @fbelavenuto Testedt ARPL 1.13a actual Loader today updated all Addons and Modules before creating the Loader System: Gen8 Microserver I3 16GB RAM 4x3tb Raid 0 and 1x SSD Samsung SSD 1x Intel 520SFP+ Dual 10 gbe / 1 port connected SFP+ DSM Version 3622xs 42962 u3 Selected Modules: ALL Addons: CPU Info Codec Patch Update from other installed DSM Version --> Working perfect Reset all Data and doing a fresh install --> working perfect So do NOT change anything at this ixgbe Modul thank you for develop this Masterpiece of a Loader This Loader needs a Hall of Fame for Fabio both have a nice day see ya
 1 point
 -
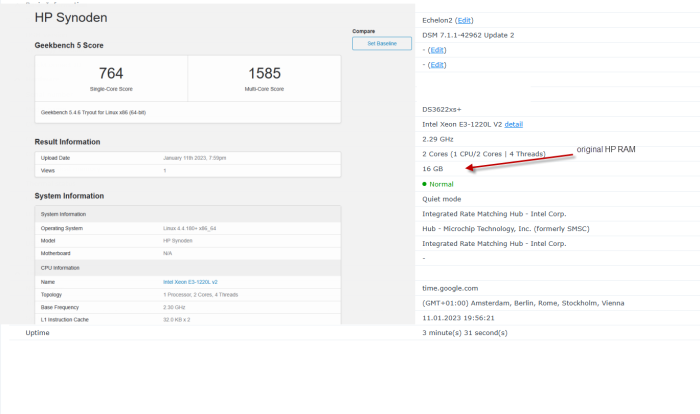
Hi Found my Result with E3 1220Lv2 https://browser.geekbench.com/v5/cpu/19832438 there is a different to your Geekbench test maybe check your bios settings like this see Attachement check that hyperthreading is enabled AHCI_E3-1220L_v2.txt
 1 point
 -
for me in personal ARPL is the easiest way to install XPE and ARPL 1.03b is the last which is working for the gen8 in my experience form the arpl generation for me your result is not so bad pls note i have tested wit a xeon 1240v2 cpu in my gen8 this is not the orginal cpu it has much more power you can also test with Peters Mshell https://github.com/PeterSuh-Q3/tinycore-redpill/releases/tag/v0.9.3.0-1 here are other results with your cpu https://browser.geekbench.com/processors/intel-xeon-e3-1220l-v2 https://browser.geekbench.com/processors/intel-xeon-e3-1220l1 point
-
Hi Go with Baremetal ARPL 1.03b and set the Cpu Governor for High frequencies FAN Noise problem is gone update ILO to the latest version Image ARPL here best is go with 3622xs 42962 u3 https://github.com/nemesis122/arpl/releases/tag/1.03 Set Task in the taskmager User defiendied Script as root and then Idle has the same Power consumption modprobe acpi-cpufreq && echo "performance" | tee /sys/devices/system/cpu/cpu*/cpufreq/scaling_governor Have a look after the command for High CPU Freq. the benchmark1 point
-
It just depends on your needs. Will you need to run virtual machines ? If so, you may consider Proxmox VE or ESXi. if you don't need any virtual machines to run H24, you may go for baremetal. Both works fine as long as bios is configured as SATA AHCI.. Do not expect hardware transcoding with it, CPU is not compatible. You may want to use DS3622xs+ loader.1 point
-
Да завсегда на здоровье ..... ))) Держите Рождественский подарок 😀 https://cloud.mail.ru/public/1kTb/PhDrvnfKt1 point
-
Just a note: On the bootloader link page, the link to tinycore zip file downloads the "main" branch, which does NOT contain the disk image files. It should link to the "stable" branch, which does include the disk image files.1 point
-
Успешная попытка была с tinycore-redpill v.0.4.4. Когда пробовал с более поздними версиями 0.4.5 и 0.4.6, система не устанавливалась, после установки и рестарта снова показывалось система не установлена. Похоже что-то убрали. У вас до этого даже не доходит, очевидно сетевая карта не поддерживается.1 point
-
Есть загрузчик под 6.2.4. Пользователь XPEH успешно установил 6.2.4 использовав инструкцию на которую он дал ссылку. Я попробовал сделать по инструкции, у меня не получилось.1 point
-
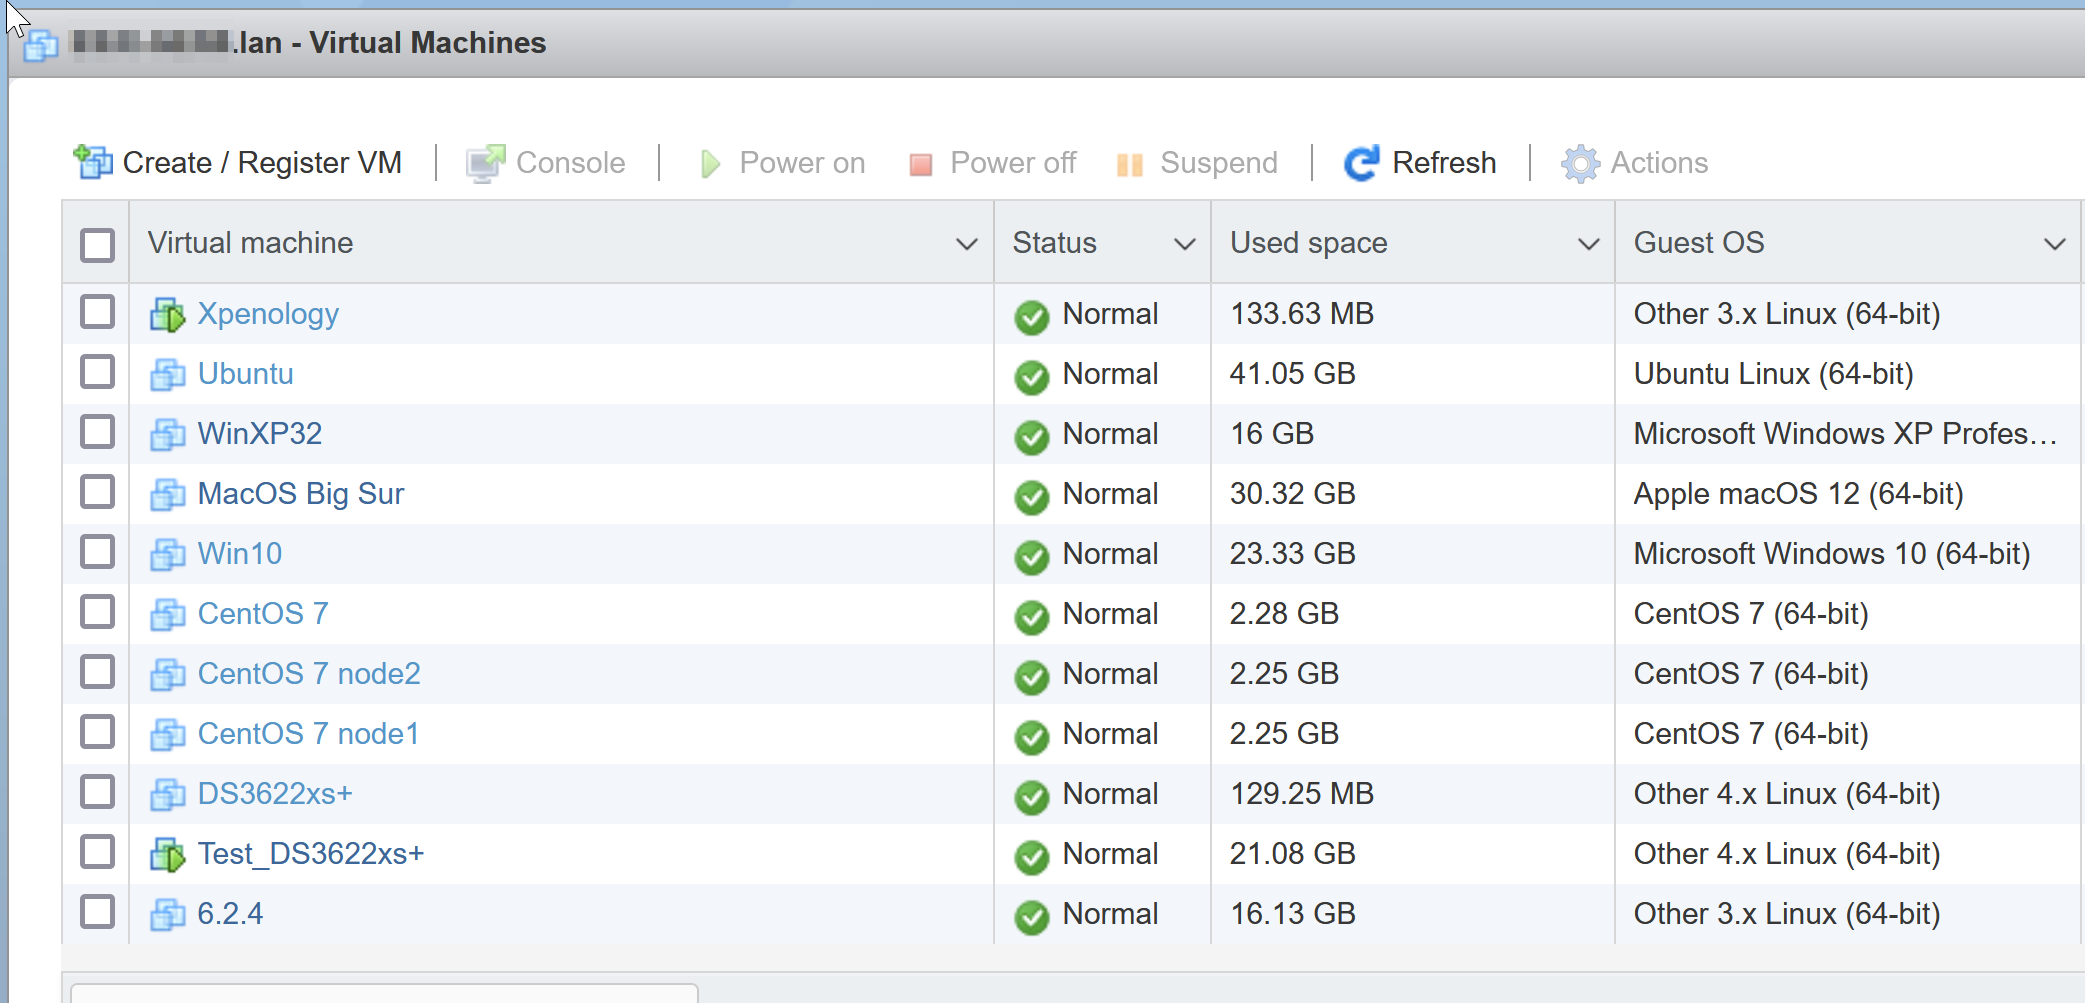
Hello, Je ne vais donc pas paraphraser mes VDD, juste donner mon expérience du coup. @mprinfo Tout l'intérêt du RDM est justement de pouvoir passer de baremetal à ESXi et vis versa sans soucis. Et cela fonctionne bien. Personnellement je fais tourner ESXi 7.0 sans aucun problème, je n'ai rien downgrade de particulier mais j'utilise une carte LSI SAS en passthrough, Ce downgrade était à priori nécessaire pour les performances disques avec mauvais driver, mais en ESXi 7.0 je ne suis pas sur du tout que ce soit encore nécessaire. Et au contraire avec le RDM il faut utiliser le AHCI et ne surtout pas laisser la P120i gérer le raid. @kevinevic La première question à te poser et de savoir si ça a un réel intérêt pour toi d'utiliser ESXi ou non. Si ton usage se résume à 99% Synology, il vaut peut être mieux rester sur du baremetal, et faire tourner ce qui peut l'être avec Docker (Jeedom tourne très bien sous docker). Ceci étant dit, comme déjà évoqué, tout dépend du matériel que tu as. Dans mon cas perso, j'ai un HP Microserver Gen8 Xeon avec 16Gb de RAM. De mon point de vue perso, inutile d'envisager un hyperviseur (ESXi ou Proxmox pour ne citer qu'eux) si tu as moins de 16Gb de RAM, parce que tu vas très vite être limiter par le manque de RAM disponible si tu compte faire tourner plusieurs machines virtuelles. Je pense que l’intérêt principale d'un hyperviseur et de permettre de s'affranchir des contraintes de configurations exotiques de la machine hôte/physique (Carte mère, type de carte réseau, drivers associés etc...). A partir du moment où tous les périphériques sont détectés/fonctionnels dans ton hyperviseur, tout le reste est "émulé" dans tes machines virtuelles : - nombre de vCPU (nombre de cores) - quantité de RAM allouée à la VM - carte réseau conventionnelle (comme E1000e sur ESXi). - création d'un port COM virtuel accessible en telnet depuis le réseau (utile pour débug Xpenology quand la carte réseau n'est pas détectée) Une VM qui tourne sur hyperviseur a un gros avantage, elle est déplaçable de façon presque "transparente". Si ta machine physique tombe en panne, tant que tes disques sont intacts et tes VM accessibles, tu remonte une autre machine, pas forcément identique, tant que ESXi (ou proxmox) est capable de tourner dessus, tes VM fonctionneront à nouveau sans aucune modification sur la nouvelle machine. Cependant, faire tourner un hyperviseur veut dire qu'il faut comprendre son fonctionnement, surveiller les mises à jour éventuelles. Cela ajoute une couche de configuration/supervision. Est-ce vraiment nécessaire ? Toi seul saura répondre à cette question. Pour ma part, j'ai commencé avec un Xpenology en baremetal sur un HP N54L, je faisais tourner Jeedom dessus avec un container docker. Mais j'avais besoin de pouvoir faire tourner de temps en temps des machines virtuelles (ubuntu/linux) J'ai fini par remplacer le N54L par un HP Microserver Gen8 et je suis passé par ESXi pour faire tourner Xpenology. J'ai alloué 4Gb de RAM à Xpenology, me laisser 12Gb (un peu moins en considérant que ESXi a besoin de RAM pour fonctionner) pour les autres VM que je faisais tourner. J'ai également changé de domotique de Jeedom pour Home Assistant. Il y avait une version clé en main pour ESXi, au delà du fait que j'ai trouvé Home Assistant plus pratique à l'usage. Et contrairement à toi j'ai fait le cheminement inverse, j'ai basculé Home Assistant sur un raspberry pi dédié, pour ne plus avoir de domotique HS à chaque fois que je décide d'administrer l'ESXi (l'arrêter pour changer les disques et faire des tests Xpenology, etc...) Sur le HP Gen8, je fais tourner ESXi sur une clé USB bootable (port interne sur la CM) J'ai un SSD qui sert de datastore pour stocker les VM. Et mes 4 disques 4To sont branchés sur une carte PCI-e LSI SAS2308 HBA que j'envoie en passthrough dans la VM Xpenology. Pour les disques, j'ai choisi cette option pour garder le SMART data accessible dans DSM, pour que DSM puisse m'avertir si un disque tombe en carafe. Mais ça implique de gérer les drivers mpt3sas de la carte dans le loader. Ce que RedPill c'est bien faire aujourd'hui, même si ce loader est encore à considérer comme en "béta". Quand tu utilises un hyperviseur avec Xpenology, la question que tu dois te poser est de savoir comment gérer les disques de Xpenology. Le plus simple est de créer des disques "virtuels" prenant l'intégralité de chacun des disques. Avantage : simplicité d'intégration dans la VM Inconvénient : Incompatible avec autre chose que ESXi. Impossible de les débrancher/transférer simplement en baremetal. Pas de remontées SMART data des disques non plus. 2 autres choix sont possibles : - RDM (Raw Device Mapping) : Cette solution permet de mapper un disque physique à un fichier "disk" virtuel. Cela permet de présenter une image disque virtuel dans la VM mais qui écrira exactement sur le disque comme si c'était physiquement le disque branché dans la VM. Cette solution permet justement de pouvoir basculer/revenir en baremetal si besoin est, car les disques ont été intégralement gérés/initialisés par DSM. Le petit inconvénient reste que les données SMART data ne sont toujours pas accessible dans DSM. - Sinon une carte PCI-e LSI SAS HBA en mode IT que tu donnes en passthrough dans la VM. Cette option requiers certains prérequis. Le premier étant que ton CPU doit être compatible passthrough. Les xéons sont compatibles, mais pas les céléron. Donc si ton Gen8 est équipé d'un Celeron G1610t, c'est mort, faut changer de CPU. Il faut que cette carte soit reconnue par le loader. C'est le cas avec le loader DS3615xs de Jun's. Ca fonctionne plutôt bien. Cela a été plus compliqué au début avec le nouveau loader Redpill. mais on arrive à une situation qui se stabilise actuellement et mes derniers tests valident le fonctionnement de ma carte en passthrough. Mes VM actuellement dispo à titre d'exemple : Ce n'est que mon expérience perso au fil du temps, mais je ne suis pas un expert des hyperviseurs pour autant. J'espère que nos réponses te seront utiles.
 1 point