Leaderboard


Popular Content
Showing content with the highest reputation on 05/05/2022 in all areas
-
Hello~! I am xpenology user. And I am an IT engineer who creates shell scripts as hobbies. Please understand that it is written by a google translate site. because i’m korean who is not fluent in English. I created built Redpill Multi boot loader. Multiple DSMs can be used as one loader Requirement ============================================================= 1, Redpill-Multiloader_7.1-42661.img file Download Please understand that Google Drive is used because of its large capacity. There is a link below. 2. It is the same as using the existing Redpill Tinycore or a separately made loader. 3. ESXi Enviroment (Bootloader SATA1 (1:0), DataDisk SATA0 (0:0)) or Baremetal Enviroment (It can be used by making a USB with rufus or dd, etc.) How to RUN Redpill Multiloader ============================================================= 1. Redpill-Multiloader_7.1-42661.zip decompression 2. Modify /boot/grub/grub.cfg by mounting the first partition on OSFmount or TC #==================================================================================== ## User config - Your values Change #==================================================================================== set sn=1234SQRDD5678 set netif_num=1 set mac1=001122334455 set SataPortMap=9 set DiskIdxMap=0 set SasIdxMap=0 The USB or Boot oder part is an additional setting and does not necessarily need to be modified. 3. Convert Redpill-Multiloader_7.1-42661.img to Redpill-Multiloader_7.1-42661.vmdk, Redpill-Multiloader_7.1-42661-flat.vmdk 4. Register as boot disk in ESXi VM (default SATA1 (1:0)) 5. Enter GRUB and use the desired DSM version How to ADD Ext Driver (for Baremetal & ESXi, How to make USB Stick include) ============================================================= Additional notes ============================================================= 1. It is built by default for EXSi and can be modified after additional builds if necessary. (I'll update the method further.) 2. Due to variable processing for sn, mac, etc., it is temporarily modified in GRUB state and cannot be used. 3. The video has been processed only with the popular DS918+, DS920+, DS1621+, DS3622xs+, and DVA3221, and DS3615xs and DS3617xs are also available. 4. USB is handled as a submenu, and pressing ESC will return to the upper menu. 5. In the future, we plan to make Multiloader production possible directly on TC through tr_cb.sh. https://xpenology.com/forum/topic/60469-tinycore-redpill-create-boot-image-usb-tr_cb-v099-r01/ ## Update v2.0.0-r02- 2022.04.29 - Modification of efi classification conditional statement and redistribution of images - How to add Ext Driver Video production Attachement ============================================================= Download : (Google drive link - 400MB) - Please understand that Google Drive is used because of its large capacity https://drive.google.com/file/d/1t1cOPMmlSg3c65mXJBeI_44yor_sp9Xl/view?usp=sharing Finally comment ============================================================= I'm an ESXi user, so the Native test is lacking.(Check only basic bootability) Please note that there may be errors. If you tell me the test results and points for improvement, I'll reflect them. Have Nice Day!! Thank you~!!!2 points
-
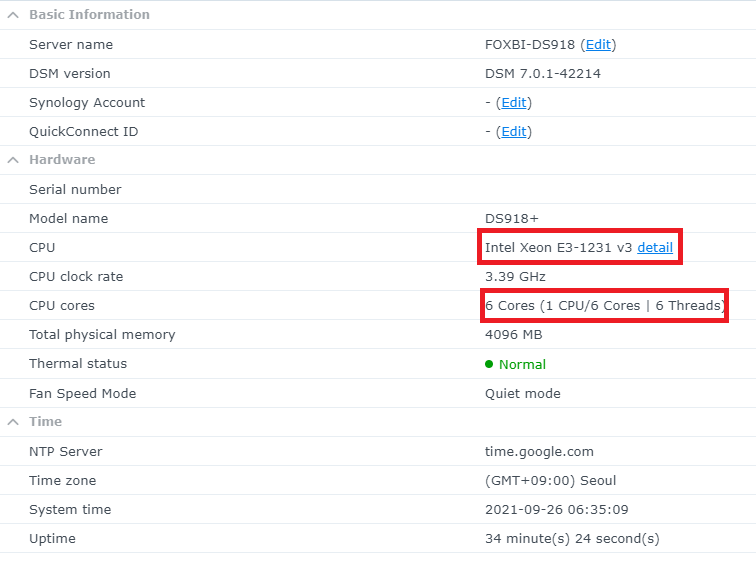
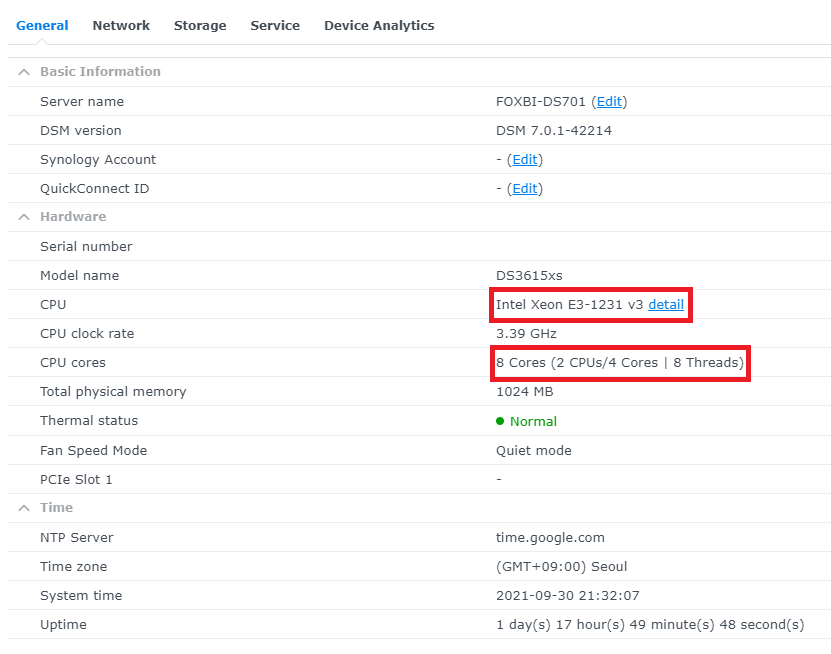
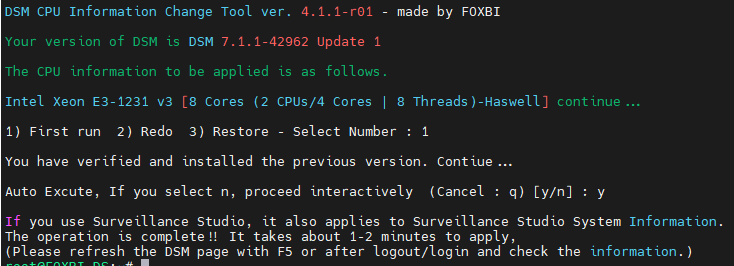
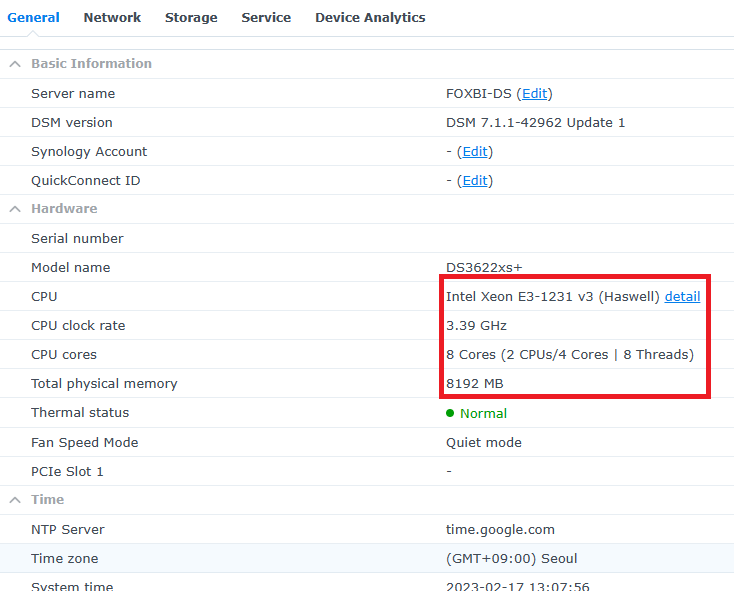
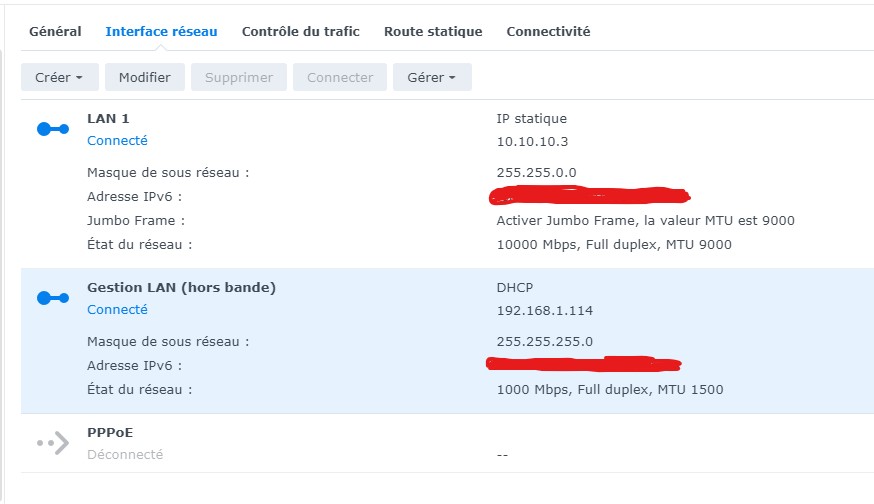
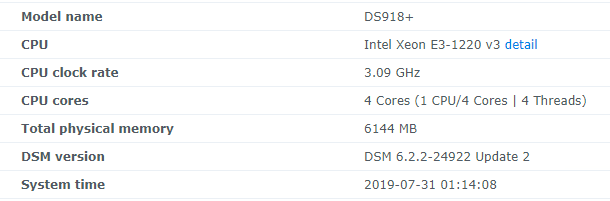
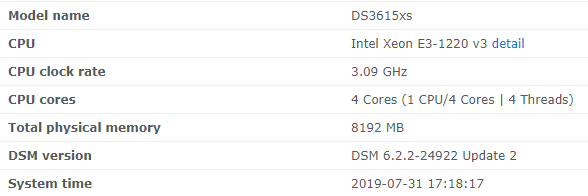
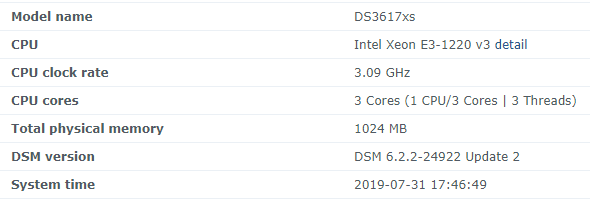
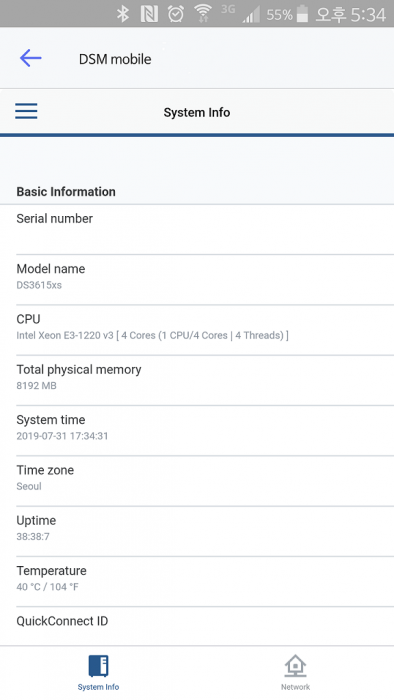
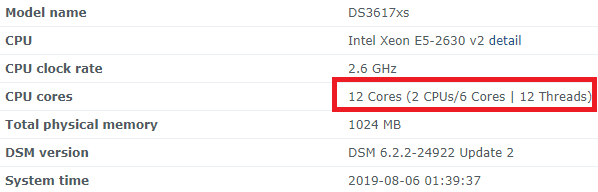
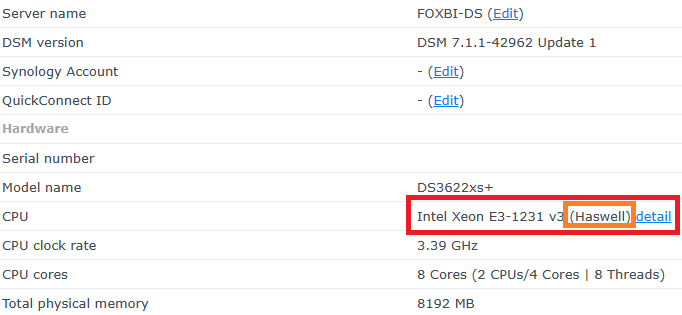
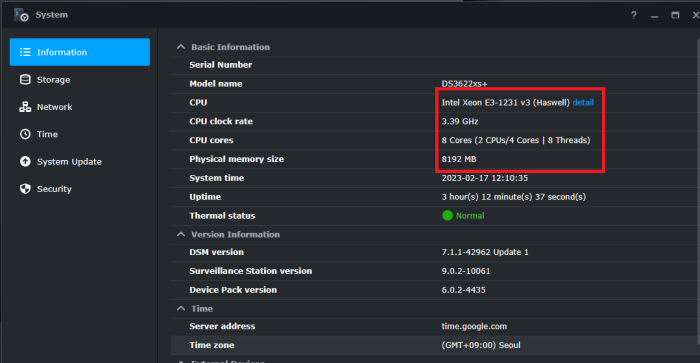
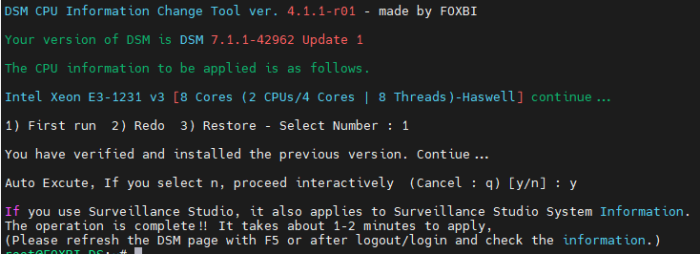
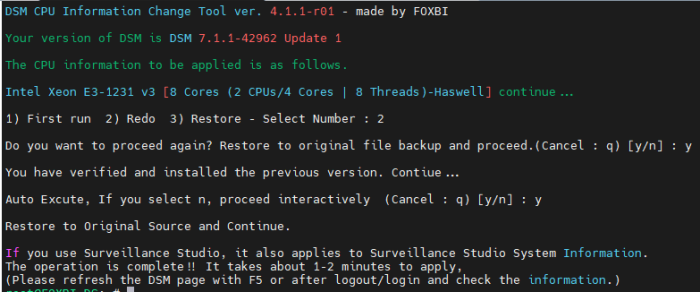
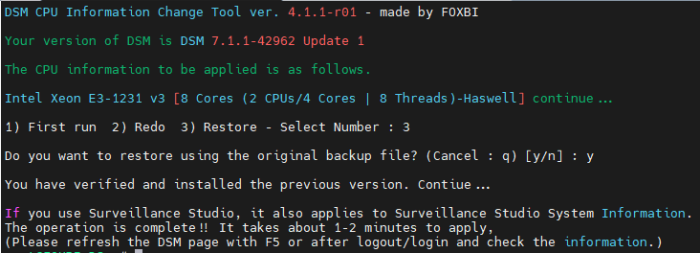
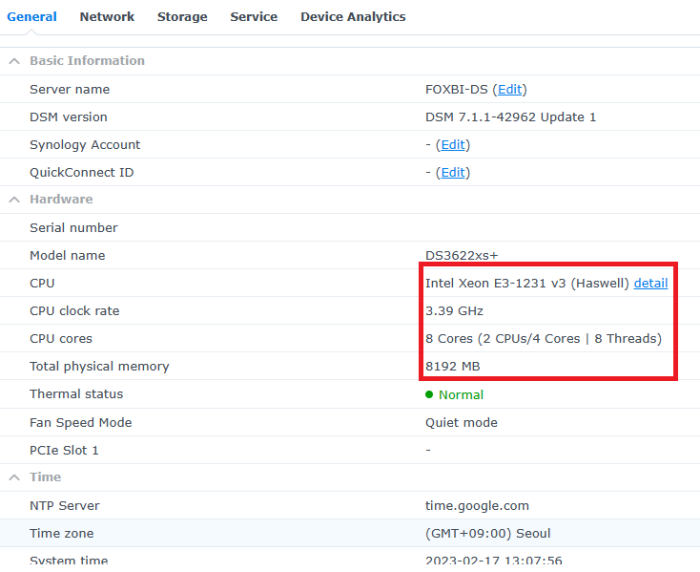
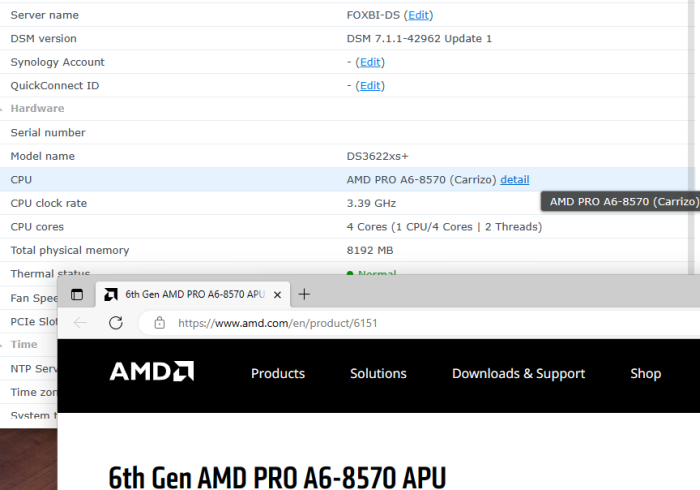
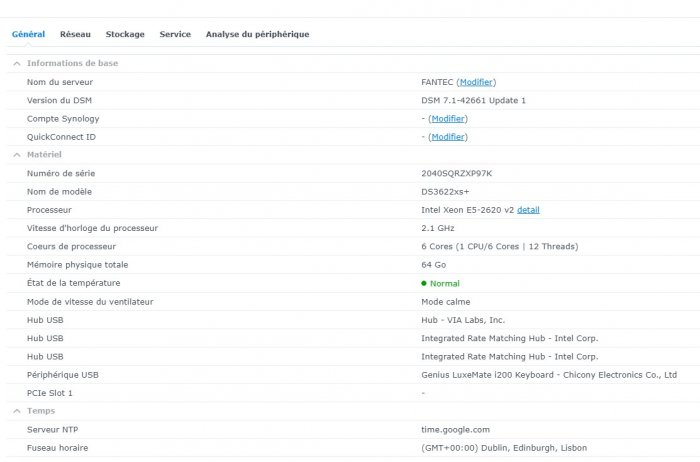
Hello! I am xpenology user. And I am an IT engineer who creates shell scripts as hobbies. Please understand that it is written by a google translate site. because i’m korean who is not fluent in English. I created a tool to change cpu information for Xpenology’s users. Modify the actual cpu name and cores of your pc or server. Howto Run ============================================================= 1. Download attached file on your PC (ch_cpuinfo.tar) (ch_cpuinfo_en.tar) / (ch_cpuinfo_kr.tar is file for korean) 2. Upload file to your DSM location (by filestation, sftp, webdav etc....) 3. Connect to ssh by admin account. (dsm > control panel > terminal & snmp > terminal > enable ssh check) 4. Switch user to root: sudo su - (input admin password) 5. Change directory to where ch_cpuinfo.tar file is located: cd /volume1/temp 5-1. in another way, Download ch_cpuinfo.tar with wget wget https://github.com/FOXBI/ch_cpuinfo/releases/download/ch_cpuinfo/ch_cpuinfo.tar 6. Decompress file & check file: tar xvf ch_cpuinfo.tar ls -lrt (check root’s run auth) 7. Run to Binary file ./ch_cpuinfo or ./ch_cpuinfo.sh (If you use busybox in DSM 5.x, you can use it as a source file) 8. When you execute it, proceed according to the description that is output. 9. Check your DSM’s CPU name, CPU cores at “information center” made a video of the how to run ch_cpuinfo. Extra Action If you want to use ch_cpuinfo in your language Modify and use the LANG.txt file in the same path as ch_cpuinfo. It is possible to use after changing the English content of each variable after translation and changing the value of CUSTLANG in line 8 to Y. Sample image(by Google trans) ==================================================== Addtional, Adjust binary to excute file made by shc(http://www.datsi.fi.upm.es/~frosal) The tool does not inclue worms, bad code. If you want to edit the CPU information yourself manually, please refer to the contents below. ——————————————————————————————————————————————————————————————— Location : /usr/syno/synoman/webman/modules/AdminCenter Source : admin_center.js / admin_center.js.gz(above 6.2) Add Before -> if(Ext.isDefined(h.cpu_vendor)&&Ext.isDefined(h.cpu_family)&&Ext.isDefined(h.cpu_series)){ o.push([_T("status","cpu_model_name"),String.format("{0} {1} {2}",h.cpu_vendor,h.cpu_family,h.cpu_series)])} if(Ext.isDefined(h.cpu_cores)){o.push([_T("status","cpu_cores"),h.cpu_cores])} Add contents: h.cpu_vendor="Intel";h.cpu_family="Xeon";h.cpu_series="E3-1220 V3";h.cpu_cores="4 Cores (1 CPU/4 Cores | 4 Threads)"; h.cpu_detail="<a href='https://ark.intel.com/content/www/us/en/ark/search.html?_charset_=UTF-8&q=E3-1220 V3' target=_blank>detail</a>" Change contens: String.format("{0} {1} {2}",h.cpu_vendor,h.cpu_family,h.cpu_series) to String.format("{0} {1} {2} {3}",h.cpu_vendor,h.cpu_family,h.cpu_series,h.cpu_detail) ——————————————————————————————————————————————————————————————— Finally, All descriptions are based on version 6.2, and the actual executable file supports 5.x, 6.x and 7.x Publish the source through github(https://github.com/FOXBI/ch_cpuinfo). For versions DSM 6.x and later, you can use the binary as before. If you use busybox in DSM 5.x, you can use it as a source file(ch_cpuinfo.sh). Please contact me by comment or bug report, i’ll respond to you as much as possible within my ability. Test & Made Environment ———————————————————————————————————— Base Server : HP ML310e v2 gen8 + VMware ESXi 6.0 + RDM DSM : DSM 6.2.3-25426 Update 3 (DS3615xs) Base Server : HP ML310e v2 gen8 + VMware ESXi 6.0 DSM : DSM 7.0.1-42214 (DS3615xs) Base Server : HP ML310e v2 gen8 + VMware ESXi 6.0 DSM : DSM 7.0.1-42214 (DS918+) Base Server : HP ML310e v2 gen8 + VMware ESXi 6.0 DSM : DSM 6.2.4-25556 (DS3615xs) Base Server : Intel E5-2630 v2 + VMware ESXi 6.7u2 DSM : 6.2.2-24922 Update 2 (DS3617xs) ———————————————————————————————————— Change Log Update new version (ch_cpuinfo ver 4.2.0-r01) 2023.02.18 - Application of AMD's CPU information collection function improvement - xpenlib(cpu_info.sh) refered https://github.com/FOXBI/xpenlib/blob/main/cpu_info.sh Update new version (ch_cpuinfo ver 4.2.1-r01) 2023.03.05 - Fixed error when users of previous version perform redo with version 4.2.0-r01 (Thanks for the @Mentat report.) I am sorry for not being able to actively respond to your inquiries due to busy life. Thank you!! Have a nice day!! Cheer up!! We can do it!! Reduce activity & Stay home & Wear a Mask!! Let's overcome COVID-19 !! Let's pray and support together for the two countries where the earthquake caused great damage and many deaths and missing people. ============================================= Download links: ch_cpuinfo ver 4.2.0-r01 - new version update -> ch_cpuinfo ver 4.2.1-r01 - new version update -> ch_cpuinfo.tar Reference images # 1.04b + DS918+ # 1.03b + DS3615xs # 1.03b + DS3617xs # Normal output is possible even when using more than 8core. # Support DSM 7.x


 1 point
 -
use jun's loader 1.03b and make new usb for that (remember to match usb vid/pid), try if you can find the system with it in you network if it does work the loader should detect the disks with 6.1 and offer to migrate to 6.2 if its not found in network its most likely about csm mode in uefi bios and the usb boot device (needs to be legacy instead of uefi usb device)1 point
-
Thanks to all . Installed and all is working now.
 1 point
 -
Hi create a new loader with this steps and let me know (Manual ) thanks - Command for 3622 XS - [DS3622xs+] ./rploader.sh update now ./rploader.sh fullupgrade now ./rploader.sh serialgen DS3622xs+ ./rploader.sh identifyusb now ./rploader.sh satamap now ./rploader.sh build broadwellnk-7.0.1-42218 manual ./rploader.sh clean now ./rploader.sh build broadwellnk-7.1.0-42661 manual1 point
-
There is no auto option for build switch. The valid options are : compile -> runs through redpill-lkm compilation process (Not thoroughly tested though, likely to fail) static -> uses the static redpill module from redpill extension and calls also the listmodules function. manual -> uses the static redpill module from redpill extension and proceeds with the extensions you have manually added without running the listmodules function. DTS patching will need to be done manually, for platforms that require DTS patching. default -> static listmodules function will try to list your pci devices, query modules.alias.4.json.gz for a kernel module for your PCI-ID, and match and add an extension from the rpext-index.json. At the end, it will also try to patch the model.dts, for platforms that require DTS patching.1 point
-
The option auto is a mispropagated option that does not actually exist and is equivalent to the effect of using it without any option. The difference between the three options is the list of each function below. However, if you look closely, static and auto(none) have the same function. Only manual excludes listmodules function. The listmodules() function is the part that automatically detects and processes each device ID and exts. static) echo "Using static compiled redpill extension" getstaticmodule echo "Got $REDPILL_MOD_NAME " listmodules echo "Starting loader creation " buildloader [ $? -eq 0 ] && savesession ;; manual) echo "Using static compiled redpill extension" getstaticmodule echo "Got $REDPILL_MOD_NAME " echo "Manual extension handling,skipping extension auto detection " echo "Starting loader creation " buildloader [ $? -eq 0 ] && savesession ;; *) echo "No extra build option specified, using default <static> " echo "Using static compiled redpill extension" getstaticmodule echo "Got $REDPILL_MOD_NAME " listmodules echo "Starting loader creation " buildloader [ $? -eq 0 ] && savesession ;;1 point
-
@FOXBI Feel free to do whatever you like ! if this makes you and other users happy, just do it1 point
-
Today, through your source analysis, I was able to see how you used to handle encrypted pats after version 42281 and how to import zImage, rd.gz , GRUB_VER, grub_cksum.syno through it. Also, I was able to check how to create custom.gz. I think your method and the ideas you have developed are amazing!! If you allow it, I would like to use that method and reflect it in the process of creating a multiloader. However, since rploader is in charge of the build process, I will try to apply only the part that proceeds after the build.1 point
-
It was something to be thankful for for JUN in the past, but it was very disappointing that flexible update support was not possible afterward due to the static source management of the JUN loader. Switching to open source through GITHUB will make REDPILL shine even more valuable. As a result, I am very happy that I, as a general user, was able to participate in some parts.1 point
-
Got it working: https://ip:port/webapi/auth.cgi?api=SYNO.API.Auth&version=3&method=login&account=username&passwd=password&format=%20cookie at the end leave a space between format =cookie so dont use format=cookie, rather format= cookie https://ip:port/webapi/entry.cgi?api=SYNO.ActiveBackup.Activation&method=set&version=1&activated=true&serial_number=serialno1 point
-
Sata option is typically meant for VM install (proxmox or ESXI etc). It will be a lot of wasted disk if you want to boot like that on bare metal. Nothing else can be on that SATA disk. Not sure if RAID of the boot disk is even worth it - you can just backup the image and start from a new USB drive or dis, if the current one fails. Actual data and synology system partition will already be part of your data disks (should be RAID, to sustain disk failures) and it will boot up with nothing lost with the new USB.1 point