Leaderboard


Popular Content
Showing content with the highest reputation on 04/26/2022 in all areas
-
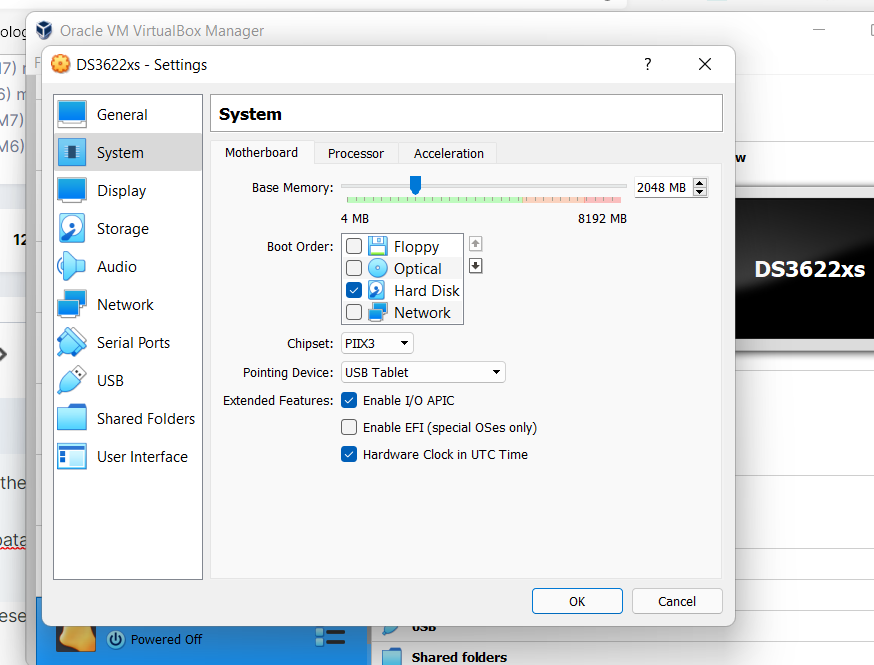
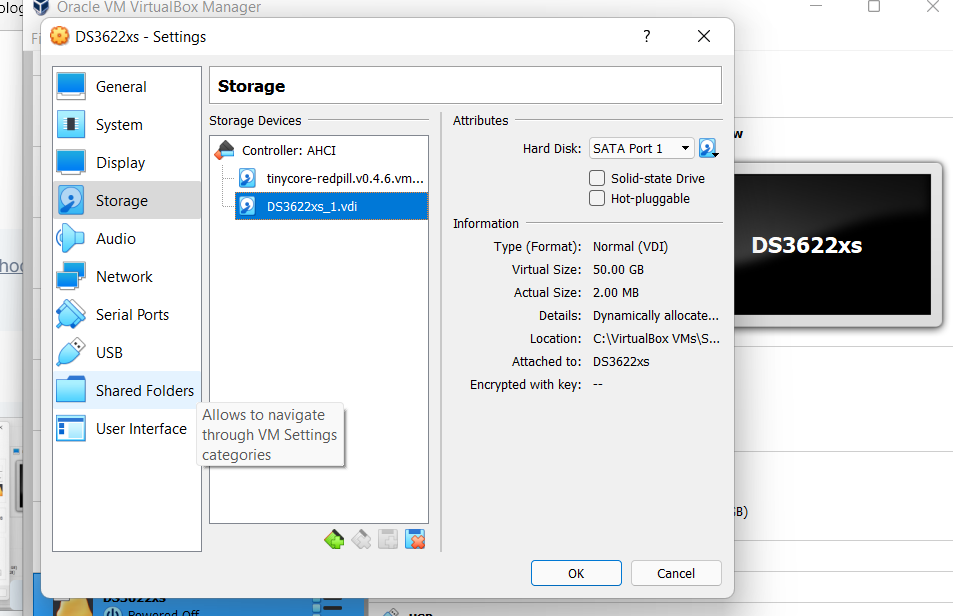
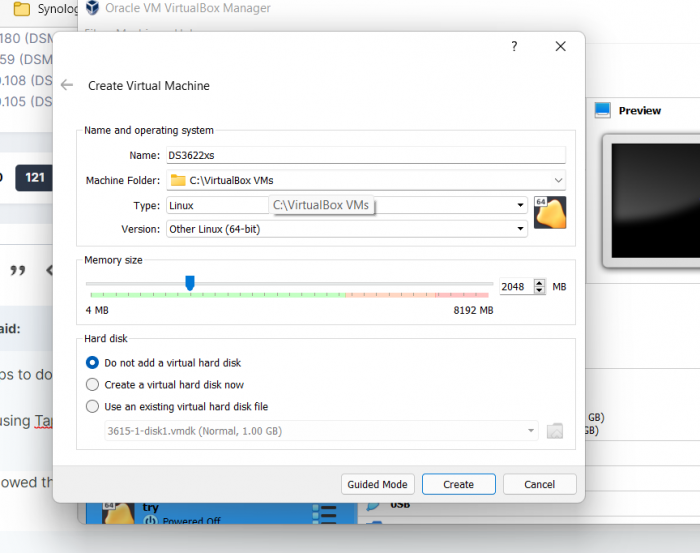
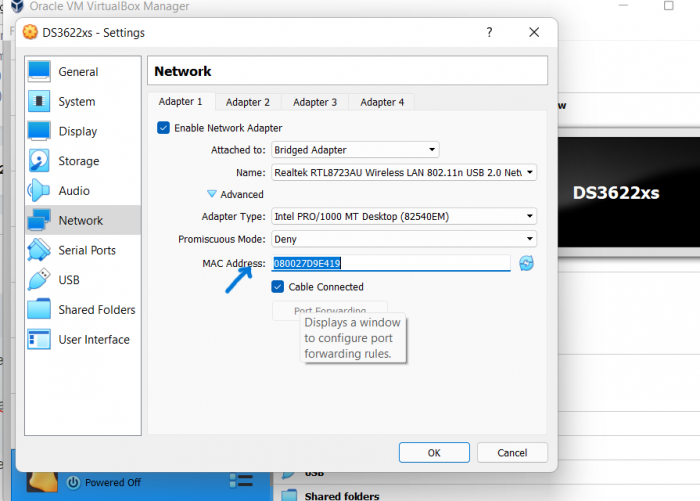
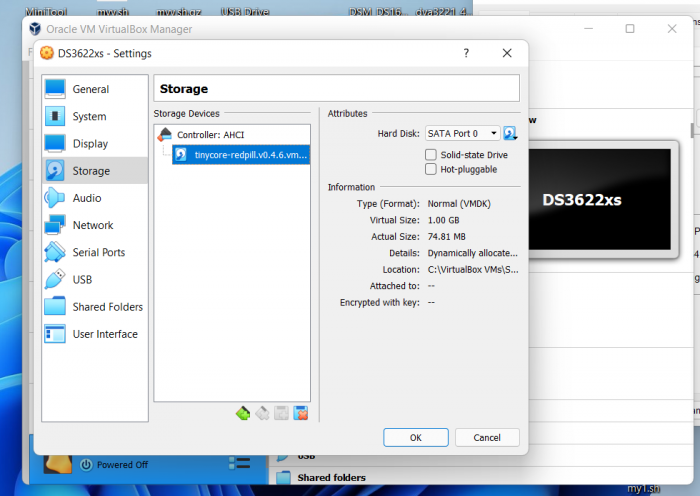
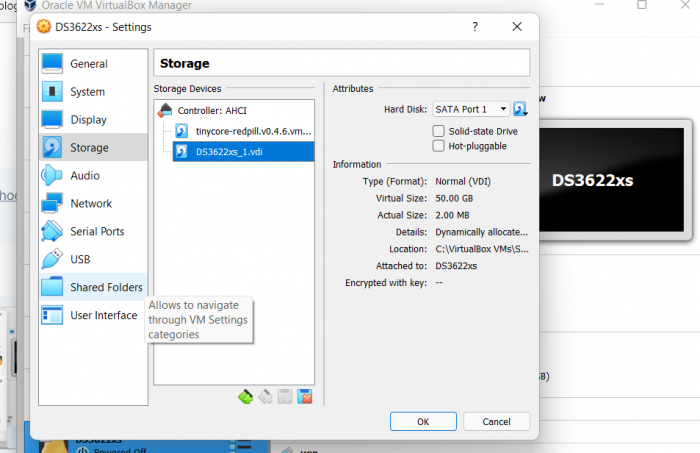
To setup in Virtualbox I followed these steps: 1- create a new VM. 2- From "tinycore-redpill", use the provided vmdk file "tinycore-redpill.v0.4.6.vmdk" and copy it to to the VM Directory. 3- Use the copied file as SATA HDD. 4- Add at least one more SATA HDD. 5- Start the VM. 6- SSh into the VM and run the following commands: - ./rploader.sh update now - ./rploader.sh fullupgrade now - ./rploader.sh serialgen DS3622xs+ - ./rploader.sh satamap now - ./rploader.sh identifyusb now NOT NEEDED FOR VIRTUALBOX. 7- Add EXT for "e1000": - ./rploader.sh ext broadwellnk-7.1.0-42661 add https://raw.githubusercontent.com/pocopico/rp-ext/master/e1000/rpext-index.json 8- Build: - ./rploader.sh build broadwellnk-7.1.0-42661 auto 9- check and copy the MAC address in the "user_config.json" file: - cat user_config.json 10- Backup, Clean and poweroff the VM. - ./rploader.sh backup now - ./rploader.sh clean now - sudo poweroff 11- Change the MAC address for the VM with the address copied from the "user_config.jsin" file. 12- Start the VM and complete setup.
 5 points
 -
Issuing these commands on main PVE node shell, it replaced subscription only repo (paid) to community driven repo (free). Removes the NO SUBSCRIPTION nag when logging into web gui portal and updates proxmox to most current version, super easy. # Disable Commercial Repo sed -i "s/^deb/\#deb/" /etc/apt/sources.list.d/pve-enterprise.list apt-get update # Add PVE Community Repo echo "deb http://download.proxmox.com/debian/pve $(grep "VERSION=" /etc/os-release | sed -n 's/.*(\(.*\)).*/\1/p') pve-no-subscription" > /etc/apt/sources.list.d/pve-no-enterprise.list apt-get update # Remove nag echo "DPkg::Post-Invoke { \"dpkg -V proxmox-widget-toolkit | grep -q '/proxmoxlib\.js$'; if [ \$? -eq 1 ]; then { echo 'Removing subscription nag from UI...'; sed -i '/data.status/{s/\!//;s/Active/NoMoreNagging/}' /usr/share/javascript/proxmox-widget-toolkit/proxmoxlib.js; }; fi\"; };" > /etc/apt/apt.conf.d/no-nag-script apt --reinstall install proxmox-widget-toolkit # Update proxmox pve to newest available version apt upgrade -y After the update process completes, click the reboot button and you will be updated to newest version. Logout of web ui, refresh and login and you will see no subscription nag screen. Press the thanks button on this post
 3 points
 -
Hello~! I am xpenology user. And I am an IT engineer who creates shell scripts as hobbies. Please understand that it is written by a google translate site. because i’m korean who is not fluent in English. I created built Redpill Multi boot loader. Multiple DSMs can be used as one loader Requirement ============================================================= 1, Redpill-Multiloader_7.1-42661.img file Download Please understand that Google Drive is used because of its large capacity. There is a link below. 2. It is the same as using the existing Redpill Tinycore or a separately made loader. 3. ESXi Enviroment (Bootloader SATA1 (1:0), DataDisk SATA0 (0:0)) or Baremetal Enviroment (It can be used by making a USB with rufus or dd, etc.) How to RUN Redpill Multiloader ============================================================= 1. Redpill-Multiloader_7.1-42661.zip decompression 2. Modify /boot/grub/grub.cfg by mounting the first partition on OSFmount or TC #==================================================================================== ## User config - Your values Change #==================================================================================== set sn=1234SQRDD5678 set netif_num=1 set mac1=001122334455 set SataPortMap=9 set DiskIdxMap=0 set SasIdxMap=0 The USB or Boot oder part is an additional setting and does not necessarily need to be modified. 3. Convert Redpill-Multiloader_7.1-42661.img to Redpill-Multiloader_7.1-42661.vmdk, Redpill-Multiloader_7.1-42661-flat.vmdk 4. Register as boot disk in ESXi VM (default SATA1 (1:0)) 5. Enter GRUB and use the desired DSM version How to ADD Ext Driver (for Baremetal & ESXi, How to make USB Stick include) ============================================================= Additional notes ============================================================= 1. It is built by default for EXSi and can be modified after additional builds if necessary. (I'll update the method further.) 2. Due to variable processing for sn, mac, etc., it is temporarily modified in GRUB state and cannot be used. 3. The video has been processed only with the popular DS918+, DS920+, DS1621+, DS3622xs+, and DVA3221, and DS3615xs and DS3617xs are also available. 4. USB is handled as a submenu, and pressing ESC will return to the upper menu. 5. In the future, we plan to make Multiloader production possible directly on TC through tr_cb.sh. https://xpenology.com/forum/topic/60469-tinycore-redpill-create-boot-image-usb-tr_cb-v099-r01/ ## Update v2.0.0-r02- 2022.04.29 - Modification of efi classification conditional statement and redistribution of images - How to add Ext Driver Video production Attachement ============================================================= Download : (Google drive link - 400MB) - Please understand that Google Drive is used because of its large capacity https://drive.google.com/file/d/1t1cOPMmlSg3c65mXJBeI_44yor_sp9Xl/view?usp=sharing Finally comment ============================================================= I'm an ESXi user, so the Native test is lacking.(Check only basic bootability) Please note that there may be errors. If you tell me the test results and points for improvement, I'll reflect them. Have Nice Day!! Thank you~!!!1 point
-
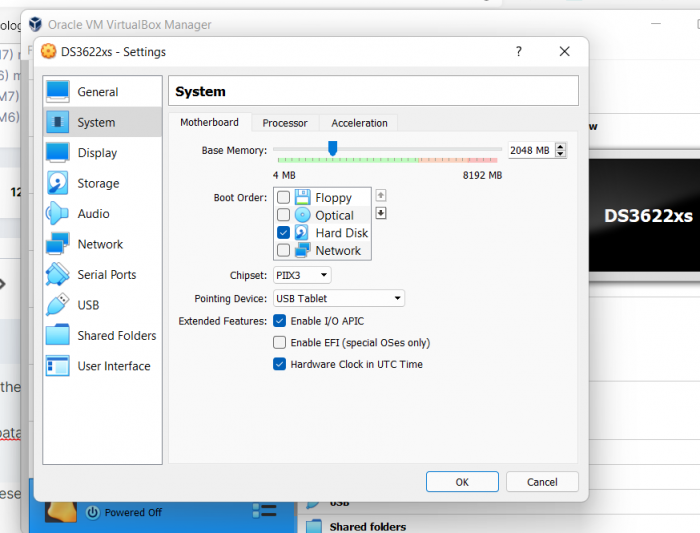
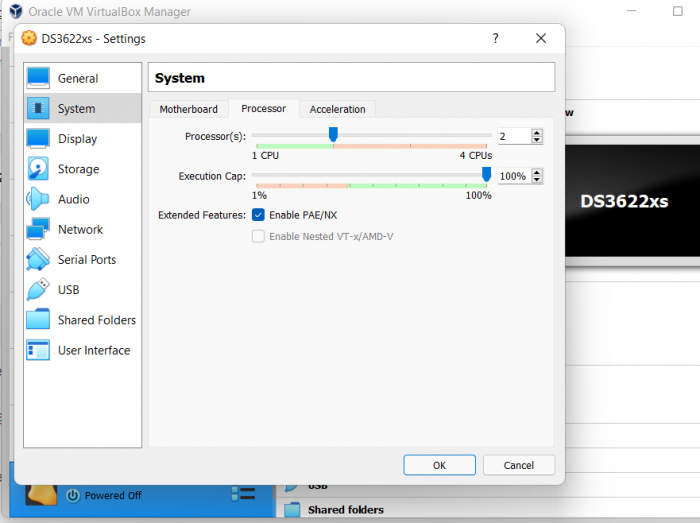
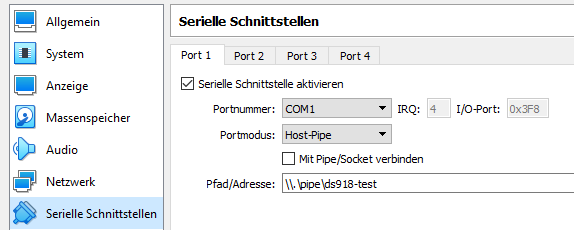
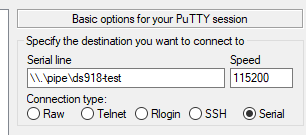
the main thing with virtualbox war usually to have the same mac in the vm and the dsm config (aka grub.cfg) i use ich9 as chipset as its a sata/ahci chipset by default, the rest is the same as with the vm config for 6.2.3 one sata controller, 1st disk is the loader network is bridged and Intel 1000MT Desktop (thas the e1000 extension in the rp loader) i guess all the intel nic's in virtual box will work as they are all 8254x and thats all e1000 when it comes to the driver its also handy to configure the com1 port to have access to the log when booting putty as terminal
 1 point
 -
I know that redpill supports both efi and mbr. The USB side has not yet been fully tested, but it was carried out when trying to boot from microserver gen8 with a USB made with the redpill image as the base. I'll check the USB boot some more.1 point
-
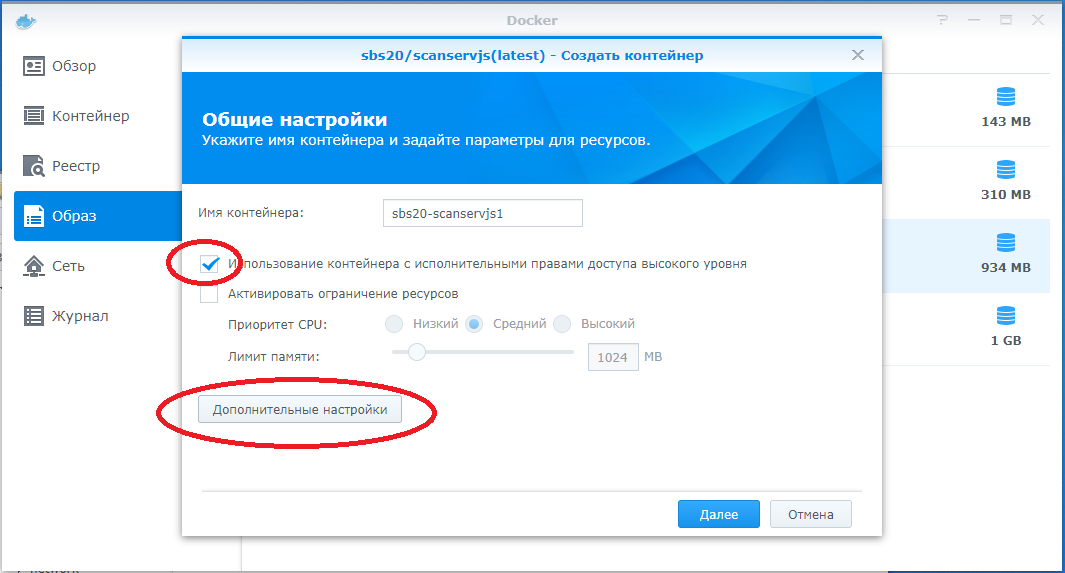
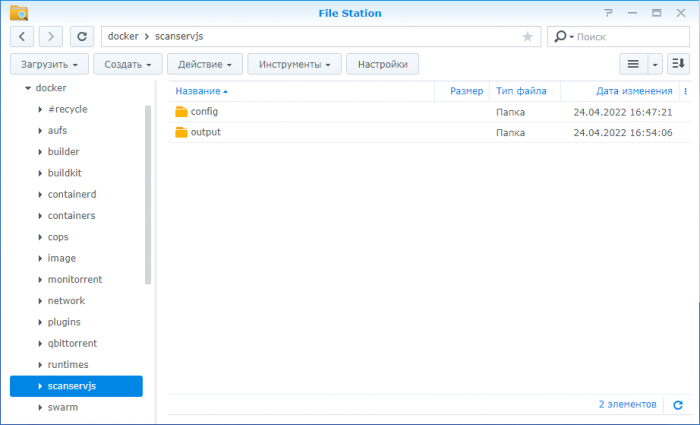
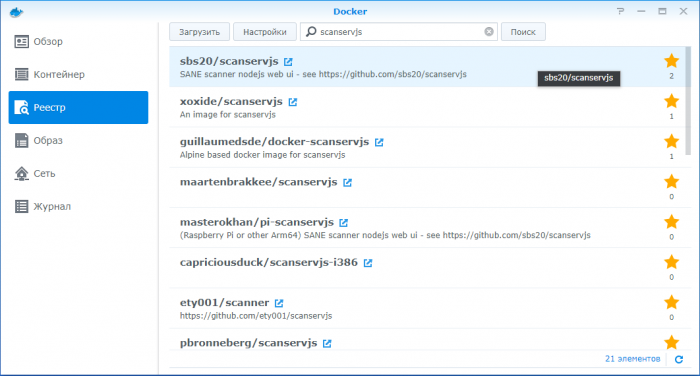
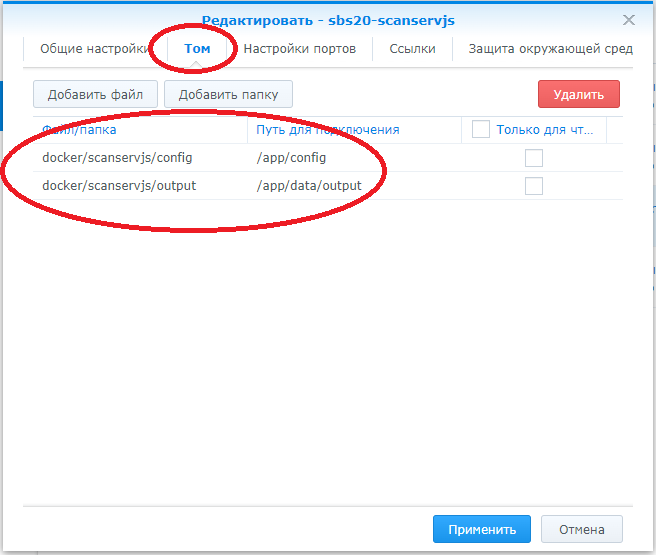
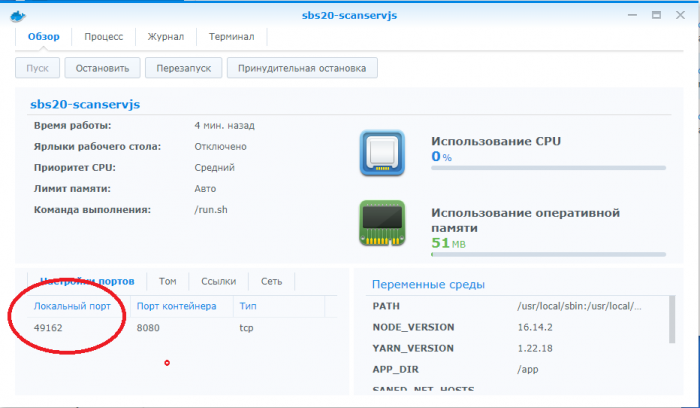
Было свободнее время, разобрался😃 0) Подключаем сканер к насу 1) Создаем где удобно папку scanservjs (у меня она в папке докера) 2) В ней создаем две подпапки - config и output 3) В реестре докера находим scanservjs от sbs20 и качаем 4) Когда образ скачался - создаем контейнер и попутно его настраиваем 5) Ставим галку у прав доступа высокого уровня, открываем дополнительные настройки 6) Здесь главное замонтировать созданные ранее папки: Папка /docker/scanservjs/config - путь для монтирования /app/config Папка /docker/scanservjs/output - путь для монтирования /app/data/output 7) По умолчанию, прога использует пор 8080, если он занят, то можно принудительно выставить нужный в разделе настройки портов. Если не задавать, то он будет задан автоматически 😎 Нажимаем Применить, далее, применить, после чего контейнер автоматически запустится 9) В сведениях запущенного контейнера проверяем локальный порт, после чего можно заходить в вэб интерфейс Настройки эти не совсем оптимальные, т.к. мы даем контейнеру доступ высокого уровня, зато без проблем автоматически определяется сканер=)

 1 point
 -
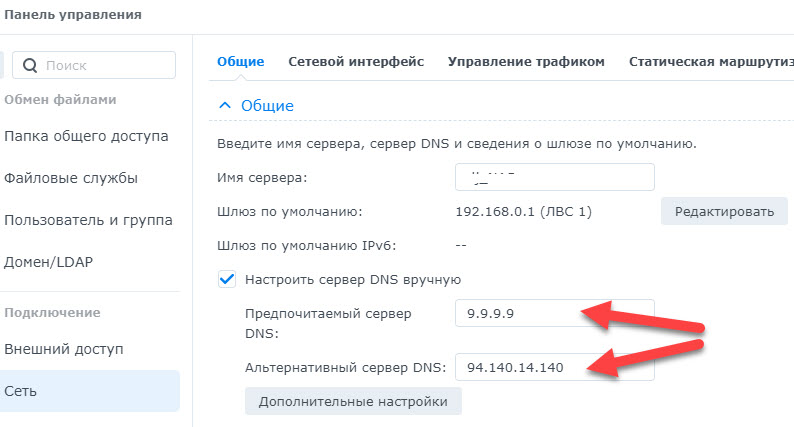
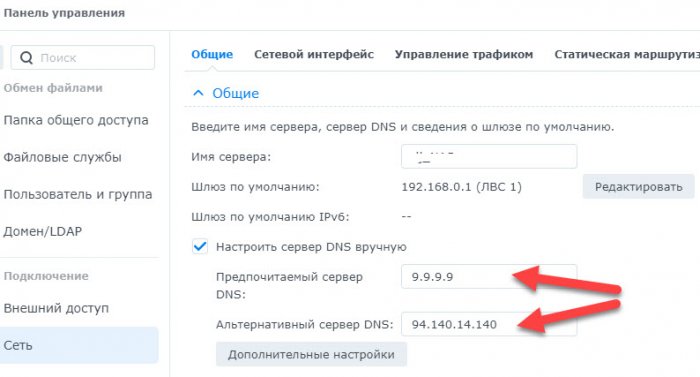
Всё, на сегодня проблема решена полностью - VPN и правки hosts не нужны вовсе. Цитата с одного дружественного сайта: No need for VPN to bypass the block anymore. Simply use AdGuard public DNS: 94.140.14.140, 94.140.14.141, or Quad9 public DNS: 9.9.9.9, 149.112.112.112 Всё, что нужно настроить для нормальной работы плагина - настроить сервер DNS вручную (у казать 1-2 ip-адреса из четырёх, перечисленных выше), например:
 1 point
 -
Huge difference in network speed between e1000 vs VirtIO E1000 nic set in Proxmox # e1000 nic in proxmox with e1000/e drivers in DSM # ./rploader.sh ext broadwellnk-7.1.0-42661 add https://raw.githubusercontent.com/pocopico/rp-ext/master/e1000/rpext-index.json # ./rploader.sh ext broadwellnk-7.1.0-42661 add https://raw.githubusercontent.com/pocopico/rp-ext/master/e1000e/rpext-index.json # I added had to both to get nic to communicate? [ ID] Interval Transfer Bitrate Retr Cwnd [ 5] 0.00-1.00 sec 439 MBytes 3.68 Gbits/sec 0 816 KBytes [ 5] 1.00-2.00 sec 485 MBytes 4.07 Gbits/sec 19 1.26 MBytes [ 5] 2.00-3.00 sec 508 MBytes 4.26 Gbits/sec 14 1.14 MBytes [ 5] 3.00-4.00 sec 516 MBytes 4.33 Gbits/sec 17 1.03 MBytes [ 5] 4.00-5.00 sec 510 MBytes 4.28 Gbits/sec 0 1.34 MBytes [ 5] 5.00-6.00 sec 488 MBytes 4.09 Gbits/sec 24 1.22 MBytes [ 5] 6.00-7.00 sec 409 MBytes 3.43 Gbits/sec 151 1.14 MBytes [ 5] 7.00-8.00 sec 505 MBytes 4.24 Gbits/sec 25 1.01 MBytes [ 5] 8.00-9.00 sec 480 MBytes 4.03 Gbits/sec 0 1.21 MBytes [ 5] 9.00-10.00 sec 440 MBytes 3.69 Gbits/sec 0 1.21 MBytes - - - - - - - - - - - - - - - - - - - - - - - - - [ ID] Interval Transfer Bitrate Retr [ 5] 0.00-10.00 sec 4.67 GBytes 4.01 Gbits/sec 250 sender [ 5] 0.00-10.00 sec 4.66 GBytes 4.00 Gbits/sec receiver VirtIO nic set in proxmox #VirtIO nic set in Proxmox VirtIO drivers in DSM # ./rploader.sh ext broadwellnk-7.1.0-42661 add https://raw.githubusercontent.com/pocopico/redpill-load/master/redpill-virtio/rpext-index.json [ ID] Interval Transfer Bitrate Retr Cwnd [ 5] 0.00-1.00 sec 3.06 GBytes 26.3 Gbits/sec 141 868 KBytes [ 5] 1.00-2.00 sec 3.08 GBytes 26.5 Gbits/sec 1 868 KBytes [ 5] 2.00-3.00 sec 3.04 GBytes 26.1 Gbits/sec 0 868 KBytes [ 5] 3.00-4.00 sec 3.03 GBytes 26.0 Gbits/sec 2 868 KBytes [ 5] 4.00-5.00 sec 3.04 GBytes 26.1 Gbits/sec 1 868 KBytes [ 5] 5.00-6.00 sec 3.03 GBytes 26.1 Gbits/sec 0 868 KBytes [ 5] 6.00-7.00 sec 3.04 GBytes 26.1 Gbits/sec 0 868 KBytes [ 5] 7.00-8.00 sec 3.03 GBytes 26.1 Gbits/sec 0 868 KBytes [ 5] 8.00-9.00 sec 3.00 GBytes 25.7 Gbits/sec 0 868 KBytes [ 5] 9.00-10.00 sec 2.93 GBytes 25.2 Gbits/sec 0 1020 KBytes - - - - - - - - - - - - - - - - - - - - - - - - - [ ID] Interval Transfer Bitrate Retr [ 5] 0.00-10.00 sec 30.3 GBytes 26.0 Gbits/sec 145 sender [ 5] 0.00-10.00 sec 30.3 GBytes 26.0 Gbits/sec receiver Thank You! @RedCat@IG-88@dodo-dk1 point
-
You need to edit the /home/tc/ds920p.dts and then execute : /home/tc/dtc -I dts -O dtb ds920p.dts > ds920p.dtb Finally copy that edited file in redpill-load/custom/extensions/redpill-dtb/ds920p_42661/model_ds920p.dtb and execute : ./rploader.sh build geminilake-7.1.0-42661 manual1 point
-
Христос Воскресе православные !!!! Всем Блага и рабочей Хрени )))1 point
-
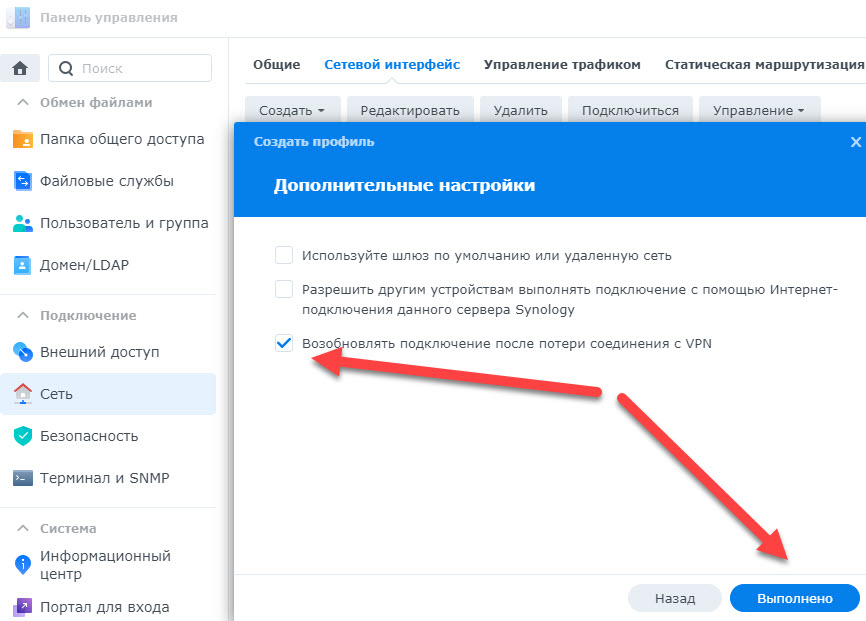
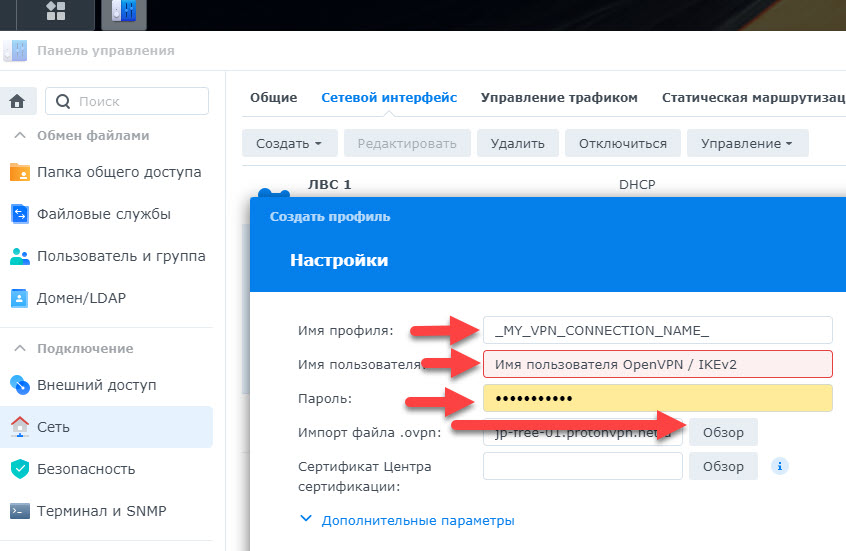
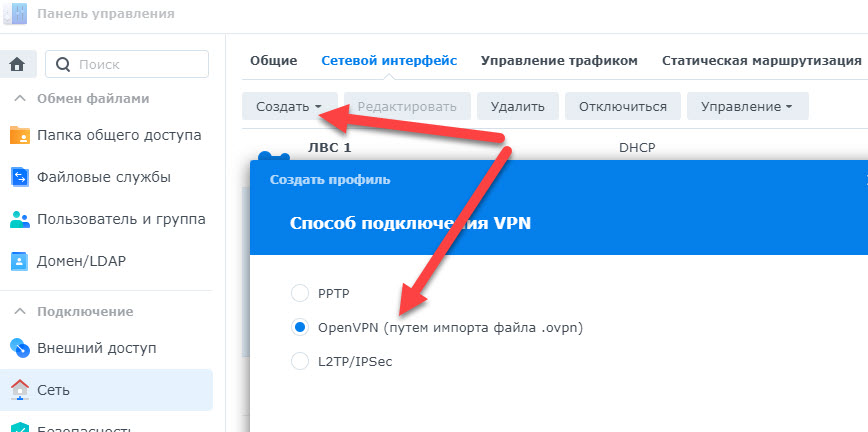
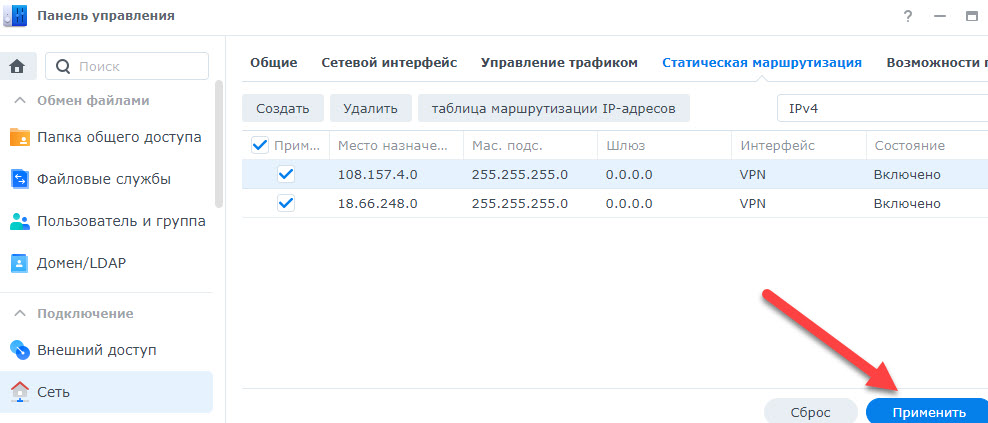
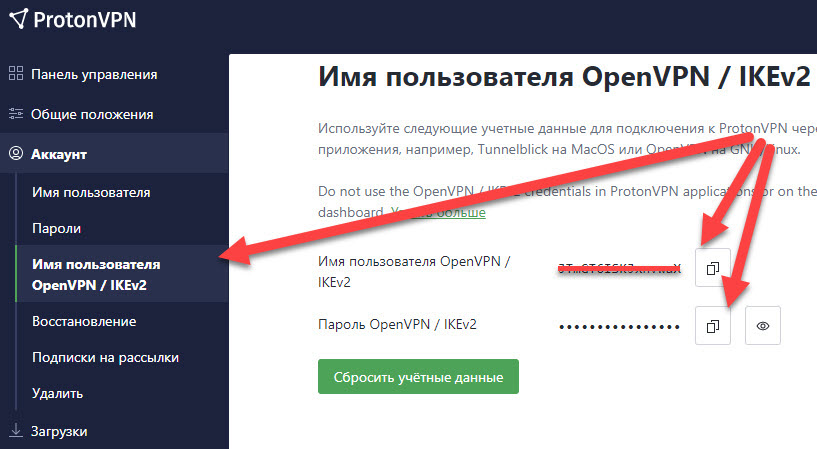
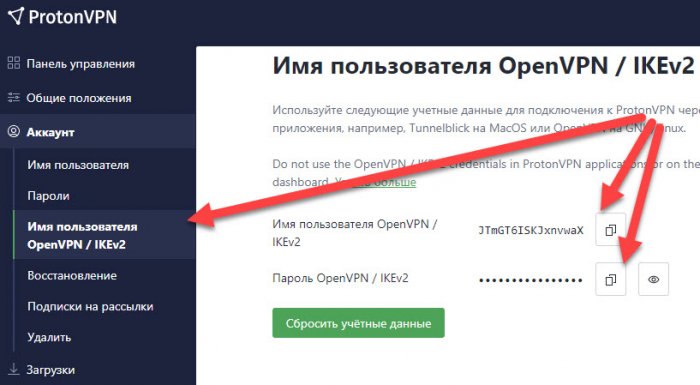
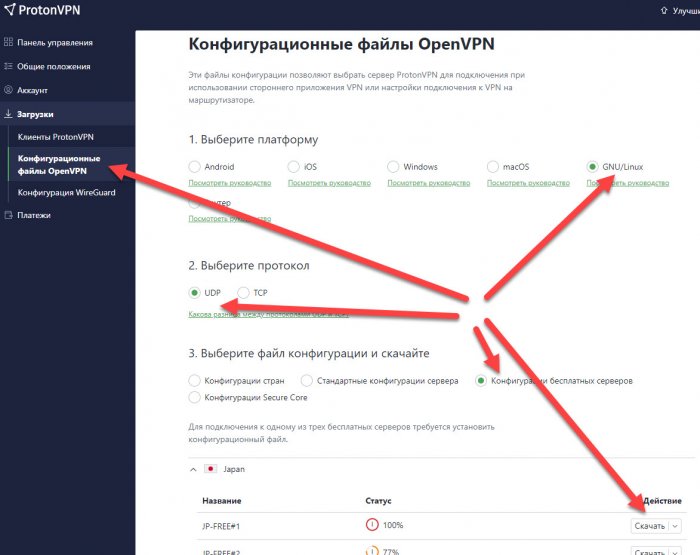
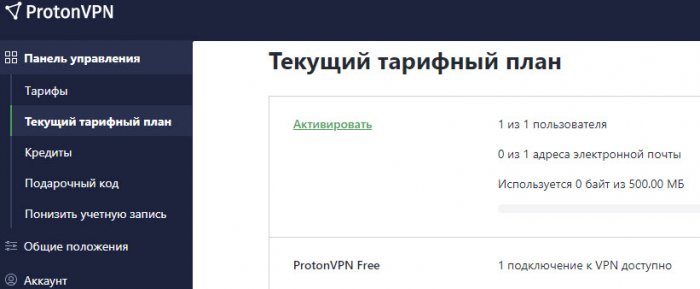
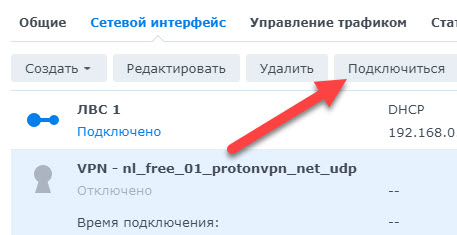
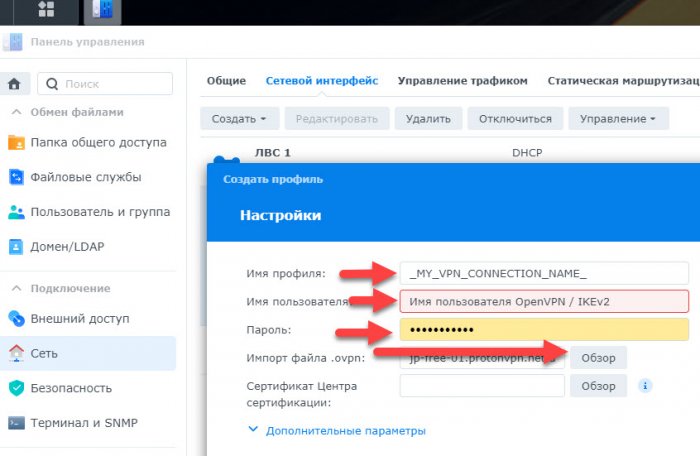
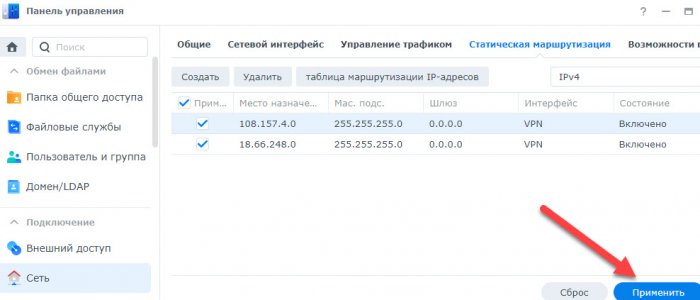
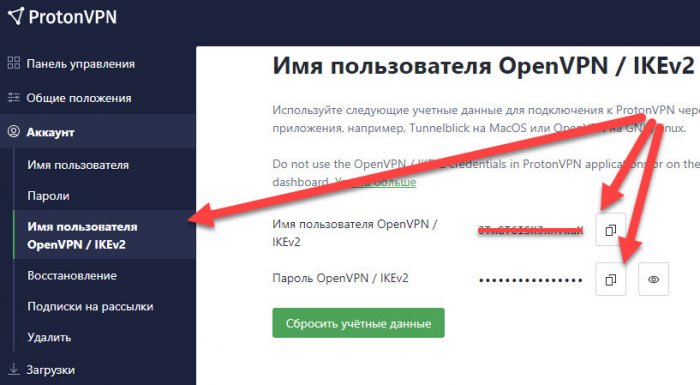
Даю! Настройка VPN для плагина The Movie Database в DSM (если заблокирован api.themoviedb.org) Получить конфигурационный файл OpenVPN - на примере бесплатного ProtonVPN: Зарегистрироваться на сайте, получить бесплатный тариф ProtonVPN Free Скачать конфигурационный файл OpenVPN Использовать для настройки в DSM логин и пароль для OpenVPN / IKEv2 Настроить VPN в DSM: Панель управления/ Сеть /Сетевой интерфейс/ Создать профиль VPN, OpenVPN: Указать название профиля, логин/пароль (п.1.3), выбрать ранее загруженный файл конфигурации .ovpn (п.1.2): Не указывать "Используйте шлюз по умолчанию или удалённую сеть"!: Подключиться: Настроить Статическую маршрутизацию в DSM: Панель управления/ Сеть/ Статическая маршрутизация/ Создать - добавляем две строки: 108.157.4.0 255.255.255.0 0.0.0.0 VPN - для themoviedb.org 18.66.248.0 255.255.255.0 0.0.0.0 VPN - для image.tmdb.org Не забудьте нажать "Применить": Отредактировать файл hosts: это требуется, т.к. themoviedb.org и image.tmdb.org используют множество адресов (видимо, для распределения нагрузки), прописывать их все в маршруты неудобно. И для api.themoviedb.org почему-то всегда возвращается localhost (nslookup -type=A api.themoviedb.org) Добавляем в файл /etc/hosts три строки: 108.157.4.61 themoviedb.org 108.157.4.61 api.themoviedb.org 18.66.248.40 image.tmdb.org (как отредактировать hosts не описываю) Наслаждаемся результатом: UPD: возможно, это - не самый оптимальный вариант, но хотя бы уже работает 😃


 1 point
 -
Вот реально Хрень впереди планеты всей ..... Я вот пользователь на уровне "Лампочки мигают и всё нормально" , но и мне понятен этот принцип "почти неубиваемости" Чего я только не делал с Хренью и положил только раз и то в начале славных дел )))1 point
-
There was always a plan to use the dialog GUI for interactive actions. You can test it by running ./rploader.sh interactive <platform> If you could continue the work on that script it would be better i think.1 point
-
- Outcome of the update: SUCCESSFUL - DSM version prior update: RedPill TinyCore DS3622xs+ DSM 7.0.1-42218 - Loader version and model: RedPill TinyCore broadwellnk-7.1.0-42661 - Using custom extra.lzma: NO - Installation type: BAREMETAL - HP Gen8 Microserver - Intel Xeon E3-1220L V2, 16GB RAM, NIC: Intel X520 SFP+ 10Gbit - Additional comments: Doing this Manual that the Network Driver ixgbe is NOT Additional added - Command for 3622 XS - [DS3622xs+] ./rploader.sh update now ./rploader.sh fullupgrade now ./rploader.sh serialgen DS3622xs+ ./rploader.sh identifyusb now ./rploader.sh satamap now ./rploader.sh build broadwellnk-7.0.1-42218 manual ./rploader.sh clean now ./rploader.sh build broadwellnk-7.1.0-42661 manual -and it is working without "manual" there was Kernel Panic because from the ixgbe Driver or you can disable the network adapater during the loader building -Onboard SATA ports and the SSD in the obbe Slot Found all drives and they are listed in order.1 point
-
- Finding the "ds920p.dts" , "ds1621p.dts" Value - 1) After booting to TC, enter the lspci -tnnvq command. tc@box:~$ lspci -tnnvq -[0000:00]-+-00.0 Intel Corporation Gemini Lake Host Bridge [8086:31f0] +-00.1 Intel Corporation Celeron/Pentium Silver Processor Dynamic Platform and Thermal Framework Processor Participant [8086:318c] +-02.0 Intel Corporation GeminiLake [UHD Graphics 605] [8086:3184] +-0e.0 Intel Corporation Celeron/Pentium Silver Processor High Definition Audio [8086:3198] +-0f.0 Intel Corporation Celeron/Pentium Silver Processor Trusted Execution Engine Interface [8086:319a] +-12.0 Intel Corporation Celeron/Pentium Silver Processor SATA Controller [8086:31e3] +-13.0-[01]--+-00.0 Intel Corporation 82575EB Gigabit Network Connection [8086:10a7] | \-00.1 Intel Corporation 82575EB Gigabit Network Connection [8086:10a7] +-13.1-[02]----00.0 JMicron Technology Corp. JMB58x AHCI SATA controller [197b:0585] +-13.2-[03]----00.0 Realtek Semiconductor Co., Ltd. RTL8111/8168/8411 PCI Express Gigabit Ethernet Controller [10ec:8168] +-13.3-[04]----00.0 ASMedia Technology Inc. ASM1062 Serial ATA Controller [1b21:0612] +-15.0 Intel Corporation Celeron/Pentium Silver Processor USB 3.0 xHCI Controller [8086:31a8] +-1f.0 Intel Corporation Celeron/Pentium Silver Processor LPC Controller [8086:31e8] \-1f.1 Intel Corporation Celeron/Pentium Silver Processor Gaussian Mixture Model [8086:31d4] 2 ) Look at the above sentence and set the following values to be included in the attached "ds920p.dts" file. pcie_root = "00:12.0" pcie_root = "00:13.1,00.0" pcie_root = "00:13.3,00.0" 3) My system has 3 sata controllers each with 2 ports. pcie_root = "00:12.0"; ata_port = <0x00>; pcie_root = "00:12.0"; ata_port = <0x01>; pcie_root = "00:13.1,00.0"; ata_port = <0x00>; pcie_root = "00:13.1,00.0"; ata_port = <0x01>; pcie_root = "00:13.3,00.0"; ata_port = <0x00>; pcie_root = "00:13.3,00.0"; ata_port = <0x01>; 4) See attached file for final result. < P.S > If you are using nvme, you can put the pcie_root value of nvme in nvme_slot. nvme_slot@1 { pcie_root = "00:1d.0,00.0"; port_type = "ssdcache"; }; nvme_slot@2 { pcie_root = "00:14.0"; port_type = "ssdcache"; ds920p.dts1 point
-
The list below is not meant to be comprehensive nor to explain in detail the ins and outs of each command. This is more of a cheat list of commands that I have used or seen used among members through the years. Displays the content of the directory you are in. Both files and directories are displayed: ls -la Displays information about the disk space in gigabytes: df -h Displays information about the machine and operating system it is run on: uname -a Displays your machine uptime since last boot: uptime -p Displays memory use in a human-readable output: free -w -h Shows the directory you are currently in: pwd Shows a frequently updated list of the processes running on your machine (press ctrl+c to exit): htop List USB buses and device: lsusb List PCI buses and devices: lspci Lists partitions: fdisk -l Displays a compact and summarized list of all usb controllers with associated vid/pid: cat /proc/bus/usb/devices | grep -e "^ $" -e "Vendor" -e "Manufacturer" -e "Product" Provides comprehensive hardware information: dmidecode Shows a snapshot of the kernel's RAID/md state by reading the /proc/mdstat file: cat /proc/mdstat Displays what type of processor your system is running including the number of CPUs present: cat /proc/cpuinfo Displays information about CPU: dmidecode -t 4 Get the status of all services running either started or stopped: synoservice -status Displays in real time entries in all logs under /var/log (press ctrl+c to exit): find ../var/log -name "*.log" | xargs tail -f Displays the message buffer of the kernel: dmesg Will reboot your machine: reboot None of the commands provided above are destructive. Now if you go and change some of the flags (options) in some of the commands, they could become destructive SO if you don't know what you are doing don't test your luck. I will not be held responsible for your sloppiness. In other words, if you don't know why you need to use a command, then you are better of investigating first on google the intricacies of said command. If you need help on a specific utility simply use the '--help' flag following the utility's name, for instance if you want to know what options are available for the "cat" utility, then type "cat --help" and it will output what options are available. The 'dmidecode' utility is not available on my DS214 but since with Xpenology we are all using 3615, 3617 or 918 it should be present in all 3 models.1 point