Leaderboard


Popular Content
Showing content with the highest reputation on 02/19/2020 in all areas
-
DSM 6.2.3 will not work with these drivers, if you install or update you will fall back to "native" drivers that come with DSM, like no realtek nic on 3615/17 but on 918+ or no mpt2/mpt3sas on 918+ or no broadcom onboard nic on HP microserver or Dell server read this if you want to know about "native" drivers https://xpenology.com/forum/topic/13922-guide-to-native-drivers-dsm-617-and-621-on-ds3615/ synology reverted the changes made in 6.2.2 so the old drivers made for 6.2.(0) are working again and there are new drivers made for 6.2.3 too (we got recent kernel source from synology lately) https://xpenology.com/forum/topic/28321-driver-extension-jun-104b-for-dsm623-for-918/ This is the new 2nd test version of the driver extension for loader 1.04b and 918+ DSM 6.2.2, network drivers for intel and realtek are now all latest and the same as in 3615/17 from mid. december (also broadcoam tg3 driver is working), tries to address the problems with the different GPU's by haveing 3 versions of the pack additional information and packages for 1.03b and 3615/3617 are in the lower half under a separate topic (i will unify the 918+ and 3615/17 parts later as they are now on the same level again) mainly tested as fresh install with 1.04b loader with DSM 6.2.2, there are extra.lzma and extra2.lzma in the zip file - you need both - the "extra2" file is used when booting the 1st time and under normal working conditions the extra.lzma is used (i guess also normal updates - jun left no notes about that so i had to find out and guess). Hardware in my test system used additional driver: r8168, igb, e1000e, bnx2x, tn40xx, mpt2sas The rest of the drivers just load without any comment on my system, i've seen drivers crashing only when real hardware is present so be warned, i assume any storage driver beside ahci and mps2sas/mpt3sas as not working, so if you use any other storage as listed before you would need to do a test install with a new usb and a single empty disk to find out before doing anything with your "production" system i suggest testing with a new usb and a empty disk and it that's ok then you have a good chance for updating for updating its the same as below in the 3615/17 section with case 1 and 2 but you have extra.lzma and extra2.lzma and you will need to use https://archive.synology.com/download/DSM/release/6.2.2/24922/DSM_DS918+_24922.pat most important is to have zImage and rd.gz from the "DSM_DS918+_24922.pat" file (can be opened with 7zip) together with the new extra/extra2, same procedure as for the new extra for 3615/17 (see below) all 4 files extra.lzma, extra2.lzma (both extracted from the zip downloaded), zImage and rd.gz go to the 2nd partition of the usb (or image when using osfmount), replacing the 4 files there if you want the "old" files of the original loader back you can always use 7zip to open the img file from jun and extract the original files for copying them to usb if really wanting to test with a running 6.2.x system then you should empty /usr/lib/modules/update/ and /usr/lib/firmware/i915/ before rebooting with the new extra/extra2 rm -rf /usr/lib/modules/update/* rm -rf /usr/lib/firmware/i915/* the loader will put its files on that locations when booting again, this step will prevent having old incompatible drivers in that locations as the loader replaces only files that are listed in rc.modules and in case of "syno" and "recovery" there are fewer entries, leaving out i915 related files, as long as the system boots up this cleaning can be done with the new 0.8 test version there a 3 types of driver package, all come with the same drivers (latest nic drivers for realtek and intel) and conditions/limitations as the 3615/17 driver set from mid. december (mainly storage untested, ahci and mpt3sas is tested). 1. "syno" - all extended i915 stuff removed and some firmware added to max compatibility, mainly for "iGPU gen9" (Skylake, Apollo Lake and some Kaby Lake) and older and cases where std did not work, i915 driver source date: 20160919, positive feedback for J3455, J1800 and N3150 2. "std" - with jun's i915 driver from 1.04b (tested for coffee lake cpu from q2/2018), needed for anything newer then kaby lake like gemini lake, coffee lake, cannon lake, ice lake, i915 driver source date: 20180514 - as i had no source i915 driver is the same binary as in jun's original extra/extra2, on my system its working with a G5400, not just /dev/dri present, tested completely with really transcoding a video, so its working in general but might fail in some(?) cases, also 8th/9th gen cpu like i3/i5 8100/9400 produce a /dev/dri, tested with a 9400 and it does work 3. "recovery" - mainly for cases where the system stops booting because of i915 driver (seen on one N3150 braswell), it overwrites all gpu drivers and firmware with files of 0 size on booting so they can't be loaded anymore, should also work for any system above but guarantees not having /dev/dri as even the firmware used from the dsm's own i915 driver is invalid (on purpose) - if that does not work its most likely a network driver problem, safe choice but no transcoding support start with syno, then std and last resort would be recovery anything with a kernel driver oops in the log is a "invalid" as it will result in shutdown problems - so check /var/log/dmesg the often seen Gemini Lake GPU's might work with "std", pretty sure not with "syno", most (all?) testers with gemini lake where unsuccessful with "std" so if you don't like experimenting and need hardware transcoding you should wait with the version you have the "_mod" on the end of the loader name below is a reminder that you need to to "modding" as in make sure you have zImage and rd.gz from DSM 6.2.2 on you usb for booting, the new extra.lzma will not work with older files 0.8_syno ds918+ - extra.lzma/extra2.lzma for loader 1.04b_mod ds918+ DSM 6.2.2 v0.8_syno https://gofile.io/d/mVBHGi SHA256: 21B0CCC8BE24A71311D3CC6D7241D8D8887BE367C800AC97CE2CCB84B48D869A Mirrors by @rcached https://clicknupload.cc/zh8zm4nc762m https://dailyuploads.net/qc8wy6b5h5u7 https://usersdrive.com/t0fgl0mkcrr0.html https://www104.zippyshare.com/v/hPycz12O/file.html 0.8_std ds918+ - extra.lzma/extra2.lzma for loader 1.04b_mod ds918+ DSM 6.2.2 v0.8_std https://gofile.io/d/y8neID SHA256: F611BCA5457A74AE65ABC4596F1D0E6B36A2749B16A827087D97C1CAF3FEA89A Mirrors by @rcached https://clicknupload.cc/h9zrwienhr7h https://dailyuploads.net/elgd5rqu06vm https://usersdrive.com/peltplqkfxvj.html https://www104.zippyshare.com/v/r9I7Tm0K/file.html 0.8_recovery ds918+ - extra.lzma/extra2.lzma for loader 1.04b_mod ds918+ DSM 6.2.2 v0.8_recovery https://gofile.io/d/4K3WPE SHA256: 5236CC6235FB7B5BB303460FC0281730EEA64852D210DA636E472299C07DE5E5 Mirrors by @rcached https://clicknupload.cc/uha07uso7vng https://dailyuploads.net/uwh710etr3hm https://usersdrive.com/ykrt1z0ho7cm.html https://www104.zippyshare.com/v/7gufl3yh/file.html !!! still network limit in 1.04b loader for 918+ !!! atm 918+ has a limit of 2 nic's (as the original hardware) If there are more than 2 nic's present and you can't find your system in network then you will have to try after boot witch nic is "active" (not necessarily the onboard) or remove additional nic's and look for this after installation You can change the synoinfo.conf after install to support more then 2 nic's (with 3615/17 it was 8 and keep in mind when doing a major update it will be reset to 2 and you will have manually change this again, same as when you change for more disk as there are in jun's default setting) - more info's are already in the old thread about 918+ DSM 6.2.(0) and here https://xpenology.com/forum/topic/12679-progress-of-62-loader/?do=findComment&comment=92682 I might change that later so it will be set the same way as more disks are set by jun's patch - syno's max disk default for this hardware was 4 disks but jun's pach changes it on boot to 16!!! (so if you have 6+8 sata ports then you should not have problems when updating like you used to have with 3615/17) Basically what is on the old page is valid, so no sata_*, pata_* drivers Here are the drivers in the test version listed as kernel modules: The old thread as reference !!! especially read "Other things good to know about DS918+ image and loader 1.03a2:" its still valid for 1.04b loader !!! This section is about drivers for ds3615xs and ds3617xs image/dsm version 6.2.2 (v24922) Both use the same kernel (3.10.105) but have different kernel options so don't swap or mix, some drivers might work on the other system some don't at all (kernel oops) Its a test version and it has limits in case of storage support, read careful and only use it when you know how to recover/downgrade your system !!! do not use this to update when you have a different storage controller then AHCI, LSI MPT SAS 6Gb/s Host Adapters SAS2004/SAS2008/SAS2108/SAS2116/SAS2208/SAS2308/SSS6200 (mpt2sas) or LSI MPT SAS 12Gb/s Host Adapters SAS3004/SAS3008/SAS3108 (mpt3sas - only in 3617), instead you can try a fresh "test" install with a different usb flash drive and a empty single disk on the controller in question to confirm if its working (most likely it will not, reason below) !!! The reason why 1.03b loader from usb does not work when updating from 6.2.0 to 6.2.2 is that the kernel from 6.2.2 has different options set witch make the drivers from before that change useless (its not a protection or anything), the dsm updating process extracts the new files for the update to HDD, writes the new kernel to the usb flash drive and then reboots - resulting (on USB) in a new kernel and a extra.lzma (jun's original from loader 1.03b for dsm 6.2.0) that contains now incompatible drivers, the only drivers working reliable in that state are the drivers that come with dsm from synology Beside the different kernel option there is another thing, nearly none of the new compiled scsi und sas drivers worked They only load as long as no drive is connected to the controller. ATM I assume there was some changes in the kernel source about counting/indexing the drives for scsi/sas, as we only have the 2.5 years old dsm 6 beta kernel source there is hardly a way to compensate People with 12GBit SAS controllers from LSI/Avago are in luck, the 6.2.2 of 3617 comes with a much newer driver mpt3sas then 6.2.0 and 6.2.1 (13.00 -> 21.00), confirmed install with a SAS3008 based controller (ds3617 loader) Driver not in this release: ata_piix, mptspi (aka lsi scsi), mptsas (aka lsi sas) - these are drivers for extremely old hardware and mainly important for vmware users, also the vmw_pvscsi is confirmed not to work, bad for vmware/esxi too Only alternative as scsi diver is the buslogic, the "normal" choice for vmware/ESXi would be SATA/AHCI I removed all drivers confirmed to not work from rc.modules so they will not be loaded but the *.ko files are still in the extra.lzma and will be copied to /usr/modules/update/ so if some people want to test they can load the driver manually after booting These drivers will be loaded and are not tested yet (likely to fail when a disk is connected) megaraid, megaraid_sas, sx8, aacraid, aic94xx, 3w-9xxx, 3w-sas, 3w-xxxx, mvumi, mvsas, arcmsr, isci, hpsa, hptio (for some explanation of what hardware this means look into to old thread for loader 1.02b) virtio driver: i added virtio drivers, they will not load automatically (for now), the drivers can be tested and when confirmed working we will try if there are any problems when they are loaded by default along with the other drivers they should be in /usr/modules/update/ after install To get a working loader for 6.2.2 it needs the new kernel (zImage and rd.gz) and a (new) extra.lzma containing new drivers (*.ko files) zImage and rd.gz will be copied to usb when updating DSM or can be manually extracted from the 6.2.2 DSM *.pat file and copied to usb manually and that's the point where to split up between cases/way's case 1: update from 6.2.0 to 6.2.2 case 2: fresh install with 6.2.2 or "migration" (aka upgrade) from 6.0/6.1 Case 1: update from 6.2.0 to 6.2.2 Basically you semi brick your system on purpose by installing 6.2.2 and when booting fails you just copy the new extra.lzma to your usb flash drive by plugging it to a windows system (witch can only mount the 2nd partition that contains the extra.lzma) or you mount the 2nd partition of the usb on a linux system Restart and then it will finish the update process and when internet is available it will (without asking) install the latest update (at the moment update4) and reboot, so check your webinterface of DSM to see whats going or if in doubt wait 15-20 minutes check if the hdd led's are active and check the webinterface or with synology assistant, if there is no activity for that long then power off and start the system, it should work now Case 2: fresh install with 6.2.2 or "migration" (aka upgrade) from 6.0/6.1 Pretty much the normal way as described in the tutorial for installing 6.x (juns loader, osfmount, Win32DiskImager) but in addition to copy the extra.lzma to the 2nd partition of the usb flash drive you need to copy the new kernel of dsm 6.2.2 too so that kernel (booted from usb) and extra.lzma "match" You can extract the 2 files (zImage and rd.gz) from the DSM *.pat file you download from synology https://archive.synology.com/download/DSM/release/6.2.2/24922/DSM_DS3615xs_24922.pat or https://archive.synology.com/download/DSM/release/6.2.2/24922/DSM_DS3617xs_24922.pat These are basically zip files so you can extract the two files in question with 7zip (or other programs) You replace the files on the 2nd partition with the new ones and that's it, install as in the tutorial In case of a "migration" the dsm installer will detect your former dsm installation and offer you to upgrade (migrate) the installation, usually you will loose plugins, but keep user/shares and network settings DS3615: extra.lzma for loader 1.03b_mod ds3615 DSM 6.2.2 v0.5_test https://gofile.io/d/iQuInV SHA256: BAA019C55B0D4366864DE67E29D45A2F624877726552DA2AD64E4057143DBAF0 Mirrors by @rcached https://clicknupload.cc/h622ubb799on https://dailyuploads.net/wxj8tmyat4te https://usersdrive.com/sdqib92nspf3.html https://www104.zippyshare.com/v/Cdbnh7jR/file.html DS3617: extra.lzma for loader 1.03b_mod ds3617 DSM 6.2.2 v0.5_test https://gofile.io/d/blXT9f SHA256: 4A2922F5181B3DB604262236CE70BA7B1927A829B9C67F53B613F40C85DA9209 Mirrors by @rcached https://clicknupload.cc/0z7bf9stycr7 https://dailyuploads.net/68fdx8vuwx7y https://usersdrive.com/jh1pkd33tmx0.html https://www104.zippyshare.com/v/twDIrPXu/file.html1 point
-
Hi all:) After a little bit of reverse engineering I was able to bypass the license checking mechanism introduced in DSM 6 successfully with a simple two line binary patch of synocodectool and therefore enable transcoding without a valid serial number[emoji4]. I wrote a little script to make it easier for everyone. For more information please check the github repo: https://github.com/likeadoc/synocodectool-patch HOWTO: 1. wget https://raw.githubusercontent.com/likeadoc/synocodectool-patch/master/patch.sh 2. chmod +x patch.sh 3. ./patch.sh Done:) If things go wrong simply restore the original file: ./patch.sh -r Cheers1 point
-
I have a 2415+ Synology and wanted to try playing with the Dell. I used : Jun's Mod V1.02b (non MBR) DS3617xs 15284.pat Dell T20 Xeon 1226- V3 8GB ram 4 - WD 12TB Bios settings- AHCI Mode Boot to USB only UEFI boot Legacy devices enabled All CPU HT and cores enabled Secure boot disabled Serial Port disabled- I didn't need it and didn't try it. All USB enabled Audio disabled- I don't need it and didn't try it. Steps 1. Downloaded software 2. Made USB from image - JUN 3. Make Bios Changes 4. find.synology.com 5. Install the 3617 15284.pat Notes- You have to have 4 drives when installing the SynOS OR it will give you a data error stating drives 5&6 are missing or damaged. It wasn't a problem after install with less than 4 drives. If you install a higher version- it will install about 60% and give you a Fail Common:Common error You can update to the patched version 3, but not Upgrade to 6.2. I have done things to this to test out how good Synology is. I have built the raids, killed the raids, formatted, speed test smart test and made several raid crashed to test out how it rebuilds. I put about 6 TB on it and then unplugged drives. inserted the same drive but formatted- and it rebuilt without issue. I have installed apps without issue. I do not have the stones nor need to try the Synology branded software or surveil station. I didn't try the Plex server yet. The boot up times and responsiveness is way faster than my 2415. Boot times are 30 seconds and access is instant. This turned out to be a neat project. Time machine works. I want to test the ability for numerous power failures during copying, rebuilding, etc. Things I wouldn't have dreamed of doing with mission critical data on my real Synology.1 point
-
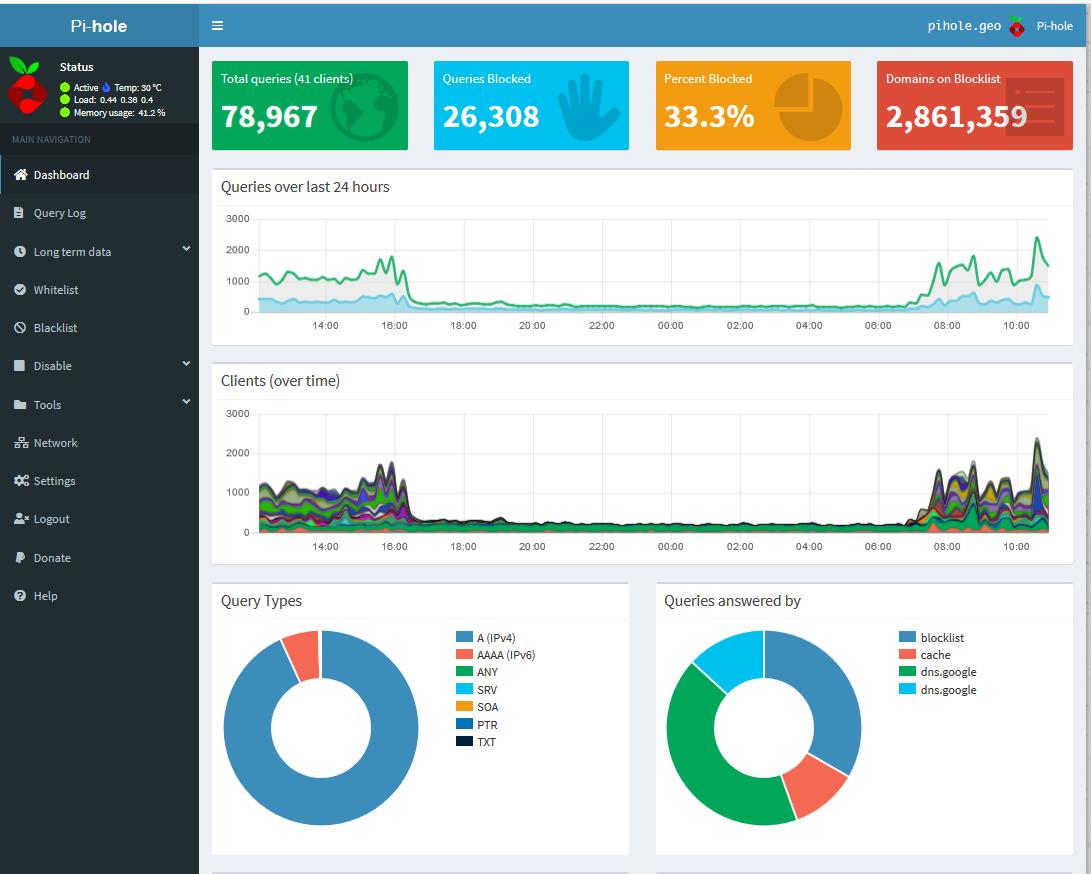
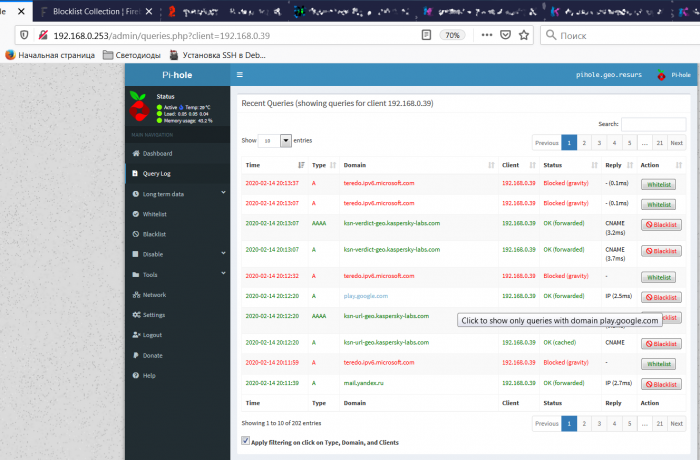
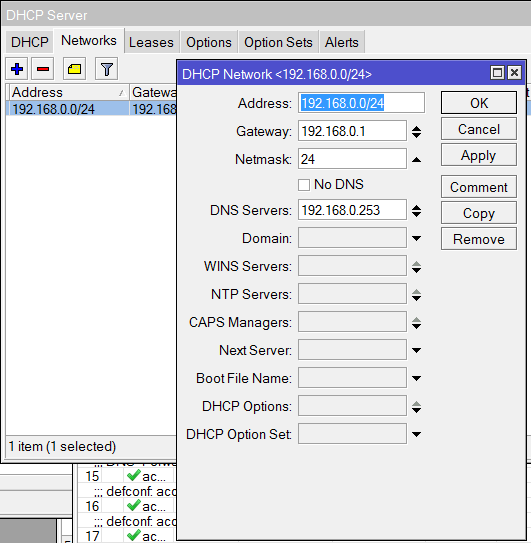
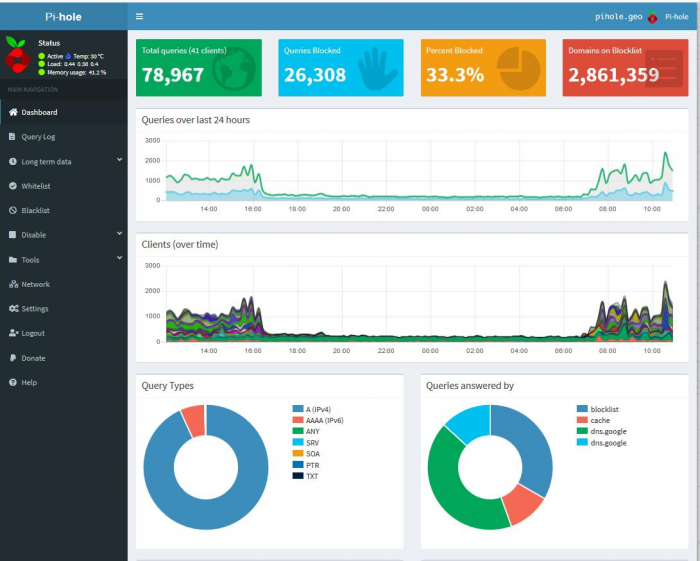
Устанавливаем резалку рекламы Pi-hole в докер на Synology. Вступление: мануалов много, но они не совсем правильные. Часть из них используют bridge сеть докера, тем самым затрудняя доступ из локальной сети к нутрям контейнера. Не каждому понятно как в него пробраться. Часть мануалов рекомендуют привязывать к контейнеру HOST-сеть докера. Тем самым блокируя порты самой Synology, так как Pihole использует тот же 80-й порт и прочие. Я нашел адекватный мануал на английском и решил оставить след по нему в виде скриншотов и надписей на русском языке. А как вы знаете - они есть даже в общественных парижских туалетах. Оригинал мануала лежит вот тут Итак, если очень кратко: редактируем под себя файл настроек, заходим в SSH на Synology под root, говорим докеру скомпоновать контейнер и вуаля. Далее, распишу более подробно. У меня образ Pihole был заранее скачан. Я не уверен, скачает ли докер его сам, поэтому заранее зайдите в реестр докера и слейте себе образ Pihole под ваш процессор. Будем считать, что образ (в неправильном переводе на русский звучит как "Изображение") у вас скачан. Идем по ссылке выше, качаем файл docker-compose.yaml и редактируем его под свои нужды: Основной смысл редактирования - привести настройки сети к вашим. Как отредактировали этот файл, то кладем его на файлостанцию. Разумно сделать отдельную папку Docker и в ней делать папки для конкретного контейнера. И в эти папки уже прокидывать при нужде папки из контейнеров. В итоге, у меня оно вот так: В папку pihole я положил отредактированный ранее файл docker-compose.yaml Теперь залазим на нашу Synology каким-то терминалом, пролазим в папку с файлом docker-compose.yaml и выполняем команду: docker-compose up -d Пролазим именно под рутом, иначе демон докера будет ругаццо! Видим, что все готово. Идем опять в админку докера и видим наш работающий свеженький контейнер. Было: Стало: Отлично! Теперь нужно нарыть пароль для админки. Если вы его указали в конфиге, то перепрыгивайте на следующий шаг. Если не указывали, то дважды щелкаем на контейнере в админке докера (скрин выше) и лезем в журнал. В Журнале ищем пароль: Пароль найден. Переходим по адресу, присвоенному контейнеру в docker-compose.yaml и заходим в админку: Вуаля! Пол дела сделано! Надавив Dashboard, справа вверху на красном фоне вы можете глянуть количество блокируемых доменов. У меня их было порядка 120 тысяч. "Но ведь это не так и много!" - скажете вы и будете в чем-то правы )) Я подошел к вопросу точно так же, как и вы и по итогу у меня почти 3.5 млн доменов блокируемого хлама. Кто-то скажет, что это дескать неправильно, гнаться за количеством. Но лично мне и в моей ситуации - это нисколько не вредит. Да, нушные сайты заблокированы. Заблокирован фейсбук и куча прочей дряни. И даже фишки.нет заблокирован кастомными списками. Но для предприятия это не есть проблемой. Всё что нужно для работы у меня работает. А остальное - юзверя дома будут фейсбучить и так далее. В любом случае - разблокировать домен с пихолькой очень легко. Итак, теперь нам нужно 120 тысяч блокируемых доменов расширить до 3.4 миллионов. Может не всем нам, но кому-то наверняка нужно. Так что этим и займемся. Благо - это лишь пара скриншотов и десяток кликов мышом! Идем на сайт https://firebog.net Видим кучку готовых списков. В соседней вкладке/окне браузера открываем админку и идем в настройки: Settings - Blocklist Копипастим нужные списки в соответствующее поле и жмем Save and Update. готовый полный список на сегодня: Подожем немного, пока наша пихолька подгрузит в себя громадные списки доменов хлама и выходим на главную страницу (Dashboard). Ух-ты! 3.4 млн блокируемого говнища! Ура! Ну как-то так, ребята! Если у вас не работает какой-то сайт, то на главной странице есть список клиентов (Top Clients (total)) Ищем в нем нужного вам клиента и смотрим куда он бродит: Как видите - из этой панели легко можно увидеть блокируемые домены и добавить их в список нефильтруемых (Whitelist). Последнее, что нужно сделать, это указать в настройках роутера, чтобы при раздаче DHCP он выдавал в качестве адреса DNS сервера - именно адрес вашей пихольки. У меня в микроте это выглядит примерно так: Учтите, что настройка mac-lan докера предполагает, что часть "верхних" адресов может быть занята этой созданной докером сеткой. Если только пихолька будет у вас пользоваться этой сетью докера - то проблем не будет. Но если к этой сетке когтить иные контейнеры, то могут возникнуть грабли с адресами. Короче, это вопрос нудный, писать долго и я думаю, большинство понимают о чем речь. upd: забыл сказать: мозила резала на ура! В хроме попробовал - оказалось много рекламы. Почистил кеш DNS хрома и системы - не помогло. Дальше разбираться не стал. Это я к тому пишу, что от браузера зависит эффективность этого мероприятия. Учитывайте! Вот два дня работы системы в сети с несколькими десятками клиентов. Ну, вроде всё рассказал. Надеюсь, это будет полезным кому-то! Могу лишь добавить, что в ЖЖ у меня adblock и ghostery не справлялись с рекламой. После установки пихольки рекламы в ЖЖ почти нет. То же самое и с фишками. Удачи! Экономьте трафик! US Robotics 33600 - наше всё! Помним, любим, скорбим ))

 1 point
 -
Couldnt sleep, so I 6.2.2 drivers.... and guess what............. :)))))))) The Realtek is working. Two Ethernetports up and running. Thank you ! Can sleep again.1 point
-
sorry to waste time i have figured out the problem1 point
-
To the OP. Please provide detailed information on your hardware, loader etc. Without it we cannot help. Also I would suggest reading the rules and FAQs. Uppercase use is not tolerated specially in the title. Quote form the rules:1 point
-
THANKS! This is absolutely what I needed. The QNAP TS-x69 Pro board has the option to disable UEFI boot and boot just legacy but for some reason the normal bootloader from the Jun's would not boot in legacy mode on this device. UEFI would boot but then no ethernet. I know legacy on MBR worked ok too as I booted FreeDOS usb stick. Thanks to your modded MBR loader its working great! Damn QNAP OS is limited to 3GB or it locks up and also prevents SSD cach on this older model. XPeneology and DSM breaks both those beariers and give this old NAS new life 8GB RAM and a pair of 500GB SSDs for cache.1 point
-
I troubleshot that one. Solution: Unplug computer with only one drive hooked up. Remove Bios Battery. Replace bios Battery and reset Bios settings as above. This solved it. Don't know why.0 points