

T-REX-XP
-
Posts
288 -
Joined
-
Last visited
-
Days Won
1
Posts posted by T-REX-XP
-
-
9 hours ago, ThorGroup said:
Why would you do that? If you're doing bare metal the DSM is perfectly fine with using an SSD. Emulating SSD as HDD can actually be destructive to the SSD as the OS will not know that the underlying storage is a flash media.
If you want to use the internal SSD/flash storage as the install media you surely can. If it's a SATA-based one just boot with SATA support. If it's USB just take the vid/pid and put it into the config.@ThorGroup, Thank you for the updates. God job so far:)
There is a lot of hardware that has building EMMC/SSD storage and Intel-based CPU. Some of them successfully loaded Jun loader, but no one HDD has been found. Also the sata ports is also missed. This PC is really great candidate to be a portable/travel NAS. My dream is to build portable nas that is based on intel CPU with quick copy button and other features from DSM))
It will be the ideal variant for the drones owners or travelers.
Do you have an example how to use the PMU emulation?? Any examples ?? Thanks in advance.
As I saw, now all communication with PMU will be mirrored to /dev/ttyS1 so we can easily find the output of the PMU when some sort of FAN or beep settings has been changed in the DSM settings. For example Fan speed set to Quite mode
[ 2250.254824] <redpill/pmu_shim.c:324> Got 1 bytes from PMU: reason=1 hex={2d} ascii="-"
[ 2250.476426] <redpill/pmu_shim.c:324> Got 1 bytes from PMU: reason=1 hex={6b} ascii="k"
[ 2250.493676] <redpill/pmu_shim.c:249> Unknown 1 byte PMU command with signature hex="6b" ascii="k"
It give us the possibility to connect Arduino and try to build the our own PMU with hardware copy button))
-
 1
1
-
-
13 hours ago, T-REX-XP said:
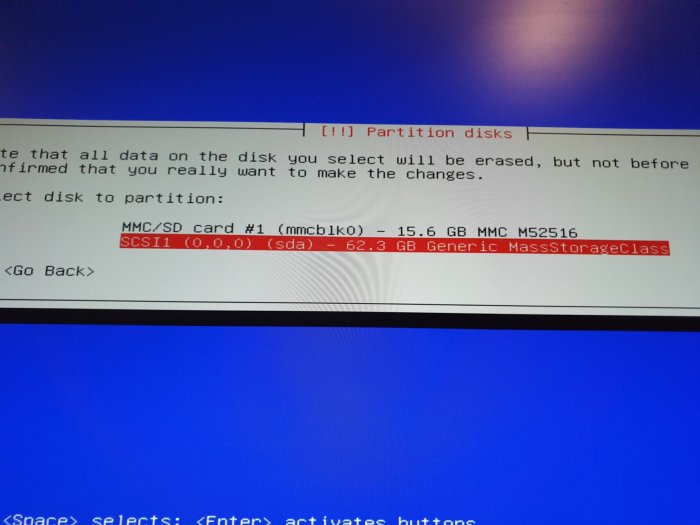
@ThorGroup, is it possible to map internal ssd as hdd, that is available for installer? There are a lot of single board pc with embedded ssd. It will be a good chance use them as energy efficiency solutions or portable nas. I have one os them, so I can provide any logs, etc...
Thanks.
@ThorGroup,From the device perspective it look like this: MMC/SD card mmcblk0 device. Thanks in advance.
-
3 minutes ago, psychoboi32 said:
can you not increase ram of it? if not my idea use linux and make that drive as ISCSI so I can connect that storage local that I will do
No, I can't do it. is not standalone mb. All components embedded to motherboard via soldering. Its compact and low energy consuming solution, such as raspberry pi.
-
Just now, T-REX-XP said:
Is a pretty limited by resources hw. With intel atom and 2gigs of ram. So I'm not sure that the proxmox or esxi will be best approach for it.
For example, atomic pi, latte panda, chuwi larchbox, etc... no name intel based pc from aliexpress.
-
Just now, psychoboi32 said:
With proxmox you can do that install in it and give require space as SATA0 drive
")
Is a pretty limited by resources hw. With intel atom and 2gigs of ram. So I'm not sure that the proxmox or esxi will be best approach for it.
-
@ThorGroup, is it possible to map internal ssd as hdd, that is available for installer? There are a lot of single board pc with embedded ssd. It will be a good chance use them as energy efficiency solutions or portable nas. I have one os them, so I can provide any logs, etc...
Thanks.
-
7 minutes ago, haydibe said:
If someone shares the required details about how it's done, then we can give it a try
Here is the modules and installer
Thanks to the @loomes))
Quote -
33 minutes ago, haydibe said:
and another update of the tool chain
Thanks for the update. It will be great when this tool chain will also include power buttons modules to the loader))
-
19 minutes ago, BlaBla1973 said:
I'm using barematel for plex hardware transcoding. Is this possible using virtualization?
i guess yes.
For example, I'm using Unraid with i915 driver, so I can easily pass /dev/dri./card128 device to the VM.
-
 1
1
-
-
Is anyone able to compile the beep driver from the following sources https://elixir.bootlin.com/linux/v3.10.108/source/drivers/input/misc/pcspkr.c?? Just want to emulate the beeper functionality. Thanks
-
54 minutes ago, rlatn0123 said:
it has vid & pid but no luck
Did you try to load 1.04 via pxe. I was tried, find synology found the new device but install process is not successfully. I guess you need to start from the worked loader, then try to use new one with the same parameters. Now I'm still research the worked solution for booting 1.04 via pxe.
-
5 hours ago, Aigor said:
Do i have to add disk to VM or change ipxe command line?
ThanksAs I can see, your configuration has empty vid and pid. Maybe it is a reason.
-
18 hours ago, haydibe said:
redpill tool chain docker
Is any one has patch for dsm 7.0 for this tool chain ?
-
24 minutes ago, loomes said:
OK in the next Step i have used Backups from my two Harddisks from the old Xpenology Install and mountet this backups to the new redpill Xpenology and fired it up.
The old Installation was detected and i selected migrate and installed the new DSM Version, reboot, all is fine, all Data are there
What is your HW? Please correct me am I wrong, but right now we do not have an extra drivers from @IG-88 at this loader. Thanks
-
35 minutes ago, loomes said:
Now i have compiled on a very old Wheezy Machine ( gcc4) and the loader itself on the Bullseye Machine... and it starts up load redpill and i can install DSM
Can you please share the artifact?)) Thanks.
Also, it would be great to prepare docker image for Redpill))
-
5 hours ago, Vortex said:
Not an errors. Just Status notifiers/Commands goes to the PIC16F1829
According to:
#define UART2_CMD_BUTTON_POWER              0x30 /* '0' */
#define UART2_CMD_SHUTDOWN                  0x31 /* '1' */
#define UART2_CMD_BUZZER_SHORT              0x32 /* '2' */
#define UART2_CMD_BUZZER_LONG               0x33 /* '3' */
#define UART2_CMD_LED_POWER_ON              0x34 /* '4' */
#define UART2_CMD_LED_POWER_BLINK           0x35 /* '5' */
#define UART2_CMD_LED_POWER_OFF             0x36 /* '6' */
#define UART2_CMD_LED_HD_OFF                0x37 /* '7' */
#define UART2_CMD_LED_HD_GS                 0x38 /* '8' */
#define UART2_CMD_LED_HD_GB                 0x39 /* '9' */
#define UART2_CMD_LED_HD_AS                 0x3A /* ':' */
#define UART2_CMD_LED_HD_AB                 0x3B /* ';' */
#define UART2_CMD_LED_HD_BREATH             0x3D /* '=' */
#define UART2_CMD_LED_USB_ON                0x40 /* '@' */
#define UART2_CMD_LED_USB_BLINK             0x41 /* 'A' */
#define UART2_CMD_LED_USB_OFF               0x42 /* 'B' */
// control by microp, echo J to ttyS1 to light on the 10G led, echo K to ttyS1 to turn off the 10G led
#define UART2_CMD_LED_10G_LAN_ON            0x4A /* 'J' */
#define UART2_CMD_LED_10G_LAN_OFF           0x4B /* 'K' */
#define UART2_CMD_SWITCH_MICROP_VERSION     0x4F /* 'O' */
#define UART2_CMD_LED_MIRROR_OFF            0x50 /* 'P' */
#define UART2_CMD_LED_MIRROR_GS             0x51 /* 'Q' */
#define UART2_CMD_LED_MIRROR_GB             0x52 /* 'R' */
#define UART2_CMD_LED_MIRROR_AS             0x53 /* 'S' */
#define UART2_CMD_LED_MIRROR_AB             0x54 /* 'T' */
#define UART2_CMD_TOGGLE_FAN_RPS_REPORT     0x55 /* 'U' */
#define UART2_CMD_SET_PWM_DUTY              0x56 /* 'V' */
#define UART2_CMD_SET_PWM_FREQ              0x57 /* 'W' */
#define UART2_CMD_BUTTON_USB                0x60 /* '`' */
#define UART2_CMD_BUTTON_RESET              0x61 /* 'a' */
// control by up, must echo u first! uP #1
#define UART2_CMD_FAN_FAILURE               0x66 /* 'f' */
// control by up, must echo EC1 first! uP #17
#define UART2_CMD_CPUFAN_FAILURE            0x67 /* 'g' */
#define UART2_CMD_RCPOWEROFF                0x70 /* 'p' */
#define UART2_CMD_RCPOWERON                 0x71 /* 'q' */
#define UART2_CMD_DISABLE_SCHEDULE_POWERON  0x72 /* 'r' */
#define UART2_CMD_ENABLE_SCHEDULE_POWERON   0x73 /* 's' */
#define UART2_CMD_DISABLE_FANCHECK          0x74 /* 't' */
#define UART2_CMD_ENABLE_FANCHECK           0x75 /* 'u' */
#define UART2_CMD_DISABLE_CPUFANCHECK       "EC0"
#define UART2_CMD_ENABLE_CPUFANCHECK        "EC1"
#define UART2_CMD_ENABLE_POWERBTN_WAKEUP    "SW1"
#define UART2_CMD_DISABLE_POWERBTN_WAKEUP   "SW0"
#define UART2_CMD_ALARM_LED_ON              "LA1"
#define UART2_CMD_ALARM_LED_BLINKING        "LA2"
#define UART2_CMD_ALARM_LED_OFF             "LA3"
#define UART2_CMD_SWITCH_LED_CONTROL        "M"  //Switch the led control between status and power
#define UART2_CMD_WOL_ENABLE                "l"
#if defined(MY_DEF_HERE) || defined(MY_ABC_HERE)
#define UART2_CMD_GET_UNIQUE_CMD            0x52 /* 'R' */
#endif
lets'decode:
4 - Power LED on
9 - Status LED green blink
8 - Status LED green on
3 - Long beep (successfully booted)
R -GetMicroP (several attempts)
r - Disable Sched. Poweron
K - LAN10G LED off
p - RC power off (?)
- - is a delimiter
It would be great if these commands (GetMicroP is most important)
(together with /dev/ttyS1) were shimmed in the LKM!
It will be greater when we can process it via the hook)) to fix fan speed or beep via the webui))
-
Can we write a hook to catch message from DSM? It looks like the same approach has been written for the fan controlling.
-
Спасибо за апдейты)) приятно слышать что компании ещё живо. С вашего описания стало понятно, что dsm 7 rc, сейчас в таком же состоянии как и qts( ос от qnap). Тоже игрался какое то время с её установкой. Но там до удобности нашего загрузчика ещё далеко. Часть операций в ручном режиме в консоли.
-
On 4/11/2021 at 4:52 PM, IG-88 said:
i maintain the alternative of using open medial vault, if dsm breaks i can boot up omv from a disk or usb and have
Hi. I have tried OMV too. But it looks like windows XP in 2021. Works,but user experience is so strange. From my perspective, the DSM has much better UI/UX, at the same time give us the platform for a lot of apps. So, long story short, maybe it will be better to build our own alternative of DSM? Something like, docker friendly OS with a build in docker registry as a repository. Or for it can be a extra packages for OMV, with a new admin panel, etc.
Sandstorm
NextCloud
Cozy
https://www.cozy.io/en/features/
-
Guys, can you please share the loader with 9p drivers ? Thanks in advance.
-
Насколько я знаю, вайлдкард сертификаты требуют подтверждения владения домена через dns запись. Чтобы автоматически работало, нужно чтоб ваш dns провайдер поддерживал апи по которому можно вносить изменения. С nic.ua так не получилось у меня.
-
On 5/22/2019 at 9:05 PM, Sass said:
Loader: Jun's Loader v1.04b for DSM 6.2 (on USB 2.0 Stick Intenso Micro Line 4 GB)
DSM: DSM 6.2.1-23824 Update 6 - DS918+
Bare Metal (build and installed in 05.2019)
Motherboard: ASUS P11C-I (Mini-ITX)
Chipset: Intel C242
CPU: Intel Core i3-8100 (Socket 1151v2) 4x 3.60GHz
RAM: 2x 8GB G.Skill Aegis DDR4-2400 DIMM CL15 (running as DDR4-2100 according to BIOS)
Integrated NIC: 2x Gb LAN (Intel I210-AT)
HDDs SATA: 3x 8TB WD80EFAX (WD Red)
SDD Cache: 2x 120GB Crucial BX500 (SATA)
NVMe SDD: 512 GB WesternDigital/SanDisk PC SN520 (M.2 2242, PCIe 3.0) >> reported as model WD5000-BEVT in DSM Disk Manager >> NOT working, DSM displays "I/O-Error" in Disk Manager protocols
Other than the NVMe SDD, the system works as a charm, including both GB-LAN ports.
I removed the NVMe SDD. Also, I still have an SATA-Port available, so I'll add another big SATA SDD soon. Also, I plan to get a PCIe LAN Card with 2x 10GBE (RJ-45), but am currently unsure which model would be working out-of-Jun's-box.
MANY THANKS to JUN and all Forum Members, who's information helped me pinpoint the necessary hardware for my Server!!!
Hi. Could you please confirm that your MB supports HW video transcoding ?
-
20 hours ago, Mincemeat said:
Does i915 conflict disable transcoding?
Guys, I have the same issue during transfer file via the new 2.5 adapter on my xpenology. And i have successfully fixed it when i set the mtu to 4088 instead of 9000. But current speed of copying big file just ~130mb/s. I have generic one 8156 adapter from aliexpress on both devices.
-
Господа, кто пробовал подключать 2.5/5/10 Гбит сетевые карты ? можете поделиться результатом теста?

RedPill - the new loader for 6.2.4 - Discussion
in Developer Discussion Room
Posted
Is it possible add UEFI support to the tool chain ?