WiteWulf
-
Posts
423 -
Joined
-
Last visited
-
Days Won
25
Everything posted by WiteWulf
-
JBOD will still be presenting all your physical disks to the guest as one single disk. As has been pointed out, you must have your HBA in IT mode to pass through individual disks to the guest.
-
 Hi @togashie, there are CPU architecture requirements for the different Synology devices emulated by redpill. I believe the Gen10 uses an AMD Opteron CPU, you should make sure that is compatible with the DS918+: You could try emulating a 3622xs+ instead. It's generally more compatible and is what I run in an ESXi VM on a Gen8. To install 7.1.0-42661-1 you should be using the pat files in this directory to do the initial install: https://archive.synology.com/download/Os/DSM/7.1-42661-1-NanoPacked
 -
Hi @Blackpool, you're a bit confused between BIOS and firmware, so let me try to explain... BIOS (Basic Input Output System) is a small hardware/software component on older equipment (replaced by UEFI on modern computers) that gets the hardware in a state to boot the OS from storage when it first powers on. The BIOS usually contains software that allows you to configure IO (serial, parallel, USB, SATA, SCSI, IDE, etc.), memory, power and such like. While Synology devices have a BIOS, it's not user accessible and isn't usually upgradeable. The Synology devices also have a firmware, DSM, that is installed on the device. If you've done a Mode 2 reset this has been removed from your device, along with all configuration and data (https://kb.synology.com/en-uk/DSM/tutorial/How_to_reset_my_Synology_NAS_7). You'd want to get the latest available .pat file for the DS212 and install it using Synology Assistant from another machine on the network. FYI, Synology stopped support for the 212 at 6.2.4 (https://archive.synology.com/download/Os/DSM/6.2.4-25556). The .pat file does not contain BIOS files, it's just the custom Linux OS Synology uses for its firmware. Having said all that, and having read through your lengthy thread on synoforum (https://www.synoforum.com/threads/complete-newbie-help-needed.9515/page-4) it looks to me like your 212 is dead 😬 To be honest, the symptoms you were describing (intermittent network connectivity) sounds like a hardware issue anyways. Honestly, it's a pretty basic (and unsupported, now) piece of kit. Treat yourself to some new hardware and install xpenology on it
-
It's dead, gone, kaput. Sorry, there's no recovering data from a striped set (RAID0) when you've formatted one of the disks. Restore from backup. You *did* take a backup first, right? 😀
-
There's a very long thread on the P222 operating temps (specifically in a Gen8) here: https://homeservershow.com/forums/topic/6790-p222-temperature-in-gen8/ I've not got to the end of it yet, but the consensus appears to be: yes, they're hot, you need to run the fans on full and/or use an additional fan for the P222
-
As part of a long project to convert a bare-metal redpill DS3615xs install on an HP Gen8 Microserver to be virtualised in ESXi as a DS3622xs+ on the same hardware (without dataloss and/or rebuilding) with TCRP (covered in detail here) I recently bought and installed a used HP P222 HBA. At a high level: backed everything up checked the backup replaced the redpill USB stick with a TCRP one configured for the same DSM version slowly worked through updating to the latest DSM version (7.0.1-42661-4 at the time) updated the backup installed ESXi on the internal SD card, with a 60GB SSD on the ODD SATA port to use as a datastore created a new VM with the SATA HDDs on the internal B120i adapter (already in AHCI mode) in RDM mode the above worked, but disk throughput wasn't great installed the P222 card switched it to HBA mode in ESXi and configured it as a passthrough PCI device moved the SATA cable for the internal drive cage to the P222 card connected a new 1x4 SATA cable to the B120i port and reconnected the 60GB SSD to port 1 (which is 6Gb/s, as opposed to 3Gb/s on the ODD port) reconfigured the VM, removing the RDM disks and adding the P222 card as a passthrough device added the hpsa driver to TCRP and tweaked the SataPortMap and DiskIdxMap settings to see the drives properly (not entirely successfully, but good enough) Massive thanks to @Orphée @pocopico @scoobdriver @flyride and @Peter Suh for guiding me through the above! I thought I'd got a good deal on it for £9 as it came without a cache card or back up battery, but didn't think I'd need these. It turns out the card's firmware permanently disables itself if no cache module is installed. So I had to buy a 512MB cache card and battery for £15 to get it working. The easiest way to access the settings when you're on HP hardware's to be running the HP custom ESXi image that includes the management tools. You can also upgrade the firmware easily from the ESXi command line tools. It's a lot easier, and quicker, than using the HP Intelligent Provisioning tool imho. So, from the ESXi command line I was able to switch it from RAID mode to HBA mode. https://www.hpe.com/us/en/servers/hpe-esxi.html You may find these links useful for similar tasks: https://kallesplayground.wordpress.com/useful-stuff/hp-smart-array-cli-commands-under-esxi/ https://wiki.polaire.nl/doku.php?id=hp_p222_configuration#hp_p222_configuration https://forums.unraid.net/topic/91922-convert-hp-smart-array-controller-to-hba-mode/ One thing I noted from those pages is that the (now installed) cache can be split between read and write caches, but I couldn't get the cache to work in HBA mode. I suspect it only works when the card is in RAID mode and has some volumes configured to cache accesses for. It's annoying that I had to buy the cache module to get the card working, but can't actually use it in this configuration 😆 Lastly, *damn* this card runs hot! The iLO reckons it's at 85degC, way hotter than anything else in the system. This means the fans are now running at 30% and noticeably louder than they were before. The server sits in the AV cupboard in our lounge and is now too loud to stay there. Fortunately, the whole point of this project was to enable moving the server into a datacenter at work, so I don't care how much noise it makes there
- 1 reply
-
- 1
-

-
Migrating Baremetal to ESXi - Passthrough HDDs or Controller?
WiteWulf replied to WiteWulf's question in Answered Questions
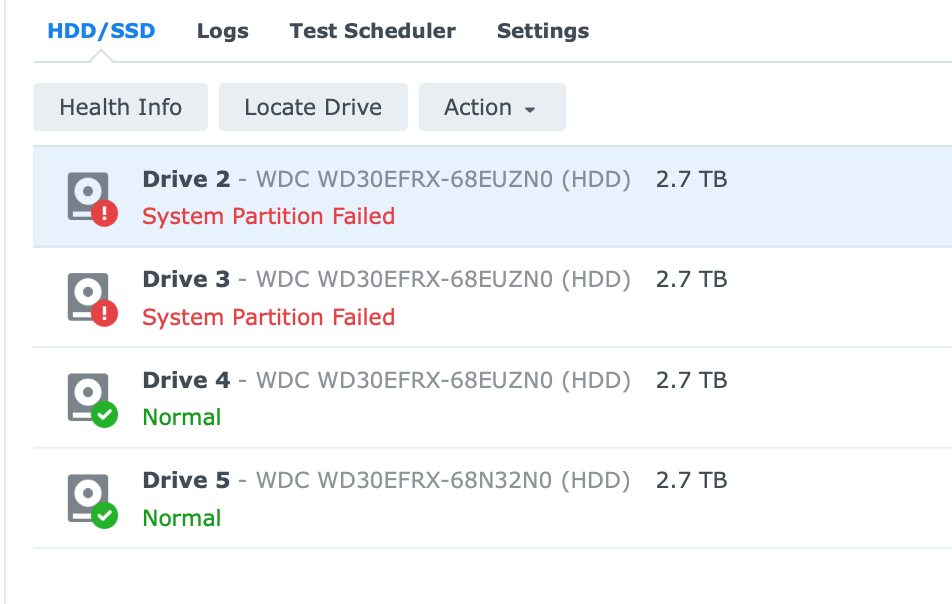
Right, we're getting somewhere! The VM is now booted up into DSM proper, no recover prompt, and I can see all four physical drives on the passthrough adapter However: disks are numbered starting at 2 (as mentioned previously, DiskIdxMap seems to have not worked with it starting at sdb). This is, of course, cosmetic, and doesn't seem to affect the operation of the system it's saying system partition failed for the first two disks Also: I let Storage Manager repair the system partitions and it was fine after 5 minutes syncing with the other disks. I think this is all finally done, now. Thanks for everyone's help, I've learned a huge amount doing this.

-
Migrating Baremetal to ESXi - Passthrough HDDs or Controller?
WiteWulf replied to WiteWulf's question in Answered Questions
I tried creating a new loader with the revised sataportmap and diskidxmap settings, but the disks still start at sdb and run through sde. Thanks @Peter Suh, I'll give that a go. Is this because I created a new bootloader on 7.1.0-42661 for an installed system that was already patched up to 42661-4? -
Migrating Baremetal to ESXi - Passthrough HDDs or Controller?
WiteWulf replied to WiteWulf's question in Answered Questions
@Peter Suh SynologyNAS> cat /var/log/*rc* START /linuxrc.syno.impl Insert Marvell 1475 SATA controller driver Insert basic USB modules... :: Loading module usb-common ... [ OK ] :: Loading module usbcore ... [ OK ] :: Loading module ehci-hcd ... [ OK ] :: Loading module ehci-pci ... [ OK ] :: Loading module xhci-hcd ... [ OK ] :: Loading module xhci-pci ... [ OK ] :: Loading module usb-storage ... [ OK ] :: Loading kernel modules from extensions ... Loading kmod #0 "hpsa.ko" for pocopico.hpsa (args: ) Loading kmod #0 "vmxnet3.ko" for pocopico.vmxnet3 (args: ) :: Loading kernel modules from extensions ... [ OK ] :: Executing "on_boot" custom scripts ... Running "check-hpsa.sh" for pocopico.hpsa->on_boot Loading module hpsa -> Module hpsa loaded succesfully Ran "check-hpsa.sh" for pocopico.hpsa->on_boot - exit=0 Running "check-vmxnet3.sh" for pocopico.vmxnet3->on_boot Loading module vmxnet3 -> Module vmxnet3 loaded succesfully Ran "check-vmxnet3.sh" for pocopico.vmxnet3->on_boot - exit=0 Running "boot-wait.sh" for redpill-boot-wait->on_boot Confirmed a valid-looking /dev/synoboot device Ran "boot-wait.sh" for redpill-boot-wait->on_boot - exit=0 Running "install_rd.sh" for redpill-misc->on_boot Starting ttyd, listening on port: 7681 Ran "install_rd.sh" for redpill-misc->on_boot - exit=0 :: Executing "on_boot" custom scripts ... [ OK ] Extensions processed insmod: can't insert '/lib/modules/etxhci-hcd.ko': No such file or directory Insert net driver(Mindspeed only)... Starting /usr/syno/bin/synocfgen... /usr/syno/bin/synocfgen returns 0 Insert synorbd kernel module Insert synofsbd kernel module Insert sha256 kernel module All disk ready or timeout execeed Assemble args: -u 724e4f33:087db4e2:3017a5a8:c86610be /dev/sdag1 /dev/sdah1 mdadm: /dev/md0 has been started with 2 drives (out of 12). Partition Version=8 /sbin/e2fsck exists, checking /dev/md0... e2fsck 1.44.1 (24-Mar-2018) /sbin/e2fsck -yvf returns 0 Mounting /dev/md0 /tmpRoot ------------upgrade Begin upgrade procedure Failed to found any patch No upgrade file found ============upgrade ------------bootup-smallupdate Failed to AssertFileKeyValueEqual value1: /etc.defaults/VERSION:smallfixnumber -> 0 value2: /tmpRoot/.syno/patch/VERSION:smallfixnumber => 3 Skip bootup smallupdate, because root is not matched to junior ============bootup-smallupdate Failed to AssertFileKeyValueEqual value1: /etc.defaults/VERSION:smallfixnumber -> 0 value2: /tmpRoot/.syno/patch/VERSION:smallfixnumber => 3 Exit on error [7] root not matched with junior... Tue Sep 20 13:06:30 UTC 2022 /dev/md0 /tmpRoot ext4 rw,relatime,data=ordered 0 0 none /sys/kernel/debug debugfs rw,relatime 0 0 @pocopicothanks for the tip re. ESXi sata devices. I'll rebuild the bootloader again with the suggested settings and try again. At least I understand what the parameters mean now, and how it's interacting with the hardware (virtual and physical). -
Migrating Baremetal to ESXi - Passthrough HDDs or Controller?
WiteWulf replied to WiteWulf's question in Answered Questions
Thanks for the response @Peter Suh I've rebuilt the loader with blank entries as described for SataPortMap and DiskIdxMap in user_config.json { "extra_cmdline": { "pid": "0xa4a5", "vid": "0x0525", "sn": "XXXXXXXXXXXX", "mac1": "XXXXXXXXXXXX", "SataPortMap": "", "DiskIdxMap": "" }, "synoinfo": { "internalportcfg" : "0xffff", "maxdisks" : "16", "support_bde_internal_10g" : "no", "support_disk_compatibility" : "no", "support_memory_compatibility" : "no" }, "ramdisk_copy": { } } The web UI is once again offering to recover (which I've not tried yet). On the command line: SynologyNAS> dmesg | grep -i hpsa [ 20.445717] HP HPSA Driver (v 3.4.14-0) [ 20.447285] hpsa 0000:0b:00.0: MSI-X capable controller [ 20.451250] hpsa 0000:0b:00.0: Logical aborts not supported [ 20.452414] hpsa 0000:0b:00.0: HP SSD Smart Path aborts not supported [ 20.487388] scsi host30: hpsa [ 20.495158] hpsa 0000:0b:00.0: scsi 30:0:0:0: added Direct-Access ATA WDC WD30EFRX-68E PHYS DRV SSDSmartPathCap- En- Exp=1 [ 20.497690] hpsa 0000:0b:00.0: scsi 30:0:1:0: added Direct-Access ATA WDC WD30EFRX-68E PHYS DRV SSDSmartPathCap- En- Exp=1 [ 20.500025] hpsa 0000:0b:00.0: scsi 30:0:2:0: added Direct-Access ATA WDC WD30EFRX-68E PHYS DRV SSDSmartPathCap- En- Exp=1 [ 20.502359] hpsa 0000:0b:00.0: scsi 30:0:3:0: added Direct-Access ATA WDC WD30EFRX-68N PHYS DRV SSDSmartPathCap- En- Exp=1 [ 20.504692] hpsa 0000:0b:00.0: scsi 30:0:4:0: masked Enclosure PMCSIERA SRCv8x6G enclosure SSDSmartPathCap- En- Exp=0 [ 20.507063] hpsa 0000:0b:00.0: scsi 30:3:0:0: added RAID HP P222 controller SSDSmartPathCap- En- Exp=1 All disks seen... SynologyNAS> fdisk -l Disk /dev/synoboot: 1024 MB, 1073741824 bytes, 2097152 sectors 130 cylinders, 255 heads, 63 sectors/track Units: sectors of 1 * 512 = 512 bytes Device Boot StartCHS EndCHS StartLBA EndLBA Sectors Size Id Type /dev/synoboot1 * 0,32,33 6,62,56 2048 100351 98304 48.0M 83 Linux /dev/synoboot2 6,62,57 15,205,62 100352 253951 153600 75.0M 83 Linux /dev/synoboot3 15,205,63 130,138,8 253952 2097151 1843200 900M 83 Linux fdisk: device has more than 2^32 sectors, can't use all of them Disk /dev/sdae: 2048 GB, 2199023255040 bytes, 4294967295 sectors 267349 cylinders, 255 heads, 63 sectors/track Units: sectors of 1 * 512 = 512 bytes Device Boot StartCHS EndCHS StartLBA EndLBA Sectors Size Id Type /dev/sdae1 0,0,1 1023,254,63 1 4294967295 4294967295 2047G ee EFI GPT fdisk: device has more than 2^32 sectors, can't use all of them Disk /dev/sdaf: 2048 GB, 2199023255040 bytes, 4294967295 sectors 267349 cylinders, 255 heads, 63 sectors/track Units: sectors of 1 * 512 = 512 bytes Device Boot StartCHS EndCHS StartLBA EndLBA Sectors Size Id Type /dev/sdaf1 0,0,1 1023,254,63 1 4294967295 4294967295 2047G ee EFI GPT fdisk: device has more than 2^32 sectors, can't use all of them Disk /dev/sdag: 2048 GB, 2199023255040 bytes, 4294967295 sectors 267349 cylinders, 255 heads, 63 sectors/track Units: sectors of 1 * 512 = 512 bytes Device Boot StartCHS EndCHS StartLBA EndLBA Sectors Size Id Type /dev/sdag1 0,0,1 1023,254,63 1 4294967295 4294967295 2047G ee EFI GPT fdisk: device has more than 2^32 sectors, can't use all of them Disk /dev/sdah: 2048 GB, 2199023255040 bytes, 4294967295 sectors 267349 cylinders, 255 heads, 63 sectors/track Units: sectors of 1 * 512 = 512 bytes Device Boot StartCHS EndCHS StartLBA EndLBA Sectors Size Id Type /dev/sdah1 0,0,1 1023,254,63 1 4294967295 4294967295 2047G ee EFI GPT Disk /dev/md0: 2431 MB, 2549940224 bytes, 4980352 sectors 622544 cylinders, 2 heads, 4 sectors/track Units: sectors of 1 * 512 = 512 bytes Disk /dev/md0 doesn't contain a valid partition table Disk /dev/md1: 2047 MB, 2147418112 bytes, 4194176 sectors 524272 cylinders, 2 heads, 4 sectors/track Units: sectors of 1 * 512 = 512 bytes Disk /dev/md1 doesn't contain a valid partition table But naming looks weird ¯\_(ツ)_/¯ Clicking "Recover" in the web UI reboots the VM and brings me back to the same page. It's still stuck in a recovery loop. -
Migrating Baremetal to ESXi - Passthrough HDDs or Controller?
WiteWulf replied to WiteWulf's question in Answered Questions
So if I'm reading the settings TCRP comes up with correctly: SataPortMap=1 DiskIdxMap=10 Does that mean show one disk for SATA port 1? And start naming disks from sdq ( hex 10 = decimal 16, hence the 17th letter of the alphabet, "q", right?) I think I need: SataPortMap=14 But I'm unsure what to do about DiskIdxMap... *edit* I tried with SataPortMap=14 and DiskIdxMap=0A00, with the hope of starting the drive naming on the second adapter (the P222) at sda, but instead I get no sda, and sdb, sdc, sdd and sde It's not showing the bootloader device, at least, but still stuck in a recover loop. -
Migrating Baremetal to ESXi - Passthrough HDDs or Controller?
WiteWulf replied to WiteWulf's question in Answered Questions
Here's some (possibly) relevant dmesg output relating to ATA devices: I found the sataportmap/diskidxmap/sataremap docs on GitHub: https://github.com/cake654326/xpenology/blob/master/synoconfigs/Kconfig.devices -
Migrating Baremetal to ESXi - Passthrough HDDs or Controller?
WiteWulf replied to WiteWulf's question in Answered Questions
lspci output from TCRP: tc@box:~$ lspci -tnnvq -[0000:00]-+-00.0 Intel Corporation 440BX/ZX/DX - 82443BX/ZX/DX Host bridge [8086:7190] +-01.0-[01]-- +-07.0 Intel Corporation 82371AB/EB/MB PIIX4 ISA [8086:7110] +-07.1 Intel Corporation 82371AB/EB/MB PIIX4 IDE [8086:7111] +-07.3 Intel Corporation 82371AB/EB/MB PIIX4 ACPI [8086:7113] +-07.7 VMware Virtual Machine Communication Interface [15ad:0740] +-0f.0 VMware SVGA II Adapter [15ad:0405] +-11.0-[02]----00.0 VMware SATA AHCI controller [15ad:07e0] +-15.0-[03]----00.0 VMware VMXNET3 Ethernet Controller [15ad:07b0] +-15.1-[04]-- +-15.2-[05]-- +-15.3-[06]-- +-15.4-[07]-- +-15.5-[08]-- +-15.6-[09]-- +-15.7-[0a]-- +-16.0-[0b]----00.0 Hewlett-Packard Company Smart Array Gen8 Controllers [103c:323b] So we can see the passthrough adapter at 16.0-[0b]----00.0 I've created a new bootloader with the hpsa driver added and it booted up okay. Following the console output I saw it detect the drives (but they all seem to be SCSI, is this right?), SynologyNAS> dmesg | grep hpsa [ 6.271992] hpsa 0000:0b:00.0: MSI-X capable controller [ 6.273518] hpsa 0000:0b:00.0: Logical aborts not supported [ 6.273827] hpsa 0000:0b:00.0: HP SSD Smart Path aborts not supported [ 6.309877] scsi host1: hpsa [ 6.312591] hpsa 0000:0b:00.0: scsi 1:0:0:0: added Direct-Access ATA WDC WD30EFRX-68E PHYS DRV SSDSmartPathCap- En- Exp=1 [ 6.313671] hpsa 0000:0b:00.0: scsi 1:0:1:0: added Direct-Access ATA WDC WD30EFRX-68E PHYS DRV SSDSmartPathCap- En- Exp=1 [ 6.314855] hpsa 0000:0b:00.0: scsi 1:0:2:0: added Direct-Access ATA WDC WD30EFRX-68E PHYS DRV SSDSmartPathCap- En- Exp=1 [ 6.316852] hpsa 0000:0b:00.0: scsi 1:0:3:0: added Direct-Access ATA WDC WD30EFRX-68N PHYS DRV SSDSmartPathCap- En- Exp=1 [ 6.318856] hpsa 0000:0b:00.0: scsi 1:0:4:0: masked Enclosure PMCSIERA SRCv8x6G enclosure SSDSmartPathCap- En- Exp=0 [ 6.320857] hpsa 0000:0b:00.0: scsi 1:3:0:0: added RAID HP P222 controller SSDSmartPathCap- En- Exp=1 The web interface gave me the "Welcome back" page, said it had found drives that had been moved, and asked if I wanted to recover, which I said okay to. It rebooted, then kernel dumped. Rebooting again it doesn't see drives any more: SynologyNAS> dmesg | grep hpsa [ 6.093779] hpsa 0000:0b:00.0: MSI-X capable controller [ 6.094499] hpsa 0000:0b:00.0: Logical aborts not supported [ 6.095484] hpsa 0000:0b:00.0: HP SSD Smart Path aborts not supported [ 29.377728] hpsa 0000:0b:00.0: failed to enter simple mode Rebooting the VM doesn't seem to fix this, only rebooting the ESXi host. This suggests to me that the P222 card has gone into an error state and needs power cycling? So, power cycling and booting it up again it sees the disks this time and doesn't kernel dump, but asks me to recover. It looks like I'm stuck in a recover loop now. Is this a satamap issue, as the hpsa driver isn't loaded when I run satamap in TCRP and it can't see the drives? satamap output from tcrp as follows: Succesfully installed SCSI modules Found "02:00.0 VMware SATA AHCI controller" Detected 30 ports/1 drives. Mapping SATABOOT drive after maxdisks Found SCSI/HBA "0b:00.0 Hewlett-Packard Company Smart Array Gen8 Controllers (rev 01)" (0 drives) lspci: -s: Invalid slot number Found SCSI/HBA "" (0 drives) lspci: -s: Invalid slot number Found SCSI/HBA "" (0 drives) lspci: -s: Invalid bus number Found SCSI/HBA "" (0 drives) lspci: -s: Invalid slot number Found SCSI/HBA "" (0 drives) lspci: -s: Invalid slot number Found SCSI/HBA "" (0 drives) lspci: -s: Invalid slot number Found SCSI/HBA "" (0 drives) lspci: -s: Invalid slot number Found SCSI/HBA "" (0 drives) lspci: -s: Invalid slot number Found SCSI/HBA "" (0 drives) lspci: -s: Invalid slot number Found SCSI/HBA "" (0 drives) lspci: -s: Invalid slot number Found SCSI/HBA "" (0 drives) lspci: -s: Invalid slot number Found SCSI/HBA "" (0 drives) Computed settings: SataPortMap=1 DiskIdxMap=10 This suggests to me that TCRP is seeing it as a SCSI adapter, rather than a SATA HBA, correct? Do I need to manually specify the satamap parameters? Any suggestions, @Orphée/ @pocopico / @flyride / @Atlas? I'm keen to learn and fix this on my own, but can't seem to find any documentation on how sataportmap actually works, only people asking for help with their configuration and others responding with a working config 🙄 -
Migrating Baremetal to ESXi - Passthrough HDDs or Controller?
WiteWulf replied to WiteWulf's question in Answered Questions
Okay, got the cache card and battery over the weekend! installed the cache and battery moved the SATA cable for the internal drive cage over to the P222 connected a 1x4 SATA tail to the onboard B120i adapter and put the existing 60GB SSD on port 1 (which is 6Gb/s, as opposed to the 3Gb/s port it was on before) booted up I was pleasantly surprised that the P222 was immediately enabled (some reports online that it needs to be powered up for an hour or so for the battery to charge to a point where it's out of an error state and enabled). ESXi booted off the SD card on the motherboard and immediately recognised the SSD with it's datastore (it was on the same HBA, just moved to a different port, so not surprising). Using ssacli from the ESXi command line I put the P222 in HBA mode and checked that all the drives were visible (they were), then configured ESXi to pass it through to the xpenology VM (this was quite complex, so I'll not go into detail here) and deleted the RDM disks. Now the VM boots up and says it can't find any disks, which is to be expected, as I haven't added the hpsa driver to the bootloader yet, which is my next job. -
How to expand volume size in DSM 7 installed on esxi?
WiteWulf replied to W25805's topic in Developer Discussion Room
What I would've done is, rather than expanding an existing disk, create a new disk and add it to the existing storage pool, then expand the volume. But as you're using Basic RAID that's not possible. As DSM formats the disks and adds a variety of different partitions to them behind the scenes (and isn't designed to run in a hypervisor environment) I don't think it will allow you to extend virtual disks. It's possible, I believe, to do this on the cmdline, bypassing DSM's Storage Manager, but it's complex (particularly with btrfs) and you risk losing all your data. Looking at your hardware (Dell R730xd ), are you using some sort of RAID with redundancy at the bare metal level and presenting ESXi with one or more large disks? If you're doing that on the bare metal there's no point doing and redundant RAID in DSM as you're wasting disk space. I'd be inclined to: in ESXi, shrink the virtual disk back down again (or restore the snapshot you took before extending it (you did take a snapshot, right? )) use the space to create a new virtual disk add the new disk to the VM in DSM, create a new Storage Pool (this time using a RAID type that you can extend , like JBOD, or something with protection like SHR (not necessary if you're doing some sort of RAID with protection at the hardware level) with the new disk create a new volume on the new storage pool -
Migrating Baremetal to ESXi - Passthrough HDDs or Controller?
WiteWulf replied to WiteWulf's question in Answered Questions
Another quick update: - bad news: still waiting for the cache card and battery for the P222, so no progress with that, but... - good news: I couldn't wait and decided to try passing through the HDDs in RDM mode to a new DS3622xs+ VM mode and it worked (eventually!) Using TCRP I created a new DS3622xs+ 7.0.1-42218 bootloader in ESXi on sata0:0, and added the four HDDs on sata1:0-3 The first time it booted it wanted to do a clean install and obviously hadn't groked that there was a previous install on the four physical HDDs. I guessed that as I hadn't taken care to configure them in any particular order it might not be reinstating the RAID properly. So I booted the physical server off the old redpill USB stick and made a note of what HDDs (by serial number) were on which SATA port, then went back to ESXi and reconfigured them on the VM in the same order. I rebuilt the TCRP bootloader (I figured satamap may need to be refreshed at a minimum), and this time it correctly identified the disks as having come from a DS365xs and offered to migrate them to the new virtual DS3622xs+. The migration completed after updating a few packages and setting the IP address on the NIC back to static (why do they love to revert back to DHCP?) Upgrading to 7.1.0-42661-1 didn't go very smoothly, though. TCRP "postupdate" identified it as 7.1.0-42661-3 update and it got stuck in a recover loop. I had to create a fresh 7.1.0-42661 bootloader, then reboot and run postupdate *again*. At this point it installed the update correctly (watching what was going on on the serial port), and I was subsequently able to update to 7.1.0-42661-4 "normally". When the cache card arrives I'll move the HDDs over to the P222, configure that as a passthrough adapter, and see what breaks! -
Migrating Baremetal to ESXi - Passthrough HDDs or Controller?
WiteWulf replied to WiteWulf's question in Answered Questions
Hmmm, trying to get the P222 configured in the Gen8 today and running into a few problems. I wanted to use Intelligent Provisioning to update it's firmware, but couldn't launch it. This is typical of a corrupt NAND on the iLO, and can easily be fixed by formatting the NAND (guide here). That sorted, I noticed that there's an iLO firmware update available (2.81, I'm on 2.78), but all download links 404. 2.80 is available so I've installed that instead. Finally got into Intelligent Provisioning and it says the P222 is permanently disabled as there's no cache module present! Well, that showed me. I thought I'd got a bargain with that card (with no cache) for £9, intending to run it without cache, but it won't even run at all without cache. I'll see what I can find on eBay -
Okay, that's confirmed what I thought. The only way you can recover the data from that disk is to mount it in a linux environment as per the guide previously linked to. You cannot access the data on it in another diskstation environment.
-
No, I understood you I don't think it's possible to take the disk in its current form, insert it into a running diskstation with other disks and retain the data on it. Your disk is not simply a disk with a single partition and some data on it, once it's been initialised in a diskstation it has a load of partitions and data on in addition to wherever you store your personal data. If the disk was the *only* disk in the original DS1621 and you insert it into a bare diskstation with no other disks you may be able to migrate the disk and recover the data. As you're using a hypervisor anyway (proxmox, right?), you should be able to test this by making a copy of the disk in question, creating a new diskstation VM and adding the copied disk. See what happens and let us know how it works out
-
As I understand it, *any* volume that is configured in a Synology Diskstation has ~10GB reserved on it that gets a copy of the operating system put on it. If you configure a 21GB (the smallest accepted by DSM, iirc) virtual HDD in your proxmox environment and add it to your disk station VM you'll see it advise you that there is ~11GB usable space on it, the rest is reserved by the OS and gets that copy/backup written to it. This is to ensure the disk station can boot in the event of failed disk(s). Only USB and network storage are the exception to this. As such, I don't think it's possible for a disk/volume that's been in Synology device to only contain your data. However, installing the disk in a linux machine you should be able to mount the partitions on the disk and access the data as per the guide @sbv3000 linked to.
-
Please Help: Can't Update DS918+ on ESXi from 7.0-41890
WiteWulf replied to WiteWulf's question in Answered Questions
Okay, I sorted this in the end, but it's more of a workaround than a fix, I never managed to get 7.0-41890 to upgrade in place to anything newer. In the end I created a new DS3622xs+ VM with TCRP and mounted the HDD from the original DS918+ VM in that. When it booted up it identified the old drive and offered to do a "migrate disks" procedure, which worked and got me to 7.1.0-42661-1. I then ran through the individual updates to get it to 7.1.0-42661-4 Job done. -
where does xpenology store main DSM files?
WiteWulf replied to JakeSully's question in General Questions
The DSM "system" files aren't stored on the USB stick on a running system (the USB stick just contains a bare minimum of files to bootstrap the hardware and get it to pretend that it's Synology hardware, this is essentially the purpose of Redpill). The DSM system files are store on the HDD(s) in your NAS, a copy is stored on every HDD, I believe. If you can't login as root you're probably going to have to mount the drives on a PC booted with a linux livecd and edit the files from within that system. Good luck! -
Yeah, it all depends how that single drive was configured in the "dead" DS1621; it seems odd to only have a single drive in a 6-bay NAS. If it truly was a single drive, or a single drive in a storage pool configured as "basic", you should be able to slot it straight into the new, unpopulated (no drives), DS1621 and it will offer to migrate the data when you power on. If the second DS1621 already has drives in it and is running, though, I'm not sure how it will react to having a drive from another NAS inserted (as the drive from the previous NAS will contain boot and system information). At a guess, it will likely tell you the drive is unusable in it's current state and offer to initialise it for you, at which point you'll lose the data on it.
-
Migrating Baremetal to ESXi - Passthrough HDDs or Controller?
WiteWulf replied to WiteWulf's question in Answered Questions
Well, the migration to the temporary VM completed late last night, and I'm pleasantly surprised how smoothly it went. I'll start rebuilding the Gen8 on Monday when I get chance... -
Migrating Baremetal to ESXi - Passthrough HDDs or Controller?
WiteWulf replied to WiteWulf's question in Answered Questions
I'm finally picking this up again. I've run up a few VMs with TCRP over the last week or so and feel confident with it, so am taking the following approach: - temporarily run a low spec DS6322xs+ VM on another machine with enough storage to migrate the Gen8's DS3615xs to - run the migration (this is nearly complete, migrating 6TB of data over GigE to a USB datastore takes a long time at 300mb/s!) - shut down the Gen8 - install a P222 card - connect the internal drive cage to it - connect a couple of SATA SSDs to the B120i's 6Gb/s ports (I have 4x SATA cable for this) - install ESXi on the Gen8, using the SSDs for datastore and passing through the HDDs on the P222 - build a new DS3622xs+ VM and migrate all the data back again I realise that if the passthrough works properly first time I may be able to simply migrate the disks to the new VM, but the migration to the VM is an insurance policy in case this doesn't work and I lose data somehow. Wish me luck! BTW, there's an eBay seller in the UK doing P222 cards (albeit without cache or half height brackets) for £9 inc. delivery: https://www.ebay.co.uk/itm/143592506228 A bargain if you're looking to upgrade an HP Microserver