WiteWulf
-
Posts
423 -
Joined
-
Last visited
-
Days Won
25
Everything posted by WiteWulf
-

TinyCore RedPill loader (TCRP) - Development release 0.9
WiteWulf replied to pocopico's topic in Developer Discussion Room
I've got a feeling the missing user_config.json may have been part of the failed backup problem, then. Both times I ran this I did a build first, then remembered I hadn't entered the ipsettings in user_config.json. I added the settings and ran the build again, then did 'rploader.sh backup' and both times the backup failed, but I didn't think to mention it. -
Yeah, that summup sounds good. Just remember to configure the HBA as a passthrough PCI device in ESXi, otherwise your guest won't see it. What card you go for is up to you. I went with the P222 because: a) it was cheap (but there was obviously a reason for that, it was missing the battery and cache, which it wouldn't operate without) b) it's an HP device, and the HP firmware sometimes plays more nicely (particularly with power management/fans) with HP devices it recognises c) the P222 doesn't need refreshing to operate in HBA/IT mode, it's a just a command line setting in the management tools d) the P222 cards drivers and management tools are included in the HP custom ESXi images.
-
TinyCore RedPill loader (TCRP) - Development release 0.9
WiteWulf replied to pocopico's topic in Developer Discussion Room
Okay, just say when you're ready to go. I'll grab some lunch, catch up with some $dayjob, and run through it again -
TinyCore RedPill loader (TCRP) - Development release 0.9
WiteWulf replied to pocopico's topic in Developer Discussion Room
One more thing, I booted back into TCRP (rather than TCRPFriend) to check something, and rploader.sh and user_config.json are missing from ~tc (possibly other files, those are the only two I knew to look for. I also noted that the redpill wallpaper was absent, as was the terminal that loops through system settings. Something's not right here.... -
TinyCore RedPill loader (TCRP) - Development release 0.9
WiteWulf replied to pocopico's topic in Developer Discussion Room
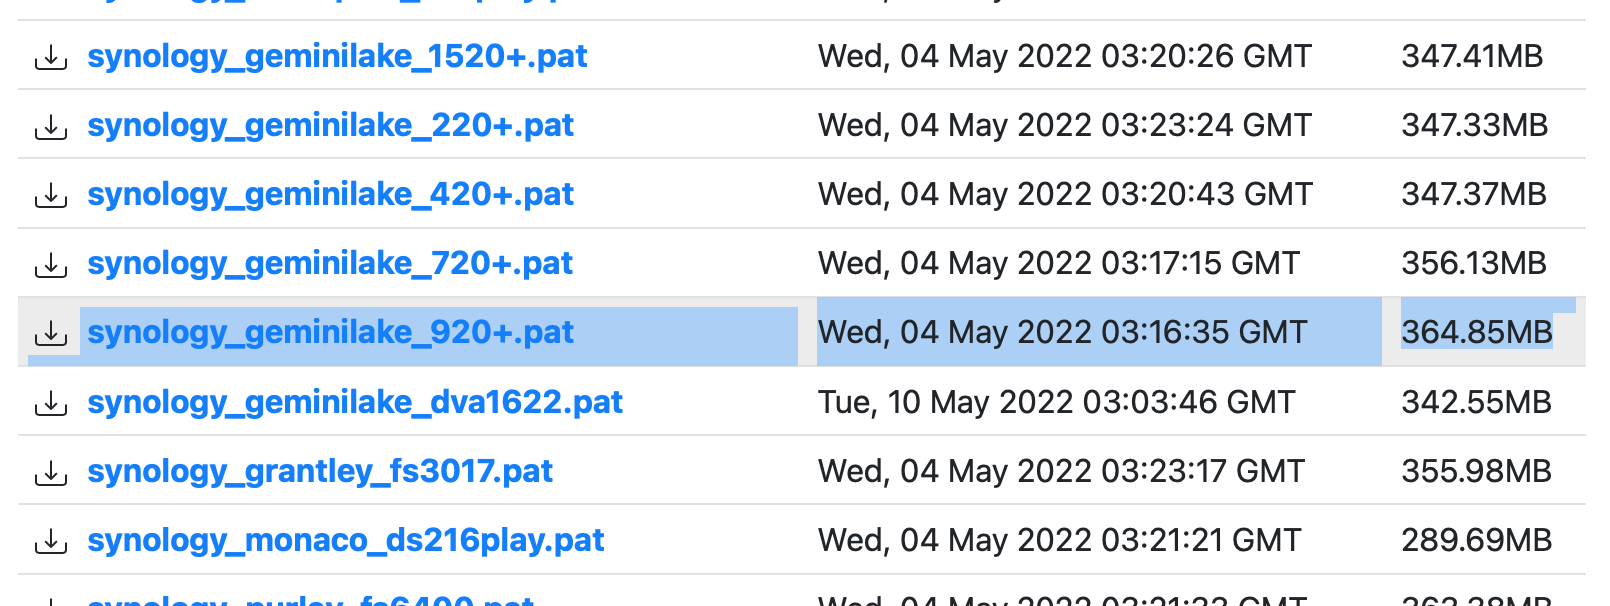
I ran through the procedure a second time and the settings appear to have persisted this time (although still saying No IP when Friend is loaded and failing to check for update). One other strange thing I noted: when doing the first install I used the PAT file listed on archive.synology.com as "7.1-42661 (with Update 1)", but after the install is complete Control Panel states that "DSM 7.1.0-42661 Update 4" is installed. I wasn't sure if I'd installed U4 and not made a note of it the first time around, so I built the server again and it did the same. Has Synology bundled U4 into this without telling anyone, or is something going wrong in TCRP? I'm happy to do another install of 7.1.0 and update to 7.1.1 with a complete list of actions and screen grabs if you want, let me know.
-
TinyCore RedPill loader (TCRP) - Development release 0.9
WiteWulf replied to pocopico's topic in Developer Discussion Room
Cool... I also noticed this on first boot (when I was looking more closely): <screengrab removed as it has my IP address in it> The check for a new version of Friend seems to fail, even though it thinks it's configured... Network settings are set to static [....] Checking for latest friend [...] No IP yet to check for latest friend Then it shows the IP address later on in the output -
TinyCore RedPill loader (TCRP) - Development release 0.9
WiteWulf replied to pocopico's topic in Developer Discussion Room
FYI, after the initial install of 7.1.0-42661 TCRPFriend definitely displayed the configured IP address at boot time. It was only lost after installation of the 7.1.1-42692 update -
TinyCore RedPill loader (TCRP) - Development release 0.9
WiteWulf replied to pocopico's topic in Developer Discussion Room
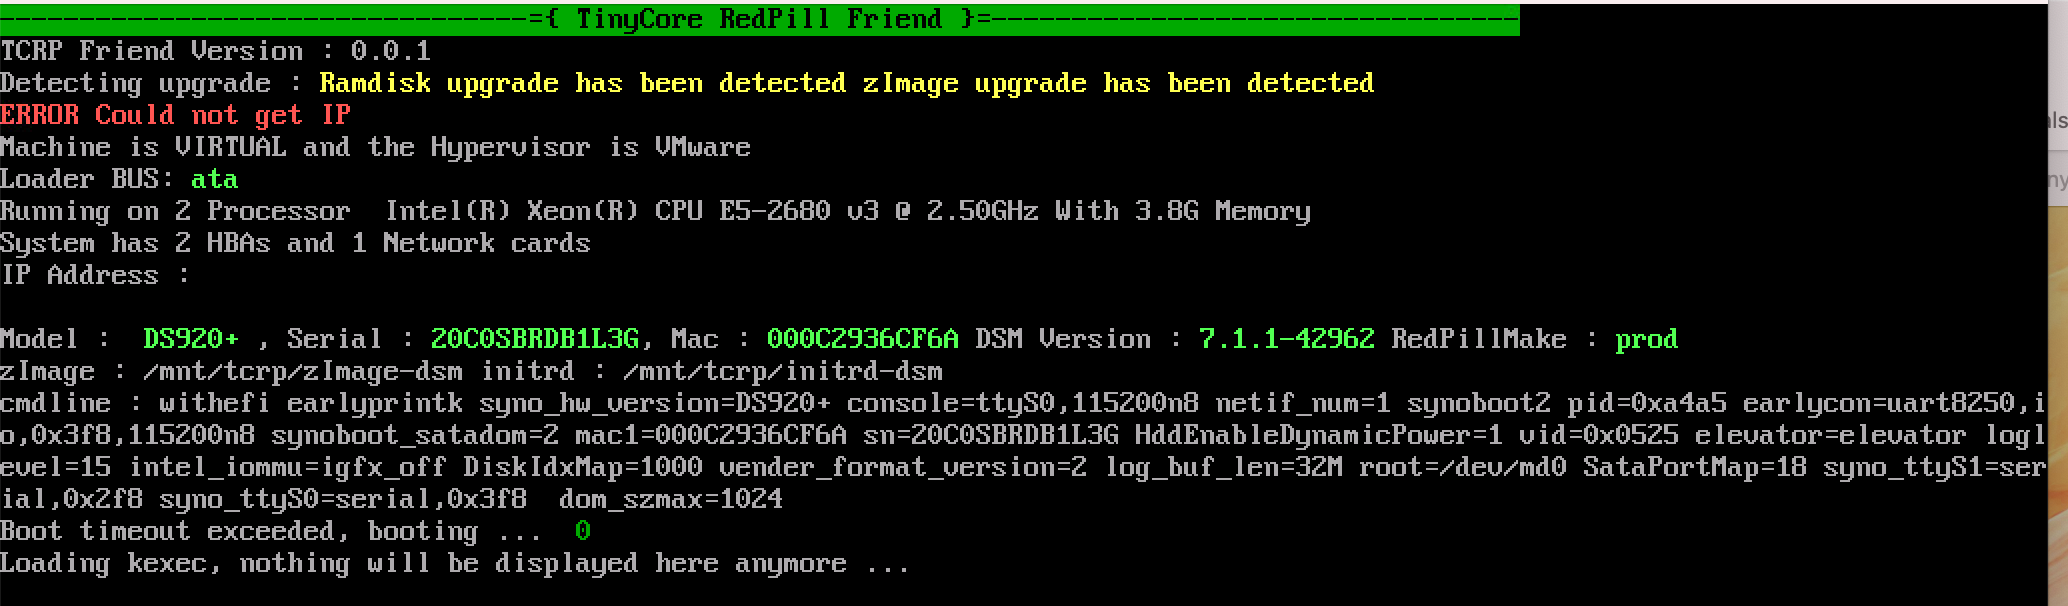
Okay, I installed a test DS920+ on my big ESXi host. Setting up a Synology server in an environment with no DHCP is still a PITA, with lots of having to go to the Synology Assistant on a device on the same LAN to force an IP configuration to it (I had to do this two or three times during setup, iirc). But I got 7.1.0-42661-4 installed with a bare configuration, then installed 7.1.1-42692 and rebooted. TCRPFriend seems to have worked, as the server is up and running with the target DSM version, but the console output at boot time is confusing as it says "ERROR Could not get IP" and lists no IP address(es) for the NIC (see screenshot). This behaviour persists through subsequent reboots but, strangely, when booting into TCRP (rather than TCRPFriend) it has the correct configuration. I thought you said TCRP needed to be manually configured each time? I booted into TCRP to check and see if user_config.json still had my network settings in it, and they're gone, it's blank again. Did the upgrade to 7.1.1-42692 wipe them out?
-
TinyCore RedPill loader (TCRP) - Development release 0.9
WiteWulf replied to pocopico's topic in Developer Discussion Room
Okay, I understand. I was expecting TCRP to use them to, but if TCRPFriend works properly I guess I shouldn't need to boot into TCRP again (and it's not a big deal to manually configure it when necessary). TCRPFriend was the really important part, to facilitate automatic upgrades, so that's looking good. I'm just about to upgrade this test machine, I'll let you know how it goes. -
TinyCore RedPill loader (TCRP) - Development release 0.9
WiteWulf replied to pocopico's topic in Developer Discussion Room
@pocopico re. static IP config, I'm not sure what I'm doing wrong here. I've booted into a fresh VM with a newly downloaded (five minutes ago) tinycore-redpill.v0.9.2.7.vmdk.gz. I can see the new ipsettings stanza in user_config.json, and I've edited it to have my settings, but when I reboot the settings are lost and the VM still has no networking. Do I still need to manually configure TCRP's network settings, and these only affect TCRPFriend and "normal" booting of the xpenology system? -
You should have a read through this thread, where I worked through a very similar problem to yourself with help from other Gen8 users: Running on ESXi gives you a few advantages: - simplified hardware/driver support with Xpenology - use "spare" CPU and RAM resource for other VMs if you have any You're better off passing the HDDs (or the controller) through to the guest and letting DSM manage the RAID, imho. DSM's RAID options are very flexible. However, RDM (passing through individual HDDs) has slow performance. It works better if you pass through the SATA controller and let DSM access it directly. But, if you pass the onboard controller through you can't keep datastores on storage attached to that controller (as ESXi can no longer see it). This is why you need an additional storage controller: one to keep the ESXi host datastore on, and one to pass through to the Xpenology guest. Another performance element to bare in mind: only ports 1 and 2 on the onboard SATA controller are 6gb/s, the second two HDDs and the ODD port are only 3gb/s. As you've already read elsewhere: get a P222 (or similar HBA that can be operated on IT mode), move the HDDs to that and put the SSD(s) on ports 1 and 2 on the onboard controller.
-
TinyCore RedPill loader (TCRP) - Development release 0.9
WiteWulf replied to pocopico's topic in Developer Discussion Room
Yes, that looks good. I take it you're inferring broadcast address from the netmask specified in ipaddr? They don't always align, but that's an even more niche case I'll give this a try tomorrow when I'm back on-site where this is required 👍 -
TinyCore RedPill loader (TCRP) - Development release 0.9
WiteWulf replied to pocopico's topic in Developer Discussion Room
Peter's got most of it. The only other one I can think of (for network environments that are even more locked down than mine) is a http proxy, but that would also need to be supported by the scripts and tools, so may be outside the scope of this. -
TinyCore RedPill loader (TCRP) - Development release 0.9
WiteWulf replied to pocopico's topic in Developer Discussion Room
Hi @pocopico, I'm just having a look at the developer train of TCRP now and starting to familiarise myself with TCRP Friend. I have a couple of questions relating to what is likely a very rare/niche use case: - does TCRP Friend need internet/network access to operate? - if so, is/would it be possible to use a config file to provide statically configured NIC settings rather than relying on DHCP? The reason I ask is that a couple of my production servers live on a datacenter network that has no DHCP, by design. All devices connected to this network must be statically configured. TCRP works as I can manually configure it each time I boot into the graphical environment using System Tools->Control Panel->Network, although it would admittedly be really useful to have a permanent network config file for TCRP use, too. -
How to expand volume size in DSM 7 installed on esxi?
WiteWulf replied to W25805's topic in Developer Discussion Room
Yes, you can use JBOD in DSM, but it's referred to as "Basic" RAID. Remember a big limitation of JBOD (that bit me in the arse recently): it has no fault tolerance (obviously), but be aware this means you cannot remove a disk from the array without losing all data. -
I think this is something of a watershed moment for TCRP and Redpill. Congratulations on the achievement and thank you for all the hard work that's been put into this @pocopico (and @ThorGroup, wherever you may be these days).
-
I could be wrong, but I don't think the release version of TCRP supports 7.1.1 yet. If you're using TCRP 0.8.x.x you'll have to stick to 7.1.0 builds. If you want 7.1.1 builds you'll need to be in the developer version of TCRP, 0.9.x.x
-
It really depends on what you want to use the NAS for, and how many users will be using it simultaneously. If all you're intending to use it for is network attached storage with a couple your requirements will be pretty low, CPU and RAM wise. But if you add in a media server, audio and video transcoding, CCTV, VPN endpoint, Photos storage, docker host etc. then you'll need more of everything. I can't recommend USB storage for anything other than local backup (although some may disagree). While you can get decent throughput reading or writing a single file, USB attached storage slows down very quickly as you try to access more files simultaneously (serial vs parallel file access). I'm not talking about multiple users here, but multiple processes on the NAS wanting access to storage and increasing latency. You also lose the ability create any sort of redundant storage pools with USB storage, which is one of the main reasons for using a system like Synology. FWIW I run Xpenology on a Lenovo Tiny M7 (a very small form factor PC) within ESXi, with an M2 SATA disk and a regular 3.5" SATA HDD for storage and it's great for running a TailScale VPN endpoint, a few docker containers and as a Time Machine backup for my Mac. But my Plex servers are all run on proper server hardware with multiple HDDS configured as fast, redundant RAID arrays. Horses for courses as we say
-
TinyCore RedPill loader (TCRP) - Development release 0.9
WiteWulf replied to pocopico's topic in Developer Discussion Room
I've been meaning to ask for a while now: what is the correct sequence of actions when performing a DSM update with TCRP? Install the update in DSM (obviously), but when it comes to reboot do you immediately choose TCRP at the grub prompt and run postupdate, or do you let it run the install post-reboot, *then* reboot and go into TCRP and run postupdate? -
I run LibreNMS (a free implementation of Observium) running in a docker container on the DSM itself. This also monitors other bits of network kit around the house, and some servers elsewhere. I'm running DSM on an ESXi host (which is also monitored in LibreNMS) on an HP Gen8, whose iLO exposes hardware data via IPMI which can be added in alongside an SNMP entry. https://www.librenms.org Librenms "knows" about Synology devices and what hardware and software components to monitor and alert on.
-
You can find all the Synology DSM PAT files here: https://archive.synology.com/download/Os/DSM
-
Can you give the output from the command you issued in Step 2, rather than just "that didn't work" Also Jadahl hosts his server on his home broadband, I think, so it tends to be up and down a lot. Just keep trying and it'll be back eventually.
-
DS3622xs+ (broadwellnk) will run on any x86_64 architecture. Bromolow is for DS3615xs, which you shouldn’t be using anymore on redpill due to kernel panics. I’d recommend DS3622xs+ for baremetal or virtualised operation on a Gen8, as newer Synology platforms such DS918 and DS920 require more modern CPUs.
-
I'm trying to figure out how to make the best use of a relatively small NVMe SSD and larger spinning HDD in the ESXi host I run one of my xpenology systems on. After doing some digging about I think I've got it figured and wanted to share in the hopes it may be useful. All of the following assumes your are not using any hardware RAID on your host system, and are passing the physical or virtual disks straight through to DSM DSM stores a copy of the system files on every HDD (physical or virtual) that the system can see, to ensure there's always a working version of the OS (if not all the user data) if there should be a HDD failure. On the system I've been testing with I have a relatively small (30GB) virtual disk on the SSD that was the only disk present when I built the initial DSM install. Storage Manager reports only 18.2GB of usable space in the volume/storage pool created with it, so there's obviously a relatively large amount of space reserved for system files on there. I subsequently added 100GB and 500GB virtual disks (both on a 1TB SATA HDD in the ESXi host). Storage Manager presents these as 85.4GB and 469.4GB volumes respectively. It would appear that DSM reserves a variable amount of space, but not one that's consistent as a percentage of the disk size. We've got, roughly: 11.8GB of 30GB or 39% 14.4GB of 100GB or 14.4% 30.6GB of 500GB or 6% ...reserved on each disk. I install all my DSM Apps, and keep docker containers and data, on the SSD volume to ensure they're as fast as can be, but how does the system know/choose which copy of the OS to boot from and use from the many disks in most systems? Looking at the output of 'cat /proc/mdstat': dsm2:~$ cat /proc/mdstat Personalities : [raid1] [linear] md2 : active raid1 sata2p3[0] 20732928 blocks super 1.2 [1/1] [U] md4 : active raid1 sata3p3[0] 513563648 blocks super 1.2 [1/1] [U] md3 : active linear sata1p3[0] 94133248 blocks super 1.2 64k rounding [1/1] [U] md1 : active raid1 sata1p2[0] sata3p2[2] sata2p2[1] 2097088 blocks [16/3] [UUU_____________] md0 : active raid1 sata1p1[0] sata3p1[2] sata2p1[1] 8388544 blocks [16/3] [UUU_____________] I can see four RAID1 (mirrored) sets (md0, md1, md2 and md4), where md0 and md1 are on all three disks, and md4 and md5 are on single disk. There's also a linear/JBOD set on a single disk, md3. DSM uses /dev/mapper to map these block devices onto user visible volumes. We can see the this in the output of 'sudo dmsetup deps -o devname': vg1-syno_vg_reserved_area: 1 dependencies : (md2) vg2-syno_vg_reserved_area: 1 dependencies : (md3) cachedev_2: 1 dependencies : (vg1-volume_1) vg3-volume_3: 1 dependencies : (md4) cachedev_1: 1 dependencies : (vg2-volume_2) cachedev_0: 1 dependencies : (vg3-volume_3) vg2-volume_2: 1 dependencies : (md3) vg3-syno_vg_reserved_area: 1 dependencies : (md4) vg1-volume_1: 1 dependencies : (md2) ...and of 'df -h': Filesystem Size Used Avail Use% Mounted on /dev/md0 7.9G 1.7G 6.1G 22% / devtmpfs 2.0G 0 2.0G 0% /dev tmpfs 2.0G 124K 2.0G 1% /dev/shm tmpfs 2.0G 20M 1.9G 1% /run tmpfs 2.0G 0 2.0G 0% /sys/fs/cgroup tmpfs 2.0G 632K 2.0G 1% /tmp /dev/mapper/cachedev_2 19G 5.0G 14G 28% /volume1 /dev/mapper/cachedev_0 470G 120G 350G 26% /volume3 /dev/mapper/cachedev_1 86G 3.3G 83G 4% /volume2 So it would appear that: - md0 is a 7.9GB RAID1 volume containing the OS that is present on every disk in the system and mounted as / - md1 is a 2GB RAID1 volume again spread across all disks. I think this used for devtmpfs - md2 is a 19GB RAID1 volume with a single disk (on my SSD) visible to the user as /volume1 - md3 is a 86GB linear/JBOD volume with a single disk (on my SATA HDD) visible to the user as /volume2 - md4 is a 470GB RAID1 volume with a single disk (on my SATA HDD) visible to the user as /volume3 I still wasn't clear why the amount of data reserved on each member disk for the md0 RAID1 set seemed inconsistent, or what the logic behind it is. So I looked at the partitions for each disk: sudo fdisk -l /dev/sata1 Password: Disk /dev/sata1: 100 GiB, 107374182400 bytes, 209715200 sectors Disk model: Virtual SATA Hard Drive Units: sectors of 1 * 512 = 512 bytes Sector size (logical/physical): 512 bytes / 512 bytes I/O size (minimum/optimal): 512 bytes / 512 bytes Disklabel type: dos Disk identifier: 0x51a58d33 Device Boot Start End Sectors Size Id Type /dev/sata1p1 8192 16785407 16777216 8G fd Linux raid autodetect /dev/sata1p2 16785408 20979711 4194304 2G fd Linux raid autodetect /dev/sata1p3 21241856 209510399 188268544 89.8G fd Linux raid autodetect garyp@dsm2:/dev$ sudo fdisk -l /dev/sata2 Disk /dev/sata2: 30 GiB, 32212254720 bytes, 62914560 sectors Disk model: Virtual SATA Hard Drive Units: sectors of 1 * 512 = 512 bytes Sector size (logical/physical): 512 bytes / 512 bytes I/O size (minimum/optimal): 512 bytes / 512 bytes Disklabel type: dos Disk identifier: 0xdaa5db65 Device Boot Start End Sectors Size Id Type /dev/sata2p1 8192 16785407 16777216 8G fd Linux raid autodetect /dev/sata2p2 16785408 20979711 4194304 2G fd Linux raid autodetect /dev/sata2p3 21241856 62709759 41467904 19.8G fd Linux raid autodetect garyp@dsm2:/dev$ sudo fdisk -l /dev/sata3 Disk /dev/sata3: 500 GiB, 536870912000 bytes, 1048576000 sectors Disk model: Virtual SATA Hard Drive Units: sectors of 1 * 512 = 512 bytes Sector size (logical/physical): 512 bytes / 512 bytes I/O size (minimum/optimal): 512 bytes / 512 bytes Disklabel type: dos Disk identifier: 0xae6ebcf7 Device Boot Start End Sectors Size Id Type /dev/sata3p1 8192 16785407 16777216 8G fd Linux raid autodetect /dev/sata3p2 16785408 20979711 4194304 2G fd Linux raid autodetect /dev/sata3p3 21241856 1048371199 1027129344 489.8G fd Linux raid autodetect We can now see that each disk has a uniform space allocation! There's an 8GB partition for the OS, a 2GB partition for devtmpfs, and the rest exposed to DSM for use. I think the additional "missing" space must be filesystem overhead. As I'm using btrfs here, that's understandable: https://btrfs.wiki.kernel.org/index.php/FAQ#Why_is_there_so_much_space_overhead.3F It would appear that my efforts to create a fast OS drive on the SSD were in vain, as the OS data is mirrored across disks in the system. As I understand RAID, this would mean reads will benefit from the fastest disk, but writes will be constrained by the slower SATA HDD. So, in summary: - you'll always lose at least 10GB of whatever disk you put in your Xpenology system - you can lose all but one of the disks and the system will still boot - when mixing different disk types, OS (not user data) read speeds are dictated by the fastest device - OS write speeds are dictated by the slowest device - your data is not protected in the same way unless you choose to create redundancy in your storage pools! I hopeful this little exploration proves useful to some of you....
-
7.1 Install loop
WiteWulf replied to sandyring's topic in General Installation Questions/Discussions (non-hardware specific)
Hi @sandyring, I'm also running a Gen8 here that was originally on Jun's loader, but got migrated to redpill in the early days. While DS3615xs runs well on Jun's loader it's proven to be very unstable (in a reproducible manner) on redpill: https://github.com/RedPill-TTG/redpill-lkm/issues/21 As such, you're better of emulating a DS3622xs+ on Gen8 hardware. I'd recommend you follow flyride's tutorial here: ...then build a broadwellnk/DS3622xs+ bootloader for 7.0.1-42661. You may need to specify the tg3 driver to get the onboard NICs working. (NB. DSM 7.1 is only supported on the development version of TCRP at present, it'll come to the release version shortly). Although you were previously emulating a DS3615xs, the system will boot up, see your existing disks with DSM data on them, and offer to migrate. It thinks you've moved the disks physically from a DS3615xs to a new DS3622xs+- 1 reply
-
- 1
-