

ideasman69
-
Posts
117 -
Joined
-
Last visited
-
Days Won
2
Posts posted by ideasman69
-
-
From both a performance and reliability standpoint. I'd always opt for both over having a disk appear as disk 1 instead of disk 2 or 3 - but that's just me.
performance/reliability vs appearance 🤷♂️
-
Thanks for all your testing and results @flyride. From previous experience with proxmox, I'm going to stick with the q35 option and just deal with the drive numbering offset.
q35 should be picked when passing through PCIe devices, but each to their own of course
")
-
...but it doesn't with the SAS controller.
i've got an identical setup in my homelab. proxmox VM but instead of passing through an 8 port HBA, i'm passing through 2 x standard AHCI controllers. The satamap options do work on that.
-
22 minutes ago, pocopico said:
see, but why you have sata for boot ? In proxmox that the TTH was initially targeting has the USB boot ability. You can set your VM to boot from a USB loader and then you could probably remove the sata HBA
you can't get rid of them though. If i switch to the USB loader, it gets rid of one of them - but the first one always remains. @phone guy is using the virtual USB loader and his disks start at disk 2. because I'm using the loader via a SATA port, my disks start at disk 3.
i prefer this method as the bootloader image gets backed up along with the VM.
-
8 hours ago, pocopico said:
Your better option then is to use DiskIdxMap and sata_remap to move disk number around. They should work on 3622 as they did in the past
I'd love to, but like @phone guy says - it doesn't seem to work on proxmox.
When i run rploader satamap, it finds the three controllers:
- intel sata (no disks attached)
- intel sata (redpill image attached)
- sas hba (8 disks attached)
I set the two intel controllers to 1 disk each which generates this:
"SataPortMap": "118",
"DiskIdxMap": "000102"In the past i'd use this to map the sas controller to start at 00, the second intel controller to start at disk 9 and the first controller to start at disk 10:
"SataPortMap": "118",
"DiskIdxMap": "090800"But the sas controller seems to totally ignore this mapping
-
Ah ok. I’m currently using the 3622 build which seems to support the expansion. Although adding the sasidxmap setting to the user_config makes no difference.
My sas connected disks start at disk 3 as I’m using the bootloader in SATA0 (rather than the virtual usb stick). KVM/proxmox makes one sata controller when there are no disks and then another for when there are disks.
I’ve just set my satamap to 11 as trying to set the unused controller to 0 causes a panic.
-
14 hours ago, phone guy said:
@pocopico@flyride Since you guys are deep in the satamap right now, any clue why VM (proxmox) build with HBA pci pass thru (8i card) always starts at disk 2? Never starts adding drives at disk 1. There is no other sata controller being issued to VM, no emu hdd, only the LSI 8i card pass thru pci 01:00 but any added hdd start appearing at slot #2
i came to post the same question but it looks like you guys are all over it!
I've been playing around with it for hours without any luck. Should the SasIdxMap=0 option still work in redpill? This old post by @jun says:
On 8/5/2018 at 10:34 AM, jun said:SasIdxMap make SAS controller start from disk 0
-
1 hour ago, phone guy said:
DS3622+ acpi shutdown working (for me) was
./rploader.sh ext broadwellnk-7.1.0-42661 add https://raw.githubusercontent.com/dodo-dk/rp-ext/main/acpid/rpext-index.jsonawesome, thanks mate ill give this a shot! Will you add that to your proxmox guide??
also - why does everyone seem to go down the virtual usb route with proxmox? I've found the following very easy:
- upload any of the images from the github (bios img, uefi img or vmdk) and upload to local -> iso images
- run qm importdisk {vmid} /var/lib/vz/template/iso/tinycore-redpill-uefi.v0.4.6.img local-lvm via shell
- assign it to SATA0 in the VM hardware settings
Does the virtual USB method have any advantages over using the bootloader in the virtual SATA controller?
-
On 5/14/2022 at 11:35 AM, phone guy said:
Use putty to SSH into tcrp to build the loader, The main thing when building if you used virtualized nic card, add the v9fs ext to get network port working, use this command before executing the redpill build command in putty.
./rploader.sh ext <build platform> add https://raw.githubusercontent.com/pocopico/rp-ext/master/v9fs/rpext-index.json
would this be a better package to use for virtio?
https://github.com/pocopico/redpill-load/raw/develop/redpill-virtio/rpext-index.json
QuoteThis extension adds support for fast para-virtualized devices in hypervisors supporting VirtIO. The following features are supported:
- MMIO-mapped devices
- PCI(e) passthrough devices
- Ethernet devices
- SCSI/SATA storage
Then again, looking through the v9fs files, it does mention the same modules and more:
"kmods": { "virtio.ko": "", "virtio_ring.ko": "", "virtio_mmio.ko": "", "virtio_pci.ko": "", "virtio_blk.ko": "", "virtio_net.ko": "", "virtio_scsi.ko": "", "9pnet.ko": "", "9pnet_virtio.ko": "", "9p.ko": "" },-
 2
2
-
3 minutes ago, phone guy said:
I believe there was a "Lost in translation" moment somewhere when the guides were being written. But as of now, you only have to build for 42661
oh cool, thanks.
i dont know if the acpid module is working for me as my proxmox "shutdown" button doesnt do anything
-
On 5/14/2022 at 6:46 AM, howudodat said:
Trying to isntall 3622xs+ on proxmox using the below steps:
install tcrp:./rploader.sh update now ./rploader.sh fullupgrade now ./rploader.sh serialgen DS3622xs+ ./rploader.sh identifyusb now ./rploader.sh satamap now ./rploader.sh build broadwellnk-7.0.1-42218 ./rploader.sh clean now ./rploader.sh ext broadwellnk-7.1.0-42661 add https://github.com/pocopico/redpill-load/raw/develop/redpill-virtio/rpext-index.json ./rploader.sh ext broadwellnk-7.1.0-42661 add https://github.com/pocopico/redpill-load/raw/develop/redpill-acpid/rpext-index.json ./rploader.sh build broadwellnk-7.1.0-42661
Can anyone explain why most of the guide I see have 2 seperate build commands? Like this one quoted above... a build command for 7.0.1 and then another for 7.1.0?
Is there any reason why we couldn't just do the following?
./rploader.sh update now
./rploader.sh fullupgrade now
./rploader.sh serialgen DS3622xs+
./rploader.sh identifyusb now
./rploader.sh satamap now
./rploader.sh ext broadwellnk-7.1.0-42661 add https://github.com/pocopico/redpill-load/raw/develop/redpill-virtio/rpext-index.json
./rploader.sh ext broadwellnk-7.1.0-42661 add https://github.com/pocopico/redpill-load/raw/develop/redpill-acpid/rpext-index.json
./rploader.sh backup now
./rploader.sh build broadwellnk-7.1.0-42661
-
8 hours ago, pocopico said:
It looks to me like CPU emulation issue. Please follow @haydibeguide. You may find it in his signature.
thanks mate. I used his guide which produced a VM identical to mine... it ended up being my satamap. I had it 0 for the VM's sata controller that had no drives attached. once I set it to 6, it booted 😕
i spent hours on that!
-
4 hours ago, -iliya- said:
problem with last rploader.sh
curl: (60) SSL certificate problem: certificate is not yet valid
More details here: https://curl.haxx.se/docs/sslcerts.htmlcurl failed to verify the legitimacy of the server and therefore could not
establish a secure connection to it. To learn more about this situation and
how to fix it, please visit the web page mentioned above.
chown: cannot access 'custom_config.json': No such file or directory
chown: cannot access 'global_config.json': No such file or directory
chown: cannot access 'modules.alias.3.json.gz': No such file or directory
chown: cannot access 'modules.alias.4.json.gz': No such file or directory
chown: cannot access 'rpext-index.json': No such file or directory
chown: cannot access 'user_config.json': No such file or directory
chown: cannot access 'dtc': No such file or directory
chown: cannot access 'rploader.sh': No such file or directory
chown: cannot access 'ds1621p.dts': No such file or directory
chown: cannot access 'ds920p.dts': No such file or directory
gzip: modules.alias.*.gz: No such file or directory
chmod: cannot access 'rploader.sh': No such file or directory
Please make sure you are using the latest 1GB img before using backup option
Current /home/tc size is 3.6M , try to keep it less than 1GB as it might not fit into your image
Should i update the sdf with your current files [Yy/Nn]the time/date isn't set in your tinycore instance
-
Hi guys,
I'm having NO luck with redpill on proxmox. I've tried a number of methods:
- qm importdisk the vmdk and assigning it to SATA0
- both the bios and uefi IMG files as virtual usb devices like in this post
- with and without the virtio modules
- different versions and models (ie 918+, DS3622xs+, 7.0.1, 7.1 etc)
The TinyCore Image Builder loads up fine. I can go through the update/generate process. Once I reboot out of TinyCore and attempt to load the appropriate RedPill option from the boot menu - it always panics in the exact same spot when loading ahci:
[    2.117175] ahci 0000:00:1f.2: version 3.0
[    2.118230] ahci 0000:00:1f.2: AHCI 0001.0000 32 slots 6 ports 1.5 Gbps 0x3f impl SATA mode
[    2.119318] ahci 0000:00:1f.2: flags: 64bit ncq only
[    2.119953] BUG: unable to handle kernel NULL pointer dereference at 0000000000000120
[    2.120301] IP: [<ffffffff813ffefe>] ata_host_start.part.37+0x18e/0x1b0
[    2.121399] PGD 0
[    2.121399] Oops: 0000 [#1] SMP
[    2.121399] Modules linked in: redpill(OE)
[    2.121399] CPU: 1 PID: 1 Comm: swapper/0 Tainted: G           OE   4.4.180+ #42661
[    2.121399] Hardware name: QEMU Standard PC (Q35 + ICH9, 2009), BIOS rel-1.15.0-0-g2dd4b9b3f840-prebuilt.qemu.org 04/01/2014
[    2.125182] task: ffff88007b108000 ti: ffff88007b110000 task.ti: ffff88007b110000
[    2.125182] RIP: 0010:[<ffffffff813ffefe>]  [<ffffffff813ffefe>] ata_host_start.part.37+0x18e/0x1b0
[    2.125182] RSP: 0018:ffff88007b113be8  EFLAGS: 00010246
[    2.125182] RAX: 0000000000000000 RBX: ffff8800351d23d8 RCX: 0000000000000080
[    2.125182] RDX: 0000000000000000 RSI: 000000000000001c RDI: 0000000000000000
[    2.125182] RBP: ffff88007b113c10 R08: ffffffff818a9c60 R09: 0000000000000040
[    2.125182] R10: 00000000000000fa R11: ffffffff81a056ad R12: ffff8800351d23d8
[    2.131324] R13: 000000000000001c R14: ffffffff81428cf0 R15: ffffffff818a9c60
[    2.131324] FS:  0000000000000000(0000) GS:ffff88007dd00000(0000) knlGS:0000000000000000
[    2.131324] CS:  0010 DS: 0000 ES: 0000 CR0: 0000000080050033
[    2.131324] CR2: 0000000000000120 CR3: 00000000357c0000 CR4: 00000000001606f0
[    2.131324] Stack:
[    2.131324]  ffff8800351d23d8 ffff8800351d23d8 000000000000001c ffffffff81428cf0
[    2.131324]  ffffffff818a9c60 ffff88007b113c58 ffffffff81406176 0000000000000202
[    2.131324]  0000000000000080 ffff8800351d23d8 ffff8800351d23d8 000000000000001c
[    2.131324] Call Trace:
[    2.131324]  [<ffffffff81428cf0>] ? ahci_handle_port_intr+0x90/0x90
[    2.131324]  [<ffffffff81406176>] ata_host_activate+0xb6/0x110
[    2.131324]  [<ffffffff81428dfd>] ahci_host_activate+0x4d/0x180
[    2.131324]  [<ffffffff81313a5a>] ? pcibios_set_master+0x5a/0x80
[    2.131324]  [<ffffffff81425ef9>] ahci_init_one+0x9a9/0xdf0
[    2.131324]  [<ffffffff81315d50>] pci_device_probe+0x90/0x100
[    2.131324]  [<ffffffff8139d50a>] driver_probe_device+0xba/0x260
[    2.131324]  [<ffffffff8139d729>] __driver_attach+0x79/0x80
[    2.131324]  [<ffffffff8139d6b0>] ? driver_probe_device+0x260/0x260
[    2.131324]  [<ffffffff8139b7e9>] bus_for_each_dev+0x69/0xa0
[    2.131324]  [<ffffffff8139cf59>] driver_attach+0x19/0x20
[    2.131324]  [<ffffffff8139cbac>] bus_add_driver+0x19c/0x1e0
[    2.131324]  [<ffffffff81932b91>] ? ata_sff_init+0x31/0x31
[    2.131324]  [<ffffffff8139decb>] driver_register+0x6b/0xc0
[    2.131324]  [<ffffffff813147f1>] __pci_register_driver+0x41/0x50
[    2.131324]  [<ffffffff81932baa>] ahci_pci_driver_init+0x19/0x1b
[    2.131324]  [<ffffffff81000340>] do_one_initcall+0x80/0x130
[    2.131324]  [<ffffffff818f56e7>] ? do_early_param+0x90/0x90
[    2.131324]  [<ffffffff818f5faf>] kernel_init_freeable+0x14d/0x1de
[    2.131324]  [<ffffffff8155e50d>] ? rest_init+0x74/0x74
[    2.131324]  [<ffffffff8155e516>] kernel_init+0x9/0xd3
[    2.131324]  [<ffffffff81563baf>] ret_from_fork+0x3f/0x80
[    2.131324]  [<ffffffff8155e50d>] ? rest_init+0x74/0x74
[    2.131324] Code: 39 80 16 00 48 83 eb 08 41 83 ec 01 45 85 e4 79 db 4c 89 f7 e8 c4 10 fa ff 44 89 f8 5b 41 5c 41 5d 41 5e 41 5f 5d c3 48 8b 43 28 <48> 83 b8 20 01 00 00 00 0f 85 f4 fe ff ff e9 67 ff ff ff 41 bf
[    2.131324] RIP  [<ffffffff813ffefe>] ata_host_start.part.37+0x18e/0x1b0
[    2.131324]  RSP <ffff88007b113be8>
[    2.131324] CR2: 0000000000000120
[    2.131324] ---[ end trace b4d1009b2d916780 ]---
[    2.160499] Kernel panic - not syncing: Attempted to kill init! exitcode=0x00000009
[    2.160499]
[    2.161484] Kernel Offset: disabled
[    2.161484] ---[ end Kernel panic - not syncing: Attempted to kill init! exitcode=0x00000009
[    2.161484]
I believe the ahci controller at 0000:00:1f.2 is the default KVM sata controller which doesn't have an option to remove. I've tried attaching the loader to SATA0. Tried passing through 2 different types of physical AHCI controllers but it always panics here.
I had no troubles going through the process on ESXi on this exact same hardware, as well as baremetal on this same hardware.
Does anyone have any ideas what I might be missing?
-
run the date command in your ssh session and see what it's set to.
my vm was set to 2015 for some reason so any https request would fail as the certificates aren't valid yet.
i just ran ntpd -p north-america.pool.ntp.org -q to grab the correct time
-
1
-
-
and hate to be that guy... but you really missed all these at the top of your browser?

-
Thanks for this guide! I've had DSM5 installed on a kimsufi KS-1 server for a couple years now. Someone made a synboot.img file for DSM5 that was a single partition and fit perfectly in between two of the synology created partitions. I could never get the DSM6 bootloader working until now - so thanks a bunch.
If you create your bootloader partition on the other unused area - you won't get any issues within the Synology GUI:
I tried to get the DSM6.2 bootloader working but even after copying the extra files from both synboot.img partitions to the newly created partition, it doesn't seem to boot.
-
yeah they're awesome and they do a great job. just stick with loader 1.02b and DSM 6.1x
-
sorry i still dont understand. I have a 1.04b build here with 6.2.2-24922 update 3 and working hardware acceleration.
following your guide on replacing the extra.lmza file and cleaning out the modules folder removes the /dev/dri folder as expected.
-
this is interesting because i just built a machine yesterday with a Intel I219V onboard NIC which the 1.04b bootloader doesn't like. I needed to stick in an old Intel 1000PT card to get it to appear on the network
-
can you please clarify that?
does /dev/dri exist when i915.ko drm_kms_helper.ko and drm.ko are removed? or does it only exist when you've replaced them with files from fedora?
-
On 6/30/2019 at 12:25 AM, real3x said:
Try my extra : (no need to disable anything in bios)
Change of this extra.lzma >
- removed drivers i915.ko drm_kms_helper.ko drm.ko in usr/lib/modules
- removed reference of this drivers in etc/rc.modules
im assuming that using this extra.lzma kills hardware acceleration?
-
26 minutes ago, rvmeush said:
Just a quick observation on the info you posted - the bandwidth listed in the iperf3 test seems to be megabits per second (Mbits) while the info shown in your graph seems to be megabytes per second (MB/s).
it kinda has both. the interval on the left is in exact seconds, the transfer column is how many MBytes were transferred in that second - ie 112MBytes / sec
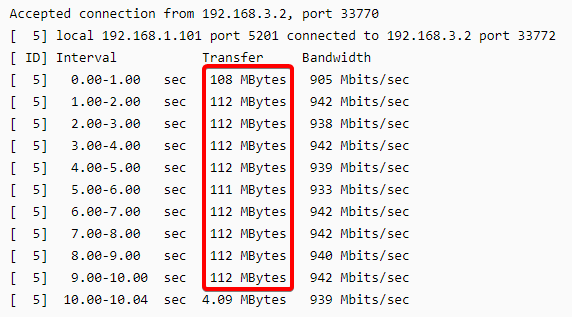
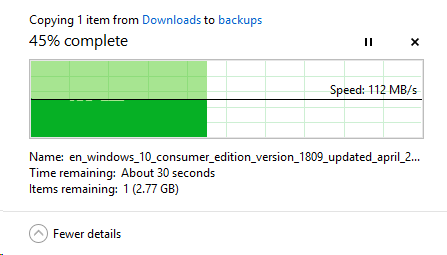
anyway - after moving back to DSM 6.1 and EXT4, speeds have gone back to full speed:
-
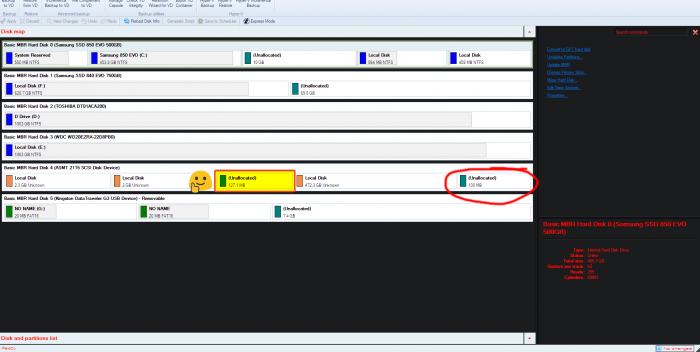
Hi guys..
Whats the go with slowish network file transfers? If i do an iperf in each direction from the nas to my study PC - it maxes out the connection.
NAS as the server:
$ ./iperf3_3.1.3 -s
-----------------------------------------------------------
Server listening on 5201
-----------------------------------------------------------
Accepted connection from 192.168.1.101, port 49554
[  5] local 192.168.3.2 port 5201 connected to 192.168.1.101 port 49555
[ ID] Interval           Transfer     Bandwidth
[  5]   0.00-1.00   sec   108 MBytes   907 Mbits/sec
[  5]   1.00-2.00   sec   112 MBytes   942 Mbits/sec
[  5]   2.00-3.00   sec   113 MBytes   944 Mbits/sec
[  5]   3.00-4.00   sec   112 MBytes   943 Mbits/sec
[  5]   4.00-5.00   sec   112 MBytes   943 Mbits/sec
[  5]   5.00-6.00   sec   112 MBytes   941 Mbits/sec
[  5]   6.00-7.00   sec   112 MBytes   940 Mbits/sec
[  5]   7.00-8.00   sec   112 MBytes   942 Mbits/sec
[  5]   8.00-9.00   sec   112 MBytes   941 Mbits/sec
[  5]   9.00-10.00  sec   112 MBytes   942 Mbits/sec
[  5]  10.00-10.04  sec  4.68 MBytes   938 Mbits/sec
- - - - - - - - - - - - - - - - - - - - - - - - -
[ ID] Interval           Transfer     Bandwidth
[  5]   0.00-10.04  sec  0.00 Bytes  0.00 bits/sec                  sender
[  5]   0.00-10.04  sec  1.10 GBytes   938 Mbits/sec                  receiver
Windows 10 machine as the server:
iperf3.exe -s
-----------------------------------------------------------
Server listening on 5201
-----------------------------------------------------------
Accepted connection from 192.168.3.2, port 33770
[  5] local 192.168.1.101 port 5201 connected to 192.168.3.2 port 33772
[ ID] Interval           Transfer     Bandwidth
[  5]   0.00-1.00   sec   108 MBytes   905 Mbits/sec
[  5]   1.00-2.00   sec   112 MBytes   942 Mbits/sec
[  5]   2.00-3.00   sec   112 MBytes   938 Mbits/sec
[  5]   3.00-4.00   sec   112 MBytes   942 Mbits/sec
[  5]   4.00-5.00   sec   112 MBytes   939 Mbits/sec
[  5]   5.00-6.00   sec   111 MBytes   933 Mbits/sec
[  5]   6.00-7.00   sec   112 MBytes   942 Mbits/sec
[  5]   7.00-8.00   sec   112 MBytes   942 Mbits/sec
[  5]   8.00-9.00   sec   112 MBytes   940 Mbits/sec
[  5]   9.00-10.00  sec   112 MBytes   942 Mbits/sec
[  5]  10.00-10.04  sec  4.09 MBytes   939 Mbits/sec
- - - - - - - - - - - - - - - - - - - - - - - - -
[ ID] Interval           Transfer     Bandwidth
[  5]   0.00-10.04  sec  0.00 Bytes  0.00 bits/sec                  sender
[  5]   0.00-10.04  sec  1.09 GBytes   936 Mbits/sec                  receiver
Running a dd benchmark on the RAID array shows plenty of write speed:
dd if=/dev/zero of=test bs=512M count=4 conv=fdatasync oflag=direct
4+0 records in
4+0 records out
2147483648 bytes (2.1 GB) copied, 9.32972 s, 230 MB/s
but when transferring files over the network, these are the kinda numbers i get:
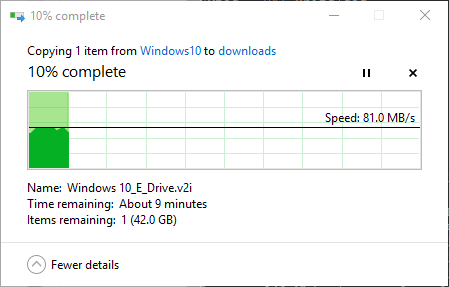
And it's not my PC either - as when i copy to/from the PC to my laptop, both NICs are maxed out at 112MB/s
The hardware:
Gigabyte-GA B85M-HD3G (onbaord intel nic)
i5 4570S
8GB DDR3
4 x 4TB in SHR, BTRFS
Latest 918 bootloader, latest DSM
I've tried each of the SMB version settings in DSM - none make a difference. I have a feeling i had faster transfers when i was using a 3615 loader and EXT4. I can't image it's an issue with the CPU as the CPU load doesn't go up when transferring to or from.
Any ideas??

TinyCore RedPill Loader (TCRP)
in Loaders
Posted
Hi guys,
Just curious if the kernel, bootloader etc output that I see out of COM1 during boot is recorded to a file somewhere? I've had a couple of unexpected shutdowns of my synology VM and trying to track down what might be causing it.
Cheers